Text Tool
While the Text Tool is usually something you can jump right into without instruction, that is not the case with Krita. If you don't understand how Krita manages text, you will become frustrated quickly.

Text Tool – Adds text to your document with various formatting options. Text will always be in a vector layer.
An important point is that you need to use a mouse when working with text. There are bugs in Krita that will make your pen act chaotically. These pen issues will make the Text Tool seem completely broken. Switch to a mouse, and the problems will disappear. The developers are aware of this issue and hope to fix it in the future.
For creating text, there are two text types: Artistic and Multiline. The Artistic type is made for creating text on a path or breaking it into anchor points. The Multiline type is used for blocks of copy where you need multiple lines and formatting options. The Multiline type works best most of the time, so we will start there.
Multiline Text
To create a text area, click the Text Tool from the toolbox. Now before you get too excited and actually click on the canvas, take a look at the Tool Options.
You will notice that you are presented with a couple of options.
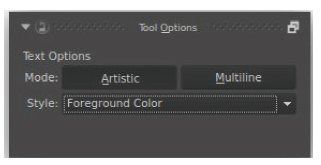
Make sure to select the correct type of text you want before you create the object.
- Mode – The type of text object that will be created: Artistic or Multiline.
- Style – Only used for Artistic type. This will be used for the text color. This can be changed later.
Once you create your text on the canvas, you cannot go back and change the type later. For now, let's select Multiline text. Draw a box on the canvas. You will be shown a blinking cursor that will let you type. Type in a few words. Notice that wherever you select on the canvas, your text box will still stay selected. The Tool Options will change while editing your text.
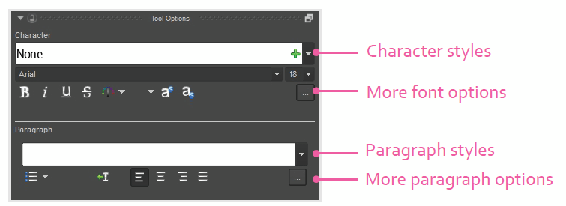
You will be presented with some options that are common in text editing applications. I won't go over all of the options since they are pretty standard. I will call out a few differences that you might not be familiar with.
The top white text box will allow you to save presets for styles. As soon as you change a setting, such as the text size, a plus icon will appear by the style drop-down. This helps when you need to reuse styles. There are separate areas for Character styles and Paragraph styles. The ellipsis (...) icons at the end of the Character and Paragraph options provide a dialog with even more options. The Paragraph options have a large amount of formatting and features.

Alert
Use the mouse with the Text Tool. There is a bug that causes your pen to behave chaotically. Hopefully this will be fixed in the future.
The easiest way to edit text is to double-click on the text box. The Shape Handling Tool needs to be selected for this to work. You can then press Ctrl + A to select everything. Now you can do things like bold the text, change the color, or edit the font. You cannot edit the line height for text.
Artistic Text
Text On Path
There are times you might want to have your text go on custom paths. This can be useful for placing text on irregular objects or bending text around an object.
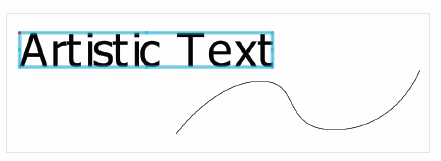
The easiest way for this to work is to create a path by using any of the vector tools on the toolbox. Make sure the path is on a vector layer. Select the Text Tool and mark it as Artistic text. Create a text box on the canvas.
Everything needs to be on a vector layer for Text On Path to work.
Edit the text you want to put on a path. You can edit the text by clicking the Shape Handling Tool, then double-clicking on the text. This will make the text box turn into edit mode. Press Ctrl + A to select all of the text. Hover the mouse over the path you want the text to wrap around. Your cursor will change to a hand pointer. Double-click on the path. Your text should now be following the path.
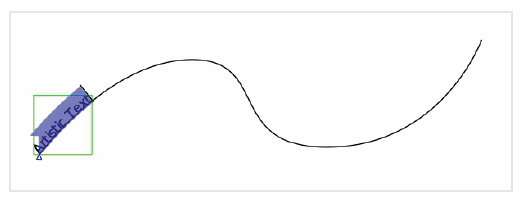
Text will be resized so it fits on the path. The triangle at the beginning controls where the text starts.
You can also change where the text starts wrapping in two ways. The first is to drag the starting triangle below the beginning of the text. The second way is to click the slider below the Text On Path icon in the Tool Options. To remove the text from the path, you can click the Detach Path icon on the Text On Path Tool Options.
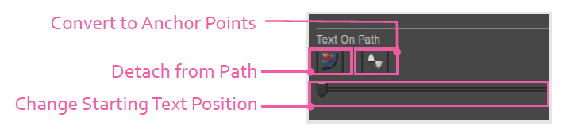
Convert to Path Option
If you need to convert the text to anchor points, you can access this function on the Text On Path options. This option only exists when the Artistic text option was used to create the object. Once your text is converted to anchor points, you cannot edit the text or add to it. This conversion is a one-way operation. Converting the text to paths has a couple of advantages.
- A printer might not have the fonts available, so converting your text to anchor points will ensure that an outside person can view the text.
- You can edit the anchor points for text. This is usually done to modify typography after it has been laid out.

