Assistant Tool
The Assistant Tool contains the most powerful drawing aids in Krita. It contains assistants that will help you draw circles, lines, and vanishing points. They can be a bit difficult to figure out based on the name. We will start by going through each assistant individually, then later see how we can combine them.

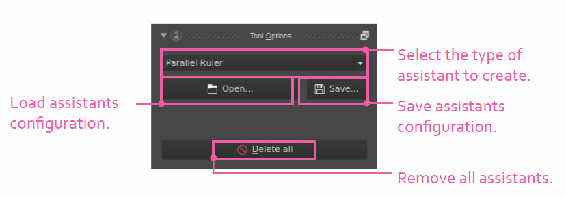
Assistant Tool – Add, edit, and delete drawing assistants. The Tool Options give options for creating and deleting assistants.
- Vanishing Point – Your lines will converge at a single point.
- Ellipse – Creates circular shapes. The assistant snaps exactly to the circle.
- Spline – Creates a Bézier curve that your brush can follow.
- Perspective – Creates a grid that can be used to help with perspective. Your strokes will lock to the perspective.
- Concentric Ellipse – Similar to the Ellipse assistant, but you are not constrained to the ellipse path.
- Parallel Ruler – Draw a line and all lines will be constrained to that angle.
- Ruler – Your lines will be constrained to a line that you draw.
- Infinite Ruler – Your lines will be constrained to your assistant line. This extends beyond the start and end points.
- Fish Eye Point – Warp all of your lines along an axis. Using two of these assistants can create a fish-eye lens effect.
Managing and Using Assistants
Creating, editing, and deleting your assistants are all done through the Assistant Tool in the toolbox. Your Tool Options will update and show you the available types of assistants you can create.
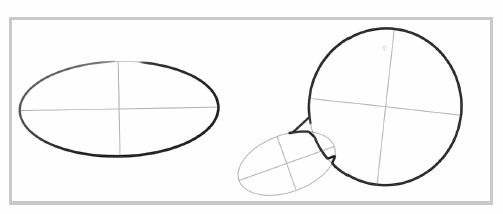
Select Ellipse from the assistant type drop-down. You can now add three points to the canvas to create the guide. The first point you place will be one side of the ellipse, the second point will be outer side, and the third point will determine how elliptical the assistant will be.
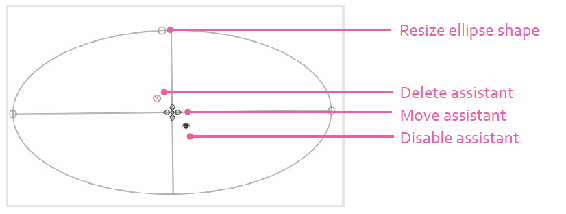
After the Ellipse assistant is created, you will be able to do a few things. Moving any of the circles on the outside will squish and resize the shape. The middle cursor allows you to move the entire assistant. The delete icon removes the assistant. The eye icon will toggle the active status. Disabling the eye icon means that the assistant will not be used when drawing.
Now let’s see how to use the assistant. Let’s switch back to the Freehand Brush Tool. You will notice the ellipse assistant will still appear on the canvas. If you start drawing, the assistant doesn’t have any effect. This is because your brush needs to have the Assistant checkbox turned on. This is accessed from the Tool Options for the Freehand Brush Tool.
When you turn on the Assistant checkbox from the Tool Options, you will see a slider enabled on the right. This slider will determine how much influence the assistants will have on your brush stroke. High values will lock your brush to the assistants, while lower values will only apply your stroke as you get closer to the guide. It should start out at 1000. Let’s leave the setting there and try to draw something again.
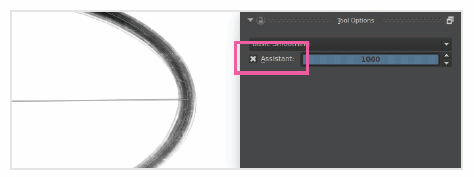
Turn on the assistant from the Tool Options.
It works! After we draw a stroke or two, we are done with the assistant. We now want to move the assistant and resize it to make a smaller ellipse.
You can edit assistants by going back to the Assistant Tool. When we select the Assistant Tool from the toolbox, we will see the Ellipse assistant options come alive. We can now move the handles around and change the shape of the ellipse. When we are done, we can go back to the Freehand Brush Tool and start drawing. The Assistant Tool is designed to set up and manage your assistants. While most tools will apply things to your canvas, this tool will only help you set things up.
Showing and Hiding Assistants
If you want to disable a specific assistant, you will need to use the eye icon by it. This is shown on the lower right portion while you are editing assistants.
If you want to hide the visual guides for all of the assistants, you can do that in the main menu. The View menu has a couple of options to toggle the visibility.
- Show Painting Assistants – If enabled, hide all of the assistants while drawing. The assistants will still work, but you will not be able to see the guide lines.
- Show Assistant Previews – Show or hide the preview lines. These are not visible when editing the assistant. Only certain assistants use these like the vanishing point assistant.
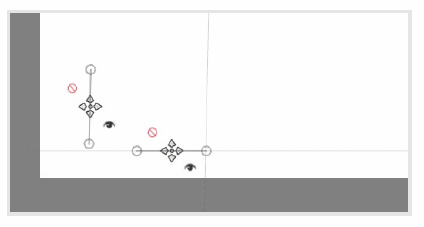
Working with Multiple Assistants
Assistants are powerful because you can work with more than one at a time. Different assistants can be combined to create some helpful setups. Creating and using multiple assistants works the same as using only one. When you are adding assistants on the canvas with the Assistant Tool, you are in a create mode. Whatever assistant you have selected in the drop-down is what will be created. If you wish to later edit an assistant, you can click any of the controls that exist for each assistant. Create a few ellipses on the canvas like the following example.
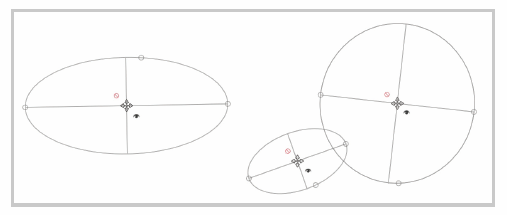
Working with multiple assistants: Notice the two ellipses that overlap.
Snap single is a tool option that helps you work with multiple assistants. This option is on by default. If this option is off, your drawing strokes will be able to use more than one assistant in a single stroke as shown in the image below.
Having multiple assistants overlap creates issues when the Snap single option is off.
The two intersecting circles on the right are acting a little unpredictably. The magnetism slider of each assistant is what is giving us this effect. It is similar to how gravity pulls us in a direction. If we introduce another object that has gravity, it will try to pull us in a different direction. What direction we end up going in depends on how much gravity (magnetism) each assistant has and the direction of our brush stroke. This is a chaotic situation to be in while drawing. It is usually better to leave the Snap single option on to avoid this issue.
Now that we understand how to add, remove, and edit assistants, let’s continue to see what the other assistant types can do.
Ruler/Line Assistants
There are three line assistants that are similar, so I will group them together. You create these assistants the same way that you learned how to create the Ellipse assistant. Go to the Assistant Tool and see the different ruler options.

These assistants are all created the same way. You click a starting and ending point on the canvas. Even though they are created the same, you can see in the image above that they all behave differently.
- Parallel Ruler – Take your assistant line to set the angle for your brush strokes. All of your lines will be fixed at that angle.
- Ruler – Draw only in the area that is set by the start and end points.
- Infinite Ruler – Similar to the Ruler, but this will let your lines extend beyond the start and end points.

Tip
Holding down Shift while moving an assistant point will snap the line horizontally or vertically. This works for all of the assistant types.
Spline Assistant
This assistant is similar to the Ruler assistant, but it has control over Bézier curve anchor points. From the Assistant Tool options, select Spline. The first two points you create on the canvas will be the start and end points; the last two points will be how the curve bends.
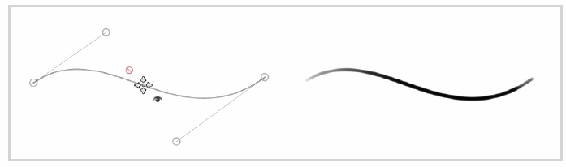
Your snapping is limited to the curve that exists. This can be helpful for larger curves that are difficult to draw manually.
Perspective Assistant
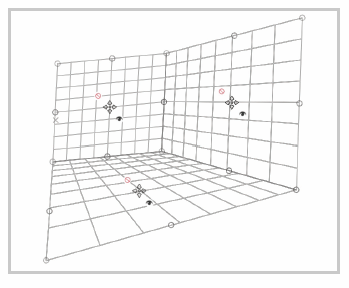
When you start off creating a Perspective assistant, you will be required to draw four anchor points. You will see an "x" appear when two of the corner anchors begin to converge. If you move the corner handles, you can reposition the grid. Like other assistants, you can delete, move, and hide the assistant with the associated icons.

If you grab any of the side handles, you will create a new perspective grid. This can be nice for things like walls. When you create connecting grids, the move icon will try to move all of the connecting grids along with it. When drawing on perspective grids, there are a few important things to know.
Extend the Perspective assistant to multiple planes. This can be done by grabbing any of the side handles on the assistant.
Tip
When you use multiple perspective grids, you do not have to worry about the different grids "fighting" each other with snapping. Whatever grid snaps first, your brush will stay on.
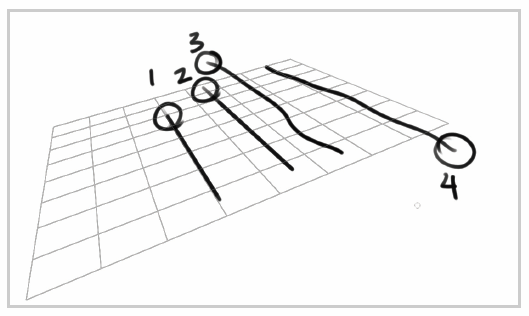
Lines will snap depending on where your stroke starts.
When using the perspective grids, you have to be careful where you draw. In the example above, the circles indicate where I started drawing.
- I started drawing my line inside the grid right on a line. The perspective grid snaps like expected.
- I started drawing my line in between grid lines. The perspective grid picked up fine and created a straight line.
- If you start drawing outside of the grid, there will be no snapping, even if you later go inside the grid.
- Trying to go a different direction now, my line still does not snap to the perspective grid because I started outside.
You can see that the snapping for this assistant only works as long as you start inside the assistant. If you start your stroke outside the grid, the assistant will be ignored.
You do not have to use these assistants for snapping purposes. I have seen artists use the perspective grid only for reference. After creating a few grids, they simple draw on top with a regular brush. This might be able to help you visualize volumes better than staring at a blank canvas.
Vanishing Point Assistant
Have all of your brush strokes go toward a single point. This is similar to the perspective grid but allows you to make strokes outside of a grid. When you add a Vanishing Point assistant to the canvas, there will be multiple points shown like the image below. I added some numbers to the illustration to help explain what each point does for the assistant.
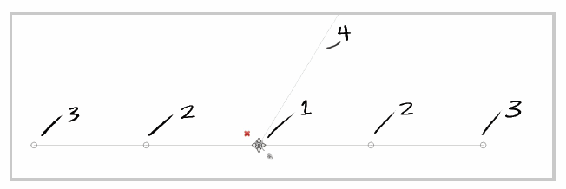
- Assistant center – Move, delete, or disable the vanishing point. This also serves as the vanishing point that your lines will move toward.
- Line guides – Handles that will rotate the guide line to where you want. This has no effect on the results. It is only an aid to help you line up things when using reference images or drawings.
- Vanishing point guide – The vanishing point guide will move the vanishing point in relation to the line guide like a hinge. This can be helpful if your vanishing point is outside of the canvas.
- Cursor line – This will draw a preview line from your cursor to the vanishing point. It is a preview of what will happen if you start to draw.
If you hold down your pen in between the move icon and the eye icon, you can move the entire assistant with all handle guides. If you just move the assistant center, the handles will not move along with it.
Radial Speed Lines with a Vanishing Point
If you create one Vanishing Point assistant, you can get a radial speed lines effect. This is commonly used in comic books to create a sense of speed and motion. We can also create angular speed lines by using the Parallel Ruler assistant. These two assistants all by themselves are valuable.
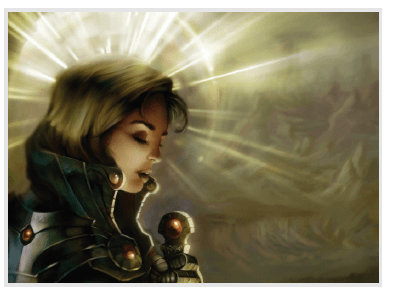
Artwork by Ramón Miranda
Create a light aura using a Vanishing Point assistant.
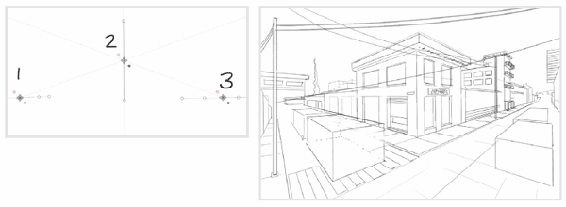
Combining Assistants and a One-Point Perspective Setup
What makes assistants so flexible in Krita is that you can use more than one at a time. We will use this flexibility to create a one-point perspective setup. There is no button for this, so we will have to do a little thinking to accomplish this. We will need three assistants to make this work.
- Depth – Vanishing Point assistant
- Width – Parallel Ruler assistant
- Height – Parallel Ruler assistant
It doesn’t matter what order you create the assistants in. Let’s start off with the two parallel rulers. If you have any assistants still on the screen, you can remove them if you want by pressing the Delete all button on the assistant’s Tool Options.
Select the Assistant Tool and select the Parallel Ruler type. Create a vertical line and a horizontal line like the following example.
Create a one-point perspective setup with two Parallel Ruler assistants.
Notice that the bottom left part of the canvas is the edge of the document. I think it is easier to keep the assistants out of the way when drawing. If you have the Snap single option off and start to draw, you will notice all of your strokes will be constrained to either the horizontal or vertical line.
Lines may jump to another assistant if you get too close or change your stroke direction. This only happens when Snap single is unchecked.
All of our lines are constrained to the horizontal and vertical axis now. You will see a couple of diagonal lines that appear out of place. If you start drawing a horizontal line and move your pen vertically, there will be a catching point where the vertical assistant will take over. This is something to watch out for. It can actually create some interesting effects. Now let’s add our final Vanishing Point assistant.

Note
When using the Parallel Ruler assistant, the lengths of the lines do not matter. The angle is the only part of the assistant that has an effect.
Tip
When you get close to a vanishing point, there will be “jumping” between assistants. This can be minimized by drawing “to” the vanishing point. The farther you are from the vanishing point, the more predictable the lines will behave since the assistants will be farther apart.
In the following example, I moved my Vanishing Point assistant close to the other assistants. This serves as the horizon line, so you might want to move it so it aligns with your image. Now let’s try to go back to drawing something to see what type of results we come up with.
The final one-point perspective setup is in place.
While using the assistants can be nice for blocking in larger volumes, you will probably want to switch this off when doing detail work. You can manually click the Assistant checkbox to turn off the settings, or you can use the shortcut Ctrl + Shift + L. This shortcut can be a stretch for your fingers, so you might want to reassign it.
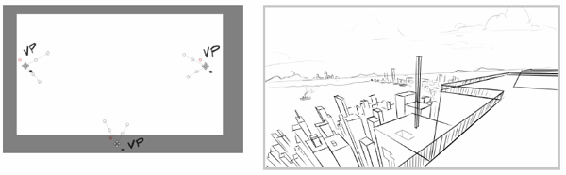
Creating a Two-Point Perspective Setup
Instead of going through the previous exercise again, we will jump right into the setup. This uses one-point perspective and adds an extra vanishing point.
- Vanishing Point – Sets where the lines will converge. Notice how the assistant is aligned horizontally with the other vanishing point. The outside handles do not have to be lined up like the image.
- Parallel Ruler – Sets the vertical angle. The position and length do not matter.
- Vanishing Point – Sets where the lines will converge. The outside handles do not have to be lined up like the image.
When you start working with multiple assistants, the assistant preview can get in your way. You can turn off these indicators through the main menu View > Show painting assistants and View > Show assistant previews.
To make a line and ignore all of the assistants, you can hold down the V key. This will temporarily activate the Line Tool. This can make it easier to get a line to respond correctly.
Tip
It is easy to forget where the vanishing points are at when you hide them. It can be easier to make a few small strokes by the vanishing points so you have a reference to go by.
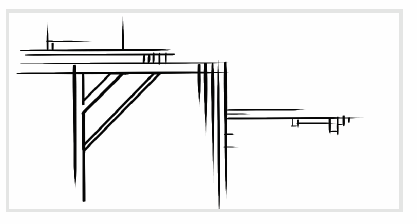
Three-Point Perspective Setup
This is a similar setup to the two-point perspective. We are going to swap out the vertical parallel assistants with another Vanishing Point assistant.
The height will now converge to a vanishing point. You can move the height vanishing point farther away if you want the perspective distortion to be less severe. In the following example on the right, you can see a quick sketch using the assistants. As your view becomes farther away, the perspective effect diminishes.
Isometric View Setup
A popular style in video games and technical drawings, isometric artwork is similar to two-point perspective, but the depth will be parallel lines instead of using a vanishing point. This can be achieved by creating three Parallel Ruler assistants. The angle of the assistants is the only important part of the setup.
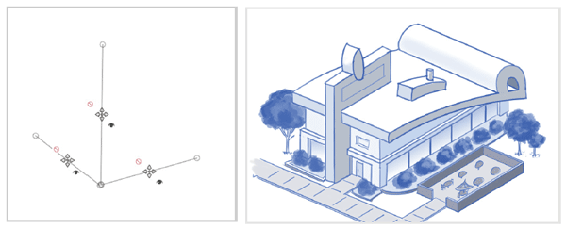
In the previous example on the right, I made a sketch, scanned it, then built up the foundation lines with the assistants. My original sketch angles were off, so the assistants helped correct them. After the foundation lines were in place, I turned the assistants off and drew over them on a new layer.
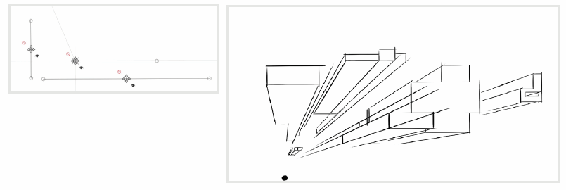
Fish Eye Point Assistant
Simulate a fish-eye, or telephoto, lens effect. The way these effects are generally done, you will need to create two Fish Eye Point assistants rotated 90 degrees apart.
On the left, you can see what a Fish Eye Point assistant will look like on the canvas. I also lightly drew in a few lines so you can see what will happen when you start drawing. The illustration on the right by Wolthera is taking this assistant as a base for helping her create this effect. Wolthera added more assistants to get this effect. She added an additional Fish Eye Point assistant that went horizontally. She also added three Vanishing Point assistants: one each on the left, middle, and right.
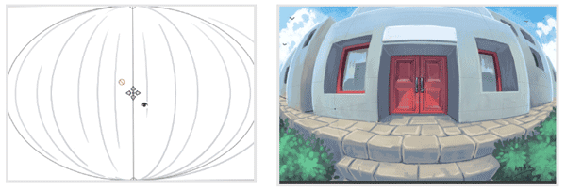
Artwork by Wolthera van Hövell tot Westerflier
Concentric Ellipse Assistant
Create circles at different diameters. This is similar to the Ellipse Tool, but the Concentric Ellipse assistant allows you to draw outside of the assistant line. When you start drawing, the brush will snap to that specific diameter. The only decisions you have to make are where to put the center and how circular the assistant will be.
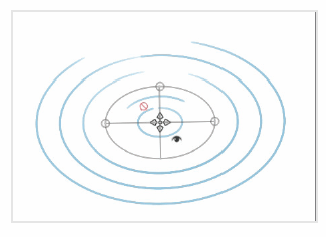
Concentric circles can be useful from things like drawing tires to creating orbiting effects around objects.

