Importing Brushes
In addition to brushes that come with Krita, there are outside artists that provide brushes for you to use. Krita provides only a sampling to get started. New brushes are kind of like new toys. You get them and new worlds open up. Outside brush sets will include things that will help with rendering fire, foliage, or star fields. Let’s go over briefly how to find some brushes on the Internet and import them in.
Using Brushes from the Internet
Go to krita.org and navigate to the resources area. You can find this by going to the Learn section and clicking the Resources tab. You can see a number of different brush sets that artists have created.
Select the David Revoy brush set. This will take you to the GitHub site where David updates his brushes. GitHub is normally a site for programmers to share code. David decided to keep his brushes here since he updates them frequently. Let’s download them! You can see on the right there is a Download ZIP option at the bottom.
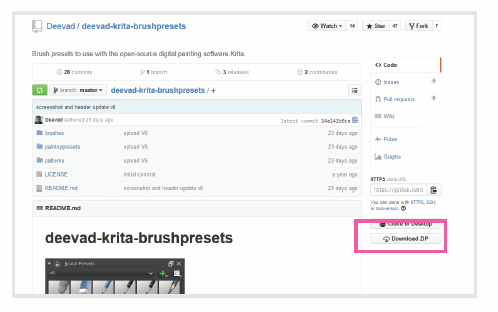
View the files and instructions to download David Revoy’s brush set. Use the download link on the right to get a zip file.

Tip
Sometimes brushes and textures are in formats such as a “tar” file. This is another format that is designed to make file packages smaller. If you are having issues opening any of the resources, take a look at the free program 7-zip at .

Warning
Krita occasionally upgrades its brush system. These new features can make old brush packs break. When searching for brushes on the Internet, make sure to look for what version of Krita the brushes were designed for. Always try to download the latest brush sets to have the best chance of them working.
Open the zip file and select the two folders brushes and paintoppresets. We need to determine where to put these files so Krita will know how to load them. The easiest way to get to this location is from inside of Krita. From the main menu, go to Settings > Manage Resources.
This will open the resource manager. From here, click the option Open Resource Folder on the right. A new window will appear showing you where Krita is storing all of its brushes, patterns, and workspace information.
There should already be brushes and paintoppresets folders in there. Drag David’s brushes into these folders and save over them. On Linux, if you get the option to merge or replace, select merge.
That is it! The next time you start Krita, you will see the new presets in your presets areas. There are quite a few websites where you can find additional brush packs.
New brushes will appear after you restart Krita.
Importing Brushes with the Resource Manager
Another method for adding presets into Krita is through the resource manager. You can download resource bundle files from the Internet and import them into the resource manager. The file will have a .bundle file extension.
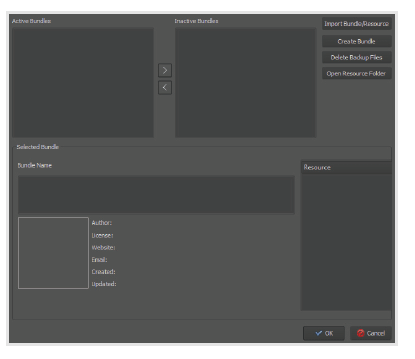
The resource manager allows you to manage brushes, patterns, workspaces, GIMP brushes, and Photoshop brushes.
To access the resource manager, go to Settings > Manage Resources.
Once you download a package from the Internet, you can import the bundle with the Import Bundle/Resource option. You can then choose what resources you want to be active. Active resources will show up on the preset editor, while inactive resources will be hidden. When you are done, press OK.
You can import individual images as well to use for patterns and brush tip shapes. You can see the full list of supported file types by clicking Import Bundle/Resource and looking through the supported file types in the drop-down.

