Chapter 9
Animation for Production
So far, you’ve learned most of the basics for making your character move and express himself. Producing an animated movie requires that simple elements of animation be combined with each other and integrated into a scene. Furthermore, even a simple animated production can benefit from keeping processes such as modeling and texturing separated from animation and setting up a well-integrated production pipeline.
Blender has a number of tools to enable you to create animation for a production environment. The armature proxy system and the Non-Linear Animation (NLA) Editor are two of the most significant. The armature proxy system enables you to link rigged characters from external files in a nondestructive way so that the model can continue to be updated even while animation is progressing. The NLA Editor provides a layer of abstraction to work with the actions you created in previous chapters so that you can control looping and speed of actions and combine multiple actions.
- Working with Proxies
- Using the NLA Editor
- NLA in Action
. When you do this, a file browser window opens, and you can navigate into another .blend file to select the datablock you want to link (Blender’s file browser treats other .blend files identically to directories).
Linking
When you link a datablock in this way, the instance in the receiving .blend file cannot be edited. You can only edit the object in the original file, which is now referred to as a library. When you make changes to the object in the library file, the changes will also be applied to the linked instance. When you link datablocks, the relationship on the disk between the library .blend and the linking .blend file becomes important. If the .blend files are moved with respect to one another or if the library .blend is renamed, then the linking .blend file will be broken.
A useful cousin to linking is appending. Append is also found in the File menu and carried out identically to linking. However, when you append a datablock, the appended datablock is a complete and independent copy. The appended object or datablock is no longer dependent in any way on the original file and may be edited. Changes in the original file will have no effect on objects or datablocks appended from that file.
Linking Rigged Characters with Proxies
In the case of props or other things that do not need to be animated or can be animated at the object level, ordinary linking is sufficient. However, rigged characters are more complicated. In particular, the armature needs to be poseable, which is not possible using ordinary linking. For this reason, proxy rigs are used.To link and proxy a rig for animation, it’s necessary to first prepare the library by ensuring that the entire character rig—meshes, armatures, and all—are grouped together in a single group. If you haven’t done that already, do it now.
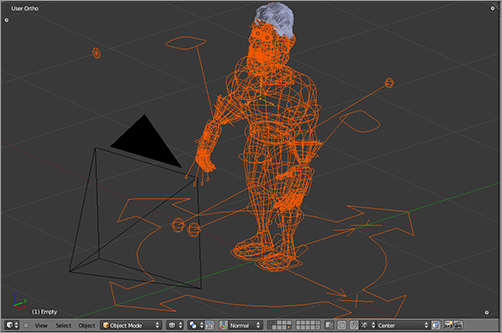
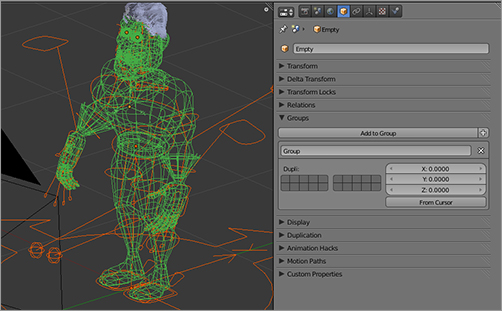
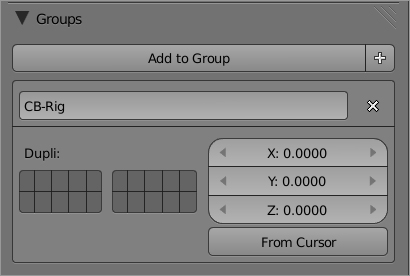
Using the file from the previous chapter, select all the objects in your Captain Blender rig: the body, the eyeballs, the Empty object that controls the logo mapping, and the rig, as shown in . Press Ctrl+G to group the objects. Grouped objects are displayed with a green wireframe, and in the Properties window under Groups, a group called Group will be displayed for objects in that group, as shown in . Change the name of that group to CB-Rig, as shown in . Now that these objects are grouped, you can append or link them to another .blend file in one step. Save the file with a name that identifies it as a library or resource for the character.
Selecting all the objects in the character rig for grouping
Grouping the objects
Changing the group name
To create a proxied rig from the rigged character in your library, follow these steps:
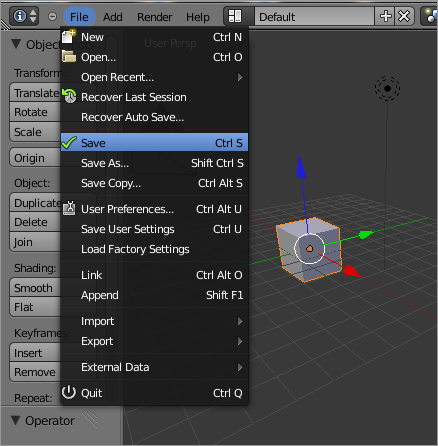
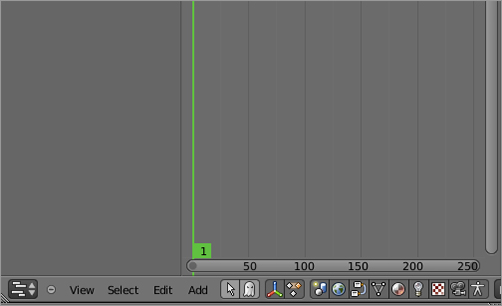
1. Open a new Blender session. Save the session immediately, as shown in , giving it a meaningful name. Saving is necessary for linking, because the linking process depends on creating a relationship between two relative locations on the hard drive. When you’ve saved the file, delete the default cube.
Saving the fresh session
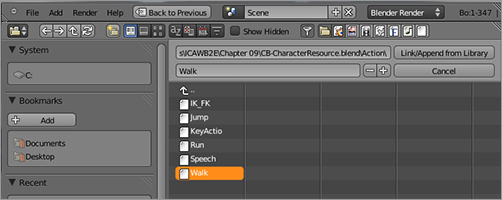
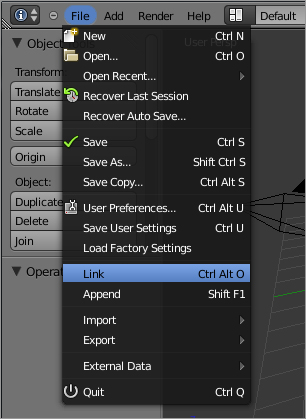
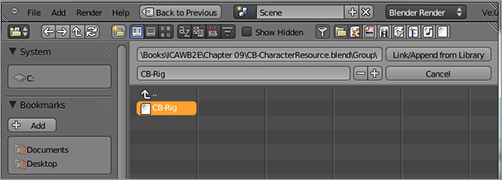
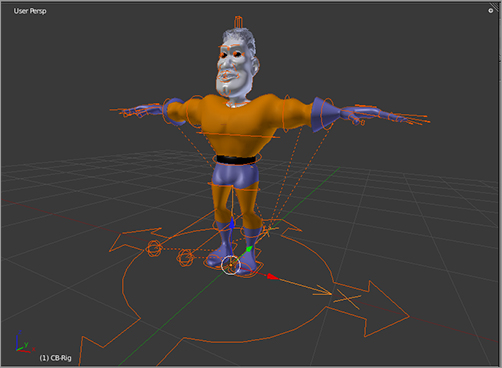
2. Choose Link from the File drop-down menu. In the file browser, navigate to the library .blend file on your hard disk. Click the .blend filename to navigate into the .blend file, and then click Groups to navigate into the Groups virtual directory. You should find a datablock there called CB-Rig (or whatever the name of the group was that you created when you prepared the library), as shown in . Select this datablock, and click the Link/Append From Library button in the upper right of the file browser. The grouped rig will appear in your 3D viewport, as shown in . If necessary, press Alt+G to return it to the center of the space. Notice that this group instance can be selected only as a unit. You cannot select individual objects within the group.
Linking the CB-Rig group datablock
The linked group
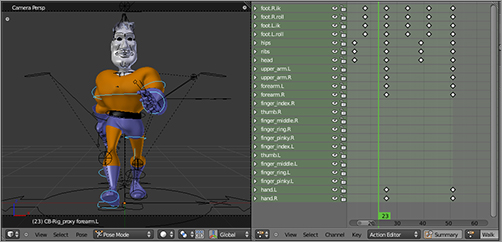
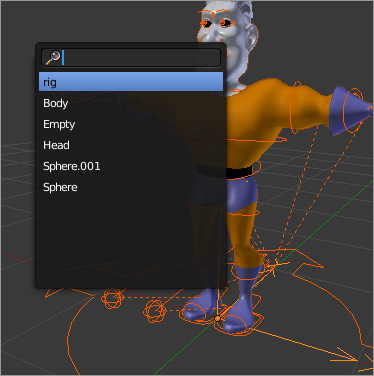
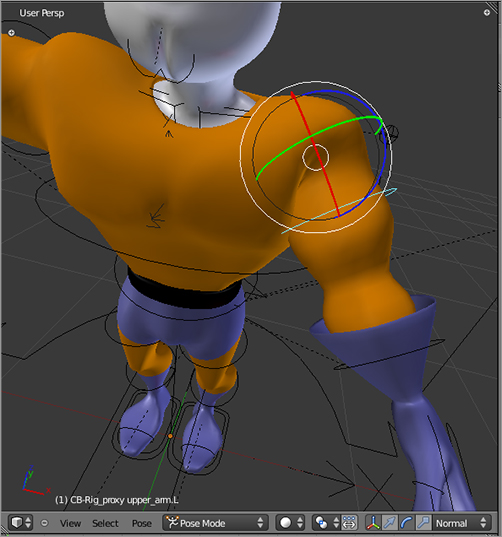
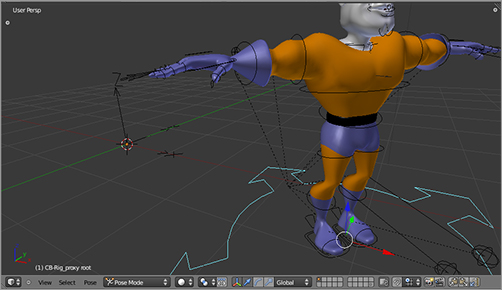
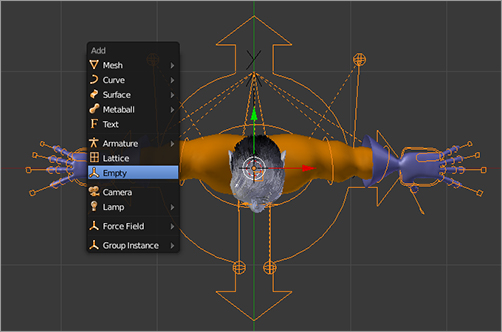
3. Press Ctrl+Alt+P to create a proxy object. When you do this, a menu will open, as shown in , to enable you to choose which object you want to make a proxy for. Choose the rig object. This will make a proxy for the armature. This new object will be named CB-Rig_proxy. If you select it and enter Pose mode, you will be able to pose the character, as shown in .
The Make Proxy menu
Posing the proxy armature
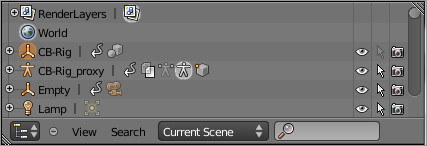
4. This step is not strictly necessary, but it’s a good idea to help avoid accidentally selecting the group instance when you want to select the proxy object. Open an Outliner window, and choose Current Scene in the display drop-down menu in the header. To the right of the CB-Rig entry, click the little arrow icon to toggle selectability of the CB-Rig group instance (see ). When this is toggled off, the group instance will not be selectable in the 3D viewport. This will make it easier to select the proxy rig every time. You will never need to select the group instance when animating.
Toggling the CB-Rig group instance to be unselectable
You’ve now created a proxy rig to do your animating. The Mesh objects are all traditionally linked to their library sources, so if the meshes change in the library, they will change in this scene without affecting the animation. You can now animate exactly as you would ordinarily animate.
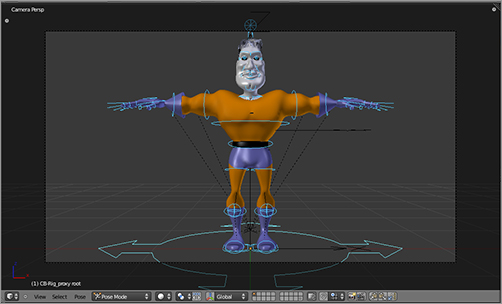
From here on, you should do any posing or positioning of the character in Pose mode. This includes simple positioning of your character in space. Do not move the rig proxy object or the group instance in Object mode. If you want to relocate your character in the 3D space, enter Pose mode and do so by moving the root bone, as shown in . Notice that the object center remains at the origin of the space.
Moving the root bone in Pose mode
. It shows a representation of the Timeline, and the area at the left displays its channels. Both editor views serve the similar functions of arranging or modifying a set of underlying F-Curves to output an animation. Although the DopeSheet displays a simplification of many F-Curve views, with each key representing one or more F-Curve keys, the NLA Editor enables the combination of actions.
NLA Editor
The main type of element in the NLA Editor is called a strip, and each strip represents one of your already-created actions. In this way, you can use the NLA Editor to place many different actions on the Timeline as strips, layering them, repeating them, and applying other parameters to them to generate a final animation.
Linking Actions to the NLA
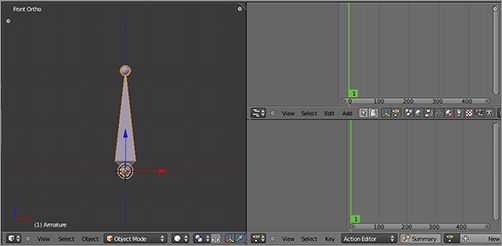
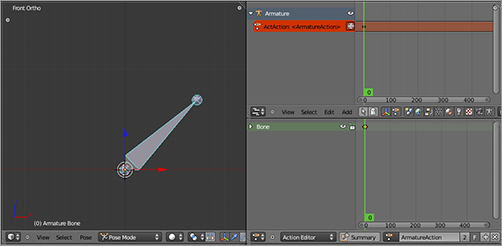
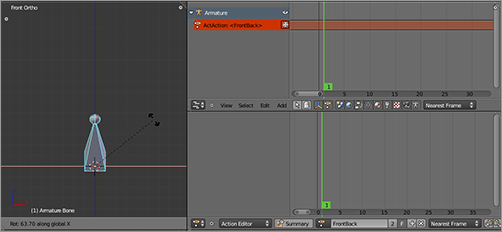
To understand the relationship between individual actions and the animation created by the NLA Editor, you’ll take a look at a very simple example. Start a new blend, delete the default cube, and add an armature object with a single bone. Make sure you have your workspace set up so you can see a 3D viewport, an Action Editor, and an NLA Editor simultaneously, as shown in . (You will probably also want a Timeline visible.)
3D viewport, Action Editor, and NLA Editor
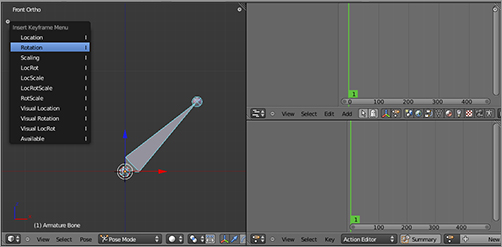
You’ll create two actions. The first action will have the bone swing gently from side to side. Rotate the bone slightly to the right, and key the rotation at frame 1, as shown in . The key will appear in the Action Editor as you expect. In the NLA Editor, a channel will be automatically created for the armature object. Under this channel, slightly indented, is a channel representing the current action, as you can see in .
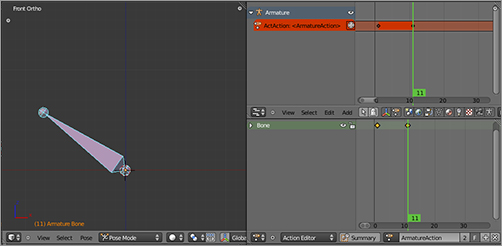
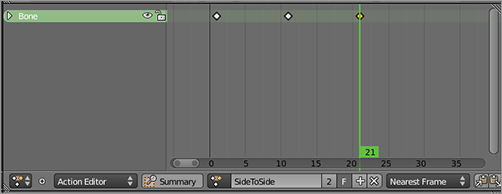
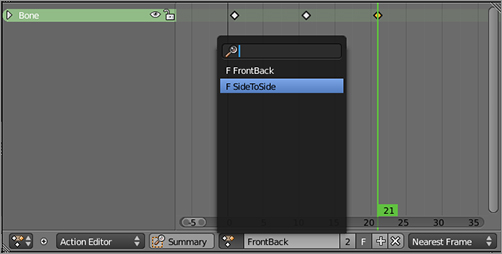
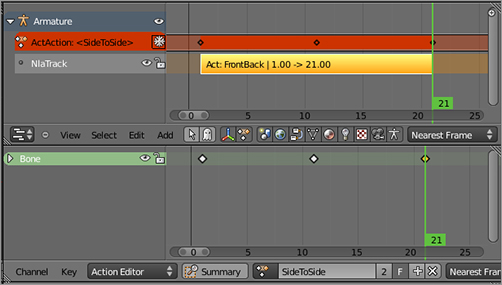
Press the up arrow key on your keyboard to advance 10 frames to frame 11. Rotate the bone to the left extreme, and key the pose, as shown in . Copy the key from frame 1, and move the duplicate to frame 21. Rename the action SideToSide, as shown in , and notice that the name of the action channel has changed to reflect this in the NLA Editor. Also, set the end frame in your Timeline to 20 to make this animation repeat smoothly.
Keying a first bone pose
The keyed pose
Second bone pose
SideToSide action
Now that you’ve finished creating the SideToSide action, you’ll create a new action called FrontToBack. To do this, you could simply select Add New from the Actions drop-down menu, which would duplicate the SideToSide action and give you a new action called SideToSide.001. In this case, however, start fresh with a new, blank action. To do this, click the X to the right of the Actions drop-down menu, which unlinks the SideToSide action from the armature. Note that this does not delete the action from your .blend file.
When you create actions, Blender gives them a fake user by default. For this reason, actions remain part of your .blend file, even when they are not in use by any object. (Recall the discussion of fake users in Chapter 1.) To fully delete a created action from your .blend file, deselect the F icon in the Action Editor. After you do this, assuming that no objects are using the action, the action will not be persisted the next time the file is closed.
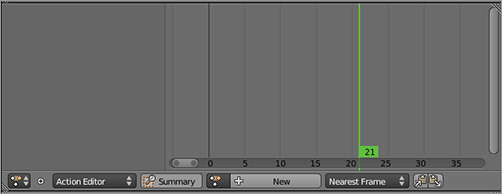
For now, rest assured that you’re not likely to accidentally delete actions. All this does is remove the action’s association with the armature and thus remove it from the NLA Editor. Select the bone, and press Alt+R to clear any rotations on the bone so you can truly start fresh with the new action, as shown in . Although you have unlinked the action from the armature and removed it from the NLA Editor, notice that the bone stays in whatever position it was in when you unlinked the action. If you want to start from a completely clean slate, be sure to select the bone and press Alt+G and Alt+R to clear any translations or rotations.
Starting fresh with a clear Action Editor
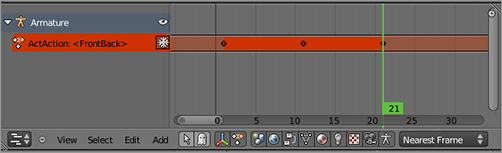
To create the second action, simply rotate the bone forward a bit around the x-axis and key the pose in frame 1. Again, this will automatically create an action called ArmatureAction, which you will rename to FrontToBack. As you can see in , FrontToBack is now the active action; as such, it is represented in the NLA Editor under the Armature channel.
Creating FrontToBack
Finish creating a back-and-forth swinging motion around the x-axis by keying a back frame and duplicating frame 1 to frame 21.
You now have two actions created. You can select the active action using the drop-down menu in the DopeSheet header, as shown in . Currently, the active action is FrontToBack because that is the last action you worked on. The active action is also the one represented in the NLA Editor.
Selecting the active action
Working with NLA Strips
The NLA Editor wouldn’t be much use if all it did was display the currently active action; as you can guess, it does considerably more than this. To insert an action into the NLA Editor so that you can incorporate it into the final animation, you need to create an NLA strip from the action. The NLA strip for an action is separate from the action itself; it is a representation of an action that the NLA Editor can process in various ways.
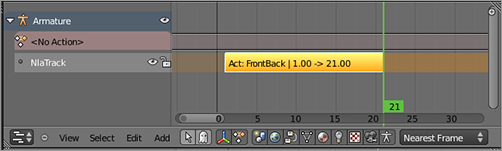
To create an NLA strip for an action, click the snowflake icon to the right of the action’s name in the action channel. When you do this, the action will be converted to an NLA channel and be made inactive as an action, as shown in . The name of the created strip is the same as the name of its corresponding action.
Creating an NLA strip
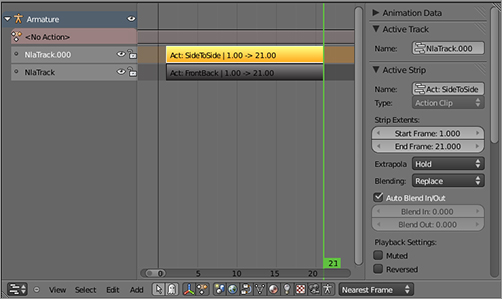
Now, in the Action Editor, select the SideToSide action from the drop-down menu and make it the active action. Note what happens (see ): the active action channel in the NLA Editor now contains SideToSide, but the FrontToBack NLA strip remains in place. After an NLA strip has been created for an action, the strip remains in the NLA Editor regardless of what happens in the Action Editor. NLA strips can be deleted like anything else in Blender with the X key, but don’t do that now. Instead, click the snowflake icon to create a strip for SideToSide, which will appear as shown in . You can select strips in the same way as you select other objects in Blender—by right-clicking or by selecting all strips and keys with the A key.
SideToSide as active action
NLA strip for SideToSide
Action Output and NLA Output
Animation generated from the NLA Editor is based upon the interaction of NLA channels. The NLA channels are organized by precedence from top to bottom; by default, you will see the animation for the topmost channel in the 3D viewport.
When you select an action in the Action Editor, the action appears as a red channel across the top of the NLA Editor, as you have seen. In this state, the active action is the animation that plays in the 3D viewport, overriding whatever other animation has been created in the NLA Editor. While this action is in this raw action state, there’s not much you can do with it in the NLA Editor. If you want to integrate it in some way with other channels in the NLA Editor, you must convert it to a strip as described previously.
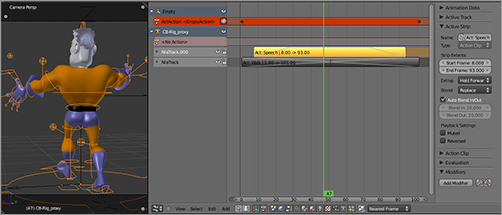
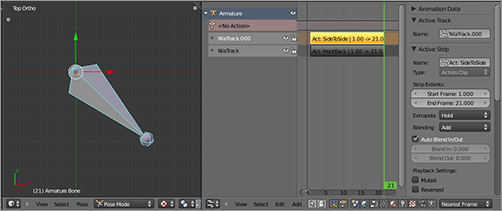
Once the actions have been converted to strips, they can be combined in several ways, determined by the Blending value of the uppermost strip. The default Blending value is Replace, meaning that the uppermost strip will override the strips below it. So, for example, if you play the animation that you just created, you will only see the SideToSide movement. However, if you change the Blending value to Add in the Properties Shelf (toggled visible with N key), then the F-Curve values of the two action strips add to one another, resulting in a diagonal swinging movement that is the sum of SideToSide and FrontToBack, as shown in .
Multiplicative blending and subtractive blending are also available. However, these blending options are less frequently used, and their results are less intuitive than additive blending. For most armature animation, you will use either replacement or additive blending.
The two strips playing with additive blending
More Fun with NLA Strips
NLA strips are more than simply instances of actions. They also have a number of properties of their own that determine their behavior and how the action they contain interacts with the whole animation. You can see the properties of the selected strip in the Properties Shelf in the right side of the window. As always, the Properties Shelf is hidden and shown with the N key.
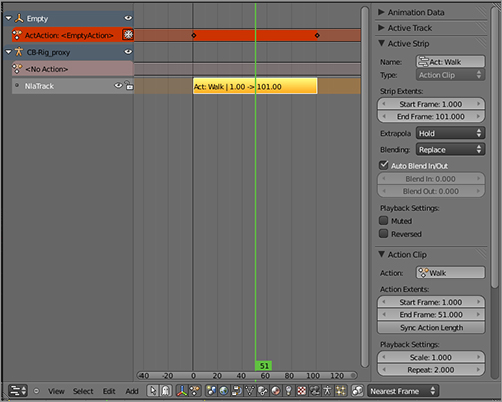
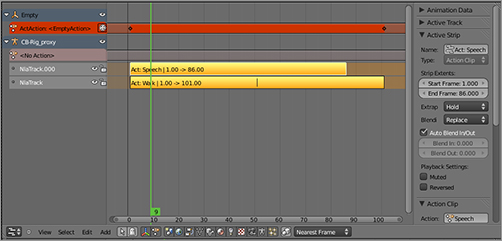
Among other things, the strip’s transform properties determine the starting and ending points of the strip and the number of repetitions of the action the strip represents. When first created, the number of repetitions is 1, and the length of the strip is identical to the length of the action itself. Select the topmost strip, SideToSide, and set the Repeat value to be 3 while keeping the End Frame value at 21, as shown in .
Changing the repeat value of the strip
You can now see the difference between playback modes very clearly. The bone swings back and forth at triple speed, per the repeating strip, three times for every one forward-backward swing.
You can isolate individual strips by clicking the little dot to the left of the strip’s name. This will show you only the selected strip’s animation result in the 3D viewport.
.
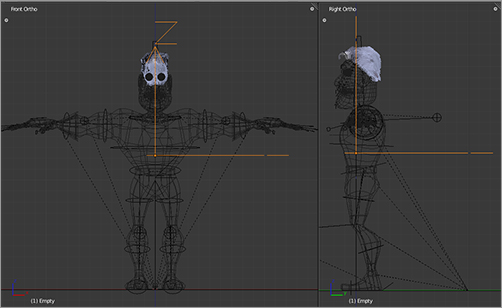
3. Raise the Empty object up along the z-axis so that it is somewhere around the middle of Captain Blender’s body, as shown in . This is the point at which the camera will aim.
Initial camera and empty positions
Adjusting the location of the Empty object
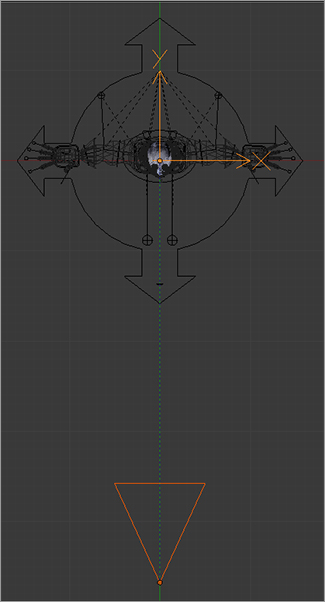
4. Position the camera directly in front of the Empty object, some distance away, as shown in .
Initial camera position
5. Select the camera first, and then choose the Empty object second (making sure no other objects are selected). Having them on their own layer should be helpful for this. Press Ctrl+T, and select the TrackTo constraint, which causes the camera to point directly at the Empty object at all times.
6. Next, with the same objects selected in the same way, press Ctrl+P to create a parent relationship. This parents the camera to the Empty object so that when the empty moves, the camera also moves.
7. Press 0 on the numeric keypad to go into camera view. In this mode, you can select the camera object by clicking the rectangular line around your view. Move both the camera and the Empty object to create a nicely framed view of your subject. Remember that to move the Empty object or the camera up or down, you can select the object and translate along the global z-axis. To zoom the camera in and out, select the camera and translate along the local z-axis. Press G and then press Z twice. Your shot should wind up looking something like the example in .
View from the camera
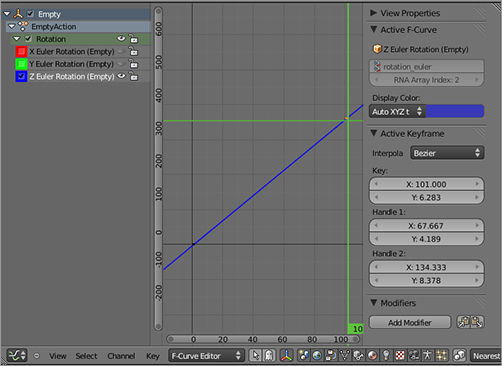
8. Press 7 on the numeric keypad to get back into top view, and select the Empty object. Key its rotation. Move forward 10 frames; rotate the empty slightly counterclockwise, constraining the rotation to the z-axis; and key its rotation again.
9. With the empty selected, open an F-Curve editor window. Select the first point, and place it manually at x position 1 and y position 0 by inputting the values directly in the Key X and Key Y fields. You want the Empty object to complete a 360-degree rotation in 101 frames. So, set the second point to Key X value 101. For the Key Y value of the second point, remember that you must express angles in radians. There are 2π radians in a complete circle, but you don’t need to calculate this yourself. Simply enter 2*pi in the field, and Blender will automatically calculate the value to 6.283, as shown in . Make sure that the handle types are set to Vector for both points and that the extrapolation type is linear.