Chapter 8
Facial Animation and Lip Sync
This chapter builds on the pose-to-pose example from the previous chapter, adding facial movements and lip sync to go with the gesticulations you have already put into place.
Lip syncing and facial animation are sophisticated arts that can take years to become proficient in. The goal here is just to get you started with this kind of work in Blender, so be prepared to spend time practicing before your results are exactly how you want them. Furthermore, as with almost everything in Blender, there are a variety of ways to go about doing lip sync and facial animation. As I mentioned in Chapter 5, I have chosen to use shape keys driven by bones. I find this to be an easy way to work, and it is a good fit with nonlinear animation, as you will see in more detail in the next chapter.
In Chapter 18, I suggest several tutorials to look at for different approaches, including one approach based entirely on shape keys, without bone drivers, and another approach based almost entirely on using a sophisticated facial armature to do mesh deformations. Your own work will certainly benefit from trying a variety of approaches to see which suits your personal animation style best.
- Facial Posing
- Lip Sync
- Playback
, you see several full facial expressions for Captain Blender. Compare these expressions with the sequence of face shapes described in Chapter 5. A few fairly simple shapes can yield a broad palette of emotional expression when combined properly. In the figure, you can see how the bones controllers are positioned to yield each facial expression. Note that the gaze bone is not shown, and other armature bone positions other than the shape drivers (for example, the head bone) are not shown.
The first expression (a) is a happy, optimistic expression, featuring a slight (and slightly asymmetrical) curl of the nose to emphasize the smile. The smile itself is not simply the smile shape, either, but also involves widening the lips and lowering the jaw slightly. The eyes are slightly squinted, and the eyebrows are raised; in particular, the left outer brow is raised.
The second expression (b) is a fearful expression. The mouth gets its shape from a combination of rounding and frown to bring the edges down slightly. The brows are knit and raised in the middle.
The third expression (c) shows nervous anticipation. The brows are raised very slightly. The mouth is closed, with the bottom lip curled in and one edge of the mouth raised in a hesitant half-smile.
The fourth expression (d) is an angry, menacing expression. The eyebrows are down with the outer portion slightly raised, angling them downward even more sharply. The mouth is closed with a hint of frown, and the lips are pursed inward slightly. The nose is crinkled asymmetrically. Perhaps the most important thing to note about this expression is the angle of the head. Head, neck, and even shoulder positioning is easy to overlook, but they are a crucial aspect of facial posing.
Facial expressions composed of multiple shapes
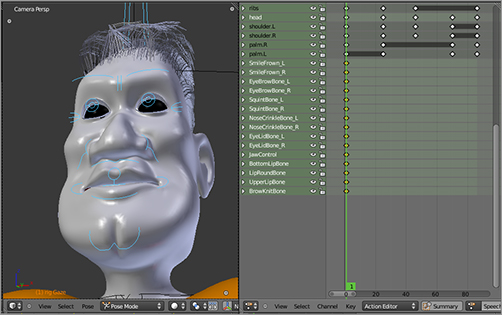
To get started posing the face, go into the Action Editor as you did previously to pose the body. Select all face bones in the rest position, and key their location and rotation in frame 1 with the I key in the 3D viewport, as you did with other bones. Once keyed, channels will be created for the bones in the Action Editor, as shown in .
Keying face bone rest positions
Pose-to-Pose vs. Straight-Ahead Revisited
Facial animation presents a special case where you must choose between a pose-to-pose approach and a straight-ahead approach, introduced in Chapter 7. The importance of timing might suggest that a pose-to-pose approach would be appropriate, but flow is equally important. Simply moving from one face shape to another does not yield convincing facial animations. Another challenge here is that the timing is particularly demanding in the case of lip sync. If timing is slightly off, it can be quite noticeable; getting the timing precisely right the first time is difficult without seeing a real-time playback of the animation.
When you don’t have to worry about lip sync, facial posing for expressiveness is much less demanding. You can do something like the pose-to-pose animation you did at the end of the previous chapter for that here. You don’t touch the mouth or the lower face right now; simply pose the eyes in a way that makes sense with the utterance. You can always go back and adjust it if there are problems with the timing or the interaction with the lip sync.
To time your animation to a specific sound file, you need to load the sound file and position it where you want it on the Timeline. For this, you’ll use the file every-era-has-its.wav, which you can find in the downloadable files that accompany this book.
To place the sample where you want it on the Timeline, you will need to use Blender’s Sequence Editor. Open up a Sequence Editor window now. In the Sequence Editor, press Shift+A to load media, and select Sound from the available options. Find the sound file on your hard drive, and select it. The file now appears as a block in the Video Sequence Editor. Place this block so that it is flush against the first frame in the sequence display.
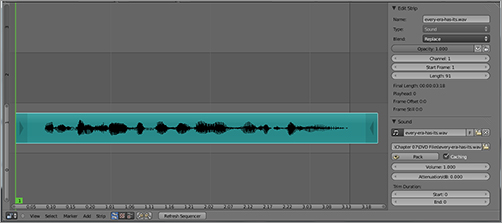
Look now at the Properties Shelf to the right of the sequence display in the Video Sequence Editor. If you can’t see it, press the N key to toggle its visibility. The sound file you loaded in the Sequence Editor is listed as a sound datablock. Select Caching under the Sound properties, as shown in . Finally, select Audio Scrubbing in the Playback menu in the Timeline, just as you did in Chapter 7 to ensure that the audio plays back in time with the animation when you scrub forward and backward manually along the Timeline.
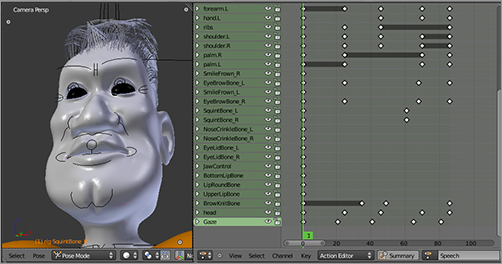
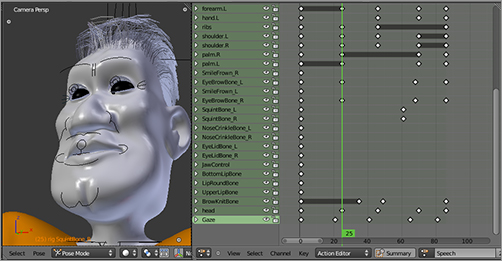
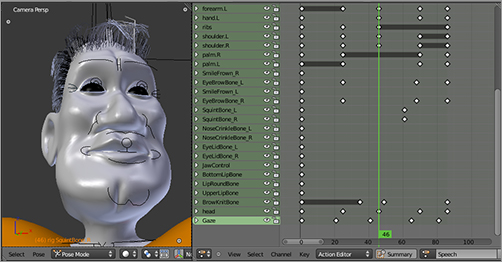
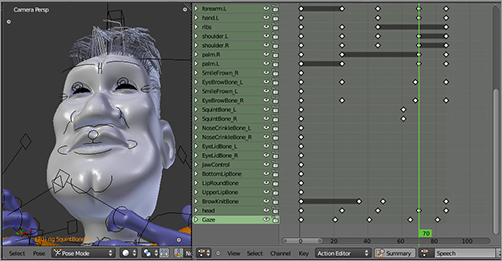
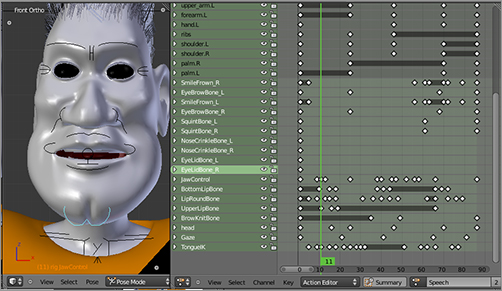
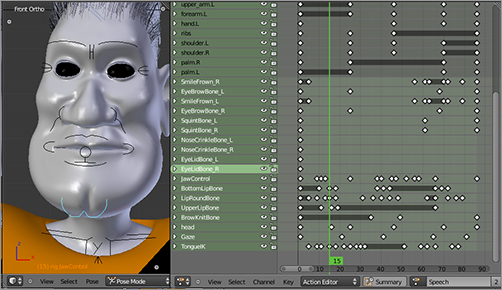
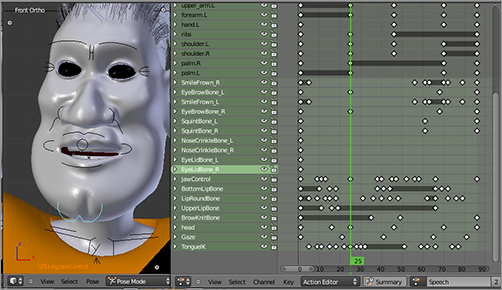
In , you can see a selection of the main key points in the animation. Note the frame number parentheses at the bottom of each screenshot. The first frame is the rest position. Frame 25 occurs just before the end of “It has been said,” which marks the beginning of the pronouncement. The expression is dispassionate here. In frames 46 and 70, while the main portion of the utterance is being spoken, the character emotes more strongly. The last two screenshots show the expression going back to approximately the rest pose. Note that you will not be making this action cyclic, so there is no need for it to end as it began. It is no problem that Captain Blender’s brows remain slightly knitted.
The sound file as it appears in the Video Sequence Editor
Animating the expressions of the eyes
The second-to-last screenshot catches the character in mid-blink. Be sure not to forget to make your characters blink. People ordinarily blink more than once every 10 seconds or so, and it will become noticeable if your character does not blink occasionally. A total of six frames—three frames to shut and three frames to open—is a good length for a blink. If you can place a blink for dramatic effect, it is a bonus, but you should have blinks in any case. It makes for a nice realistic effect to have a character blink when changing the direction of its gaze, but do not do this all the time.
One hard-and-fast rule about the placement of blinks, which holds for any film medium, is that shots should not be cut on blinks. No shot should begin or end with the character’s eyes closed, no matter how briefly. For this reason, don’t place blinks too close to the beginning or the end of an animation because it could restrict your options for editing the shot later.
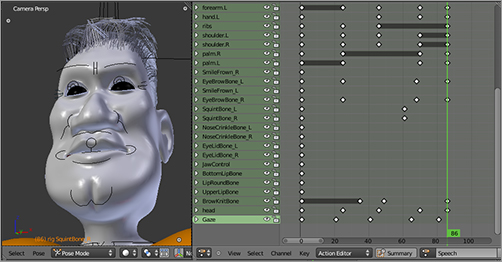
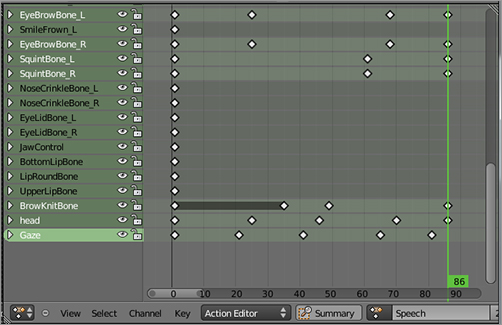
I mentioned the importance of not having facial movements coincide too much with one another. As you can see by looking at the keys in , even in this simple series of movements around the eyes, I tried to mix things up. The eyebrows do not move in sync with the squint movements, and the knitting of the brow is also not in sync with either of them. The head movement and the gaze bone movement are also keyed slightly out of sync, with the gaze bone slightly ahead of the head movements. Several movements beginning and ending in an overlapping manner help conceal the essentially linear nature of shape keys.
Key placement for head and face movements
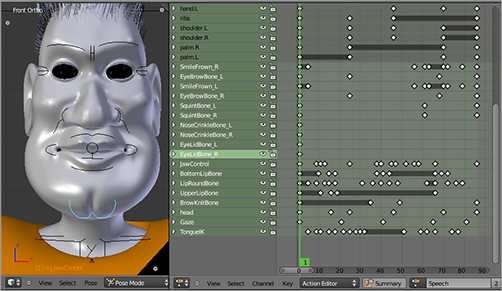
shows the poses and keys for several frames throughout the utterance. Jaw movement is, unsurprisingly, important. The movement of the jaw makes a difference to the roundness of the mouth, which enables you to express the difference between sounds such as “ee,” located high in the mouth and spoken with a wide mouth, and “ah,” located lower in the mouth and spoken with a less-wide mouth.
The first four images cover the portion of the utterance “It has been.” The focus here is simply on the shape of the open mouth until you hit the “b,” which requires a closed, slightly pursed mouth that will open in a rapid burst, after which the jaw remains high and the lips round slightly.
Animating the first part of the utterance “It has been said that every era has its visionary.”
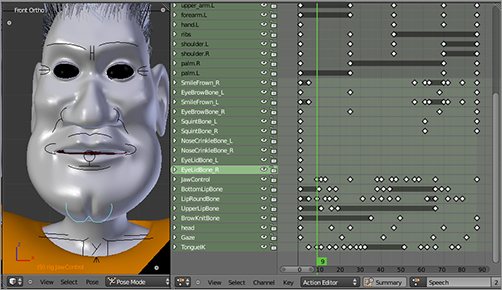
In the previous image, the portion of the utterance in frame 25 between the words “said that” seemed to call for some tongue movement. Not all sounds that use the tongue necessarily demand that the tongue be animated. If you can’t see it, don’t animate it. But between the “d” and the “th,” it seemed conspicuous when I omitted tongue movement on my first pass through this animation.
In , the focus is on “visionary.” The frames shown represent every other frame for the lip sync of that word. The “v” is created by putting the lips together, mainly by raising the jaw and rolling the lower lip in by raising its control bone. This shape releases and moves into a widening of the mouth as the LipRound bone is lowered. The jaw remains fairly high. The rest of the movements are fairly subtle. The “zh” sound in “visionary” is enunciated entirely within the mouth, out of view, so you don’t deal with this. Also, although “visionary” ends with an “ee” sound, the actual pronunciation in the recording is sufficiently deemphasized that an exaggeratedly wide “ee” position would not fit the sound well.
Another approach that works more quickly is to create shapes for each of the phoneme sets mentioned in Chapter 5. Instead of manipulating a number of individual controls to form the long “e” sound, you simply activate the single “e” shape controller. Depending on what system you choose to use, you can make anywhere from 10 different shapes that will pretty much cover all human speech, down to just a few. Of course, the fewer shapes you create and use, the less convincing your lip sync will be.
A closer look at “visionary”
The advantage of creating shapes is that you can name each shape by its associated sound (for example, “ee”), making it easy to identify the proper controller and set keys while scrubbing through the audio. You can combine and refine this quicker approach by using the individual controllers mentioned previously, really tweaking the facial shapes as each case demands. If you don’t need camera close-up hero animation, a shortcut like this can save a lot of time. Obviously, the level of detail and nuance you need in your shape set also depends a lot on the degree of realism you’re going for in your animation.
Keying Shapes Directly
You can also use the DopeSheet to key shape values directly by using its shape sliders in the Shape Key Editor. You enter Shape Key Editor mode using the same drop-down menu you used to enter the Action Editor. shows a simple example of this. When a mesh is selected in Object mode, the channels displayed in the Shape Key Editor correspond to available shape keys.
A shape key keyed directly in the Action Editor
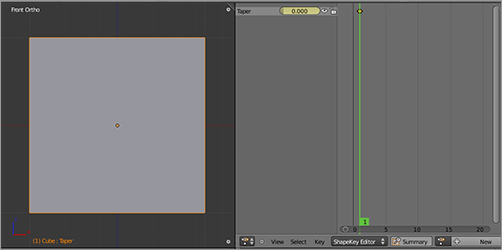
In this simple example, there is a single shape key, Taper, defined for the cube, with no drivers associated with it. The single channel in the Shape Key Editor corresponds to this shape. To the right of the channels is an area for shape sliders.
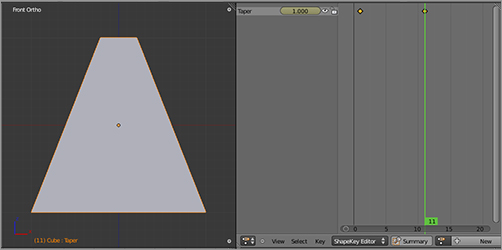
New keyframes can be placed by clicking the slider. If you click the slider only, a key with the current slider value is created; if you slide the slider, a key with the new value is created, as in the lower image. This keying is automatic and does not require the I key.
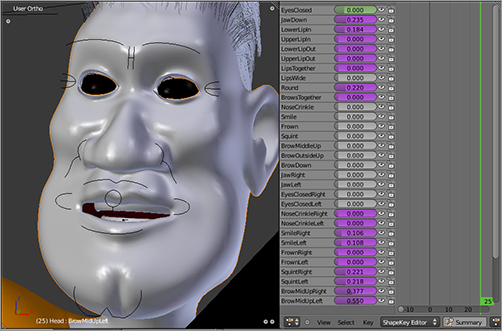
Direct keying of shape sliders becomes more complicated (and less advisable) when the shapes are also driven by bones. The key points from the drivers themselves are displayed as keys in the Action Editor, as you can see in , which shows the Shape Key Editor display of the shapes you have been working with in this chapter (note that the mesh, not the armature, is selected). This way of displaying keys might be slightly confusing, but it can be useful if you want to see the exact value of any given shape key at any point in the animation. You can edit driven shape keys directly in the Shape Key Editor, but the values will be overridden by keyed driver values, so there’s usually not much point doing this.
It is sometimes simpler to work with direct keying. However, with a complex rig that uses multiple shape keys together, an intuitive rig using drivers is the best way to go.
The bone-posing approach is intuitive and direct in terms of working with visual representations of the shapes. Furthermore, posing bones enables you to incorporate facial movements into the same action as other bone movements, as you have done in the example in this chapter.
The Action Editor display of driven keys
Regardless of how you choose to key your shapes, the task of creating lip-synced animation remains essentially the same. It involves working with a few basic shapes, frequently referencing a mirror, and using a healthy dose of trial and error. To find out how your keys are looking, you need to know how to play back your animation at full speed with your sound synced.
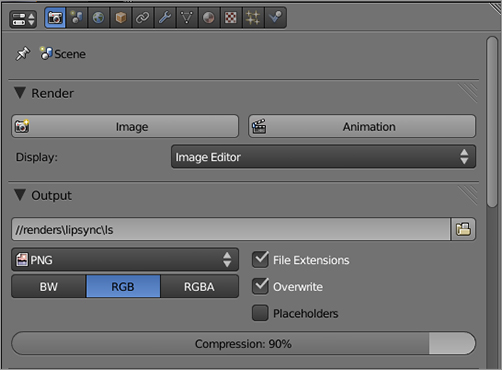
. Note that in these fields, Blender considers both a slash and a backslash to indicate a directory. So, the slash at the end of speech has the same meaning as the backslash at the end of renders and means that lipsync is a subdirectory of renders. The double slash at the beginning of the path indicates that the output directory is a subdirectory of the current working directory, that is, the directory that the .blend file is in.
Setting the output path for the rendered images
2. Now, when you render, your frames appear, by default, as a collection of numbered PNG files in this directory. Render the contents of the 3D viewport now by clicking the Render button on the header of the 3D viewport while holding down Ctrl. Remember to go into camera view to get the best idea of how your animation is looking. You can zoom the whole 3D view forward and backward for better framing in your 3D viewport by using the + and – keys or by rolling your mouse wheel, if you have one. This does not affect the rendered result, only the way it appears in the viewport.

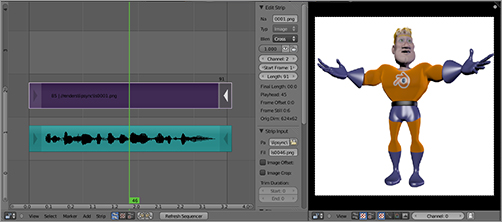
3. After your animation has fully rendered, open a Sequence Editor window. You actually want two Sequence Editors open, so split this window. In one of the two Sequence Editor windows, select Image Preview by clicking the middle of the three header buttons shown here.
4. In the Sequence View window, you should already see the audio strip that you imported previously. You want to bring in the images now, so press Shift+A to add a sequence strip, and select Images from the available options. In the File Browser, go to the /renders/lipsync/ directory where the frames are. Select the entire contents of this directory with the A key, and click Add Image Strip. You will be returned to the Sequence Editor.
5. You can move Sequence Editor strips around using the G key in much the same way that you move other things in Blender. Place the new strip so that the first frame of the strip is at frame 1.
6. Play back the sequence using Alt+A or by pressing the Play button in the Timeline. This process ensures that the animation is played back in all windows, as shown in . After maybe one or two slow run-throughs, your animation should play back at full speed with the sound. If the sound is not synced with the video, first try to adjust the relative placement of the audio strip in the Sequence Editor to get the best possible match.