Chapter 7
Armature Animation
In this chapter, you finally get down to the business of full-fledged character animation in Blender. You rigged the character, took a look at the underlying mechanisms of how animation works, and probably have become pretty comfortable with the interface. It’s time to see what you can make Captain Blender do.
Although this book is not intended as a substitute for in-depth study of the art of animation, this chapter touches on some basic principles of creating convincing motion that have stood the test of time from the early days of Disney. Animation is a descendent art form of cartooning, which used simple drawings to express a wide range of emotions and ideas, and as such exaggeration is a crucial aspect. Although CG can enable you to work with very realistic images, the exaggerated, cartoon-influenced aspect remains significant, as anybody familiar with such “live-action” films as The Mask or The Matrix is aware. In hyper-realistic CG, use of motion capture and related technologies can move out of the realm of proper animation and into something else entirely. In films such as King Kong and The Lord of the Rings, for example, the character models for Kong and Gollum essentially amount to digital costumes applied to a human actor.
This book is mainly concerned with animation in the traditional sense, which almost inevitably assumes a certain degree of exaggeration.
- Posing and Keyframing with the DopeSheet and the Action Editor
- Walk and Run Cycles
- Pose-to-Pose Animation
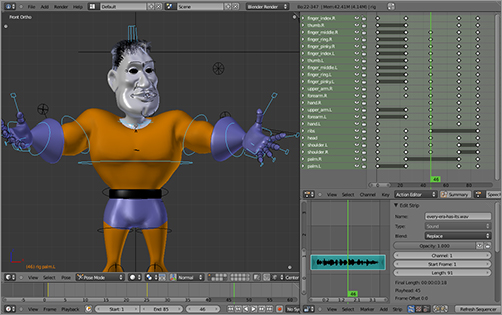
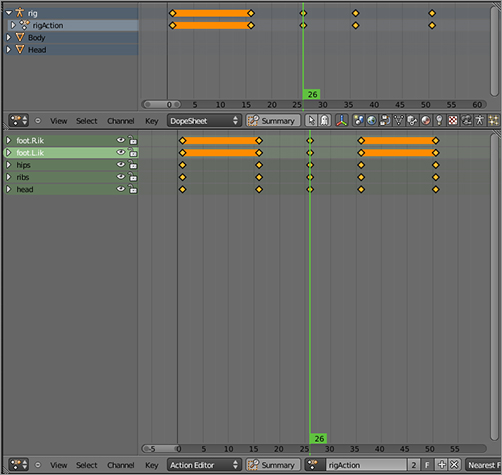
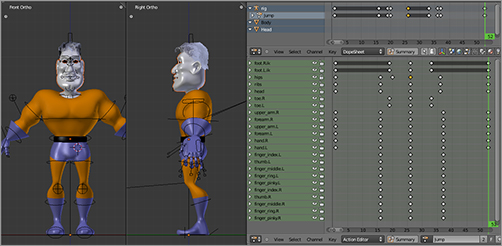
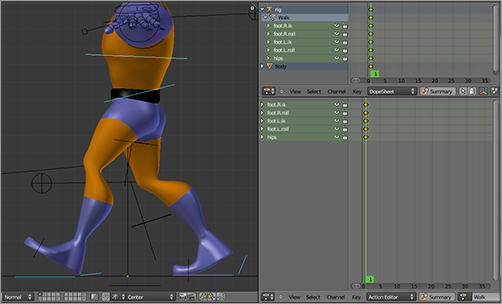
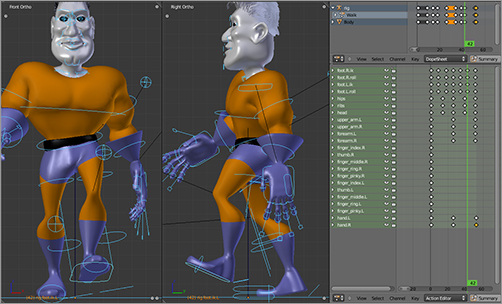
shows two DopeSheet windows. The top one is set to DopeSheet mode, and the bottom one is set to Action Editor mode. They look similar, but how they function differs in important ways.
The DopeSheet and Action Editor
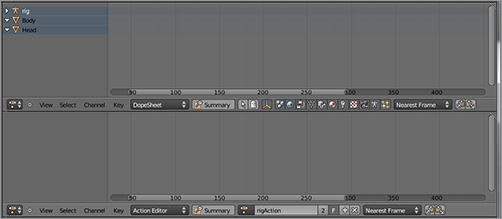
In this chapter, you’re mainly going to work in the Action Editor. The Action Editor is essentially an interface for keying and organizing collections of keyframes associated with a specific object. The DopeSheet is an overview of actions for multiple objects. Keys you create or edit in the Action Editor or DopeSheet represent actual key points in the underlying F-Curves and can be edited as such, but the Action Editor and DopeSheet interfaces make it much easier to see the arrangement of keys for many bones in an armature (or in the case of the DopeSheet for many objects) at once, rather than having to deal with a huge number of F-Curves and key points. For example, locating and rotating a single bone at a particular point in time actually involves seven different F-Curves. You don’t want to have to see all those curves just to know that the bone has been keyed for location and rotation. The Action Editor and DopeSheet show you pertinent information about where keys are without giving you too much information.
The Action Editor enables you to create and edit separate actions independently of each other. As you will see in the next few chapters, you can use and combine individual actions in several ways. This chapter will focus on creating and working with individual actions.
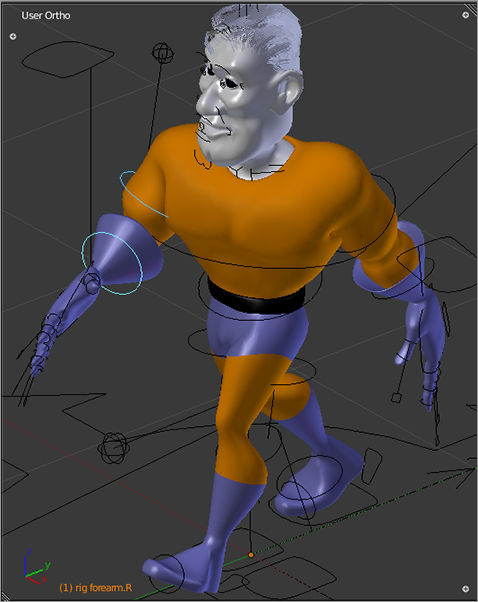
Bouncing Captain Blender
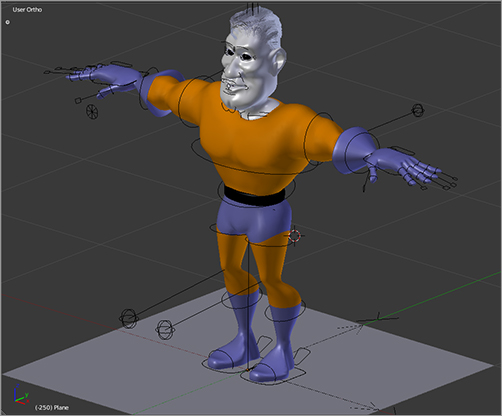
You’ll begin by creating a basic jump action. Add a plane at the zero point, as shown in , and scale it up along the x- and y-axes. This will be the ground.
Positioning the character on the floor
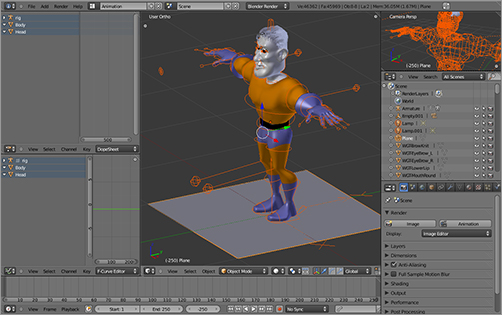
Now you’ll really start animating. You’ll want a 3D viewport window and an Action Editor window open here, as well as a Timeline window. One option is to select the Animation screen from the Screen drop-down menu at the top of your work area to create a display like that shown in . This gives you a setup that includes most of the necessary windows. There is only one DopeSheet window, however. For this chapter, split the DopeSheet horizontally, and set one of the DopeSheet windows to Action Editor mode. The default animation length is 250 frames, which corresponds to a 10-second animation.
Animation screen
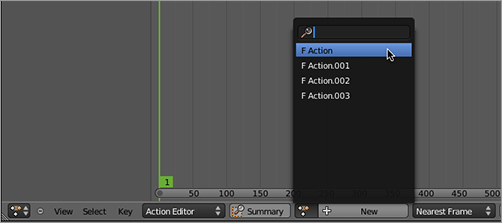
You can create new actions in several ways. First, you can click the New button in the Action Editor header. All currently existing actions can be found in the drop-down menu that occupies the same space as the New button in the header, as shown in . The first action created when you click New will be named Action. Subsequent new actions will be called Action.001, Action.002, and so on, and you can rename them by typing a new name into the field. If an action is currently active in the Action Editor, several familiar buttons appear to the right of the action’s name, as you can see in . The number immediately to the right of the Action name field shows how many datablock users of the action are currently in Blender. Clicking this button will create a copy of the action and make it a single-user datablock. The F button to the right of this toggles a fake user for the action. With this button toggled off, unused actions will be discarded when your current Blender session is shut down. The plus symbol button to the right of this creates a new empty action, just like the New button. Finally, the X symbol button to the right of this removes the current action from the Action Editor and disconnects it from the current animation. The action will still be available to select from the drop-down, and it will persist from session to session if the fake user is left in place, even if it is not used in the scene.
The Action Editor drop-down menu
The Action field and buttons

When there is no active action, you can create a new action by simply keying. The newly created action will be automatically given a name that incorporates the object’s name to which the action corresponds. For example, if you key the Cube object, the new action will be named CubeAction by default.
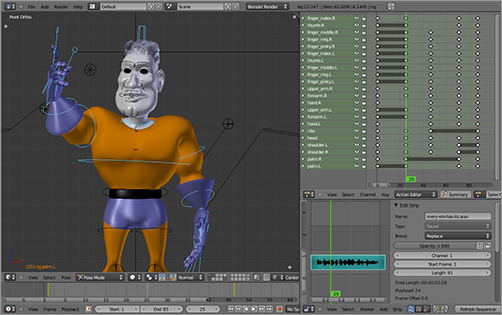
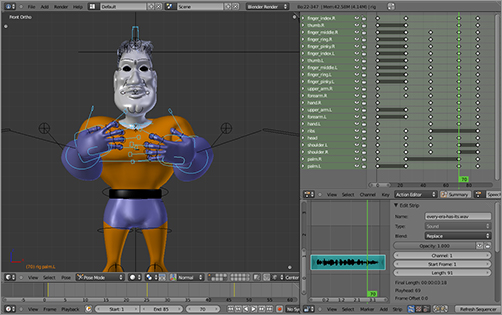
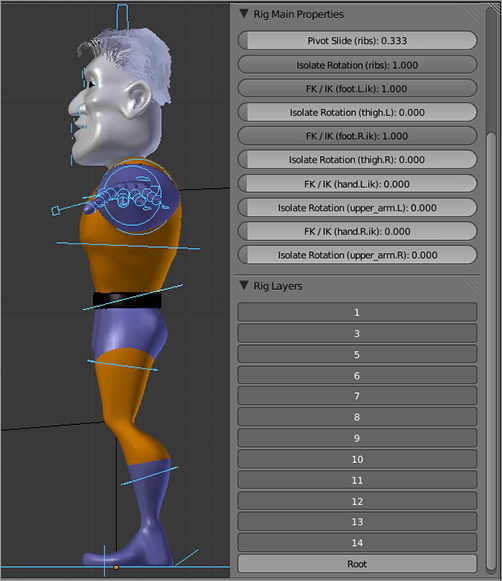
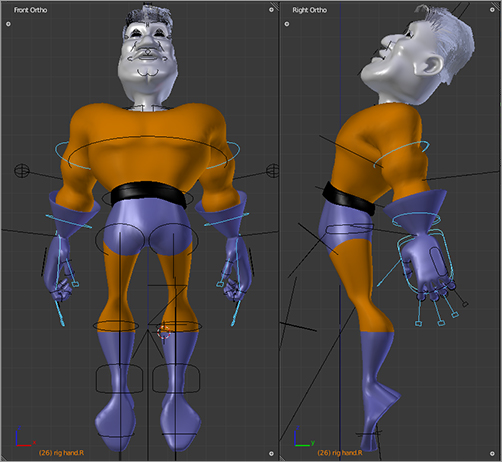
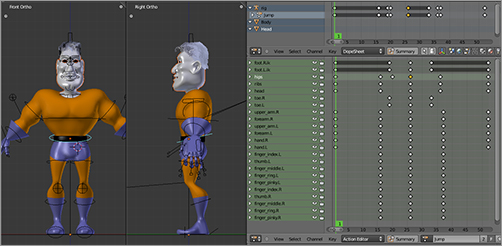
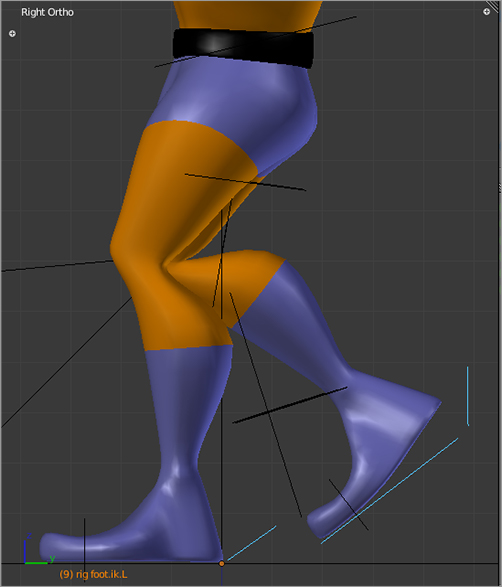
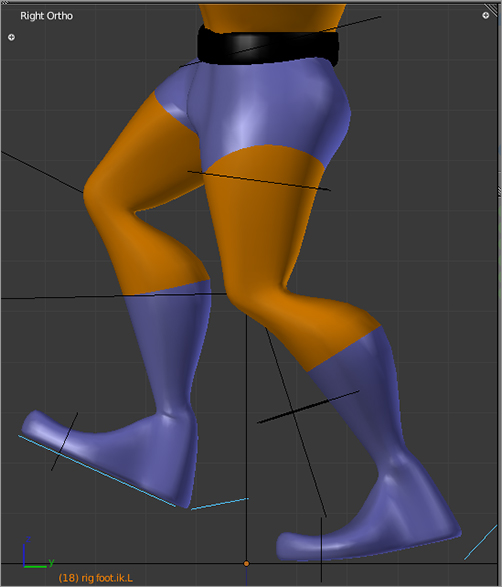
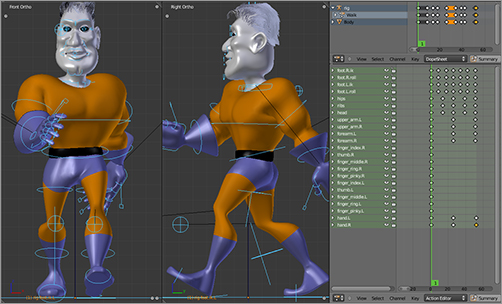
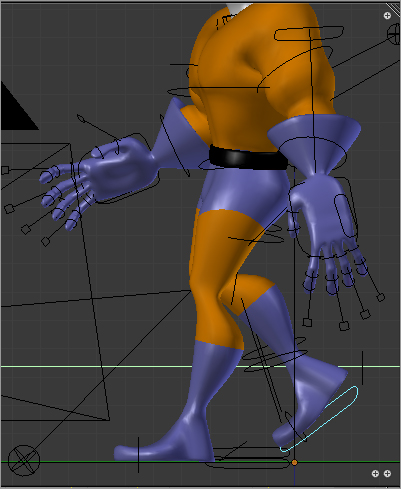
Make sure your Timeline says you are on frame 1, select the rig object in the 3D viewport, and enter Pose mode. Before you begin, make sure your IK and FK posing settings are the way they should be. For the jumping, walking, and running cycles you’ll be looking at in this chapter, the legs will be posed using IK posing, and the arms will be posed using FK posing. This makes it easy to pose the legs to interact with the ground and to pose the arms in a way that creates nice arcs. You can see the IK and FK settings by selecting the bones in Pose mode (go ahead and select them all with the A key) and looking under Rig Main Properties in the Properties Shelf to the right of the 3D viewport (toggle the Properties Shelf visibility with the N key), as shown in . Set the FK/IK values for the foot.ik.L and foot.ik.R bones to 1 by sliding the sliders all the way to the right, as shown in .
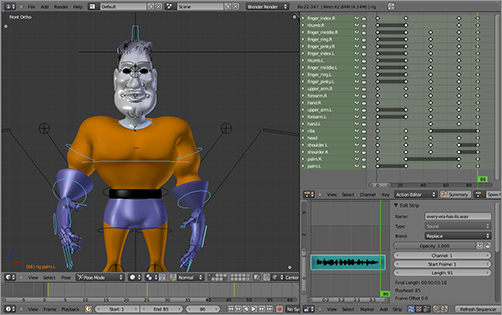
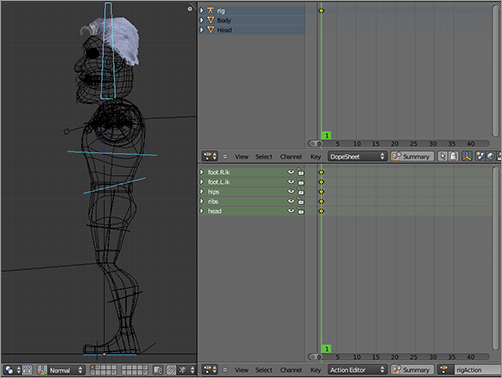
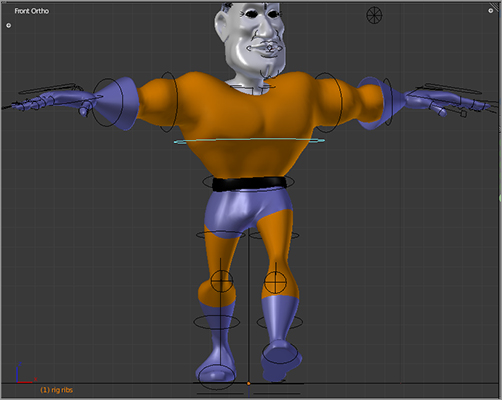
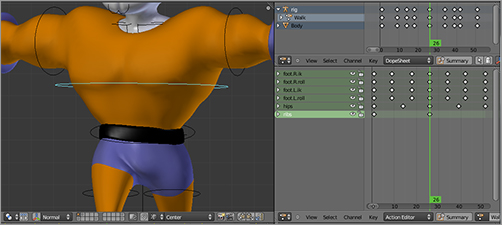
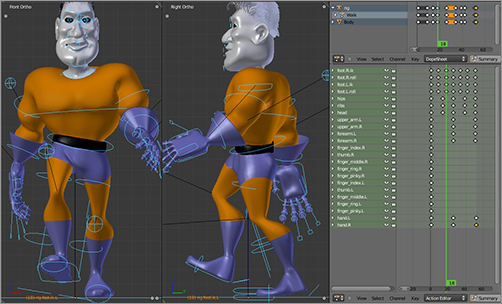
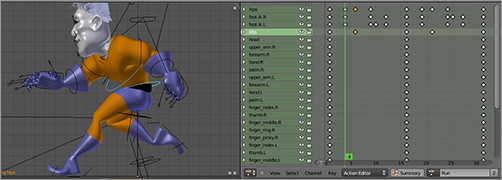
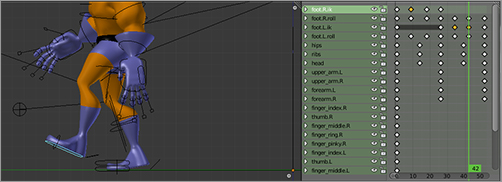
Enter Right Ortho view by pressing 3 on the numeric keypad and toggling into orthographic view using 5 on the numeric keypad. In the 3D viewport, select the following bones: hips, ribs, head, foot.ik.R, and foot.ik.L. Press the I key over the 3D viewport, and choose LocRot from the keying options in the menu that appears. This will create location and rotation keyframes for each of the five bones. These will show up in the DopeSheet and Action Editor, as shown in . As you can see in the DopeSheet, the objects in the scene are listed, and a single summary keyframe is shown for the rig object. In the action, each keyed bone is given its own horizontal channel, and the keyframes for that channel are displayed as white diamonds (yellow when selected). This keyframe display is actually a shorthand for several underlying F-Curve key points.
The FK/IK settings for bones
Keyframes for the first frame
The five bones you’ve keyed are the main bones you’re concerned with for the jumping motion. Other bones will also be involved to enhance the effect, but the main motion will depend on these bones. You’ll create a cycle that begins and ends with the armature’s rest pose, so you’ll key the relevant bones now.
You’ll incorporate a little exaggeration right off the bat, in terms of the timing. Because you want to emphasize the motion and the height that Captain Blender is jumping to, you’ll make the whole motion slightly slower than it would be in real life. The whole action will take 50 frames, or 2 seconds. This is not slow enough to appear to the viewer as actual slow motion, but it will highlight the sense of mass and energy in the motion.
This motion has three main parts, aside from the rest positions at the beginning and end. There is the initial crouch as the character gets ready to launch upward. Next is the apex of the jump, where the character is at his most extended point, and then is the recoil point after pressing the ground on the way down, which forces the character down into a position not much different from the initial crouch.
The timing of the up and down motion needs to be symmetrical because, like the ball bouncing, the rise and fall of an object with gravity create a parabolic shape. So, you want the figure’s movement into and out of the crouching position at the beginning and the end of the jump to be considerably slower than the leap and landing, which you want to be explosive and jolting, respectively.
To complete the keyframing for the jump, follow these steps:
1. Ensure that the hips, ribs, head, and foot.ik.L/R bones are keyed in the rest position in frame 1, as described previously.
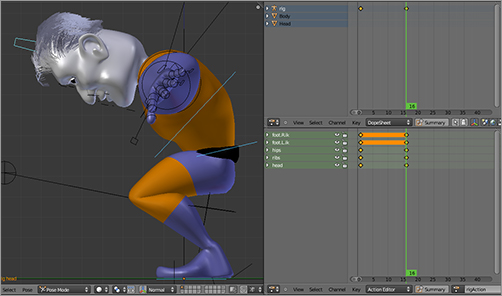
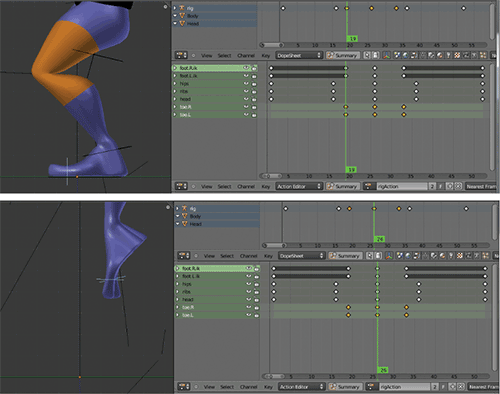
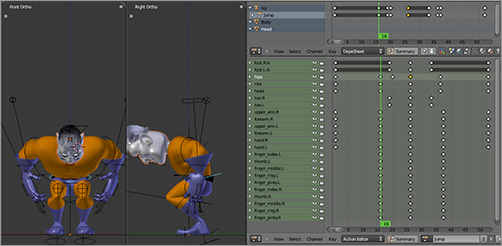
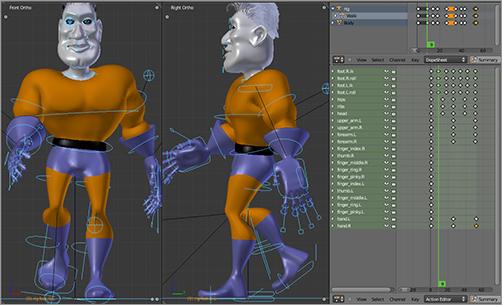
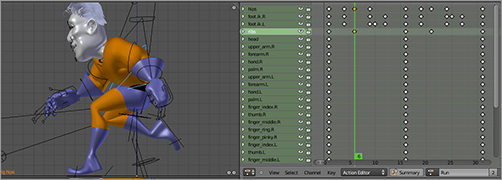
2. Go to frame 16 by entering the frame number in the Timeline field. Position and key the hips, ribs, head, and foot.ik.L/R bones at frame 16, as shown in . This gives the figure a bit longer than one-half second to get down into the crouching position.
Crouch pose
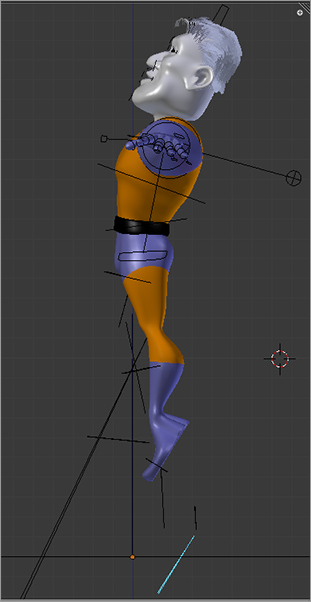
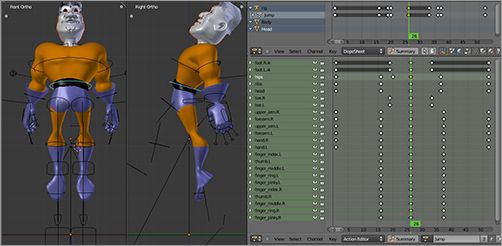
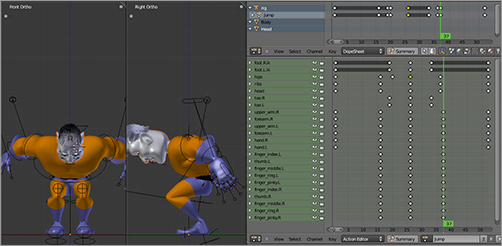
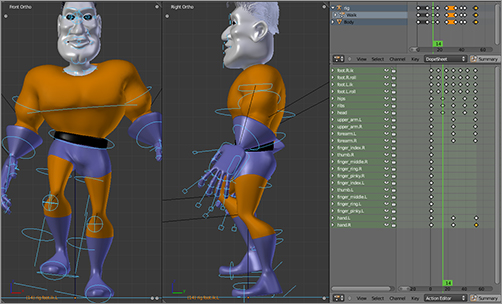
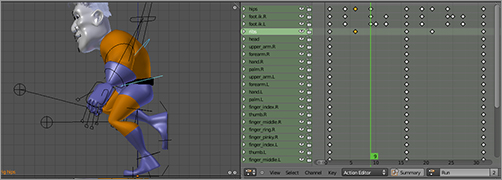
3. Go to frame 26, select all bones with the A key, and then press Alt+R and Alt+G to clear all location and rotation transformations on the bones. Pose the character as shown in , which will be the apex of the leap. Notice that the chest is somewhat curved back, while the hips are pushed a little bit forward. Key these bone positions.
4. In the Action Editor, select all the keys in frame 16 with the Box Select tool (B key). Selected keys will be yellow. Selecting keys with the Box Select tool does not automatically unselect other keys, so double-check that only the keys in frame 16 are selected. Press Shift+D to duplicate the keys. Then while holding down Ctrl, move the copied keys to frame 36. Holding down Ctrl while moving keys constrains their placement to full frames. Do the same thing to duplicate the keys from frame 1 to frame 51. The result should look like .
Apex of the leap
Duplicating keyframes in the Action Editor
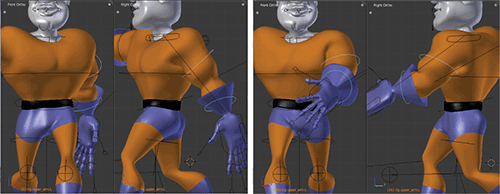
5. You’ll make a few small modifications here to improve the effect. One will be to key the rotation of the toe.L/R bones. They should be in rest position before and after the jump and rotated at the apex of the jump, as shown in .
6. Position and key the arms as shown in , , and to complete the posing for the animation.
Modifications to improve the effect
Rest arm position (frames 1 and 51)
Crouched arm position (frames 16 and 36)
Apex arm position (frame 26)
Previewing Your Animation
Now that you have finished the basic keyframing of your jump action, you’ll want to see how it looks. You can do this by pressing the Play button on the Timeline to activate the animation or by pressing Alt+A in the window where you want to activate the animation.
The problem with simply watching the animation in this way is that, depending on the speed of your computer’s processor and the complexity of your character mesh, the delay caused by calculating the figure’s position for each frame means that the animation might play back either much too quickly or much too slowly to give you an accurate portrayal of the motion. With a fairly high-poly mesh like Captain Blender, including particle hair, this calculation is likely to be unusually slow and certainly does not give you a realistic idea of what your animation looks like at the proper frame rate.
A quick-and-dirty solution is to select only the layer with your armature object and watch the animation run with only the armature. This will still be slowed down from the correct frame rate, but it will probably be watchable as movement. For certain troubleshooting tasks, this is a useful method. However, it is still important to see the entire mesh figure deforming at full speed to see what your animation really looks like.
The other extreme is to properly render an animation, as you’ll learn how to do in Chapter 11. However, this process is impractical at a project’s early stage of development because it takes up large amounts of time and resources calculating light and surface effects for each frame that you do not need to see when you are only trying to evaluate the animation.
The most accurate way to play back an animation in real time without fully rendering the images is to use the 3D viewport’s OpenGL render button, which you can find on the header of the 3D viewport (it is the rightmost button displaying a movie clapperboard icon). Clicking this button gives you an animated render of the 3D window as it is currently shown (the button to the right of this button, with a camera icon, gives you a still OpenGL render).
After you render the animation, you can play it back at full speed in the player of your choice. See Chapter 11 for suggestions on external video players and instructions on how to integrate them with Blender. Because your 3D viewport is getting rendered here, you can use 0 on the numeric keypad to go into camera view to get a render of the animation from the camera’s point of view. So, you can render your animation from a few different perspectives and see how it looks. If you run into problems with this part, you might want to skip ahead to Chapter 11 to read up more fully on rendering animations.
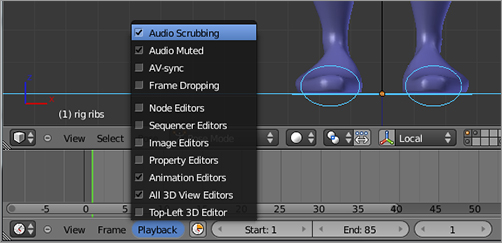
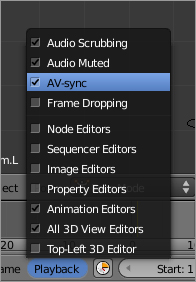
There is still another option for playback, which is probably the most suitable for our purposes here. In the Playback menu of the Timeline window there is toggle button labeled AV-Sync (see ). Enabling AV-Sync tells Blender to attempt to play back animations triggered by the Play button or Alt+A in real time. If necessary, Blender skips frames to show you the proper timing of your animation. Before you go to the trouble of doing the OpenGL render, try using the AV-Sync option. It gives acceptable results, even under demanding circumstances. Also, one advantage of keeping your animation preview live (nonrendered) is that Blender enables you to transform the view, even while it is playing your animation in real time. Try using the scroll wheel, Shift+MMB-drag, and MMB-drag in a third window while your animation loops in real time.
Sync option for animation playback
Tweaking F-Curves
When I rendered the jumping animation, it turned out pretty well, but the jump was happening awfully quickly. Quick may be realistic for a jump like this, but to get the motion effect I was after, I wanted to exaggerate the length of time spent at the apex slightly. This would help emphasize the character’s physical strain at the apex and give more of a sense of height, power, and mass.
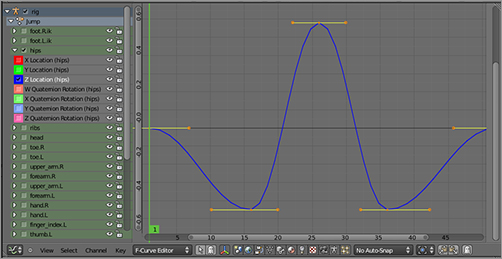
To do this, you need to work directly on the curve responsible for holding Captain Blender in the air, namely, the Z Location F-Curve on the hip bone.
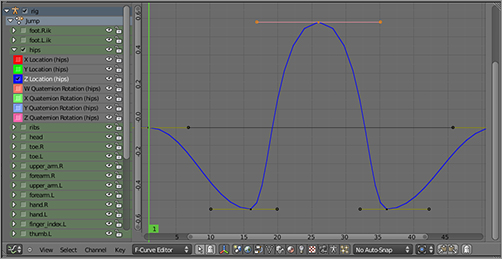
With your torso bone selected in the 3D viewport, switch your Action Editor to the Graph Editor, open the Hips channel by clicking the triangle icon to the left of the channel name, and select the Z Location channel. In , you can see that the curve is too sharp right now. The character is returning to the ground too abruptly, so you’ll want to round off this curve. You can do that by simply selecting the two Bezier handles of the topmost control point and scaling up with the S key. The result is the rounder curve shown in .
Z-axis F-Curve as calculated
Rounded off to exaggerate
Check the new motion with Alt+A. Never mind whether it’s more realistic; it’s definitely better looking and more evocative.
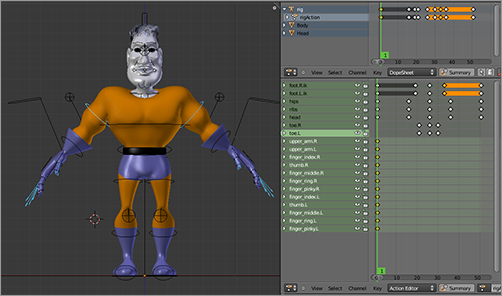
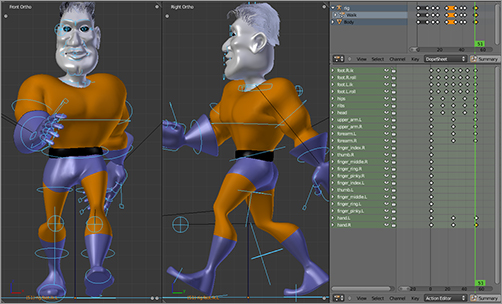
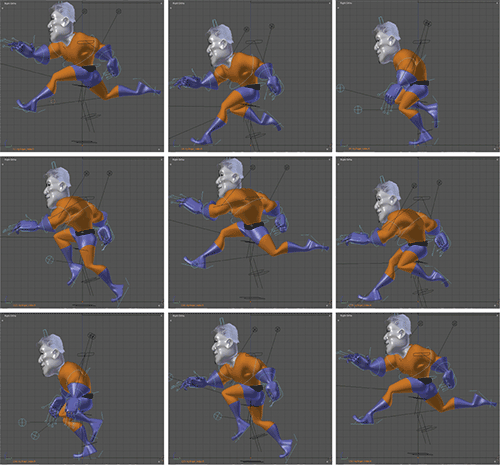
You can see an overview of each keyframe and its poses and keys for the complete action in . The fully rendered video of the action is in the file jump.avi on the accompanying DVD.
F-Curves make the task of animation much easier by automating a lot of the most painstaking work. However, remember that you must strike a balance between doing things by hand and using automated tools. Getting a sense of how much to tinker with F-Curves requires experience and skill. Overkeying and overediting curves can result in choppy, erratic movement, whereas simply letting the F-Curves do all the work yields unconvincingly smooth motions.
Jump action
Line of Action
“In animation, the line of action is the basis for rhythm, simplicity, and directness!”—Preston Blair
An important aspect of animation, as with cartooning, is boiling down complex visual information to its simplest, most basic elements. This is related to the exaggeration discussed earlier. You know that you need to exaggerate certain aspects of form and pose to get the motion effects you want. The question is, what to exaggerate? A big nose, for example, is a form of exaggeration, but enlarging Captain Blender’s nose at the apex of his jump obviously does not contribute to the effectiveness of the animation. The answer to how to use exaggeration effectively can be found in an awareness of lines of action.
The line of action for a pose is a single smooth line that you can draw through the pose, which conforms to the pose in terms of energy and direction. It is more basic to the pose than any specific portion of the figure or armature’s position. Effective animation is an interplay between lines of action, and one important trait of a good animator is some intuitive feeling for these lines. Lines of action do not have any explicit manifestation in your software, but you should try to cultivate an awareness of them in your mind.
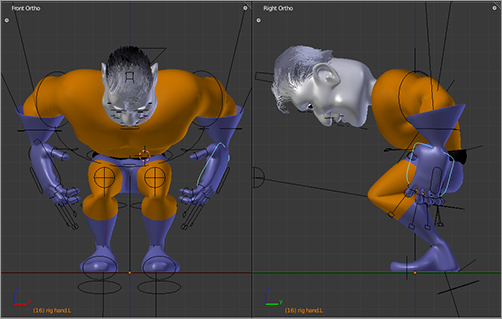
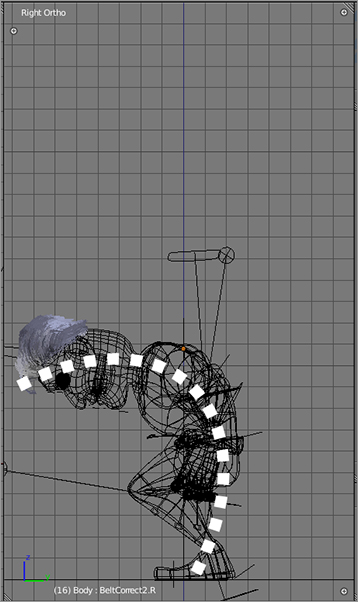
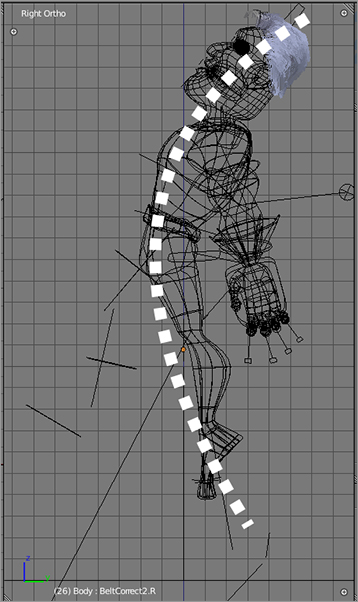
I drew lines of action through the extreme poses in the jump animation in and . As you can see, these lines capture the curled, hunched quality of the crouch position and the stretched, arcing quality of the apex pose. They also give you insight into what you need to exaggerate to make the pose more effective. Squash and stretch effects should agree with the line of action of the movement.
Line of action for the crouch pose
Line of action for the apex pose
Not all poses have such immediately obvious lines of action, but it is a good idea to think in these terms when creating your poses. If you can envision a single line that expresses the energy and motion of each pose and work to make your exaggerations and secondary movements complement and support this line, your animation will be much more effective.
Manual vs. Auto Keyframing
Keying a value such as a bone position fixes that value for subsequent frames in the animation. You can pose a bone in a particular frame, and it will hold that pose (pressing Alt+G and Alt+R to clear position and rotation is the same as posing to the rest position) as long as you are on that frame. However, if you do not key the positions, they will jump back to their previously keyed positions as soon as you move to another frame.
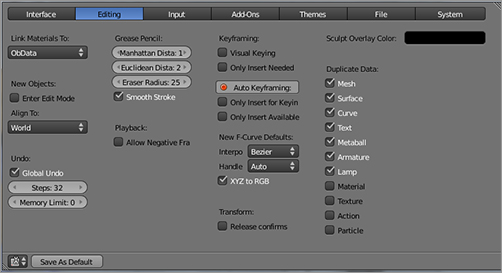
You can set Blender to use automatic keyframing in the user preferences by selecting the Auto Keyframing button shown in . You can also activate Auto Keyframing using the similar button on the Timeline. Selecting this option inserts a keyframe every time you change the pose of your armature or transform an object, eliminating the need to use the I key.
User preference for auto keying
Using Auto Keyframing is entirely a matter of personal preference. Some people find that it speeds their workflow, whereas other people prefer to set up their pose first and then key the positions when they have them as they like them. In both cases, it is important to make sure you are on the correct frame before you begin keying so that you don’t delete any keys unintentionally. The danger of doing this is slightly higher when using auto keying.
One interesting use of Auto Keyframing is to turn it on and move an object in real time while playing the animation in the 3D viewport. By doing this, you can record the movements of an object as you make them in real time.
.
Keying the first extreme pose for a walk cycle
A single step in a leisurely walk can be expected to take about a second, so you will put the right foot forward extreme 25 frames later, at frame 26. To place this second extreme keyframe, follow these steps:
1. With the current frame at 1, select these five keyed bones: foot.ik.L, foot.ik.R, foot.roll.L, foot.roll.R, and hips. Make sure that these bones have had their positions correctly keyed as described previously.
2. Copy the pose of the bones to the Clipboard using the  button in the 3D viewport header.
3. Go to frame 26, either by moving the green frame marker line with the arrow keys or by typing 26 into the current frame field on the Timeline.
4. Paste the mirror image of the copied pose in reverse using the  button. This function requires that the bones all be named correctly, with matching bones on the left and right having the same base name followed by .R and .L. If you have problems with this working, go back and double-check that your bones are properly named.
5. In this case, the four bones you’re concerned with should already be selected. However, in cases in which the mirrored pose uses different bones than the original pose, the relevant bones are not automatically selected. The original bone selection remains unchanged. So before keying the new pose, be sure that all the bones you want to key are selected. Then key the pose as shown in .
To complete the walk cycle, in the Action Editor window, select the four keys in frame 1. Make sure that only these keys are selected. Press Shift+D to duplicate the keys and move them to frame 51, as shown in . Set the end frame in the Timeline to 50. Preview the animation. You should have a smooth (albeit very slidey) start to a walk cycle.
Keying the mirrored extreme pose
Duplicating the pose from frame 1
When people walk, their feet come off the ground during the forward motion, and you need to animate that. Following the same steps as the extreme poses, key the foot positions for the pose in at frame 9, and key its mirror image (using Copy and Paste Mirrored) at frame 34. Then key the pose shown in at frame 18, and key its mirror image at frame 42. Don’t key the hips this time. Again, preview the animation. It should look more like an actual walk.
Keying the first in-between pose for the feet
Keying the second in-between pose
The last thing you need to do with the lower body is key the vertical motion of the hips bone. You’ve already keyed the hips bone to be lower at the extremes. At frames 14 and 38, where the height of the walk hits its apex, key the torso at its rest position (select the bone and hit Alt+G to make sure it is in its rest position). Preview the animation again to make sure it looks natural.
Why Start with the Extremes?
Traditionally, you create the extreme poses first because they hold most of the interesting information about the form and mood of the movement. The in-between poses, although very important, can be thought of as functioning largely to fill in the space between extreme poses.
In CG, you want to think about how you place extremes, particularly if you want to create a cycling action. In this case, the curves leading out of the action must match up seamlessly with the curves leading into the action, both in value and in angle; otherwise, the repetition will be jumpy. The easiest place to make curves match is at the point where they are both at zero angles. The apex of a curve whose value is reversing is a very good spot for this. As mentioned earlier, the pose extremes tend to be the places where values are reversing, which make them good candidates for cycle points.
Upper Body Movement in the Walk Cycle
You now have the lower body moving the way you want it. But the human walk involves more than just the legs and feet. The whole body is involved in walking, and this section looks at the movements of the head, shoulders, and arms.
A basic principle of character animation is that the character’s movements say as much or more about the character as the visual aspects of the character. Most animators practice their skills on extremely simple models to focus their energies on expressing emotion through motion. At all points of creating actions, you should be considering what the pose says about the character’s mood and personality.
Captain Blender’s walk is a confident, deliberate walk that befits a superhero of his stature. You’ll give him a pronounced swing to the shoulders to emphasize this. This is a simple, smooth motion that needs to be keyed only on the extremes. The upper body moves in opposition to the legs in a normal walk, so in frame 1, rotate the ribs bone around the z-axis to bring the right shoulder forward, as shown in . Use the Clipboard copy pose mirroring to put the reverse pose at frame 26, as shown in . Of course, the key from frame 1 should also be copied to frame 51.
Keying the mirrored shoulder position
Reversing the pose
He is now swiveling a lot, but this is not quite enough to give you the confident, determined aspect you’re looking for because his head is moving back and forth as well. To fix this problem, you should key the head to be in a forward position at frame 1 and frame 26, as shown in . I recommend doing the poses for both frames by hand, without using the copy function or being overly precise, to enable a slight amount of variation into the movement. So far, you’ve been using a lot of copying and mirroring tools, which can lead to robotic movements. Of course, frame 51 needs to be identical to frame 1 to keep the cycle smooth, so it needs to be copied directly.
Keeping the head pointed forward

Arms and Hands
The arms are currently set to use FK posing, so you can pose the bicep, forearm, and hand to swing naturally along with the walk. It is enough to pose the arms to coincide with the extreme frames.
First, pose the left arm for frames 1 and 26, as shown in , and then use the Clipboard and pose mirroring to duplicate the motion on the right side, as in . Making some very slight modifications in the right- and left-side arm and hand movements can help loosen things up, but do not make them too uneven, or else the walk will look strange.
Backward and forward movement of the left arm
Mirroring the arm poses
gives a complete overview of keys and poses for the walk cycle. You can find the video file, which is called walk.avi, among the downloadable files for this book.
Walk cycle keys and poses
IK vs. FK Posing
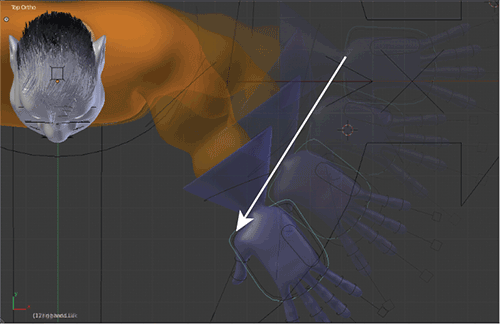
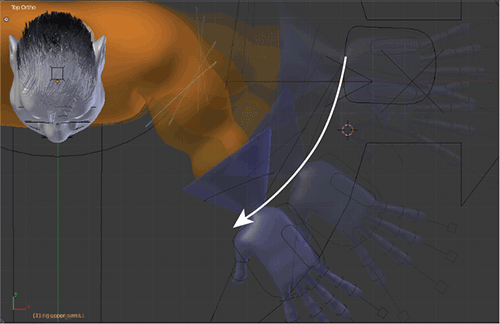
You now have used both IK posing and FK posing, and you understand the difference. But it’s worth giving some thought to when exactly you should use each kind of posing. You know why you used IK posing for the feet: IK posing for the feet during a walk or jump cycle enables you to simulate the way real feet are fixed on the ground during these cycles. But why FK posing for the arms?
You can see the answer to this by comparing to . Both figures use two keys with identical start and end poses. However, uses IK posing, whereas uses FK posing. The pose for is created by moving the hand.ik bone, and the pose for is created by rotating the upper arm bone. In , the movement of the hand.ik bone is interpolated, resulting in the hand traveling from one pose to the next in a straight line. In , the rotation of the upper arm is interpolated, resulting in an arcing motion.
Ordinarily, people’s arms swing freely in arcing movements. It is very unnatural for a person’s hand to move in a perfectly straight line through space unless it is in some way physically restrained. This is the key to deciding when to use IK or FK posing. When the end of a limb is held by something or constrained to move with some other object, IK posing is a good option. When a limb, be it arm, leg, head, or tail, is swinging freely, you will get the best results with FK posing.
IK posing (IK influence set to 1)
FK posing (IK influence set to 0)
A Run Cycle
This book doesn’t walk you through the run cycle because the process of creating the run cycle is more or less identical to the walk cycle. The main difference between running and walking is that in a walk, at least one foot is always in contact with the ground, whereas in a run, the body spends a fair amount of time completely aloft. The extreme poses, in particular, feature both feet fully off the ground. The other difference, of course, is that running tends to be faster on a strides-per-second basis. Instead of a 50-frame cycle, the present run cycle is 30 frames long.
is an overview of the run cycle poses’ keyframes. You should be able to figure out the details of their placement yourself. Pay special attention to the posing of the upper body; notice that the figure strains forward on the extremes. Also, because there is a considerable amount of up and down movement, make sure you key the head to point approximately in the same direction throughout the action. Use the gaze bone’s position to gauge this as you pose the head bone. Do this by hand, and not too precisely, because it will not be realistic if the head’s direction is robotically fixed while the character is running at full speed.
Keyed poses for a run cycle
You can see the animated run cycle in the file run.avi on the DVD.
To speed up or slow down the cycle, you can select all the keys and scale them by pressing the S key. This process scales them toward or away from the vertical green line, so it’s a good idea to put this at frame 1 to keep all the values positive. Also be sure to adjust your animation’s end frame accordingly. If you choose to scale your action to adjust the timing, you can, after you’re done, snap the keys onto whole-numbered frames by pressing Shift+S and replying OK to the prompt.
Expressing Weight
Certain points in a run cycle can exhibit evidence of mass that is not visible at the slower speeds of the walk cycle. Specifically, with a fairly massive character such as Captain Blender, you should emphasize the force of his impact. You can see this illustrated in , in which the head and rib bones are keyed just before the impact frame and keyed in a more crunched position just after the impact. This pose relaxes again over the course of the next several frames.
The ribs and head crunch slightly just after impact.
Remember that with character animation, perfect stillness is the kiss of death. Living things are never perfectly still. A single perfectly motionless limb on a character can be enough to remind viewers that they are not truly seeing a living being and jerk them out of the animation experience. The key is to combine a variety of smooth movements with complementary directions and timing to create an overall feeling of movement that is irregular but not choppy or inconsistent. Whenever you work with armatures, keep all these things in mind so that you can work toward convincing, natural-looking movement for your characters.
.
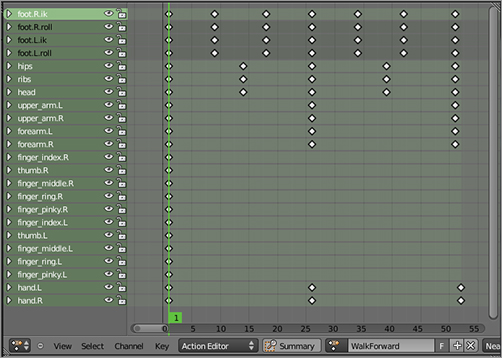
The WalkForward action to begin with
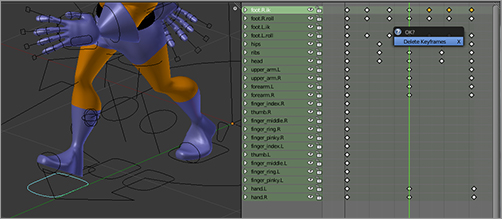
2. Select the foot.ik.L bone as shown in . This foot is extended forward and should not move until it is time for it to move forward again on the next stride. In the Action Editor, delete all of the keys for this foot right of the first key, as shown in .
Selecting the foot.ik.L bone
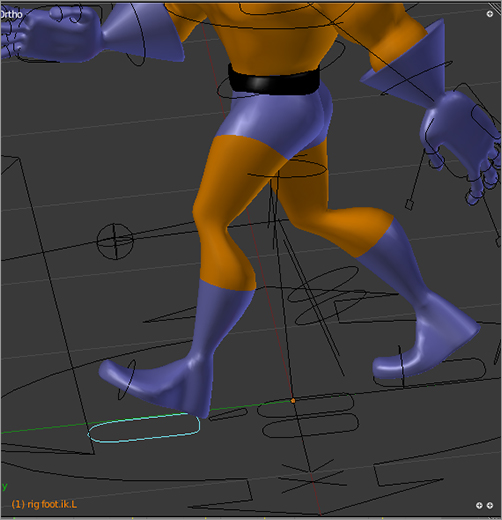
Deleting the keys

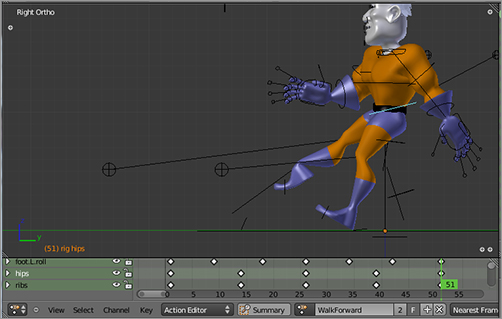
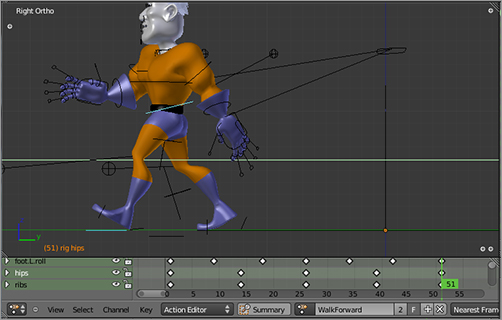
3. Advance to frame 26, the other extreme. Captain Blender will assume an awkward position like the one shown in . To fix this, select both the hips bone and the foot.ik.R bone simultaneously and move them forward by pressing the G key followed by the Y key. Move them forward until they look right, as shown in . Don’t worry about being precise. Slight variations in stride length add to naturalness.
Advancing to frame 26
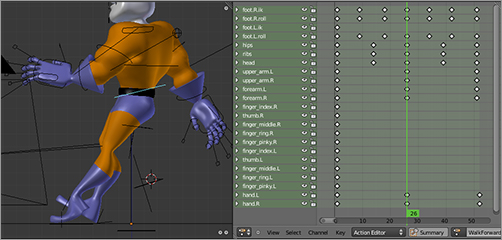
Bringing the right foot and the hips forward

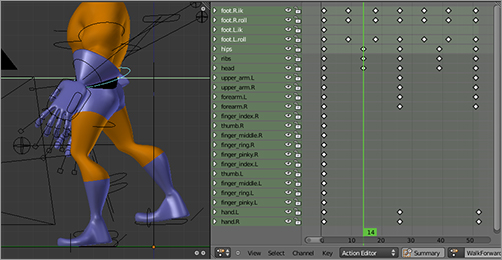
4. Move back to frame 14, where the hips are keyed. The hips need to be brought forward as shown in .
Bringing the hips forward in mid-stride
5. Frames 9 and 18 are where you key the in-between poses for the right foot. In each of these frames, you simply need to bring the foot.ik.R bone forward along the y-axis. shows the pose for frame 9. Do the same thing for frame 18.
The first in-between pose for the right foot
6. From frame 26 on, the right foot should stay planted on the ground. Select the keyframes for this bone subsequent to frame 26, as shown in , and delete them.
Deleting keyframes for the right foot
7. Advance to frame 51. You’ll need to bring the hips bone and the left foot all the way forward from their original frame 1 positions, as shown in . Key these bones in the new positions.
Bringing the hips and left foot forward from the first frame position to the 51st frame position
8. Bring the hips forward for frame 38 and key their position. For frames 34 and 38, you will use the pose clipboard copy and mirrored paste to reverse the opposite foot’s poses from frames 8 and 18, respectively. Paste these poses in reverse onto the left foot, and then move the foot forward appropriately before keying the new position. shows the resulting poses.
Moving both Torso and FootRoot.L

9. Create further strides by first pasting the extreme pose and then moving the hips and noncontact foot forward and keying the noncontact foot and hips. In-between poses should also be created in the same manner, by pasting the pose and then moving the necessary bones forward. Of course, if you continue this walk beyond 51 frames, you will also need to copy the poses of the other bones. You will only ever need to adjust the locations of the hips and the two foot IK bones.