database using the AWS RDS offering.
Reference:
283
Chapter 7 Spring Boot app on aWS eKS
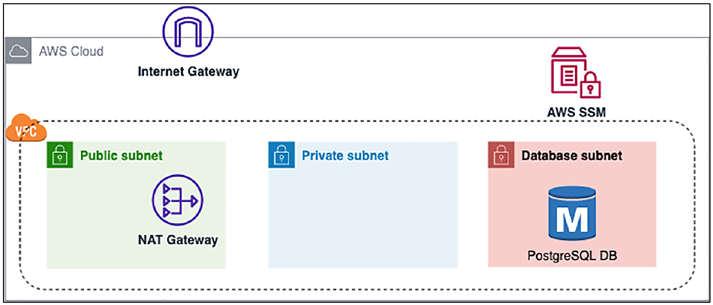
Figure 7-6. PostgreSQL using AWS RDS
The preceding diagram shows the implementation of the code defined
in the pgitops\infra\rds.tf, which is specifying the following:
–
A standalone PostgreSQL database with configurable
versions, size, family, storage, etc., in the database
subnet that was created earlier in the networking
section.
–
The module generates a 16-digit random password for
the database and is stored in the AWS SSM store.
–
The database connection URL is also stored in the AWS
SSM store.
7.4.1 Database Module
Let’s look at the infra/rds.tf file to better understand how our database has been set up.
284
Chapter 7 Spring Boot app on aWS eKS
Code Block 7-11. Defining the RDS database in Terraform
File: pgitops\infra\rds.tf
XXXXXXXXXXXXXXX------SNIPPED-------XXXXXXXXXXXXXXXXXXXXX
39: module "pgsql" {
40:
41: source = "terraform-aws-modules/rds/aws"
42: version = "4.2.0"
43:
44: identifier = " ${module.clustername.
cluster_name}-pgsql"
45: engine = var.db_engine
46: engine_version = var.db_engine_version
47: family = var.db_engine_family
48: major_engine_version = var.db_major_
engine_version
52: storage_encrypted = true
53: db_name = var.db_name
54: username = var.db_user_name
55: create_random_password = true
56: random_password_length = 16
61: vpc_security_group_ids = [module.pgsql_sg_
ingress.id]
70: parameters = [
71: {
72: name = "client_encoding"
73: value = "utf8"
74: }
75: ]
84: }
285
Chapter 7 Spring Boot app on aWS eKS
Note i’ve omitted some fields and focused only on the important
ones for brevity.
L41–42: We are informing terraform to load the module from the
official terraform registry with a fixed version.
L44: Declaring the identifier with the clustername format as discussed
earlier.
L45–48: Specifying the details about the PostgreSQL database, its
version, engine, family, etc.
L55–56: Generating the random password with a length of 16
characters.
L61: Referring to the security group we created in the networking.tf file for PostgreSQL database connectivity. It is necessary to specify the security
group here in order to facilitate database connectivity.
L70–75: Specifying the database configuration parameters.
7.4.2 Database Configuration and Secrets
It is critically important to avoid storage of sensitive information like
database passwords, which is what we’ll understand next to avoid storing
credentials in static files. The following code shows how we can retrieve
the password from terraform configuration and store it in an AWS SSM
Parameter Store as a SecureString.
Code Block 7-12. Storing DB Creds in AWS SSM
File: pgitops\infra\rds.tf
XXXXXXXXXXXXXXX------SNIPPED-------XXXXXXXXXXXXXXXXXXXXX
086: # Write the DB random password in SSM
087: module "ssmw-db-password" {
286
Chapter 7 Spring Boot app on aWS eKS
088: source = "./modules/ssmw"
089: parameter_name = "db_password"
090: parameter_path = "/${var.org_name}/database"
091: parameter_value = module.pgsql.db_instance_
password
092: parameter_description = "DB Password"
093: clustername = module.clustername.cluster_name
094: parameter_type = "SecureString"
095: environment = var.environment
096: }
097:
098: # Write the DB end point URL in SSM
099: module "ssmw-db-endpoint" {
100: source = "./modules/ssmw"
101:
102: parameter_name = "db_endpoint_url"
103: parameter_path = "/${var.org_name}/database"
104: parameter_value = module.pgsql.db_instance_address
105: parameter_description = "Endpoint URL of postgresql"
106: clustername = module.clustername.cluster_name
107: parameter_type = "String"
108: environment = var.environment
109: }
XXXXXXXXXXXXXXX------SNIPPED-------XXXXXXXXXXXXXXXXXXXXX
L87–96: We are extracting the random password created in the
database module referred to as module.pgsql.db_instance_password
and writing it as a SecureString SSM parameter at the path “$org_name/
database/db_password”. SecureString holds the data in an encrypted
format using the default AWS KMS key. We can, however, specify our own
KMS generated key to store the data, enhancing the security.
287
Chapter 7 Spring Boot app on aWS eKS
Note though we are encrypting the string in aWS SSM store, the
value of the password is still stored in the terraform state file in
clear-text format. anyone having access to the state file can derive
the password quite easily. hence, as a defense-in-depth measure, it
is necessary to restrict access to state files. We can, however, avoid
this by first creating the password manually in the aWS SSM store. in
Chapter , we shall explore how we can use aWS Secret Manager to store the password.
L99–109: Similar to storing of the password in the AWS SSM store, we
are storing the database connection URL in the AWS SSM store as well so
that any application wishes to access the database can access it by simply
viewing the SSM path “$org_name/database/db_endpoint_url”.
7.5 Kubernetes
Kubernetes is one of the most popular Container Orchestration products
and is also one of the key components for our GitOps cycle. AWS has an
offering called EKS (Elastic Kubernetes Service), which is a managed
Kubernetes service wherein AWS is responsible for all the control plane
components (etcd, apiserver, scheduler, controller) and the user is
responsible for all the data plane components (worker nodes).
References:
AWS EKS
Kubernetes Components
288
Chapter 7 Spring Boot app on aWS eKS
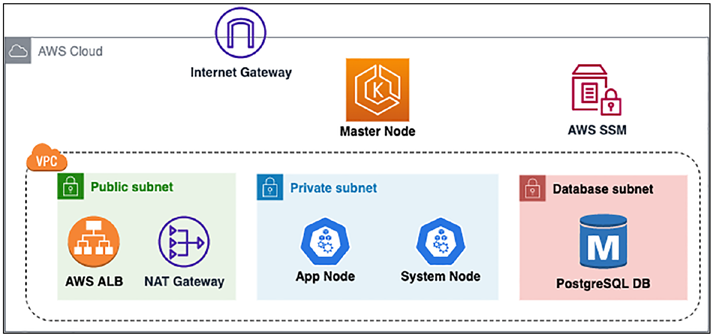
Figure 7-7. AWS EKS architecture
We’ll be setting up a two-node Kubernetes cluster using the code
defined in the pgitops\infra\eks.tf file utilizing the following features:
–
A master node that is totally abstracted from us and
deployed in a separate AWS VPC.
–
Two worker nodes, namely, app and system, both
deployed in the private subnet. The worker nodes are
nothing but EC2 instances with Kubernetes setup
deployed.
–
In terms of EKS, there are two types of worker nodes:
managed and unmanaged. Managed worker nodes are
where AWS takes full control and responsibility to
update and scale up the resources and align the worker
nodes with the master node. In unmanaged, it is our
responsibility to create the nodes, set up Kubernetes
dependencies, scale up/down, and authenticate to the
master node. This is generally achieved by creating EC2
templates.
289
Chapter 7 Spring Boot app on aWS eKS
–
All the network plumbing/communication between the
master node and the worker nodes is done
internally by AWS.
–
Once our EKS cluster is deployed and ready, we then
create an AWS ALB (Application Load Balancer) in the
public subnet, which is used as an ingress controller,
which routes traffic to the ingress services that will be
created in the EKS cluster.
7.5.1 EKS
Let’s look at the infra/eks.tf file to better understand how our EKS cluster has been set up.
Code Block 7-13. EKS server setup in Terraform
File: pgitops\infra\eks.tf
XXXXXXXXXXXXXXX------SNIPPED-------XXXXXXXXXXXXXXXXXXXXX
15: # Main module that creates the master plane components
16: module "eks" {
17: source = "./modules/ekscluster"
18:
19: clustername = module.clustername.cluster_name
20: eks_version = var.eks_version
21: private_subnets = module.networking.private_subnets_id
22: vpc_id = module.networking.vpc_id
23: environment = var.environment
24: instance_types = var.instance_types
25:
26: }
290
Chapter 7 Spring Boot app on aWS eKS
L15–26: Initiates a module that creates the EKS cluster with master
node and two worker nodes. We need to feed in the EKS version, the
private subnet where the worker nodes will be spun up.
7.5.2 EKS Module
Let’s dig in a bit into the module source to find out what’s happening.
Detailed implementation can be found here.
Code Block 7-14. EKS Module definition
File: pgitops\code\infra\modules\ekscluster\main.tf
02: module "eks" {
03: source = "terraform-aws-modules/eks/aws"
04: version = "18.7.0"
05: cluster_name = var.clustername
06: cluster_version = var.eks_version
07: subnet_ids = var.private_subnets
08: vpc_id = var.vpc_id
09: enable_irsa = true
10:
11: cluster_addons = {
12: coredns = {
13: resolve_conflicts = "OVERWRITE"
14: }
15: vpc-cni = {
16: resolve_conflicts = "OVERWRITE"
17: }
18: }
XXXXXXXXXXXXXXX------SNIPPED-------XXXXXXXXXXXXXXXXXXXXX
291
Chapter 7 Spring Boot app on aWS eKS
L03: Refers the module in Terraform registry with a specific version
number. This module provided by Terraform follows the best practices
for setting up a managed/unmanaged EKS cluster and hence is highly
recommended to use. However, there are very frequent changes to the
minor/major versions, so it is also recommended to keep a tab on the
version.
L06–08: Provides input for the specific EKS version, the private
subnets, and the VPC where the EKS cluster needs to be placed.
L09: Enables IRSA (IAM Roles for Service Accounts), using which,
we can provide granular privileges to Kubernetes PODs by aligning their
services accounts to AWS IAM Roles. This is a very important security
feature, which we’ll explore in more detail in the next chapter.
L11–18: Here, we can specify installation/configuration of Kubernetes
add-ons. List of all add-ons supported by AWS EKS off the shelf
.
7.5.3 EKS Worker Nodes
One important aspect about EKS is that AWS creates only the master node
or the control plane component of Kubernetes. The worker nodes needed
to be created by us. The module that we are using allows us to specify the
worker node groups that need to be created within which multiple worker
nodes can be created as per the scaling configuration.
Let’s look at how we are setting up the Managed worker node groups as
shown here.
Code Block 7-15. EKS Managed Node groups
File: pgitops\code\infra\modules\ekscluster\main.tf
XXXXXXXXXXXXXXX------SNIPPED-------XXXXXXXXXXXXXXXXXXXXX
59: eks_managed_node_groups = {
60:
292
Chapter 7 Spring Boot app on aWS eKS
61: system = {
62: name = "system"
63: use_name_prefix = true
64:
65: tags = {
66: Name = "system"
67: Environment = var.environment
68: terraform-managed = "true"
69: }
70: },
71: app = {
72: name = "app"
73: use_name_prefix = true
74:
75: tags = {
76: Name = "app"
77: Environment = var.environment
78: terraform-managed = "true"
79: }
80: }
81: }
82:
XXXXXXXXXXXXXXX------SNIPPED-------XXXXXXXXXXXXXXXXXXXXX
L61–81: Declaring the nodes with appropriate tags. Using “user_
name_prefix” helps in better identification of the nodes.
293
Chapter 7 Spring Boot app on aWS eKS
Code Block 7-16. EKS Managed Node Groups default settings
File: pgitops\code\infra\modules\ekscluster\main.tf
XXXXXXXXXXXXXXX------SNIPPED-------XXXXXXXXXXXXXXXXXXXXX
44: eks_managed_node_group_defaults = {
45: ami_type = "AL2_x86_64"
46: disk_size = 50
47: ebs_optimized = true
48: enable_monitoring = true
49: instance_types = var.instance_types
50: capacity_type = "ON_DEMAND"
51: desired_size = 1
52: max_size = 3
53: min_size = 1
54: update_config = {
55: max_unavailable_percentage = 50
56: }
57: }
XXXXXXXXXXXXXXX------SNIPPED-------XXXXXXXXXXXXXXXXXXXXX
L44–57: We are declaring some common properties of each worker
node. Each of these properties can be overridden when we are exclusively
defining the node groups on L59–81.
We are defining the following:
–
L45 – AMI Type, which is the default AMI for
Kubernetes resources
–
L46 – Specifying the EBS Disk Size that will be attached
to the EC2 instance to be 50 GB
–
L48 – Enabled monitoring
294
Chapter 7 Spring Boot app on aWS eKS
–
L49 – Specifying the instance type of the EC2
–
L51–53 – Specifying the scaling sizes
–
L54–56 – Specifying at least 50% availability while
scaling up/down
7.5.4 EKS Security Groups
The next section of this EKS Module defines the security groups needed for
operational purposes.
Code Block 7-17. EKS Security Groups definitions
File: pgitops\code\infra\modules\ekscluster\main.tf
XXXXXXXXXXXXXXX------SNIPPED-------XXXXXXXXXXXXXXXXXXXXX
21: node_security_group_additional_rules = {
22:
23: ingress_allow_access_from_control_plane = {
24: type = "ingress"
25: protocol = "tcp"
26: from_port = 9443
27: to_port = 9443
28: source_cluster_security_group = true
29: description = "Allow access from
control plane to
webhook port of
AWS load balancer
controller"
30: }
31:
32: egress_all = {
295
Chapter 7 Spring Boot app on aWS eKS
33: description = "Node all egress"
34: protocol = "-1"
35: from_port = 0
36: to_port = 0
37: type = "egress"
38: cidr_blocks = ["0.0.0.0/0"]
39: ipv6_cidr_blocks = ["::/0"]
40: }
41: }
XXXXXXXXXXXXXXX------SNIPPED-------XXXXXXXXXXXXXXXXXXXXX
The EKS Module provided by Terraform as mentioned earlier follows
the best practices; hence, in terms of accessibility, it’s quite locked down.
We need to specify security groups in order to facilitate communication
between master node and worker nodes, which is by default limited and
locked down to certain ports only like communication between the API
server and kubelet over port 10250, etc. These security groups are what we
need to define in the preceding section.
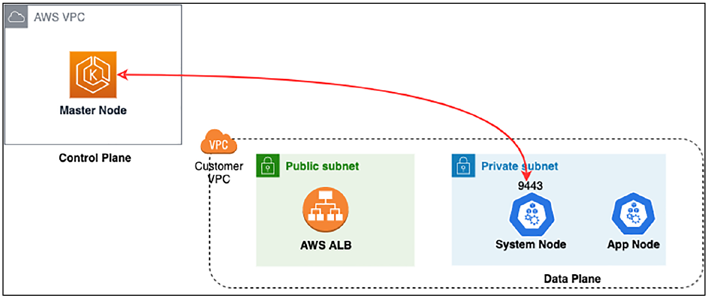
Figure 7-8. EKS Security Groups visualization
296
Chapter 7 Spring Boot app on aWS eKS
L23–30: Here, we are defining the security group that allows access
from the master node (AWS EKS Control Plane) in an AWS Managed VPC
to the worker nodes (EKS Data Plane) on port 9443. What’s running on
port 9443 is something we’ll see in the next subsection.
L32–41: Since the worker nodes are created in the private subnet,
they do not have access to the Internet. Hence, it’s necessary to set up this
default egress group to allow the worker nodes to access the Internet to
download docker images or perform DNS lookups. The protocol with a
value of “-1” indicates TCP/UDP to facilitate DNS lookups.
7.5.5 EKS Ingress Controller
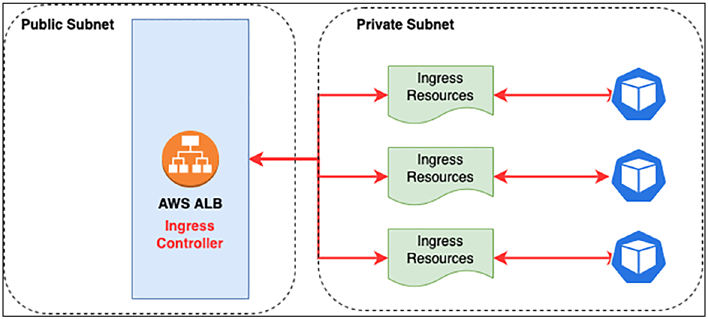
In Kubernetes, ingress controllers and ingress resources help in shaping
up the entire traffic between the client and the individual pods. Ingress
controllers are like the load balancers, and ingress resources are the small
configuration pieces of that load balancer that help in modularizing
the various different configurations that are needed to facilitate the
communication to the respective pods. The same has been illustrated in
the following diagram.
Figure 7-9. Connectivity between AWS ALB and EKS Ingress
Resources
297
Chapter 7 Spring Boot app on aWS eKS
In order to set up an ingress controller, we need to create a Kubernetes
deployment resource of the specific controller that we need to set up. This
deployment resource serves as a load balancer controller, which is then
used to set up an actual Application Load Balancer in the public subnet
using the following code.
This deployment is exposed on port 9443, which is consumed by
the Kubernetes API server (master node/control plane) to supervise
the creation of the application load balancer. Hence, we need to ensure
that a security group exists with port 9443 between the master node and
the worker nodes, which was discussed in the earlier section (refer to
Figur
Code Block 7-18. Setting up AWS ALB ingress controller
File: pgitops\infra\eks.tf
XXXXXXXXXXXXXXX------SNIPPED-------XXXXXXXXXXXXXXXXXXXXX
28: # Module that creates the Application Load Balancer for use
as an Ingress Controller
29: module "alb_ingress" {
30: source = "./modules/alb"
31:
32: clustername = module.clustername.cluster_name
33: oidc_url = module.eks.cluster_oidc_issuer_url
34: oidc_arn = module.eks.oidc_provider_arn
35: awslb_version = "1.4.1"
36: environment = var.environment
37:
38: depends_on = [module.eks, module.networking]
39: }
XXXXXXXXXXXXXXX------SNIPPED-------XXXXXXXXXXXXXXXXXXXXX
298
Chapter 7 Spring Boot app on aWS eKS
L29-39: Sets up an AWS Load balancer controller deployment by
providing the OIDC and the Load Balancer controller helm chart version.
Note We’ll be exploring oiDC (openiD Connect) and irSa (iaM roles
for Service accounts) in more detail in Cha.
7.6 DNS
7.6.1 Route53 Record Creation
Once the load balancer controller is created, a separate load balancer for
each individual ingress resource with a DNS name taking the format as
< ingress-name>-<account-id>.<region>.elb.amazonaws.com, for example, my-ingress-1234567890.us-west-2.elb.amazonaws.com. We can access our
application by following this path; however, it's not something feasible to
remember. Hence, we need to map this DNS name to our custom DNS,
which is done by the following piece of code.
Code Block 7-19. Creating the Route53 Record and inserting ALB
hostname
File: pgitops\infra\dns.tf
XXXXXXXXXXXXXXX------SNIPPED-------XXXXXXXXXXXXXXXXXXXXX
20: # Fetch the Zone ID of the hosted domains
21: data "aws_route53_zone" "domain" {
22: name = "${var.domain}."
23:
24: }
XXXXXXXXXXXXXXX------SNIPPED-------XXXXXXXXXXXXXXXXXXXXX
299
Chapter 7 Spring Boot app on aWS eKS
38: # Fetching the ZoneID for ELB
39: data "aws_elb_hosted_zone_id" "main" {}
40:
41: # Mapping The Ingress controller hostname with DNS Record
42: resource "aws_route53_record" "app" {
43: zone_id = data.aws_route53_zone.domain.zone_id
44: name = local.url
45: type = "A"
46:
47: alias {
48: name = kubernetes_ingress_
v1.app.status.0.load_
balancer.0.ingress.0.hostname
49: zone_id = data.aws_elb_hosted_zone_
id.main.id
50: evaluate_target_health = true
51: }
52:
53: depends_on = [module.alb_ingress, kubernetes_
ingress_v1.app]
54:
55: }
L20–24: We are fetching the zone ID of the Route53 zone, which we
had created in the beginning by executing the aws route53 command. We
are querying it using the domain name that we’ll be using.
L39: Since every load balancer has a public DNS name as mentioned
previously, it also has a specific zone ID where it is deployed, which is
managed by AWS. We are simply querying that zone ID.
L43: Creating the DNS record in the Route53 zone that we created
earlier.
300
Chapter 7 Spring Boot app on aWS eKS
L47–51: The record that we need to create is an Alias record, which is recommended by AWS for setting up DNS records for Load Balancers. On
L48, we are fetching the hostname of the ingress resource that is created.
The value of the variable local.url will be used to map the ingress DNS
hostname. How the value of local.url is derived is explained in the next
section.
Tip this might sound astonishing but yes, aWS Load Balancer
Controller deployment will set up a separate aWS Load Balancer. So if
we have three ingress resources, we’ll see three different aWS Load
Balancers. this can be avoided using the ingress group annotation
when defining ingress resources that groups different ingress
resources as one. this will be discussed in more detail in Chapter
where we need to set up two ingress resources.
References:
Kubernetes Ingress Resource Annotations for AWS ALB
7.6.2 Multi-environment DNS
We need to keep our code DRY (Don’t Repeat Yourself) and at the same
time have it running in multiple environments. While other things can
remain the same across different environments, the domain name cannot
remain the same; hence, the following code sets up the layout where
depending on the environment, the value of the variable local.url will
change dynamically.
301
Chapter 7 Spring Boot app on aWS eKS
Code Block 7-20. Dynamically configuring App URL as per the
environment
File: pgitops\infra\dns.tf
01: // Pseudo Code
02: // if(environment==staging){
03: // url = staging.gitops.rohitsalecha. com
04: // }elseif(environment==prod){
05: // url = gitops.rohitsalecha. com
06: // }elseif(environment==dev){
07: // url = dev.gitops.rohitsalecha. com
08: // }
09:
10: locals {
11:
12: staging_url = var.environment == "staging" ?
"staging.${var.domain}" : ""
13: prod_url = var.environment == "prod" ? "${var.
domain}" : ""
14: dev_url = var.environment == "dev" ? "dev.${var.
domain}" : ""
15:
16: url = coalesce(local.staging_url, local.prod_url, local.
dev_url)
17:
18: }
XXXXXXXXXXXXXXX------SNIPPED-------XXXXXXXXXXXXXXXXXXXXX
L01–08: Is the Pseudo Code explanation of the multi-environment
problem that we are solving.
302
Chapter 7 Spring Boot app on aWS eKS
L10–18: Since terraform doesn’t provide syntaxes like if..else, etc., we
make use of the coalesce function, which accepts only a non-null value. So if the environment is staging, the variable staging_url will be non-null, but the other variables will be null. Hence, the final value of the url variables takes the value stored in staging_url.
This is a small hackety solution to simulate the if..else statement
behavior.
7.6.3 ACM
Now that we’ve mapped a custom domain for the load balancer hostname
(ingress resource hostname), we should also ensure that the application
is accessible over an HTTPS communication and not on clear-text
HTTP. This can be achieved by utilizing the following code, which
generates a public SSL certificate for a given domain specified by the local.
url variable and the Route53 Zone ID. The Route53 Zone ID is required
here because custom. What this essentially does is that it creates an ACM
certificate on top of an ELB (Elastic Load Balancer).
Code Block 7-21. Generating an HTTPS certificate using AWS ACM
File: pgitops\infra\dns.tf
XXXXXXXXXXXXXXX------SNIPPED-------XXXXXXXXXXXXXXXXXXXXX
26: # Generate Certificate for the particular domain
27: module "acm" {
28: source = "./modules/acm"
29:
30: zone_id = data.aws_route53_zone.domain.zone_id
31: domain = local.url
32: environment = var.environment
33:
303
Chapter 7 Spring Boot app on aWS eKS
34: depends_on = [module.alb_ingress]
35:
36: }
XXXXXXXXXXXXXXX------SNIPPED-------XXXXXXXXXXXXXXXXXXXXX
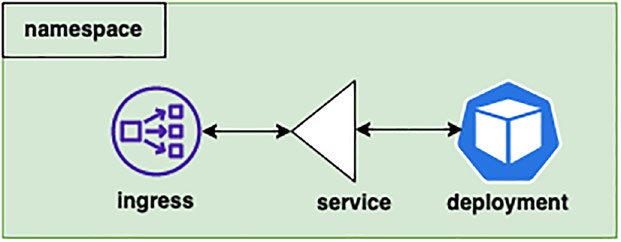
7.7 Application
Figure 7-10. Relationship between Kubernetes ingress, service, and
deployment
Our application is deployed in the EKS and has the following components:
–
A specific namespace is created where all the components
like the ingress, service, and deployment will be created.
–
A deployment resource is created, which holds the
Kubernetes pod.
–
The Deployment is exposed to the Kubernetes network
through a Service configured as “NodePort”.
–
The Service is exposed to the external (Internet)
network through the ingress resource.
–
Each ingress resource created creates a unique load
balancer.
304
Chapter 7 Spring Boot app on aWS eKS
7.7.1 Namespace
Let’s look at how each of the components is described in pgitops\
infra\app.tf.
Code Block 7-22. Creating a Kubernetes namespace using
Terraform
File: pgitops\infra\app.tf
03: resource "kubernetes_namespace_v1" "app" {
04: metadata {
05: annotations = {
06: name = var.org_name
07: }
08: name = var.org_name
09: }
10: depends_on = [module.eks]
11: }
XXXXXXXXXXXXXXX------SNIPPED-------XXXXXXXXXXXXXXXXXXXXX
L03–11: We are declaring a Kubernetes namespace using a terraform
declaration syntax. We specify the annotation and the name of the
namespace using a variable var.org_name, which is specified in the
terraform.auto.tfvars file.
Just to draw some comparison, the following is the manifest file that
performs the same action in YAML format that would be executed using
the kubectl utility provided by Kubernetes.
Code Block 7-23. Creating a Kubernetes namespace using YAML
apiVersion: v1
kind: Namespace
metadata:
305
Chapter 7 Spring Boot app on aWS eKS
name: "gitops"
labels:
name: "gitops"
7.7.2 Deployment
Before we discuss the Kubernetes deployment resource, there is an
important prerequisite without which our deployment would not execute.
This important prerequisite is nothing but our PostgreSQL database
password that was stored in the AWS SSM store. The same is retrievable
using the following code snippet, which reads the value specified at
the path.
Code Block 7-24. Reading a database password from AWS SSM
File: pgitops\infra\app.tf
XXXXXXXXXXXXXXX------SNIPPED-------XXXXXXXXXXXXXXXXXXXXX
16: module "ssmr-db-password" {
17: source = "./modules/ssmr"
18:
19: parameter_name = "db_password"
20: parameter_path = "/${var.org_name}/database"
21:
22: depends_on = [module.ssmw-db-password]
23: }
XXXXXXXXXXXXXXX------SNIPPED-------XXXXXXXXXXXXXXXXXXXXX
The value for the AWS SSM can be retrieved using the following syntax:
“module.ssmr-db-password.ssm-value”, as we’ll see being used in the
Kubernetes deployment specification next.
306
Chapter 7 Spring Boot app on aWS eKS
Code Block 7-25. Kubernetes deployment
File: pgitops\infra\app.tf
25: resource "kubernetes_deployment_v1" "app" {
26: metadata {
27: name = var.org_name
28: namespace = kubernetes_namespace_v1.app.metadata.0.name
29: labels = {
30: app = var.org_name
31: }
32: }
XXXXXXXXXXXXXXX------SNIPPED-------XXXXXXXXXXXXXXXXXXXXX
50: spec {
051: container {
052: image = "salecharohit/practicalgitops"
053: name = var.org_name
054: env {
055: name = "DB_PORT"
056: value = "5432"
057: }
058: env {
059: name = "DB_HOST"
060: value = module.pgsql.db_instance_address
061: }
062: env {
063: name = "DB_NAME"
064: value = var.db_name
065: }
066: env {
067: name = "DB_USERNAME"
068: value = var.db_user_name
069: }
307
Chapter 7 Spring Boot app on aWS eKS
070: env {
071: name = "DB_PASSWORD"
072: value = module.ssmr-db-password.ssm-value
073: }
074:
75: port {
76: container_port = "8080"
77: protocol = "TCP"
78: }
XXXXXXXXXXXXXXX------SNIPPED-------XXXXXXXXXXXXXXXXXXXXX
L28: Here, we are explicitly referencing the namespace that we created
earlier using the terraform reference syntax. This ensures an implicit
dependency in a way that first the namespace will be created and then the
deployment. Hence, it is extremely important to add this line as we want
this dependency to be maintained.
L52: Specifying the container image for the deployment pod
specification. This image is currently stored in DockerHub; however, you
can store it in any container registry accessible by your EKS Node.
Note For the purpose of this book, i’ve used Dockerhub, but
yes using an eCr would be highly recommended especially when
working in a complete aWS environment as you get much lesser
latency while downloading the images and also capability to scan the
docker images for security vulnerabilities.
L54–73: Specifying the database environment variables like the
database port, hostname, name, username, and finally the password. The
password field is being populated dynamically from the AWS SSM read
module as specified earlier. Hence, no manual intervention of entering
password is now required.
308
Chapter 7 Spring Boot app on aWS eKS
L75–78: We are specifying the container port on which our pod will be
exposed, that is, port 8080.
7.7.3 NodePort Service
In Kubernetes, it is a best practice to expose a Deployment/Pod through a
service to the internal network. Hence, we’ve created a Kubernetes service
as shown in the following within the same namespace as the Deployment
and exposed it over port 8080.
Code Block 7-26. Kubernetes service
File: pgitops\infra\app.tf
XXXXXXXXXXXXXXX------SNIPPED-------XXXXXXXXXXXXXXXXXXXXX
106: resource "kubernetes_service" "app" {
107: metadata {
108: name = var.org_name
109: namespace = kubernetes_namespace_v1.app.
metadata.0. name
110: }
111: spec {
112: port {
113: port = 8080
114: target_port = 8080
115: }
116: selector = {
117: app = var.org_name
118: }
119: type = "NodePort"
120: }
309
Chapter 7 Spring Boot app on aWS eKS
121: depends_on = [kubernetes_deployment_v1.app]
122: }
XXXXXXXXXXXXXXX------SNIPPED-------XXXXXXXXXXXXXXXXXXXXX
L116–118: The service connects the Deployment pods over port 8080
using the selector label app.
7.7.4 Ingress
The following code is used to create a Kubernetes ingress resource with all
the specific annotations described here.
Code Block 7-27. Creating a Kubernetes ingress resource
File: pgitops\infra\app.tf
XXXXXXXXXXXXXXX------SNIPPED-------XXXXXXXXXXXXXXXXXXXXX
124: resource "kubernetes_ingress_v1" "app" {
125: wait_for_load_balancer = true
126: metadata {
127: name = var.org_name
128: namespace = kubernetes_namespace_v1.app.
metadata.0. name
129: annotations = {
130: "kubernetes.io/ingress.class" = "alb"
131: "alb.ingress.kubernetes.io/scheme" =
"internet-facing"
132: "alb.ingress.kubernetes.io/target-type" = "ip"
133: "alb.ingress.kubernetes.io/certificate-arn" =
module.acm.acm_arn
134: "alb.ingress.kubernetes.io/listen-ports" =
"[{\"HTTP\": 80}, {\"HTTPS\":443}]"
135: }
310
Chapter 7 Spring Boot app on aWS eKS
136: }
137: spec {
138: rule {
139: host = local.url
140: http {
141: path {
142: backend {
143: service {
144: name = var.org_name
145: port {
146: number = 8080
147: }
148: }
149: }
150: path = "/*"
151: }
152:
153: }
154: }
155: depends_on = [module.alb_ingress, kubernetes_
ingress_v1.app]
156: }
XXXXXXXXXXXXXXX------SNIPPED-------XXXXXXXXXXXXXXXXXXXXX
L129–134: We are defining the annotations that govern the complete
operation of the ingress resource.
–
L130: We are defining the ingress class as “alb” since we
are using the AWS ALB as the ingress controller
deployed earlier in the EKS section. Each ingress
resource will hence communicate with the ingress
controller deployment in EKS to spin up a fresh new
Load Balancer.
311
Chapter 7 Spring Boot app on aWS eKS
–
L131: There are two schemes: Internet facing and
internal. By configuring our ingress resource as Internet
facing, it automatically gets added in the public subnet
by querying for the particular tag. These are the same
tags we configured in Section 7.3 if you recall.
–
L132: The target type we are defining as IP based as we
are configuring the service as NodePort type.
–
L133: We are configuring the SSL certificate in the
ingress resource generated by the AWS ACM module.
Since the ingress resource is spinning up a unique ALB,
it is important to configure the SSL certificate here as
SSL offloading will happen at this point.
–
L134: Configuring the ports on which the AWS ALB will
be listening on to the external Internet. If we are
specifying 443 as a port, it is mandatory to have an AWS
ACM ARN, which we are providing on L133.
–
L155: Here, we are explicitly declaring the dependency
on the AWS ALB ingress controller deployment module
as it needs to be created prior to the ingress resource.
As stated earlier, this dependency is critical because the
ingress resource communicates with the ingress
controller deployment to spin up an AWS Application
Load Balancer.
–
L125: This line is of critical importance as our Route53
record creation as discussed in the DNS module
depends on the Application Load Balancer hostname,
which in turn depends on the ingress resource.
However, the ALB will take time to start up and have a
312
Chapter 7 Spring Boot app on aWS eKS
hostname assigned to it. Hence, this line performs
regular checks on whether the load balancer has been
set up or not and will wait before moving the execution
to other modules.
7.7.5 Kubernetes Provider
I discussed terraform providers in Section 3.2 where these providers are
nothing but plugins for different cloud and cloud-native environments.
Similar to how we’ve got for AWS, we are declaring a provider for
Kubernetes and Helm in pgitops/infra/kubernetes.tf as shown here.
Code Block 7-28. Defining a Kubernetes provider
File: pgitops\infra\kubernetes.tf
03: provider "kubernetes" {
04: host = module.eks.cluster_endpoint
05: cluster_ca_certificate = base64decode(module.eks.cluster_
certificate_authority_data)
06: exec {
07: api_version = "client.authentication.k8s.io/v1alpha1"
08: command = "aws"
09: args = [
10: "eks",
11: "get-token",
12: "--cluster-name",
13: module.eks.cluster_id
14: ]
15: }
16: }
XXXXXXXXXXXXXXX------SNIPPED-------XXXXXXXXXXXXXXXXXXXXX
313
Chapter 7 Spring Boot app on aWS eKS
Reference: Kubernetes Provider for Terraform Documentation
(
L04–05: Every provider needs authentication information in order
to perform the requested operations. For AWS, we are supplying the
AWS Access Key and ID using environment variables. However, for the
Kubernetes provider, we need the hostname of the Kubernetes cluster
and the CA certificate that is used for generating the authentication token
for the Kubernetes API. These details are obtained from the EKS Module
defined in the pgitops/infra/eks.tf file and are fetched once the EKS
Module has been set up.
L06–13: This Kubernetes provider directly interacts with the
Kubernetes API over HTTPS.
Once we have the hostname and the Cluster CA certificate, Terraform
needs to obtain the Kubernetes API token in order to authenticate to
the Kubernetes API. This authentication is performed using the aws
command, that is, aws eks get-token –cluster-name $cluster-id, where
$cluster-id is nothing but the cluster name created using the EKS Module.
This provider (Kubernetes and Helm) will be kicked into action
whenever we need to deploy any resource within Kubernetes. If we do not
define this provider, we won’t be able to deploy/create any Kubernetes
resource, not even a simple namespace. Hence, this provider is needed
purely for all Kubernetes operations.
7.7.6 Variables
Last, but one of the most important configurations, is setting the variable
values defined in pgitops/infra/terraform.auto.tfvars. We can keep all the variable values as is except for the following two.
314
Chapter 7 Spring Boot app on aWS eKS
Code Block 7-29. Defining Kubernetes variables
File: pgitops\infra\kubernetes.tf
XXXXXXXXXXXXXXX------SNIPPED-------XXXXXXXXXXXXXXXXXXXXX
40: org_name = "gitops"
41: domain = "change.me.please"
L40–41: Kindly replace the following values before attempting to
execute the code. Your domain should be the one which you’ve set as per
the DNS configurations in Section 7.1.
Note the value that i’ve set for myself is gitops.rohitsalecha.com, which is what you’ll see throughout this book.
7.7.7 Default Environment
By default, the environment that has been configured is the dev
environment and the region as us-east-1 as is evident from the following
file. This is done because the developers need to independently test their
code from their local systems before pushing the changes into staging.
Hence, they can see their changes live and test it out.
While for the prod and staging environments, we need to configure
these two variables in Terraform Cloud as explained in the previous
chapter.
Code Block 7-30. Defining the default environment for Kubernetes
File: pgitops\infra\kubernetes.tf
04: variable "environment" {
05: description = "The Deployment environment"
315
Chapter 7 Spring Boot app on aWS eKS
06: type = string
07: default = "dev"
08: }
XXXXXXXXXXXXXXX------SNIPPED-------XXXXXXXXXXXXXXXXXXXXX
15: variable "region" {
16: description = "AWS region"
17: type = string
18: default = "us-east-1"
19: }
7.8 Execution
Now that we’ve a good understanding of the different infrastructure
items that we are going to spin up, let’s go ahead and start the entire
infrastructure.
Note prior to running terraform, it’s necessary to set up the
route53 hosted Zone as discussed in DnS configuration in
the prerequisites section of this chapter. i currently have my
route53 hosted Zone set up with the domain name as dev.gitops.
rohitsalecha.com.
7.8.1 Setting Up the EKS Cluster
Fire the following commands to get started; ensure you’ve got your AWS
credentials configured in the CLI as well.
316
Chapter 7 Spring Boot app on aWS eKS
CLI Output 7-31. Executing new infra
export AWS_PROFILE=gitops
cd pgitops/infra
terraform init
terraform apply -auto-approve
Terraform apply should take about close to ~15 minutes to complete.
Once done, simply browse to the development domain name as by default
for developers, application is hosted on dev.$domain_name as configured
in the pgitops/infra/dns.tf.
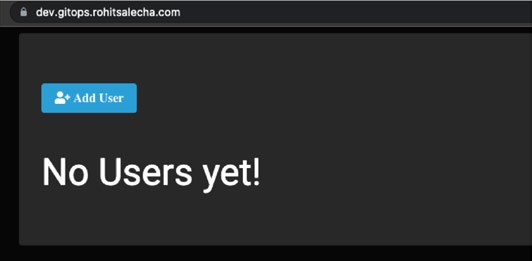
The following screenshot shows that our application is now up and
running.
Figure 7-11. Development environment up and running
Viewing all the users.
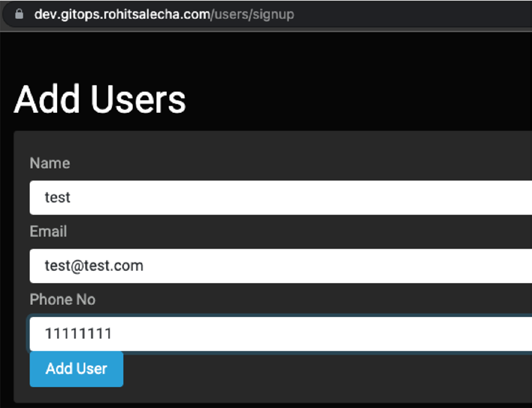
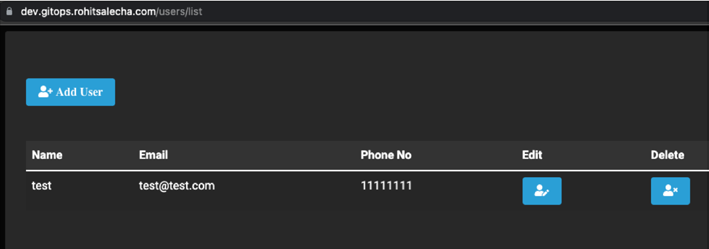
Let’s add a test user to check if everything is working fine.
317
Chapter 7 Spring Boot app on aWS eKS
Figure 7-12. User Adding screen
Figure 7-13. List of users added
7.8.2 Accessing the EKS Cluster
Now that our application is up and running let’s check how our Kubernetes
environment has been configured by accessing it using the kubectl utility.
318
Chapter 7 Spring Boot app on aWS eKS
AWS CLI has a very useful command to setup the Kubeconfig file
which the kubectl utility needs in order to authenticate to the Kubernetes
cluster. The command is
aws eks --region $REGION update-kubeconfig --name $CLUSTER
So, let’s execute this command and then explore the Kubernetes
cluster.
CLI Output 7-32. Accessing the Kubernetes development
environment
cmd> EXPORT AWS_PROFILE=gitops
cmd> aws eks --region us-east-1 update-kubeconfig -- name
gitops-us-east-1-dev
Added new context arn:aws:eks:us-east-1:147611229030:cluster/
gitops-us-east-1-dev to /Users/rohitsalecha/.kube/config
cmd> kubectl get nodes
NAME STATUS ROLES AGE
VERSION
ip-10-0-11-206.ec2.internal Ready <none> 6m
v1.20.11-eks-f17b81
ip-10-0-11-63.ec2.internal Ready <none> 6m11s
v1.20.11-eks-f17b81
cmd> kubectl get all -n gitops
NAME READY STATUS RESTARTS AGE
pod/gitops-795f75dd58-zmkv2 1/1 Running 0 3m1s
NAME TYPE CLUSTER-IP EXTERNAL- IP
PORT(S) AGE
service/gitops NodePort 172.20.192.96 <none>
8080:30307/TCP 2m50s
319
Chapter 7 Spring Boot app on aWS eKS
NAME READY UP- TO-DATE AVAILABLE AGE
deployment.apps/gitops 1/1 1 1 3m4s
NAME DESIRED CURRENT READY AGE
replicaset.apps/gitops- 795f75dd58 1 1 1 3m4s
7.9 Clean-Up
Since our use case is done, let’s destroy the environment using the
following commands. It should take approximately ten minutes to destroy
the entire environment.
CLI Output 7-33. Destroying the Kubernetes environment
cmd> export AWS_PROFILE=gitops
cmd> terraform destroy -- auto-approve
Note at any point, if terraform is unable to destroy, please check
annexure a where steps have been presented to delete the resources
manually.
7.10 Conclusion
In this chapter, we saw the different components we are spinning up
using Terraform and that other than setting the Route53 Zone manually,
everything else was completely automated.
However, we did not explore the GitOps workflow here; we did not
deploy this code in the staging and then in the production environment,
which this book is all about. The major reason to do that is that we haven’t
320
Chapter 7 Spring Boot app on aWS eKS
yet created separate AWS accounts for staging/production/development,
which is what we’ll explore in the next chapter. We’ll be creating
separate accounts and also creating users with different privileges and
authorization roles not just for accessing AWS but also for Kubernetes!
From the next chapter onward, we’ll start improving this code, and
as a first step, we’ll work on implementing a proper authentication and
authorization in the entire infrastructure including AWS + Kubernetes in
the next chapter.
321
CHAPTER 8
Authentication and
Authorization
In this chapter, we’ll look at how to create AWS accounts using AWS
organizations for different environments and use cases using Terraform.
We’ll create four different AWS accounts, which will be aligned with three
different organization units or OUs. Each account is being created for
specific use cases, which will be discussed in this chapter. We’ll also look
at how we can create Route53 Zones for each of the operational accounts
for better segregation of DNS records. However, this time around, we’ll
be doing completely through Terraform, and no manual intervention
will be required. Lastly, we’ll create IAM Users and IAM Roles with set
permissions to interact with different AWS accounts and also do mapping
of AWS IAM Roles with Kubernetes Groups to provide a seamless
authentication and authorization through code!
8.1 Prerequisites
In addition to all the previous requirements, we’ll need the following:
– GNU PG Utility to generate public/private keys.
– Please download and install for your respective OS
using the following link:
© Rohit Salecha 2023
323
R. Salecha, Practical GitOps,
ChApter 8 AuthentICAtIon And AuthorIzAtIon
– AWS account that we’ll be using here should not have
AWS organization setup previously, that is, the Root AWS
organization account should not be created.
Ensure that you have the following before getting started:
– The pgitops directory created in Chapter
– Access to the DNS console of your top-level domain or
sub-domain as we’ll be adding a few more NS records
– Terraform Cloud configured with prod and staging
workspaces
8.1.1 Code Update
Before diving into the code, let’s first ensure that we’ve updated the
pgitops directory with the code from Chapter folder. To do this, follow the following steps:
– First, copy contents of Chapter folder into the pgitops folder.
– Get inside the pgitops directory and then check which
files/folders are changing.
– Commit changes into the repository; however, while
committing, ensure to have the “[skip ci]” added in the
commit as shown in the following as I don't intend to
execute the actions yet as the code is still incomplete:
Tip Github Actions execute whenever there is a new commit in the
branch. If we wish to skip the execution for a specific commit, we can
simply add [skip ci] verbatim in the commit message.
324
ChApter 8 AuthentICAtIon And AuthorIzAtIon
cmd> cp -a chapter8/. pgitops/
cmd> cd pgitops
cmd> git status
On branch main
Your branch is up to date with 'origin/main'.
Changes not staged for commit:
(use "git add <file>..." to update what will be committed)
(use "git restore <file>..." to discard changes in working
directory)
modified: README.md
modified: infra/README.md
modified: infra/app.tf
modified: infra/dns.tf
modified: infra/kubernetes.tf
modified: infra/providers.tf
modified: infra/terraform.auto.tfvars
modified: infra/variables.tf
Untracked files:
(use "git add <file>..." to include in what will be
committed)
.github/workflows/global.yaml
global/
infra/rolebindings.tf
no changes added to commit (use "git add" and/or "git
commit -a")
cmd> git add .
# Please ensure to add [skip ci] in the commit message.
cmd> git commit -m "chapter 8 commit [skip ci]"
cmd> git push
325
ChApter 8 AuthentICAtIon And AuthorIzAtIon
the changes can be summarized as follows:
– Added a new folder called “global,” which contains all the
code related to creating AWS organizations, Route53
Zones, and IAM User/Roles. So basically, we’ll be having
terraform files in two folders (i.e., infra and global).
– Added a new workflow file called global.yaml to have a
proper Git workflow just like staging/production changes
– Added a new file called rolebindings.tf under the infra
folder, which does mapping of Kubernetes groups with
IAM roles in the AWS ConfigMap.
– Rest all files under the infra folder have been modified as
per the changes done with the global folder.
Each change/addition will be discussed in detail in this chapter.
8.2 AWS Organizations
AWS organizations is a service provided by AWS where we can create and
centrally administer/manage multiple different accounts that are created
for a specific purpose. There are two primary concepts that need to be
understood in AWS organizations, and they are root account/management
account and member accounts with OUs or organization units. Let’s
understand in more detail.
326
ChApter 8 AuthentICAtIon And AuthorIzAtIon
8.2.1 Root Account
Root account as the name suggests is the main account that we signed up
with. It is also called the management account as it has full control over
the billing and cloud deployments. As of now, I am accessing everything
through the Root account, and our current authentication framework
is extremely risky from a security and scalability perspective. Let’s
understand our current design and call out the drawbacks/limitations of it.
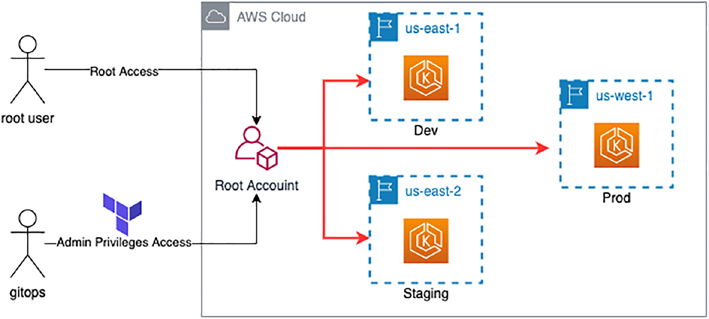
The previous diagram provides a glimpse into the operating model that
we have currently:
– Using the root user, I created an AWS account, which is
also known as the “root account” or the “Management
account.”
– I then created another user called “gitops” and provided
Administrator privileges.
– I then accessed the AWS Console using the “gitops” user
credentials to download the AWS Access Keys and AWS
Access ID.
327
ChApter 8 AuthentICAtIon And AuthorIzAtIon
– This set of AWS Access Keys and Access ID was then used
to configure the Terraform environment to spin up the
Dev/staging and prod environments.
Limitations/drawbacks of the previous architecture are as follows:
– Currently if we need to create new users, then everyone
will need to access the root account with certain pre-
defined privileges.
– Segregating environments in different regions is definitely
not a good idea as anyone who has access to the root
account with Admin privileges can easily gain access to
all the environments.
– From a billing perspective as well, it becomes extremely
difficult to create bill reports per region.
– Developers will be limited by the number of regions they
can use to perform their checks/tests.
These are just a few reasons; however, if we attempt to align with AWS
Best Practices, then it would almost fill two pages or maybe more.
8.2.2 Member Accounts and OUs
Member accounts and Organizational Units are created to have a proper
segregation of duties and responsibilities for the various different accounts
an Organization may have. These accounts can inherit the organizational
structure (but not limited to it) that a typical organization has like having
segregated departments like Finance, Marketing, Engineering, etc. Since
all these departments function separately, it’s best that their operations are
very well segregated. This is where AWS organizations can be utilized to its
fullest extent by helping to design and implement the operational aspects
of running an entire organization while at the same time having full control
over every small aspect of it.
328
ChApter 8 AuthentICAtIon And AuthorIzAtIon
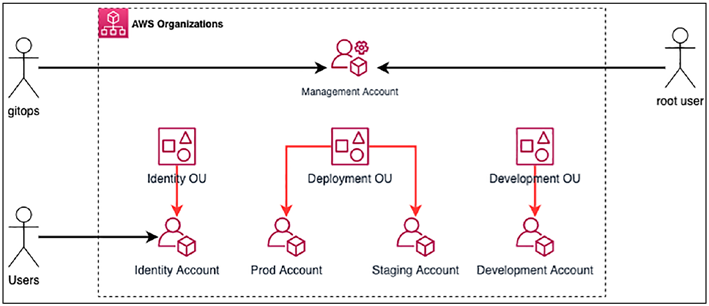
Figure 8-1. AWS organization high-level view
In the preceding diagram we are using AWS organizations to create
multiple OUs or Organizational Units and member accounts associated
with each OU. Let’s understand better:
– The management account or the root account is now
accessible only by the gitops user that I created and also
the root user credentials. Other than these two, no one
else has access and no one will ever need it as well with
exception for billing purposes.
– I’ve created OUs with specific purposes like Identity OU,
Deployment OU, and Development OU. OUs are created
to group similar member accounts where their function-
ality is aligned. We can then apply Service Control
Policies or SCPs at OU level, which makes it easier to
govern. We’ll be exploring SCPs in greater depth in the
next chapter.
– Each member account is serving a specific purpose.
– The prod and staging accounts are for deploying the
application and are LIVE environments.
329
ChApter 8 AuthentICAtIon And AuthorIzAtIon
– The development account is provided to the developers
to do their testing independently of the staging/prod
environment.
– Identity account is where all IAM Users, Roles, and
Groups will be created. One key thing to note here is that
we are not going to create users in any other account
except for identity accounts.
– Users will only have access to identity accounts where
they can change their passwords/update their MFA
and perform only IAM- related activities.
– They will not be allowed to create an EC2 instance or
any other functions in the identity account.
– They will be allowed to perform all other operations
only in dev environments, which are accessible by
Assuming IAM Roles created in the dev account. We’ll
be covering more details on the User and Role
Management later in this chapter.
Let’s now look into how the AWS organizations and the member
accounts have been created in Terraform.
All the magic is happening in the pgitops/ global/organisations.tf file as shown in the following.
Code Block 8-1. Creating the AWS organization using Terraform
File: pgitops/global/organisations.tf
01: # Initializing Root Organization
02: resource "aws_organizations_organization" "root" {
03: }
04:
330
ChApter 8 AuthentICAtIon And AuthorIzAtIon
05: # Create an OU for Identity management
06: resource "aws_organizations_organizational_unit"
"identity" {
07: name = "Identity Management Account"
08: parent_id = aws_organizations_organization.root.
roots[0].id
09: }
10:
11: # Create an OU for deployment accounts
12: resource "aws_organizations_organizational_unit"
"deployment" {
13: name = "Deployment Accounts"
14: parent_id = aws_organizations_organization.root.
roots[0].id
15: }
16:
17: # Create an OU for development/sandbox accounts
18: resource "aws_organizations_organizational_unit"
"development" {
19: name = "Development Accounts"
20: parent_id = aws_organizations_organization.root.
roots[0].id
21: }
XXXXXXXXXXXXXXX------SNIPPED-------XXXXXXXXXXXXXXXXXXXXX
L02–03: This is where it all starts by first creating a root organization.
This line is not actually creating anything; it’s just setting up the AWS
organization service and assigning the current account where you’ve
logged in as a root account or a management account.
L06–20: Creating the Organizational Units as discussed earlier and
assigning the root account as the parent account.
331
ChApter 8 AuthentICAtIon And AuthorIzAtIon
Let’s look at how I am creating the member accounts in the same file
gitops/ global/organisations.tf.
Code Block 8-2. Creating member accounts
File: pgitos/global/organisations.tf
XXXXXXXXXXXXXXX------SNIPPED-------XXXXXXXXXXXXXXXXXXXXX
25: module "identity_account" {
26: source = "./modules/awsaccounts"
27:
28: name = var.accounts["identity"]. name
29: email = var.accounts["identity"].email
30: parent_id = aws_organizations_organizational_unit.
identity.id
31:
32: }
33:
34: # Org hosting Production infrastructure
35: module "prod_account" {
36: source = "./modules/awsaccounts"
37:
38: name = var.accounts["prod"]. name
39: email = var.accounts["prod"].email
40: parent_id = aws_organizations_organizational_unit.
deployment.id
41:
42: }
XXXXXXXXXXXXXXX------SNIPPED-------XXXXXXXXXXXXXXXXXXXXX
332
ChApter 8 AuthentICAtIon And AuthorIzAtIon
L25–42: AWS account creation has been modularized as in general it
requires three primary information for a unique setup (i.e., account name,
email address, and parent account ID).
The parent account ID is nothing but the Organizational Unit IDs,
whereas the name and the email addresses are retrieved from the pgitops/
global/terraform.auto.tfvars, which is shown as follows.
Code Block 8-3. Member account email and names’ configurations
File: pgitops/global/terraform. auto.tfvars
02: accounts = {
03: dev = {
04: name = "dev"
05: email = "[email protected]"
06: },
07: identity = {
08: name = "identity"
09: email = "[email protected]"
10: },
11: prod = {
12: name = "prod"
13: email = "[email protected]"
14: },
15: staging = {
16: name = "staging"
17: email = "[email protected]"
18: }
19: }
XXXXXXXXXXXXXXX------SNIPPED-------XXXXXXXXXXXXXXXXXXXXX
333
ChApter 8 AuthentICAtIon And AuthorIzAtIon
L02-19: The accounts variable here is a “map of maps” type. The first-
level map is the accounts that we need to create, and the second-level map
is the details of those accounts.
Each account creation requires a specific email address, and since
I don't wish to manage multiple emails, I recommend to use the ‘+’
identifier as shown previously that maps all the different accounts (i.e.,
prod, identity, staging, and dev) to a single email inbox. This gives the
flexibility to create multiple emails with a single inbox.
It is not necessary to login using any of those accounts that are
generally used for “break-the-glass” emergency moments when the
management account/admin account is locked out and you need to access
any of these accounts. You would, however, receive email notifications on
these emails informing that your account has been created and, in some
scenarios, also be asked for verification without which you won’t be able to
perform any operations.
We’ll see the email notifications in action when we execute the
terraform files in the “Global” folder.
8.2.3 AWS Provider
An important question to answer is, what access will be needed to create
these accounts?
The answer is pretty simple; we’ll need the existing Admin account
keys that we’ve been using so far. All operations for AWS organizations
must be done through the admin user credentials.
An interesting observation to keep a note on is AWS organizations
cannot be created using your root account access. Hence, you need to
create a user account and provide administrator access to that user and
then only you’ll be able to operate AWS organizations.
A top-up question would be, how will Terraform administer the other
AWS accounts since the current credentials that we have can only access
the Management Account?
334
ChApter 8 AuthentICAtIon And AuthorIzAtIon
To answer this question, let’s look at the code in the awsaccounts
Module located at pgitops/global/modules/awsaccounts/main.tf.
Code Block 8-4. AWS accounts module
File: pgitops/global/modules/awsaccounts/main.tf
03: resource "aws_organizations_account" "default" {
04: name = var.name
05: email = var.email
06: parent_id = var.parent_id
07: role_name = "Administrator"
08: lifecycle {
09: ignore_changes = [role_name]
10: }
11: }
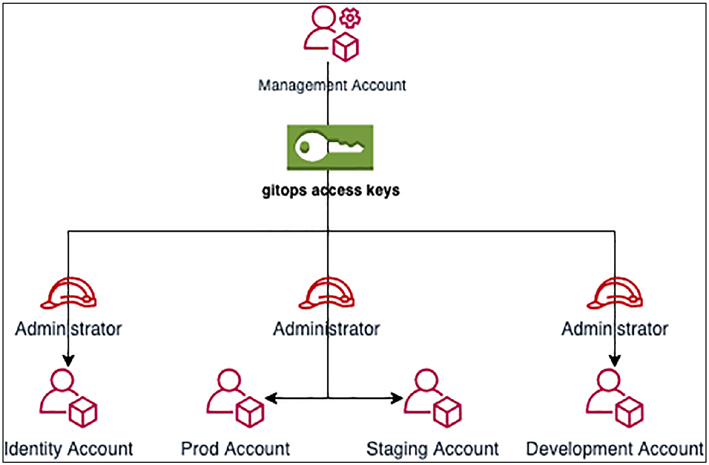
L07: While other lines are self-explanatory, it’s important to
understand what’s happening at this line. Whenever an AWS account is
created using AWS organizations, a default IAM Role with Administrator
privileges is created in the target account with a corresponding
AssumeRole created in the management account. This is also called
an Organization Administrator Role, which is then used to access and
create resources in the target account through the management account
credentials.
335
ChApter 8 AuthentICAtIon And AuthorIzAtIon
Figure 8-2. High-level view of all AWS accounts
This operation is facilitated by declaring the following code in the
pgitops/global/providers.tf as shown as follows.
Code Block 8-5. Declaring AWS Providers for different accounts
using Assume Role
File: pgitops/global/providers.tf
17: provider "aws" {
18: # Any region can be set here as IAM is a global service
19: region = var.region
20: }
21:
22: # Provider configuration for Assuming Administrator Role in
Identity account.
23: provider "aws" {
336
ChApter 8 AuthentICAtIon And AuthorIzAtIon
24: assume_role {
25: role_arn = "arn:aws:iam::${module.identity_account.
id}:role/Administrator"
26: }
27:
28: alias = "identity"
29: region = var.region
30: }
L17–20: This is the primary provider that will utilize the provided
access keys of the management account (gitops in our case) and perform
all the magic.
L23–30: This is where we are declaring a different provider with an
alias as “identity.” This provider has an assume role configured at L25,
which will assume the “Administrator” IAM role created in the identity
account and perform all the requested operations.
Similarly, different providers are configured for prod, staging and
development accounts as well as shown in the following code.
Code Block 8-6. Declaring AWS Providers in code
File: pgitops/global/main.tf
02: module "staging" {
03: source = "./staging"
04:
05: account = "staging"
06: identity_account_id = module.identity_account.id
07: domain = "staging.${var.domain}"
08:
09: providers = {
10: aws = aws.staging
11: }
337
ChApter 8 AuthentICAtIon And AuthorIzAtIon
12:
13: }
14:
16: module "prod" {
17: source = "./prod"
18:
19: account = "prod"
20: identity_account_id = module.identity_account.id
21: domain = var.domain
22:
23: providers = {
24: aws = aws.prod
25: }
26:
27: }
8.3 AWS IAM
Now that we’ve seen how AWS organizations is being used to create
accounts, let’s do a deep dive to understand how we can go about creating
user accounts and provide them with the necessary privileges to perform
the requisite set of actions.
338
ChApter 8 AuthentICAtIon And AuthorIzAtIon
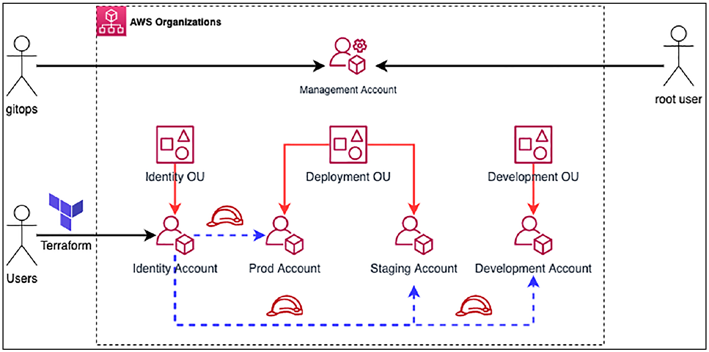
Figure 8-3. AWS organizations and user access
The preceding diagram depicts what we are ultimately trying to
accomplish:
– All users will be created in the identity account only.
– Privileges assigned to the users in the identity account
will be limited and defined by the groups that will be
created. However, no user will be able to perform any
non-IAM operation in the identity account.
– IAM Roles with predefined permissions will be created in
each of the non-identity accounts.
– Each IAM User will be required to Assume the IAM Roles
created in the non-identity accounts. This is also called
Cross-Account IAM Roles Access.
– Terraform also will have access only to the identity
account and will be required to Assume roles into differ-
ent accounts to perform the required operations.
339
ChApter 8 AuthentICAtIon And AuthorIzAtIon
8.3.1 IAM Users
As discussed earlier, IAM Users are being created in the identity account
and will be having access only to the identity account. From there on,
they’ll have to assume a role and then access other accounts.
Let’s look at how we are creating IAM Users using Terraform.
Code Block 8-7. Creating AWS IAM Users using Terraform
File: pgitops/global/identity.tf
XXXXXXXXXXXXXXX------SNIPPED-------XXXXXXXXXXXXXXXXXXXXX
62: module "users" {
63: for_each = var.users
64:
65: source = "./modules/awsusers"
66:
67: user_name = var.users[each. key].username
68: pgp_key = file("data/${var.users[each.key].pgp_key}")
69:
70: groups = var.users[each. key].role == "admin" ? [aws_iam_
group.iam_admin. name] : [aws_iam_group.self_manage. name]
71:
72: providers = {
73: aws = aws.identity
74: }
75: }
XXXXXXXXXXXXXXX------SNIPPED-------XXXXXXXXXXXXXXXXXXXXX
L63: Iterating through a map of users that we need to create. I’ll show
the map of users shortly.
340
ChApter 8 AuthentICAtIon And AuthorIzAtIon
L68: When creating IAM Users using terraform, we’ll need a Public
GPG Key that is used by Terraform to encrypt the passwords for each user.
The encrypted password is then shown on the console and decrypted only
by the private GPG Key, which only the user has access to. All Public PGP
keys need to be stored under the pgitops/global/data folder only.
L70: Within the identity account, I’ve created two groups, and
depending on the role, that is, admin/non-admin, the user is dynamically
assigned to that particular group in the identity account.
L72–74: In the “AWS Provider” section, we saw how Terraform will
assume the Administrator IAM Role in the identity account. Hence, here
we are specifying the provider to inform Terraform to execute all the code
written in this module in the identity account only. If the provider is not
specified, it will execute the code in the context of the current account,
which is nothing but the management account.
Let’s look at the users variable, which is a map of user-related
information as shown in the following.
Code Block 8-8. Configuring the Users variable
File: pgitops/global/terraform. auto.tfvars
XXXXXXXXXXXXXXX------SNIPPED-------XXXXXXXXXXXXXXXXXXXXX
21: users = {
22: raadha = {
23: username = "raadha"
24: pgp_key = "raadha.pub"
25: role = "developer"
26: },
27: sita = {
28: username = "sita"
29: pgp_key = "sita.pub"
341
ChApter 8 AuthentICAtIon And AuthorIzAtIon
30: role = "admin"
31: },
32: padma = {
33: username = "padma"
34: pgp_key = "padma.pub"
35: role = "readonly"
36: }
37: }
XXXXXXXXXXXXXXX------SNIPPED-------XXXXXXXXXXXXXXXXXXXXX
The first-level map is the username, and the second-level map is the
username with the role and the name of the GPG Key assigned for that
particular user.
I’ve currently defined three different organization roles, that is,
developer, admin, and readonly. IAM Roles with requisite permissions
will be created in different environments implementing access for the
respective roles as we’ll see in the “IAM Roles” section a little later.
Let’s understand what’s going behind the scenes in the /modules/
awsusers; the code for the main.tf file is shown in the following.
Code Block 8-9. AWS Users module implementation
File: pgitops/global/modules/awsusers/main.tf
01: # Create an AWS Human user with provided username
02: resource "aws_iam_user" "default" {
03: name = var.user_name
04: tags = {
05: terraform-managed = "true"
06: }
07: }
08:
342
ChApter 8 AuthentICAtIon And AuthorIzAtIon
09: # Create a login profile to generate a temporary password
encrypted with the provided GPG Key
10: # Mandatory Reset of password
11: resource "aws_iam_user_login_profile" "default" {
12: user = aws_iam_user.default. name
13: pgp_key = var.pgp_key
14: password_reset_required = true
15: lifecycle {
16: ignore_changes = [
17: password_reset_required
18: ]
19: }
20: }
21:
22: # Add User to the Groups provided
23: resource "aws_iam_user_group_membership" "default" {
24: user = aws_iam_user.default. name
25: groups = var.groups
26: }
XXXXXXXXXXXXXXX------SNIPPED-------XXXXXXXXXXXXXXXXXXXXX
L02-07: Creating an AWS IAM User with a specific username.
L11-20: Every user’s login profile needs to be created with a temporary
encrypted password, which mandatorily needs to change on first access.
Once the user accesses the console and changes the password, the
password_reset_required attribute in the user’s metadata flips to false.
However, whenever there is an update to the Terraform code, the
password_reset_required attribute flips to true and the user’s password is resetted. To avoid the ignore_changes lifecycle attribute on L16 is required, which states that ignore the changes to the password_reset_required
attribute.
343
ChApter 8 AuthentICAtIon And AuthorIzAtIon
If the user forgets the password, then the admin user will log into the
console and generate a new set of passwords for that user. It’s neither
feasible nor advisable to run the entire terraform code just to change a
user’s password.
L22-26: Lastly, every user in the identity account must be mapped to at
least one group, which is what we’ll explore next.
Lastly, we are enforcing the password policy as well for all Users
configured in the identity account using the following code.
Code Block 8-10. Setting Password policy on identity account
File: pgitops/global/identity.tf
01: # Create a Password Policy in the Identity Account as users
will be created in this account only
02: resource "aws_iam_account_password_policy" "strict" {
03: minimum_password_length = 10
04: require_lowercase_characters = true
05: require_numbers = true
06: require_uppercase_characters = true
07: require_symbols = true
08: allow_users_to_change_password = true
09:
10: provider = aws.identity
11:
12: }
XXXXXXXXXXXXXXX------SNIPPED-------XXXXXXXXXXXXXXXXXXXXX
344
ChApter 8 AuthentICAtIon And AuthorIzAtIon
8.3.2 IAM Groups
The identity account serves as the landing zone for all the users. Hence,
basic permissions need to be provided to each user so that they can
access their own account. Hence, I’ve created two sets of IAM Groups,
and depending on the role provided to the user, she is added to that
particular group.
Let’s look at the IAM Administrator Group.
Code Block 8-11. Creating IAMAdmin Role for identity account
File: pgitops/global/identity.tf
XXXXXXXXXXXXXXX------SNIPPED-------XXXXXXXXXXXXXXXXXXXXX
38: resource "aws_iam_policy" "iam_admin" {
39: name = "IAM Administrator"
40: policy = file("data/iamadmin.json")
41:
42: provider = aws.identity
43: }
44:
45: # Create an IAM Administrator Group
46: resource "aws_iam_group" "iam_admin" {
47: name = "IAM Administrator"
48:
49: provider = aws.identity
50: }
51:
52: # Attach the IAM Administrator Policy with Group
53: resource "aws_iam_group_policy_attachment" "iam_admin" {
54: group = aws_iam_group.iam_admin. name
55: policy_arn = aws_iam_policy.iam_admin.arn
345
ChApter 8 AuthentICAtIon And AuthorIzAtIon
56:
57: provider = aws.identity
58: }
L45–50: Create an IAM group called IAM Administrator.
L38–43: Assign an IAM Policy with the permissions specified in the file
located at pgitops/global/data/iamadmin.json as shown in the following.
This Policy states that it provides all IAM-related permissions on all IAM
resources.
Code Block 8-12. IAM Administrator Permissions Policy
File: global/ data/iamadmin.json
01: {
02: "Version": "2012-10-17",
03: "Statement": [
04: {
05: "Sid": "IAMAdmin",
06: "Effect": "Allow",
07: "Action": [
08: "iam:*"
09: ],
10: "Resource": "*"
11: }
12: ]
13: }
L52–58: Attach the IAM Policy to the IAM Group.
The Self-Managed group allows users to be able to access the identity
account using the username/password provided by the administrator,
change her password, and download her access keys. All other actions are
prohibited.
346
ChApter 8 AuthentICAtIon And AuthorIzAtIon
The Terraform code for the Self-Managed group remains the same
as that of IAM Administrator with the exception of the policy that is too
verbose to mention here. Hence, a snippet of the policy can be seen in the
following.
Code Block 8-13. Self-Manage IAM Permissions Policy
File: global/ data/self_manage.json
XXXXXXXXXXXXXXX------SNIPPED-------XXXXXXXXXXXXXXXXXXXXX
13: {
14: "Sid": "AllowManageOwnPasswords",
15: "Effect": "Allow",
16: "Action": [
17: "iam:ChangePassword",
18: "iam:GetUser"
19: ],
20: "Resource": "arn:aws:iam::*:user/${aws:u
sername}"
21: },
22: {
23: "Sid": "AllowManageOwnAccessKeys",
24: "Effect": "Allow",
25: "Action": [
26: "iam:CreateAccessKey",
27: "iam:DeleteAccessKey",
28: "iam:ListAccessKeys",
29: "iam:UpdateAccessKey"
30: ],
31: "Resource": "arn:aws:iam::*:user/${aws:u
sername}"
XXXXXXXXXXXXXXX------SNIPPED-------XXXXXXXXXXXXXXXXXXXXX
347
ChApter 8 AuthentICAtIon And AuthorIzAtIon
L14–19: Policy allows users to manage their own passwords. L20
provides an explicit declaration of the username that also enforces
authentication.
L23–30: Policy allows users to manage their AWS Access Keys.
8.3.3 IAM Roles
Before we begin the discussion of how I am creating the role, let’s discuss a
little bit about how Cross-Account Roles function.
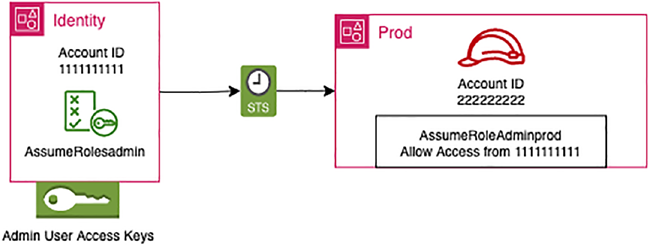
Figure 8-4. Cross-Account IAM Roles Access
Let’s take an example of an Admin user in the identity account
who needs to login and operate in the prod account. How will this
operation happen?
In the prod account, we first need to create an IAM Role
called “AssumeRoleAdminprod” and attach the existing policy of
“arn:aws:iam::aws:policy/AdministratorAccess”. In addition to this, we also
need to add an Assume Role Policy where we are specifying the identity
account ID as a Trusted Entity. In Terraform, this can be achieved through
the following code.
348
ChApter 8 AuthentICAtIon And AuthorIzAtIon
Code Block 8-14. AWS IAM Cross-Account Role
01: # Create an IAM Role with an AssumeRole Policy for a
trusted entity
02: resource "aws_iam_role" "default" {
03: name = "AssumeRoleAdminprod"
04: assume_role_policy = jsonencode({
05: Version = "2012-10-17",
06: Statement = [
07: {
08: Effect = "Allow",
09: Action = "sts:AssumeRole",
10: Principal = {
11: "AWS" : "arn:aws:iam::1111111111:root"
12: }
13: }]
14: })
15: tags = {
16: terraform-managed = "true"
17: account = var.account
18: }
19: }
20:
21: # Attach the Policies provided to the IAM role
created above
22: resource "aws_iam_role_policy_attachment" "default" {
23:
24: policy_arn = ["arn:aws:iam::aws:policy/
AdministratorAccess "]
25: role = aws_iam_role.default. name
26: }
349
ChApter 8 AuthentICAtIon And AuthorIzAtIon
L02–19: In the prod account, we first need to create an IAM Role called
“AssumeRoleAdminprod” and attach an assume role policy specifying the
identity account ID as a Trusted Entity as shown on L11.
L21–26: We then attach the predefined policy of arn
“arn:aws:iam::aws:policy/AdministratorAccess” to the IAM Role created
previously.
Next, in the identity account, we create an IAM Policy called
“AssumeRolesadmin” and attach it to the IAM User “admin,” thereby
granting only the admin user to access the Administrator role in the prod
account. A sample terraform code to do this is as shown in the following.
Code Block 8-15. AWS IAM Cross-Account Role Contd
02: resource "aws_iam_policy" "default" {
03: name = "AssumeRolesadmin"
04: description = "Allow IAM User to Assume the IAM Roles"
05: policy = jsonencode({
06: Version = "2012-10-17",
07: Statement = [
08: {
09: Effect = "Allow",
10: Action = "sts:AssumeRole",
11: Resource = ["arn:aws:iam::2222222222:role/
AssumeRoleAdminprod"]
12: }]
13: })
14: }
15:
16: resource "aws_iam_user_policy_attachment" "default" {
17: user = "admin"
18: policy_arn = aws_iam_policy.default.arn
19: }
350
ChApter 8 AuthentICAtIon And AuthorIzAtIon
L02-14: We are defining the AWS IAM Policy, which will allow the
user/group to whom this policy would be attached to, to assume the
specific role in the specific account mentioned on L11.
L16-19: Attaching the Policy created previously to the specific user.
Tip Many terraform developers and AWS IAM architects would
advise to attach these policies to a group rather than a user for
better/broader access management. I’ve attached the policy to a user
in this book to keep things simple.
The following code snippet shows how we are creating the AWS IAM
Roles in the prod account and supplying the identity account id to add as a trusted entity.
Code Block 8-16. Creating AWS IAM Roles in prod account
File: pgitops/global/prod/main.tf
XXXXXXXXXXXXXXX------SNIPPED-------XXXXXXXXXXXXXXXXXXXXX
12: # Create an AWS ReadOnly Role with a Managed
ReadOnlyAccess Policy
13: module "assume_readonly_role" {
14: source = "./modules/assumerolepolicytrust"
15:
16: role_name = "AssumeRoleReadOnly${var.account}"
17: trusted_entity = "arn:aws:iam::${var.identity_account_
id}:root"
18: policy_arn = ["arn:aws:iam::aws:policy/
ReadOnlyAccess"]
19: account = var.account
20:
351
ChApter 8 AuthentICAtIon And AuthorIzAtIon
21: }
22:
23: # Create an Admin Role with Administrator Access Policy
24: module "assume_admin_role" {
25: source = "./modules/assumerolepolicytrust"
26:
27: role_name = "AssumeRoleAdmin${var.account}"
28: trusted_entity = "arn:aws:iam::${var.identity_account_
id}:root"
29: policy_arn = ["arn:aws:iam::aws:policy/
AdministratorAccess"]
30: account = var.account
31:
32: }
XXXXXXXXXXXXXXX------SNIPPED-------XXXXXXXXXXXXXXXXXXXXX
For performing the IAM Roles Mapping, we are using the local variable
called user_role_mapping as shown in the following.
Code Block 8-17. user_role_mapping variable
File: pgitops/global/identity.tf
XXXXXXXXXXXXXXX------SNIPPED-------XXXXXXXXXXXXXXXXXXXXX
80: locals {
81: user_role_mapping = {
82: developer = [
83: module.staging.assume_dev_role_arn,
84: module.prod.assume_dev_role_arn,
85: module.dev.assume_admin_role_arn
86: ],
87: admin = [
88: module.staging.assume_admin_role_arn,
352
ChApter 8 AuthentICAtIon And AuthorIzAtIon
89: module.prod.assume_admin_role_arn,
90: module.dev.assume_admin_role_arn
91: ],
92: readonly = [
93: module.staging.assume_readonly_role_arn,
94: module.prod.assume_readonly_role_arn,
95: module.dev.assume_readonly_role_arn
96: ]
97: }
98: }
XXXXXXXXXXXXXXX------SNIPPED-------XXXXXXXXXXXXXXXXXXXXX
Here I am simply declaring which IAM Role should be assigned to
the role that I’ve defined in the users variable. For example, A developer
role will get access to the dev IAM Roles in the staging and the prod
environment and admin role in the dev environment. Any user who takes
up the developer role will automatically get access to the staging and prod
environment as a developer and the dev environment as an admin.
The following code performs this mapping between the users and their
respective roles by iterating over the user_role_mapping local variable we saw previously.
Code Block 8-18. Looping through user_role_mapping variable
File: pgitops/global/identity.tf
XXXXXXXXXXXXXXX------SNIPPED-------XXXXXXXXXXXXXXXXXXXXX
103: module "user_role_mapping" {
104: source = "./modules/useriamrolepolicyattachment"
105:
106: for_each = var.users
107:
353
ChApter 8 AuthentICAtIon And AuthorIzAtIon
108: roles = local.user_role_mapping[each.value["role"]]
109: user_name = each. key
110:
111: providers = {
112: aws = aws.identity
113: }
114:
115: depends_on = [module.users]
116: }
XXXXXXXXXXXXXXX------SNIPPED-------XXXXXXXXXXXXXXXXXXXXX
Table should help summarize how I’ve configured the IAM Roles access for different users.
354
ChApter 8 AuthentICAtIon And AuthorIzAtIon
Table 8-1. Permissions Table
User
Org Role
IAM Role
Sita
admin
AssumeroleAdminprod
AssumeroleAdminstaging
AssumeroleAdmindev
padma
readonly
Assumerolereadonlyprod
Assumerolereadonlystaging
Assumerolereadonlydev
raadha
developer
Assumeroledeveloperprod
Assumeroledeveloperstaging
AssumeroleAdmindev
8.4 AWS Route53
In the last chapter, we created a Route53 Zone record in the root account
through the AWS CLI. However, in this chapter, we’ll look at how we can
create the same using Terraform and one each for every deployment
account for better segregation as depicted in the following.
355
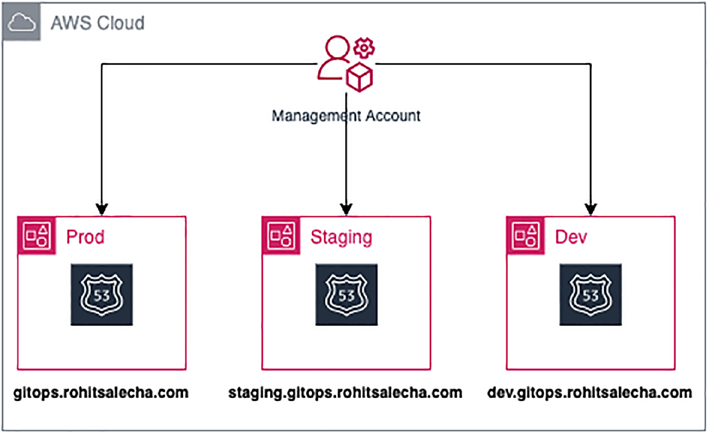
ChApter 8 AuthentICAtIon And AuthorIzAtIon
Figure 8-5. AWS Route53 Hosted Zone for each account
The following code shows how AWS Route53 zone can be created for
the staging account.
Code Block 8-19. Creating Route53 Hosted Zone for Staging
File: pgitops/global/main.tf
02: module "staging" {
03: source = "./staging"
04:
05: account = "staging"
06: identity_account_id = module.identity_account.id
07: domain = "staging.${var.domain}"
08:
09: providers = {
10: aws = aws.staging
356
ChApter 8 AuthentICAtIon And AuthorIzAtIon
11: }
12:
13: }
XXXXXXXXXXXXXXX------SNIPPED-------XXXXXXXXXXXXXXXXXXXXX
L07: This is how I am passing the value of the domain name that is
needed for each environment. Similarly for every environment, I am
passing the respective domain value.
Under the hood in the individual module folder, this is how I am
creating the Route53 Zones by passing the value of the domain at L37 as
shown in the following.
Code Block 8-20. Creating Route53 Hosted Zone for Staging Contd
File: pgitoos/global/staging/main.tf
XXXXXXXXXXXXXXX------SNIPPED-------XXXXXXXXXXXXXXXXXXXXX
36: resource "aws_route53_zone" "default" {
37: name = var.domain
38:
39: tags = {
40: Account = var.account
41: terraform-managed = "true"
42: }
43: }
8.5 Executing Global
Under the global folder, I’ve added only those resources that need to be
created only once and are required for operation of the staging/production
and development environments. Resources like IAM Users and their Roles,
Route53 Records, and AWS accounts need to be created only once; hence,
357
ChApter 8 AuthentICAtIon And AuthorIzAtIon
they all have been grouped together. It would not be possible to create
these resources along with the application infrastructure that we’ve set
up in the last chapter as things like User’s Access Keys, Route53 records,
and IAM Roles would be needed to create the entire infrastructure for the
application in different environments.
Hence, we’ll first need to ensure that all the terraform code in the
global folder is executed first and then execute each environment. Also, one
crucial information that will be needed while creating the environments is
the account IDs of the environments that we need to operate in.
For example, when spinning up the dev environment, we’ll need to
pass the account ID of the dev environment in terraform code of the infra
folder and same for each of the other accounts. We’ll see why we need the
account ID when I will be executing the infra folder.
8.5.1 Generate GNU PG Keys
Every user who needs access to the AWS Console needs to generate a pair
of GPG keys. The private key is configured in her system, and the public
key is to be shared to the administrator along with an approved level of
access required in the different environments. Once the Terraform is
executed, the administrator shall share the encrypted password string with
every user, which needs to be changed on first login. Once the user logs in,
she can download her access keys to operate on the AWS environment.
Let’s walk through the entire process for user “sita” who is having
administrator access to all environments.
Ensure that GNU PG has been installed as mentioned in the
“Prerequisites” section before going ahead. Once you fire the command
to generate the key as shown in the following, you’ll be asked to enter your
real name and email address and then confirm with an O(kay).
After that, you’ll be prompted to enter your passphrase twice.
358
ChApter 8 AuthentICAtIon And AuthorIzAtIon
Note ensure you don’t lose the passphrase as without that you
won’t be able to decrypt your key back.
CLI Output 8-21. Generating GPG Keys
cmd> gpg --generate- key
prompt> Real name: sita
prompt> Email address: [email protected]
prompt> Change (N)ame, (E)mail, or (O)kay/(Q)uit?: O
prompt> Enter passphrase
prompt> Re-enter passphrase
Let’s now save the public key so that terraform can utilize it to encrypt
your console password. To save the key, first we’ll need to list the keys
to understand the Key ID as highlighted in blue in the following. Once
we have the Key ID, we can export it into the data folder as shown in the
following.
CLI Output 8-22. Listing and Exporting GPG Public Key
cmd> cd pgitops
cmd> gpg -- list-keys
gpg: checking the trustdb
gpg: marginals needed: 3 completes needed: 1 trust model: pgp
gpg: depth: 0 valid: 1 signed: 0 trust: 0-, 0q, 0n,
0m, 0f, 1u
gpg: next trustdb check due at 2024-06-21
/Users/rohitsalecha/.gnupg/pubring.kbx
--------------------------------------
pub ed25519 2022-06-22 [SC] [expires: 2024-06-21]
27B6CF62B1352FC30F3F14C6D3B5FCD325AAEC25
359
ChApter 8 AuthentICAtIon And AuthorIzAtIon
uid [ultimate] sita
sub cv25519 2022-06-22 [E] [expires: 2024-06-21]
cmd> gpg --export 27B6CF62B1352FC30F3F14C6D3B5FCD325AAEC25 |
base64 > global/data/sita.pub
cmd> ls global/data/sita.pub
global/data/sita.pub
Note Similarly, we need to perform the same operations for other
users defined (i.e., padma and radha and have their public keys
saved in the global/data directory). It is extremely important to have
their public keys generated and saved as well because I need to
demonstrate the role-Based Access control that has been configured.
8.5.2 Configure Variables
Next, an important task that we need to do is ensure the pgitops/global/
terraform.auto.tfvars file is properly configured with all the values.
The emails for the various environments must be configured properly
and must be unique and valid as an example shown in the following,
which I’ll be using for showing the rest of the demonstrations through the
book. Please ensure to change these before moving ahead; else you’ll get
an error stating that this account already exists.
Warning these email addresses need to be unique and never used
for creating AWS accounts; if any existing email addresses are used,
you’ll get an error stating the email address already exists.
360
ChApter 8 AuthentICAtIon And AuthorIzAtIon
Code Block 8-23. Configuring emails for the AWS accounts
File: pgitops/global/terraform. auto.tfvars
02: accounts = {
03: dev = {
04: name = "dev"
05: email = "[email protected]"
06: },
07: identity = {
08: name = "identity"
09: email = "[email protected]"
10: },
11: prod = {
12: name = "prod"
13: email = "[email protected]"
14: },
15: staging = {
16: name = "staging"
17: email = "[email protected]"
18: }
19: }
XXXXXXXXXXXXXXX------SNIPPED-------XXXXXXXXXXXXXXXXXXXXX
Configure the Users with the exact username and the exact name of the
public key as stored under the data folder as shown in the following.
Code Block 8-24. Configure users and their GPG keys
File: global/terraform. auto.tfvars
XXXXXXXXXXXXXXX------SNIPPED-------XXXXXXXXXXXXXXXXXXXXX
361
ChApter 8 AuthentICAtIon And AuthorIzAtIon
21: users = {
22: raadha = {
23: username = "raadha"
24: pgp_key = "raadha.pub"
25: role = "developer"
26: },
27: sita = {
28: username = "sita"
29: pgp_key = "sita.pub"
30: role = "admin"
31: },
32: padma = {
33: username = "padma"
34: pgp_key = "padma.pub"
35: role = "readonly"
36: }
37: }
XXXXXXXXXXXXXXX------SNIPPED-------XXXXXXXXXXXXXXXXXXXXX
And finally, the org name and the main domain name, which should
be either your subdomain or your top level whichever you’ve chosen in the
previous chapter.
Code Block 8-25. Adding Domain and Org values
File: pgitops/global/terraform. auto.tfvars
XXXXXXXXXXXXXXX------SNIPPED-------XXXXXXXXXXXXXXXXXXXXX
39: org_name = "gitops"
40: domain = "gitops.rohitsalecha.com"
XXXXXXXXXXXXXXX------SNIPPED-------XXXXXXXXXXXXXXXXXXXXX
362
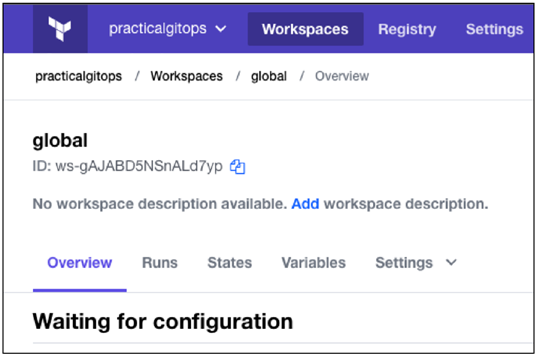
ChApter 8 AuthentICAtIon And AuthorIzAtIon
8.5.3 Terraform Cloud Workspace
Next, one very important step is to configure Terraform Cloud
workspace for the global folder. All the information about the state of
the infrastructure setup in the global folder will now be available in
terraform cloud.
Figure 8-6. Terraform Cloud Global workspace
Ensure the name you choose for the Global workspace is also
recorded here.
Code Block 8-26. Global workspace configuration
File: pgitops/global/global.hcl
1: workspaces { name = "global" }
2: hostname = "app.terraform.io"
3: organization = "practicalgitops"
L1: Need to update the name of the global folder
363
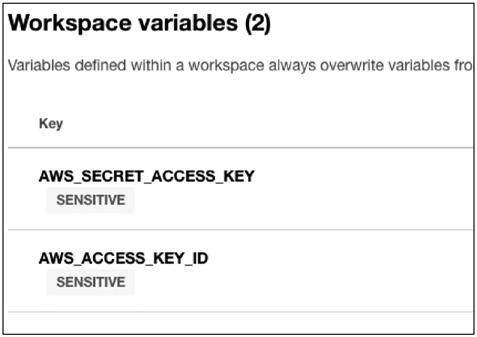
ChApter 8 AuthentICAtIon And AuthorIzAtIon
Next, ensure your AWS Keys have been configured as environment
variables. For the Global workspace, we only need the AWS Keys
configured in the variables section; nothing else is needed. These keys are
of the administrator user “gitops” that we created initially.
Figure 8-7. Configuring AWS Keys in Workspace
Note the account that you’ll be using here should not have an
existing AWS organization root account. It should be a fresh account.
8.5.4 Terraform Apply
Now that we are all set to perform our terraform apply, let’s follow the
process of first pushing our changes in a branch, creating a PR, reviewing
the PR, and then merging the branch into master.
CLI Output 8-27. Pushing Code for Global
cmd> git status
On branch main
364
ChApter 8 AuthentICAtIon And AuthorIzAtIon
Your branch is up to date with 'origin/main'.
Changes not staged for commit:
(use "git add <file>..." to update what will be committed) (use "git restore <file>..." to discard changes in working directory)
modified: global/ data/padma.pub
modified: global/ data/raadha.pub
modified: global/ data/sita.pub
modified: global/terraform. auto.tfvars
no changes added to commit (use "git add" and/ or "git commit -a")
cmd> git checkout -b global1
Switched to a new branch 'global1'
cmd(global1)> git add .
cmd(global1)> git commit -m “first commit”
cmd(global1)> git push --set-upstream origin global1
As soon as the changes are pushed, you should be able to see the
message on github.com.
Let’s Compare and Pull Request and start the process.
Once the PR is created, you should see the following screen.
365
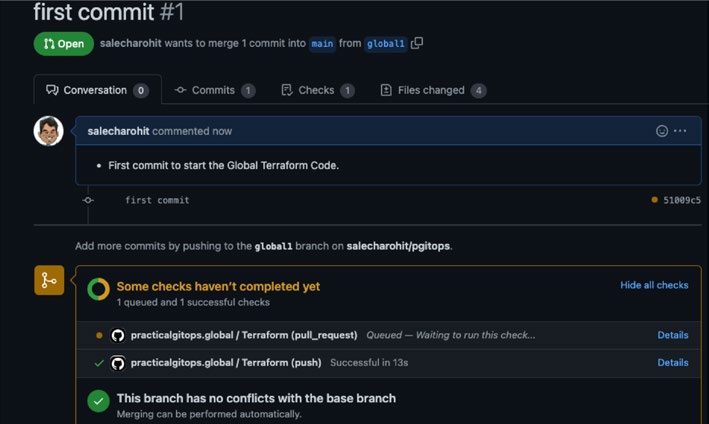
ChApter 8 AuthentICAtIon And AuthorIzAtIon
Figure 8-8. PR Screen request to merge
After a while, it will start the Terraform Plan and show us the following
in our Github Comments and we can review the full plan.
366
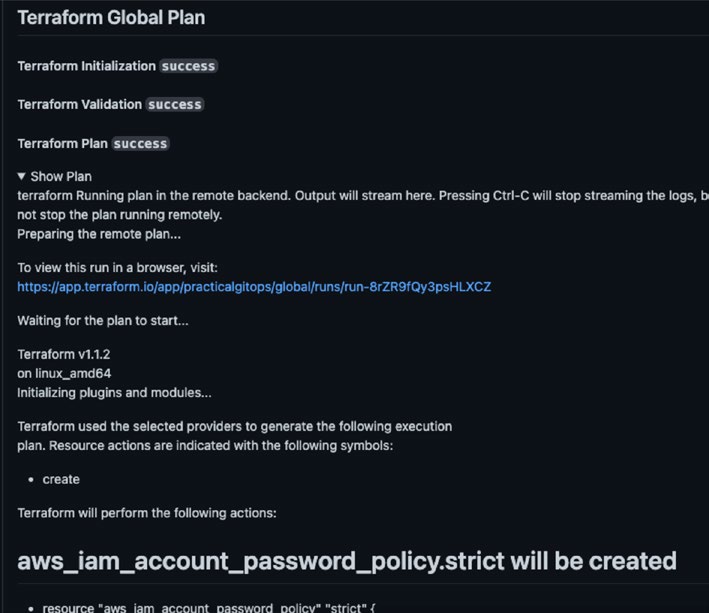
ChApter 8 AuthentICAtIon And AuthorIzAtIon
Figure 8-9. Review Terraform Plan in PR
Once the PR is merged, terraform apply shall start and finally
Terraform output would look something like the following once apply is
finished.
367
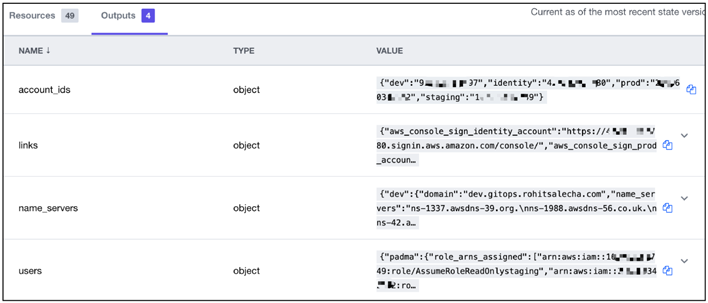
ChApter 8 AuthentICAtIon And AuthorIzAtIon
Figure 8-10. Terraform output
8.5.5 Terraform Output
Let’s understand each of the terraform output.
Account IDs
The account IDs need to be noted as we’ll need to configure each account
ID for the respective environments as a Terraform variable, something that
we’ll discuss later while executing the infra folder.
Also, as soon as you see this output, you would also receive a Welcome
email from Amazon on each of the email addresses specified for the
account creation.
Links
The links provided here are just for bookmarking the identity account ID
URL for sign-in and the respective Roles that need to be assumed into
different accounts.
368
ChApter 8 AuthentICAtIon And AuthorIzAtIon
Name Servers
The Name Servers provided here need to be updated in your DNS records
for each of the account as shown in the following.
Code Block 8-28. DNS nameservers
{
"dev": {
"domain": "dev.gitops.rohitsalecha.com",
"name_servers": "ns-1337.awsdns-39.org.\nns-1988.awsdns-56.
co.uk.\nns-42.awsdns-05.com.\nns-654.awsdns-17.net."
},
"prod": {
"domain": "gitops.rohitsalecha.com",
"name_servers": "ns-1046.awsdns-02.org.\nns-1921.awsdns-48.
co.uk.\nns-214.awsdns-26.com.\nns-706.awsdns-24.net."
},
"staging": {
"domain": "staging.gitops.rohitsalecha.com",
"name_servers": "ns-1040.awsdns-02.org.\nns-1595.awsdns-07.
co.uk.\nns-303.awsdns-37.com.\nns-807.awsdns-36.net."
}
}
So as an example, to update the prod account DNS Servers, I need to
add the following as NS Records against gitops.rohitsalecha.com:
ns-1046.awsdns-02.org.
ns-1921.awsdns-48.co.uk.
ns-214.awsdns-26.com.
ns-706.awsdns-24.net.
369
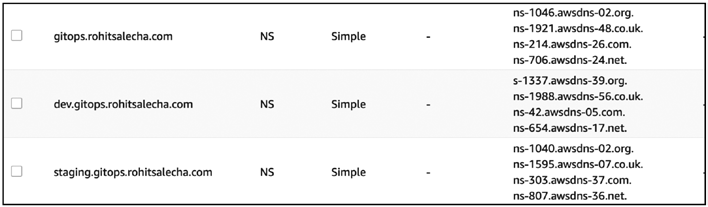
ChApter 8 AuthentICAtIon And AuthorIzAtIon
Figure 8-11. Configuring nameservers
Users
Next, output of the users block consists of the users encrypted temporary
passwords and their assumable roles. As an example, let’s view the details
of the administrator Sita.
Code Block 8-29. Sample Users Output
"sita":{
"role_arns_assigned": [
"arn:aws:iam::1xxxxxxxx9:role/AssumeRoleAdminstaging",
"arn:aws:iam::2xxxxxxxx2:role/AssumeRoleAdminprod",
"arn:aws:iam::9xxxxxxxx97:role/AssumeRoleAdmindev"
],
"temp_password": "wV4Dg8bNTGnmb5USAQdA8+383VwQHuVL3HJ4YXF4
tlnRAYgOVSmJU9fHHV7R1UUwzKJgvFoJi7y+4784x4muIYeO+kialt/
6QfgB8iHPCxedgXovISPJzhYgw8ArlOoJ1FABBwEMkLPQrwCqZE+d3Z
KuwtOBsP7j4xAPYepnY6IBOxj55DiW04VdRLGzaaosLwthHkT5CSPX
crpfhHxpyfFeb2a70i8pXOn5SnJEw8pCA=="
}
Let’s decrypt the passwords encrypted using the GPG key generated
earlier.
370
ChApter 8 AuthentICAtIon And AuthorIzAtIon
CLI Output 8-30. Decrypting the password
cmd> export GPG_TTY=$(tty)
cmd> echo "<temp_password string>" | base64 -d | gpg --decrypt Using the password output on the console and the Identity URL link
provided in the links’ section, you can now log into the AWS Console
using the temporary password. At first, you’ll be prompted to change
your password, which must be done immediately. Once authenticated,
download the keys and configure an AWS Profile on the CLI using the
following commands.
CLI Output 8-31. Configuring Sita’s AWS Profile
cmd> aws configure --profile sita
prompt> AWS Access Key ID : AKIAXXXXXXXXXXXXXXXXXXX
prompt> AWS Secret Access Key : o9PxxxxxxxxxxxxxxxxxxxxxxxxxUc
prompt> Default region name : us-east-2
prompt> Default output format : json
Note You’ll need to repeat all the previous steps for all the other
users in order to see Access Control in action.
8.5.6 Possible Issues
This is a tidy bit of a complicated setup as there are many variables
involved here and in most scenarios executing terraform more than once
may be required, hence just highlighting some possible issues that you
may run into.
371
ChApter 8 AuthentICAtIon And AuthorIzAtIon
Email Already Exists
CLI Output 8-32. Email already exists error
│ Error: error waiting for AWS Organizations Account (identity) create: unexpected state 'FAILED', wanted target 'SUCCEEDED'.
last error: EMAIL_ALREADY_EXISTS
│
│ with module.identity_account.aws_organizations_account.
default,
│ on modules/awsaccounts/main.tf line 3, in resource "aws_
organizations_account" "default":
│ 3: resource "aws_organizations_account" "default" {
This is a typical error if you are using an email address that is already
tied to an AWS account. Every AWS account needs an email; hence any
duplication globally can result in this error.
Hence, the solution here would be to change the email address in the
pgitops/global/terraform.auto.tfvars file and push the changes.
AWS Subscription Not Found
CLI Output 8-33. AWS subscription not found error
│ Error: error creating Route53 Hosted Zone: OptInRequired: The
AWS Access Key Id needs a subscription for the service
│ status code: 403, request id: 671818a6-464f-4815-b56a-
da2c74b3555c
│
│ with module.staging.aws_route53_zone.default,
│ on staging/main.tf line 36, in resource "aws_route53_zone"
"default":
│ 36: resource "aws_route53_zone" "default" {
372
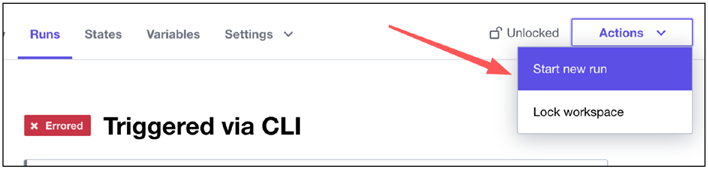
ChApter 8 AuthentICAtIon And AuthorIzAtIon
If you encounter this error, follow the following solution.
The solution to this problem is ridiculously simple: Just login into
your AWS account using the root email address and password of the
management account and rerun the terraform code.
You can quite simply just select Actions➤ Start new run from the
Terraform Workspace as shown here.
Figure 8-12. Terraform Cloud running apply from cloud
If at all you get any error other than the preceding scenarios, the best
solution is to just search on Google as it’s impossible to cater into all
different scenarios.
8.6 EKS Authz
Services like RDS using MySQL/PostgreSQL or EKS using the Kubernetes
specifications have their own set of authentication when deployed
independently of AWS. However, once AWS provides these services,
the authentication and authorization (authz) to these services are then
managed or sometimes even overridden by AWS IAM for the sole purpose
of uniformity.
Having a uniform/standard approach toward authentication is very
important and strongly emphasized by AWS.
373
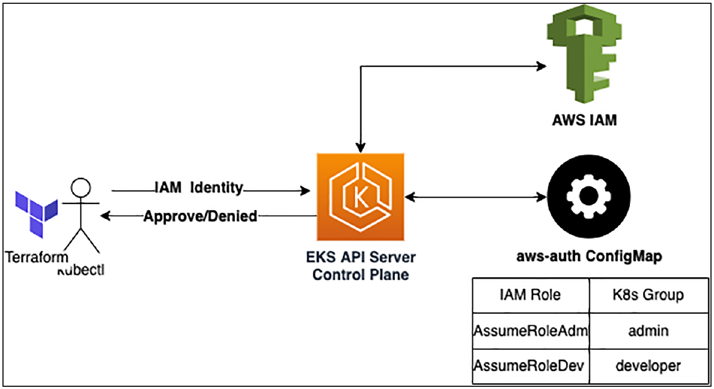
ChApter 8 AuthentICAtIon And AuthorIzAtIon
In AWS EKS as well, the authentication to the Kubernetes cluster is
through AWS IAM and not utilizing the existing methods for authenticating
to Kubernetes. We’ll be exploring the following different authentication
mechanisms employed by EKS:
A. Client Authentication – Authentication of kubectl to
AWS EKS.
B. Node Authentication – How Nodes authenticate and
join the EKS Cluster.
C. Pod Authentication – How individual pods running
on EKS authenticate to AWS. This we shall explore in
the next chapter.
8.6.1 EKS Client Authentication
Figure 8-13. EKS Client Authentication
The preceding diagram shows a very high-level overview of how AWS IAM
Authentication is used for authenticating a user and Kubernetes RBAC
374
ChApter 8 AuthentICAtIon And AuthorIzAtIon
(Role-Based Access Control) is used for implementing authorization. The
following are the highlights of the authentication and authorization process:
– AWS IAM recognizes an IAM User or an IAM Role as an
identifier as an AWS Identity. Hence, while authenticat-
ing using kubectl, the identifier information is first
passed to the API Server along with the authentication
token generated by the “aws eks get-token.” If you can
recall, this is the same command that is configured in
the kubernetes.tf file where we’ve declared the
Kubernetes provider.
– EKS API Server relays this information to AWS IAM and
performs the verification. This verification is nothing
but authentication.
– Once the authentication is successful, then the EKS API
Server checks the aws-auth ConfigMap that stores the
information about IAM Role Mapping against the
Kubernetes Groups. Based on this information, it
authorizes the AWS Identity to access the cluster.
This is how any client, be it kubectl or terraform, needs to perform to
access the Kubernetes cluster. In our case, we’ve implemented the AWS
Identity as an IAM Role and not an IAM User.
The following is the same AWS-Auth ConfigMap that shows the
mapping between the IAM Role that we created in the global folder for the
dev account.
Code Block 8-34. AWS ConfigMap (sample)
apiVersion: v1
data:
mapRoles: |
XXXXXXXXXXXXXXX------SNIPPED-------XXXXXXXXXXXXXXXXXXXXX
375
ChApter 8 AuthentICAtIon And AuthorIzAtIon
- rolearn: arn:aws:iam::XXXXXXXXXXX:role/AssumeRoleEKSAdmindev
username: admin
groups:
- admin
- rolearn: arn:aws:iam::XXXXXXXXXXX:role/
AssumeRoleEKSDeveloperdev
username: developer
groups:
- developer
- rolearn: arn:aws:iam::XXXXXXXXXXX:role/
AssumeRoleEKSReadOnlydev
username: readonly
groups:
- readonly
kind: ConfigMap
metadata:
name: aws-auth
namespace: kube-system
The following code is the template that is used to generate the
preceding ConfigMap.
Code Block 8-35. AWS ConfigMap creation in Terraform
File: pgitops/infra/rolebindings.tf
2: data "aws_caller_identity" "current" {}
3:
4: locals {
5:
6: # Creating the AWS-AUTH
07: aws_auth_configmap_yaml = <<-EOT
08: ${chomp(module.eks.aws_auth_configmap_yaml)}
376
ChApter 8 AuthentICAtIon And AuthorIzAtIon
09: - rolearn: arn:aws:iam::${data.aws_caller_identity.
current.id}:role/AssumeRoleAdmin${var.environment}
10: username: admin
11: groups:
12: - system:masters
13: - rolearn: arn:aws:iam::${data.aws_caller_identity.
current.id}:role/AssumeRoleDeveloper${var.
environment}
14: username: developer
15: groups:
16: - developer
17: - rolearn: arn:aws:iam::${data.aws_caller_identity.
current.id}:role/AssumeRoleReadOnly${var.
environment}
18: username: readonly
19: groups:
20: - readonly
21: EOT
22:
23: }
XXXXXXXXXXXXXXX------SNIPPED-------XXXXXXXXXXXXXXXXXXXXX
L09-12: We are first fetching the ID of the current account where
Terraform is executing, which is also the same environment configured.
We’ve templated the name of the IAM Role to match the environment. Here,
we are mapping the Admin IAM Role with the system-masters, which is a
default administrator group in Kubernetes. So any user assuming this role
will access the Kubernetes cluster with admin privileges.
L13-16: Here we are associating the Developer IAM Role with the
developer group created in Kubernetes. So any user who would be
assuming this role will access the Kubernetes cluster with developer
privileges. Same is implemented for the readonly group as well.
377
ChApter 8 AuthentICAtIon And AuthorIzAtIon
The following code shows how using Terraform we are creating the
developer Role and RoleBinding and assigning it to the “developer” group.
Code Block 8-36. Kubernetes RoleBindings
File: infra/rolebindings.tf
XXXXXXXXXXXXXXX------SNIPPED-------XXXXXXXXXXXXXXXXXXXXX
27: resource "kubernetes_role_v1" "developer" {
28: metadata {
29: name = "developer"
30: namespace = kubernetes_namespace_v1.app.metadata.0.name
31: }
32:
33: rule {
34: api_groups = ["*"]
35: resources = ["pods", "deployments", "services",
"ingresses", "namespaces", "jobs", "daemonset"]
36: verbs = ["*"]
37: }
38: }
39:
40: resource "kubernetes_role_binding_v1" "developer" {
41: metadata {
42: name = "developer"
43: namespace = kubernetes_namespace_v1.app.metadata.0.name
44: }
45: role_ref {
46: api_group = "rbac.authorization.k8s.io"
47: kind = "Role"
48: name = "developer"
49: }
378
ChApter 8 AuthentICAtIon And AuthorIzAtIon
50: subject {
51: kind = "Group"
52: name = "developer"
53: api_group = "rbac.authorization.k8s.io"
54: }
55: }
XXXXXXXXXXXXXXX------SNIPPED-------XXXXXXXXXXXXXXXXXXXXX
L27-31: Here I am creating the developer role and assigning it specific
privileges that a developer may need while accessing the Kubernetes
cluster.
L40-55: Here we are binding the developer role to a group called
“developers,” which is what is mapped in the aws-auth ConfigMap as well.
Similarly, I’ve created the readonly group as well in the same file.
8.6.2 EKS Node Authentication
Node authentication is happening with the kubelet utility installed on
the node servers. However, it still needs a specific AWS Identity as all
authentication is with AWS IAM only and not with any X509 certificates
that are traditionally used for Node authentication.
Let’s look at the sample aws-auth ConfigMap again to better
understand how node authentication works as shown in the following.
Code Block 8-37. AWS ConfigMap post apply
apiVersion: v1
data:
mapRoles: |
- rolearn: arn:aws:iam::XXXXXXXXXXX:role/app-eks-node- gro
up-20220208122024106100000003
username: system:node:{{EC2PrivateDNSName}}
379
ChApter 8 AuthentICAtIon And AuthorIzAtIon
groups:
- system:bootstrappers
- system:nodes
- rolearn: arn:aws:iam::XXXXXXXXXXX:role/system-eks-node- gr
oup-20220208122024106000000002
username: system:node:{{EC2PrivateDNSName}}
groups:
- system:bootstrappers
- system:nodes
XXXXXXXXXXXXXXX------SNIPPED-------XXXXXXXXXXXXXXXXXXXXX
kind: ConfigMap
metadata:
name: aws-auth
namespace: kube-system
Here we can see that the mapping is between a specific IAM Role
and the groups as Kubernetes default groups of “system:bootstrappers”
and “system:nodes” that have the capabilities to join and manage
worker nodes.
This IAM Role is created by the EKS Module and has very specific
permissions that allow joining to the master node.
Hence, when kubelet needs to authenticate to the AWS IAM, it’ll
make use of this specific IAM Role as the AWS Identity to AWS IAM for
authentication.
Previously, it can be understood that aws_auth ConfigMap is an
extremely critical resource and hence I’ve created it separately as shown in
the following.
Code Block 8-38. Implementing AWS-Auth ConfigMap
File: pgitops/infra/rolebindings.tf
XXXXXXXXXXXXXXX------SNIPPED-------XXXXXXXXXXXXXXXXXXXXX
380
ChApter 8 AuthentICAtIon And AuthorIzAtIon
091: resource "kubectl_manifest" "aws_auth" {
092: yaml_body = <<YAML
093: apiVersion: v1
094: kind: ConfigMap
095: metadata:
096: labels:
097: app.kubernetes.io/managed-by: Terraform
098: name: aws-auth
099: namespace: kube-system
100: ${local.aws_auth_configmap_yaml}
101: YAML
102:
103: depends_on = [module.eks]
104:
105: }
It is important to study the terraform plan generated during apply as
well as destroy as it indicates the approximate order in which the resources
will be created/destroyed. In both cases, the order is extremely important
and depends_on meta-attribute plays a pivotal role.
For example, if we don’t add “resource.kubectl_manifest.aws_auth” as
a depending resource for the namespace creation/destruction as shown
on L10, then terraform will happily destroy the aws_auth ConfigMap prior
to destroying the namespace, which will lead to errors and the namespace
will need to be manually destroyed.
Code Block 8-39. AWS-AUTH ConfigMap and Namespace
dependency
File: pgitops/infra/app.tf
03: resource "kubernetes_namespace_v1" "app" {
04: metadata {
381
ChApter 8 AuthentICAtIon And AuthorIzAtIon
05: annotations = {
06: name = var.org_name
07: }
08: name = var.org_name
09: }
10: depends_on = [module.eks, resource.kubectl_manifest.
aws_auth]
11: }
XXXXXXXXXXXXXXX------SNIPPED-------XXXXXXXXXXXXXXXXXXXXX
L10: Explicitly defining the dependency of aws_auth ConfigMap before
creating the namespace.
Note It’s also worth noting that the way I am creating the aws-auth
ConfigMap is not a standard terraform format. I’m using a third-party
provider called kubectl_manifest whose detailed documentation can
This provider is used when it’s required to execute yaml files directly as
we do using the kubectl utility such as kubectl apply -f k8s.yaml.
8.6.3 Provider Configuration
In the previous chapter, we were passing the identity as an AWS User by
simply configuring the AWS provider with ACCESS KEY ID and SECRET
ACCESS KEY. This worked well as I was creating resources within the same
account.
382
ChApter 8 AuthentICAtIon And AuthorIzAtIon
However, here I have all our users created in the identity account,
and all resources need to be created in the accounts of their respective
environments. Hence, if we need to access the other accounts using the
identity account, then we need to perform Cross-Account IAM Role access,
and hence, the IAM Role ARN has been specified in the assume_role
section on L51-52 as shown in the following.
Code Block 8-40. Cross-Account Provider configuration
File: pgitops/infra/providers.tf
XXXXXXXXXXXXXXX------SNIPPED-------XXXXXXXXXXXXXXXXXXXXX
47: locals {
48: assume_role_arn = "arn:aws:iam::${var.assume_role_
account_id}:role/AssumeRoleAdmin${var.environment}"
49: }
50: provider "aws" {
51: assume_role {
52: role_arn = local.assume_role_arn
53: }
54: region = var.region
55: }
The role that is being accessed is the Administrator IAM role that has
been created for each environment. So only a user who has access to this
IAM Role will be able to execute these Terraform files. In our case, it is
the user Sita whose access keys need to be configured in Terraform Cloud
staging and prod workspaces. However, in most scenarios, a Terraform
user can also be created and assigned the IAM Administrator role or any
specific high privilege role.
The variable var.assume_role_account_id is a new variable that has
been added that holds the value of the account id where the role needs to
be accessed. So, when we are running in prod, we need to populate this
value with the prod account ID and so on.
383
ChApter 8 AuthentICAtIon And AuthorIzAtIon
However, the default value for this would be the development
environment value and needs to be added in the terraform.auto.tfvars file
as shown in the following.
Code Block 8-41. Adding the development environment
Account ID
File: pgitops/infra/terraform.auto.tfvars
42: assume_role_account_id = "5XXXXXXXXXXXX5"
For prod and staging environments, this value needs to be added in
the respective Terraform Cloud workspaces in the variables section, which
we’ll see when we are ready to execute our infra changes.
In the pgitops/infra/kubernetes.tf file, we also need to update our aws eks get-token command to pass in the role arn to be able to assume the role as shown on L12-13.
Code Block 8-42. Adding Assume Role configuration in the
Kubernetes provider
File: infra/kubernetes.tf
03: provider "kubernetes" {
04: host = module.eks.cluster_endpoint
05: cluster_ca_certificate = base64decode(module.eks.cluster_
certificate_authority_data)
06: exec {
07: api_version = "client.authentication.k8s.io/v1alpha1"
08: command = "aws"
09: args = [
10: "eks",
11: "get-token",
12: "--role-arn",
13: local.assume_role_arn,
384
ChApter 8 AuthentICAtIon And AuthorIzAtIon
14: "--cluster-name",
15: module.eks.cluster_id
16: ]
17: }
8.7 Executing Infra
Let us now go ahead and start deployment of the application and its
related infrastructure in different environments. We shall first start with the
deployment into the development environment on the local system, and
then the changes will be migrated to the staging and prod environments,
which will be executed from the Terraform Cloud workspace.
8.7.1 AWS Profiles
Before we move ahead, we need to ensure that we’ve configured the
AWS Profiles of all the users that have been created (i.e., Sita, Padma
and Raadha). The following is the sample AWS Credentials file that I’ve
configured for Sita, which includes the ability to be able to assume roles
into different accounts. The same needs to be configured for Padma and
Raadha as well.
Code Block 8-43. AWS Credential file for Sita
[sita]
aws_access_key_id = AKIAxxxxxxxxxxWMX
aws_secret_access_key = o9PRxxxxxxxxxxxxxxxxxxxxxxxxxWfUc
[sita-dev]
role_arn = arn:aws:iam::9xxxxxxxxx97:role/AssumeRoleAdmindev
source_profile = sita
[sita-prod]
role_arn = arn:aws:iam::2xxxxxxxxx42:role/AssumeRoleAdminprod
385
ChApter 8 AuthentICAtIon And AuthorIzAtIon
source_profile = sita
[sita-staging]
role_arn = arn:aws:iam::1xxxxxxxxx9:role/AssumeRoleAdminstaging
source_profile = sita
You’ll need to update your account numbers as per the output shown
in your Terraform Cloud Global workspace. Let’s test the profiles if they
have been properly configured using the following commands.
Note everywhere for infrastructure provisioning we’ll be using
Sita’s access key as she has the administrator rights. We can always
create a terraform user and assign it those rights.
Code Block 8-44. Accessing all AWS Profiles configured
cmd> export AWS_PROIFLE=sita
cmd> aws sts get-caller-identity
{
"UserId": "AIDAWG4C7562DXE4Y3C3Q",
"Account": "4xxxxxxxxxx0",
"Arn": "arn:aws:iam::4xxxxxxxxxx0:user/sita"
}
cmd> export AWS_PROFILE=sita-prod
cmd> aws sts get-caller-identity
{
"UserId": "AROATOK7P4B7EGWNWTDXN:botocore-
session- 1656261720",
"Account": "2xxxxxxxxxxx2",
"Arn": "arn:aws:sts::2xxxxxxxxxxx2:assumed-role/
AssumeRoleAdminprod/botocore-session-1656261720"
}
386
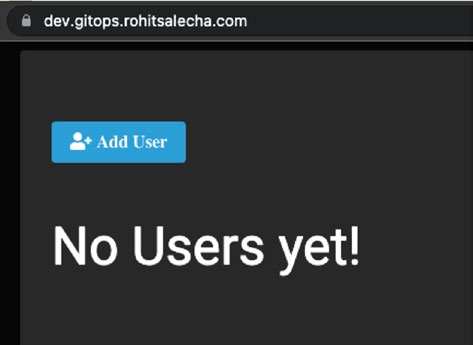
ChApter 8 AuthentICAtIon And AuthorIzAtIon
8.7.2 Development
Let’s first start our development environment but prior to doing that
ensure that the value of assume_role_account_id in the pgitops/infra/
terraform.auto.tfvars file is populated with the development account id.
Code Block 8-45. Set up the development environment
cmd> cd pgitops/infra
cmd> export AWS_PROFILE=sita-dev
cmd> terraform init
cmd> terraform validate
cmd> terraform apply --auto-approve
Terraform apply would take about ~15 minutes, and DNS propagation
would take another 5 minutes after terraform apply is completed. The
following is the post that we can see our application up and running.
Figure 8-14. Development environment up and running
387
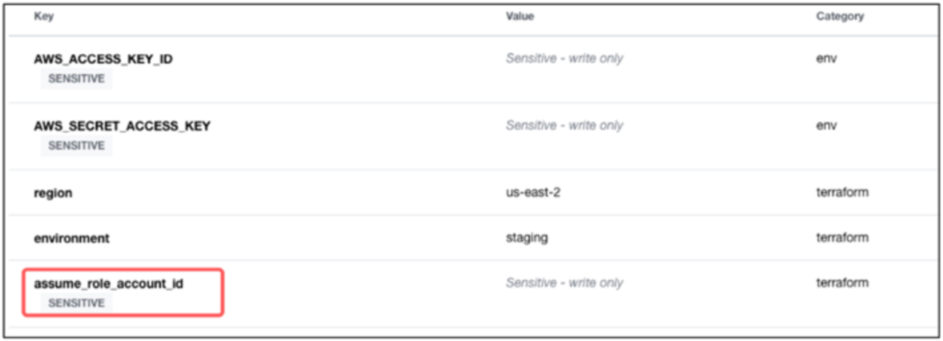
ChApter 8 AuthentICAtIon And AuthorIzAtIon
8.7.3 Staging
Open up your terraform cloud staging workspace and ensure that the
following variables are properly configured.
AWS_ACCESS_KEY_ID and AWS_SECRET_ACCESS_KEY should be
of the sita user as she has the rights to assume administrator roles into all
accounts.
assume_role_account_id variable must be populated with the staging
account id.
Figure 8-15. Adding an Assume Role Account ID variable in staging
workspace
Next, let’s create a new branch called staging and then check in the
code. Since this is the first time we are creating the staging branch and
since we’ve tested everything is working in development, terraform apply
would run directly as per the workflow rules setup in .github/workflows/
infra-staging.yaml :
cmd> git status
On branch main
Your branch is up to date with 'origin/main'.
Changes not staged for commit:
(use "git add <file>..." to update what will be committed)
388
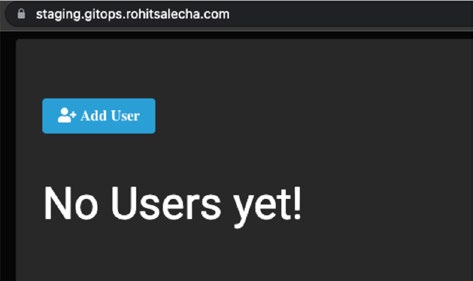
ChApter 8 AuthentICAtIon And AuthorIzAtIon
(use "git restore <file>..." to discard changes in working directory)
modified: infra/terraform.auto.tfvars
no changes added to commit (use "git add" and/or "git
commit -a")
cmd> git checkout -b staging
cmd(staging)> git add .
cmd(staging)> git commit -m "deploying to staging"
cmd(staging)> git push --set-upstream origin staging
Staging environment live !
Figure 8-16. Staging environment is up
8.7.4 Prod
Let’s now create and merge the PR and deploy the changes into the prod
environment!
389
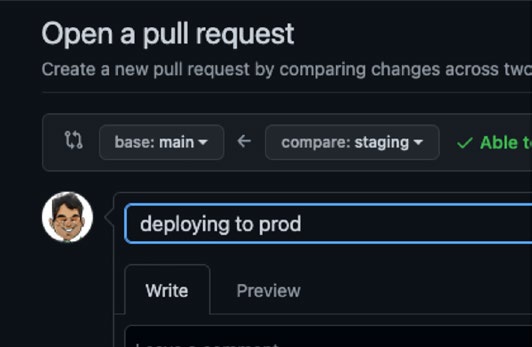
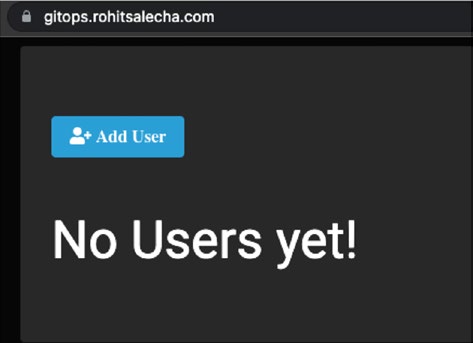
ChApter 8 AuthentICAtIon And AuthorIzAtIon
Figure 8-17. PR for prod deployment
Prod environment is live !
Figure 8-18. Prod environment is up
8.8 EKS Access Control
Now that all three environments are live, let’s see how access control has
been implemented in the prod EKS environment.
390
ChApter 8 AuthentICAtIon And AuthorIzAtIon
Before we move ahead, let’s have a summary of the Users and their
Roles for better understanding.
Table 8-2. AWS User Kubernetes Permissions
User
Role
K8s Permissions
Sita
Admin
perform any actions on all resources
raadha developer perform any action on pods, deployments, services, ingresses,
namespaces, jobs, daemonsets
padma readonly perform only read action on
pods, deployments, services, ingresses, namespaces, jobs,
daemonsets
Let’s understand the access control for Sita by executing the
commands as shown in the following. Since she is the administrator, she
has full access.
CLI Output 8-46. Testing Kubernetes Auth for Sita in Prod
cmd> export AWS_PROFILE=sita-prod
cmd> aws eks --region us-west-1 update-kubeconfig --name
gitops-us-west-1-prod
cmd> kubectl auth can-i get nodes
yes
cmd> kubectl auth can-i create pod
yes
cmd> kubectl auth can-i get secrets -n gitops
yes
391
ChApter 8 AuthentICAtIon And AuthorIzAtIon
Let’s switch profile to that of Raadha and observe that she being
a developer has only read/write access to limited resources in gitops
namespace only.
CLI Output 8-47. Testing Kubernetes Auth for Radha in Pro
cmd> export AWS_PROFILE=radha-prod
cmd> aws eks --region us-west-1 update-kubeconfig --name
gitops-us-west-1-prod
cmd> kubectl auth can-i get nodes
no
cmd> kubectl auth can-i create pod
no
cmd> kubectl auth can-i create pod -n gitops
yes
cmd> kubectl auth can-i get secrets -n gitops
no
Let’s now switch profile and see the access that Padma has, which is
readonly and that too limited to gitops namespace only.
CLI Output 8-48. Testing Kubernetes Auth for Padma in Prod
cmd> export AWS_PROFILE=padma-prod
cmd> aws eks --region us-west-1 update-kubeconfig --name
gitops- us-west-1-prod
cmd> kubectl auth can-i get nodes
no
cmd> kubectl auth can-i create pod -n gitops
no
392
ChApter 8 AuthentICAtIon And AuthorIzAtIon
cmd> kubectl auth can-i get pod -n gitops
yes
cmd> kubectl auth can-i get pod
no
8.9 Clean-Up
It’s best that we do a proper clean-up for this chapter as we are using 3X
resources. We won’t be needing staging and prod environments in the
next chapters as we’ll be focusing on different aspects like security and
observability. Hence, it’s best to destroy all environments, and we’ll spin
them up again in next chapters.
8.9.1 Dev
Dev environment was created from the local machine; hence, we only
need to execute the following commands to destroy it.
CLI Output 8-49. Destroying Dev Environment
cmd> export AWS_PROFILE=sita-dev
cmd> cd pgitops/infra
cmd> terraform destroy --auto-approve
393
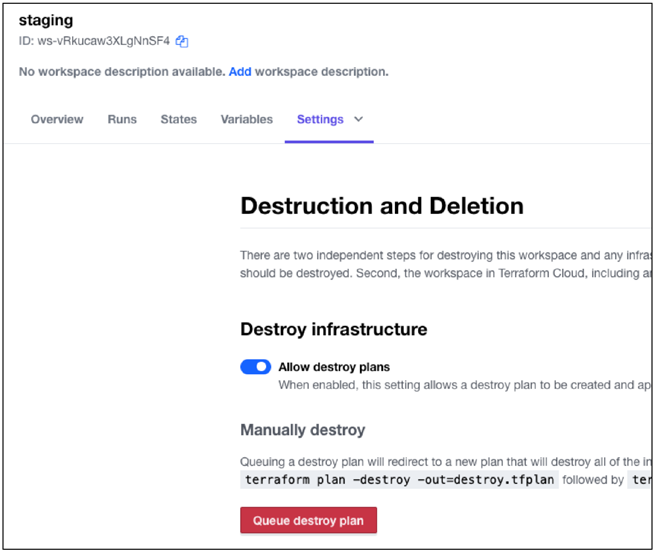
ChApter 8 AuthentICAtIon And AuthorIzAtIon
Note At any point if terraform is unable to destroy, please check
Annexure A where steps have been presented to delete the resources
manually.
8.9.2 Staging/Prod
Staging and prod environments need to be destroyed from the
Terraform Cloud workspace as shown in the following by navigating to
Settings➤ Destruction and Deletion. Similar steps need to be followed for the prod environment as well.
Figure 8-19. Destroying the staging environment
394
ChApter 8 AuthentICAtIon And AuthorIzAtIon
Note At any point if terraform Cloud is erroring to destroy, please
check Annexure B where steps have been presented to delete the
resources manually. If this doesn’t work, then follow Annexure A.
The global environment can also be destroyed in the same
manner; however, hold on for now as we’ll be needing it for
the next two chapters ahead. Hence, please keep the Global
workspace as it is.
8.10 Conclusion
In this long chapter, we saw how Access Control can be implemented using
AWS IAM on the AWS environment in general as well as on the AWS EKS
environment completely through Terraform and that too in a completely
automated Git-controlled manner.
In the next chapter, we’ll explore a few other security measures that
are necessary for cloud environments like Secret encryption, HTTPS
redirection, Network Segregation, Service Control Policies, implementing
security scanning for IaC, and how pods running on EKS can access AWS
services securely!
395
CHAPTER 9
Security and Secrets
Management
In this chapter, we’ll look into various different areas pertaining to the
security of our application and infrastructure. We’ll discuss how to manage
the database using AWS Secrets Manager and how it can directly be
injected into the pods. Then we’ll look at a few small aspects of securing
our ALB and restricting the network for the RDS. After that, we’ll look at
how pods can authenticate to AWS and access different resources. Then
we’ll look at how the disk of the EKS nodes can be encrypted using AWS
KMS and how we can enforce Service Control Policies or SCPs on different
OUs such that developers cannot spin up expensive EC2 resources. Finally,
we’ll end by adding a tool called Checkov in the GitHub Actions pipeline,
which will continuously spill out security issues on every PR.
9.1 Code Update
Before diving into the code, let’s first ensure that we’ve updated the pgitops
directory with the code from the Chapter . To do this, follow these steps:
–
First copy the contents of the Chapt folder into the pgitops folder.
–
Get inside the pgitops directory and then check which
files/folders are changing.
© Rohit Salecha 2023
397
R. Salecha, Practical GitOps,
Chapter 9 SeCurity and SeCretS ManageMent
–
We shall commit only the global and .github directories
as we need the changes to be reflected in the global
environment.
–
Changes done in the infra folder can be committed,
and the CI can be skipped as we’ll be testing the
changes only in the development environment for this
chapter.
CLI Output 9-1. Updating Chapter 9 code
cmd> cp -a chapter9/. pgitops/
cmd> cd pgitops
cmd> git status
On branch main
Your branch is up to date with 'origin/main'.
Changes not staged for commit:
(use "git add <file>..." to update what will be committed)
(use "git restore <file>..." to discard changes in working
directory)
modified: .github/workflows/global.yaml
modified: .github/workflows/infra-prod.yaml
modified: .github/workflows/infra-staging.yaml
modified: README.md
modified: global/README.md
modified: global/organisations.tf
modified: infra/README.md
modified: infra/app.tf
modified: infra/eks.tf
modified: infra/modules/alb/iam_policy.json
modified: infra/modules/alb/main.tf
modified: infra/modules/alb/variables.tf
modified: infra/modules/ekscluster/main.tf
398
Chapter 9 SeCurity and SeCretS ManageMent
modified: infra/modules/ekscluster/variables.tf
modified: infra/networking.tf
modified: infra/rds.tf
modified: infra/variables.tf
Untracked files:
(use "git add <file>..." to include in what will be committed) global/data/deny_creating_users.json
global/data/ebs_rds_encryption_check.json
global/data/instance_type_limit.json
global/data/padma.pub.old
global/data/raadha.pub.old
global/data/region_lock.json
global/data/sita.pub.old
global/modules/awsorgpolicy/
global/scp.tf
global/terraform.auto.tfvars.old
infra/data/
infra/modules/awskms/
infra/modules/awssm/
infra/modules/csisecretsdriver/
infra/modules/irsa/
infra/terraform.auto.tfvars.old
no changes added to commit (use "git add" and/or "git commit -a") The changes can summarized as follows:
–
Enhancing security of EKS by encrypting the EBS using
the default AWS KMS key
–
Encrypting secrets stored in EKS using the custom AWS
KMS key.
–
Enhancing AWS ALB security using mandatory HTTPS
redirection and dropping invalid headers.
399
Chapter 9 SeCurity and SeCretS ManageMent
–
Restricting RDS to private subnet and not VPC.
–
Installing Secrets Store CSI (Container Storage
Interface) Driver that fetches secrets directly from AWS
Secrets Manager reducing exposure of secrets in
K8s files.
–
Implementing and understanding IRSA (IAM Roles for
Service Accounts) that fetches secrets from AWS Secrets
Manager.
–
In the workflow files, we’ve added a new step that
introduces a security scanning tool called “Checkov”
his tool scans terraform files for known bad security practices.
–
We’ve added multiple Service Control Policies (SCPs):
–
To lock the regions of deployment
–
Ensuring that only encrypted EBS and RDS are
deployed in staging/production
–
Disabling user creation in all accounts except identity
–
Restricting the instance types that can be created in
Development OU
9.1.1 Committing only Global
For the sake of simplicity and for ensuring that the global folder is
committed, let’s execute the following commands.
Note - - (double hyphens) after the commit message indicates that
we wish to commit only the specific directories, which is exactly the
use case here.
400
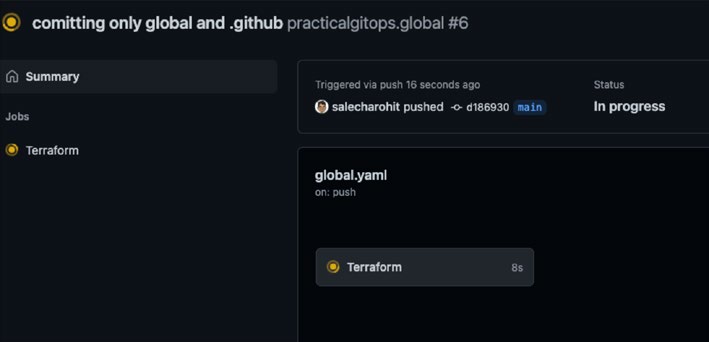
Chapter 9 SeCurity and SeCretS ManageMent
CLI Output 9-2. Comitting only changes in the Global folder
cmd> git add .
cmd> git commit -m 'committing only global and .github' --
global .github
cmd> git push
Once we fire git push, it can be observed that only global changes have
gone live as shown here.
Figure 9-1. Global folder Comit triggering action
With this, the following items have been created:
–
All the SCPs described previously have been created
and now operational.
–
Our new GitHub workflow with Checkov is now
operational.
401
Chapter 9 SeCurity and SeCretS ManageMent
9.1.2 Committing Infra
The other changes, that is, infra, etc., are still in staging in our local system
as shown in the following. Let’s push these changes as well but without
triggering the GitHub Actions, that is, by adding [skip ci] in our commit
message.
CLI Output 9-3. Skipping comitting changes in the infra folder
cmd> git status
On branch main
Your branch is up to date with 'origin/main'.
Changes to be committed:
(use "git restore --staged <file>..." to unstage)
modified: README.md
XXXXXXXXXXXXXXX------SNIPPED-------XXXXXXXXXXXXXXXXXXXXX
modified: infra/rds.tf
new file: infra/terraform.auto.tfvars.old
modified: infra/variables.tf
cmd> git commit -m '[skip ci] committing infra'
cmd> git push
9.2 Enhancing EKS Security
As stated earlier, the master node or the control plane of Kubernetes
in AWS EKS is managed completely by AWS. Hence, AWS takes full
responsibility of keeping it highly available and secure. However, security
of the data plane components like Kubernetes Secrets and of the worker
nodes (which are nothing but EC2 instances) like EBS encryption,
implementing IMDSv2 metadata, etc., needs to be done by us. In this
section, we’ll see how that can be done completely through terraform.
402
Chapter 9 SeCurity and SeCretS ManageMent
9.2.1 Encrypting K8s Secrets
One of the best practices of Kubernetes security is to encrypt the secrets.
We need encryption keys that’ll be used to encrypt the secrets. AWS KMS
(Key Management Services) is a popular service that has two types of keys:
–
Managed by AWS – These keys are generated and
managed by AWS internally and are not chargeable.
–
Managed by User – These keys are also generated by
AWS but managed by us and are chargeable.
If you recall, we set up our RDS database using the code as shown in
the following in pgitops/infra/rds.tf.
Code Block 9-4. Encrypting PostgreSQL
File: pgitops/infra/rds.tf
39: module "pgsql" {
XXXXXXXXXXXXXXX------SNIPPED-------XXXXXXXXXXXXXXXXXXXXX
52: storage_encrypted = true
53: db_name = var.db_name
54: username = var.db_user_name
XXXXXXXXXXXXXXX------SNIPPED-------XXXXXXXXXXXXXXXXXXXXX
84: }
85:
L52: By having the storage_encrypted=true, the module internally is
using the default AWS KMS keys and encrypting the entire database.
However, for storing secrets in Kubernetes, let’s make use of a custom
AWS KMS key, which is generated using the following module.
403
Chapter 9 SeCurity and SeCretS ManageMent
Code Block 9-5. Creating a KMS key
File: pgitops/infra/eks.tf
15: module "eks_kms" {
16: source = "./modules/awskms"
17:
18: environment = var.environment
19: description = "KMS Key to encrypt secrets in
the Cluster"
20: kms_alias = "eks2"
21: deletion_window_in_days = 7
22:
23: }
L20: This value should be unique for the account as it helps as an
identifier to the key.
L21: KMS keys are not deleted immediately; hence, we can configure
the time uptil which we can retrieve the keys back, which is generally
between 7 and 30 days.
We are then using the ARN (Amazon Resource Name) of the key
generated from the preceding module and then pass it into the EKS
module as shown here.
Code Block 9-6. Attaching the KMS key to EKS
File: pgitops/infra/eks.tf
25: module "eks" {
26: source = "./modules/ekscluster"
27:
28: clustername = module.clustername.cluster_name
29: eks_version = var.eks_version
404
Chapter 9 SeCurity and SeCretS ManageMent
30: private_subnets = module.networking.private_subnets_id
31: vpc_id = module.networking.vpc_id
32: environment = var.environment
33: kms_key_arn = module.eks_kms.key_arn
34: instance_types = var.instance_types
35:
36: }
L33: Reference to the KMS Key ARN from the KMS module.
Let’s dive inside the module and see how exactly the value is
being passed.
Code Block 9-7. Encrypting all Kubernetes Secrets with the
AWS KMS key

