Chapter 3 IntroduCtIon to terraform
name = "http_sg_ingress"
tags = {
"Environment" = "dev"
}
# (7 unchanged attributes hidden)
}
XXXXXXXXXXXXXXX------SNIPPED-------XXXXXXXXXXXXXXXXXXXXX
Terraform detected that a new rule has been added with port 8080, and
hence, it provided a plan to reconcile those changes. Before we reconcile,
let’s check if the current terraform.tfstate file contains the changes that we’ve made.
CLI Output 3-33. Terraform shows command grepping for
port 8080.
cmd> terraform show | grep 8080
As can be seen, the preceding output is empty, which means that
our current state doesn’t have the new security group whereas terraform
detected some changes that we performed manually from the AWS GUI.
Let’s run terraform apply to reconcile the changes, and if we execute terraform show and grep for port 8080, we can see that the state has been
reconciled.
CLI Output 3-34. Reconciliation with terraform apply
cmd> terraform apply --auto-approve
cmd> terraform show | grep 8080
from_port = 8080
to_port = 8080
cmd> terraform destroy --auto-approve
118
Chapter 3 IntroduCtIon to terraform
Tip driftctl is an excellent tool that detects, tracks, and alerts on
infrastructure drifts ().
AWS Config is also a very good service provided by AWS to monitor,
detect, and alert on cloud infrastructure changes
3.9 Clean-Up
Just to ensure that we don’t end up getting billed unnecessarily, execute
the following commands to confirm that we’ve deleted all the resources.
CLI Output 3-35. Terraform destroy commands for complete
clean-up
cmd> export AWS_PROFILE=gitops
cmd> cd chapter3/infra/iteration1
cmd> terraform destroy --auto-approve
cmd> cd chapter3/infra/iteration2
cmd> terraform destroy --auto-approve
cmd> cd chapter3/infra/iteration3
cmd> terraform destroy --auto-approve
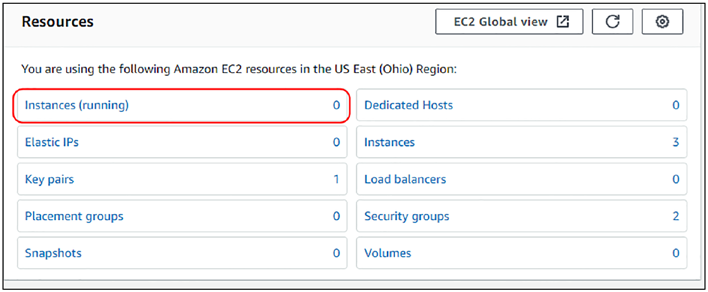
It is also highly recommended that you visit the EC2 console on
the AWS GUI and double-check if everything is deleted. The Instances
(running) field should show 0.
119
Chapter 3 IntroduCtIon to terraform
Figure 3-6. EC2 instance dashboard screen showing zero running
instances
Note always double-check the region; we’ve been following
us- east- 2 in this chapter.
3.10 Terraform Commands Reference
Listing some terraform commands for reference
120
Chapter 3 IntroduCtIon to terraform
Table 3-1. Terraform Commands Reference
Command
Description
terraform init
Initializes the terraform code by downloading the dependencies
terraform plan
Shows the details about the Crud (create, read, update,
and delete) operations that will be performed on the cloud
infrastructure. uses the -out filename.tfplan flag to output the
plan into a file
terraform apply
accepts and applies the changes that were discussed in the
earlier stage that perform all the Crud operations. uses the
--auto-approve flag to automate
terraform destroy destroys all the resources that were defined. uses the --auto-
approve flag to automate
terraform fmt
formats the terraform code by applying the rules to all the .tf
files under the root directory. uses the -recursive flag to apply
to all .tf files in the subdirectories
terraform validate Validates the terraform configuration files
terraform show
Shows the contents of the .tfstate file in a more readable
manner
3.11 Conclusion
In this chapter, we learned how to create an EC2 server hosting an SSH
and an HTTP service on AWS cloud using Terraform and also learned its
nuances in the process. Terraform is a declarative syntax language, and it
is slightly difficult to formulate our ideas especially when we come from
a background coding in Java, Python, etc. Hence, we learned what are the
best ways to organize our program and the different syntaxes like the
121
Chapter 3 IntroduCtIon to terraform
meta- arguments, output variables, modules, and so on. We also learned
how to manipulate the terraform state by selectively destroying resources
and reconcile the state in case of a drift with the actual deployed
configuration.
In the next chapter, we’ll look at how the terraform state can be
managed remotely rather than storing it locally as local creation inhibits
collaboration and is extremely risky.
122
CHAPTER 4
Introduction to
Terraform Cloud and
Workspaces
In the previous chapter, we were introduced to Terraform using a simple
example of spinning up an EC2 machine on AWS. We also learned about
a few best practices of writing a Terraform code through three different
iterations. However, what we learned in the previous chapter was suitable
for individual testing and development as the terraform state that stores
all the information about the cloud infrastructure that has been set up is
stored locally in the developer’s machine.
Terraform state, as we’ll learn in more detail, is an extremely sensitive
and critical file, and it is certainly not advisable to have it stored in the
local machine. Hence, in this chapter, we’ll explore how we can store the
terraform state in Terraform Cloud, which is an offering by the creators
of terraform. In Terraform Cloud, it is more readily accessible, and we
can very well avoid the trauma of accidental deletion/modification so as
to protect the integrity of the whole Infrastructure-as-Code operation.
We’ll also look at how we can deploy the same terraform code in multiple
environments with minimal tweaking.
© Rohit Salecha 2023
123
R. Salecha, Practical GitOps,
Chapter 4 IntroduCtIon to terraform Cloud and WorkspaCes
4.1 Prerequisites
In addition to the previous chapters, the following is the prerequisite for
this chapter:
–
Terraform Cloud account – For remote management of
the terraform state. Please sign up and create a free
account.
–
4.2 Terraform State Management
When you hit terraform apply, terraform creates/updates/deletes your infrastructure in the cloud in conformance with the instructions that are
provided. Once the apply operation is completed, it also creates a file called terraform.tfstate detailing all the information about the resources that currently exist in your infrastructure. A different way to put it,
terraform.tfstate reflects the implementation of the desired state of your cloud infrastructure. It’s a huge JSON file that we’ve seen in the previous
chapters and is one of the most important files in the entire terraform
operation process. This file is always created in the root folder where
terraform apply has been executed.
The file must follow the CIA triad of security, that is, confidentiality,
integrity, and availability.
• Confidentiality – The terraform state file is a clear-
text JSON file and hence should be kept in a location
where access is limited to a few people. Any secret if
embedded in the terraform file will also be shown in
clear text here.
124
Chapter 4 IntroduCtIon to terraform Cloud and WorkspaCes
• Integrity – Don’t ever try to modify the state file by hand
as it contains details about your cloud infrastructure.
Hence, only the terraform binary must be allowed to
edit it.
• Availability – Terraform while executing plan, apply,
and destroy needs to be able to read that file; hence, it
should be made available to the terraform binary.
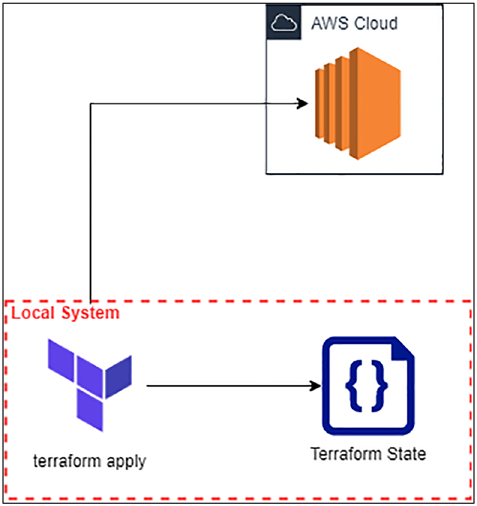
Terraform binary while operating on the terraform.tfstate file locks it when in use. During this time, it doesn’t allow anyone to view/edit or even
delete the file. This is Terraform’s way to manage the CIA of the tfstate file on your local machine as illustrated in the following diagram.
Figure 4-1. Terraform state when saved locally
125
Chapter 4 IntroduCtIon to terraform Cloud and WorkspaCes
By now, you must’ve realized why we should not operate terraform
from our local machines when spinning up cloud infrastructure especially
for production environments. Let’s elaborate some of the reasons why:
–
Managing the tfstate file locally makes it less collabora-
tive. If you’re working in a team, then you’d have to
manually share the tfstate file, which is not scalable.
–
Storing the state in the local machine can certainly make
it susceptible to accidental deletions and modifications,
dismantling the CIA triad.
–
In case of a multi-environment setup, we need to main-
tain multiple state files locally, which makes it extremely
difficult to manage.
Hence, we need to keep the state file in a location
–
Which is accessible to authorized individuals
–
Where the complete CIA triad is maintained
–
Where locking of the file should be possible to avoid
multiple people pushing different changes
–
Where multi-environment setup would be easy and
maintainable
4.3 Introduction to Terraform Cloud
I personally don’t believe in silver bullet theories, but for the requirements
discussed previously for terraform state management, Terraform Cloud is
indeed a silver bullet addressing them.
126
Chapter 4 IntroduCtIon to terraform Cloud and WorkspaCes
Note prior to 2019, developers would store terraform state in cloud
storage solutions like s3 buckets in aWs, Cloud storage in GCp, and
so on. this practice is still prevalent even today as it helps in solving
the preceding problems; however, we are exploring terraform Cloud
to access various other features like apI automation and VCs linking,
which we’ll explore in the upcoming chapters.
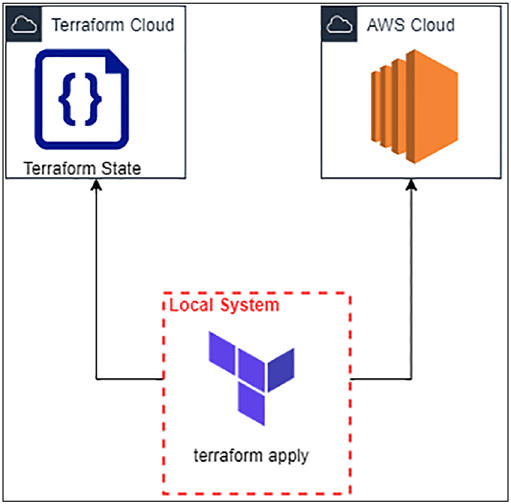
By configuring your local terraform workspace with Terraform Cloud,
all operations like plan, apply, destroy, etc., are now delegated completely
to Terraform Cloud. Your state as well gets stored securely in Terraform
Cloud as illustrated here.
Figure 4-2. Terraform state stored in Terraform Cloud
127
Chapter 4 IntroduCtIon to terraform Cloud and WorkspaCes
In Terraform Cloud, in order to store the state, we need to make
workspaces, which help in logically segregating all aspects of terraform operation. We can define workspaces for specific environments like
staging, prod, etc., and also assign specific configurations for these
environments. Hence, workspaces make it extremely easy to seamlessly
create separate environments by leveraging the same code base.
4.4 Terraform Cloud – Getting Started
4.4.1 Creating a Workspace
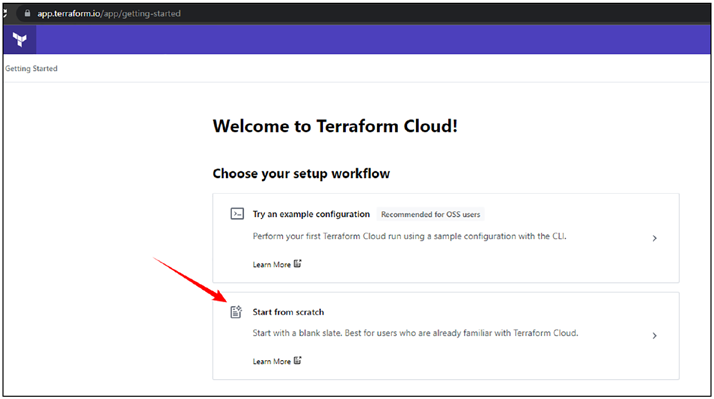
Once you’ve signed up for a free Terraform Cloud account and logged in,
you should be able to see a screen as shown here. We need to click on Start
from scratch.
Figure 4-3. Terraform start from scratch screen
128
Chapter 4 IntroduCtIon to terraform Cloud and WorkspaCes
Note terraform Cloud uI is constantly changing. the screenshots
you’ll see are as of may 11, 2022.
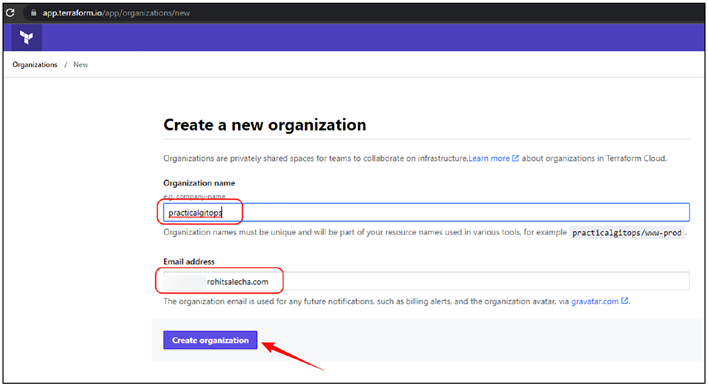
In Terraform Cloud, the first thing that we need to create is an
Organization, so enter a suitable organization name and your email
address and then click Create Organization as shown here.
Note here, possibly, you’ll need to create a unique name for your
organization as practicalgitops may not work.
Figure 4-4. Create Organization screen
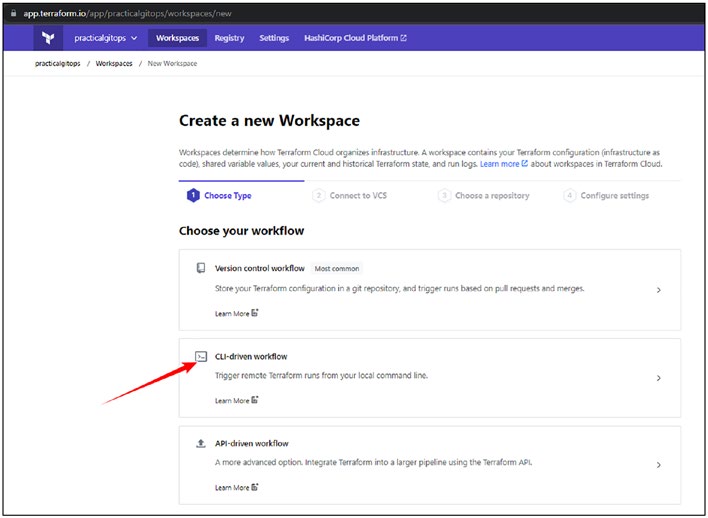
On the next screen, it’ll redirect you to select from the three options:
• Version control workflow – Execute terraform directly
from GitHub. Terraform Cloud installs the terraform
application in the repository that we wish to connect.
Triggers are executed whenever there is a git push.
129
Chapter 4 IntroduCtIon to terraform Cloud and WorkspaCes
• CLI-driven workflow – Execute terraform from your
CLI. Connect the CLI terraform binary with terraform
cloud. Manual commands need to be fired as a trigger.
• API-driven workflow – Execute terraform using
Terraform API. Supply the terraform cloud token and
access the terraform cloud environment. Triggers can
be customized to a very high degree.
One common functionality in all the preceding options is that the
terraform state is stored in the Terraform Cloud application.
In this chapter, we’ll do a deep dive into the CLI-driven workflow, and
in Chapter 5, we’ll look at the other two options.
Figure 4-5. Selecting CLI-driven workflow
130
Chapter 4 IntroduCtIon to terraform Cloud and WorkspaCes
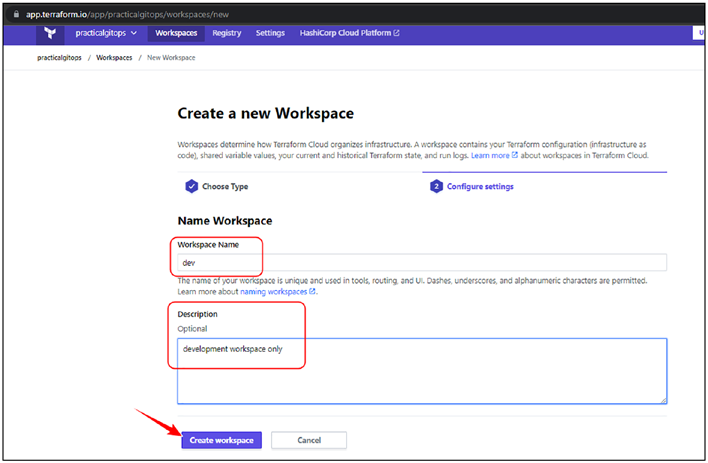
On the next screen, add the workspace name as dev with a suitable
description and then click Create workspace.
Figure 4-6. Creating a workspace called dev
4.4.2 Configure Workspace
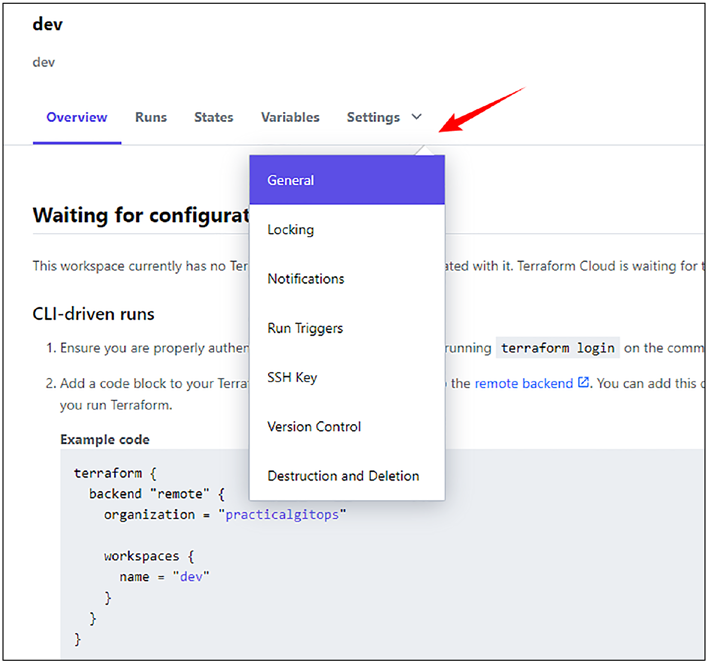
We’ve got the workspace created but not completely configured; hence,
let’s click Settings ➤ General as shown here.
131
Chapter 4 IntroduCtIon to terraform Cloud and WorkspaCes
Figure 4-7. Access workspace settings
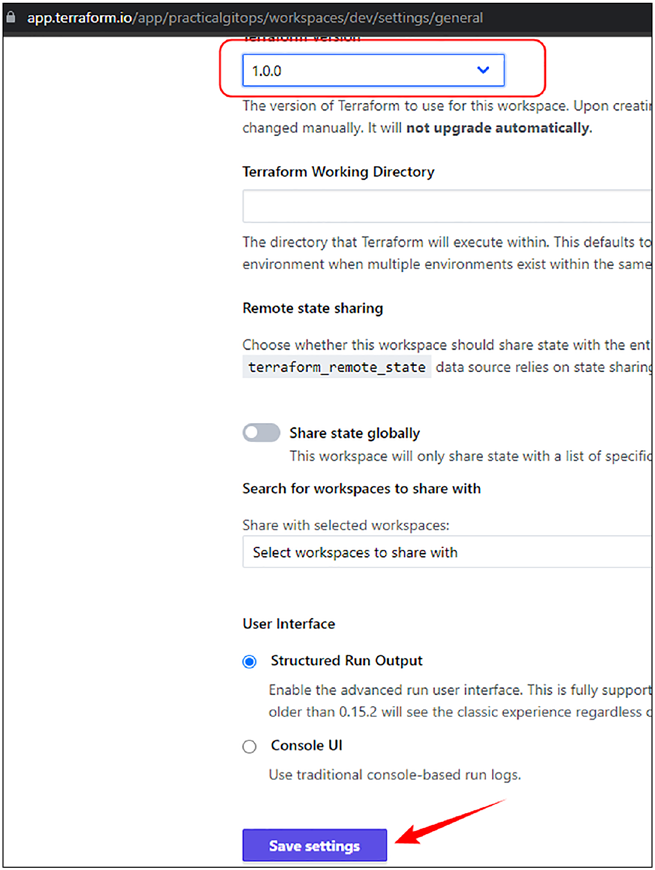
Here, we just need to change one setting as shown in the following.
However, in the next chapter, we’ll need to add an additional setting of the
“Terraform Working Directory.”
–
Lock the Terraform version to 1.0.0
Click Save settings.
132
Chapter 4 IntroduCtIon to terraform Cloud and WorkspaCes
Figure 4-8. Modifying Terraform version
133
Chapter 4 IntroduCtIon to terraform Cloud and WorkspaCes
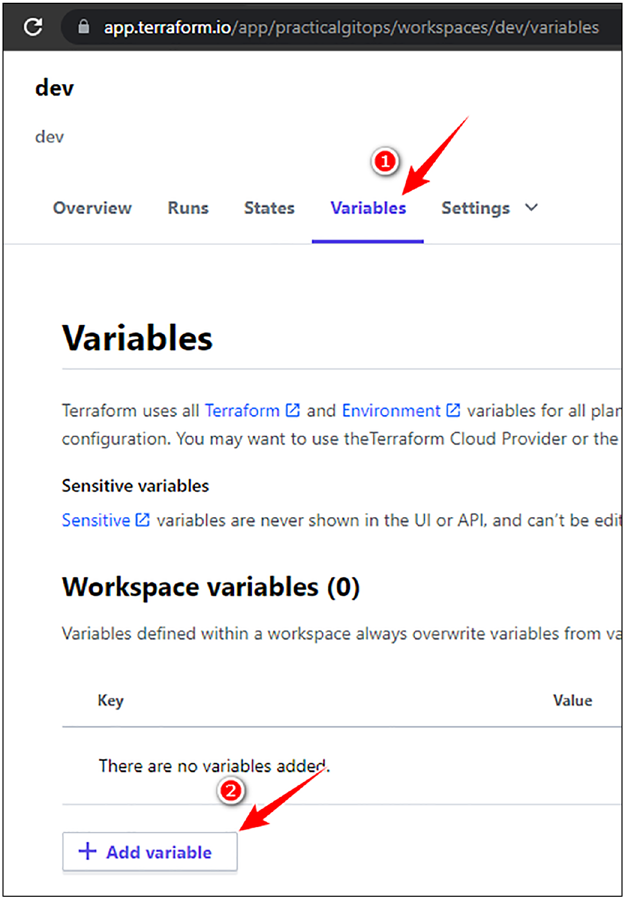
4.4.3 Workspace Variables
Next, click on the Variables tab on the left side of Settings or simply
browse to
.
134
Chapter 4 IntroduCtIon to terraform Cloud and WorkspaCes
Figure 4-9. Accessing the Terraform Variables section
135
Chapter 4 IntroduCtIon to terraform Cloud and WorkspaCes
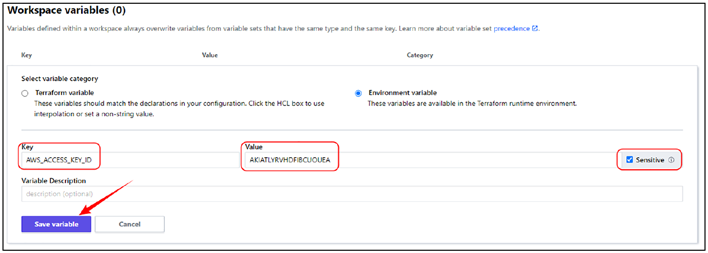
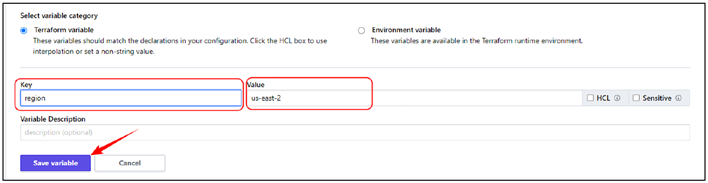
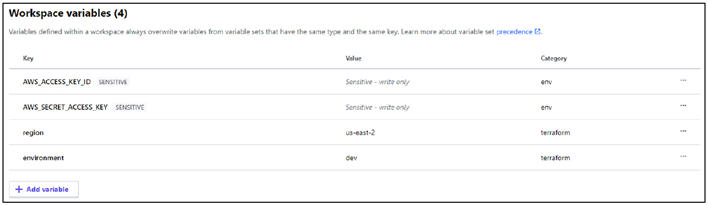
Here, we need to add four variables: two environment variables and
two terraform variables.
–
Environment variables
–
AWS Access Key ID: AWS_ACCESS_KEY_ID
–
AWS Secret Access Key: AWS_SECRET_ACCESS_KEY
Figure 4-10. Configuring AWS environment variables
–
Terraform variables
–
AWS Region: region: us-east-2
–
Environment: environment: dev
Figure 4-11. Configuring terraform variables
Your Variables page should have the following details.
136
Chapter 4 IntroduCtIon to terraform Cloud and WorkspaCes
Figure 4-12. Terraform Cloud all variables configured
Environment variables are utilized by Terraform for configuring the
environment in which terraform needs to be run. For example, we’ve
provided the AWS Access Keys as an environment variable to set up the
AWS environment just the way we used the AWS_PROFILE variable in the
previous chapters.
Terraform variables consist of data that terraform requires for its
execution and can be configured in the workspace.
4.4.4 Terraform Login
Next, we need to move our focus on the terminal to fire a very important
command. So yank up your terminal window where Terraform is installed
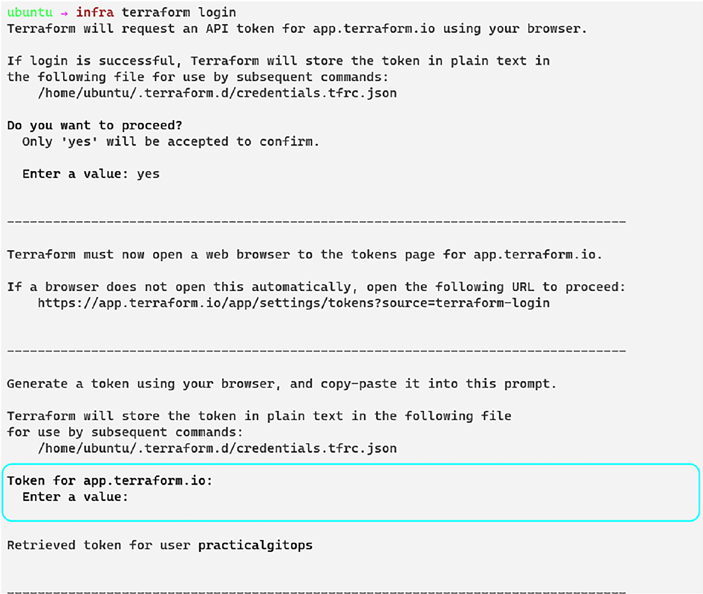
and execute the command terraform login and follow these steps: 1. Execute the command terraform login.
2. It’ll ask for your permission to store the token in a
file called credentials.tfrc.json.
3. Once you enter “Yes”, it’ll open your browser
and navigate to the following link:
137
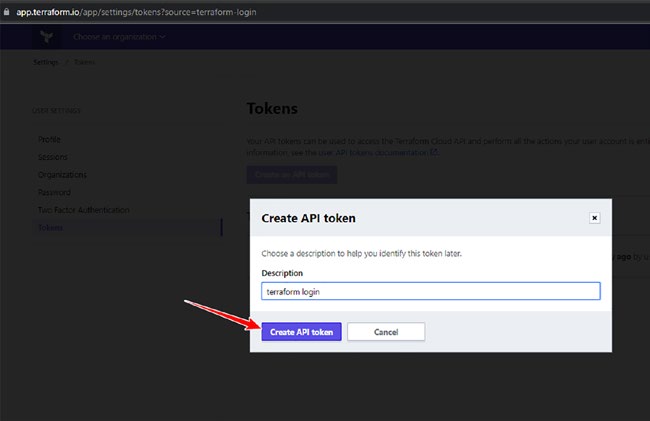
Chapter 4 IntroduCtIon to terraform Cloud and WorkspaCes
asking for your permission to create an API token. Provide any name to the
token and click Create API token.
Figure 4-13. Create API token screen
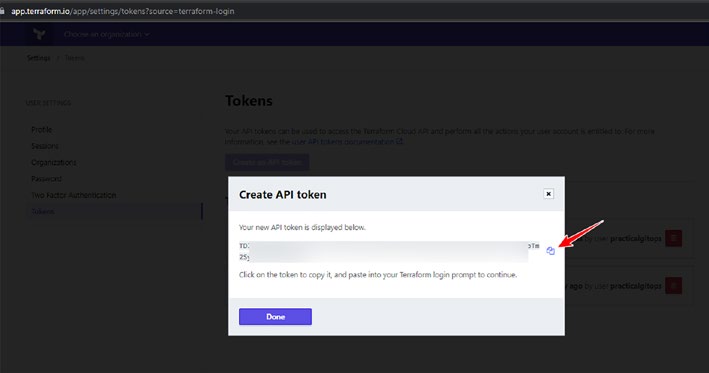
4. Copy the generated token.
138
Chapter 4 IntroduCtIon to terraform Cloud and WorkspaCes
Figure 4-14. Copying the generated token
5. Paste it in the command line where the cursor is
waiting for your input.
139
Chapter 4 IntroduCtIon to terraform Cloud and WorkspaCes
Figure 4-15. Pasting the Terraform API token
We’ve now successfully connected our CLI with Terraform Cloud!
Note this is a very sensitive operation; hence, you need to ensure
that access to this file is limited. This is needed only for this
chapter; you can then discard the value by deleting this file.
4.4.5 Running Terraform in Terraform Cloud
Now let’s execute the code that we developed in the third iteration in the
previous chapter not locally but on Terraform Cloud!
140
Chapter 4 IntroduCtIon to terraform Cloud and WorkspaCes
However, before we jump into the execution part, there is a small
change that needs to be explained. We’ve added three new files: backend.
tf, dev.hcl, and prod.hcl.
CLI Output 4-1. Chapter4 directory structure
cmd>cd chapter4/infra
cmd> tree -a
.
├── backend.tf
├── dev.hcl
├── main.tf
├── modules
│ └── securitygroup
│ ├── main.tf
│ ├── output.tf
│ └── variables.tf
├── output.tf
├── prod.hcl
├── providers.tf
├── scripts
│ └── user_data.sh
├── terraform.auto.tfvars
└── variables.tf
3 directories, 12 files
The backend.tf file informs terraform that the state needs to be
stored remotely and the exact location of the states is provided in the dev.
hcl and prod.hcl files for the development and production workspaces, respectively.
141
Chapter 4 IntroduCtIon to terraform Cloud and WorkspaCes
Code Block 4-2. backend.tf file
File: chapter4/infra/backend.tf
1: terraform {
2: backend "remote" {}
3: }
Code Block 4-3. dev.hcl file
File: chapter4/infra/dev.hcl
1: workspaces { name = "dev" }
2: hostname = "app.terraform.io"
3: organization = "practicalgitops"
Through this new configuration file, we are basically telling terraform
to store the terraform.tfstate file in the dev workspace that was created in the practicalgitops organization earlier through the GUI on app.
terraform.io.
Let’s now run our Terraform commands.
Code Block 4-4. Running terraform init
cmd> cd chapter4/infra
cmd> terraform init -backend-config=dev.hcl
Initializing modules...
- generic_sg_egress in modules/securitygroup
- http_sg_ingress in modules/securitygroup
- ssh_sg_ingress in modules/securitygroup
Initializing the backend...
Successfully configured the backend "remote"! Terraform will
automatically
use this backend unless the backend configuration changes.
142
Chapter 4 IntroduCtIon to terraform Cloud and WorkspaCes
XXXXXXXXXXXXXXX------SNIPPED-------XXXXXXXXXXXXXXXXXXXXX
There are three interesting things to note here:
1. The
terraform init command takes an additional
argument ( -backend- config=dev.hcl) specifying the
details about the remote backend configuration.
2. Everything is now being initialized in Terraform
Cloud, and the state file will also be stored there as is
evident from the message Successfully configured
the backend “remote” .
3. Last but most importantly, we are no longer
specifying the AWS Profile credentials! The
command to export the AWS_PROFILE variable
is not needed anymore because terraform will be
utilizing the AWS Credentials stored as environment
variables in Terraform Cloud! Hence, we can get
rid of the AWS credentials from our local machines!
This is happening because of terraform login.
Let’s view the output for terraform plan as shown here.
Code Block 4-5. Running terraform plan
cmd> terraform plan
Running plan in the remote backend. Output will stream here.
Pressing Ctrl-C
will stop streaming the logs, but will not stop the plan
running remotely.
Preparing the remote plan...
143
Chapter 4 IntroduCtIon to terraform Cloud and WorkspaCes
The remote workspace is configured to work with
configuration at
dev relative to the target repository.
Terraform will upload the contents of the following directory,
excluding files or directories as defined by a
.terraformignore file
at /chapter4/infra/.terraformignore (if it is present),
in order to capture the filesystem context the remote workspace
expects:
/chapter4/infra
To view this run in a browser, visit:
https://app.terraform.io/app/practicalgitops/dev/runs/run-
a3a6RtaP35qttEwj
XXXXXXXXXXXXXXX------SNIPPED-------XXXXXXXXXXXXXXXXXXXXX
Let’s understand what exactly is happening here.
1. Terraform will bundle our entire working directory
that is everything under the dev directory into
Terraform Cloud, and hence, it is asking to
add .gitignore equivalent .terraformignore
in case we wish to avoid leakage of sensitive or
unnecessary data.
2. Next, once the code is uploaded, it’ll execute
terraform plan in the cloud and stream the logs
here. We can alternatively also view the live logs
in the link provided:
(ensure your authenticated).
144
Chapter 4 IntroduCtIon to terraform Cloud and WorkspaCes
Note You would be having a slightly different link depending on
the organization and workspace name. also, each run has a globally
unique number.
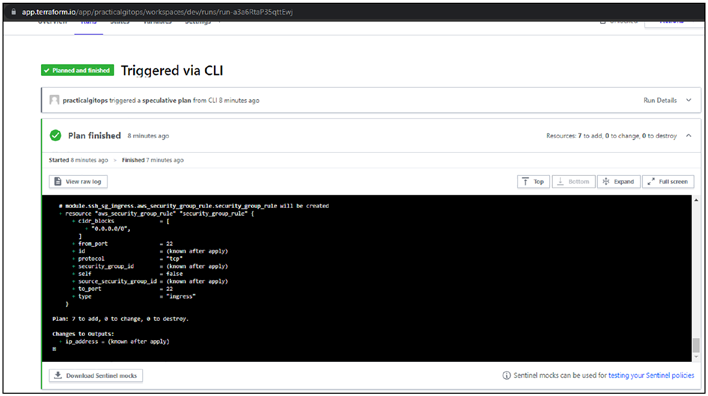
So let’s open the link and view what it looks like. Terraform Cloud is
spooling the exact same information as we saw in the CLI but in a much
prettier interface.
Figure 4-16. Terraform plan output on Terraform Cloud
Next, let’s execute terraform apply and see what happens.
CLI Output 4-6. Running terraform apply
cmd> terraform apply
Running apply in the remote backend. Output will stream here.
Pressing Ctrl-C
145
Chapter 4 IntroduCtIon to terraform Cloud and WorkspaCes
will cancel the remote apply if it's still pending. If the
apply started it
will stop streaming the logs, but will not stop the apply
running remotely.
Preparing the remote apply...
The remote workspace is configured to work with
configuration at
dev relative to the target repository.
Terraform will upload the contents of the following directory,
excluding files or directories as defined by a
.terraformignore file
at /chapter4/infra/.terraformignore (if it is present),
in order to capture the filesystem context the remote workspace
expects:
/chapter4/infra
To view this run in a browser, visit:
https://app.terraform.io/app/practicalgitops/dev/runs/run-
XPKVvP68Xk4pEB33
XXXXXXXXXXXXXXX------SNIPPED-------XXXXXXXXXXXXXXXXXXXXX
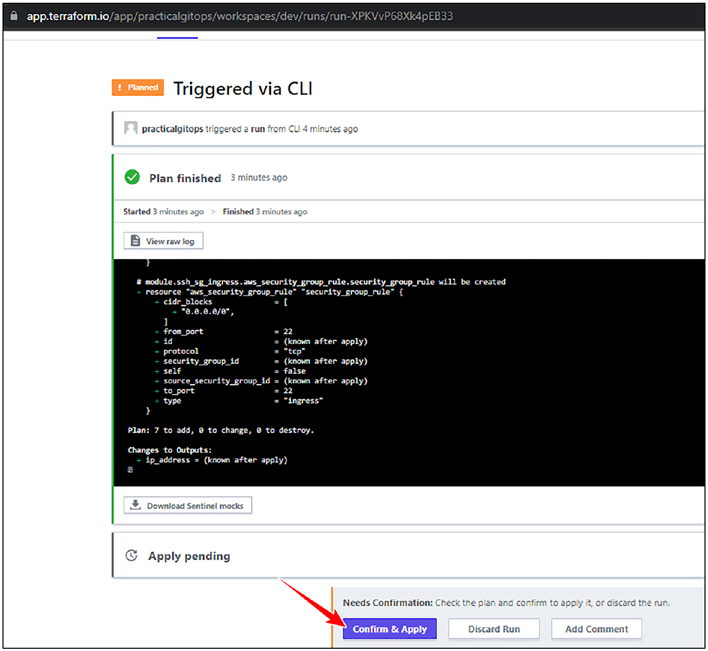
The terraform apply command also spools out an almost identical
output on the CLI; however, if we open the brows
(ensure your authenticated), it looks a bit different.
146
Chapter 4 IntroduCtIon to terraform Cloud and WorkspaCes
Figure 4-17. Output of terraform apply on Terraform Cloud
What’s happening here is that Terraform is awaiting our approval on
the GUI, that is, on the browser to confirm and apply the plan. Earlier
we were getting a cursor on the CLI (which we do get now as well, but
it is recommended to apply from cloud); however, here, it is asking for
approval on the Terraform Cloud portal.
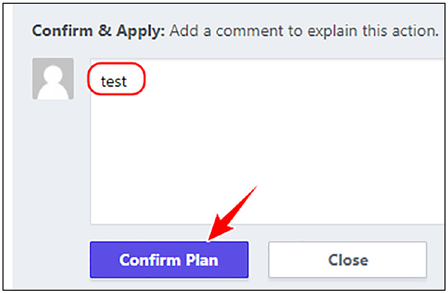
So let’s go ahead and click Confirm & Apply and see what happens.
When you hit the Confirm & Apply button, it’ll ask for a comment; just add
any appropriate comment and click Confirm Plan as shown here.
147
Chapter 4 IntroduCtIon to terraform Cloud and WorkspaCes
Figure 4-18. Comment before applying
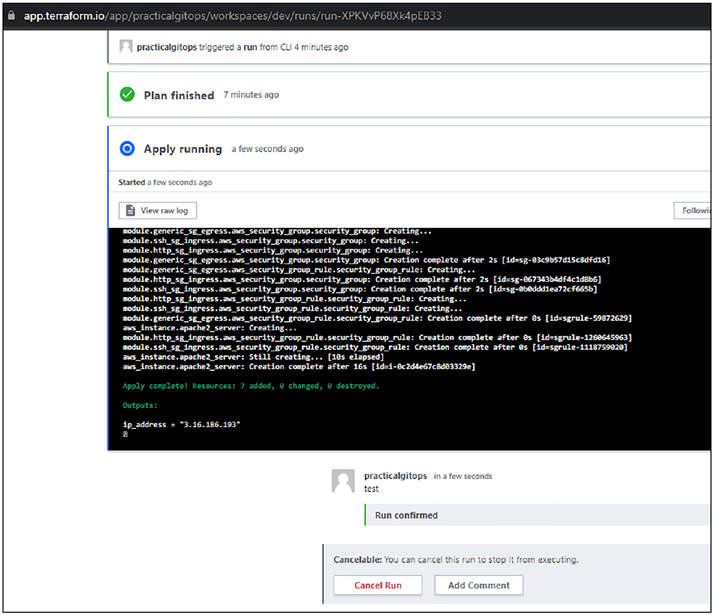
We can see that the plan is being applied as shown here.
148
Chapter 4 IntroduCtIon to terraform Cloud and WorkspaCes
Figure 4-19. Output of terraform apply on Terraform Cloud
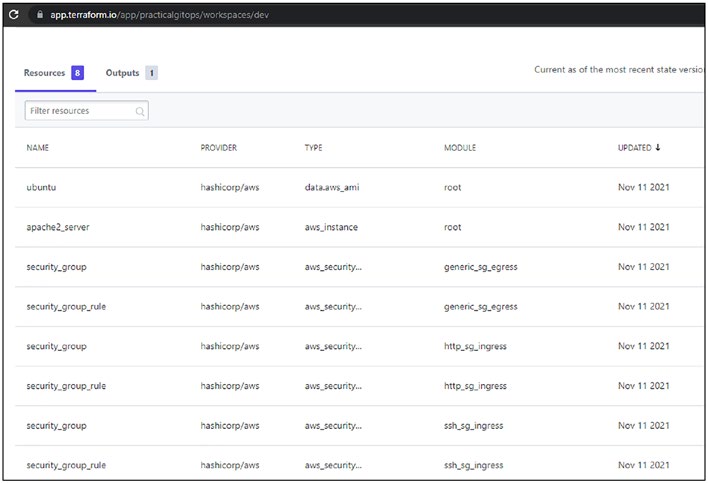
Once the plan is applied successfully, navigate to the Overview tab and
you should be able to see a very nicely formatted output of everything that
has been created in this plan as shown here.
149
Chapter 4 IntroduCtIon to terraform Cloud and WorkspaCes
Figure 4-20. Terraform Apply Overview showing all
resources created
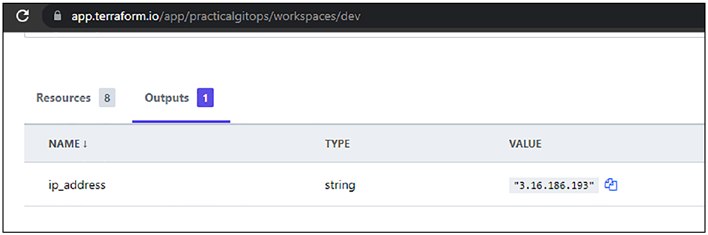
It also provides the details of the Output in the tab next to the
Resources tab as shown here.
Figure 4-21. Terraform Output field value on Terraform Cloud
150
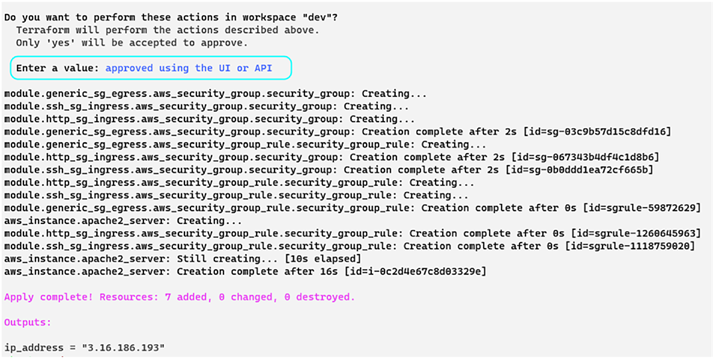
Chapter 4 IntroduCtIon to terraform Cloud and WorkspaCes
Interestingly, the same output is also streamed in our CLI as
shown here.
Figure 4-22. Terraform Cloud output streamed on CLI
Great! So we are executing Terraform commands from the CLI, and all
operation is happening on Terraform Cloud! Now, we can share this same
source code with other team members. They can then make changes to the
terraform code and deploy them from their machine, and the terraform
state remains shared between them.
Whenever a team member runs terraform apply, the state is first
checked remotely and then updated in the cloud.
Let’s now destroy by using the terraform destroy command as shown
in the following. We can use the --auto-approve flag to override the manual approval in Terraform Cloud for destruction as well as apply.
CLI Output 4-7. Running terraform destroy
cmd> terraform destroy --auto-approve
Running apply in the remote backend. Output will stream here.
Pressing Ctrl-C
151
Chapter 4 IntroduCtIon to terraform Cloud and WorkspaCes
will cancel the remote apply if it's still pending. If the
apply started it
will stop streaming the logs, but will not stop the apply
running remotely.
Preparing the remote apply...
The remote workspace is configured to work with
configuration at
dev relative to the target repository.
Terraform will upload the contents of the following directory,
excluding files or directories as defined by a
.terraformignore file
at /chapter4/infra/.terraformignore (if it is present),
in order to capture the filesystem context the remote workspace
expects:
/chapter4/infra
To view this run in a browser, visit:
https://app.terraform.io/app/practicalgitops/dev/runs/run- gkkgV
av4xNCdcKQU
4.4.6 Terraform Cloud Run and States
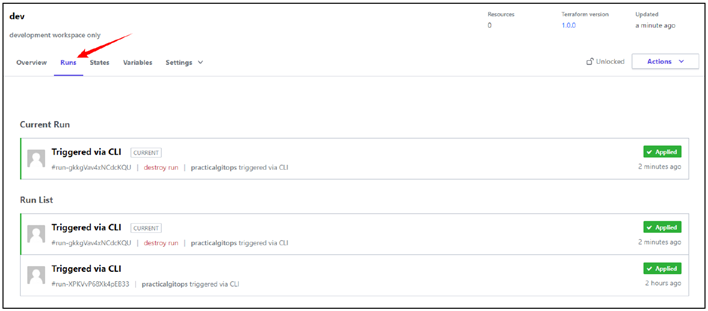
We also get a full log of all the terraform commands executed on the
workspace in the Runs tab as shown in the following with the latest being
shown first. This is something we’ll never get if we run from CLI directly.
This helps in understanding how, when, and what is happening to our
infrastructure, something difficult to decipher when using cloud storage as
a remote backend unless we develop our own solution.
152
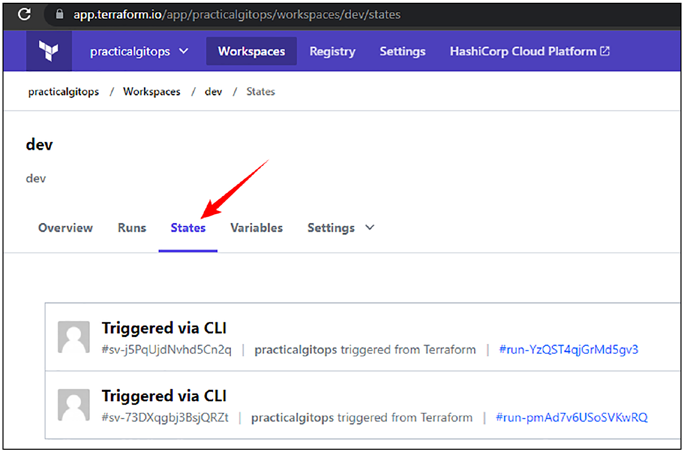
Chapter 4 IntroduCtIon to terraform Cloud and WorkspaCes
Figure 4-23. Terraform Cloud Run log
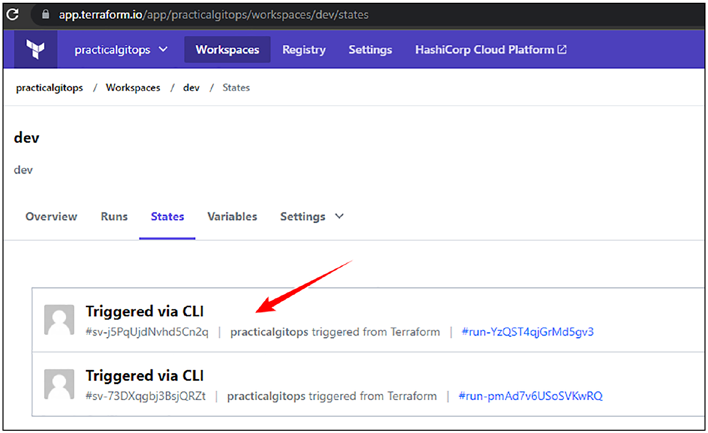
The state is now stored in the Terraform Cloud and can be viewed by
navigating to the States tab as shown here.
Figure 4-24. Terraform states log in Terraform Cloud
153
Chapter 4 IntroduCtIon to terraform Cloud and WorkspaCes
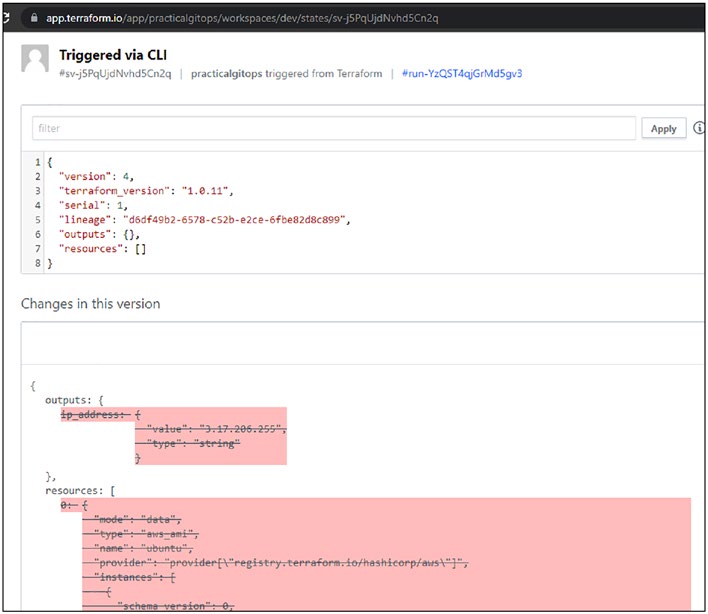
All state changes are versioned, and we can view the difference in the
state configurations between two consecutive runs. Let’s click on the first
state to view the changes.
Figure 4-25. Terraform states stored in Terraform Cloud
As can be seen from the following image, Terraform Cloud is displaying
the changes that have happened between the two states. Here, we are
seeing the difference between an apply step and a destroy step. The red
highlights show resources that were destroyed. But as and when we run
our infrastructure using Terraform Cloud, we’ll be able to see all the
changes that are happening.
154
Chapter 4 IntroduCtIon to terraform Cloud and WorkspaCes
Figure 4-26. Terraform Cloud state diff
These exceptional features of having a log of every run and displaying
of state information per run and the difference between runs provide
wonderful insights into our infrastructure changes. If we store our state in
a cloud storage backend, then we won’t get all this information out of the
box. We’ll probably have to upload the state files in a separate software to
view all this information. However, in Terraform Cloud, we get all this out
of the box.
155
Chapter 4 IntroduCtIon to terraform Cloud and WorkspaCes
4.5 Multi-environment with DRY
In the software engineering domain, DRY is a very important concept,
which basically stands for Don’t Repeat Yourself. Infrastructure as Code
metamorphoses your infrastructure projects into software projects, and
hence, this same principle is applicable here as well. So how do we go
about creating Terraform code that is DRY?
4.5.1 Adding Production Environment
Well, we are already doing that with our current code base. The only
additional file that we’ve added is prod.hcl as shown here, which is only pointing to a different workspace, that is, prod.
Code Block 4-8. File: code\infra\prod.hcl
File: code\infra\prod.hcl
1: workspaces { name = "prod" }
2: hostname = "app.terraform.io"
3: organization = "practicalgitops"
Let’s follow the same steps as provided in the “Creating a Workspace”
section to create a new prod workspace.
Tip It is strongly recommended here to use aWs organizations to
create different environments to achieve proper segregation between
dev and prod accounts. We’ll learn about it in more detail in Chapter
8 where we’ll be set up and discuss aWs organizations with a multi-
account strategy completely using terraform.
156
Chapter 4 IntroduCtIon to terraform Cloud and WorkspaCes
Keeping all the steps the same as we did for the dev workspace, the
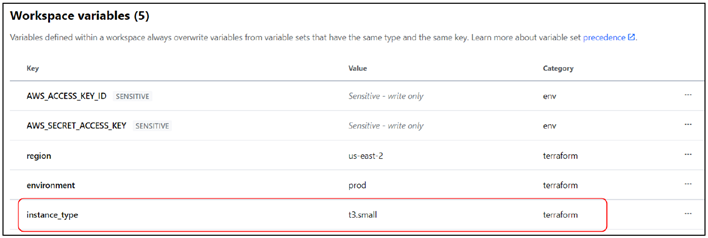
only difference in this new prod workspace is an additional variable that
we are adding in the Terraform Cloud, that is, instance_type variable, and providing it a value of t3.small. We are also changing the environment
variable value to prod. We could also change the region.
Figure 4-27. Terraform Cloud variables
Why are we doing this? Because our production system needs a little
more higher configuration machine. Hence, we can override the value of
any variable specified in the terraform.auto.tfvars file by specifying the same here in Terraform Cloud.
Let’s run the terraform code in our new production environment by
specifying a different backend configuration file this time around.
CLI Output 4-9. Running terraform init error
cmd> cd chapter4/infra
cmd> terraform init -backend-config=prod.hcl
Initializing modules...
Initializing the backend...
╷
│ Error: Backend configuration changed
157
Chapter 4 IntroduCtIon to terraform Cloud and WorkspaCes
│
│ A change in the backend configuration has been detected,
which may require migrating existing state.
│
│ If you wish to attempt automatic migration of the state, use
"terraform init -migrate-state".
│ If you wish to store the current configuration with no
changes to the state, use "terraform init -reconfigure".
When we run terraform init with a different backend configuration,
we get an error because terraform has not been initialized for prod.hcl; it was initialized for the dev environment earlier. Here, we’ve two options:
1. Run
rm -rf .terraform to remove the terraform
configuration so that it can create a new one.
2. Run
terraform init -backend-config=prod.hcl
-reconfigure, which we’ll reconfigure the state.
We’ll, however, proceed with the nondestructive one, that is,
reconfiguring the state as shown here.
CLI Output 4-10. Terraform init reconfigure
cmd> terraform init -backend-config=prod.hcl -reconfigure
cmd> terraform plan
Running plan in the remote backend. Output will stream here.
Pressing Ctrl-C
will stop streaming the logs, but will not stop the plan
running remotely.
XXXXXXXXXXXXXXX------SNIPPED-------XXXXXXXXXXXXXXXXXXXXX
# aws_instance.apache2_server will be created
+ resource "aws_instance" "apache2_server" {
158
Chapter 4 IntroduCtIon to terraform Cloud and WorkspaCes
+ ami = "ami-06c7d6c0
987eaa46c"
XXXXXXXXXXXXXXX------SNIPPED-------XXXXXXXXXXXXXXXXXXXXX
+ instance_type = " t3.small"
+ ipv6_address_count = (known after
apply)
+ ipv6_addresses = (known after
apply)
+ key_name = "gitops"
XXXXXXXXXXXXXXX------SNIPPED-------XXXXXXXXXXXXXXXXXXXXX
cmd> terraform apply --auto-approve
4.5.2 TF Variables Overriding
An interesting observation to note here is that our terraform variables in
the cloud for the instance_type have been successfully overridden.
Terraform Variable has the following order of precedence with the
decreasing order of priority:
1. Terraform Cloud declaration/environment variables
2. Passing variables in CLI, for example, terraform
apply -var “instance_type=t3.small”
3. Passing variable value in the terraform.auto.
tfvars file
4. Passing variable value as “default” in *.tf files
When the terraform apply completes execution, you’ll be able to see a new EC2 instance launched in the production environment.
159
Chapter 4 IntroduCtIon to terraform Cloud and WorkspaCes
In this manner, by configuring a different workspace for different
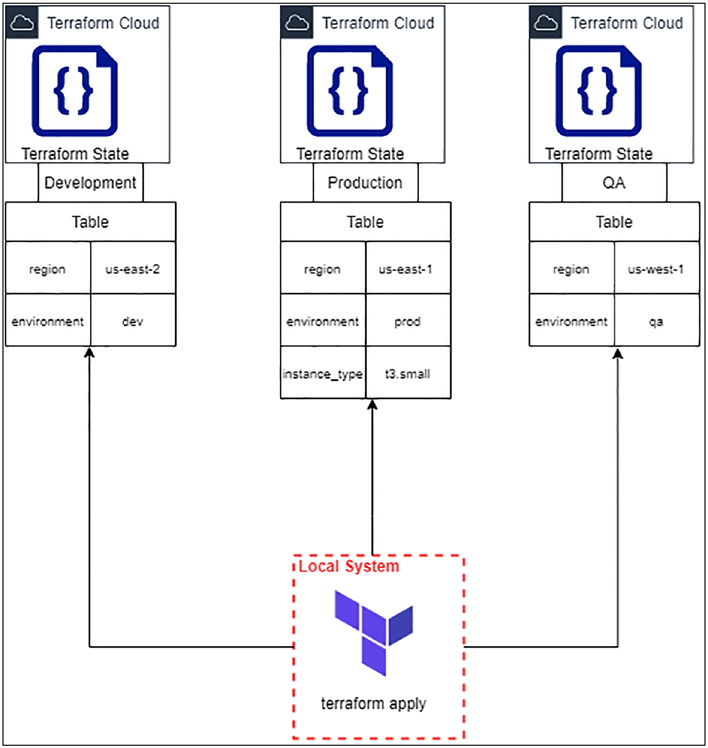
environments and tweaking the terraform/environment variables, we
can deploy various different environments using the same code base as is
illustrated in the following figure.
Figure 4-28. Terraform Cloud with different workspaces
160
Chapter 4 IntroduCtIon to terraform Cloud and WorkspaCes
4.6 Clean-Up
Just to ensure that we don’t end up getting billed unnecessarily, execute
the following commands to confirm that we’ve deleted all the resources.
CLI Output 4-11. Running terraform destroy
cmd> export AWS_PROFILE=gitops
cmd> cd chapter4/infra
cmd> terraform destroy --auto-approve
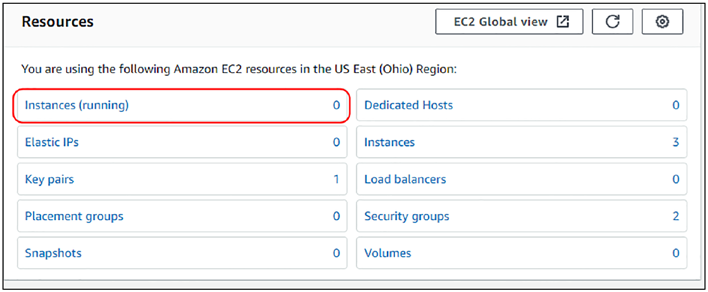
It is also highly recommended that you visit the EC2 console on
the AWS GUI and double-check if everything is deleted. The Instances
(running) field should show 0.
Figure 4-29. EC2 running instances status
Note always double-check the region; we’ve been following us-
east- 2 in this chapter.
161
Chapter 4 IntroduCtIon to terraform Cloud and WorkspaCes
4.6.1 Destroying Terraform Cloud Workspaces
It may for some reason or other be necessary to destroy a workspace,
maybe to change the workflow or maybe some sensitive information has
been accidentally committed.
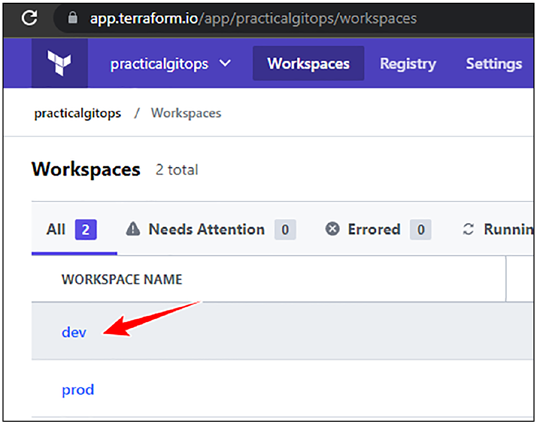
The following steps illustrate how we can go about doing the same.
1. Click on a workspace that you’d like to destroy.
Figure 4-30. Click on the workspace to destroy
2. Then click Settings and then Destruction and
Deletion as shown here.
162
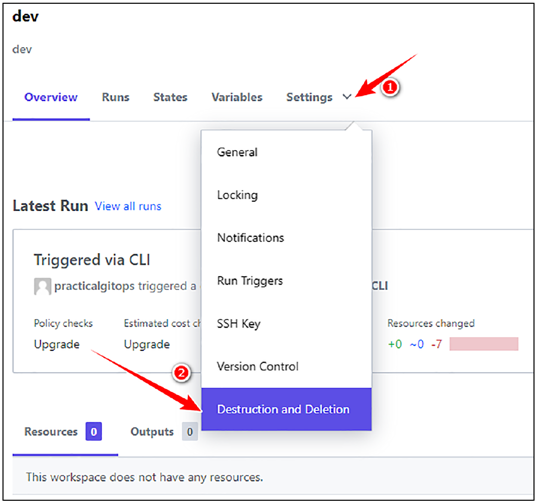
Chapter 4 IntroduCtIon to terraform Cloud and WorkspaCes
Figure 4-31. Click on destruction and deletion
3. Scroll down and click Delete from
Terraform Cloud.
163
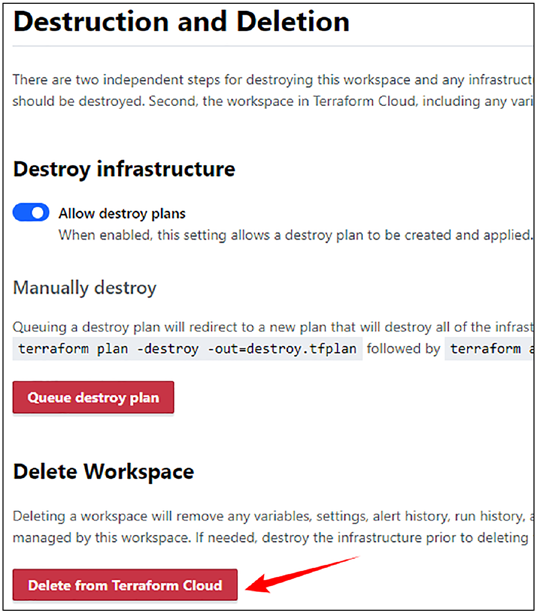
Chapter 4 IntroduCtIon to terraform Cloud and WorkspaCes
Figure 4-32. Workspace deletion
4. You’ll be asked to confirm the deletion by entering
the name of the workspace you’re deleting. Enter
the name and then click Delete workspace as
shown here.
164
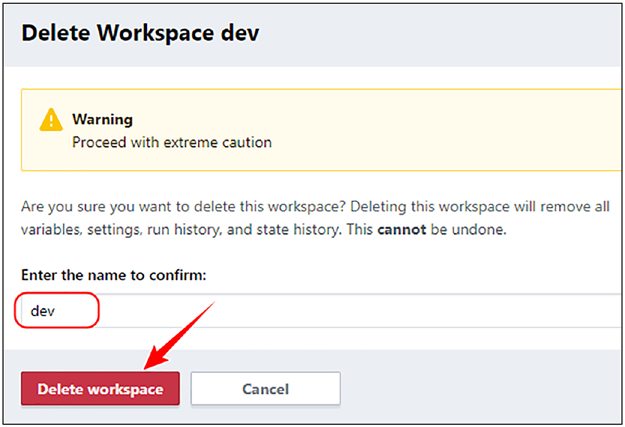
Chapter 4 IntroduCtIon to terraform Cloud and WorkspaCes
Figure 4-33. Delete workspace confirmation
5. Your workspace will then be deleted along with all
the runs and state information.
6. Similarly destroy your prod workspace as well.
4.7 Terraform Cloud Security Best Practices
Terraform Cloud is now not only storing your state but is also provisioning
your AWS infrastructure. It hence becomes an extremely critical asset for
the organization.
If an adversary gains access to your Terraform Cloud account, they can
1. Gain read-only access to your GitHub repository
2. Delete Cloud workspaces
3. View sensitive information (if any) stored in your
terraform state files
165
Chapter 4 IntroduCtIon to terraform Cloud and WorkspaCes
Hence, it is extremely important to ensure certain necessary security
best practices such as
1. Creating separate organizations for different
environments on a similar note as AWS
organizations
2. Providing access to only limited users:
3. Enabling 2FA for all users:
4. The default session timeout is 20160 minutes; you
might want to reduce it:
5. Monitoring VCS events:
6. Monitoring active sessions of users:
7. Setting a strong password:
8. Creating tokens per user and also regularly
monitoring their usage:
These are some of the best practices that can be followed from a
security perspective.
166
Chapter 4 IntroduCtIon to terraform Cloud and WorkspaCes
4.8 Conclusion
In this chapter, we looked at how we can utilize the Terraform Cloud
utility to store the terraform space in a remote and secure environment.
Terraform Cloud also provides versioning to our terraform state, thereby
allowing us to determine the changes between the previous states, thereby
enabling us to properly version control the infrastructure changes. It
also helps in creating workspaces that are mutually independent of each
other and hence can be used to set up different environments using the
same code base. Finally, we also saw how we can destroy the workspaces
created in the Terraform Cloud as a necessary action in certain unforeseen
conditions.
In this chapter, we saw all about how terraform state can be stored
remotely; however, we needed to fire the commands to execute terraform.
In the next chapter, we’ll look at two different ways in which we can
leverage Terraform Cloud to execute the commands for us by tying it with
our GitHub repository.
167
CHAPTER 5
Terraform Automation
with Git
In the previous chapter, we looked at how terraform state can be stored
remotely to allow for collaboration with a larger team. However, just
having the state configured remotely won’t help much as we also need
the teams to collaborate with their code changes. We need a mechanism
wherein the developers can push their code into an SCM (Source Code
Management) repository and view/approve each other’s changes before
executing terraform. Git allows for full collaborative workflows; hence, in
this chapter, we’ll look at two different methods using GitHub and GitHub
Actions. We can enable collaboration between developers by taking
away their responsibility of manually executing terraform commands
from CLI by leveraging the VCS driven-workflow and the Terraform API-
driven workflow provided by Terraform Cloud, thus automating the entire
terraform workflow. We’ll also finally look at the drawbacks of using the
VCS workflow and why GitHub Actions is a preferable setup.
© Rohit Salecha 2023
169
R. Salecha, Practical GitOps,
Chapter 5 terraform automation with Git
5.1 Prerequisites
In addition to the previous chapters, the following are the prerequisites for
this chapter:
– Git installed and accessible from the command line.
–
provides installation steps for almost all major operating systems.
– It is also assumed that you’ve basic working knowledge
of git commands and managing remote git
repositories.
– GitHub account; we’ll be creating a number of reposito-
ries from this chapter onward to keep learning clean.
–
– You’ve connected GitHub with SSH (optional)
– I’ll be using git mainly from the CLI, and hence, whenever
performing git push, you’ll be asked to enter your GitHub
credentials; if you wish to avoid that, then you can configure
your Git with SSH.
–
is a guide providing instructions to set up the same across all major operating systems.
– DockerHub account
–
170
Chapter 5 terraform automation with Git
5.2 Terraform Automation with GitHub
Till now we’ve been manually executing the commands terraform init,
terraform plan, and terraform apply. In Terraform Cloud, you could
trigger a terraform plan by simply committing into your git repository!
There are absolutely no commands that need to be fired from the
command line other than checking your code into your repository. This
can be accomplished using the VCS (Version Controlled System) feature
of Terraform Cloud where we need to integrate our repository with it and
then everything is managed from Terraform Cloud.
5.2.1 Setting Up the GitHub Repository
Let’s start by first setting up a GitHub repository. Assuming you are already
logged into your GitHub account, navigate to to create a new repository and follow the following steps:
1. Create an appropriate name for your repository. I’ve
chosen to keep the naming convention as section-
chapter(n)
2. Select the appropriate visibility. I’ve chosen it as
Private for now.
3. Click Create repository.
171
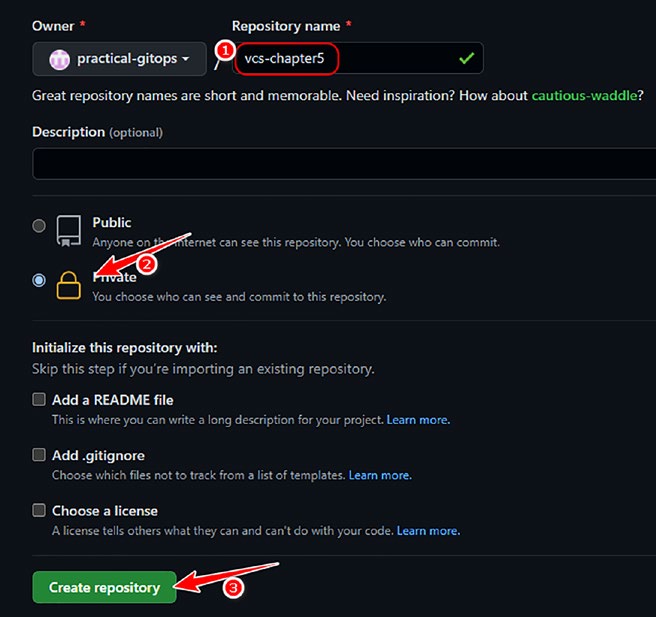
Chapter 5 terraform automation with Git
Figure 5-1. Creating GitHub repository
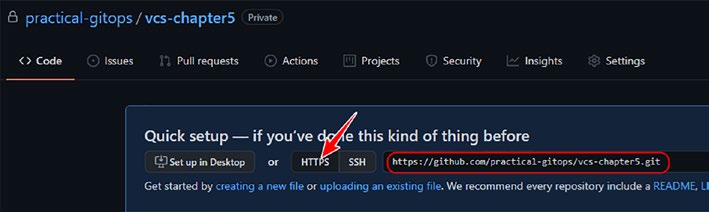
Once your repository has been created, ensure to note down your
repository URL.
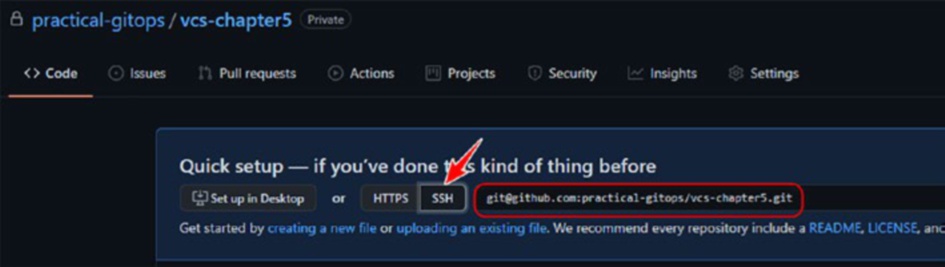
If you’ve configured your SSH keys with GitHub, then you can select
the SSH tab and note down the GitHub SSH URL as shown here.
172
Chapter 5 terraform automation with Git
Figure 5-2. GitHub SSH URL
If you’ve not configured SSH and are going to enter your credentials,
then select the HTTPS tab as shown here.
Figure 5-3. GitHub HTTPS URL
Note it is extremely important to know which urL you are using,
whether httpS or SSh, as depending on that, you’ll be authenticated
to Github when checking in your code.
Now, navigate to the following folder location and let’s upload the code
to the GitHub repository that we’ve created.
CLI Output 5-1. Adding code to the GitHub repository
cmd> cd chapter5/vcs
cmd> tree -a
.
173
Chapter 5 terraform automation with Git
├── .gitignore
├── README.md
└── infra
├── main.tf
├── modules
│ └── securitygroup
│ ├── main.tf
│ ├── output.tf
│ └── variables.tf
├── output.tf
├── providers.tf
├── scripts
│ └── user_data.sh
├── terraform.auto.tfvars
└── variables.tf
├── README.md
4 directories, 12 files
cmd> git init
cmd> git add .
cmd> git commit -m "first commit"
cmd> git branch -M main
# Enter proper URL here, If you've not configure SSH then enter
HTTPS URL
cmd> git remote add origin <your_https_or_ssh_url_here>
cmd> git push -u origin main
Visit the GitHub repository URL to confirm if all files have been
uploaded successfully.
174
Chapter 5 terraform automation with Git
5.2.2 Connecting GitHub with Terraform Cloud
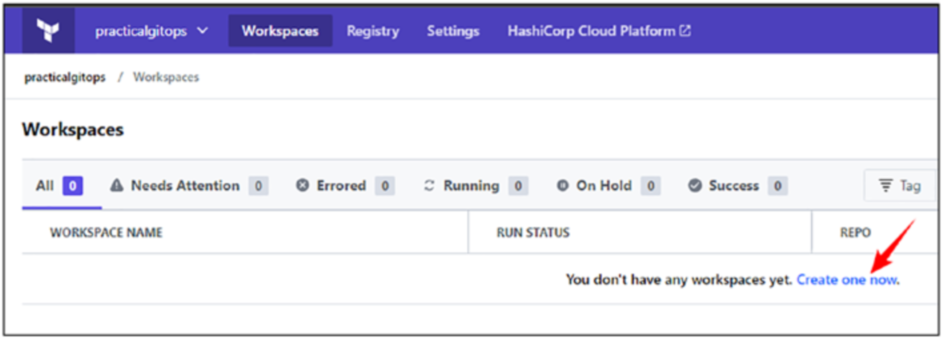
Visit the Terraform Cloud application and click on create new workspace
as shown here.
Figure 5-4. Creating new Terraform Cloud workspace
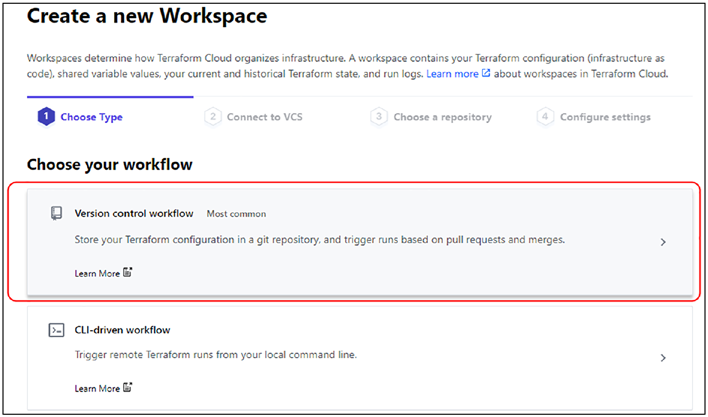
In the new workspace creation screen, select the Version control
workflow as shown here.
Figure 5-5. Selecting Version control workflow
175
Chapter 5 terraform automation with Git
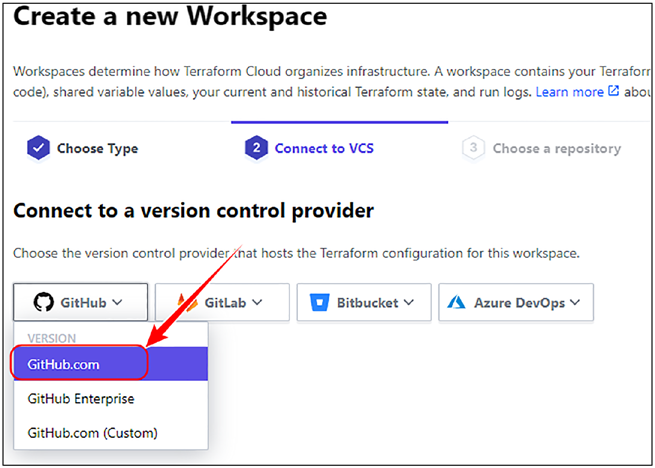
In the Connect to VCS section, select GitHub as shown here.
Figure 5-6. Connecting Terraform Cloud to GitHub.com
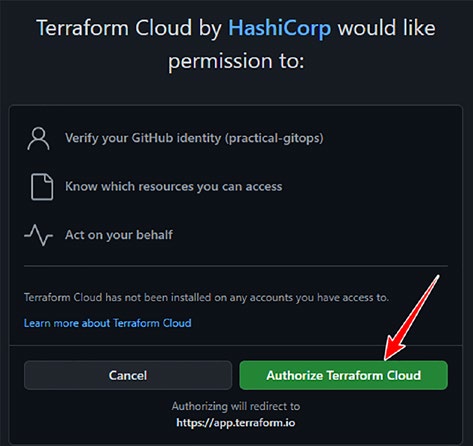
When you select GitHub, you’ll be prompted to authorize Terraform
Cloud to access your GitHub account as shown in the following. Click
Authorize Terraform Cloud.
176
Chapter 5 terraform automation with Git
Figure 5-7. Authorizing Terraform Cloud
Note if you’ve pop-up blockers installed, then the preceding step
will fail. please allow popups for this particular site.
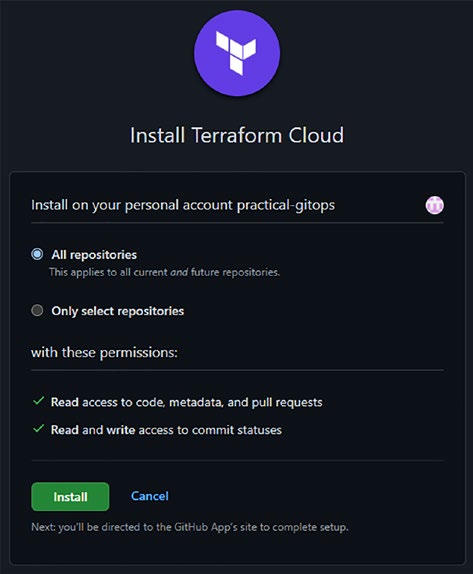
Next, there will be another popup that will ask your permission to
install Terraform Cloud in your GitHub repositories as shown here.
Note Do not click on install here as this is an excessive permission
and terraform Cloud will have read access to all your repositories.
please check the next steps.
177
Chapter 5 terraform automation with Git
Figure 5-8. Installing Terraform Cloud to the GitHub repository
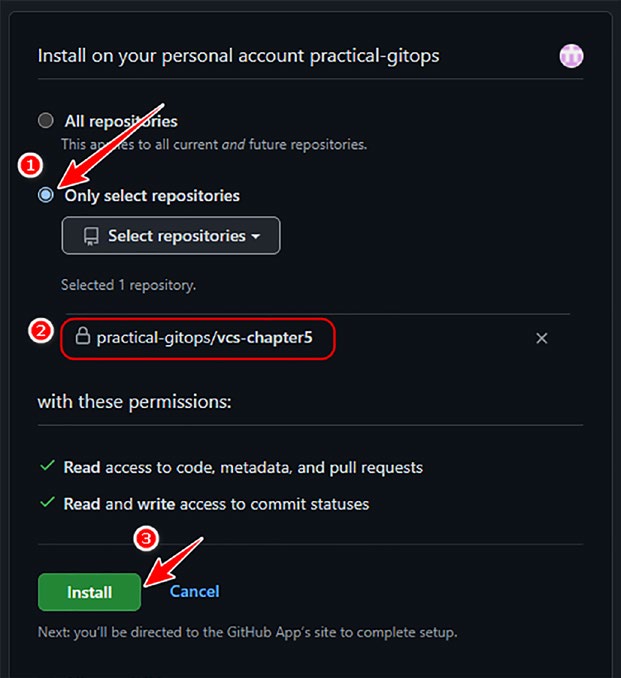
Since we don’t wish to provide access to all our repositories, we’ll
follow the following steps:
1. Select radio button Only select repositories.
2. Select the repository we just created in the drop-
down box.
3. Click Install.
178
Chapter 5 terraform automation with Git
Figure 5-9. Selecting specific GitHub repository only
5.2.3 Creating VCS-Driven Workspace
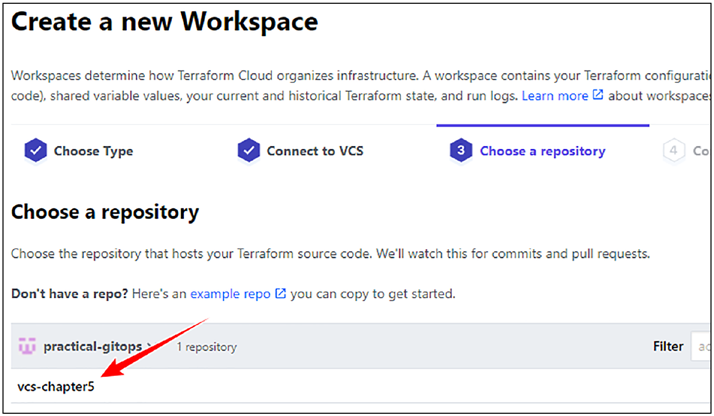
Once the authorization has been completed, you’ll be redirected to the
Terraform Cloud, and the repository that we had selected will now be
shown as follows. Let’s click on it to proceed further.
179
Chapter 5 terraform automation with Git
Figure 5-10. Selecting the GitHub repository connected
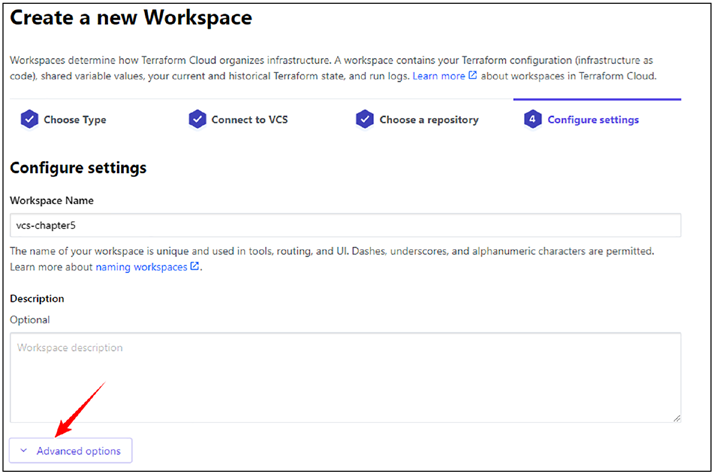
Finally, we’ll be on the Configure Settings tab where we need to put in
some additional configurations. Click Advanced options as shown here.
180
Chapter 5 terraform automation with Git
Figure 5-11. Configuring advanced settings
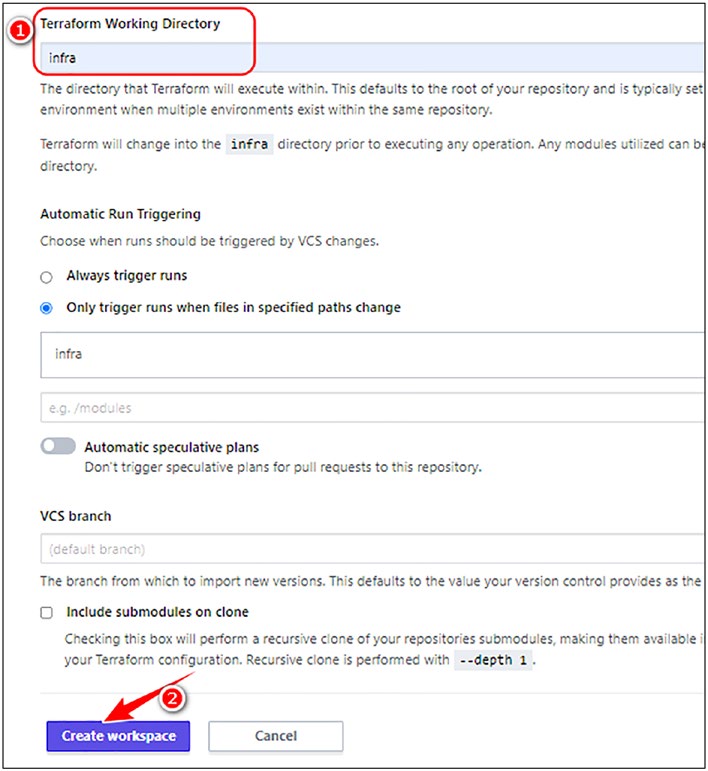
There is a very important configuration that we need to add, and that is
about the working directory as shown here.
1. Enter the name of the Terraform Working
Directory as infra.
2. Click
Create workspace.
181
Chapter 5 terraform automation with Git
Figure 5-12. Configuring Terraform Working Directory
This is a very important configuration because Terraform will be
downloading the entire GitHub repository on its own servers. It’ll by
default run the terraform commands on the root folder, but since there are
no *.tf files, it’ll fail.
Hence, we need to inform Terraform Cloud that all our *.tf files are
actually in the infra folder.
182
Chapter 5 terraform automation with Git
5.2.4 Configuring Environment Variables
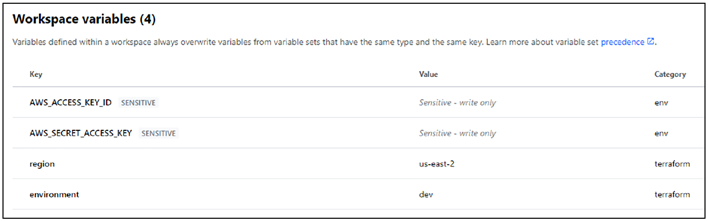
Next, we need to configure the variables section as we did in the earlier
chapter. The following are the variables that need to be added as
shown here:
– Environment variables
– AWS Access Key ID: AWS_ACCESS_KEY_ID
– AWS Secret Access Key: AWS_SECRET_ACCESS_KEY
– Terraform variables
– Region: region: us-east-2
– Environment: environment: dev
Figure 5-13. Configuring Terraform and environment variables
Note terraform Cloud ui is constantly changing. the screenshots
you’ll see are as of nov 29, 2021.
183
Chapter 5 terraform automation with Git
5.2.5 Executing Plan in Cloud
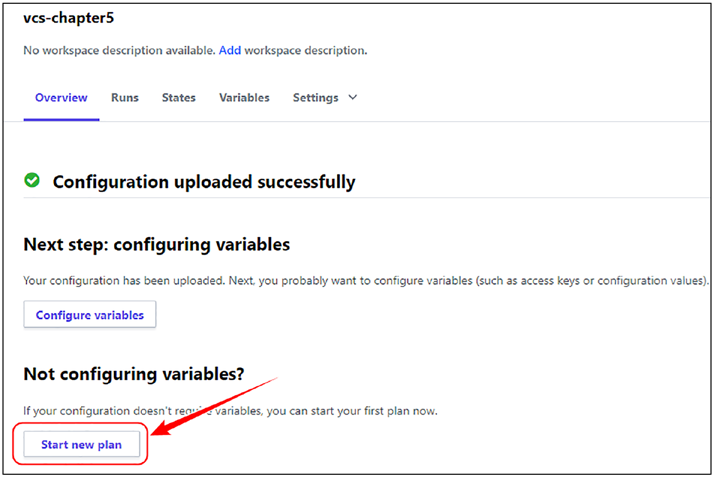
Now that we’ve everything configured, let’s visit our workspace and start
the build. When configuring the VCS with Terraform Cloud for the very
first time, we need to trigger the build manually using the Start new plan
button as shown here.
Figure 5-14. Manually triggering Terraform VCS workflow
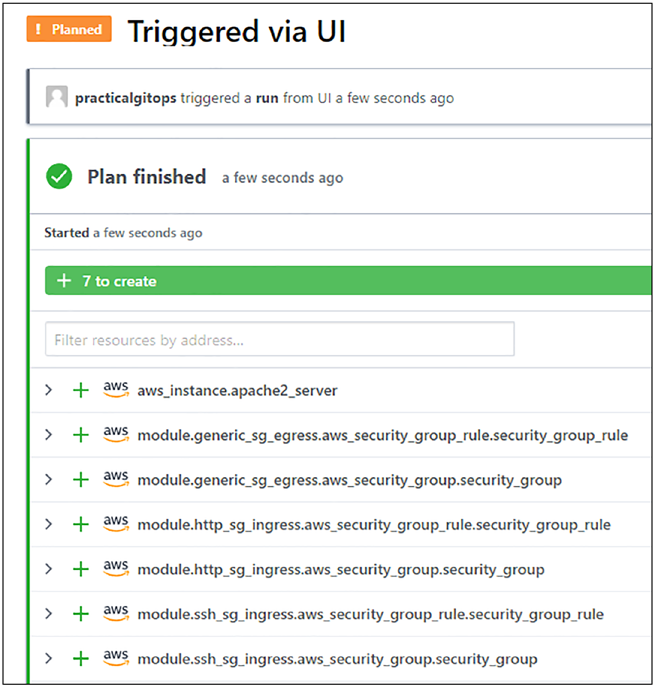
After clicking Start new plan, it’ll run terraform plan and will show what resources are going to be created as shown here.
184
Chapter 5 terraform automation with Git
Figure 5-15. Terraform plan output in Terraform Cloud
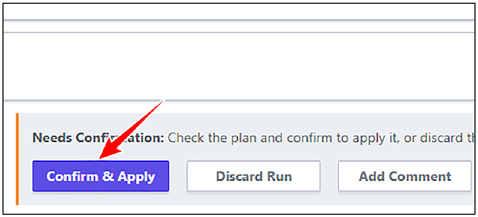
If we scroll down a little, you’ll see that the plan is waiting for our
confirmation and approval just like how we had in the CLI run. Let’s hit
Confirm and Apply.
185
Chapter 5 terraform automation with Git
Figure 5-16. Confirm & Apply terraform plan
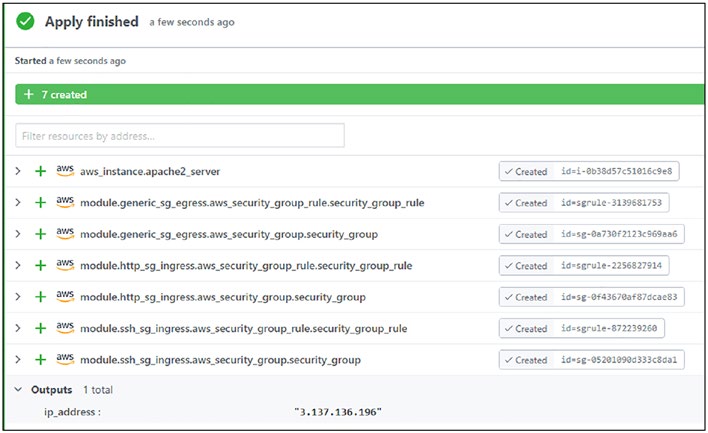
Once you click Confirm & Apply, it’ll ask to enter a comment. After a
while, it’ll show the plan being executed and finally complete with all the
resource IDs and our public IP address as shown here.
Figure 5-17. Terraform apply finished
Accessing the IP publicly lands us on the default Apache2 page as
shown here.
186

Chapter 5 terraform automation with Git
Figure 5-18. Accessing public IP
5.2.6 Triggering the VCS
What we saw here was a manual trigger that we executed from the
Terraform Cloud console. Now let’s see how we can trigger it using VCS
or GitHub.
So let’s say another colleague of yours who has access to this repository
wishes to add another EC2 server and wishes to obtain the public IP
address of that server. The following are the additions that they have added
to our existing code base.
Note when you access the code under the vcs/infra folder, you’ll
see that these lines are commented for ease of use. hence, you
just need to uncomment and push the changes to the repository.
uncommented code would look like this as shown here.
Adding a new EC2 named apache2_server_1
Code Block 5-2. Adding new EC2
File: chapter5/vcs/infra/main.tf
XXXXXXXXXXXXXXX------SNIPPED-------XXXXXXXXXXXXXXXXXXXXX
79: }
80:
187
Chapter 5 terraform automation with Git
81: // Uncomment for Section 5.3.4 - Trigger the VCS
82: resource "aws_instance" "apache2_server_1" {
83: ami = data.aws_ami.ubuntu.id
84: instance_type = var.instance_type
85: vpc_security_group_ids = [module.http_sg_ingress.sg_id,
86: module.generic_sg_egress.sg_id,
87: module.ssh_sg_ingress.sg_id]
88: key_name = var.ssh_key_name
89: user_data = file("./scripts/user_data.sh")
90: tags = {
91: env = var.environment
92: Name = "ec2-${local.name-suffix}"
93: }
94:
95: depends_on = [
96: module.generic_sg_egress
97: ]
98: }
Adding a new output block as ip_address_1
Code Block 5-3. Adding an output block for a new EC2
File: chapter5/vcs/infra/output.tf
XXXXXXXXXXXXXXX------SNIPPED-------XXXXXXXXXXXXXXXXXXXXX
6: // Uncomment for Section 5.3.4 - Trigger the VCS
7: output "ip_address_1" {
8: value = aws_instance.apache2_server_1.public_ip
9: }
Let’s now push these new changes to our GitHub repository.
188
Chapter 5 terraform automation with Git
CLI Output 5-4. Pushing new EC2 changes to GitHub
cmd> git status
On branch main
Your branch is up to date with 'origin/main'.
XXXXXXXXXXXXXXX------SNIPPED-------XXXXXXXXXXXXXXXXXXXXX
modified: infra/main.tf
modified: infra/output.tf
no changes added to commit (use "git add" and/or "git
commit -a")
cmd> git add .
cmd> git commit -m "adding a new ec2"
[main c3f37a2] adding a new ec2
2 files changed, 22 insertions(+)
cmd> git push
XXXXXXXXXXXXXXX------SNIPPED-------XXXXXXXXXXXXXXXXXXXXX
remote: Resolving deltas: 100% (3/3), completed with 3 local
objects.
To gitops:practical-gitops/vcs-chapter5.git
3483cdf..c3f37a2 main -> main
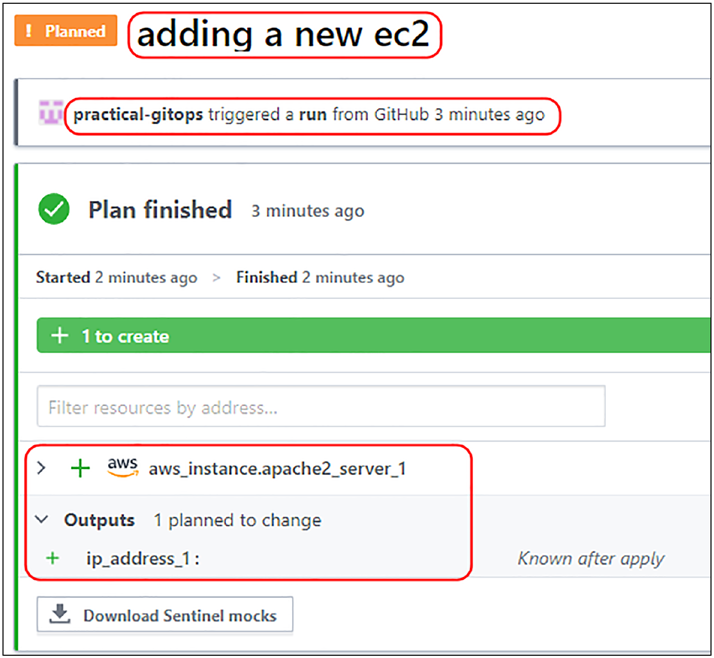
As soon as our colleague pushed the changes into the GitHub
repository, we can see the terraform plan getting executed automatically
because of the GitHub push trigger.
The name of the trigger is the same as the commit message that we set.
We can also observe the name of the new server and the output that we
had declared.
189
Chapter 5 terraform automation with Git
Figure 5-19. New EC2 terraform plan
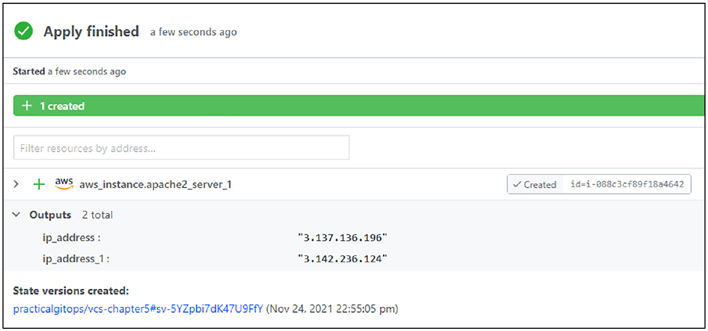
Let’s confirm and apply the plan, and now we have set up Terraform
in the cloud with state being stored remotely and also leveraging the full
collaboration feature of GitHub. The following screenshot shows that the
new server created by our colleague has been set up and running!
190
Chapter 5 terraform automation with Git
Figure 5-20. New EC2 terraform apply finished
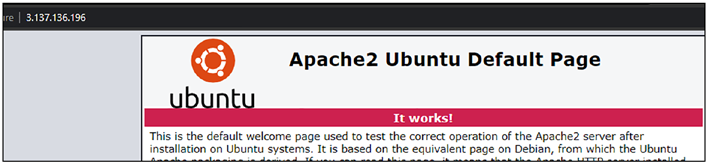
The new server is also accessible as the old one!
Figure 5-21. New EC2 publicly accessible
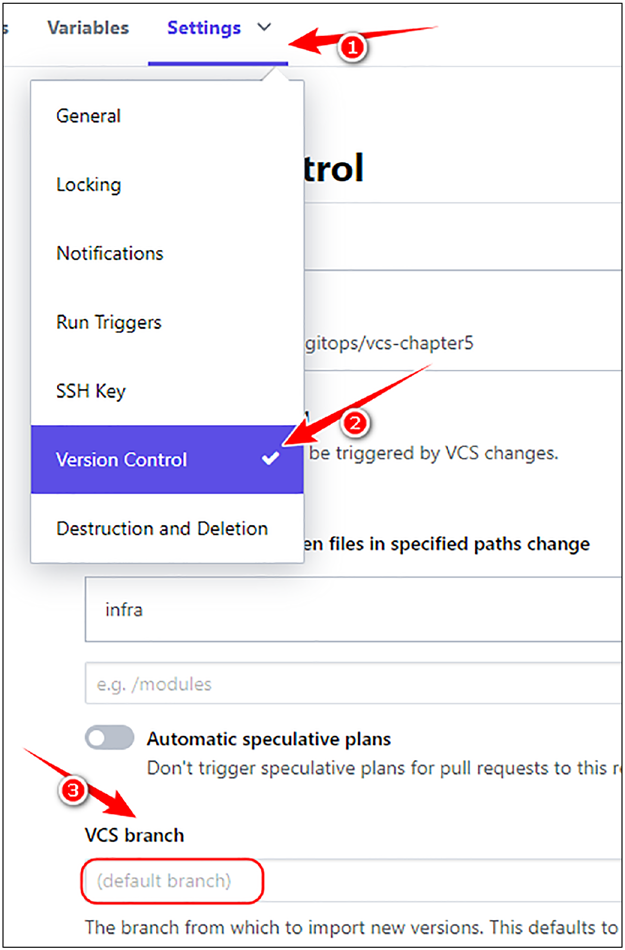
We can further fine-tune the collaboration by ensuring that Terraform
Cloud triggers deployments only from a specific branch by configuring that
branch name as shown here.
1. Go to Settings.
2. Click Version Control.
3. Enter the branch name in the VCS branch field.
191
Chapter 5 terraform automation with Git
Figure 5-22. Fine-tuning branch settings
192
Chapter 5 terraform automation with Git
5.2.7 Destroying in Terraform Cloud
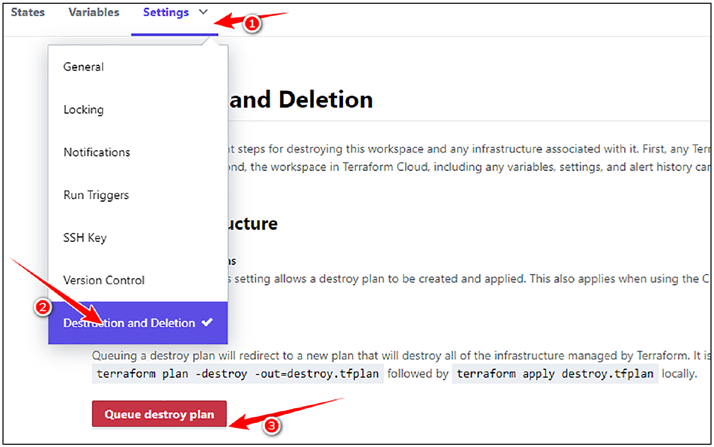
The steps to destroy the plan in Terraform Cloud were already discussed in
the previous chapter. However, they are repeated in brief here:
1. Click Settings.
2. Click Destruction and Deletion.
3. Click
Queue destroy plan.
Figure 5-23. Terraform destroy from Terraform Cloud
It shall ask for confirmation; please confirm by providing the name of
the workspace, and the destroy plan shall be executed.
193
Chapter 5 terraform automation with Git
5.2.8 Drawbacks of Terraform Cloud with VCS
We now have the terraform state stored remotely and also can use
Terraform Cloud VCS with GitHub to leverage collaboration with different
team members. However, the primary drawback of this approach is that
we no longer have control over the entire terraform workflow of init, plan,
apply, and destroy. When there is a change in GitHub, it’ll trigger the
terraform workflow.
Owing to this major limitation
• We cannot perform any linting/testing of the terraform
code prior to deployment. We may have to create a
separate branch wherein the team members may have
to test it locally, but it sort of defeats the purpose.
• We cannot add additional workflows like adding a
security guardrail to check if we’ve not leaked any
sensitive information in our commit or introduced a
security flaw.
Hence, to overcome these flaws, we’ll look at GitHub Actions wherein
we’ll have full control over the entire Terraform workflow process.
5.3 Introduction to GitHub Actions
5.3.1 CI/CD General Workflow
CI/CD operations are all about workflows that automate a certain set of
actions. Tools like Jenkins can help in creating workflows for building,
testing, and deploying software artifacts in an automated fashion. A
general CI/CD workflow would primarily consist of the following steps:
1. Pull the latest code on a trigger event like a git
commit or git push.
194
Chapter 5 terraform automation with Git
2. Build the application or the docker image using
whatever build software that application is using.
3. Push the build code to its artifact repository or the
docker image to the docker repository.
4. Pull the artifacts or the docker image from their
respective repositories and deploy in the staging/
production environment.
5. Run unit tests and security test cases on the
deployed environment.
Additional steps would be present depending on the organization and
what they wish to automate.
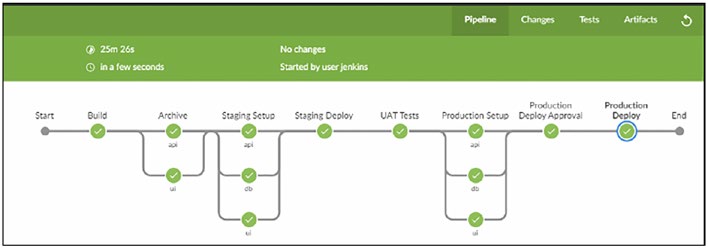
For performing these actions on a CI/CD server like Jenkins, we
need to install Jenkins and deploy a Jenkinsfile in our source code. This
Jenkinsfile is then read on a trigger event like git commit/push by Jenkins,
and it starts the entire workflow like as follows.
Figure 5-24. Jenkins stages Refer
195
Chapter 5 terraform automation with Git
5.3.2 Introduction to GitHub Actions
GitHub Actions is a service provided by GitHub.com to help us achieve
a similar workflow as the one created using Jenkins shown previously,
without having to install any software or tool. We only need to write a
YAML file and keep it in a folder named .github/workflows. When an
event like commit, push, pull request, etc., is triggered, GitHub would read
the YAML file containing all the workflow instructions and start executing
those actions, all this without having the headache to install and maintain
a full-fledged CI/CD server.
Just like in Jenkins, we have stages and steps that break down the entire
process; in GitHub Actions, we have jobs and steps. Each action file must
have at least one job, and each job must’ve at least one step.
Tip the files under .github/workflows will have the potential to
execute scripts and even read sensitive information like GithuB_
toKen. hence, it is recommended to add a file called CoDeownerS
where we can specify only certain individuals who can edit the
files stored under the .github/workflows directory (
5.3.3 Sample GitHub Actions YAML
Let’s look at a sample GitHub workflow YAML file.
Code Block 5-5. Sample GitHub Actions workflow file
File: chapter5/sample_gha.yaml
196
Chapter 5 terraform automation with Git
01: name: "Sample GHA Workflow"
02: env:
03: GLOBAL_VARIABLE: "Can be accessed by all jobs"
04: API_TOKEN: ${{ secrets.API_TOKEN }}
05:
06: on:
07: push:
08: branches:
09: - main
10: paths:
11: - "infra/**"
12: pull_request:
13: branches:
14: - main
15:
16: jobs:
17: job1:
18: runs-on: ubuntu-latest
19: env:
20: LOCAL_VARIABLE: "This is a Job1 Variable"
21: defaults:
22: run:
23: working-directory: "job1"
24: steps:
25: - name: Checkout
26: uses: actions/checkout@v2
27:
28: - name: job1_global_variable
29: run: echo "job1 with $GLOBAL_VARIABLE $API_TOKEN"
30:
31: - name: job1_local_variable
32: run: echo "job1 with $LOCAL_VARIABLE"
197
Chapter 5 terraform automation with Git
The preceding sample GitHub Actions workflow file can be divided
into three main parts.
L1–L4: Declaring the name of the workflow file and environment,
secret variables that can be called anywhere throughout the YAML
document.
L6–L14: This is the conditions or the triggers under which this
workflow will be executed. On a push to the main branch and on changes of any file in the infra folder or when a pull request is triggered on the main branch (from any branch), this workflow should be executed.
L16–L32: We are declaring the jobs that need to be executed. Here,
we are declaring a job called job1 for which we are requesting to spin up a temporary Ubuntu (latest) environment. We are declaring an environment
variable (LOCAL_VARIABLE) that will be available only to that particular
job. We are also declaring a working directory job1, which will be the
default entry point for executing any scripts.
Each job can have one or more than one step where we specify the
commands that we want to execute. The very first step on L25 is the
checkout step where we are fetching the latest code that has been checked
in. This code will be stored temporarily in the working directory that has
been defined. After that, whatever commands we wish to execute on the
latest version of the code, we can specify in the succeeding steps. All steps
are executed sequentially by default.
The steps declaration can have either a run command or a uses
attribute.
The checkout step on L25 is having the uses attribute, which is
referring to an action, which is a predefined reusable template of actions
like modules in Terraform.
GitHub Actions has many such predefined actions that can be found in
the GitHub Actions Marketplace (
).
198
Chapter 5 terraform automation with Git
5.3.4 Docker Build Automation
with GitHub Actions
Let’s take a practical example to better understand GitHub Actions by
building and then pushing a Docker image to the DockerHub public
repository.
Before we get on with understanding the code, we’ll need the
following:
–
A new repository named gha-chapter5 or whatever you’d
like to name it.
–
DockerHub Access Token, which can be generated from
the link
once you log into your DockerHub account. Please
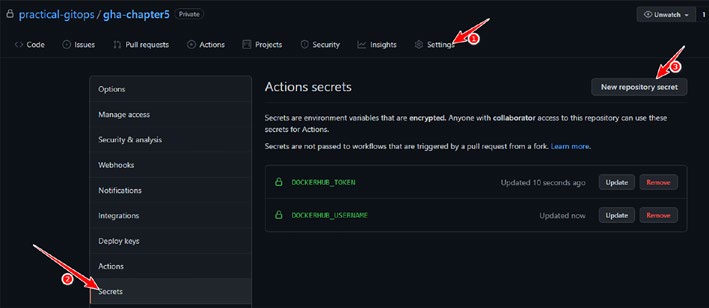
generate it and store it as a secret in the new GitHub
repository as shown here.
–
Storing secrets in GitHub:
1. Access Settings of the repository.
2. Click Secrets.
3. Click New repository secret.
Two secrets need to be stored:
• DOCKERHUB_USERNAME
• DOCKERHUB_TOKEN
199
Chapter 5 terraform automation with Git
Figure 5-25. Configuring GitHub Secrets
Let’s have a look at our GitHub Actions workflow file, which will build
and push the docker images to DockerHub.
Code Block 5-6. Workflow file for Docker image deployment
File: chapter5/gha/.github/workflows/app.yaml
01: # Github Actions Workflow file that builds and pushes the
docker images
02: name: practicalgitops.app
03: env:
04: DOCKERHUB_TAG: "${{ secrets.DOCKERHUB_USERNAME }}/
practicalgitops"
05: DOCKERFILE_PATH: app
06:
07: on:
08: push:
09: branches:
10: - main
200
Chapter 5 terraform automation with Git
11: paths:
12: - "app/**"
13: - "!**/README.md"
14:
15: # Job declaration starts.
16: jobs:
17: docker:
18: runs-on: ubuntu-latest
19: steps:
20: - name: Check out code
21: uses: actions/checkout@v2
22:
23: - name: Set up QEMU
24: uses: docker/setup-qemu-action@v1
25:
26: - name: Set up Docker Buildx
27: uses: docker/setup-buildx-action@v1
28:
29: - name: Login to DockerHub
30: uses: docker/login-action@v1
31: with:
32: username: ${{ secrets.DOCKERHUB_USERNAME }}
33: password: ${{ secrets.DOCKERHUB_TOKEN }}
34:
35: - name: Build and push
36: id: docker_build
37: uses: docker/build-push-action@v2
38: with:
39: context: "${{ env.DOCKERFILE_PATH }}"
40: push: true
41: tags: "${{ env.DOCKERHUB_TAG }}:latest"
201
Chapter 5 terraform automation with Git
L1–5: Declaring the workflow name and environment variables that’ll
be required globally.
L7–16: Trigger this workflow whenever there is a push on the
main branch and if there are any changes in the app folder (the folder containing our source code). Also ignore any changes done to README.
md in any of the folders.
L20–27: Check out the latest code and set up the entire docker build
environment.
L29–33: Authenticate to DockerHub in order to be able to push the
latest images in the next step.
L35–41: Build and push the docker image. Here, we are supplying the
context, that is, the folder where Dockerfile is located.
5.3.5 Triggering GitHub Actions
Let’s get to action by first pushing our entire code to the new repository,
and then we’ll trigger the workflow.
CLI Output 5-7. Uploading code to the remote repository for
chapter5 gha
cmd> cd chapter5/gha
cmd> git init
cmd> git add .
cmd> git commit -m "first commit"
cmd> git branch -m main
# Ensure to add your own repository URL here
cmd> git remote add origin <your_https_or_ssh_url_here>
cmd> git push -u origin main
202
Chapter 5 terraform automation with Git
Now that we’ve committed our code to the repository, let’s trigger the
workflow by doing a minor edit to one of our HTML template files. Since
this file is in the app folder, GitHub will sense a change and trigger the
workflow.
Tip You can also manually trigger the workflows from the Github
Gui by adding the workflow_dispatch condition as described here:
Code Block 5-8. HTML template edit
File: chapter5/gha/app/src/main/resources/templates/add-
user.html
13: <body>
14: <div class="container my-5">
15: <h3> Add Users</h3>
16: <div class="card">
17: <div class="card-body">
18: <div class="col-md-10">
Access the file at the chapter5/gha/app/src/main/resources/
templates/add-user.html location and edit L15 by changing Add Users text to Add User or anything you’d like between the <h3> tags as shown previously.
Once this change is done, then simply fire the following commands
again to commit the code to trigger the actions.
203
Chapter 5 terraform automation with Git
CLI Output 5-9. Uploading changes of the HTML template to
trigger docker workflow
cmd> cd chapter5/gha
cmd> git status
On branch main
Your branch is up to date with 'origin/main'.
Changes not staged for commit:
(use "git add <file>..." to update what will be committed)
(use "git restore <file>..." to discard changes in working
directory)
modified: app/src/main/resources/templates/add-
user.html
cmd> git add .
cmd> git commit -m "trigger the workflow"
cmd> git push
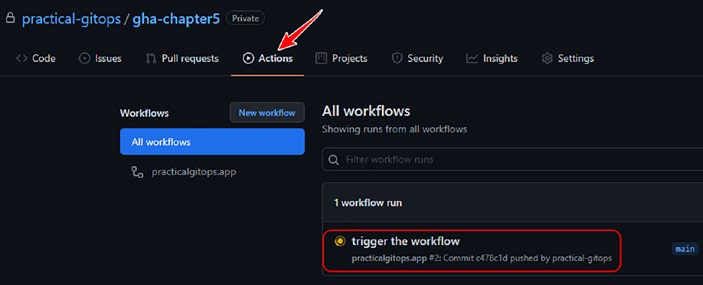
Once the commit is pushed, visit the Actions tab and observe the
workflow being initiated as shown here.
Figure 5-26. Docker workflow getting triggered
204
Chapter 5 terraform automation with Git
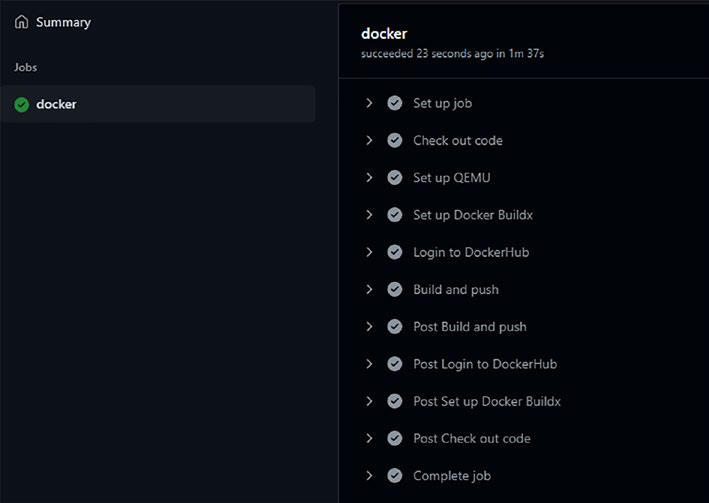
After a few minutes, you should be able to see our workflow execution
being completed as shown here. All our steps are being shown serially.
Figure 5-27. All workflow stages completing execution
205
Chapter 5 terraform automation with Git
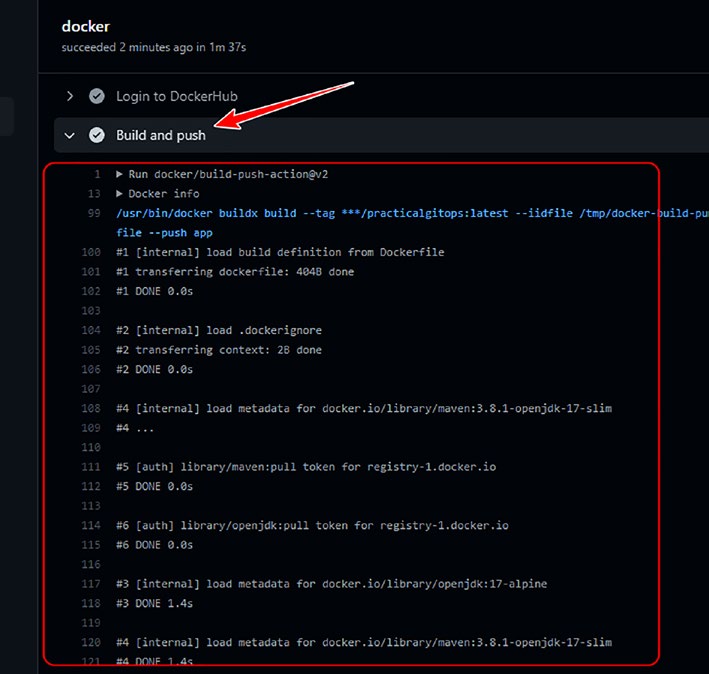
Click on any one step and check out the logs. For example, let’s click on
the Build and Push step to check out the logs.
Figure 5-28. Logs of the Build and Push step
By the end of the last step, our docker image is pushed into DockerHub
and is accessible to download and run. We’ll utilize this image when we
deploy our AWS EKS cluster in the upcoming chapters of this book. In my
case, the DockerHub image is tagged and accessible as
docker pull salecharohit/practicalgitops
() 206
Chapter 5 terraform automation with Git
For the purpose of this book, we’ll be using the image as default. You
are, however, free to use your application image.
5.4 Terraform Automation
with GitHub Actions
We saw how we can automate the process of continuously deploying
changes to our docker image. In a similar fashion, let’s understand how
we can facilitate continuous deployment of terraform changes in our infra
directory.
5.4.1 Code Walkthrough
Let’s view the code of the workflow file for terraform automation.
Note this file will be present in the chapter5/gha/.github/
workflow folder but fully commented so as not to disturb the flow of
earlier sections. please uncomment the file for use in this section.
Code Block 5-10. Terraform automation with GitHub Actions
File: chapter5/gha/.github/workflows/infra.yaml
01:# Github Actions Workflow file that automates the terraform
workflow.
02:# UnComment for section 5.4.1 - Terraform Automation with
Github Actions
03: name: practicalgitops.infra
04:
05: on:
207
Chapter 5 terraform automation with Git
06: push:
07: branches:
08: - main
09: paths:
10: - "infra/**"
11: - "!**/README.md"
12:
13: jobs:
14: terraform:
15: name: "Terraform"
16: runs-on: ubuntu-latest
17: defaults:
18: run:
19: working-directory: "infra"
20: steps:
21: - name: Checkout
22: uses: actions/checkout@v2
23:
24: - name: Setup Terraform
25: uses: hashicorp/setup-terraform@v1
26: with:
27: terraform_version: 1.0.0
28: cli_config_credentials_token: ${{ secrets.TF_API_
TOKEN }}
29:
30: - name: Terraform Init
31: id: init
32: run: terraform init -backend-config=gha.hcl
33:
34: - name: Terraform Validate
35: id: validate
208
Chapter 5 terraform automation with Git
36: run: terraform validate -no-color
37:
38: - name: Terraform Plan
39: id: plan
40: run: terraform plan -no-color
41:
42: - name: Terraform Apply
43: run: terraform apply
L5–11: Is the same as our previous docker automation workflow file
other than the folder name. So here, we want to execute this workflow only
when there is a change in the terraform code in the infra folder (except
README.md files).
L13–19: We are declaring a job called “Terraform” and setting the
working directory as infra. This means that all the commands/steps will be
executed in the infra folder where all terraform files are stored.
L21–28: Pulling the latest code and setting up Terraform in the
temporary Ubuntu container that we’ve spun up for the job.
L30-43: Is the general terraform workflow that we are looking to
automate by firing all the commands terraform init and terraform
validate
5.4.2 Terraform Login Token
Now that we’ve understood the code, let’s look at how we can deploy this
new workflow. For this, there are a couple of changes we need to make and
create a new workspace in terraform.
We need to fetch Terraform Token that we’d created in Section 4.4.4. In
most cases, the token would be stored in the ~/.terraform.d/credentials.
tfrc.json file.
Alternatively, you could simply create a new token by visitin
.
209
Chapter 5 terraform automation with Git
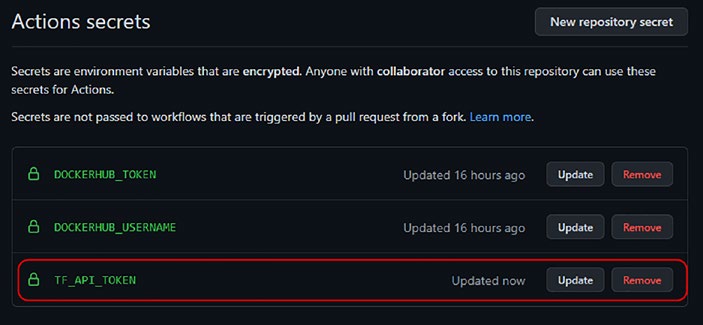
We need to store this Terraform Token as a GitHub secret in the gha-
chapter5 repository that we’d created as shown here.
TF_API_TOKEN
Figure 5-29. Configuring Terraform Token as a GitHub secret
5.4.3 Creating an API-Driven
Terraform Workspace
Next, we need to create another terraform workspace but this time, with
API-driven workflow as shown here.
210
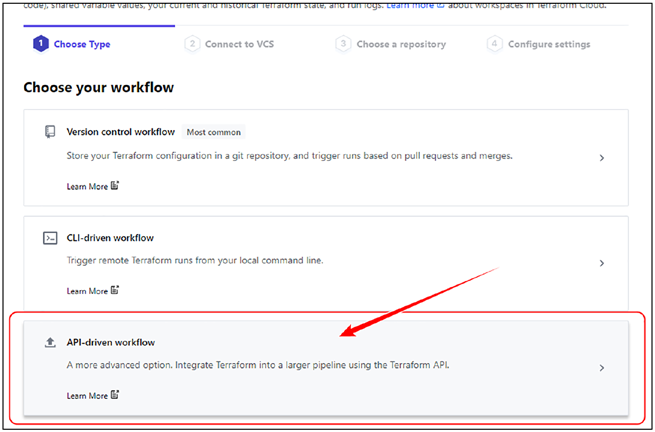
Chapter 5 terraform automation with Git
Figure 5-30. Creating an API-driven terraform workspace
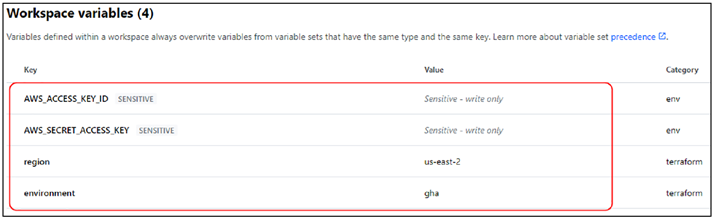
Next, just like the other workspaces, here too, we need to define the
environment terraform variables as shown here:
–
Environment variables
–
AWS Access Key ID: AWS_ACCESS_KEY_ID
–
AWS Secret Access Key: AWS_SECRET_ACCESS_KEY
–
Terraform variables
–
Region: region: us-east-2
–
Environment: environment: dev
211
Chapter 5 terraform automation with Git
Figure 5-31. Terraform workspace environment variables
That’s it! We no longer need to configure the terraform workspace
directory or the terraform version as this is an API-driven workflow!
Now let’s commit the code using the following commands.
CLI Output 5-11. Pushing terraform automation workflow
to remote
cmd> cd chapter5/gha
cmd> git status
On branch main
Your branch is up to date with 'origin/main'.
Changes not staged for commit:
(use "git add <file>..." to update what will be committed)
(use "git restore <file>..." to discard changes in working
directory)
modified: .github/workflows/infra.yaml
cmd> git add .
cmd> git commit -m "adding infra workflow file"
cmd> git push
212
Chapter 5 terraform automation with Git
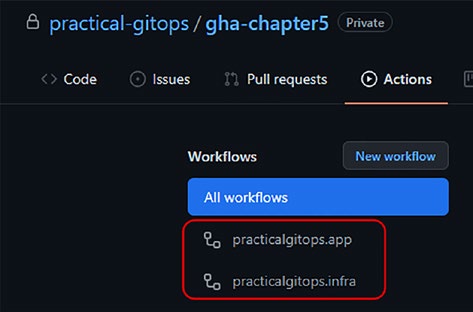
Once your code is pushed, you won’t see any action being executed,
but you should be able to see two workflows under the Actions tab as
shown here.
Figure 5-32. Both GitHub Actions workflows showing up on GitHub
5.4.4 Executing API-Driven Workflow
We now need to provide the name of the workspace that we’ve created in
gha.hcl as shown in the following. Ensure to put the complete name as
shown here.
Code Block 5-12. Configuring the workspace name
File: chapter5/gha/infra/gha.hcl
1: workspaces { name = "gha-chapter5" }
2: hostname = "app.terraform.io"
3: organization = "practicalgitops"
Let’s commit and push the code after making the changes to gha.hcl.
213
Chapter 5 terraform automation with Git
CLI Output 5-13. Pushing the workspace configuration file to
remote for triggering workflow
cmd> cd chapter5/gha
cmd> git status
On branch main
Your branch is up to date with 'origin/main'.
Changes not staged for commit:
(use "git add <file>..." to update what will be committed)
(use "git restore <file>..." to discard changes in working
directory)
modified: infra/gha.hcl
cmd> git add .
cmd> git commit -m "adding workspace name"
cmd> git push
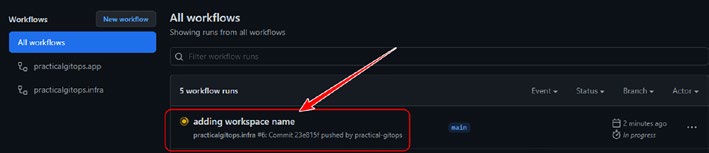
Once the code is committed, if you navigate to the Actions tab, you
should be able to see our new workflow has started as shown here.
Figure 5-33. Workflow actions triggered
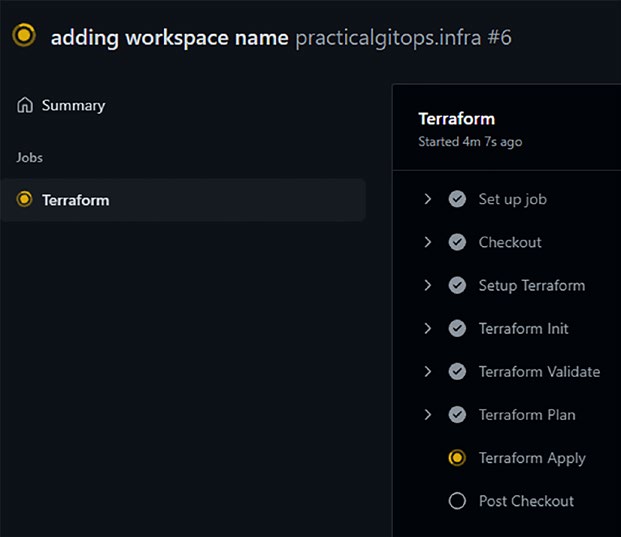
Click on the workflow, and you should see the execution of all the
terraform commands as shown here.
214
Chapter 5 terraform automation with Git
Figure 5-34. Execution of terraform commands as part of the GitHub
workflow
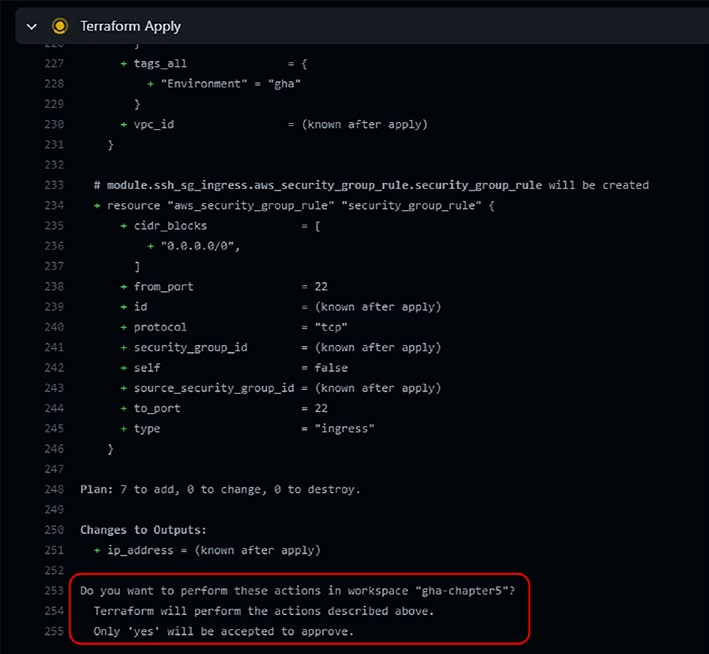
If you click on the Terraform Apply stage, you’ll see that the GitHub
action execution stage is waiting for our input. However, this input needs
to be processed on the Terraform Cloud application.
215
Chapter 5 terraform automation with Git
Figure 5-35. Terraform apply stage approval
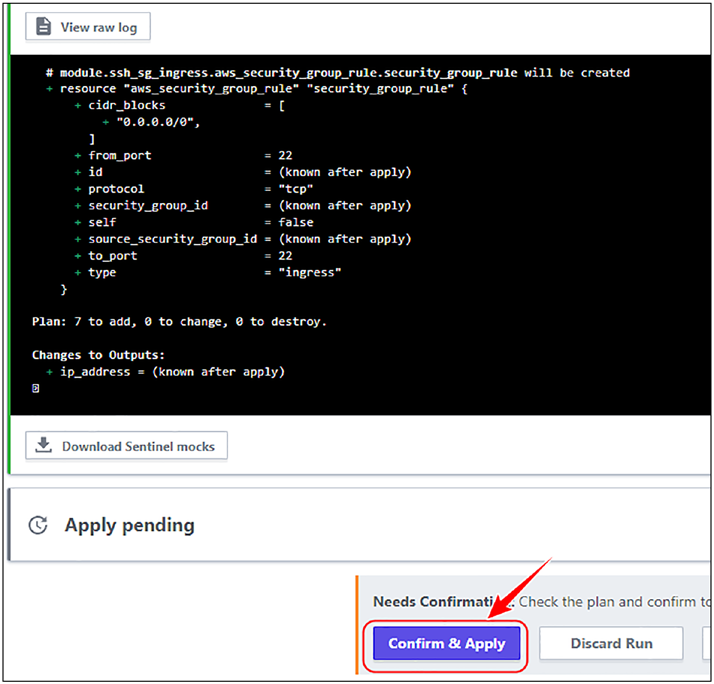
We’ll need to now visit the app.terraform.io application to confirm the
apply as shown here.
216
Chapter 5 terraform automation with Git
Figure 5-36. Confirming terraform apply triggered using
Github Actions
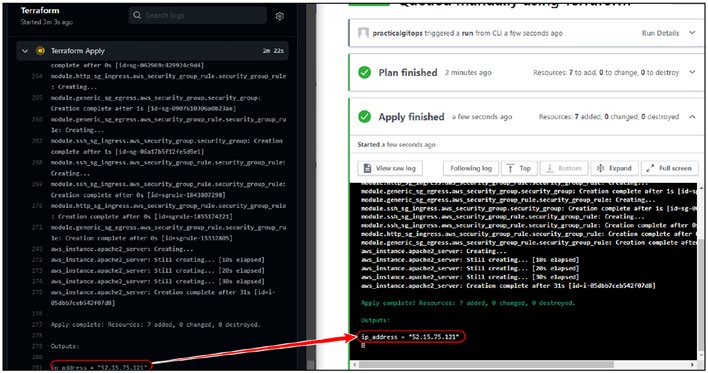
Once apply is confirmed, you should be able to see the logs streaming
on both ends as shown here.
217
Chapter 5 terraform automation with Git
Figure 5-37. Terraform apply logs streaming on both ends
That’s it! Our execution is complete!
It’s worth noting that in this API-Driven workflow, we got started very
quickly as we did not have to configure the workspaces except for the
environment variables. Everything is now being governed through GitHub
Actions.
5.5 Clean-Up
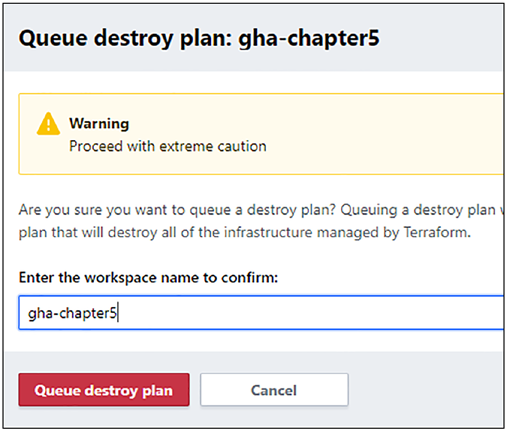
Clean-up for this section should be fairly simple as here we have executed
everything from Terraform Cloud. Navigate to Settings ➤ Destruction and
Deletion of the workspace that we wish to destroy and then click Queue
Destroy Plan. It’ll ask for your confirmation like as follows.
218
Chapter 5 terraform automation with Git
Figure 5-38. Terraform destroy on cloud confirmation
Do this for all the workspaces created.
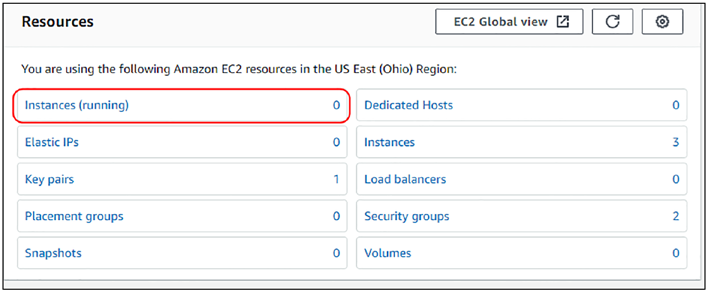
It is also highly recommended that you visit the EC2 console on
the AWS GUI and double-check if everything is deleted. The Instances
(running) field should show 0.
Figure 5-39. EC2 running status
219
Chapter 5 terraform automation with Git
Note always double-check the region; we’ve been following us-
east- 2 in this chapter.
5.6 Conclusion
In this chapter, we looked at how Git can be used as a single point of truth
for managing your application as well as your infrastructure through code.
By leveraging the various features of Git, we can establish well-defined
processes and procedures to push code smoothly in an automated fashion.
We also looked at the two ways in which terraform code can be deployed
using Git: one through the VCS driven and the other API driven. VCS
driven is good as long as all the checks and testing are happening at the
developers end, which is pretty rare. Hence, API-driven workflow helps
in baking in the checks and tests within the GitHub Actions workflow files
like terraform validate, terraform plan, etc., which gives a greater level of control.
Now that we’ve learned about Terraform, Terraform Cloud, and
GitHub Actions as individual components, it is now time to stitch all of
them together to create a complete GitOps pipeline, which is what we’ll
see in the next chapter, so stay tuned!
220
CHAPTER 6
Practical GitOps
So far, we looked at Terraform, Terraform Cloud, and GitHub Actions
working in tandem. In this chapter, we’ll work on establishing a complete
workflow involving multiple branches (staging and main) and a peer
review process using GitHub Pull Requests. Without this complete
workflow, the GitOps process is incomplete as we need to know at every
commit what infrastructure changes are happening. We need to review
every PR (Pull Request) that clearly describes the terraform plan to show what changes are being proposed as part of that PR.
We’ll be using the same code base as earlier, of creating an EC2
instance on AWS; however, the workflow will be modified a little. We’ll be
adding some if conditions within our workflow file to have finer control over the execution of terraform commands.
We’ll be first deploying our changes into a staging environment
where complete end-to-end testing will be performed. Once the staging
environment changes are working as expected, we’ll then push the
changes into the production environment. This two-stage workflow adds
necessary redundancy as infrastructure changes need to be made with
caution and speed.
© Rohit Salecha 2023
221
R. Salecha, Practical GitOps,
Chapter 6 praCtiCal GitOps
6.1 Prerequisites
This chapter requires prerequisites from the previous chapters; however,
if you’ve jumped here directly (assuming you already have a working
knowledge of AWS, Terraform, Terraform Cloud, and GitHub Actions),
then you’ll need the following information handy:
–
Git and Terraform installed in your path
–
GitHub account
–
AWS credentials to set as environment variables in Terraform
Cloud workspaces:
–
AWS_ACCESS_KEY_ID
–
AWS_SECRET_ACCESS_KEY
–
Terraform Cloud account and Terraform Cloud Token to be
configured as GitHub Secret:
–
TF_API_TOKEN
6.2 Staging Environment Workflow
6.2.1 High-Level Plan
The following diagram will help us in understanding the staging
environment workflow.
222
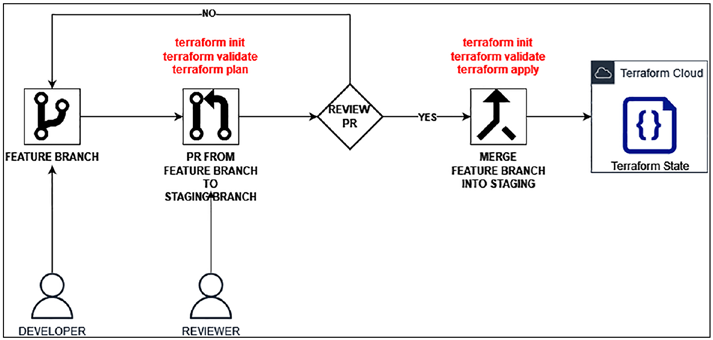
Chapter 6 praCtiCal GitOps
Figure 6-1. High-level workflow for staging environment
• The developer forks the existing repository and creates
a new branch, let’s call it feature and then adds some
changes to the existing code base.
• After successfully testing the code by running it from
their own machine, they check in the changes in the
feature branch in the remote repository.
• They then create a new Pull Request (PR) to allow
merging of the changes into the staging environment
and assign a reviewer.
• When they raise the PR, the GitHub Actions workflow
will execute three steps:
• terraform init -backend-config=staging.hcl
• terraform validate
• terraform plan
223
Chapter 6 praCtiCal GitOps
• The reviewer will be able to view the output of the
preceding commands, and the primary interest for
the reviewer will be the output of the terraform plan
command, which will show them what's adding/
deleting/updating, etc.
• If the reviewer is happy with the changes, they’ll
approve the changes and then squash and merge them
into the staging branch.
• Once there is a push into the staging branch, the
workflow will execute again with all the preceding
three steps but with the addition of one more, that is,
terraform apply.
• With this, the changes will then start getting applied in
the staging environment in Terraform Cloud.
6.2.2 Code Walkthrough
We’ll be reusing the code from the previous chapter with the only
difference being in the workflow file and the backend.tf file.
CLI Output 6-1. Directory structure of the workflow folder
cmd> cd chapter6/.github/workflows
cmd> tree -a
.
├── app.yaml
├── infra-staging.yaml
└── infra-prod.yaml
0 directories, 3 files
224
Chapter 6 praCtiCal GitOps
In this chapter, we have three workflow files:
–
app.yaml – As discussed in the previous chapter, this file
orchestrates workflow for application Docker image
creation.
–
Infra-staging.yaml – This is a modified version of the
workflow file that we had created for terraform automa-
tion. However, as we’ll see later, it's modified specifically
for the staging environment.
–
Infra-prod.yaml – Same as staging but configured for
prod workflow.
Let’s look at the Infra-staging.yaml file.
Code Block 6-2. L03–27 explanation for infra-staging.yaml
File: code\.github\workflows\infra-staging.yaml
01: name: practicalgitops.staging.infra
02:
03: on:
04: push:
05: branches:
06: - staging
07: paths:
08: - "infra/**"
09: - "!**/README.md"
10: pull_request:
11: branches:
12: - staging
13: paths:
14: - "infra/**"
15: - "!**/README.md"
225
Chapter 6 praCtiCal GitOps
16:
17: jobs:
18: terraform:
19: name: "Terraform"
20: runs-on: ubuntu-latest
21: defaults:
22: run:
23: working-directory: "infra"
24: steps:
25: - name: Checkout
26: uses: actions/checkout@v2
27:
28: - name: Uncomment Terraform Cloud Backend
Configuration file
29: id: uncomment
30: run: sed -i 's/^#*//' backend.tf
L3–15: The conditions here are scouting for changes in the infra
directory (except for the README.md file). This file will be triggered by
either a push or a pull in the staging branch only.
L28–30: The backend.tf file, which is used for instructing terraform where to look for the terraform state file, is commented in the source code
as shown here.
CLI Output 6-3. Content of backend.tf commented
cmd> cat chapter6/infra/backend.tf
//Donot uncomment this file. This file will be uncommented only
in Github Actions
#terraform {
# backend "remote" {}
#}
226
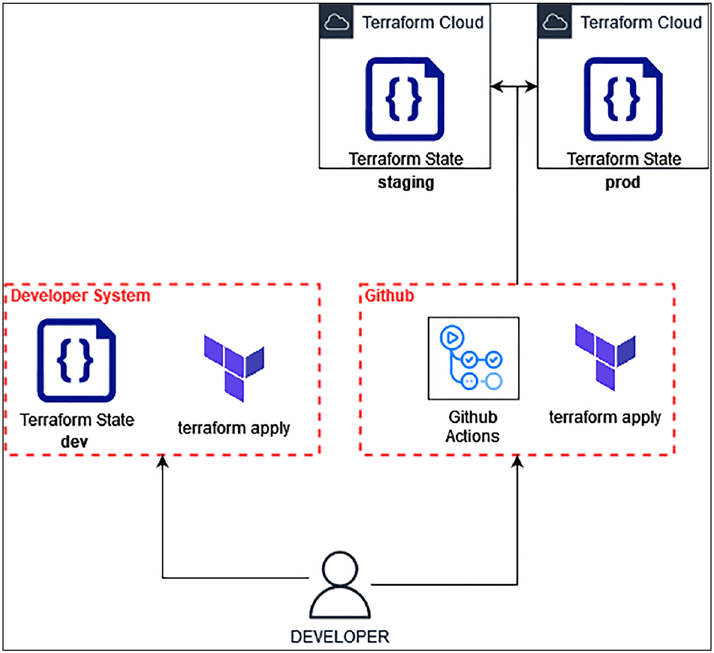
Chapter 6 praCtiCal GitOps
Why have I commented this file?
This is required to be commented because as per the high-level plan we
discussed earlier, the developer needs to run terraform from their system as
well. If we keep the backend.tf configured, then the developer will need to
configure their own workspace in Terraform Cloud and maintain the access,
which would be an added responsibility on the developers.
Hence, it's best that the developers be provided a separate
environment where they can test their terraform code independent of
Terraform Cloud.
The following figure depicts the scenario.
Figure 6-2. Staging, prod, and dev environments of a developer
227
Chapter 6 praCtiCal GitOps
In this scenario, we’ll always have the staging and prod environments
live, and updates would be continuously pushed between them. The dev
environment for the developer will be created and destroyed at will.
There will be a certain level of synergy between the staging and prod
environments with the delta being changes in EC2 configurations (for
price sensitivity) and secrets (which we’ll learn in a separate chapter in
more detail).
As shown earlier in Section 3.7, if we wish to destroy resources in
staging and prod environments, we need not run terraform destroy; we can
quite simply comment out the code and then run terraform apply.
Hence, it is necessary to keep the backend.tf file commented and used
only during the workflow where we are uncommenting the file on L28–30.
Code Block 6-4. L29–47 explanation for infra-staging.yaml
File: chapter6\.github\workflows\infra-staging.yaml
38: - name: Terraform Init
39: id: init
40: run: terraform init -backend-config=staging.hcl
41:
42: - name: Terraform Validate
43: id: validate
44: run: terraform validate -no-color
45:
46: - name: Terraform Plan
47: id: plan
48: if: github.event_name == 'pull_request'
49: run: terraform plan -no-color
50: continue-on-error: true
228
Chapter 6 praCtiCal GitOps
L46–50: We saw previously how terraform plan is being executed.
However, in this scenario, we wish to run terraform plan whenever there is a PR raised for merging code. This is required because the reviewer
needs to see what's going to be executed. The entire output is available
for the reviewer to understand what are the changes being proposed in
this PR.
Code Block 6-5. L49–79 explanation for infra-staging.yaml
File: chapter6\.github\workflows\infra-staging.yaml
52: - name: Terraform Plan Output
53: uses: actions/github-script@v6
54: if: github.event_name == 'pull_request'
55: env:
56: PLAN: "terraform\n${{ steps.plan.outputs.
stdout }}"
57: with:
58: github-token: ${{ secrets.GITHUB_TOKEN }}
59: script: |
60: const output = `## Terraform Staging
Infra Plan
61:
62: #### Terraform Initialization \`${{ steps.
init.outcome }}\`
63: #### Terraform Validation \`${{ steps.
validate.outcome }}\`
64: #### Terraform Plan \`${{ steps.plan.
outcome }}\`
65:
66: <details><summary>Show Plan</summary>
229
Chapter 6 praCtiCal GitOps
67: ${process.env.PLAN}
68: </details>
69:
70: *Pusher: @${{ github.actor }}, Action: \`${{
github.event_name }}\`*`;
71:
72: github.rest.issues.createComment ({
73: issue_number: context.issue.number,
74: owner: context.repo.owner,
75: repo: context.repo.repo,
76: body: output
77: })
78:
79: - name: Terraform Plan Status
80: if: steps.plan.outcome == 'failure'
81: run: exit 1
82:
83: - name: Terraform Apply
84: if: github.ref == 'refs/heads/staging' && github.
event_name == 'push'
85: run: terraform apply
86:
L52–77: This is a GitHub Script that we are running wherein we
are capturing the output of Terraform Init, Terraform Validate, and
Terraform Plan. If you recall, as per our review process, the reviewer
needs to be able to see the terraform plan output to get an idea of what is
changing in the PR. This script helps in outputting that information in a
proper format, which we’ll see later. If you still don’t understand what’s
happening, just hold on till we actually see this in action.
230
Chapter 6 praCtiCal GitOps
L79–81: Since on L50 we had instructed the workflow to continue
execution even in the case our terraform plan is failing, we need to
perform a check somewhere.
L83: Here, we are performing terraform apply only when there is a
push to the staging branch. This git push could either be through a PR or
by directly pushing into the repository. This is where we need to restrict
access to the branch/repository so that only approved Pull Requests can
be merged into the staging branch. Whenever an approved Pull Request is
merged, there’ll be a push to the staging branch, and our terraform apply
will hence be executed.
The Infra-prod.yaml file is an exact replica of the preceding file with the only difference being that all operations are configured to work on the
main branch rather than the staging branch.
6.2.3 Set Up Terraform Staging Workspace
Although we’ve set up a terraform workspace multiple times by now and
you would be quite familiar with it, we’ll still repeat the steps one last time.
Visit the Terraform Cloud application and click on New Workspace.
Then select API-driven workspace as shown below.
231
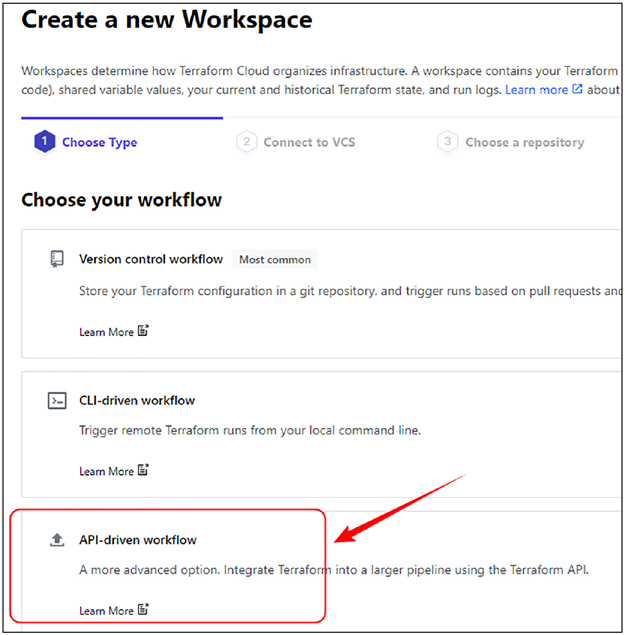
Chapter 6 praCtiCal GitOps
Figure 6-3. Creating an API-driven workspace
Configure the name as staging. Once the workspace is created, visit the
variables tab and configure the following variables as shown:
–
Environment variables
–
AWS Access Key ID: AWS_ACCESS_KEY_ID
–
AWS Secret Access Key: AWS_SECRET_ACCESS_KEY
–
Terraform variables
–
Region: region: us-east-2
–
Environment: environment: staging
232
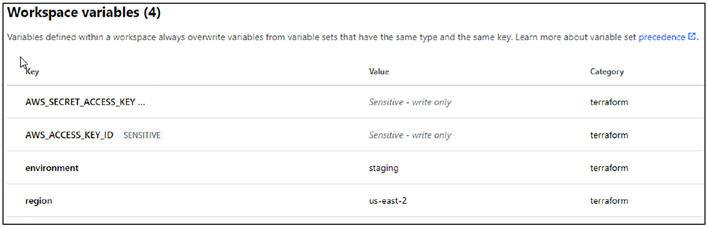
Chapter 6 praCtiCal GitOps
Figure 6-4. Configuring workspace variables
Note if you ever get a terraform version–related error, you can
modify the version in settings ➤ General and select the appropriate
terraform version, preferably 1.0.0 as the code is compatible with this
version at the time of writing this book.
6.2.4 Set Up a GitHub Repository
Now that our terraform workspace is configured, let’s set up a new GitHub
repository where all the GitHub actions will be executed.
Create a new GitHub repository with an appropriate name and
configure the following secrets:
–
TF_API_TOKEN (mandatory)
–
DOCKERHUB_TOKEN (optional)
–
DOCKERHUB_USERNAME (optional)
233
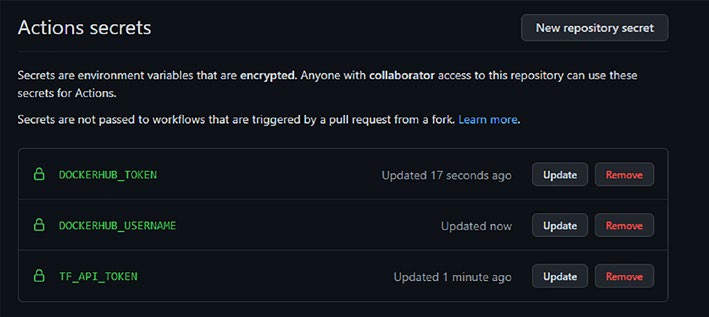
Chapter 6 praCtiCal GitOps
Figure 6-5. GitHub Secrets configuration
Note We at present do not require the Dockerhub credentials as we
won’t be modifying the Docker images any further. hence, i’ve kept it
optional throughout the book.
Let’s upload our code into the main branch of the repository using the
following commands.
Ensure you have the correct GitHub repository URL.
CLI Output 6-6. Uploading the code of Chapter o GitHub cmd> git init
cmd> git add .
cmd> git commit -m "first commit"
cmd> git branch -M main
cmd> git remote add origin <github-url>
cmd> git push -u origin main
You should be able to see the three actions being configured as part of
our repository as shown here.
234
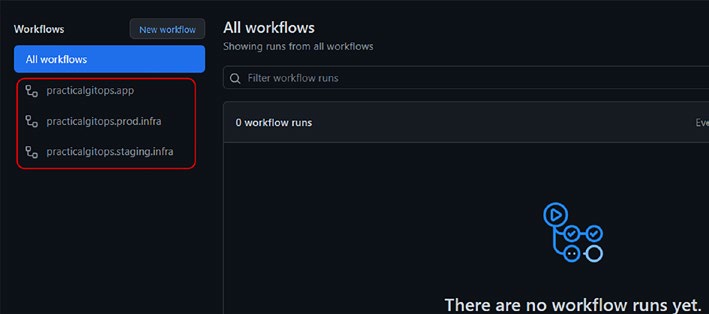
Chapter 6 praCtiCal GitOps
Figure 6-6. All actions related to our repository
6.2.5 Executing Staging Workflow
Let’s configure the name of the Terraform Cloud workspace in the staging.
hcl file as shown here.
Code Block 6-7. Workspace name configuration
File: chapter6\infra\staging.hcl
1: workspaces { name = "staging" }
2: hostname = "app.terraform.io"
3: organization = "practicalgitops"
Now in order to execute our workflow, we’ll need to create a staging
branch and push the changes in that branch. Follow the following
commands, which will execute the entire process.
235
Chapter 6 praCtiCal GitOps
CLI Output 6-8. Pushing code into the staging branch
cmd> git status
On branch main
Your branch is up to date with 'origin/main'.
Changes not staged for commit:
(use "git add <file>..." to update what will be committed)
(use "git restore <file>..." to discard changes in working
directory)
modified: infra/staging.hcl
no changes added to commit (use "git add" and/or "git
commit -a")
cmd> git checkout -b staging
Switched to a new branch 'staging'
cmd(staging)> git add .
cmd(staging)> git commit -m "executing workflow"
[staging 0eec509] executing workflow
1 file changed, 1 insertion(+), 1 deletion(-)
cmd(staging)> git push origin staging
Enumerating objects: 7, done.
XXXXXXXXXXXXXXX------SNIPPED-------XXXXXXXXXXXXXXXXXXXXX
To github.com:practical-gitops/chapter6.git
* [new branch] staging -> staging
As soon as we push our changes into the git repository, a new branch
called staging is created, and the practicalgitops.staging.infra workflow is executed as shown here.
236
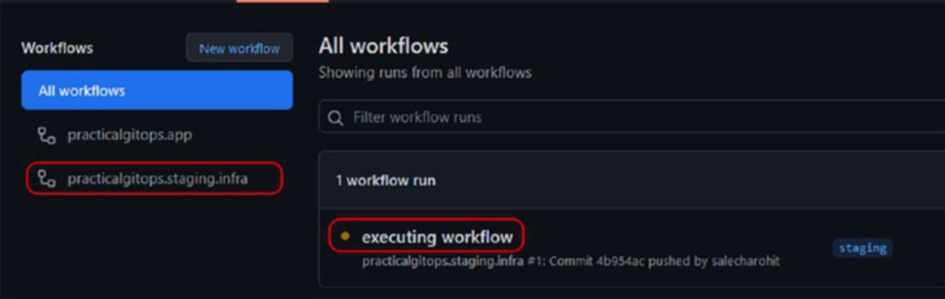
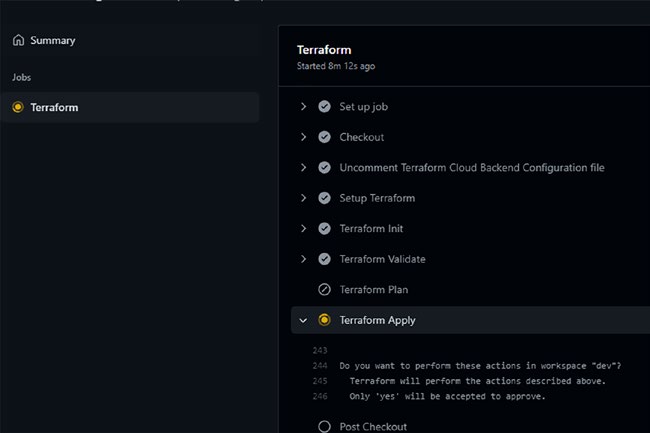
Chapter 6 praCtiCal GitOps
Figure 6-7. Staging branch workflow executing
The workflow will run through all the stages except terraform plan, as
we’ve configured it to run only during Pull Requests as shown here.
Figure 6-8. Terraform apply for staging branch workflow
As can be seen from the preceding screenshot, the workflow has
paused its execution and is waiting for our approval on Terraform Cloud as
shown here.
237
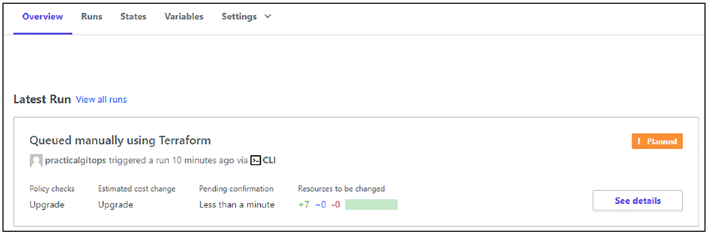
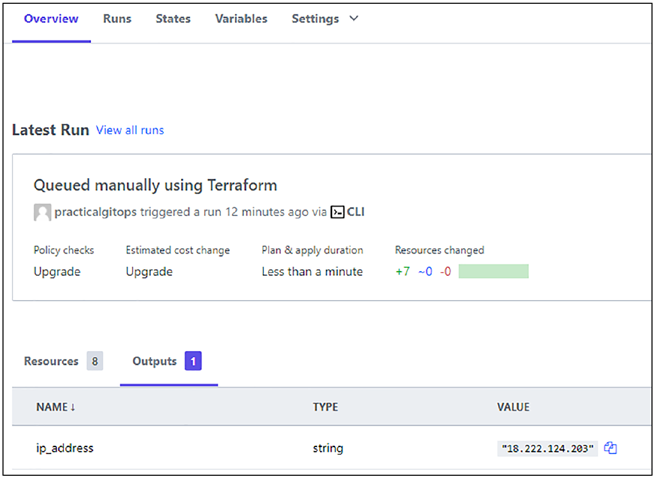
Chapter 6 praCtiCal GitOps
Figure 6-9. Staging branch workflow waiting for approval on
Terraform Cloud
Let’s go ahead and approve the plan so that our staging environment is
up and running.
Figure 6-10. Staging branch workflow after terraform apply
238
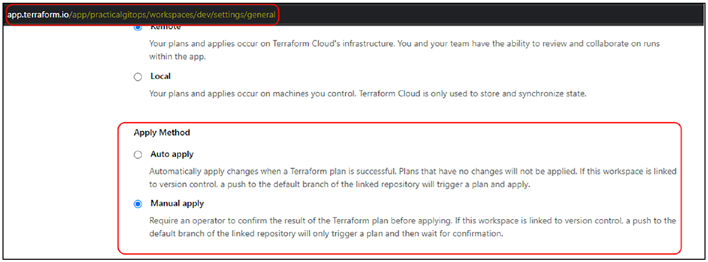
Chapter 6 praCtiCal GitOps
If you would like to disable the manual approval process in Terraform
Cloud and allow the plan to execute once approved in GitHub, then you
can visit Settings ➤ General and scroll down to the Apply Method section
shown in the following where you can select the Auto apply check box and
save. By default, the Manual apply setting is configured.
Figure 6-11. Disabling manual apply in terraform workspace
configuration
6.3 Prod Environment Workflow
Now that our staging environment is up and running and everything looks
good, let’s go ahead and set up our production environment as well.
We’ll need a separate prod terraform workspace, which can be set up
using the same instructions as discussed in the previous section. The only
difference that will be needed is that we’ll need a separate set of keys and a
separate region for deployment.
So I’ve created a new terraform workspace called prod and configured
the necessary environment variables as shown in the following. My prod
environment will run in the us-east-1 region.
239
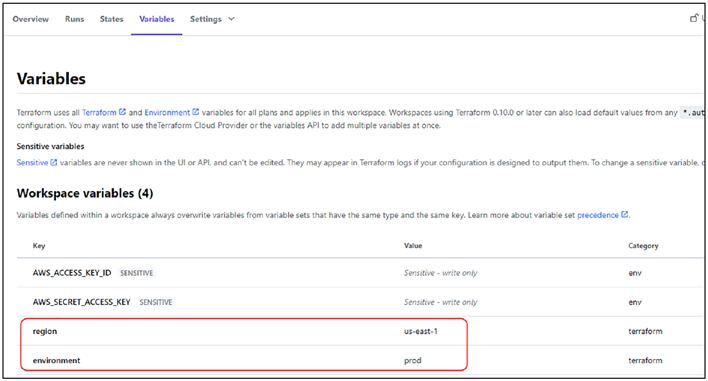
Chapter 6 praCtiCal GitOps
Figure 6-12. Prod environment workspace configuration
6.3.1 SSH Key-Pair Generation
Before we go ahead and execute our prod workflow, there is one tiny step
that we need to perform on the AWS Console. We’ve configured our EC2
instance with a key pair with name gitops as discussed in Section 2.3.7.
However, that key pair was created in the us-east-2 region, and here, we
are spinning up the server in the us-east-1 region where this key pair is not available.
Hence, we need to create this one manually using the steps outlined in
the following.
Note Going forward, we may not require to have an ssh key as
we’ll be spinning up an eKs cluster and not any eC2 machine.
Execute the following commands, which will generate the new AWS
key pair and also save it to your disk.
240
Chapter 6 praCtiCal GitOps
CLI Output 6-9. AWS SSH key-pair generation
cmd> export AWS_PROFILE=gitops
cmd> aws --region us-east-1 ec2 create-key-pair \
--key-name "gitops" \
--query 'KeyMaterial' > gitops.pem
cmd> ls -al gitops.pem
-rw-r--r-- 1 ubuntu ubuntu 1707 Dec 2 17:55 gitops.pem
Now let’s go ahead and execute our prod workflow for which we’ll need
to first edit the prod.hcl as shown in the following with the name of the
workspace created for the prod environment.
Code Block 6-10. Prod workspace backend configuration
File: chapter6\infra\prod.hcl
1: workspaces { name = "prod" }
2: hostname = "app.terraform.io"
3: organization = "practicalgitops"
CLI Output 6-11. Checking-in prod.hcl for prod workflow trigger
cmd(staging)> git checkout main
cmd> git status
On branch main
Your branch is up to date with 'origin/main'.
Changes not staged for commit:
(use "git add <file>..." to update what will be committed)
(use "git restore <file>..." to discard changes in working
directory)
modified: infra/prod.hcl
241
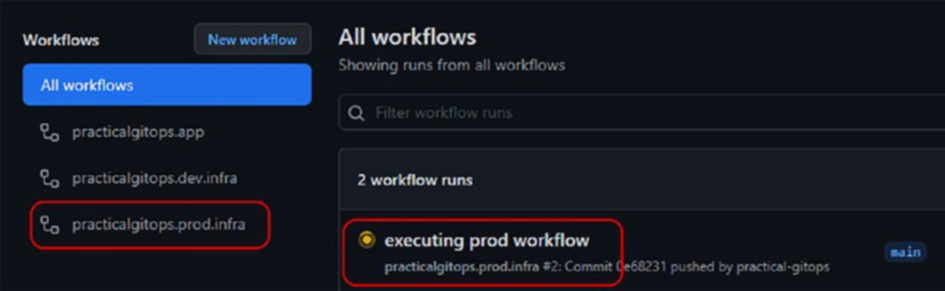
Chapter 6 praCtiCal GitOps
no changes added to commit (use "git add" and/or "git
commit -a")
cmd> git add .
cmd> git commit -m "executing prod workflow"
cmd> git push origin main
Once the code is checked in, our prod workflow will get kickstarted as
shown here.
Figure 6-13. Prod workflow being triggered
Just like the staging workflow, here too, the process is awaiting our
approval on Terraform Cloud. Let’s confirm the execution on Terraform
Cloud and allow the terraform apply to build the prod environment.
So now we have our staging as well as our prod environment up and
running with two servers in two different regions (and/or two different
AWS accounts).
242
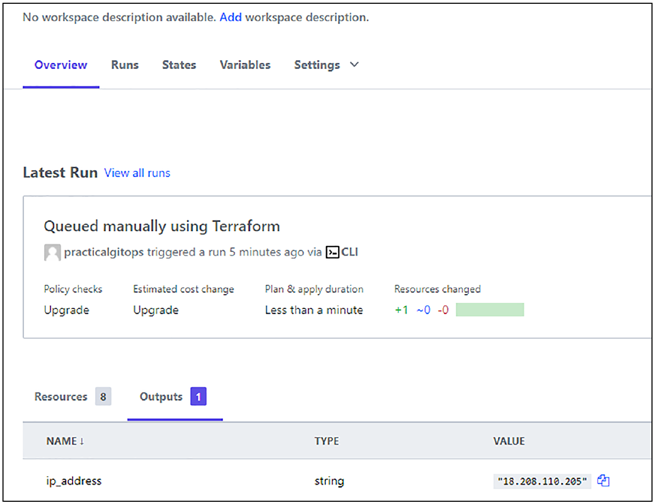
Chapter 6 praCtiCal GitOps
Figure 6-14. Prod workspace apply completed
6.4 Complete Workflow
Now that we are having a server live on the Internet, one of our colleagues
wishes to add one more. They’ll need to follow the following process:
–
Clone the repository and switch to the staging branch.
–
Make their changes.
–
Test the changes by running terraform from their local
machine in a dev environment that is completely isolated
from the staging and prod environments.
–
Create another branch; let’s call it feature1 branch.
–
Commit all the changes into the feature1 branch.
243
Chapter 6 praCtiCal GitOps
–
Push the changes into the remote
repository/feature1 branch.
–
Create a Pull Request from the feature1 to the stag-
ing branch.
–
Assign a reviewer and wait for approval.
–
Once the changes are reviewed and approved, the
reviewer shall merge and squash the changes into the
staging branch.
–
Our staging branch workflow will execute and set up our
new server into the staging environment.
–
Once everything is fine in the staging environment, then
we’ll create another PR from staging to main.
–
Once again, there will be a PR review process.
–
Once review is approved, changes will be merged into the
main branch, and our prod execution flow will be
triggered.
The following diagram is a depiction of the entire process described
previously.
244
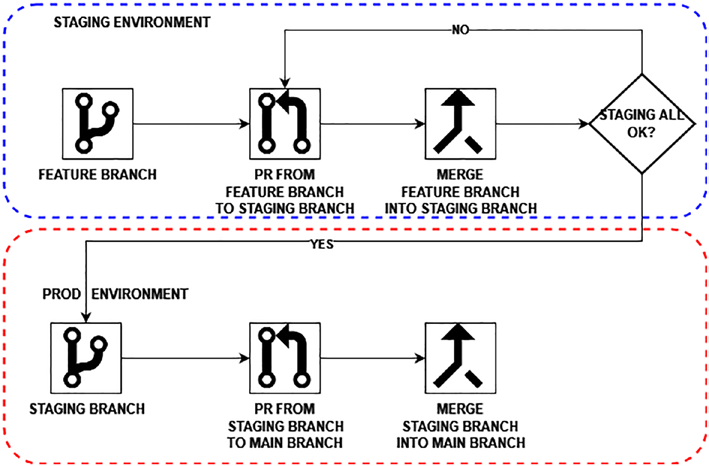
Chapter 6 praCtiCal GitOps
Figure 6-15. Complete workflow diagram
6.4.1 New Feature Request
Let’s practically experience the workflow described previously. Let’s say
one of our colleagues wishes to set up another server. They’ll first need to
add the following code in the main.tf file and the output.tf file as shown in
the following.
Note For simplicity’s sake, i’ve already added that code in both files
in a commented format. You’ve only got to uncomment it. standard
drill :-).
245
Chapter 6 praCtiCal GitOps
Code Block 6-12. Adding EC2 instance in main.tf
File: chapter6\infra\main.tf
XXXXXXXXXXXXXXX------SNIPPED-------XXXXXXXXXXXXXXXXXXXXX
81: # Uncomment for Section 6.4.1 - New Feature Request
82: resource "aws_instance" "apache2_server_1" {
83: ami = data.aws_ami.ubuntu.id
84: instance_type = var.instance_type
85: vpc_security_group_ids = [module.http_sg_ingress.sg_id,
86: module.generic_sg_egress.sg_id,
87: module.ssh_sg_ingress.sg_id]
88: key_name = var.ssh_key_name
89: user_data = file("./scripts/user_data.sh")
90: tags = {
91: env = var.environment
92: Name = "ec2-${local.name-suffix}"
93: }
94:
95: depends_on = [
96: module.generic_sg_egress
97: ]
98: }
Code Block 6-13. Adding output configuration in output.tf
File: chapter6\infra\output.tf
XXXXXXXXXXXXXXX------SNIPPED-------XXXXXXXXXXXXXXXXXXXXX
6: # Uncomment for Section 6.4.1 - New Feature Request
7: output "ip_address_1" {
8: value = aws_instance.apache2_server_1.public_ip
9: }
246
Chapter 6 praCtiCal GitOps
6.4.2 Developer Testing
Now before we check in the code, let’s first run it on our system and ensure
that the code we are pushing in is running correctly.
One small change that you’ll observe when running the terraform
commands is that this time, terraform will ask for region and environment
as these two variables were hard-coded in our terraform workspace and
we’ve not specified the value of these variables anywhere in our code base.
Hence, there are two ways we can provide this information:
1. When we execute terraform apply, it’ll ask for this
information interactively.
2. We can specify it as a CLI argument for
terraform apply.
I don't prefer interactive interfaces; hence, I’ll go ahead with option 2,
that is, to specify it as CLI arguments.
Note ensure that you are not specifying the same value as staging
or prod, else there’ll be conflicts. in practice, a new aWs organization
should be created for testing purposes to ensure proper isolation.
The following commands will set up a dev environment in the us-
west- 1 region. Since we do not have an SSH key in that region, we first
need to create one. It is strongly recommended to have a separate key per
region/account.
CLI Output 6-14. Testing environment set up for local terraform
execution
cmd> export AWS_PROFILE=gitops
cmd> aws --region us-west-1 ec2 create-key-pair \
--key-name "gitops" \
247
Chapter 6 praCtiCal GitOps
--query 'KeyMaterial' > gitops_dev.pem
cmd> terraform init
cmd> terraform plan -var="environment=dev"
-var="region=us-west-1"
cmd> terraform apply --auto-approve \
-var="environment=dev" -var="region=us-west-1"
aws_instance.apache2_server: Creating...
aws_instance.apache2_server_1: Creating...
XXXXXXXXXXXXXXX------SNIPPED-------XXXXXXXXXXXXXXXXXXXXX
Apply complete! Resources: 2 added, 0 changed, 0 destroyed.
Outputs:
ip_address = "13.57.212.113"
ip_address_1 = "54.183.78.83"
cmd> terraform destroy --auto-approve \
-var="environment=dev" -var="region=us-west-1"
Note ensure to execute the destroy command before moving ahead
as you’ll be billed for two eC2 instances.
6.4.3 Create Pull Request – Dev
Now that our code is running fine and it created two servers as expected,
let's go ahead and create another branch feature1 and check in these
changes in it. Then push the changes to the remote repository using the
following commands.
248
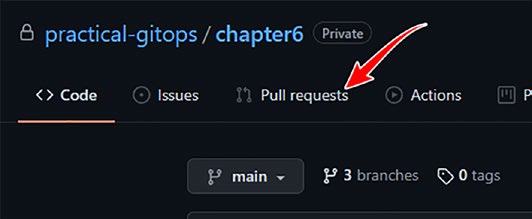
Chapter 6 praCtiCal GitOps
CLI Output 6-15. Pushing changes into the feature1 branch
cmd> git status
On branch main
Your branch is up to date with 'origin/main'.
Changes not staged for commit:
(use "git add <file>..." to update what will be committed)
(use "git restore <file>..." to discard changes in working
directory)
modified: infra/main.tf
modified: infra/output.tf
no changes added to commit (use "git add" and/or "git
commit -a")
cmd> git checkout -b feature1
cmd( feature1)> git add .
cmd feature1> git commit -m "new ec2 added"
cmd feature1> git push origin feature1
Let’s visit our GitHub repository online and create a Pull Request by
clicking on the tab as shown.
Figure 6-16. Clicking the Pull requests tab
249
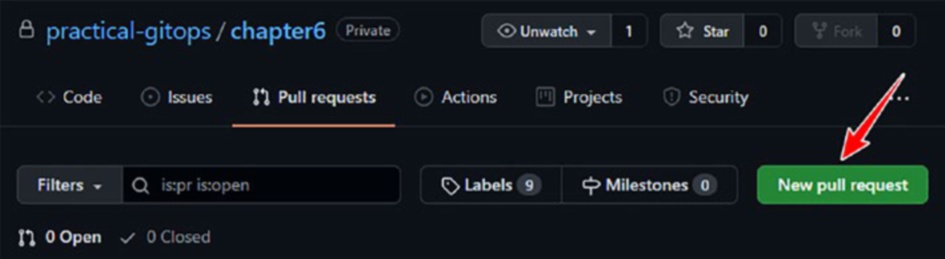
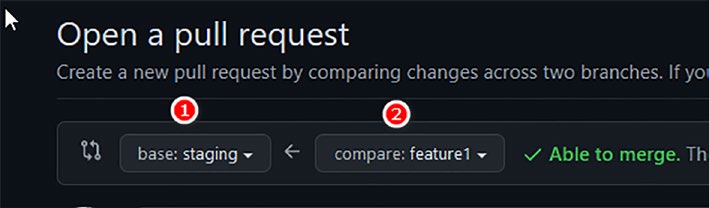
Chapter 6 praCtiCal GitOps
Click New pull request as shown here.
Figure 6-17. Clicking New pull request
Now we need to select the branches that we need to merge as part of
this Pull Request as shown here.
1. Select the base branch as staging.
2. Select the compare branch as feature1.
3. Add an appropriate comment and click Create pull
request.
Figure 6-18. Creating a Pull Request between staging and feature1
branches
250
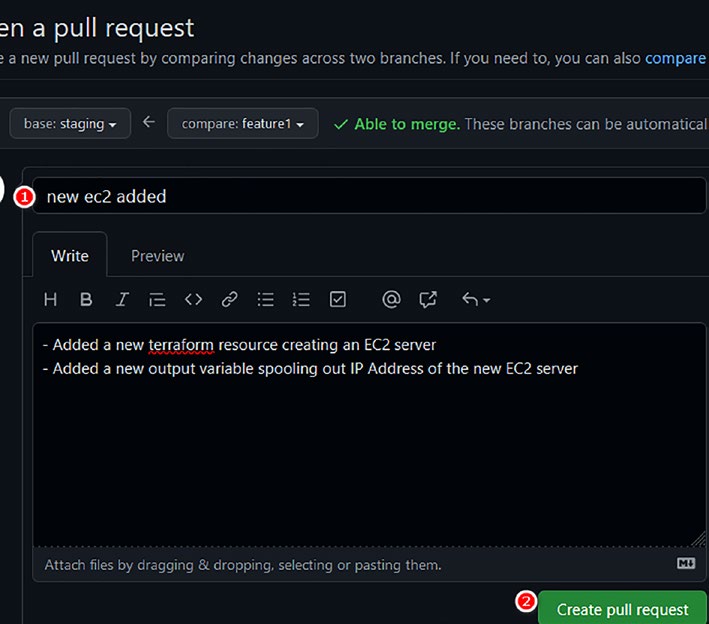
Chapter 6 praCtiCal GitOps
Next is a very important step as we need to inform the team what this
Pull Request is all about.
1. Provide a descriptive title.
2. Add comments describing what is changing in this
Pull Request.
3. Click
Create pull request.
Figure 6-19. Pull Request comments
251
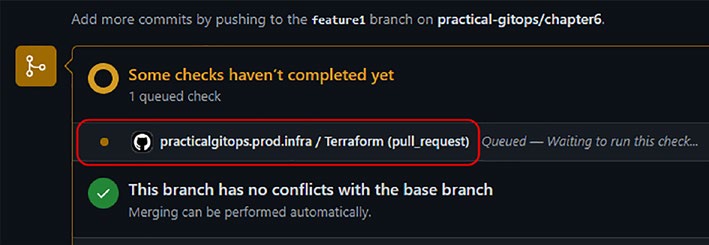
Chapter 6 praCtiCal GitOps
As soon as the Pull Request is created, our GitHub action gets executed
as shown here.
Figure 6-20. GitHub Actions triggered after Pull Request
Finally, once the GitHub action execution is complete, you should see
the output of the GitHub Script as shown in the following where it shows
all our stages.
Terraform Initialization, Terraform Validation, and Terraform Plan are successfully completed.
252
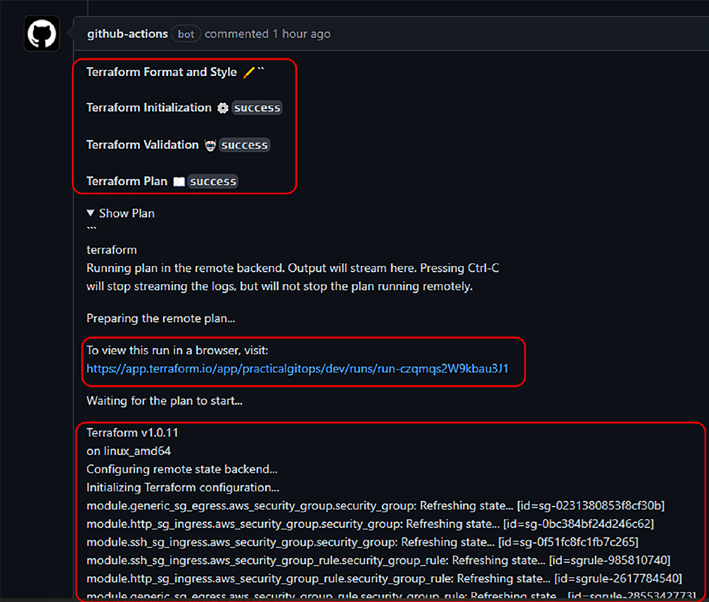
Chapter 6 praCtiCal GitOps
Figure 6-21. Terraform init, validate, and plan review screen
As you scroll down, you should be able to see the entire plan as
shown here.
253
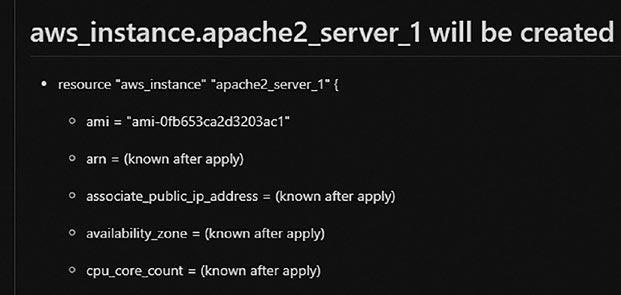
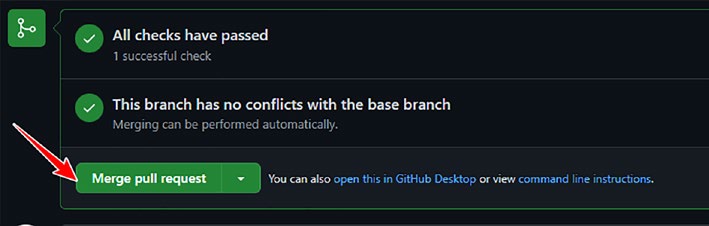
Chapter 6 praCtiCal GitOps
Figure 6-22. Viewing the part of terraform plan
If everything is fine, then we can go ahead and merge the Pull Request
by clicking on the Merge pull request button as shown here.
Figure 6-23. Clicking Merge pull request
Once the PR is merged, navigate to the Actions tab and you’ll see
GitHub Actions executing the merge request. This time, the workflow will
perform terraform apply.
254
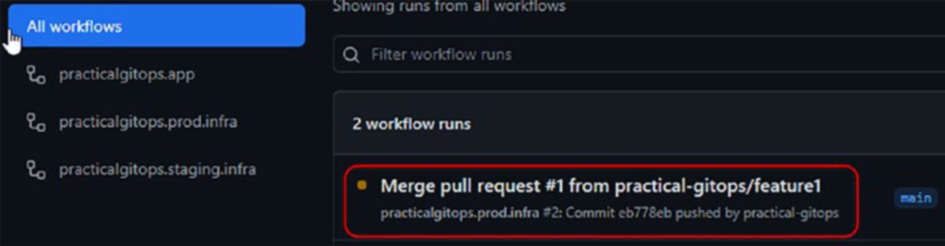
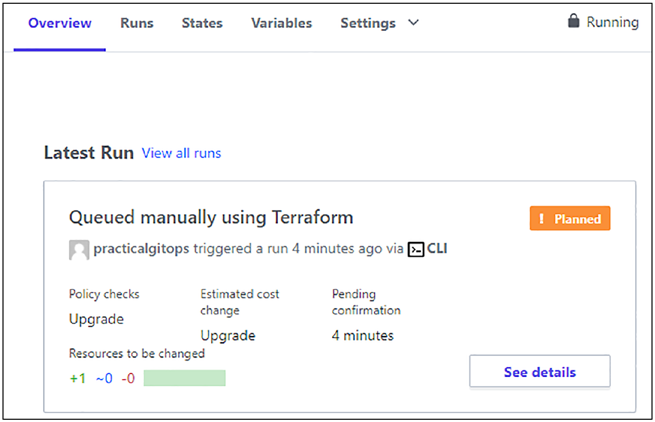
Chapter 6 praCtiCal GitOps
Figure 6-24. GitHub actions triggered upon merging Pull Requests
If you navigate to the Terraform Cloud application’s staging workspace,
you should see that our plan is awaiting our approval.
Figure 6-25. Terraform Cloud staging workspace awaiting approval
Let’s go ahead and apply the plan. After a few minutes, you can see in
the output section, it should show two IP addresses.
255
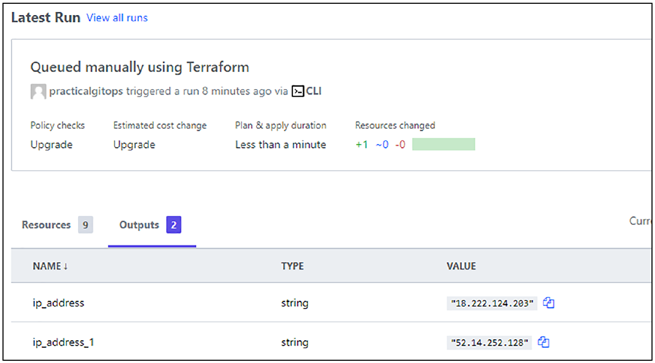

Chapter 6 praCtiCal GitOps
Figure 6-26. Terraform Output Two IPs of staging workspace
6.4.4 Create Pull Request – Prod
Once everything is working fine in the staging environment, we are
now ready to create a Pull Request and deploy the changes in the Prod
environment.
Visit the Pull Request page again, but this time around
1. Select the base branch as main.
2. Select the compare branch as staging.
3. Click
Create pull request.
Figure 6-27. Creating a Pull Request between main and staging
branches
256
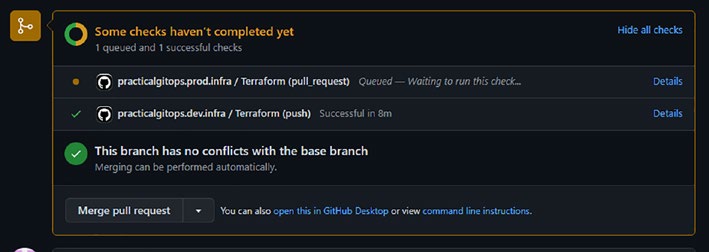
Chapter 6 praCtiCal GitOps
Exactly the same procedure can be followed while creating the PR,
and as shown in the following, our GitHub Actions will be executed
again as there is a Pull Request received on the main branch. Hence, our
practicalgitops.prod.infra workflow is now being executed as shown here.
Figure 6-28. GitHub Action being executed on the prod branch
after PR
Let’s confirm and merge the Pull Request after merging our next
GitHub action in execution to perform terraform apply just like the
previous steps.
If we now navigate to our Terraform Cloud application, we can see our
terraform apply is waiting for approval.
257
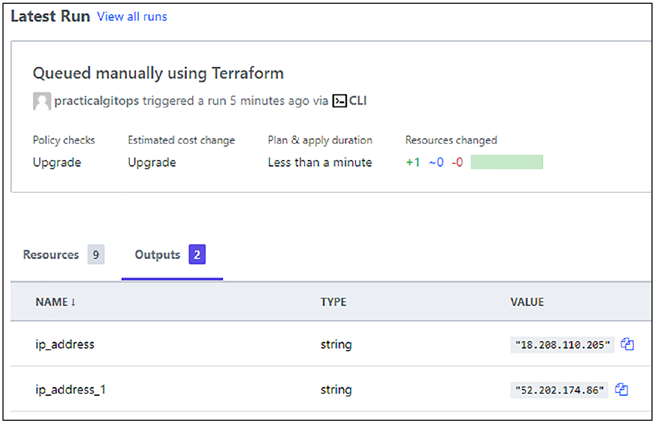
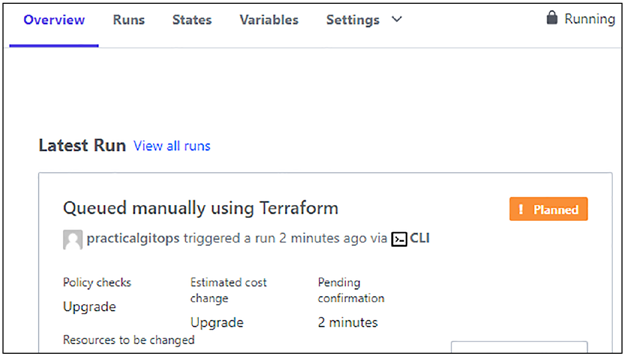
Chapter 6 praCtiCal GitOps
Figure 6-29. Prod workspace planned for terraform apply
Let’s go ahead and confirm the terraform apply, and in a few minutes,
we’ll have our changes pushed in the prod environment as shown here.
Figure 6-30. Prod environment up and running
258
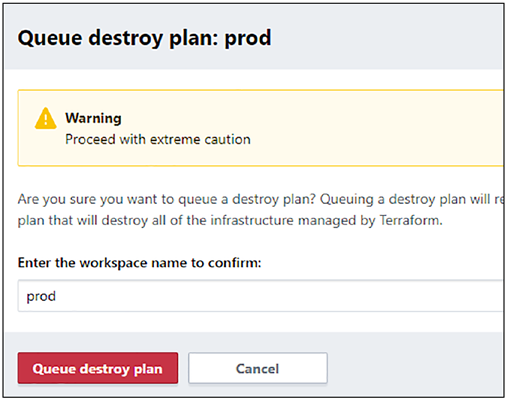
Chapter 6 praCtiCal GitOps
We now have two EC2 servers deployed in two different regions (and
environments) through the GitOps pipeline that we’ve created!
6.5 Clean-Up
Clean-up for this section should be fairly simple as here we have executed
everything from Terraform Cloud. Navigate to Settings ➤ Destruction and
Deletion of the workspace that we wish to destroy and then click Queue
destroy plan. It’ll ask for your confirmation like as follows.
Figure 6-31. Destroying resources in the prod environment
Please perform the same for staging as well.
Note Do not delete the staging and prod workspaces created in
this chapter as we’ll be reusing them in the upcoming chapters.
however, ensure you delete the resources by applying the destroy
plan discussed previously.
259
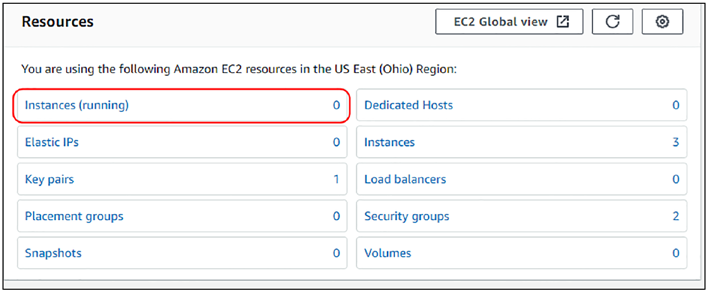
Chapter 6 praCtiCal GitOps
It is also highly recommended that you visit the EC2 console on
the AWS GUI and double-check if everything is deleted. The Instances
(running) field should show 0 for all regions.
Figure 6-32. Reconfirming the number of running instances in the
EC2 dashboard
Note always double-check the region; we’ve been following us-
east- 2, us-east-1, and us-west-1 in this chapter.
6.6 Conclusion
In this chapter, we looked at how an end-to-end GitOps workflow can
be orchestrated using GitHub SCM and GitHub Actions with a multi-
environment strategy. This workflow makes it easy to audit and control the
changes that are being pushed into our AWS infrastructure. This workflow
is also quite extensible as we’ll see in the later chapters, where we can
add various different checks like security and validation checks in an
automated fashion.
260
Chapter 6 praCtiCal GitOps
The customized output of terraform plan provides a good insight for
reviewers to be able to make proper decisions.
With this, we’ve completed the first part (i.e., Part A) of this book where
I wanted to practically demonstrate the GitOps process and the different
tools and techniques that can be used to facilitate it.
In Part B of this book, we’ll use this process and implement it for a
practical application built using the Spring Boot technology and run it in
an AWS EKS environment, communicate with an AWS RDS Postgres server,
and utilize a combination of an AWS Load Balancer and AWS Route53 to
expose the application to the outside world. All the AWS technologies,
that is, AWS EKS, RDS, Route53, and the Load Balancer, will be created
using Terraform, managed in Terraform Cloud, and orchestrated through
GitHub Actions. We’ll look at different aspects of managing this complex
infrastructure like Authentication, Authorization, Secrets Management,
Security Tooling, and Operations all in all through our GitOps process that
we’ve completed till now.
261
CHAPTER 7
Spring Boot App
on AWS EKS
In this chapter, we’ll look at the architecture and code of the deployment
of a working application developed in Spring Boot. We saw the process
of building and pushing the docker image of the application using
GitHub Actions in the previous chapter. Now we’ll use that docker image
in a Kubernetes deployment and deploy a complete AWS EKS (Elastic
Kubernetes Service) and PostgreSQL RDS using Terraform.
7.1 Prerequisites
From here onward, we’ll be utilizing the same setup for all the upcoming
chapters; hence, in addition to all the previous requirements, we’ll need
the following:
–
A top-level domain/subdomain name – This is very
important as most operations depend on it. I’ll be
discussing how you can configure the same.
–
kubectl utility – kubectl is the default utility to talk with
the Kubernetes service that we’ll be spinning up using
Terraform. Recommended to have version 1.20 or above.
As of the writing of the book, my kubectl version is 1.23.6:
–
© Rohit Salecha 2023
263
R. Salecha, Practical GitOps,
Chapter 7 Spring Boot app on aWS eKS
7.1.1 GitHub Repository
From now onward, we’ll utilize a single GitHub repository for the rest of
the book. Hence, it is important to create a folder in the root directory
wherever you’ve unzipped the repository.
I’ll name the folder pgitops, and for every chapter, we’ll copy the
code from the respective folder into this folder and initialize the GitHub
repository from here itself. Name of this folder and repository is arbitrary.
The following commands will help you in the *nix system; however, feel
free to use any GUI software for overwriting the files if CLI doesn’t work
for you.
CLI Output 7-1. Copying code into a single directory
cmd> mkdir pgitops
cmd> cp -a chapter7/. pgitops/
cmd> cd pgitops
# Ensure the copy command worked as expected by executing
tree command
cmd> tree -L 2
.
├── README.md
├── app
│ ├── Dockerfile
│ ├── README.md
│ ├── docker-compose.yaml
│ ├── pom.xml
│ ├── src
│ └── target
└── infra
├── README.md
├── app.tf
264
Chapter 7 Spring Boot app on aWS eKS
├── backend.tf
├── dns.tf
├── eks.tf
├── kubernetes.tf
├── modules
├── networking.tf
├── prod.hcl
├── providers.tf
├── rds.tf
├── staging.hcl
├── terraform.auto.tfvars
└── variables.tf
5 directories, 18 files
Let’s now create a GitHub repository and upload our code in it. I’ve
created a repo called pgitops, and using the following commands, I’ve
uploaded the code into the GitHub repository.
CLI Output 7-2. Pushing code into a new repo
cmd> git init
cmd> git add .
cmd> git commit -m "first commit"
cmd> git branch -M main
cmd> git remote add origin [email protected]:<username>/
pgitops.git
cmd> git push -u origin main
You can verify that the code has been pushed by visiting the GitHub
repository on the browser. Also open the Actions tab to view that our
actions are now ready for deployment.
265
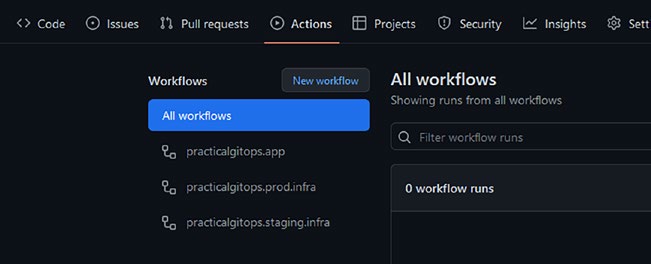
Chapter 7 Spring Boot app on aWS eKS
Figure 7-1. Verifying that code is pushed to GitHub
Next, we need to add the Terraform Token that was discussed in
the previous chapters, which the GitHub Actions utilize to execute the
Terraform API in the TF cloud.
The following image highlights the steps that can be utilized to
configure TF_API_TOKEN as a secret.
1. Access the Settings page of your repository.
2. Click Secrets ➤ Actions.
3. Add TF_API_TOKEN as the Name and the value of
the token.
266
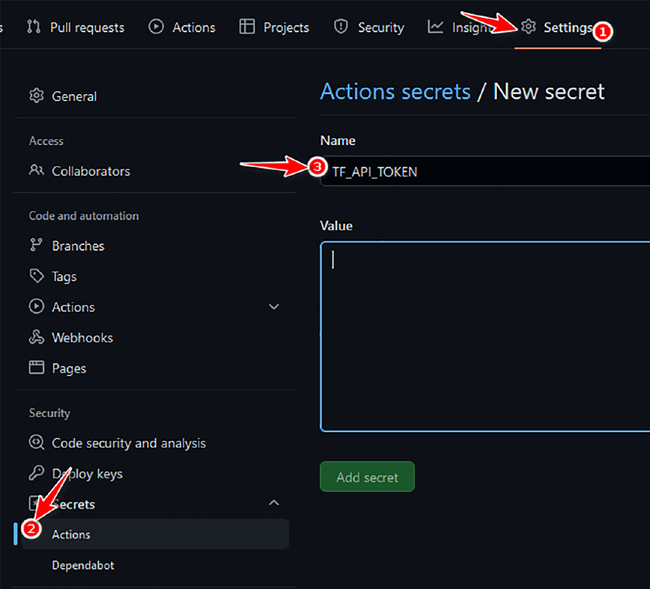
Chapter 7 Spring Boot app on aWS eKS
Figure 7-2. Adding TF_API_TOKEN
Terraform Cloud Workspace
We’ll be reusing the prod and staging Terraform Cloud workspaces (API
driven) created in Chapter
The only small change that we need to make is to remove manual
approval required every time Terraform is triggered because now we are
controlling everything from our GitHub.
This can be easily configured by visiting Settings ➤ General Settings
➤ Execution Mode ➤ Auto Apply as shown here.
267
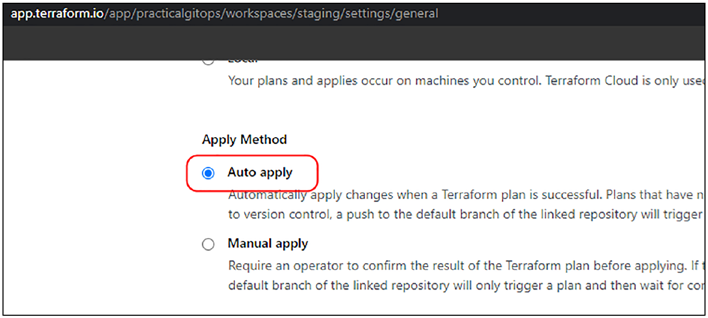
Chapter 7 Spring Boot app on aWS eKS
Figure 7-3. Switching to Auto apply
7.1.2 DNS Configuration
In order to fully understand the potential or any cloud technology and for
the best experience, it’s worthwhile to play around with domain names.
It’s strongly recommended that you get one if you don’t have one and put
it to use if you have it. I shall hence consider two possibilities, either of
which is fine to follow for the remainder of this book. I shall explain both
possibilities as follows.
Route53 is a service provided by AWS to help us manage our DNS
records. Traditionally, DNS records are managed through a file called
“Zone” files, and Route53 makes use of what are called “Hosted Zones,”
which are a container of DNS records on similar lines of the traditional
zone files. Whenever a DNS Hosted Zone is created, AWS provides a set
of nameserver records (four records), which need to be configured in
your root domain. The way these records will be configured is different
depending on your choice of configuring a domain name or a subdomain
name, which we’ll discuss next.
268
Chapter 7 Spring Boot app on aWS eKS
Note it doesn’t matter from where you’ve purchased your DnS
domain or where you are currently maintaining your DnS records to
follow ahead. the only thing that is expected is that you’ve got the
ability to update the DnS records at your current hosting provider in
order to follow the following steps. For example, i had purchased my
domain rohitsalecha.com from goDaddy.com; however, i am currently
hosting my domain on aWS route53, which is chargeable and not
included in the free tier. in order to do that, i had to update the default
nameserver records in goDaddy with the ones provided by aWS (after
configuring my hosted zone in aWS route53).
As discussed earlier, there are primarily two ways in which we can
configure our Route53 Hosted Zones: either as a top-level domain or as a
subdomain.
Top-Level Domain
If you wish to configure a top-level domain name for deploying our
application, then fire the following command, replacing rohitsalecha.com
with your domain name.
CLI Output 7-3. AWS Route53 Hosted Zone for TLD
cmd> export AWS_PROFILE=gitops
cmd> aws route53 create-hosted-zone --name rohitsalecha.com
--caller-reference 2022-05-15-22:35
{
XXXXXXXXXXXXXXX------SNIPPED-------XXXXXXXXXXXXXXXXXXXXX
"DelegationSet": {
"NameServers": [
"ns-849.awsdns-42.net",
269
Chapter 7 Spring Boot app on aWS eKS
"ns-290.awsdns-36.com",
"ns-1129.awsdns-13.org",
"ns-1713.awsdns-22.co.uk"
]
}
}
The command output provides four different nameserver values that
need to be configured with your DNS provider by overriding their current
values. You’ll need to refer to your hosting/DNS provider documentation
to be able to do the same.
For example, if you have GoDaddy as your DNS provider, then follow
this g
Note if you’ve done for top-level domain, do not repeat this for
subdomain.
Subdomain
If you already own a top-level domain and wish to utilize a subdomain
only, then you fire the following command and replace your subdomain
with gitops.rohitsalecha.com.
CLI Output 7-4. AWS Route53 Hosted Zone for subdomain
cmd> export AWS_PROFILE=gitops
cmd> aws route53 create-hosted-zone --name gitops.rohitsalecha.
com --caller-reference 2022-05-15-24:35
{
XXXXXXXXXXXXXXX------SNIPPED-------XXXXXXXXXXXXXXXXXXXXX
270
Chapter 7 Spring Boot app on aWS eKS
"DelegationSet": {
"NameServers": [
"ns-537.awsdns-03.net",
"ns-449.awsdns-56.com",
"ns-1848.awsdns-39.co.uk",
"ns-1415.awsdns-48.org"
]
}
}
The command will output a set of nameservers, which you need to add
as a record just like how you would add any other record in your DNS zone.
You’ll need to refer to the documentation of your DNS service provider on
how to perform the same.
For example, in GoDaddy, this is how you can add an NS as a record:
Note Both the preceding techniques have different implications; for
top-level domain, we are modifying the primary nameserver records,
whereas for subdomain, we are only adding a nameserver record
against the subdomain. this adding of nameservers as a record in
your DnS zone is also called subdomain delegation. effectively we
are delegating the subdomain to another provider. an important point
to note here is that not all DnS providers support this.
Delete Route53 Records
While we are doing things manually here, in the next chapter, we are going
to use Terraform to create hosted zones for us. If you’ve configured your
subdomain/top-level domain as per your requirement, then you skip the
following step.
271
Chapter 7 Spring Boot app on aWS eKS
If in case you’d like to change your mind, that is, if you’ve created a top-
level domain as a hosted zone record and wish to move to a subdomain
hosted zone or vice versa, then simply fire the following commands to
delete your hosted zone record.
CLI Output 7-5. Listing and deleting Route53 Hosted Zones
# List Hosted Zones configured in the account
cmd> export AWS_PROFILE=gitops
cmd> aws route53 list-hosted-zones
{
"HostedZones": [
{
"Id": "/hostedzone/Z0239613358THNF4E3XP9",
"Name": "gitops.rohitsalecha.com.",
"CallerReference": "2022-02-20-24:35",
"Config": {
"PrivateZone": false
},
"ResourceRecordSetCount": 2
}
]
}
# Delete the Hosted Zone record
cmd> aws route53 delete-hosted-zone --id Z0239613358THNF4E3XP9
{
"ChangeInfo": {
"Id": "/change/C025940016DSY04M1XJ6W",
"Status": "PENDING",
"SubmittedAt": "2022-05-19T17:12:25.570000+00:00"
}
}
272
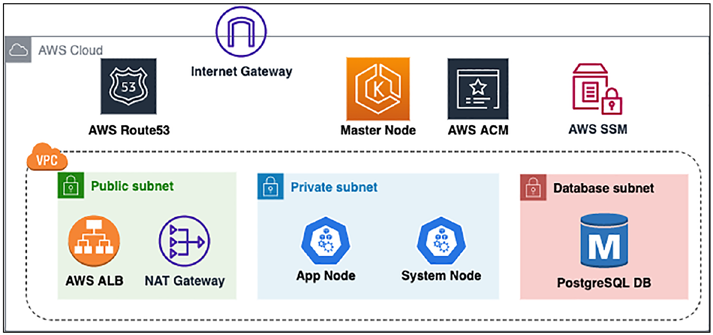
Chapter 7 Spring Boot app on aWS eKS
Warning Before moving ahead, ensure that you have your route53
records configured either as a subdomain or as a top-level domain.
7.2 Solution Architecture
Figure 7-4. High-level solution architecture
Note only main components are displayed here. representation of
many other small components has been skipped for simplicity.
The preceding diagram shows a high-level architecture of the solution that
we’ll be building. Other than Route53, rest assured everything will be set
up using Terraform in this chapter. A brief description follows:
–
We’ll be creating a VPC with three subnets, namely,
public, private, and database.
–
Public subnet will have resources that need to be
externally facing like the AWS Application Load
Balancer, which will be spun up as an ingress controller.
273
Chapter 7 Spring Boot app on aWS eKS
–
Our Kubernetes Nodes (managed by us) will be spun
up in the private subnet and will not be accessible from
the Internet.
–
The master node of Kubernetes is completely managed
by AWS, and hence, we have no control over its
placement. However, the Kubernetes API endpoint will
be available over 443 on the Internet for authentication
to the EKS cluster.
–
Our PostgreSQL database is living in the database
subnet, which is a separate subnet having additional
security controls.
–
The connectivity between the public subnet and the
private subnet is established using a NAT gateway.
There is no NAT gateway to route traffic between
database subnet and public subnet; hence, it is
sufficiently isolated.
–
We’ll be utilizing AWS Certificate Manager (ACM) to
generate the public SSL certificates for our application.
Our Terraform code will not only generate the
certificates but also validate the certificates by creating
necessary Route53 name records.
Let’s dive into the infra folder where all our terraform code resides,
and let’s try to have an approximate mapping of the different files with the
preceding solution architecture that we are building.
CLI Output 7-6. Contents of the infra folder
cmd> cd infra
cmd> tree -L 1
.
274
Chapter 7 Spring Boot app on aWS eKS
├── README.md
├── app.tf
├── backend.tf
├── dns.tf
├── eks.tf
├── kubernetes.tf
├── modules
├── networking.tf
├── prod.hcl
├── providers.tf
├── rds.tf
├── staging.hcl
├── terraform.auto.tfvars
└── variables.tf
1 directory, 13 files
–
app.tf – Defines Kubernetes deployments, services, and
ingresses that are required to be deployed in the EKS
environment.
–
dns.tf – DNS configurations and Load Balancer
mapping required.
–
eks.tf – Declaring our master and worker nodes that are
needed to set up the entire Kubernetes environment.
–
kubernetes.tf – This is a Kubernetes provider file that
needs to be maintained separately and provides
configuration information on how Terraform can
authenticate to Kubernetes to deploy Kubernetes
resources like pods, services, etc.
–
modules – Consists of reusable components for the
infrastructure.
275
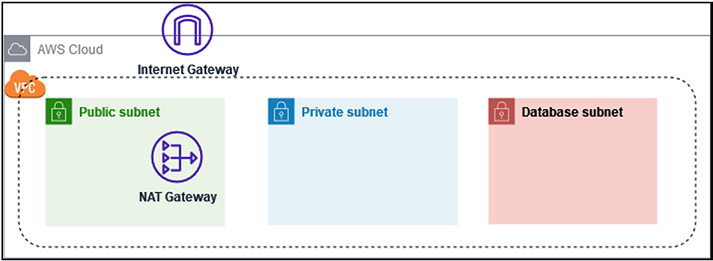
Chapter 7 Spring Boot app on aWS eKS
–
networking.tf – Defines the creation of VPC and
Security Groups necessary for deploying EKS and RDS.
–
rds.tf – Creates the PostgreSQL database and the
necessary secrets.
7.3 Networking
Let’s first run through how the network plumbing is happening using
Terraform. The following diagram gives a glimpse of what we are setting up
using Terraform from a network perspective.
Figure 7-5. High-level network architecture
Note i’ve captured only the primary components for simplicity.
there are many other components like the naCLs (network access
Control Lists), route tables, Security groups, etc., which are not
shown here but are created in our terraform code.
276
Chapter 7 Spring Boot app on aWS eKS
So the code defined in the pgitops\infra\networking.tf creates the
following:
–
A VPC with a CIDR range of 10.0.0.0/16.
–
An Internet gateway to route traffic to the Internet.
–
A public subnet with a NAT gateway to route all
Internet ingress/egress traffic.
–
A private subnet wherein resources can access the
Internet through the NAT gateway but not vice versa;
that is, nobody can access the resources defined in the
private subnet from the Internet.
–
A database subnet where we can optionally restrict
access to only within the VPC.
All the code related to networking can be found in the networking.tf file
as follows.
Code Block 7-7. Contents of the networking.tf file
File: pgitops\infra\networking.tf
XXXXXXXXXXXXXXX------SNIPPED-------XXXXXXXXXXXXXXXXXXXXX
28: module "clustername" {
29: source = "./modules/clustername"
30:
31: environment = var.environment
32: region = var.region
33: org_name = var.org_name
34: }
35:
277
Chapter 7 Spring Boot app on aWS eKS
36: # Create a VPC with all the associated network plumbing
37: module "networking" {
38: source = "./modules/vpc"
39:
40: clustername = module.clustername.cluster_name
41: environment = var.environment
42: vpc_cidr = var.vpc_cidr
43: public_subnets_cidr = var.public_subnets_cidr
44: private_subnets_cidr = var.private_subnets_cidr
45: database_subnets_cidr = var.database_subnets_cidr
46: region = var.region
47: availability_zones = data.aws_availability_zones.
availability_zones.names
48:
49: depends_on = [module.clustername]
50: }
XXXXXXXXXXXXXXX------SNIPPED-------XXXXXXXXXXXXXXXXXXXXX
L28–34: Here, we are creating a simple string that helps differentiate
uniquely the environment, the region, and the name of the organization
running this terraform code. For example, if for gitops organization we
are deploying in us-east-1 in the staging environment, then we can have
the clustername as gitops-us-east-1-staging. This string can be used to
concatenate with various resources for better identification.
L37–50: Defining the entire VPC requirements by providing the
environment, CIDR block for the VPC, and public, private, and database
subnets. Region and the availability zones in which this VPC should be
deployed. The values of the variables being passed are all set in terraform.
auto.tfvars files. This file holds the values of all variables that can be changed depending on the environment which we wish to deploy.
278
Chapter 7 Spring Boot app on aWS eKS
7.3.1 Network Module
Let’s dive into the module/vpc folder and take a look at the
implementation of the networking module that was discussed previously.
Code Block 7-8. Contents of the VPC module
File: pgitops\infra\modules\vpc\main.tf
01: # Create a VPC
02: module "vpc" {
03: source = "terraform-aws-modules/vpc/aws"
04: version = "3.12.0"
05:
06: name = "${var.clustername}-vpc"
07: cidr = var.vpc_cidr
08: enable_dns_hostnames = true
09: enable_dns_support = true
10: enable_nat_gateway = true
11: single_nat_gateway = true
12: enable_vpn_gateway = var.enable_vpn_gateway
13: azs = var.availability_zones
14: private_subnets = var.private_subnets_cidr
15: public_subnets = var.public_subnets_cidr
16: database_subnets = var.database_subnets_cidr
17: create_database_subnet_group = true
L3: Terraform maintains a registry of modules developed and
maintained by folks at HashiCorp and can be accessed a
. These modules can be easily integrated into our code by supplying the expected
input values and are developed with best practices. We’ll be making
extensive use of two such modules developed by Terraform internally:
279
Chapter 7 Spring Boot app on aWS eKS
VPC Module –
EKS Module –
RDS Module –
It’s strongly recommended to use these modules as a best practice. As
you’ll see, I’ve created quite a lot of modules that are simple to follow and
reusable for our current requirements.
Note Before updating the versions of these modules, ensure to read
through the corresponding release notes on github as there can be
breaking changes. hence, for this book, i’ve frozen the versions of the
VpC and eKS modules as can be seen in the code.
7.3.2 Network Tags
AWS EKS internally uses tags attached to resources to perform discovery;
hence, it’s very important to add the correct tags for operational reasons.
Code Block 7-9. Tags attached to VPC
File: pgitops\infra\modules\vpc\main.tf
XXXXXXXXXXXXXXX------SNIPPED-------XXXXXXXXXXXXXXXXXXXXX
18:
19: tags = {
20: "kubernetes.io/cluster/${var.clustername}" = "shared"
21: "Name" = "${var.
cluster
name}-vpc"
280
Chapter 7 Spring Boot app on aWS eKS
22: "Environment" = var.
environment
23: terraform-managed = "true"
24: }
25:
26: public_subnet_tags = {
27: "kubernetes.io/cluster/${var.clustername}" = "shared"
28: "kubernetes.io/role/elb" = "1"
29: }
30:
31: private_subnet_tags = {
32: "kubernetes.io/cluster/${var.clustername}" = "shared"
33: "kubernetes.io/role/internal-elb" = "1"
34: }
35: }
L19–34: While working with EKS, it is mandatory to add a tag as
kubernetes.io/cluster/$cluster_name is used for networking discovery and
management by AWS internally. Similarly, when creating Load Balancers
in addition to this tag, we are required to add kubernetes.io/role/elb for external facing and kubernetes.io/role/internal-elb for internal Application Load Balancers. We’ll understand a bit more about the relation of this tag
with load balancers in Section 7.7.
In addition to the preceding tags, I’ve added a few optional tags like
environment and terraform-managed for better understanding of the
resource placement and ownership. Both these tags will appear in all
resources that are created through Terraform. This is important as when
your infrastructure grows, there may arise situations where you need
to manually create/update/delete infrastructure. In such situations, it
becomes easier to understand which infrastructure was created manually
and which was created through Terraform.
Reference:
281
Chapter 7 Spring Boot app on aWS eKS
7.3.3 Security Groups
In addition to the preceding network configuration in the pgitops\infra\
networking.tf, we’ve also specified two security groups as shown here.
Code Block 7-10. Security Groups that need to be attached
File: pgitops\infra\networking.tf
XXXXXXXXXXXXXXX------SNIPPED-------XXXXXXXXXXXXXXXXXXXXX
52: # PGSQL Ingress Security Group Module
53: module "pgsql_sg_ingress" {
54: source = "./modules/securitygroup"
55:
56: sg_name = "pgsql_sg_ingress"
57: sg_description = "Allow Port 5432 from within the VPC"
58: environment = var.environment
59: vpc_id = module.networking.vpc_id
60: type = "ingress"
61: from_port = 5432
62: to_port = 5432
63: protocol = "tcp"
64: cidr_blocks = [var.vpc_cidr]
65:
66: depends_on = [module.networking]
67: }
68:
69: # Generic Egress Security Group Module
70: module "generic_sg_egress" {
71: source = "./modules/securitygroup"
72:
73: sg_name = "generic_sg_egress"
282
Chapter 7 Spring Boot app on aWS eKS
74: sg_description = "Allow servers to connect to outbound
internet"
75: environment = var.environment
76: vpc_id = module.networking.vpc_id
77: type = "egress"
78: from_port = 0
79: to_port = 65535
80: protocol = "tcp"
81: cidr_blocks = ["0.0.0.0/0"]
82:
83: depends_on = [module.networking]
84: }
L53–67: The first security group is created to allow all communication
within the VPC with the 5432 database port. This is a very open
configuration and can be limited to a specific CIDR, which we’ll see in the
later chapters.
L70–84: This is a generic security group that allows outbound access to
any resource it is attached to.
7.4 Database
Our application needs a database to store the data recorded by the users.
In this section, we will learn about how we can set up a PostgreSQL

