Practical GitOps
Infrastructure Management
Using Terraform, AWS,
and GitHub Actions
Rohit Salecha
Practical GitOps: Infrastructure Management Using Terraform, AWS, and
GitHub Actions
Rohit Salecha
Mumbai, India
ISBN-13 (pbk): 978-1-4842-8672-2
ISBN-13 (electronic): 978-1-4842-8673-9
Copyright © 2023 by Rohit Salecha
This work is subject to copyright. All rights are reserved by the Publisher, whether the whole or part of the material is concerned, specifically the rights of translation, reprinting, reuse of illustrations, recitation, broadcasting, reproduction on microfilms or in any other physical way, and transmission or information storage and retrieval, electronic adaptation, computer software, or by similar or dissimilar methodology now known or hereafter developed.
Trademarked names, logos, and images may appear in this book. Rather than use a trademark symbol with every occurrence of a trademarked name, logo, or image we use the names, logos, and images only in an editorial fashion and to the benefit of the trademark owner, with no intention of infringement of the trademark.
The use in this publication of trade names, trademarks, service marks, and similar terms, even if they are not identified as such, is not to be taken as an expression of opinion as to whether or not they are subject to proprietary rights.
While the advice and information in this book are believed to be true and accurate at the date of publication, neither the authors nor the editors nor the publisher can accept any legal responsibility for any errors or omissions that may be made. The publisher makes no warranty, express or implied, with respect to the material contained herein.
Managing Director, Apress Media LLC: Welmoed Spahr
Acquisitions Editor: James Robinson-Prior
Development Editor: James Markham
Coordinating Editor: Jessica Vakili
Cover image designed by Freepik (www.freepik.com)
Distributed to the book trade worldwide by Springer Science+Business Media New York, 1 NY
Plaza, New York, NY 10004. Phone 1-800-SPRINGER, fax (201) 348-4505, e-mail orders-ny@
springer-sbm.com, or visit www.springeronline.com. Apress Media, LLC is a California LLC and the sole member (owner) is Springer Science + Business Media Finance Inc (SSBM Finance Inc).
SSBM Finance Inc is a Delaware corporation.
For information on translations, please e-mail [email protected]; for reprint, paperback, or audio rights, please e-mail [email protected].
Apress titles may be purchased in bulk for academic, corporate, or promotional use. eBook versions and licenses are also available for most titles. For more information, reference our Print and eBook Bulk Sales web page at http://www.apress.com/bulk-sales.
Any source code or other supplementary material referenced by the author in this book is available to readers on the Github repository: https://github.com/Apress/Practical-GitOps.
For more detailed information, please visit http://www.apress.com/source-code.
Printed on acid-free paper
Table of Contents
About the Author �������������������������������������������������������������������������������xiii About the Technical Reviewers ����������������������������������������������������������xv Preface ���������������������������������������������������������������������������������������������xvii Chapter 1:
iii
Table of ConTenTs
Chapter 2:
iv
Table of ConTenTs
Chapter 3:
v
Table of ConTenTs
Chapter 4:
Chapter 5:
vi
Table of ConTenTs
Chapter 6:
vii
Table of ConTenTs
Chapter 7:
viii
Table of ConTenTs
Chapter 8:
ix
Table of ConTenTs
Chapter 9:
x
Table of ConTenTs
xi
Table of ConTenTs
Annexure A: Manually Delete Resources ������������������������������������������505
Annexure B: Terraform Cloud Destroy Problem ��������������������������������511
Annexure C: Code Compatibility on OS ���������������������������������������������515
Index �������������������������������������������������������������������������������������������������519
xii

About the Author
Rohit Salecha is a technology geek who loves
to explore anything that runs and understands
binary. As a security engineer, he is passionate
about learning the length, breadth, and depth
of technology.
Being more on the defensive side, he has
evangelized secure software development at
various organizations for more than a decade.
He is ridiculously driven by the “everything
as code” mantra and strongly believes that
the security team must strive toward making
themselves irrelevant.
In his free time, he is either reading books or watching movies. He is a
fitness freak who loves to jog, swim, and cycle on different terrains.
xiii
About the Technical Reviewers
Gaurav Raje is a Senior Product Manager at Amazon in the Returns,
ReCommerce, and Sustainability group. Previously, he was an Experience
Owner Lead at USAA where he led an Agile team and actively monitored
the backlog by discussing product features with a cross-functional team
including IT, Legal and Compliance, and Leadership. He implemented
features that provided automated solutions and reduced the manual
dependency on USAA’s customer fulfillment centers.
Prior to joining USAA, Gaurav was a Manager at PwC Consulting,
where his main projects consisted of performing gap assessments of small
Asian banks by reviewing their procedures, resources, and technology and
facilitating workshops with client stakeholders as necessary; subsequently,
he produced recommendations (procedural enhancements and a
technology implementation) to address the gaps; these recommendations
resulted in future sales opportunities.
Gaurav holds an MBA from Georgetown University and a BS in
electrical and computer engineering from the University of Colorado at
Boulder.
Anand Tiwari is an Information Security Professional. He loves to
play with open source tools and is more inclined toward defense than
offense in the information security domain. He works with the operation
and development team, solving challenges between the security and
DevOps teams.
xv
Preface
In 2018, I heard the term “Kubernetes” for the first time, and the only
understanding I had of AWS was that we can run machines in the cloud
that can be accessed from anywhere. Being in the security domain, hearing
new technology terms and learning about these technologies has been an
undying passion of mine.
It took me two years to understand DevOps, and I created a small
hobby project called Practical DevOps lab (www.rohitsalecha.com/
project/practical_devops/) to help people understand the core
underlying technologies that make up the umbrella term.
After completing this, I asked myself what’s next?
So I decided to level up, and the result is this book. I wanted to explore
cloud and cloud-native technologies like AWS and Kubernetes and how
they can be set up using Infrastructure as Code like Terraform.
I wouldn’t say that I am an expert at any of these technologies
because that was never my aim. My aim was to have a basic hands-
on understanding of them, and in this book, I am sharing that limited
knowledge that I have because being from the security domain, it’s my
job to help organizations secure their assets, but if I don’t have a basic
understanding of what they are, then I wouldn’t be doing my job well.
Since this is a totally practical and hands-on book, it would be
recommended to use it as an ebook as it’ll help in working faster. We’ll
be dealing with technologies like AWS Route53, AWS EKS (Kubernetes),
and AWS ELB, which do not fall under the free tier categories, and hence,
there’ll be charges (>$15) associated when you execute the code provided
in this book.
xvii
CHAPTER 1
What Is GitOps?
1.1 The Era of DevOps
Businesses today have expanded into different horizons and industries
with the enablement of technology. Today, we have folks delivering food at
home by simply placing an order on an application in a hand-held device
and streaming your favorite movie/sitcom on whatever device you wish to
see. All these have been possible because people are exploring different
ways to solve real-world problems with the help of technology.
An interesting question to ask at this juncture is who is pushing whom?
Is it that new ways to do business are pushing technology to the edge or is
it because we have high-end technology that businesses are thriving? This
is a typical chicken-and-egg question as to which came first: the egg or the
chicken?
Frankly speaking, it doesn’t matter who is pushing whom, but one
thing purely common between the two is “agility”; everyone wants things
to be done faster. But then going fast can be risky, and hence, people
also look for stability. Gone are the days when system administrators
would cut-short their holidays to support the festive surges. Thanks to
technology platforms like AWS (Amazon Web Services) and the like, which
are also popularly known as cloud computing platforms, businesses and
technology can achieve speed with resilience and reliability.
© Rohit Salecha 2023
1
R. Salecha, Practical GitOps,
Chapter 1 What Is GItOps?
This culture of being able to deliver software with agility and reliability
gave rise to the term which we call “DevOps.” The influence that the
DevOps methodology has had on the people, process, and technology,
the three pillars of success for any organization, is tremendous and
revolutionary. DevOps brings about a change in which businesses
operate. The IT (information technology) team has sort of broken out
of the shackles of being boring, slow, and always taking the blame for
failures. Many blogs/personas describe DevOps as a methodology that
brings Dev and Ops together, which is certainly true from a technology
perspective. However, I believe that DevOps has brought business and
technology to become equal stakeholders in the success of organizations.
Peter Sondergaard in the Gartner Symposium, 2013, declared that “Every
company is a technology company,” which implies that the success of
every business is tied to the success of your technological processes
and tools.
1.1.1 What Problems Is DevOps Addressing?
Before understanding what DevOps is, let’s rewind our clocks back and
understand how software development functioned a few decades ago. In
ancient times of IT, back when we’d just fixed the Y2K bug, the Waterfall
model of software development was very popular and most widely
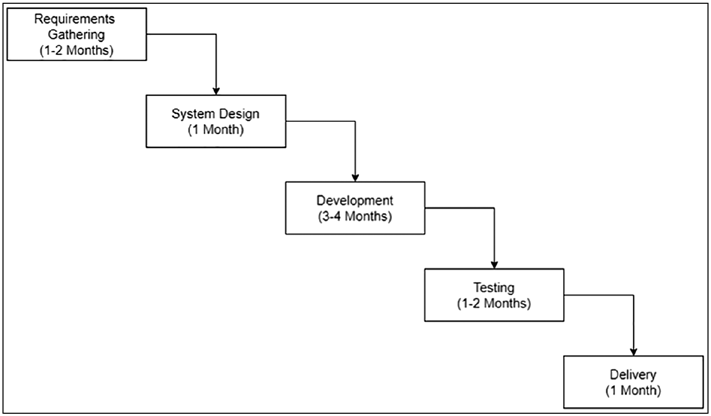
accepted. The model was quite simple as illustrated here.
2
Chapter 1 What Is GItOps?
Figure 1-1. Waterfall SDLC model
1. A project would be kicked off, and a business
analysis team would visit the client and jot down all
the requirements, which would take around one to
two months.
2. Once all the requirements are captured, the
architecture team would convert these requirements
into a system design and provide a road map for
software development.
3. Based on the preceding two stages, the software
development team would then start writing the code
and test it out in their local systems, which would
easily take a minimum of three to four months to
complete. The project management team would
track the progress of the development against the
requirements specified and also the budget.
3
Chapter 1 What Is GItOps?
4. Once a good majority of the requirements have been
done, there would be a pilot testing by deploying the
application in a staging environment.
5. Finally, if everything goes well, which seldom
happens, the application would then be delivered to
the client by deploying in the client’s environment.
What are the challenges/limitations for this model?
1. Lengthy build cycles lead to slow and sluggish
outputs.
2. Disparate environments of development and
production lead to unexpected outages.
3. Extremely focused skills where developers do
not wish to interfere in operations and vice versa.
This hinders transparency in processes and huge
dependencies.
4. The day the software is delivered, everyone involved
in that part of the application is expected to be on
the floor waiting to quickly identify if something
unexpected is observed.
5. Scaling up with manually created infrastructure is a
big challenge as downtimes are required.
6. Implementing backup and disaster recovery
strategies is expensive as it involves maintaining
two copies of infrastructure (maybe a little scaled-
down one) and also ensuring syncing of the data
between them.
4
Chapter 1 What Is GItOps?
1.2 Introduction to DevOps
DevOps is a methodology that brings together three practices that work
in tandem:
• Continuous integration
• Continuous delivery/deployment
• Continuous monitoring
Understanding each of these practices individually will help us understand
DevOps, which shall also lay groundwork for explaining the term “GitOps.”
1.2.1 Continuous Integration
Continuous integration as described by Martin Fowler (
) is a software development practice where different members of the team integrate
changes frequently from at least a one to multiple changes in a day.
There are various tools that can be used for this purpose, namely, Git,
CVS, Mercurial, SVN, etc.
The primary purpose of all these tools is to
–
Ensure version control of all the objects/files that
are saved
–
Provide necessary tooling to resolve merge conflicts so
as to reduce issues arising owing to integration
–
Provide traceability of changes so as to understand its
impact on the running systems
–
Allow the implementation of a transparent and flexible
peer review process
–
Accelerate failure detection by implementing
automated testing
5
Chapter 1 What Is GItOps?
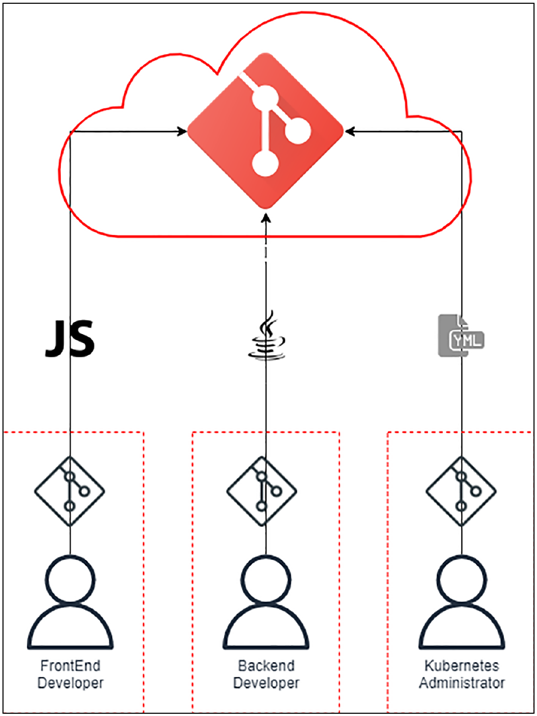
The preceding diagram illustrates the practice of continuous
integration where developers working on different parts of the project,
that is, Frontend and Backend, are all checking the application code with
the Dockerfiles and Kubernetes administrators checking the Kubernetes
Manifests into the repository. The illustration makes use of the tool called
“Git,” originally developed by Linus Torvalds in 2005, which so far is the
most widely used software for version controlling and also the tool of
choice for this book. The key element about Git is that it is “distributed,”
meaning there is a local copy on your machine and a main copy stored
somewhere on your remote servers.
In our illustration, the red dot lines signify the developer’s machine
where the entire source code of the project resides along with the current
changes that they have made. The solid lines in the shape of the cloud
signify the central repository where the code is finally merged from all the
developers. Hence, a copy of the code will always be present in the central
repository and in each developer’s machine.
6
Chapter 1 What Is GItOps?
Figure 1-2. Distributed Git model
1.2.2 Continuous Delivery/Deployment
Deployment is the practice of pulling the source code from a repository
and performing actions that are necessary to package and run the
application on a desired system.
7
Chapter 1 What Is GItOps?
Continuous deployment (CD) is a software engineering approach
in which software changes are delivered frequently through automated
deployment processes.
A dedicated CI/CD tool/server will pull the source code and execute
a series of commands that build, package, and deploy the application.
Popular CI/CD tools/servers/services are Jenkins, Azure DevOps, CircleCI,
GitHub Actions, etc.
The developers write a series of actions that are performed on serial
or parallel execution stages mimicking the movement of a conveyor belt
running in a factory. These different stages when constituted together are
called a “Pipeline,” and since they are written in a file that is also usually
checked in the repository, it gives rise to a technique called “Pipeline
as Code.”
Generally, these instructions/actions are written in a
declarative syntax.
Let’s take a simple example. Let’s say I am running an application on a
Kubernetes cluster where docker images of the applications are executed
as a containerized application. However, the images need to be built
and pushed into a central repository whose location is specified in the
Kubernetes manifest file. This requires the developers/administrators to
do the following:
1. Pull the source code from the repository.
2. Perform automated QA/security testing.
3. Build an image with the latest version of the code:
docker build -t testimage/repository:version.
4. Push the built image into a container repository:
docker push testimage/repository:version
5. Once the images are pushed into the repository, the
Kubernetes administrators apply their manifest files.
8
Chapter 1 What Is GItOps?
This process is called continuous delivery as we are continuously
delivering the changes to the central docker repository.
An interesting thing to note here is that in the continuous delivery
process, a human intervention is needed to execute the application as
indicated in step 5 where an administrator needs to apply the Kubernetes
manifest files.
Continuous deployment is a more advanced process where upon
thoroughly testing, the changes are directly deployed into the Kubernetes
environment without any human intervention, something which we’ll
explore in more detail.
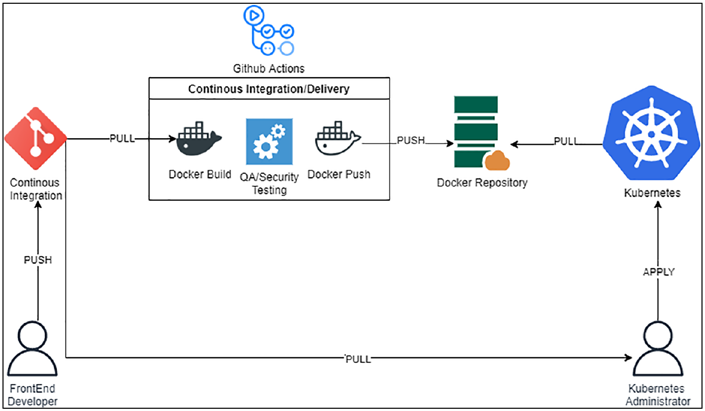
Figure 1-3. Continuous delivery pipeline
The preceding image illustrates the complete process where the docker
image building is automated as described in the following:
1. Developers push their application code and
Kubernetes administrators their Kubernetes
manifests into their respective repositories once
development and testing are complete.
9
Chapter 1 What Is GItOps?
2. The CI/CD server, GitHub Actions in our case,
which is listening for a commit event, pulls the code
into a temporary location.
3. Upon receiving the trigger of a commit event, the
tool starts the execution of the pipeline, and as
described in the figure, we are performing two
actions:
a. Docker Build – Which builds a docker image from the
Dockerfile present in the repository.
b. Set up a test environment and perform all QA/security/
integration tests.
c. Docker Push – Pushes the docker image to a central
repository once all tests are successfully completed.
4. Deploying Kubernetes manifest files:
a. Continuous delivery – A Kubernetes administrator would
receive a notification of the pipeline execution being
completed and would apply the manifest files manually from
a system using “kubectl” utility.
b. Continuous deployment – In contrast to the continuous
delivery step, here, the Kubernetes manifest files would
be deployed in an automated fashion through a different
pipeline wherein the developer would simply push their
Kubernetes manifest files into the source code repository and
the deployment pipeline would get triggered. As a matter of
fact, this is the core idea that’ll be discussed in this book.
10
Chapter 1 What Is GItOps?
1.2.3 Continuous Monitoring
Feedback is one of the most important parts of any process and is
certainly a big deal in DevOps. As we deploy faster, we are able to see the
new features quickly and rapidly; however, what to do when things go
wrong? In the case of an application running in a pod in a Kubernetes
environment, there are many things that can go wrong like no taint
matching, no node available for scheduling, etc. How do we debug this real
time without having to actually SSH into the cluster? How do we know if a
node is exhausting its memory, or the CPU is spiking? How can we get all
those details real time?
This is where the practice of continuous monitoring becomes an
extremely important part of DevOps as it gives real-time feedback on how
our infrastructure is behaving.
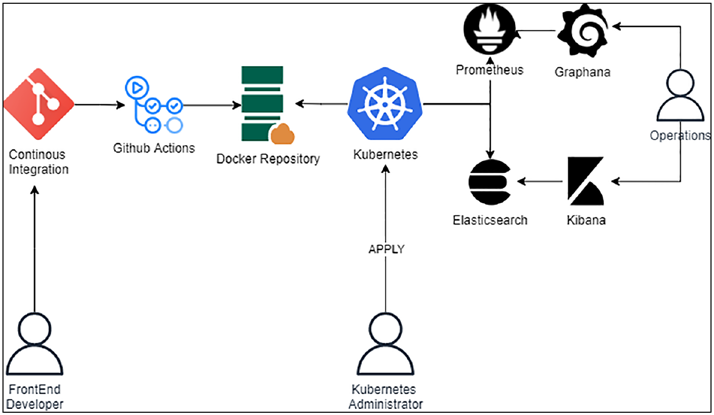
Figure 1-4. Continuous monitoring using Prometheus, Grafana, and
ELK Stack
11
Chapter 1 What Is GItOps?
The preceding image illustrates the idea of continuous monitoring
where we are using two popular solutions for monitoring the Kubernetes
cluster.
1. Prometheus and Grafana – Primarily used for
monitoring performance parameters like memory,
CPU utilization, etc. Prometheus is the data store
that pulls the requisite information, and Grafana
is the dashboarding solution for viewing the
information stored in Prometheus.
2. Elasticsearch and Kibana – Primarily used for
viewing the log events near real time like access
logs, error logs, etc. Elasticsearch is used for storing
the unstructured data pushed in through various
solutions like Logstash, Filebeat, etc. Kibana is the
visualization layer for viewing the data stored in
Elasticsearch.
Note the use cases described previously for eLK, Grafana, and
prometheus are limited for the purpose of this book. there are many
other advanced usages of these tools that the reader is expected to
understand independently.
These are only a few examples of the stages that organizations employ
to automate their deployment pipeline. Other possible stages that can
occur between continuous integration and continuous monitoring are as
follows:
–
Continuous testing – Testing the code changes through
automated testing using tools like Selenium.
12
Chapter 1 What Is GItOps?
–
Continuous verification – Verifying the results of testing
against the acceptance criteria, which are also codified
in the pipeline.
–
Continuous security – Leveraging the security toolsets
like SAST (Static Application Security Testing), SCA
(Software Composition Analysis), DAST (Dynamic
Application Security Testing), Compliance as Code,
Container Scanning, etc., as different stages within the
DevOps pipeline to derive a higher level of security
assurance before the code hits production. This is also
popularly known as the DevSecOps movement.
All in all DevOps tries to answer all the issues that we’ve observed in
the waterfall model of software development. DevOps is a methodology to
• Push our changes faster by reducing the build time
• Create a multi-environment synergy by having
least possible differences between the staging and
production environments
• Foster a multi-skilled culture where developers and
operations understand each other’s job
• Reduce dependencies between individuals by
attempting to automate as much as is possible
• Ensure scalability of infrastructure without downtimes
• Provide a way to collect and correlate the metrics for
our infrastructure so as to take appropriate actions in
case of a disaster
13
Chapter 1 What Is GItOps?
1.3 Infrastructure As Code (IaC)
Now that we’ve got a good understanding of what DevOps is all about, it’s
important to understand one more key term, which in my opinion is the
enabler of DevOps, and that is “Infrastructure as Code.” The best way to
understand this term is to take a use-case example and understand how
this requirement was solved over a period.
Let’s say we wish to run a simple HTML page using Apache Web Server
on an Ubuntu operating system (OS). The tech stack is quite simple, but
let’s understand how people managed to execute this over time.
1.3.1 Evolution of Server Infrastructure
Let’s start from the time when the client-server architecture started gaining
dominance over the mainframe technology.
1995–2005
–
Purchase a bare-metal server and place it in a stack in a
data center.
–
Install the Ubuntu OS by logging in directly from the
terminal using a CD drive.
–
Once the OS is installed, configure the network and
other necessary components.
–
Then install Apache using the “apt-get” command.
–
Configure the IP address manually and statically and
serve the web page on the address.
–
All kinds of updates, backups, etc., needed to be done
by hand and were extremely tedious.
–
Time taken to prepare the server: ~1–2 weeks.
14
Chapter 1 What Is GItOps?
Then in the new decade, virtualization technologies began to shape up
the landscape where in a single bare-metal device, multiple OS could be
installed and configured. With virtualization, the steps changed a bit.
2005–2015
–
Create a virtual machine using your favorite
virtualization technology.
–
Download the Ubuntu ISO and configure it as a virtual
disk to install the virtual machine.
–
Once the OS is installed, configure the network,
which is slightly easier especially in the virtualization
environment as compared to the manual steps.
–
Then install Apache using the “apt-get” command and
serve the web page on the IP address of the virtual machine.
–
Create virtual hosts for serving multiple websites on the
same server owing to shrinking IP address space.
–
Time taken to prepare the server: ~2–3 days.
In the past decade, people started realizing that it’s quite futile to
spin up a full-blown server with its own memory, disk, CPU, etc., just for
serving a few HTML pages even if it’s virtualized. Hence, they started using
containerization technology to quickly spin up and tear down containers.
Note all code files can be cloned from the following repository on
Github:
Once downloaded/cloned, they’ll be accessible as per the chapter
number associated with the code. so for accessing the code of
Chapter , you’ll need to open the folder “chapter1”; for accessing the source code of Chapter , you’ll need to open the folder
“chapter2” and so on.
15
Chapter 1 What Is GItOps?
2015–Present
–
The following is a sample Dockerfile that takes the
base image of the Ubuntu container and installs the
necessary components.
Code Block 1-1. Dockerfile for Apache2
File: chapter1\Dockerfile
1: FROM ubuntu
2: RUN apt-get update
3: RUN apt-get install -y apache2
4: RUN apt-get install -y apache2-utils
5: RUN apt-get clean
6: EXPOSE 80 CMD ["apache2ctl", "-D", "FOREGROUND"]
–
Once the Dockerfile is ready, its first build, and a
customized image is created, it is then pushed into a
central repository.
–
Then a container orchestration system like Docker
Swarm, Kubernetes, Mesos, etc., is used to execute as a
container application. In this manner, thousands and
millions of small websites can be containerized and
deployed in a matter of seconds.
–
Time taken to prepare the container: ~2–5 minutes.
–
Organizations also started utilizing cloud computing
like AWS wherein in a matter of few clicks, you can
get a virtual machine on the Internet with everything
pre-configured; all you’ve got to do is deploy your
application.
16
Chapter 1 What Is GItOps?
–
As an alternative to clicks on console, you can also
utilize tools like Terraform to spin up resources on
different cloud platforms. The following sample
Terraform code deploys an EC2 instance on the AWS
environment.
Code Block 1-2. Terraform code for EC2
File: chapter1\ec2.tf
17: resource "aws_instance" "app_server" {
18: ami = "ami-00399ec92321828f5"
19: instance_type = "t2.micro"
20: tags = {
21: env = "test"
22: }
23: }
–
Time taken to prepare the server: ~5–10 minutes.
The advantage that the new age technology holds, be it either
containers or cloud computing, they can all be codified in a simple
declarative format as shown in the code snippets. This gives the ability to
version control our infrastructure in a declarative manner and be able to
track, update, and manage everything from the version control software,
for example, “Git,” which will be followed in this book.
1.3.2 Tools of Trade – IaC
In the IaC space, we primarily have two types of tools that solve two
different problems:
–
Infrastructure provisioning tools – This set of tools is
primarily used for setting up the base infrastructure
17
Chapter 1 What Is GItOps?
like servers with a particular OS, for example, setting
up an Ubuntu OS or a Red Hat OS. Vagrant, Puppet,
Terraform, CloudFormation, and Docker are some
examples of infrastructure provisioning tools that can
spin up a server either locally or remotely (on cloud).
–
Infrastructure configuration tools – This set of tools
specializes in configuring the infrastructure once it
is provisioned. For example, we may set up an EC2
instance on AWS using Terraform, but we’ll need to use
a configuration tool like Ansible, Chef, or basic Shell
scripts to install the required dependencies like the
Apache2 server and set up the virtual hosts.
In this book, we’ll be exploring Terraform with AWS in much more
detail with chapters dedicated to both topics.
1.3.3 Mutable vs. Immutable Infrastructure
Change being the only constant is bound to happen to our infrastructure
as demanded by our applications’ requirements. Hence, when dealing
with infrastructure in a fast-moving DevOps environment, there is a very
important distinction that needs to be made with respect to the life span of
the infrastructure that we are deploying.
However, the degree and frequency of changes required, and the effort
required to implement these changes, is what defines our infrastructure to
be a mutable or an immutable infrastructure.
Mutable Infrastructure
• Infrastructure that, once provisioned, cannot
be destroyed owing to various reasons like high
dependency and explicit manual configurations;
examples include, but not limited to, Mail, Exchange,
Identity, and Database servers.
18
Chapter 1 What Is GItOps?
–
These systems also undergo very minimal changes
throughout their life span. For example, if you need
to update a database server, then you don’t have to
completely destroy and create a new one from scratch.
You’ve just got to update its version by retaining
the data.
–
Hence, the degree of change needed is very low,
frequency of changes is not that often, but the efforts
required to implement the changes are generally
very high.
Immutable Infrastructure
–
Infrastructure that has limited or no dependency on
other components that are running; for example, in a
microservice architecture, if one service goes down, it
doesn’t affect the other services.
–
Infrastructure that is better to recreate than update.
For example, a Front-End reactjs application running
in docker needs to update itself to a newer version. It
makes no sense to update the code from within the
running docker container. It is much better to replace
the running container with a newer image containing
the updated version.
–
Hence, the degree and frequency of changes needed is
quite high; however, the efforts required to implement
these changes are generally very low.
It is extremely important to understand these terms and be able to
visualize their implementation. These terms are also quite commonly
elucidated as pets vs. cattle. If you view a server (containerized or virtualized) as something that can be replaced at any time, then it’s like a cattle sort of
19
Chapter 1 What Is GItOps?
representing tens or thousands of servers performing a similar job. However,
if you view a server as an indispensable part of your daily operations, then it’s
a pet representing something that’s done quite uniquely.
Another very practical example is Kubernetes. The master plane
components of Kubernetes can be considered as a pet as doing any kind of
changes here can lead to drastic effects and hence need to be treated as a
mutable infrastructure. The deployments or workloads can be considered as
a cattle or an immutable resource, which can be quickly replaced/updated.
We’ll explore more about Kubernetes and its AWS equivalent, that is,
AWS EKS, in more detail in this book.
1.3.4 State in IaC
State in computer systems is a collection of information about a program or
an object stored either in a file or memory. The information represents the
current state of the program/object and helps in identifying what future state
would look like by diffing between the current and the desired information.
If we are spinning up infrastructure resources using IaC technologies,
then it’s extremely important to store their state as without that
information, we won’t know how resources were created and how they
would handle changes.
Let’s take a simple example of how Terraform manages its state when
creating a simple EC2 instance on AWS. (We’ll explore Terraform in much
more detail in chapters ahead).
A sample terraform.state file where Terraform state is stored is
shown here.
Code Block 1-3. Terraform state
{
"version": 4,
"terraform_version": "1.0.7",
20
Chapter 1 What Is GItOps?
"serial": 1,
"lineage": "2d17ac77-08f2-94d9-e1e5-991fc1e2fe12",
"outputs": {},
"resources": [
{
"mode": "managed",
"type": "aws_instance",
"name": "app_server",
"provider": "provider[\"registry.terraform.io/hashicorp/
aws\"]",
"instances": [
{
"schema_version": 1,
"attributes": {
"ami": "ami-00399ec92321828f5",
"arn": "arn:aws:ec2:us-
east- 2:871811778330:instance/i-0bc3c235e3991243b",
"associate_public_ip_address": true,
"availability_zone": "us-east-2c",
"capacity_reservation_specification": [
{
XXXXXXXX ---- SNIPPED FOR BREVITY------ XXXXXXXXX
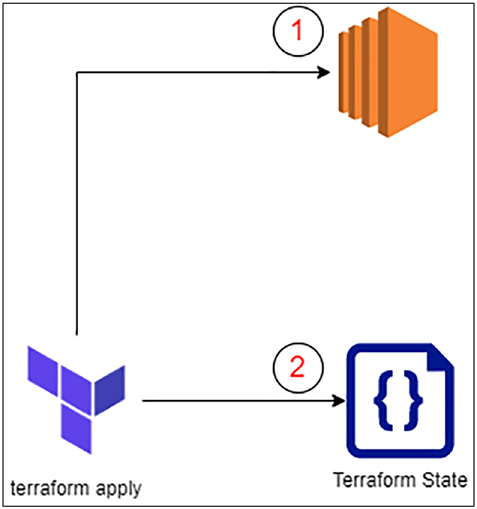
This file is created once “terraform apply” is executed and its operation
of creating an EC2 instance on AWS is completed as illustrated in
Figur
The state stores information about the instance ID, network interface
ID, and much more details that are required when modifications are to be
made to this server or to destroy this instance.
21
Chapter 1 What Is GItOps?
Figure 1-5. Executing Terraform apply
When the resource needs to be destroyed or any new resource needs to
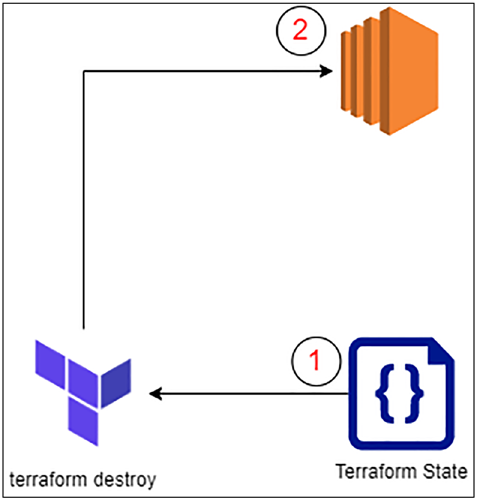
be added, Terraform will first reference the terraform.state file and provide information about what is going to change. Once that is done, it’ll then go
ahead and execute the necessary changes.
22
Chapter 1 What Is GItOps?
Figure 1-6. Executing terraform destroy
We’ll discuss in detail how to manage the terraform state in the best
possible way; however, for now, understanding the importance of state is
extremely necessary from the GitOps perspective.
1.4 Problems with Continuous Delivery
So we saw the difference between continuous deployment and continuous
delivery and that in the latter, a manual step is required to reflect the changes
in production whereas in the former, an automated pipeline needs to be set
up wherein changes are directly pushed without any manual approval.
Most organizations generally start the DevOps movement in
continuous delivery and then move up to continuous deployment as a
mature automated process needs to be in place for the same.
23
Chapter 1 What Is GItOps?
Organizations like Netflix, Google, Facebook, Amazon, etc.,
continuously deploy their changes into production without any manual
intervention. All the testing for functionality, security, and compliance is
added as part of the deployment pipeline.
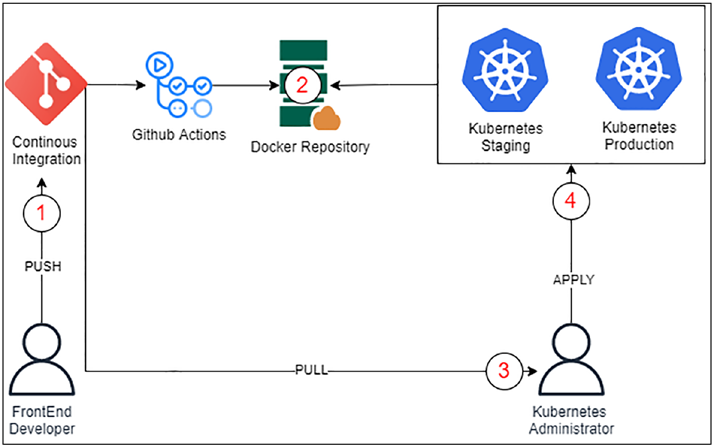
Let’s recall our DevOps diagram that employs a continuous delivery
pipeline and raise some questions regarding the environment in which our
application gets deployed.
Figure 1-7. A sample continuous delivery pipeline
1. Developers push the code into the source code
repository.
2. Once the code is pushed into the repository, GitHub
Action is triggered, which builds and pushes the
docker images to the docker repository.
24
Chapter 1 What Is GItOps?
3. Once the pipeline is executed, the Kubernetes
administrator will pull the Kubernetes manifest files
from the repository.
4. Post pulling the code, they will apply the manifest
files into the respective Kubernetes cluster for the
environments.
Now let’s analyze the potential problems/issues with this approach:
–
Manual deployment – As with all activities done
manually, there is always an element of human error.
–
No state management: In this scenario, the Kubernetes
cluster would be created by hand, and all deployments
are done by hand, albeit through the manifest files.
However, being able to track the actual state with the
manifest files would be a big challenge in itself. Hence,
there’ll be a huge gap between the current state and the
desired state, which in many cases leads to uncertainty.
Also, not just about the Kubernetes cluster but the
entire infrastructure that has been set up on cloud if
done through console/CLI will be unmanageable and
untraceable.
–
CLI vs. cloud: Every Kubernetes administrator will
have their own choice of operation; some would
want to manage through CLI, while others would
be comfortable with the GUI. This will lead to
inconsistencies in the way the cluster and its resources
are managed, leading to confusion.
If manual processes exist especially in managing the IT infrastructure
resources, there’ll always be inconsistencies leading to possible
outages/issues.
25
Chapter 1 What Is GItOps?
1.5 Introduction to GitOps
As we saw, DevOps is more of a combination of culture, tools, and
processes to develop and deliver business applications faster. GitOps is
a more technical term that encourages everything to have the “Git” as
the single source of truth. By everything, I mean your application as well
as your infrastructure must be deployed from Git. For teams following
DevOps, their application code is already maintained in Git; however, their
infrastructure is more or less deployed by hand.
Hence, GitOps stresses more on having your infrastructure deployed
directly from Git, providing flexibility to developers to be able to choose
their own deployment strategies and taking the load off the system
administrators to manage and deploy complex environments like staging,
production, backup, and disaster recovery.
GitOps is a process to manage your infrastructure deployments in an
auditable, repeatable, version-controlled, and reliable manner. GitOps will
help you create a “snapshot” of your infrastructure in the form of a “state,”
allowing you to make decisions while designing and deploying changes.
It’ll help you scale up/scale in whenever required and manage almost all
aspects of your cloud infrastructure through a few lines of code.
The following are some mandatory requirements to implement a
GitOps process for the infrastructure that is responsible for running
business applications:
–
Your infrastructure must be defined in a declarative
format and stored in a version-controlled system.
–
The state of the infrastructure must be recorded in a
well- defined format.
–
All infrastructure changes must be done through code only.
–
Any new changes in the infrastructure must be
approved by identifying the difference between the
current state and the desired state.
26
Chapter 1 What Is GItOps?
–
Drifts in state changes that occur owing to manual
infrastructure modifications must be identified and
reconciled.
In a typical GitOps process, the entire infrastructure should be
captured in Git and deployed through a CI/CD process. The application
deployment should also trigger the Kubernetes manifest files being applied
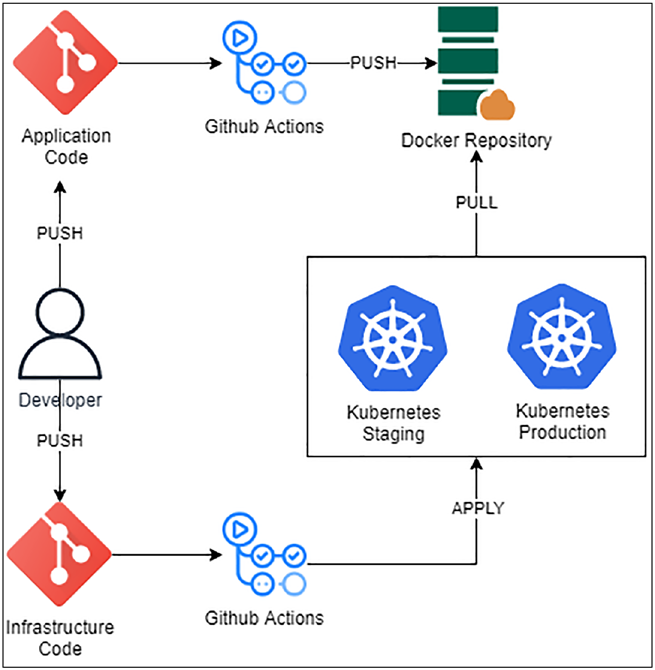
without human intervention. The following image captures the “raw” idea
of how this can be in an automated fashion.
Figure 1-8. Typical GitOps process
27
Chapter 1 What Is GItOps?
Running in parallel to the DevOps pipeline, the GitOps pipeline is
responsible for initializing, creating, and managing the infrastructure on
which the applications are being deployed in an auditable, repeatable, and
reliable manner.
What we are discussing here is a PUSH-based GitOps wherein
GitHub Actions is being used to PUSH the changes into the deployment
environment like AWS or GCP.
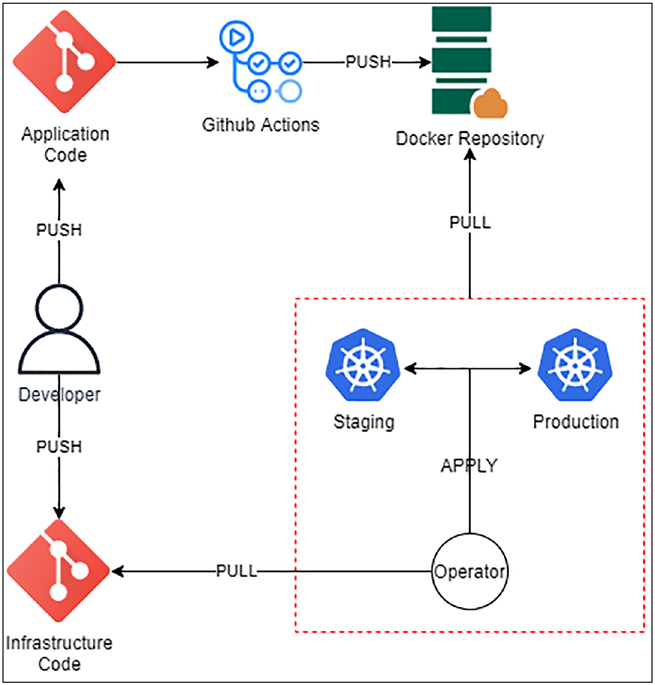
However, there exists a PULL-based GitOps that is governed by
an operator that is listening for changes and then deploys them in the
environment. Argo CD, Flux CD, etc., are tools that enable a PULL-based
GitOps that needs to be installed in the Kubernetes environment. Once
installed, a webhook configuration will listen for changes in the Git
repository and PULL the Kubernetes manifests that need to be deployed.
28
Chapter 1 What Is GItOps?
Figure 1-9. PULL-based GitOps
These PULL-based GitOps tools are more suitable for an exclusive
Kubernetes-based environment only. Some of these tools can also deploy
an entire Kubernetes cluster in an environment of your choice, that is, on
premises, AWS, GCP, etc.
In this book, I’ll, however, be discussing a PUSH-based approach
using Terraform, GitHub Actions, and AWS EKS wherein we’ll not only
be managing Kubernetes resources in code but also the supporting AWS
infrastructure like a PostgreSQL database, DNS configurations, HTTPS
certificates, Load Balancer, and many more.
29
Chapter 1 What Is GItOps?
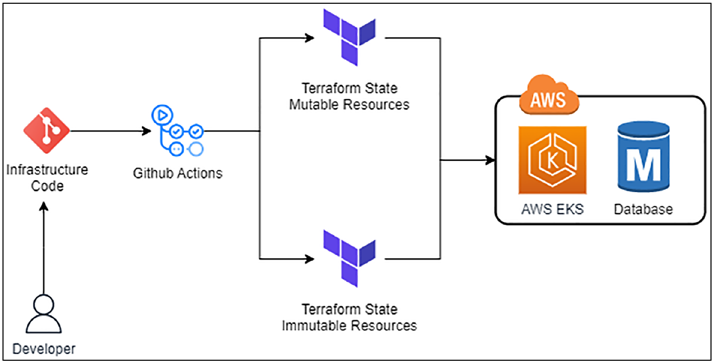
The following is the GitOps pipeline we shall build and also
understand the different components in different chapters.
Figure 1-10. Complete GitOps pipeline
1.6 Conclusion
In this chapter, we looked at what DevOps is and how it has solved some
of the biggest challenges in software development. Infrastructure as Code
added to the speed and agility of DevOps, and to utilize it better, GitOps
movement was started. GitOps helps in creating a continuous deployment
pipeline to deploy the changes faster, reliably, and efficiently.
In the next chapter, we’ll look at how we can create an EC2 instance on
AWS using Console as well as CLI to elaborate how easy it has now become
to spin up a server on AWS.
30
CHAPTER 2
Introduction to AWS
2.1 Prerequisites
AWS CLI will be explored in this chapter, and hence, to log in using the
CLI, we’ll need to install the awscli tool, which can be installed on your
favorite operating system by following the instructions provided on the
official AWS documentation:
–
–
I am currently using AWS CLI Version 2.7.9.
Note All the code in this book will work only on AWS CLI Version 2.X
and above.
2.2 Introduction to AWS
In this chapter, we’ll introduce ourselves to AWS (Amazon Web Services),
one of the most popular cloud service providers. This chapter will help us
build context for the next chapter as well; hence, even if you’re familiar
with AWS, do at least skim through this chapter.
© Rohit Salecha 2023
31
R. Salecha, Practical GitOps,
ChApter 2 IntroduCtIon to AWS
I love history, and hence, before I tend to explain a topic, I’d like to
provide a historical overview of what happened before using this new
technology/technique as, in my opinion, it helps to understand things
better. In the previous chapter, we learned about the evolution of the IT
infrastructure from a bare-metal server to a docker container and an EC2
instance running on the AWS cloud. We also discussed the challenges
faced with the bare-metal infrastructure or even the virtualization of the
infrastructure resources. However, here, I’d like to specifically talk about
one of the most important challenges with infrastructure resources, which
is scalability.
Imagine you are the infrastructure director of an e-commerce site
that is selling some amazing products. This e-commerce site owing to
its popularity has a high demand during the daytime, and by nightfall,
the demand reduces considerably. To put it in numbers , during the day,
roughly seven to eight servers are needed to serve the load, whereas by
nightfall, only two to three servers are enough to keep the site up and
running. How do you scale with such a demand? Purchasing ten servers
and keeping them operational only for 12 hours? This can be expensive
operationally and from a capital expenditure perspective, both.
Now let’s say some organization living up in the sky gives you a sort of a
magic wand that gives you the ability to spin up and tear down servers with
a single whoosh (or maybe a command). You’ve just got to log in into their
console, do some clicks, or fire some commands (we’ll see both in this
chapter) and voilà, you have your servers ready for deployment!
This is the power of what is popularly known as “cloud computing.”
This capability helps in making our demands more scalable wherein we
can spin up and tear down as many servers as needed being charged only
for the consumption.
32
ChApter 2 IntroduCtIon to AWS
AWS (Amazon Web Services) is one of the most popular “cloud
computing” service providers wherein one of the major services that they
provide is Elastic Compute Cloud or popularly known as EC2, which is a very well-thought-out name. EC2 machines can be configured with an
operating system of our choice, a range of CPU, memory, and plenty of
other configurations.
Let’s jump right in and start creating our own EC2 machine on AWS
using the AWS GUI and through the CLI interface. Why are we using both?
As stated earlier, there is a specific set of information that I require to
capture to proceed with writing our Terraform scripts in the next chapter.
I’d like you to get sensitized to that information so that it’ll become easier
for you to write terraform scripts.
2.2.1 Create an AWS Account
Let’s first go ahead and create our AWS account. If you already have an
account, feel free to skip this section. Navigate to the URL
and create a new account using an email address and strong password. Using the free account will provide us $300 of free credit
for a period of 12 months albeit certain services that we may use like AWS
EKS and AWS Route53. While signing up, you’ll be required to enter your
credit card details as well.
Note providing a cost estimation at this stage will be a bit difficult
as I am not sure how much time you’d keep the resources on. All
resources have an hourly rate, and hence, it all depends on how
many hours you keep your eKS/rdS on. Let’s assume that you’d be
running along with the book and quickly delete the resources once
you're done exploring. In such a scenario, it should cost you roughly
about $15 or more.
33
ChApter 2 IntroduCtIon to AWS
Tip You can manage multiple AWS accounts using different email
addresses. If you are concerned about the number of mailboxes to
monitor, many email providers allow you to create aliases for the
same mailbox. For example, if you use Gmail, you can create an
account using the email Sub Addressing trick like someone+gitops@
gmail.com, which is a new account for AWS, but all communication
will land on [email protected], helping you manage multiple
accounts with a single inbox.
Once you’ve created an account, you’ll be signed in as a root user in
AWS. It is strongly recommended to apply two-factor authentication on
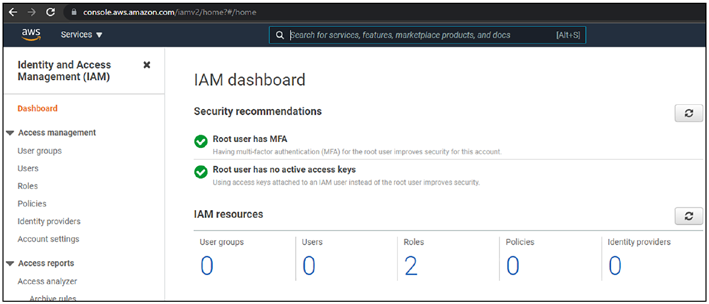
your root account and create a separate user with the requisite permissions.
Figur is the expected screen with best practices being followed upon browsing the URL
Figure 2-1. Expected IAM dashboard
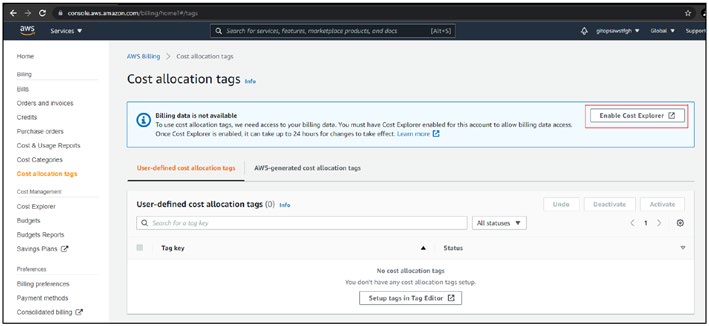
One more very important feature to enable is the Cost Explorer,
which can be enabled by browsing t
licking Enable Cost Explorer as shown in the following. Though we are in a free tier account, this will help us analyze the
expenditure in much more detail.
34
ChApter 2 IntroduCtIon to AWS
Figure 2-2. Enable Cost Explorer
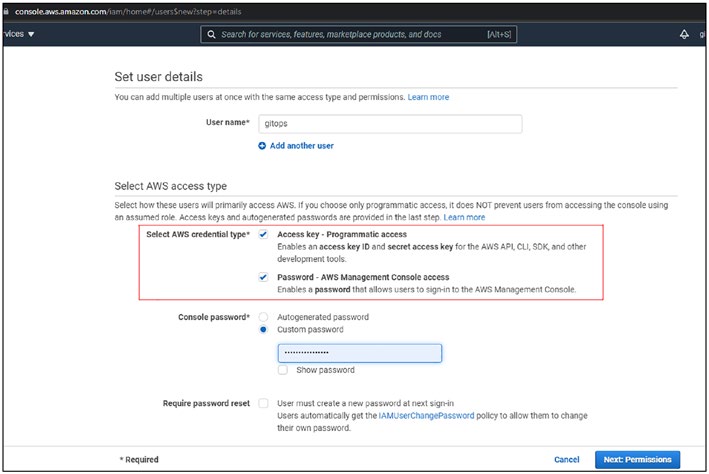
Create a new user by navigating t
licking Add Users. Ensure to enable the programmatic and password access as shown here.
Figure 2-3. Add User screen
35
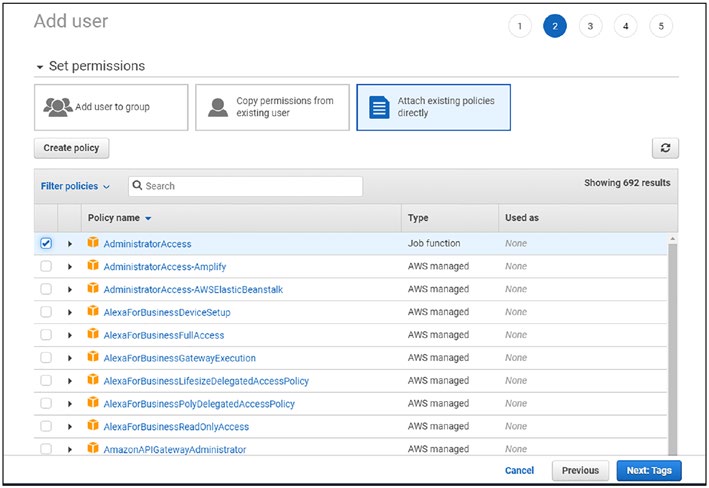
ChApter 2 IntroduCtIon to AWS
Next, click on Permissions and select Attach existing policies directly
and attach the Administrator Access as shown here.
Figure 2-4. Attach Policy and Permissions screen
Next, click Tags and add a tag as “Name=Gitops”. Next, click Review
and you will see the final screen as shown here.
Tip ever wondered why it is recommended to not to use a root
user? one of the reasons is that you cannot define permissions on
a root account. hence, it is extremely important to create a new user
and assign it permissions.
36
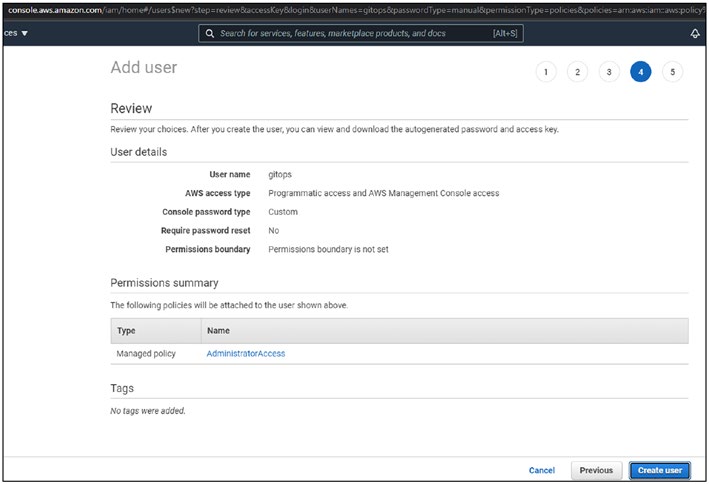
ChApter 2 IntroduCtIon to AWS
Figure 2-5. Create User Final screen
Finally, click Create User to complete the setup. You should be able to
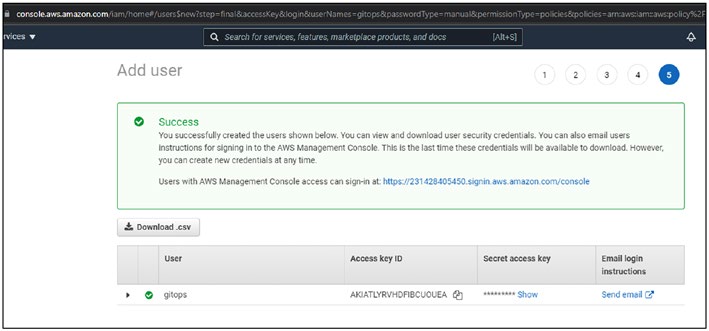
see a screen as shown here.
Figure 2-6. Access Keys Download screen
37

ChApter 2 IntroduCtIon to AWS
Save the Access Keys by downloading the CSV file as we’ll be needing
it. Ensure this file is stored in a secure location as it contains extremely
sensitive information.
2.2.2 Log in into the AWS Account
Let’s log in using the new user both through the UI and the CLI.
Open the CSV file and copy the “Console Login Link” in a browser
window. Bookmark this link as we’ll need to use this to log into our
account all the time. We’ll no longer be required to log in as the “root” user.
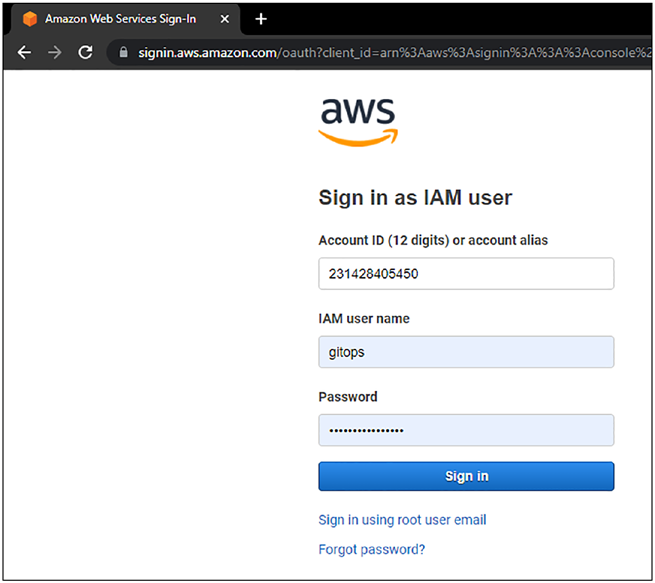
Figure 2-7. Access Keys CSV file
Sign into the AWS account using the credentials created.
38
ChApter 2 IntroduCtIon to AWS
Figure 2-8. AWS Sign-In screen
Let’s configure our AWS CLI profile by executing the command and
entering the information as shown here using the CSV file we downloaded
earlier.
CLI Output 2-1. AWS CLI profile configuration
cmd> aws configure --profile gitops
AWS Access Key ID [None]: AKIATLYRVHDFIBCUOUEA
AWS Secret Access Key [None]: XXXXXXXXXXXXXXXXXXXXXXXXXXXXXX
XXXXXXXXXX
Default region name [None]: us-east-2
Default output format [None]: json
39
ChApter 2 IntroduCtIon to AWS
Let’s confirm if we’ve configured our information correctly by
executing the following command.
CLI Output 2-2. AWS CLI login confirmation
cmd> aws sts get-caller-identity --profile gitops
{
"UserId": "AIDATLYRVHDFFW7RHDCIP",
"Account": "231428405450",
"Arn": "arn:aws:iam::231428405450:user/gitops"
}
Now that our accounts have been created, let’s create an EC2 machine,
which is the AWS’ virtual machine offering.
2.3 Creating an EC2 Machine – GUI
Now that we’ve everything set up, let’s create our first EC2 machine from
the GUI or the AWS Console to better understand the power of cloud
computing.
2.3.1 Default Region Selection
In AWS, selecting a region is very important for most services. All
instructions in the book will be provided for Ohio (us-east-2) as the
default region. So ensure you select the region as Ohio from the drop-
down box on the top-right corner as shown in the following before moving
into any of the steps.
40

ChApter 2 IntroduCtIon to AWS
Note AWS region selection is completely arbitrary as all the
services that we’ll be exploring in this book are available in all the
regions. It totally depends on the user to select which region they are
comfortable with; however, once you do select, please continue to
use it as services like AWS eKS, rdS, openSearch, etc., are region
specific.
Figure 2-9. AWS Default Region Selection screen
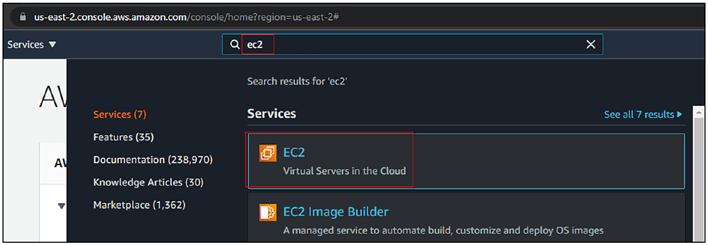
Once logged in, enter the term ec2 in the search bar on top as
shown here.
Figure 2-10. AWS Search Bar EC2 screen
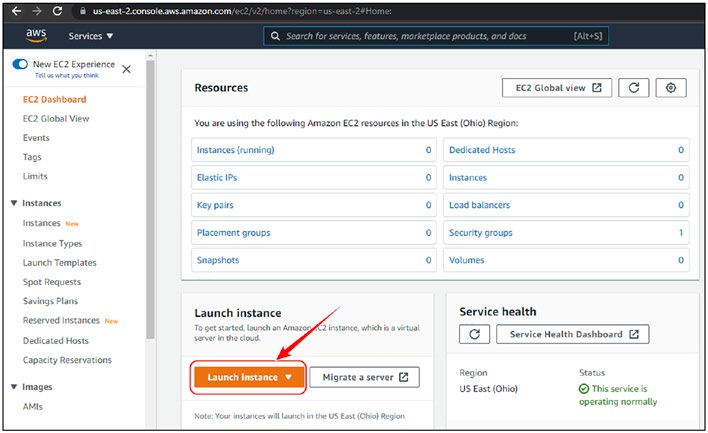
You’ll be greeted with an EC2 launch console where you can click on
the Launch Instance button as shown here.
41
ChApter 2 IntroduCtIon to AWS
Figure 2-11. AWS Launch Instance screen
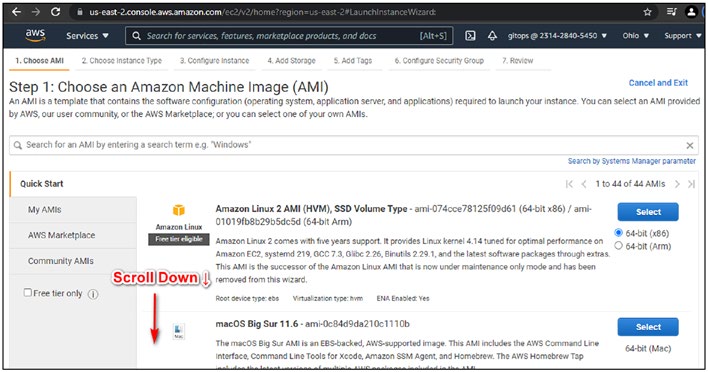
The page will navigate to a section where you can select the base
operating system that is required for spinning up our VM as shown here.
Figure 2-12. Selecting Base Operating System screen
42
ChApter 2 IntroduCtIon to AWS
2.3.2 Instance Type Selection
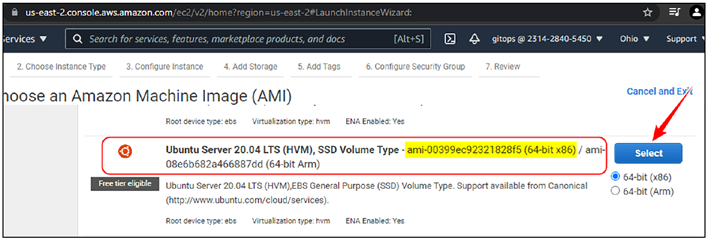
Scroll down below till you see the Ubuntu image and then click Select as shown here.
One information to note, as highlighted in yellow, is the AMI ID, which
is ami-00399ec92321828f5.
Figure 2-13. Selecting Ubuntu OS screen
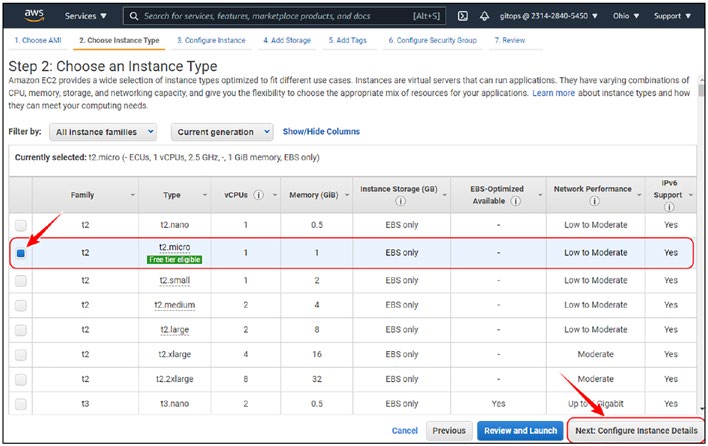
On the next screen, we’ll be asked to choose the configuration of
the virtual machine. For now, to save money, we’ll go ahead with the t2.
micro instance as shown in the following and then click Next: Configure
Instance Details.
43
ChApter 2 IntroduCtIon to AWS
Figure 2-14. Instance Selection screen
Tip In AWS, Cpu selection is the most important aspect as rAM and
bandwidth depend on it. the higher the Cpu, the higher is the rAM
and bandwidth. however, you might find certain instances that are
memory optimized not following this rule.
2.3.3 Instance Configuration
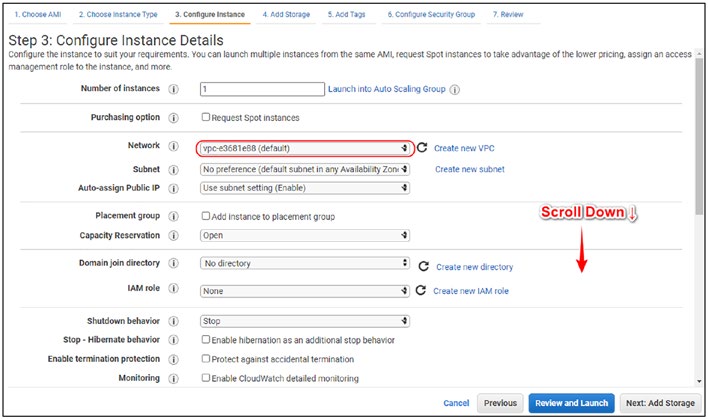
In this screen, we can configure the instance-level details like which
network it’ll belong to and what it needs to install at startup. As can be
seen in the following screenshot, the default VPC (virtual private cloud) is
configured for the instance’s deployment.
No action needed here; we just need to scroll down to a very important
section.
44
ChApter 2 IntroduCtIon to AWS
Figure 2-15. VPC Selection screen
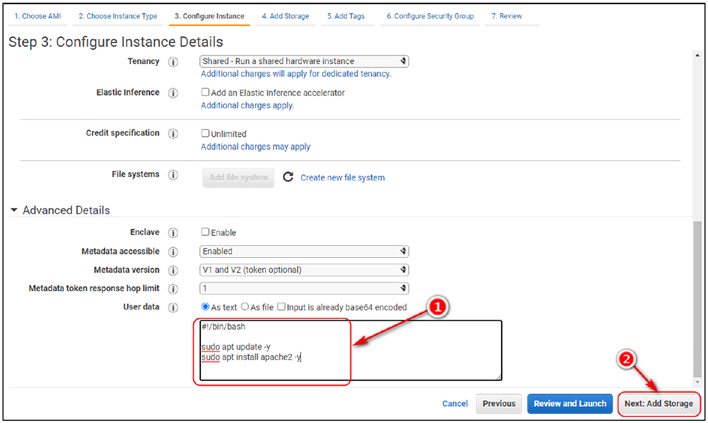
Now we need to configure the instance to run an Apache2 web server
on port 80 upon launch. This can be done by adding our commands to set
up an Apache2 server in the “User Data” section using the script as shown
in Figure .
Tip the “user data” section is a place where you can “bootstrap” your
servers with necessary dependencies using scripts for the respective
operating systems. Bash for *nix and powerShell for Windows.
Code Block 2-3. User data script
File: chapter2\user_data.sh
1: #!/bin/bash
2:
3: sudo apt update -y
4: sudo apt install apache2 -y
45
ChApter 2 IntroduCtIon to AWS
Step 1: Add the preceding script in the “User Data” section.
Step 2: Click “Next: Add Storage”.
Figure 2-16. User Data Script Configuration
2.3.4 Instance Storage
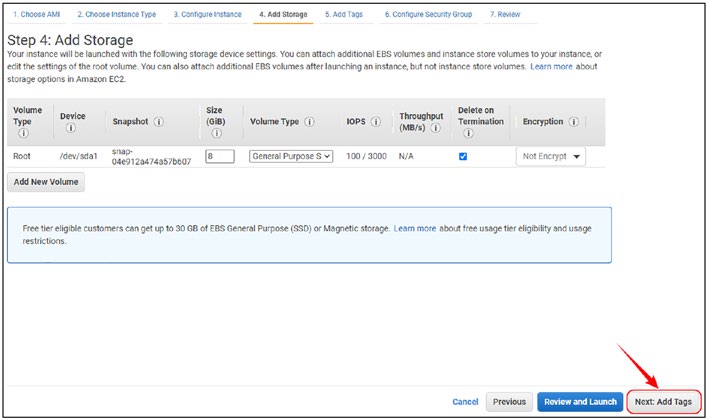
The next section is to add Storage, that is, adding a separate disk to store any data. We’ll keep the defaults here and then click Next: Add Tags.
46
ChApter 2 IntroduCtIon to AWS
Figure 2-17. Storage Configuration screen
2.3.5 Tags
Adding tags is very important especially when you’re working in a cloud
environment. If you remember when we created a new account, I asked
you to enable a setting called Enable: Cost Explorer. This functionality
relies heavily on tags to provide us proper billing information.
Aside from billing, tags help us perform granular selections that can
then be applied for authentication, authorization, configuration, and
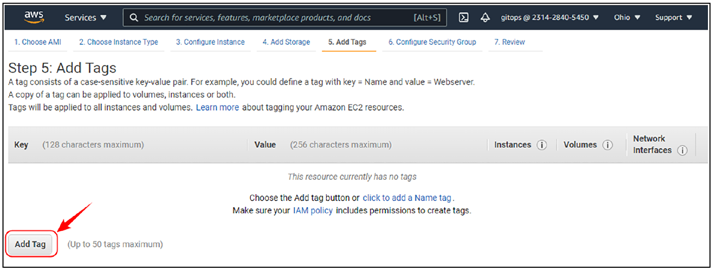
termination. So let’s click Add Tag and add a simple tag.
47
ChApter 2 IntroduCtIon to AWS
Figure 2-18. Adding Tags screen
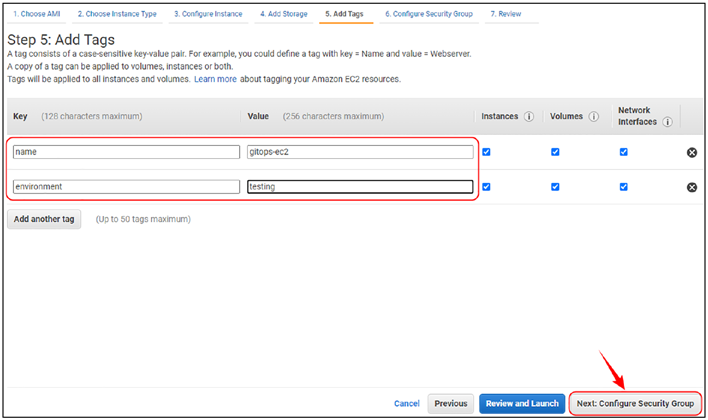
Let’s add the following tags as shown here.
name: gitops-ec2
environment: testing
After adding the tags, click Next: Configure Security Group.
Figure 2-19. Adding name and environment tags screen
48
ChApter 2 IntroduCtIon to AWS
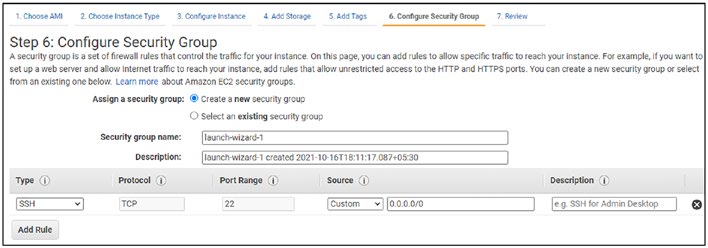
2.3.6 Security Groups
Next is a very important section from security perspective wherein we
configure which ports/services we would like to configure on our EC2
machine. The following screenshot shows that AWS is suggesting opening
the SSH port for remote login.
Tip If you're familiar with Windows Firewall in Windows or
iptables in Linux wherein we are restricting only certain ports to
be listening on our machine, security groups are almost similar in
functionality. It is AWS’ way of ensuring that no insecure services are
running by default.
Figure 2-20. Adding Security Groups screen
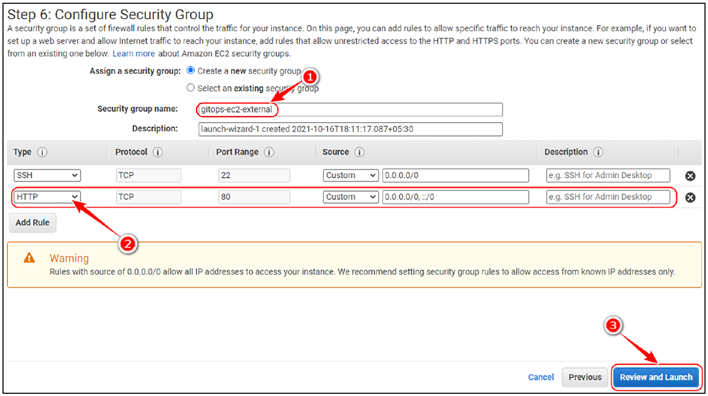
However, we are installing an Apache2 web server, and by default, it
runs on port 80. Hence, we need to allow port 80 to be listening as well for
which we’ll need to add a rule to allow port 80 as well.
49
ChApter 2 IntroduCtIon to AWS
Step 1: Add a good name to the security group, let’s call it gitops-ec2-
external.
Step 2: Add a rule to allow port 80 from all IPs 0.0.0.0/0; just select HTTP from the drop-down box.
Step 3: Click Review and Launch.
Figure 2-21. Configuring Security Groups ports 80 and 22
2.3.7 SSH Key-Pair Generation
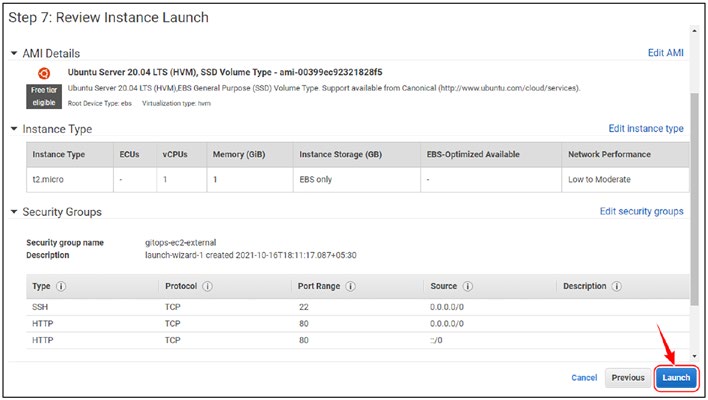
This is the final review screen where we can review all the information
which we’ve configured so far. Once all information has been reviewed,
you can click Launch as shown here.
50
ChApter 2 IntroduCtIon to AWS
Figure 2-22. Final Review screen
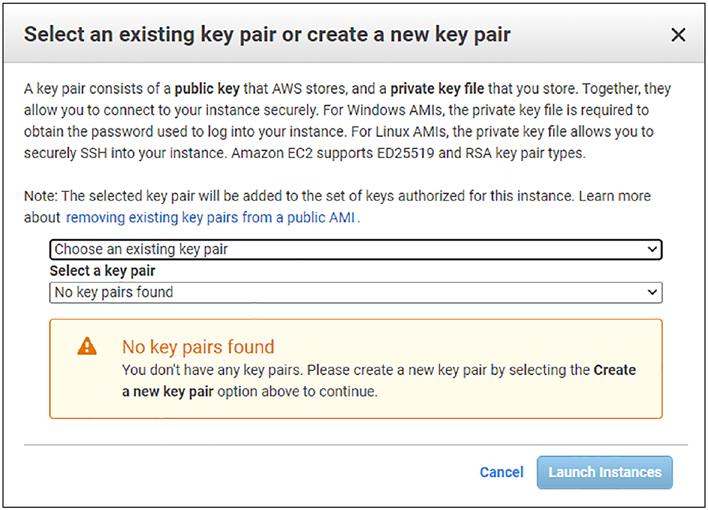
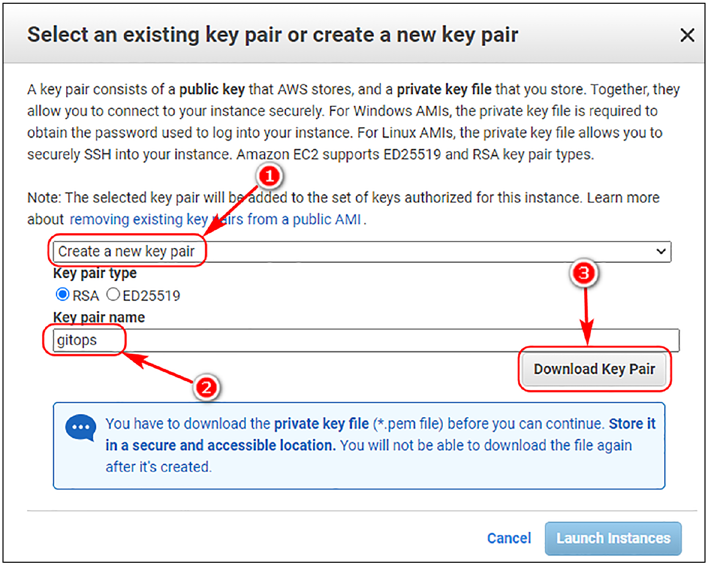
Upon clicking Launch, you’ll be asked to create an SSH key pair as
shown here. This key will be needed to log in to the EC2 machine we’ve
launched. Hence, it’s also very important and needs to be performed.
51
ChApter 2 IntroduCtIon to AWS
Figure 2-23. SSH Key Pair creation screen
From the drop-down that says Choose an existing key pair, select
Create a new key pair and add a name as gitops.
Step 1: Create a new key pair.
Step 2: Enter a name as gitops, keeping the key-pair type as default,
that is, RSA.
Step 3: Click Download Key Pair.
Note please keep the downloaded key pair safe and secure. Also,
do make a note of the name of this key pair as it’ll be required to
reference in the future.
52
ChApter 2 IntroduCtIon to AWS
Figure 2-24. Configure Key Pair Name and Download screen
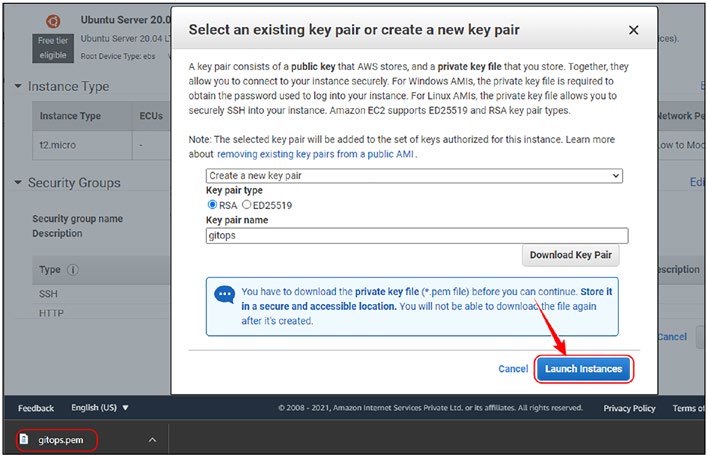
Once the key pair has been downloaded, click on Launch Instances to
finally launch the instance.
53
ChApter 2 IntroduCtIon to AWS
Figure 2-25. Launch Instance after downloading the key pair
2.3.8 Launching EC2 Instance
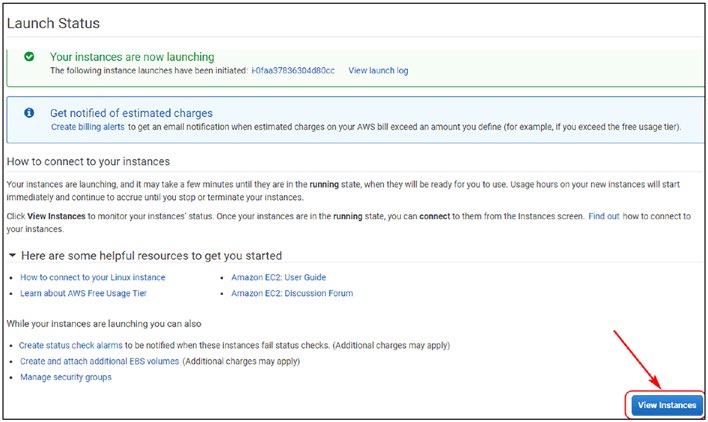
It takes about one to two minutes for the instance to launch and get
configured properly. Let’s click View Instance to view the details like the IP Address of the instance.
54

ChApter 2 IntroduCtIon to AWS
Figure 2-26. Launch Status screen
Upon clicking View Instance, you’ll be redirected to the page where all
the information about the instance can be seen. One detail that we require
is the IP Address, which you can view by scrolling a bit toward the right.
Figure 2-27. Copy the IP address
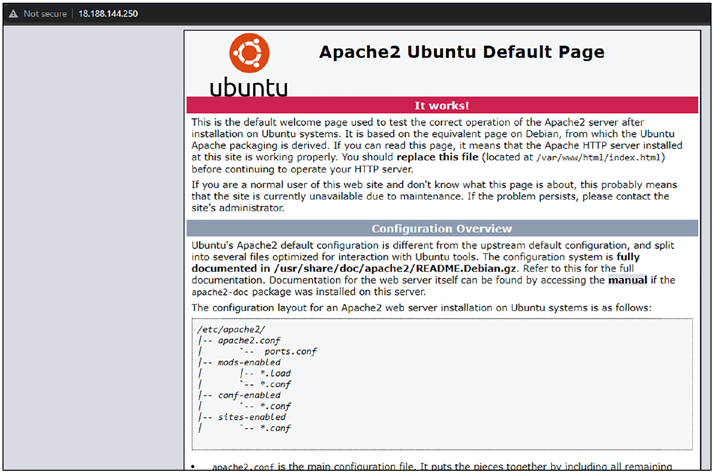
Let’s copy the IP and paste it into our browser and see the magic
unfold! We’ve successfully launched an Ubuntu system with Apache2
server running with a few clicks that would take anywhere between 10 and
15 minutes! This is the power of cloud computing!
55
ChApter 2 IntroduCtIon to AWS
Figure 2-28. Accessing EC2 from the browser
2.3.9 Terminating EC2 Instance
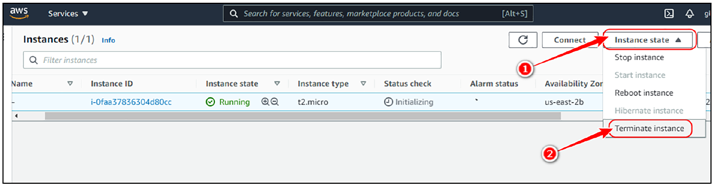
Let’s terminate this instance by following these steps:
Step 1: Click on “Instance State”.
Step 2: Click on “Terminate Instance”.
Figure 2-29. Terminating EC2 Instance
56
ChApter 2 IntroduCtIon to AWS
Note It’ll take about five minutes to terminate the instance.
2.4 Creating an EC2 Machine – CLI
We saw how it is possible to spin up a virtual machine on AWS cloud with
an Ubuntu OS and an Apache2 web server with a few clicks. Not only was
it easy but the entire process is also very much parameterized where you
can simply specify the parameters and spin up a system of your choice.
However, doing via GUI has its own limitation, the most important one
being lacking automation. To automate this process of creating an
EC2 instance, we need the AWS CLI tool that was used to configure the
access keys.
2.4.1 Configuring CLI Environment
The base command to create a running EC2 machine on AWS is the
following.
CLI Output 2-4. Configuring CLI environment
cmd> export AWS_PROFILE=gitops
cmd> aws ec2 run-instances
When working with multiple profiles, it is a good practice to either
initialize the CLI environment by exporting the AWS_PROFILE variable or
adding –profile, for example, aws ec2 run-instances --profile.
Now there are five parameters that we need in order to execute the
same Apache2 virtual machine that we spun up on AWS through the GUI
in the earlier section. They are
57
ChApter 2 IntroduCtIon to AWS
–
AMI ID – ami-00399ec92321828f5
–
Instance Type – t2.micro
–
Key Name – gitops
–
User Data – chapter2\user_data.sh
–
Security Group ID – We’ll need to fetch
–
Network/Subnet ID – We’ll need to fetch
2.4.2 Fetching Security Group ID
So first, let’s fetch the security group ID which we’d created in the earlier
section.
CLI Output 2-5. Fetching security group ID
cmd> aws ec2 describe-security-groups --query
'SecurityGroups[*].[GroupName,GroupId]'
[
[
"gitops-ec2-external",
"sg-085db3a64b72894be"
],
[
"default",
"sg-f687edba"
]
]
Using the aws ec2 describe-security-groups command, we are getting
the details of all the security groups that are configured for the account
in the default region, that is, us-east-2. However, we are only interested
58
ChApter 2 IntroduCtIon to AWS
in the security group ID, and hence, we’ve formatted the output using
the --query parameter of AWS CLI to fetch only the GroupName and the GroupID.
2.4.3 Fetching Subnet ID
Next, in a similar manner, let’s retrieve the SubnetID of the subnet where
we need to deploy our EC2 instance. A subnet is a logical grouping of
networks within a single VPC. AWS creates a subnet per zone as can be
seen in the following. The US-East region has three zones, and hence,
we are having three different subnets. We can, however, select any of the
subnets to deploy our EC2 machine in.
CLI Output 2-6. Fetching subnet ID
cmd> aws ec2 describe-subnets --query 'Subnets[*].
[SubnetId,AvailabilityZone]'
[
[
"subnet-79b62812",
"us-east-2a"
],
[
"subnet-060bdf7b",
"us-east-2b"
],
[
"subnet-49764905",
"us-east-2c"
]
]
59
ChApter 2 IntroduCtIon to AWS
So far, we’ve got the following information:
–
AMI ID – ami-00399ec92321828f5
–
Instance Type – t2.micro
–
Key Name – gitops
–
Security Group ID – sg-085db3a64b72894be
–
Network/Subnet ID – subnet-79b62812
–
User Data – chapter2\user_data.sh
2.4.4 Launching EC2 Instance
Now we are ready to run the command that will create our EC2 instance
from the CLI!
CLI Output 2-7. Launching EC2 from CLI
cmd> aws ec2 run-instances --image-id ami-00399ec92321828f5
--count 1 \
--instance-type t2.micro --key-name gitops \
--security-group-ids sg-085db3a64b72894be \
--subnet-id subnet-79b62812 --user-data file://chapter2/
user_data.sh
{
"Groups": [],
"Instances": [
{
"AmiLaunchIndex": 0,
"ImageId": "ami-00399ec92321828f5",
"InstanceId": " i-06adc4012f2b88810",
"InstanceType": "t2.micro",
60
ChApter 2 IntroduCtIon to AWS
"KeyName": "gitops",
"LaunchTime": "2021-10-23T13:28:22.000Z",
"Monitoring": {
"State": "disabled"
},
"Placement": {
"AvailabilityZone": "us-east-2a",
"GroupName": "",
"Tenancy": "default"
},
"PrivateDnsName": "ip-172-31-5-130.us-east-2.
compute.internal",
"PrivateIpAddress": "172.31.5.130",
"ProductCodes": [],
"PublicDnsName": "",
"State": {
"Code": 0,
"Name": "pending"
}
--------SNIP-----------------
}
Take note of the “instance-id”, which is “i-06adc4012f2b88810”, which
we’ll need to query the IP address of our server.
2.4.5 Accessing EC2 Instance
Now here, we need to query for the IP address of a specific instance using
the instance ID we received. The following command applies the “-filter”
flag against two attributes, that is, instance-state and instance-id, with their
respective values and then queries for the PublicIpAddress field.
61
ChApter 2 IntroduCtIon to AWS
CLI Output 2-8. Obtain the IP address through describe instances
cmd> aws ec2 describe-instances
--filters \
"Name=instance-state-name,Values=running" \
"Name=instance-id,Values=i-06adc4012f2b88810" \
--query 'Reservations[*].Instances[*].[PublicIpAddress]' \
--output text
18.217.95.186
Let’s run a curl command to verify if the instance is indeed running. As
shown here, the same is verified.
CLI Output 2-9. Curl the IP address
cmd> curl -I http://18.217.95.186
HTTP/1.1 200 OK
Date: Sat, 23 Oct 2021 17:01:56 GMT
Server: Apache/2.4.41 (Ubuntu)
Last-Modified: Sat, 23 Oct 2021 13:29:27 GMT
ETag: "2aa6-5cf051de7a237"
Accept-Ranges: bytes
Content-Length: 10918
Vary: Accept-Encoding
Content-Type: text/html
2.4.6 Terminating EC2 Instance
Let’s destroy the instance that we started earlier using the following
command by first querying for the instance ID and then running the
terminate- instances command.
62
ChApter 2 IntroduCtIon to AWS
CLI Output 2-10. Terminating the EC2 instance through CLI
cmd> aws ec2 describe-instances \
--filters \
"Name=instance-state-name,Values=running" \
--query 'Reservations[*].Instances[*].[InstanceId]' \
--output text
i-06adc4012f2b88810
cmd> aws ec2 terminate-instances --instance-id
i-06adc4012f2b88810
{
"TerminatingInstances": [
{
"CurrentState": {
"Code": 32,
"Name": "shutting-down"
},
"InstanceId": "i-06adc4012f2b88810",
"PreviousState": {
"Code": 16,
"Name": "running"
}
}
]
}
63
ChApter 2 IntroduCtIon to AWS
2.5 Clean-Up
Just to ensure that we don’t end up getting billed unnecessarily, you
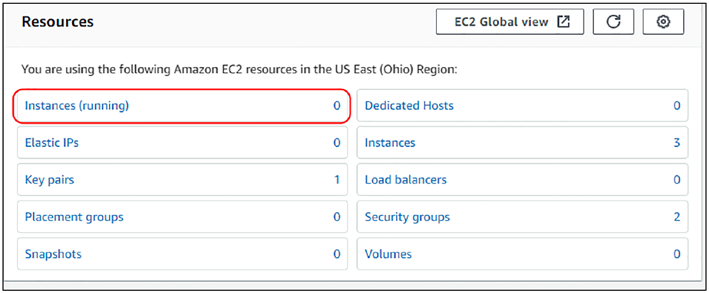
visit the EC2 console on the AWS GUI and double-check if everything is
deleted. The Instances (running) field should show 0 and ensure you’ve
selected the correct region. If it’s still showing, execute the commands
specified in CLI Output
Figure 2-30. EC2 Instances running is zero
Note Always double-check the region; we’ve been following
us- east- 2 in this chapter.
2.6 Conclusion
In this way, we saw how AWS makes it easy to set up infrastructure in a matter
of minutes in case of GUI and seconds in case of using CLI. It may, however,
be easy to perform the preceding actions, but when it comes to setting up a
production-grade environment, it cannot be (or rather should not be) done
using either GUI or using CLI as it is difficult to keep track of what’s running
and while doing interconnections with the different systems, etc.
64
ChApter 2 IntroduCtIon to AWS
At times, running infrastructure in the cloud can get expensive if you
don’t know what exactly is running as against what is needed. Hence,
in the next chapter, we’ll introduce ourselves to a tool called Terraform,
which will make our lives a lot easier as it’ll help us in not only creating
the infrastructure but also in managing the state as well as facilitating
interconnections between different systems and AWS services.
65
CHAPTER 3
Introduction
to Terraform
In the previous chapters, we looked at how an EC2 machine can be created
using the GUI as the CLI interface. In this chapter, we’ll understand what
Terraform is and how using Terraform we’ll create the exact same EC2
machine with the exact same configuration without using CLI/GUI consoles.
3.1 Prerequisites
From here onward, I’ll be showing a lot of code snippets that can be
downloaded from the GitHub link shared earlier. It is recommended that
you get hold of the following before moving ahead as all will be required
henceforth if you wish to follow along with the book:
–
A code editor. I am using Visual Studio Code (VS
Code), which can be downloaded and installed from
the following link:
–
–
Terraform plugin by HashiCorp for VS Code can be
installed from here or from within VS Code itself:
–
© Rohit Salecha 2023
67
R. Salecha, Practical GitOps,
Chapter 3 IntroduCtIon to terraform
–
Terraform binary installed in the path. The following
link can be used to download and install terraform
amd add terraform binary in the path. The code
discussed in the book currently supports Terraform
>= 1.2.0:
–
3.2 Introduction to Terraform
When we wish to set up something, there are primarily two aspects to
it: provisioning and configuring. We provision a home using bricks and
mortar and then configure it using different pieces of furniture like bed,
sofa, etc.
In the infrastructure world, when we say we need to create an Apache2
web server, we first need to provision an underlying operating system and
its binaries and then configure the server so that it can run as expected.
Tools like Terraform, Ansible, Chef, Puppet, SaltStack, AWS
CloudFormation, etc., help us in provisioning and configuring
infrastructure resources in the cloud (and on premises, e.g., OpenShift)
through simple lines of declarative code. Declarative programming is
a method of writing instructions that define the goal of the program. It
doesn’t involve itself on the how part. For example, in terraform, the
following few lines simply say that we want an EC2 instance to be up and
running. We don’t know or rather we don’t really care how it’ll be done.
Code Block 3-1. Iteration1 code for spinning up an EC2 machine
File: chapter3\infra\iteration1\main.tf
19: resource "aws_instance" "apache2_server" {
20: ami = "ami-00399ec92321828f5"
21: instance_type = "t2.micro"
68
Chapter 3 IntroduCtIon to terraform
22: user_data = << EOF
23: #!/bin/bash
24: sudo apt update -y
25: sudo apt install apache2 -y
26: EOF
27: tags = {
28: env = "dev"
29: }
30: }
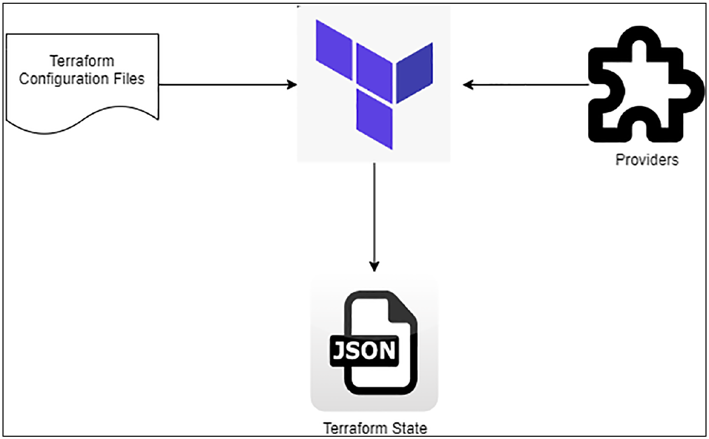
Terraform as a tool is developed in Go and has three main components
as shown here.
Figure 3-1. Terraform Core Components
• Terraform Configuration Files – Files containing the
HCL formatted declarative code providing instructions
of what needs to be done. These files have the .tf
extension.
69
Chapter 3 IntroduCtIon to terraform
• Providers – They are plugins that terraform relies on to
interact with the APIs of different IaaS (Infrastructure as
a Service) providers like AWS, GCP, and Azure or even
SaaS (Software as a Service) providers like Datadog or
PaaS (Platform as a Service) providers like Kubernetes,
which we’ll explore in detail in this book. Information
on how to start/stop/destroy the different resources/
services is baked into these providers.
• Terraform State – After taking inputs from the
configuration files and the providers, terraform
creates a state file that is a pure JSON document
wherein it maps the complete infrastructure resources
that’ve been created with all different metadata like
timestamp, configuration information like IP address,
resource identifiers, etc. The terraform state file has a
.tfstate extension.
3.3 Getting Started with Terraform
The best way to understand Terraform or any programming language/tool
is to take a use case and execute it. So we’ll look at the third way in which
an AWS EC2 machine can be provisioned using Terraform!
We’ll understand the different aspects of the terraform code like
resources, modules, variables, data elements, output, etc., through
three iterations. All the iterations would have the same result difference
would be the way we are writing the code which matters a lot, especially
when you are writing in declarative format. Each iteration would be an
improvisation over the previous one with the third iteration being the best,
most independent, scalable, and conformant with best practices.
Before we begin, let’s confirm a few things.
70
Chapter 3 IntroduCtIon to terraform
A. You’ve downloaded the code repository. You
should’ve the following folder format and you’ll
need to open the specific chapter that we are
learning.
CLI Output 3-2. Code folders
cmd> tree -d -L 1
├── chapter1
├── chapter2
├── chapter3
├── chapter4
├── chapter5
├── chapter6
├── chapter7
├── chapter8
├── chapter9
├── chapter10
10 directories
B. You’ve installed Terraform version 1.0.0 or greater
and authenticated with AWS as shown here.
CLI Output 3-3. Terraform Getting Started
cmd> terraform --version
Terraform v1.0.7
on linux_amd64
cmd> export AWS_PROFILE=gitops
cmd> aws sts get-caller-identity
{
"UserId": "AIDATLYRVHDFFW7RHDCIP",
71
Chapter 3 IntroduCtIon to terraform
"Account": "231428405450",
"Arn": "arn:aws:iam::231428405450:user/gitops"
}
3.4 Iteration #1
The following 26 lines of code will spin up an EC2 server for us on AWS
using all the defaults. Here, it can be seen that we’ve not provided the VPC
ID; hence, Terraform will query the default VPC in AWS and set up the
server in it.
CLI Output 3-4. main.tf for iteration1
File: chapter3\infra\iteration1\main.tf
01: # Setting and locking the Dependencies
02: terraform {
03: required_providers {
04: aws = {
05: source = "hashicorp/aws"
06: version = "4.10"
07: }
08: }
09:
10: required_version = ">= 1.1.0"
11: }
12:
13: # AWS Provider configuration
14: provider "aws" {
15: region = "us-east-2"
16: }
17:
72
Chapter 3 IntroduCtIon to terraform
18: # AWS EC2 Resource creation
19: resource "aws_instance" "apache2_server" {
20: ami = "ami-00399ec92321828f5"
21: instance_type = "t2.micro"
22: user_data = "${file("user_data.sh")}"
23: tags = {
24: env = "dev"
25: }
26: }
L02-11: Sort of the primary starting point of execution, like main()
where the provider dependencies are checked and downloaded. As
stated, earlier providers are nothing but plugins that fit into the terraform
architecture. Here, we are declaring that this code will run only for
Terraform version >= 1.1.0, and we are going to use the AWS provider for
the specific version. If we were to use GCP, then we’d add the GCP-related
information. We’ll be adding many more providers as we proceed ahead.
L14-16: Every provider needs some information for configuration. The
AWS provider needs information about the region, access keys, tokens, etc.
The complete documentation of the AWS provider is available here:
.
For our requirement, we only need to set the region as we’ve already
configured the AWS CLI and authenticated using it; we only need to export
the environment variable AWS_PROFILE before running terraform.
L19-30: In terraform, every resource needs to be configured separately.
Here, we’re configuring the AWS EC2 machine with all the information that
we’d seen earlier like the AMI ID, instance type, and the user data startup
script that is being loaded using the file function of Terraform. When we
start building on terraform, we’ll be mainly working on these resources,
and you can imagine each resource to be a Lego piece. The entire Lego will
be built by juxtaposition of these pieces.
73
Chapter 3 IntroduCtIon to terraform
3.4.1 Terraform Working Directory
Let’s now run this code and explore the different terraform commands.
Before running any terraform command, it is important to understand
what terraform considers as the root of the project or the terraform working directory. As shown in the following, we must first change into
the directory that contains the terraform code, which is the iteration1
directory for us.
All the *.tf files in this directory will be clubbed and executed together by terraform, and hence, this directory becomes the root directory or the terraform working directory.
CLI Output 3-5. Terraform’s current working directory
cmd> cd chapter3/infra/iteration1
cmd> ls -l
total 4
-rw-r--r-- 1 ubuntu ubuntu 476 Oct 30 11:57 main.tf
-rw-r--r-- 1 ubuntu ubuntu 59 Oct 30 11:57 user_data.sh
Terraform doesn’t apply recursively; for example, if we had a folder
called child under the iteration1 folder and we apply terraform on the
iteration1 folder, then any *.tf files inside the child directory will not apply!
CLI Output 3-6. Terraform applies to only *.tf files in a single folder cmd> cd chapter3/infra/iteration1
cmd> tree -a iteration1
iteration1 <------ Root Directory
├── child <------ Child Directory
│ └── child.tf <------ Terraform will not include
└── main.tf <------ Terraform will include
└── user_data.sh
1 directory, 3 files
74
Chapter 3 IntroduCtIon to terraform
Tip You can, however, use the flag -chdir to change the root directory to something else; for example, the terraform -chdir=child
apply command will consider the child directory as the root directory.
But still, it’ll not read the *.tf files in the parent directory!
3.4.2 Terraform init
Let’s now execute the first command, which is terraform init, as shown here.
Tip always export the profile using the aWS_profILe environment
variable as it becomes easy to follow which aWS environment we are
working on. the values in the environment variables have taken the
highest precedence in terraform’s execution.
CLI Output 3-7. Output for terraform init
cmd> export AWS_PROFILE=gitops
cmd> cd chapter3/infra/iteration1
cmd> terraform init
Initializing the backend...
Initializing provider plugins...
- Finding hashicorp/aws versions matching "~> 3.27"...
- Installing hashicorp/aws v3.63.0...
- Installed hashicorp/aws v3.63.0 (signed by HashiCorp)
Terraform has created a lock file .terraform.lock.hcl to record
the provider selections it made previously. Include this file
in your version control repository so that Terraform can
75
Chapter 3 IntroduCtIon to terraform
guarantee to make the same selections by default when you run
"terraform init" in the future.
Terraform has been successfully initialized!
You may now begin working with Terraform. Try running
"terraform plan" to see any changes that are required for your
infrastructure. All Terraform commands should now work.
If you ever set or change modules or backend configuration for
Terraform, rerun this command to reinitialize your working
directory. If you forget, other commands will detect it and
remind you to do so if necessary.
terraform init initializes the entire terraform ecosystem by
downloading and installing the dependencies. As can be seen from the
preceding command output, it basically downloads the AWS provider of
the specific version and creates a .terraform.lock.hcl file, which contains the information about all the dependencies and their hashes. Terraform init
command also creates a .terraform folder where the actual dependency is installed as shown in the following in the output of the tree command.
CLI Output 3-8. Folder structure after terraform init
cmd> tree -a
.
├── .terraform
│ └── providers
│ └── registry.terraform.io
│ └── hashicorp
│ └── aws
│ └── 4.10.0
│ └── linux_amd64
│ └── terraform-provider- aws_
v4.10.0_x5
76
Chapter 3 IntroduCtIon to terraform
├── .terraform.lock.hcl
└── main.tf
└── user_data.sh
7 directories, 4 files
3.4.3 Terraform Plan
Now that our project has been initialized, let’s execute the next command,
that is, terraform plan.
The terraform plan command provides a detailed output about all
the resources that are going to be added, removed, or updated with
appropriate signs:
+ – The plus symbol indicates that a resource will
be added.
- – The hyphen indicates that the resource will be
destroyed.
~ – The tilde indicates that the resource will be
updated.
In the preceding plan execution, we can only see + symbol since this is
the very first time we’ve applied the plan.
CLI Output 3-9. Terraform Plan output
cmd> terraform plan
Terraform used the selected providers to generate the following
execution plan. Resource actions are indicated with the
following symbols:
+ create
77
Chapter 3 IntroduCtIon to terraform
Terraform will perform the following actions:
# aws_instance.apache2_server will be created
+ resource "aws_instance" "apache2_server" {
+ ami = "ami-00399ec92321828f5"
+ arn = (known after apply)
+ associate_public_ip_address = (known after apply)
+ availability_zone = (known after apply)
+ cpu_core_count = (known after apply)
+ cpu_threads_per_core = (known after apply)
+ disable_api_termination = (known after apply)
+ ebs_optimized = (known after apply)
+ get_password_data = false
+ host_id = (known after apply)
+ id = (known after apply)
+ instance_initiated_shutdown_behavior = (known after apply)
+ instance_state = (known after apply)
+ instance_type = "t2.micro"
+ ipv6_address_count = (known after apply)
+ ipv6_addresses = (known after apply)
+ key_name = (known after apply)
+ monitoring = (known after apply)
+ outpost_arn = (known after apply)
+ password_data = (known after apply)
+ placement_group = (known after apply)
+ placement_partition_number = (known after apply)
+ primary_network_interface_id = (known after apply)
+ private_dns = (known after apply)
+ private_ip = (known after apply)
+ public_dns = (known after apply)
+ public_ip = (known after apply)
+ secondary_private_ips = (known after apply)
78
Chapter 3 IntroduCtIon to terraform
+ security_groups = (known after apply)
+ source_dest_check = true
+ subnet_id = (known after apply)
+ tags = {
+ "env" = "dev"
}
+ tags_all = {
+ "env" = "dev"
}
+ tenancy = (known after apply)
+ user_data = "7bdaf2f31b227
2f40c05104fc1ce
987cdcdbafd5"
+ user_data_base64 = (known after apply)
+ vpc_security_group_ids = (known after apply)
+ capacity_reservation_specification {
+ capacity_reservation_preference = (known after apply)
+ capacity_reservation_target {
+ capacity_reservation_id = (known after apply)
}
}
+ ebs_block_device {
+ delete_on_termination = (known after apply)
+ device_name = (known after apply)
+ encrypted = (known after apply)
+ iops = (known after apply)
+ kms_key_id = (known after apply)
+ snapshot_id = (known after apply)
+ tags = (known after apply)
+ throughput = (known after apply)
+ volume_id = (known after apply)
79
Chapter 3 IntroduCtIon to terraform
+ volume_size = (known after apply)
+ volume_type = (known after apply)
}
+ enclave_options {
+ enabled = (known after apply)
}
+ ephemeral_block_device {
+ device_name = (known after apply)
+ no_device = (known after apply)
+ virtual_name = (known after apply)
}
+ metadata_options {
+ http_endpoint = (known after apply)
+ http_put_response_hop_limit = (known after apply)
+ http_tokens = (known after apply)
}
+ network_interface {
+ delete_on_termination = (known after apply)
+ device_index = (known after apply)
+ network_interface_id = (known after apply)
}
+ root_block_device {
+ delete_on_termination = (known after apply)
+ device_name = (known after apply)
+ encrypted = (known after apply)
+ iops = (known after apply)
+ kms_key_id = (known after apply)
+ tags = (known after apply)
80
Chapter 3 IntroduCtIon to terraform
+ throughput = (known after apply)
+ volume_id = (known after apply)
+ volume_size = (known after apply)
+ volume_type = (known after apply)
}
}
Plan: 1 to add, 0 to change, 0 to destroy.
────────────────────────────────────────────
────────────────────────────────────────────
────────────────────────────────────────────
─────────────────────────────────────────
Note: You didn't use the -out option to save this plan, so
Terraform can't guarantee to take exactly these actions if you
run "terraform apply" now.
Tip terraform plan outputs can run into hundreds and even
thousands of lines; hence, if you wish to save the output, then you
can use the command terraform plan -out plan.tfplan to save the
plan that is not readable by a traditional editor but does contain all
the configuration information.
From the plan, it’s quite discernable that terraform is not only creating
the AWS EC2 instance but also creating everything associated with it like
the EBS volume, root volume, and network interfaces just to name a few.
81
Chapter 3 IntroduCtIon to terraform
3.4.4 Terraform Apply
Let’s now look at the final command: terraform apply. Upon firing the
terraform apply command, it’ll spool out the entire plan first and then wait for our input as shown here.
Let’s enter yes to execute our plan.
CLI Output 3-10. Terraform apply output
cmd> terraform apply
XXXXXXXXXXXX---SNIPPED----XXXXXXXXXXXX
Do you want to perform these actions?
Terraform will perform the actions described above.
Only 'yes' will be accepted to approve.
Enter a value: yes
aws_instance.apache2_server: Creating...
aws_instance.apache2_server: Still creating... [10s elapsed]
aws_instance.apache2_server: Still creating... [20s elapsed]
aws_instance.apache2_server: Still creating... [30s elapsed]
aws_instance.apache2_server: Creation complete after 35s
[id=i-0a2a8acd8cd1385c5]
Apply complete! Resources: 1 added, 0 changed, 0 destroyed.
That’s it, our EC2 instance has now been created with just a few lines of
code! That is the power of infrastructure as code.
3.4.5 Terraform State File
We can now see that a new file has been created called terraform.state
whose contents are as follows. The tfstate file stores all the information about the resources that we need and terraform requires to store to
82
Chapter 3 IntroduCtIon to terraform
perform any other actions like update or deletion. Feel free to scroll
through the next two pages as I just wanted to share here what the
terraform state looks like.
CLI Output 3-11. Terraform tfstate file
cmd> cat terraform.tfstate
{
"version": 4,
"terraform_version": "1.1.0",
"serial": 1,
"lineage": "1c277ed5-56d2-74b8-5037-026d4dac8a76",
"outputs": {},
"resources": [
{
"mode": "managed",
"type": "aws_instance",
"name": "apache2_server",
"provider": "provider[\"registry.terraform.io/hashicorp/
aws\"]",
"instances": [
{
"schema_version": 1,
"attributes": {
"ami": "ami-00399ec92321828f5",
"arn": "arn:aws:ec2:us-
east- 2:XXXXXXXXXXXX:instance/i-0a2a8acd8cd1385c5",
"associate_public_ip_address": true,
"availability_zone": "us-east-2b",
83
Chapter 3 IntroduCtIon to terraform
"capacity_reservation_specification": [
{
"capacity_reservation_preference": "open",
"capacity_reservation_target": []
}
],
"cpu_core_count": 1,
"cpu_threads_per_core": 1,
"credit_specification": [
{
"cpu_credits": "standard"
}
],
"disable_api_termination": false,
"ebs_block_device": [],
"ebs_optimized": false,
"enclave_options": [
{
"enabled": false
}
],
"ephemeral_block_device": [],
"get_password_data": false,
"hibernation": false,
"host_id": null,
"iam_instance_profile": "",
"id": "i-0a2a8acd8cd1385c5",
"instance_initiated_shutdown_behavior": "stop",
"instance_state": "running",
"instance_type": "t2.micro",
"ipv6_address_count": 0,
84
Chapter 3 IntroduCtIon to terraform
"ipv6_addresses": [],
"key_name": "",
"launch_template": [],
"metadata_options": [
{
"http_endpoint": "enabled",
"http_put_response_hop_limit": 1,
"http_tokens": "optional"
}
],
"monitoring": false,
"network_interface": [],
"outpost_arn": "",
"password_data": "",
"placement_group": "",
"placement_partition_number": null,
"primary_network_interface_id":
"eni-038a548d78778b9c6",
"private_dns": "ip-172-31-16-189.us-east-2.compute.
internal",
"private_ip": "172.31.16.189",
"public_dns": "ec2-34-209-221-82.us-east-2.compute.
amazonaws.com",
"public_ip": "34.209.221.82",
"root_block_device": [
{
"delete_on_termination": true,
"device_name": "/dev/sda1",
"encrypted": false,
"iops": 100,
"kms_key_id": "",
85
Chapter 3 IntroduCtIon to terraform
"tags": {},
"throughput": 0,
"volume_id": "vol-01e32fc3ab4908837",
"volume_size": 8,
"volume_type": "gp2"
}
],
"secondary_private_ips": [],
"security_groups": [
"default"
],
"source_dest_check": true,
"subnet_id": "subnet-3abb6842",
"tags": {
"env": "dev"
},
"tags_all": {
"env": "dev"
},
"tenancy": "default",
"timeouts": null,
"user_data":
"7bdaf2f31b2272f40c05104fc1ce987cdcdbafd5",
"user_data_base64": null,
"volume_tags": null,
"vpc_security_group_ids": [
"sg-f32c11d8"
]
},
86
Chapter 3 IntroduCtIon to terraform
"sensitive_attributes": [],
"private": "XXXXXXXXXXXXXXXXXXXXXXXXXXXXXXXXXXXXXXX"
}
]
}
]
}
We can also find the IP address of the EC2 machine by querying using
the following command.
CLI Output 3-12. Querying for public IP address from tfstate
cmd> cat terraform.tfstate | grep "public_ip"
"associate_public_ip_address": true,
"public_ip": " 34.209.221.82",
3.4.6 Terraform Destroy
Let’s now destroy the EC2 machine and everything else created with it
using a simple command: terraform destroy.
CLI Output 3-13. Terraform Destroy command output
cmd> terraform destroy
aws_instance.apache2_server: Refreshing state...
[id=i-0a2a8acd8cd1385c5]
Terraform used the selected providers to generate the following
execution plan. Resource actions are indicated with the
following symbols:
- destroy
87
Chapter 3 IntroduCtIon to terraform
Terraform will perform the following actions:
# aws_instance.apache2_server will be destroyed
- resource "aws_instance" "apache2_server" {
- ami = "ami-00399ec923
21828f5" -> null
- arn = "arn:aws:ec2:us-
east- 2:87181177
8330:instance/
i-0a2a8acd8
cd1385c5"
-> null
- associate_public_ip_address = true -> null
- availability_zone = "us- east- 2b"
-> null
- cpu_core_count = 1 -> null
- cpu_threads_per_core = 1 -> null
- disable_api_termination = false -> null
- ebs_optimized = false -> null
- get_password_data = false -> null
- hibernation = false -> null
- id = "i-0a2a8acd8cd13
85c5" -> null
- instance_initiated_shutdown_behavior = "stop" -> null
- instance_state = "running" ->
null
- instance_type = "t2.micro" -> null
- ipv6_address_count = 0 -> null
- ipv6_addresses = [] -> null
- monitoring = false -> null
- primary_network_interface_id = "eni-038a548d78
778b9c6" -> null
88
Chapter 3 IntroduCtIon to terraform
- private_dns = "ip-172-31-16-
189.us-east-2.
compute.
internal"
-> null
- private_ip = "172.31.16.189"
-> null
- public_dns = "ec2-34-209-221-
82.us-east-2.
compute.
amazonaws.com"
-> null
- public_ip = "34.209.221.82"
-> null
- secondary_private_ips = [] -> null
- security_groups = [
- "default",
] -> null
- source_dest_check = true -> null
- subnet_id = "subnet-3abb6842"
-> null
- tags = {
- "env" = "dev"
} -> null
- tags_all = {
- "env" = "dev"
} -> null
- tenancy = "default" ->
null
89
Chapter 3 IntroduCtIon to terraform
- user_data = "7bdaf2f31b227
2f40c05104fc1ce
987cdcdbafd5"
-> null
- vpc_security_group_ids = [
- "sg-f32c11d8",
] -> null
XXXXXXXXXXXXXXX------SNIPPED-------XXXXXXXXXXXXXXXXXXXXX
Plan: 0 to add, 0 to change, 1 to destroy.
Do you really want to destroy all resources?
Terraform will destroy all your managed infrastructure, as
shown above.
There is no undo. Only 'yes' will be accepted to confirm.
Enter a value: yes
aws_instance.apache2_server: Destroying...
[id=i-0a2a8acd8cd1385c5]
aws_instance.apache2_server: Still destroying...
[id=i-0a2a8acd8cd1385c5, 10s elapsed]
aws_instance.apache2_server: Still destroying...
[id=i-0a2a8acd8cd1385c5, 20s elapsed]
aws_instance.apache2_server: Still destroying...
[id=i-0a2a8acd8cd1385c5, 30s elapsed]
aws_instance.apache2_server: Destruction complete after 37s
Destroy complete! Resources: 1 destroyed.
90
Chapter 3 IntroduCtIon to terraform
Note from now onward, to save the environment and to avoid
making you turn multiple pages just to skip the output of terraform
commands, I shall be omitting them (terraform output commands)
altogether except for a few places where required.
Tip We can use the --auto-approve flag to avoid manually entering
yes, each time running terraform apply and destroy. the following are
the full commands:
terraform apply --auto-approve
terraform destroy --auto-approve
3.5 Iteration #2
Now that we’ve seen the complete execution of the first iteration including
terraform init, plan, apply, and destroy, let’s try to understand what the
problems are associated with this iteration. The problems in the first
iteration are as follows:
A. We must use an extra command to identify the IP
address of the machine.
B. Our machine is still not accessible over the public
Internet as we did not apply the security groups.
C. All the values like the region, instance type, and
environment are being hard-coded, and if we wish
to change them, then we’ll have to modify the main
code, which is not recommended.
91
Chapter 3 IntroduCtIon to terraform
D. We’d also like to have a common naming
convention for all resources such that it’s easier
to identify which region and environment they
belong to.
E. Currently, the AMI ID that we are using is also
hard-coded, and we’d like to fetch the latest version
of Ubuntu for which we need to access the AWS
documentation, which is quite a manual process.
How will we solve the preceding problems? The following are the
answers to the corresponding questions in the same order:
A. We’ll be using output variables of terraform.
B. We’ll create new security groups.
C. We’ll be using a separate file called terraform.auto.
tfvars to store our variables.
D. We’ll make use of local variables where we can
combine multiple variables and use the expression
language syntax to have a uniform naming
convention.
E. We’ll use the data element in terraform to fetch the
latest Ubuntu AMI.
Let’s view the code! Since the code blocks are getting bigger, I shall
break them down.
3.5.1 Terraform Variables
Just like every programming language, terraform also supports variables
that can hold values. There are multiple ways in which we can pass the
variables to terraform through *.tfvars file and the variable declaration
syntaxes as shown here.
92
Chapter 3 IntroduCtIon to terraform
Code Block 3-14. terraform.auto.tfvars file with variables and values File: chapter3\infra\iteration2\terraform.auto.tfvars
1: environment = "dev"
2: region = "us-east-2"
3: instance_type = "t2.micro"
Code Block 3-15. main.tf file containing variable declarations
File: chapter3\infra\iteration2\main.tf
01: # Variable Declaration
02: variable "environment" {
03: description = "The environment e.g uat or prod or dev"
04: type = string
05: }
06:
07: variable "region" {
08: description = "The region where we wish to deploy to"
09: type = string
10: }
11:
12: variable "instance_type" {
13: description = "EC2 instance type"
14: type = string
15: }
16:
17: locals {
18: name-suffix = "${var.region}-${var.environment}"
19: }
93
Chapter 3 IntroduCtIon to terraform
L01–15: We are now declaring the variables of different types in main.tf
and their values in a file called terraform.auto.tfvars. If we wish to modify attributes like EC2 instance type or environment or region, we only need to
modify the terraform.auto.tfvars file. This file is imported automatically
when the terraform apply command is executed; hence, we don’t need to
specify anything on the command line.
Terraform supports various variable formats like number, lists, maps,
and boolean.
L17–19: If we wish to add an expression to a variable like adding a
suffix/prefix, then we can make use of a locals declaration wherein we can declare variables that support expression syntaxes. Here, we’ve declared
a variable called name-suffix, which is a concatenation of region and
environment with a hyphen.
3.5.2 Terraform Data Source
While working with terraform, there can arise multiple instances where we
may need to read data from an already-existing resource or a repository. The
data is what we need to declare in order to perform any such read operation.
Code Block 3-16. The usage of the data declaration for a read
operation
File: chapter3\infra\iteration2\main.tf
38: # Data element fetching the AMI ID of Ubuntu 20.04
39: data "aws_ami" "ubuntu" {
40: most_recent = true
41: filter {
42: name = "name"
43: values = ["ubuntu/images/hvm-ssd/ubuntu-focal-20.04-
amd64- server-*"]
44: }
94
Chapter 3 IntroduCtIon to terraform
45: filter {
46: name = "virtualization-type"
47: values = ["hvm"]
48: }
49: # AWS ID of Canonical organisation
50: owners = ["099720109477"]
51: }
L38-51: Using the resources element, we can perform Create/Update/
Delete operations in terraform, but what about Read? As discussed earlier,
there may arise situations where during the terraform execution, we may
be required to read data of existing resources in the cloud provider. This can be achieved using the data element that is applied on a resource called
aws_ami. Since AWS has hundreds of AMI (Amazon Machine Images) IDs, we are applying a filter to narrow down to what we need using the filter
and the owner elements.
3.5.3 Terraform Resource
Resources are the actual infrastructure objects that need to be declared in
terraform and are at the heart of the entire tool. Here, we are declaring two
resources: Security Groups and an EC2 Instance.
Code Block 3-17. Security group resource creation definitions
File: chapter3\infra\iteration2\main.tf
53: # Creating Security Group with ingress/egress rules
54: resource "aws_security_group" "public_http_sg" {
55: name = "public_http_sg-${local.name-suffix}"
56:
95
Chapter 3 IntroduCtIon to terraform
57: # Allow all inbound traffic to port 80
58: ingress {
59: from_port = 80
60: to_port = 80
61: protocol = "tcp"
62: cidr_blocks = ["0.0.0.0/0"]
63: }
64:
65: # Allow EC2 to be connected from internet
66: egress {
67: from_port = 0
68: to_port = 65535
69: protocol = "tcp"
70: cidr_blocks = ["0.0.0.0/0"]
71: }
72:
73: tags = {
74: "Environment" = var.environment
75: "visibility" = "public"
76: }
77: }
L53-77: We are declaring the resource for creating a security
group, which is declaring two rules: an ingress rule to allow inbound
communication on port 80 from anywhere in the world and an egress rule
for the EC2 machine to connect to the outside world. It’s only through
this rule that we’ve been able to access our EC2 machine from over the
Internet. You might find it difficult to understand why I have added the
egress rule. Why would the EC2 machine want to communicate with
the outside world? The simple answer is to contact the Ubuntu package
repository to download the Apache2 server packages!
96
Chapter 3 IntroduCtIon to terraform
Code Block 3-18. AWS EC2 instance creation
File: chapter3\infra\iteration2\main.tf
79: # AWS EC2 Resource creation
80: resource "aws_instance" "apache2_server" {
81: ami = data.aws_ami.ubuntu.id
82: instance_type = var.instance_type
83: vpc_security_group_ids = [aws_security_group.public_
http_sg.id]
84: user_data = "${file("user_data.sh")}"
85: tags = {
86: env = var.environment
87: Name = "ec2-${local.name-suffix}"
88: }
89: }
L80-89: The resource definition for EC2 was discussed earlier;
however, there is a slight change here where we’ve modified the way we
pass the value to the ami parameter on L81. We are now populating the
value with AMI ID from the data source declared earlier. We’ve also added
reference to the security group ID on L83 that we’ve added earlier.
3.5.4 Terraform Output
The output variable allows us to retrieve any attribute about any resource
that has been created using the terraform script.
97
Chapter 3 IntroduCtIon to terraform
Code Block 3-19. Terraform output declaration with public IP
File: chapter3\infra\iteration2\main.tf
91: # Output the Public IP Address
92: output "ip_address" {
93: value = aws_instance.apache2_server.public_ip
94: }
L91-94: Here, we are retrieving the value of the public_ip variable in the terraform state that we’ve seen earlier.
Let’s execute this terraform script using the following commands and
test if everything is working as expected. Only output pertaining to the
section needed is being shown here for brevity.
CLI Output 3-20. Execution of iteration #2 script
cmd> export AWS_PROFILE=gitops
cmd> terraform init
cmd> terraform plan
cmd> terraform apply --auto-approve
XXXXXXXXXXXXXXX------SNIPPED-------XXXXXXXXXXXXXXXXXXXXX
Apply complete! Resources: 2 added, 0 changed, 0 destroyed.
Outputs:
ip_address = "52.13.99.15"
cmd> curl -I http://34.217.31.143
HTTP/1.1 200 OK
Date: Wed, 03 Nov 2021 14:29:54 GMT
Server: Apache/2.4.41 (Ubuntu)
Last-Modified: Wed, 03 Nov 2021 14:27:59 GMT
ETag: "2aa6-5cfe33780883b"
98
Chapter 3 IntroduCtIon to terraform
Accept-Ranges: bytes
Content-Length: 10918
Vary: Accept-Encoding
Content-Type: text/html
cmd> terraform destroy --auto-approve
Hence, we are now able to access our EC2 machine and improvise the
code a little with terraform variables, data sources, and terraform output!
3.6 Iteration #3
In the second iteration, we were able to make it a little better from a coding
perspective; however, there have been a few things that were missing and
some best practices that we need to instill. The following are the issues and
suggestions that we’ll need to implement:
A. We are still missing the SSH rule in the security
group, because of which, we can’t SSH into your EC2
instances.
B. The security group resource code is getting
repetitive, and a lot of the information remains
common or not much used. Hence, it’s best if there
is a way that we can abstract that information and
focus on only what is needed. The abstraction
should be such that it is reusable as well.
C. Till now, we’ve been using a single .tf file to add
all the functionality; however, as we keep adding
additional functionality, our code will grow, and
keeping everything in a single file will become
problematic.
99
Chapter 3 IntroduCtIon to terraform
D. We need to ensure that the security groups
are always created before the EC2 instance is
instantiated because our startup script user_data.sh
won’t work if the security groups are not defined.
How will we solve the preceding problems? The following are the
answers to the corresponding questions in the same alphabetical order:
A. We’ll need to create a new SSH security group with
port mappings to the SSH port 22.
B. Since we are now repeating the creation of security
groups, we can modularize it. Terraform allows a
common functionality to be loaded as a module,
which is nothing but a very crude equivalent of a
function. A function takes inputs and spools out
output. We’ll see how a terraform module also does
almost the same thing.
C. We’ll need to segregate the code into different files
as a best practice if we need to continue to add more
functionality.
D. By using the input variables and module outputs, we
can define dependencies implicitly. In Terraform,
we can define dependencies in two ways implicitly
and explicitly:
–
Using input/output variables, dependencies can be
made implicit.
–
Using the depends_on keyword, we can make depen-
dencies more explicit to influence the order of execu-
tion. We’ll be exploring the role of this keyword in
more detail through practical examples in upcoming
chapters.
100
Chapter 3 IntroduCtIon to terraform
The new set of changes is not just code-level changes but a completely
different structure in which we’ve written the code. So let’s view the
structure that is shown here.
CLI Output 3-21. New structure for iteration #3
cmd> cd chapter3/infra/iteration3
cmd> tree -a
.
├── main.tf
├── modules
│ └── securitygroup
│ ├── main.tf
│ ├── output.tf
│ └── variables.tf
├── output.tf
├── providers.tf
├── scripts
│ └── user_data.sh
├── terraform.auto.tfvars
└── variables.tf
3 directories, 9 files
–
The variables.tf and terraform.auto.tfvars files contain the input variables and their values.
–
The output.tf contains all the output variables that need
to be seen on the CLI output.
–
The provider.tf contains the provider definitions and the
dependencies information.
101
Chapter 3 IntroduCtIon to terraform
–
The main.tf file contains the actual implementation of
our requirements using the different resources and data
elements.
–
The modules folder contains the different modules that
we’ve defined. Each module consists of the follow-
ing files:
–
main.tf – Contains the implementation and declara-
tion of the resources that need to be created
–
variables.tf – Contains the input variable declarations
for the variables being defined in main.tf
–
output.tf – The output information that may be
needed like the id number of the resource
–
The scripts folder contains the startup/user data scripts
that are needed to be executed.
3.6.1 Terraform Modules
Modules in terraform can be considered as a raw equivalent of functions
in imperative languages. We combine a set of common resource creation
functionality into one single unit for reusability. It is the only way to make
terraform reusable.
In terraform for module declaration, it is mandatory to have the
module in lieu of the resource keyword and the source, which can take various different values like folder/directory path, GIT URL, HTTP/HTTPS
URL, or any FQDN (fully qualified domain name) syntax. Here, we are
feeding the values to the input variables.
Let’s have a closer look at the main.tf file and the files under the
module directory to understand the changes that have been made.
102
Chapter 3 IntroduCtIon to terraform
Code Block 3-22. Module declarations and invocation
File: chapter3\infra\iteration3\main.tf
XXXXXXXXXXXXXXX------SNIPPED-------XXXXXXXXXXXXXXXXXXXXX
19:
20: # HTTP Ingress Security Group Module
21: module "http_sg_ingress" {
22: source = "./modules/securitygroup"
23:
24: sg_name = "http_sg_ingress"
25: sg_description = "Allow Port 80 from anywhere"
26: environment = var.environment
27: type = "ingress"
28: from_port = 80
29: to_port = 80
30: protocol = "tcp"
31: cidr_blocks = ["0.0.0.0/0"]
32: }
33:
34: # Generic Egress Security Group Module
35: module "generic_sg_egress" {
XXXXXXXXXXXXXXX------SNIPPED-------XXXXXXXXXXXXXXXXXXXXX
46: }
47:
48: # SSH Ingress Security Group Module
49: module "ssh_sg_ingress" {
XXXXXXXXXXXXXXX------SNIPPED-------XXXXXXXXXXXXXXXXXXXXX
60: }
61:
103
Chapter 3 IntroduCtIon to terraform
62: # AWS EC2 Resource creation
63: resource "aws_instance" "apache2_server" {
64: ami = data.aws_ami.ubuntu.id
65: instance_type = var.instance_type
66: vpc_security_group_ids = [module.http_sg_ingress.sg_id,
67: module.generic_sg_egress.sg_id,
68: module.ssh_sg_ingress.sg_id]
69: key_name = var.ssh_key_name
70: user_data = file("scripts/user_data.sh")
71: tags = {
72: env = var.environment
73: Name = "ec2-${local.name-suffix}"
74: }
75:
76: depends_on = [
77: module.generic_sg_egress
78: ]
79: }
L21–32: Since the security group resource is going to be invoked
multiple times, we’ve created a module and specified the location of the
module using the source keyword on L22.
L66–68: The output of the security group modules, that is, the security
group ID, is being fed to the EC2 resource.
L69: Adding the name of the SSH key that we created in the previous
chapter from the GUI. The variable ssh_key_name holds the name of the key, and the value is defined in the terraform.auto.tfvars file.
L76–78: Declaration of the depends_on meta-variable where we are explicitly setting the dependency on the module.generic_sg_egress
module as we need the egress rules to be created before the server
starts up.
104
Chapter 3 IntroduCtIon to terraform
Next, let’s look at the main.tf file of the security groups module, which contains the complete implementation of security group creation.
Code Block 3-23. Module implementation code
File: chapter3\infra\iteration3\modules\securitygroup\main.tf
01: # AWS Security Group definition
02: resource "aws_security_group" "security_group" {
03: name = var.sg_name
04: description = var.sg_description
05: tags = {
06: "Environment" = var.environment
07: }
08: }
09:
10: # AWS Security Group Rules definition
11: resource "aws_security_group_rule" "security_group_rule" {
12: type = var.type
13: from_port = var.from_port
14: to_port = var.to_port
15: protocol = var.protocol
16: cidr_blocks = var.cidr_blocks
17: security_group_id = aws_security_group.security_group.id
18: }
L02–08: In contrast to the original code for creating the security groups
that we’d seen here, we are declaring two resources instead of a single
resource. This is a terraform best practice as it helps in easy decoupling
where we are declaring the security group and the rules of that security
group separately. So here, we are first declaring the security group alone.
L11–18: We are declaring the rules for the said security group and
assigning references to the security group created on L17.
105
Chapter 3 IntroduCtIon to terraform
The variables.tf and outputs.tf files contain the input and output variables for this module, respectively.
Let’s get to action and execute this terraform script using the following
commands.
Note Before firing the following commands, ensure you have the
key that was created in the previous chapter as we’ll be needing it to
SSh into our eC2 instance.
CLI Output 3-24. Executing code of iteration #3
cmd> export AWS_PROFILE=gitops
cmd> cd chapter3/infra/iteration3
cmd> terraform init
cmd> terraform plan
cmd> terraform apply --auto-approve
XXXXXXXXXXXXXXX------SNIPPED-------XXXXXXXXXXXXXXXXXXXXX
Apply complete! Resources: 7 added, 0 changed, 0 destroyed.
Outputs:
ip_address = "18.222.72.137"
cmd> curl -I http://18.222.72.137
HTTP/1.1 200 OK
Date: Mon, 08 Nov 2021 09:40:48 GMT
Server: Apache/2.4.41 (Ubuntu)
XXXXXXXXXXXXXXX------SNIPPED-------XXXXXXXXXXXXXXXXXXXXX
cmd> chmod 600 gitops.pem
cmd> ssh -i gitops.pem [email protected]
106
Chapter 3 IntroduCtIon to terraform
The authenticity of host '18.222.72.137 (18.222.72.137)' can't
be established.
ECDSA key fingerprint is SHA256:xucxKFUDt0z+dCxJ3R+SM0NcEANaosT
tGLLUV8Tlcgc.
Are you sure you want to continue connecting (yes/no/
[fingerprint])? yes
Welcome to Ubuntu 20.04.3 LTS (GNU/Linux 5.11.0-1020-
aws x86_64)
XXXXXXXXXXXXXXX------SNIPPED-------XXXXXXXXXXXXXXXXXXXXX
3.7 Selective Destroy
There may arise situations where we do not wish to destroy the entire
infrastructure, but rather just a small part of it. For example, in our
previous example, we wish to destroy the EC2 instance that we’ve created
without destroying the security groups that are declared.
The best way to be able to do this is to comment out the portion we
wish to destroy and then perform terraform apply.
Note // and # are the acceptable comment characters for terraform
compilers.
Let’s run through a practical example to understand how this would
work. Open the main.tf file in the iteration3 folder and comment out the
apache2_server resource from the main.tf file and the output variable
from the output.tf file as shown here.
107
Chapter 3 IntroduCtIon to terraform
Code Block 3-25. Commenting out EC2 declaration
File: chapter3\infra\iteration3\main.tf
XXXXXXXXXXXXXXX------SNIPPED-------XXXXXXXXXXXXXXXXXXXXX
61:
62: # AWS EC2 Resource creation
63: // resource "aws_instance" "apache2_server" {
64: // ami = data.aws_ami.ubuntu.id
65: // instance_type = var.instance_type
66: // vpc_security_group_ids = [module.http_sg_ingress.sg_id,
67: // module.generic_sg_egress.sg_id,
68: // module.ssh_sg_ingress.sg_id]
69: // key_name = var.ssh_key_name
70: // user_data = file("scripts/user_data.sh")
71: // tags = {
72: // env = var.environment
73: // Name = "ec2-${local.name-suffix}"
74: // }
75:
76: // depends_on = [
77: // module.generic_sg_egress
78: // ]
79: // }
Code Block 3-26. Commenting out terraform output declaration
File: chapter3\infra\iteration3\output.tf
1: // # Output the Public IP Address
2: // output "ip_address" {
3: // value = aws_instance.apache2_server.public_ip
4: // }
108
Chapter 3 IntroduCtIon to terraform
Next, follow the following commands and observe that the EC2
machine will get destroyed after we run terraform apply.
CLI Output 3-27. Executing code after commenting the EC2
instance
cmd> export AWS_PROFILE=gitops
cmd> cd chapter3/infra/iteration3
cmd> terraform apply --auto-approve
XXXXXXXXXXXXXXX------SNIPPED-------XXXXXXXXXXXXXXXXXXXXX
Terraform used the selected providers to generate the following
execution plan. Resource actions are indicated with the
following symbols:
- destroy
Terraform will perform the following actions:
# aws_instance.apache2_server will be destroyed
- resource "aws_instance" "apache2_server" {
XXXXXXXXXXXXXXX------SNIPPED-------XXXXXXXXXXXXXXXXXXXXX
}
Plan: 0 to add, 0 to change, 1 to destroy.
Changes to Outputs:
- ip_address = "13.58.114.103" -> null
aws_instance.apache2_server: Destroying...
[id=i-03ad2902551bfd91d]
aws_instance.apache2_server: Still destroying...
[id=i-03ad2902551bfd91d, 10s elapsed]
aws_instance.apache2_server: Still destroying...
[id=i-03ad2902551bfd91d, 20s elapsed]
aws_instance.apache2_server: Still destroying...
[id=i-03ad2902551bfd91d, 30s elapsed]
109
Chapter 3 IntroduCtIon to terraform
aws_instance.apache2_server: Destruction complete after 35s
Apply complete! Resources: 0 added, 0 changed, 1 destroyed.
From the preceding output, it is clearly visible that Terraform
destroyed our EC2 instance without destroying the security groups that
were associated with it.
Let’s finally destroy everything so that we don’t end up getting billed
unnecessarily.
CLI Output 3-28. Terraform destroys everything
cmd> cd chapter3/infra/iteration3
cmd> terraform destroy --auto-approve
3.7.1 Terraform Destroy Protection
Destroying a terraform resource is a one-way street; there is absolutely
nothing one can do once it is destroyed other than spinning it up again.
That generally is not a problem for immutable resources like EC2 servers
or docker containers; in fact, they are designed to be flexible in all
scenarios, even accidental deletion.
However, certain mutable resources like a Database server must be
protected from accidental deletion. There are multiple ways possible to do this using AWS CLI and the GUI console, but how can this be done
using terraform?
The answer is by using the life cycle meta-argument as shown in the
following, L80–82.
Note this code is not available in the repository; it is only for
demonstration purposes here.
110
Chapter 3 IntroduCtIon to terraform
Code Block 3-29. Terraform prevent destroy life cyle
meta-argument
63: resource "aws_instance" "apache2_server" {
64: ami = data.aws_ami.ubuntu.id
65: instance_type = var.instance_type
66: vpc_security_group_ids = [module.http_sg_ingress.sg_id,
67: module.generic_sg_egress.sg_id,
68: module.ssh_sg_ingress.sg_id]
69: key_name = var.ssh_key_name
70: user_data = file("scripts/user_data.sh")
71: tags = {
72: env = var.environment
73: Name = "ec2-${local.name-suffix}"
74: }
75:
76: depends_on = [
77: module.generic_sg_egress
78: ]
79:
80: lifecycle {
81: prevent_destroy = true
82: }
83:
84: }
Here, when we do terraform destroy, terraform refuses to destroy
our EC2 instance because of the life cycle meta-argument as shown in the
following output.
111
Chapter 3 IntroduCtIon to terraform
CLI Output 3-30. Deletion protection terraform apply
cmd> terraform destroy --auto-approve
XXXXXXXXXXXXXXX------SNIPPED-------XXXXXXXXXXXXXXXXXXXXX
╷
│ Error: Instance cannot be destroyed
│
│ on main.tf line 63:
│ 63: resource "aws_instance" "apache2_server" {
│
│ Resource aws_instance.apache2_server has lifecycle.prevent_
destroy set, but the plan calls for this resource to be
destroyed. To avoid this error and continue with the
│ plan, either disable lifecycle.prevent_destroy or reduce the
scope of the plan using the -target flag.
To delete the resource, we’ll need to flip the boolean from true to false:
prevent_destroy = false.
Hence, in this manner, accidental deletions can be avoided.
3.8 Terraform Drift
Drift means moving away from the normal state, which very well resonates
with the concept of terraform drift. When we hit apply, we are moving
our desired state defined in *.tf files to current state stored in *.tfstate file. Anything that is managed and defined in *.tf files can be managed
by terraform, but what about changes that are happening to resources
outside of terraform on the resources that are created using terraform? For
example, if we have an EC2 instance with security groups created using
terraform and we edit one of the security groups to add one more rule from
GUI. How would terraform behave in this scenario?
112
Chapter 3 IntroduCtIon to terraform
Terraform will attempt to reconcile with the state that is currently
stored in the .tfstate file and the actual configuration that is created in the cloud.
Let’s take a practical example to understand how exactly Terraform will
do this reconciliation.
For this, we’ll need access to the AWS GUI, and we’ll also need to spin
up the EC2 machine using the iteration #3 code.
Let’s first spin up our EC2 machine using terraform by executing the
following commands.
CLI Output 3-31. Executing terraform for iteration #3
cmd> export AWS_PROFILE=gitops
cmd> cd chapter3/infra/iteration3
cmd> terraform apply --auto-approve
Now let’s head to our AWS GUI console and search and navigate to the
Security Groups section as shown here.
113
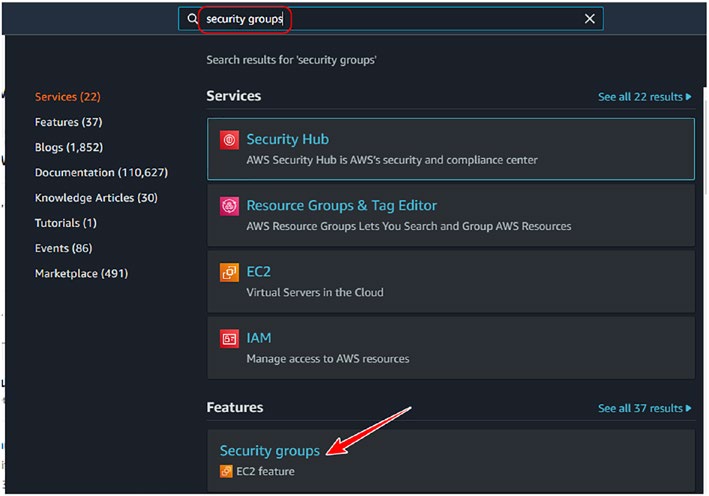
Chapter 3 IntroduCtIon to terraform
Figure 3-2. Accessing Security Groups in AWS GUI
In this section, we can see all the rules that were created by terraform.
We now need to edit the http group.
1. Select the http_sg_ingress rule.
2. Click on the Actions tab and then click Edit
inbound rules.
114
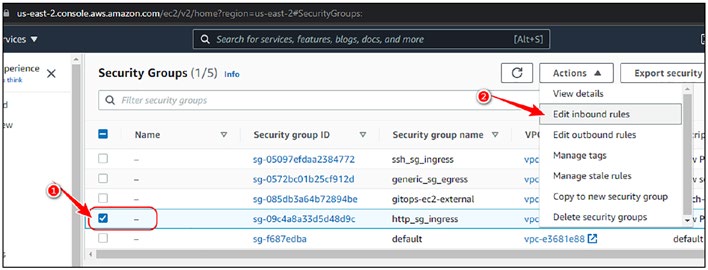
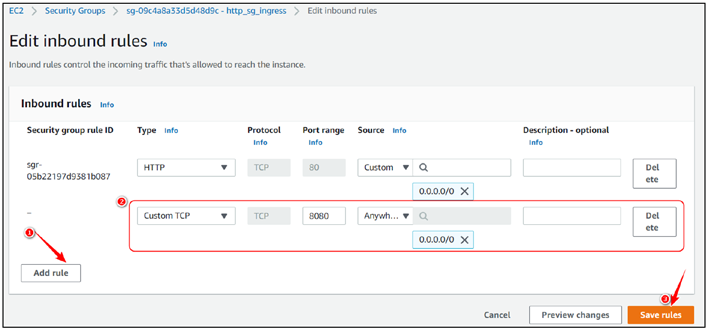
Chapter 3 IntroduCtIon to terraform
Figure 3-3. Editing Security Groups from AWS GUI
In the edit screen:
1. Click Add rule.
2. Select Custom TCP and enter the port number as
8080 and CIDR as 0.0.0.0/0.
3. Click Save rules.
Figure 3-4. Adding port 8080 as an additional security group rule
Let’s confirm that our rule has been added by viewing the screen here.
115
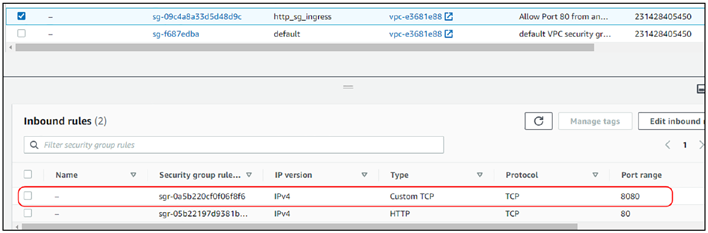
Chapter 3 IntroduCtIon to terraform
Figure 3-5. Rule edition confirmation
This addition was done manually from the GUI. Let’s head back to our
terminal and now execute terraform plan as shown here.
CLI Output 3-32. Terraform plan for reconciliation with changes
made in AWS GUI
cmd> terraform plan
XXXXXXXXXXXXXXX------SNIPPED-------XXXXXXXXXXXXXXXXXXXXX
Note: Objects have changed outside of Terraform
Terraform detected the following changes made outside of
Terraform since the last "terraform apply":
# module.generic_sg_egress.aws_security_group_rule.security_
group_rule has been changed
~ resource "aws_security_group_rule" "security_group_rule" {
id = "sgrule-1495426135"
+ ipv6_cidr_blocks = []
+ prefix_list_ids = []
# (7 unchanged attributes hidden)
}
116
Chapter 3 IntroduCtIon to terraform
# module.http_sg_ingress.aws_security_group.security_group
has been changed
~ resource "aws_security_group" "security_group" {
id = "sg-064becd5995aae1bb"
~ ingress = [
+ {
+ cidr_blocks = [
+ "0.0.0.0/0",
]
+ description = ""
+ from_port = 8080
+ ipv6_cidr_blocks = []
+ prefix_list_ids = []
+ protocol = "tcp"
+ security_groups = []
+ self = false
+ to_port = 8080
},
+ {
+ cidr_blocks = [
+ "0.0.0.0/0",
]
+ description = ""
+ from_port = 80
+ ipv6_cidr_blocks = []
+ prefix_list_ids = []
+ protocol = "tcp"
+ security_groups = []
+ self = false
+ to_port = 80
},
]
117

