LINE 6: Add the title to be shown on the button.
And that’s all in enabling the social login flow in our app.
Run the app to see this in action.
Summary
The chapter started by introducing the concept of authentication and its importance in securing web applications. It highlighted the key components of authentication, such as user management, role management, registration, login, and logout.
Next, it explained how AWS Amplify simplifies the process of setting up authentication in a React app. The chapter walked through the steps of adding authentication to the app using the Amplify CLI and configuring the authentication service.
The Amplify library provides UI components that can be used to integrate the authentication flow into the app. The chapter demonstrated how to use these components to create a login and registration UI without writing custom components.
It further explored the storage of authentication-related data, such as access tokens, refresh tokens, and user information. The browser’s developer tools are used to inspect the local storage and decode the access token to understand its contents.
72
Chapter 2 UI Component and aUthentICatIon
The chapter also covered social login integration using OAuth with AWS Amplify. It explained the concept of OAuth and how it allows third-party applications to access user information without sharing passwords. It specifically focused on integrating Google social login into the app and provided step-by-step instructions for setting it up.
Finally, the chapter concluded by summarizing the key concepts covered, including the use of Amplify’s authentication-related states and the storage of user information.
It emphasized the convenience and improved user experience provided by social login features.
Overall, the chapter provided a comprehensive guide on implementing authentication and social login in a React app using AWS Amplify, empowering developers to enhance the security and usability of their applications.
73
CHAPTER 3
CRUD and REST
APIs – Pillars of Efficient
Data Exchange
APIs are the conduits through which data flows, applications communicate and functionality is shared.
—Akshat Paul
In today’s world, the exchange of information and data between systems or devices is really important. As businesses and individuals continue to rely on digital technologies, the need for efficient and secure data transfer protocol becomes a necessity. REST APIs are one way to achieve this goal. REST APIs provide a set of standardized interface that allows systems to communicate with each other in a scalable and flexible manner.
CRUD (create, read, update, and delete) operations are some of the most common operations that any API must support. In this chapter, we will explore how to create a REST API using AWS Amplify that supports CRUD operations.
We will start by explaining what a REST API is and how it works. Then we will go through the steps defining endpoints, handling request and response, deploying the API, and testing it from Postman.
API Overview
I am pretty sure you have connected your phone with some of your friends’ Bluetooth speaker, where the speaker was not manufactured by the same company as your phone.
Please think how these different components manufactured in different factories by different companies are able to connect and communicate with each other.
The answer is the standard protocol.
75
© Akshat Paul, Mahesh Haldar 2023
A. Paul and M. Haldar, Serverless Web Applications with AWS Amplify,
Chapter 3 CrUD anD reSt apIS – pIllarS of effICIent Data exChange For Bluetooth connection, there is a standard protocol and set of rules; if the phone and speaker manufacturer follows it, they will be able to communicate to and fro. There are standard rules for USB connectors to be followed by adapters and cables. Similarly, we humans follow standard protocols of languages like pronunciations and grammars to communicate with other humans; if there is a mismatch, then they are not able to communicate.
Imagine a French and a Chinese trying to communicate in their local languages.
The protocols for computer programs are called application programming interfaces (APIs). An API is a software interface through which more than one software component interacts, sends commands, and receives responses.
When talking in terms of web development, from a high level, there are two big components, the frontend app and the backend server. Backend servers are a set of CPUs, which run programs and from a business point of view perform tasks. An API is the interface through which any application can request to perform some action; the server gets a request through these APIs, performs a defined action, and responds with the response and status after performing tasks.
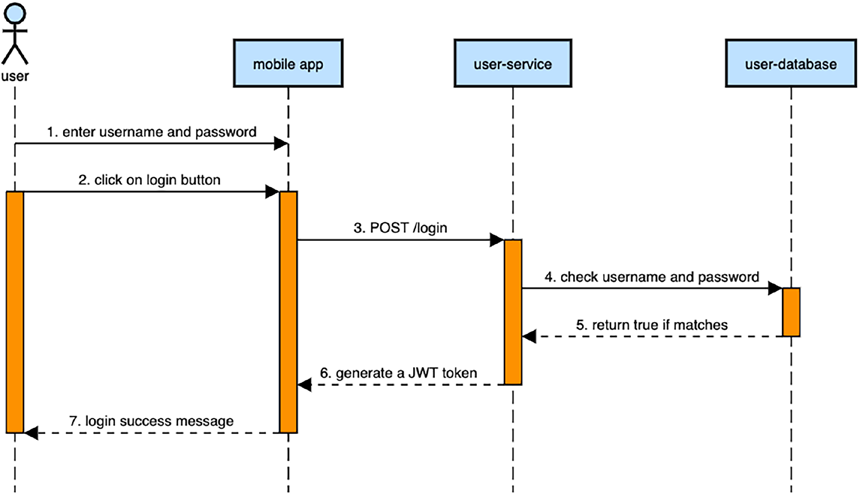
Let’s discuss the basic login flow from a user’s point of view using Figure .
Figure 3-1. The system interaction when a user tries to log in When the user wants to log in via an app, following steps are followed: STEP 1: The user enters the username and password.
76
Chapter 3 CrUD anD reSt apIS – pIllarS of effICIent Data exChange STEP 2: The user clicks the login button.
STEP 3: The mobile app requests the server by sending a POST API request on the URL path `/login` with request parameters like username and password.
STEP 4: Then the server processes that request and checks in the database if the username and password are correct.
STEP 5: The database will return true or false on the find match query.
STEP 6: The server then responds that the job is successfully finished and responds with the answer; in this case, it will be a valid JWT token.
STEP 7: The mobile app now will understand this result and navigate the user to the dashboard.
This URL path, namely, `/login`, through which the server takes a request and performs actions is an API, that is, application programming interface.
APIs are the interfaces through which our own FE (Front-end) application or third-party applications interact with the server.
In software applications, APIs play an important role; as the important business logic and computation-heavy jobs are written in servers and exposed to multiple clients via APIs, these also help the whole system to reuse some code logic exposed via APIs. For example, for Facebook, all the code of authentication and friend recommendations can be reused for web and mobile apps via APIs.
Many companies sell the logic and important data via APIs; hence, APIs are also the baseline of many businesses.
Why Do We Need an API?
The following are a few reasons about the usages of APIs:
1. Connect with systems built with different technologies
APIs let systems communicate and interoperate with each other,
even if they are built using different technology languages, for
example, the Java microservice and Node.js microservice can
communicate via JSON standard.
2. Business logic abstraction
APIs let developers use the functionality of a system without
needing to know the business logic or how it is built, for example, the weather API exposes the current weather status by wrapping
the sensor and other logics.
77
Chapter 3 CrUD anD reSt apIS – pIllarS of effICIent Data exChange 3. Enable automation
APIs enable the team to do the automation and integration with
various systems and lead a path to innovation. For example,
we can use Slack APIs to develop Slack apps to automate our
daily tasks.
4. Reduce the development time
Let’s assume we have two frontend applications, a mobile app and
a web app; it would be costly to have to maintain and write their individual servers and business logic. Maintaining separate servers and duplicating business logic for each application can be costly. By exposing APIs from servers, we can reuse the same business logic
across multiple clients and platforms, such as mobile apps and web apps. Furthermore, APIs offer the flexibility to support multiple versions and ensure backward compatibility indefinitely.
5. Improving the security
APIs encapsulate different private keys on the server side,
ensuring that only the desired data is exposed to specific users.
This approach enhances the overall security of applications,
providing end-to-end protection.
6. Extending features to multiple platforms
APIs enable us to extend the services to multiple platforms, for
example, once we have written backend services they can be
consumed by various form factors like web and mobile at the
same time.
API Design
Whenever the system’s APIs are to be used by more than one client or more than one external platform, the API design is crucial. These APIs become the interface for the developers. Hence, the API should be
• Consistent
• Understandable
• Backward compatible
78
Chapter 3 CrUD anD reSt apIS – pIllarS of effICIent Data exChange Types of APIs
As API developers, we should be aware that APIs can be classified in terms of their availability. Let’s discuss the different types:
• Public APIs: These APIs are publicly available and require no
authentication or special access to consume.
• Private APIs: These APIs belong to a particular system and are not available for everyone to use. For example, the APIs by Facebook are only available to be used by Facebook web and mobile apps. There
are various layers of security in place so that any anonymous user is not able to exploit and consume the APIs.
• Partner APIs: These are similar to private APIs, but generally shared with a third-party platform to consume, for example, a third-party wallet app integrated with an ecommerce platform for easy payment.
These partners are registered and authorized to use the APIs mostly using JWT tokens, digital certificates, or secret keys.
API Specifications and Protocols
• SOAP (Simple Object Access Protocol) APIs are based on XML format over a variety of transports, including HTTP, HTTPS, SMTP, TCP, and others. SOAP is commonly used in enterprises to exchange data from one system to another.
• gRPC (Remote Procedure Calls) is an open source RPC framework. It was developed by Google and uses HTTP/2 as the transport protocol.
gRPC is designed to be highly performant, with a focus on low latency and low bandwidth usages. It can be used to build highly scalable distributed systems. One of its use cases is microservices, where the servers communicate via APIs.
• WebSocket is a protocol for a persistent, bidirectional, full-duplex communication over a single TCP connection. It is widely supported by web browsers and enables real-time interactive use cases like chat systems, collaboration tools, online games, etc. This lets the data flow in real time without needing the client apps to poll the data again and again for latest data.
79
Chapter 3 CrUD anD reSt apIS – pIllarS of effICIent Data exChange
• Message Queue Telemetry Transport (MQTT) is a lightweight
messaging protocol for small sensors and mobile devices for high
latency or unreliable networks. MQTT runs over the TCP/IP protocol.
MQTT is often used in the Internet of Things (IoT), where low power consumptions and small message size make it suitable for various
use cases.
• Representational State Transfer (REST) APIs are based on the HTTP
or HTTPS protocol and use standard HTTP methods such as GET,
POST, PUT, DELETE, and OPTIONS to perform operations on
resources as requested over the URL. REST APIs are stateless and
are often used to expose data from backend to frontend servers. The most common format of data used is JSON.
• GraphQL is a query language API that gives the control to clients. The clients can request the exact data they want. This solves the problem in REST APIs of overfetching and underfetching. Generally, GraphQL
is used as an alternative of REST APIs.
Introduction to Lambda
AWS Lambda is a serverless compute service that runs the code without provisioning or managing servers, allowing us to focus on our application business logic rather than infrastructure management. In this section, we will learn what AWS Lambda is, how to create a function using AWS Amplify, how to deploy it, how to invoke the function via an HTTP request, and how to configure triggers to execute those functions.
Lambda Functions – The Serverless Functions
Let’s assume you are starting up a restaurant and delivering the food online to your customers. We are quite aware that setting up a restaurant is a capital-heavy investment, which requires setting up a full-fledged commercial kitchen with commercial kitchen equipment, apart from arranging the chefs and raw material, preparing menus, renting a place, and marketing. The cost generally goes from $1000 to $15,000 just for commercial equipment.
80
Chapter 3 CrUD anD reSt apIS – pIllarS of effICIent Data exChange In this case, it’s not an easy question to estimate the time to get back the return on investment. If you are starting up and especially if you are not sure how many orders we might receive and how the customers are going to react to the launch of the restaurant, it can be a big risk.
Given the following two options, which one would you choose?
1. Buy all the commercial kitchen equipment and spend $5000–
$10,000 on equipment.
2. Rent someone’s commercial kitchen and pay a small amount on
the amount of time you use to prepare food, which may cost up to
$75 per hour.
I am not sure about you, but if I would be this person who is not sure about many aspects of starting up a restaurant, I would start slow and rent on an hourly basis.
Similarly, when we deploy applications, there are many operations jobs required before we can run our business logic, which include server setup, scaling, deployment, server management, security, etc. What if there was a service where we as developers only care about writing the business logic code and everything is taken care of, and there’s no need to pay for the server instance’s computation for the whole day if you run once a day for a few hours?
Yes, the AWS Lambda function is that service.
Lambda Functions
In the AWS ecosystem, the Lambda function is a service that lets you and me run a piece of code on demand without worrying about the setup and operations of servers.
The service automatically manages the underlying operations of server management, handling high traffic, and security parts of it.
This service is capable of all the dynamic state changes and updates like adding items in a cart, making payments, listening to data from your sensor and adding in your database, or training your AI/ML models.
The Lambda function takes away all the overhead of running your piece of code and helps you to focus only on your business logic on highly available infrastructure. The Lambda function manages all the operations like provisioning of computing services, updating the security patch, operating system updates, monitoring, and logging.
81
Chapter 3 CrUD anD reSt apIS – pIllarS of effICIent Data exChange Use Cases of Lambda Functions
Lambda functions can be used in various scenarios; these functions are also capable of integrating with other available AWS services like DynamoDB or notification services.
Let’s discuss some of the use cases of Lambda functions:
1. APIs for web development to read from databases and update
data in the database
2. On-demand file processing operations like resizing of images or Excel sheet parsing
3. Various kinds of daily or weekly scheduled tasks, like parsing web pages to fetch news or job posting
4. Scalable backend for your web, mobile, or IoT apps
5. Training of AI/ML models
Cons of Using Lambda Functions
• No control over the underlying hardware
If your code requires to access some hardware capabilities like the GPU, you should not use Lambda functions.
• Cost vs. computation time required
If your code requires a computation machine to run continuously
most of the time during the day, then the Lambda function might
be costly compared to having a dedicated server to run the code.
How Lambda Function Works
The service requires you to upload the code, and then whenever triggered via the API, the function runs on a dedicated pool of servers managed by AWS and returns the response.
The function is the piece of code which runs on service AWS Lambda. This function can further integrate with third-party systems via APIs or integrate with other AWS
services. After successful processing of code, this returns some value to the caller.
82
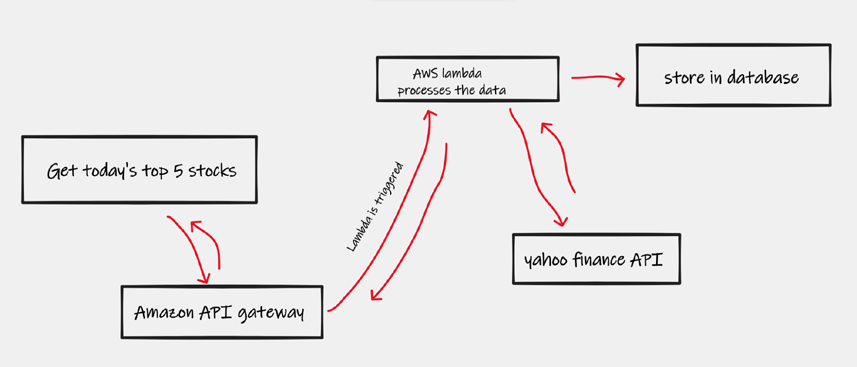
Chapter 3 CrUD anD reSt apIS – pIllarS of effICIent Data exChange Let’s take an example; you wrote a function that, when triggered, calls the Yahoo Finance API and gets the list of stocks.
Then you apply some business logic, for example, you do some sorting and some calculation to get the top five stocks.
You can then store that in the database and return the list of recommended stocks.
This can be easily represented in Figure
Figure 3-2. The steps involved when triggering the Lambda function via the REST API
What Is the Lambda Layer?
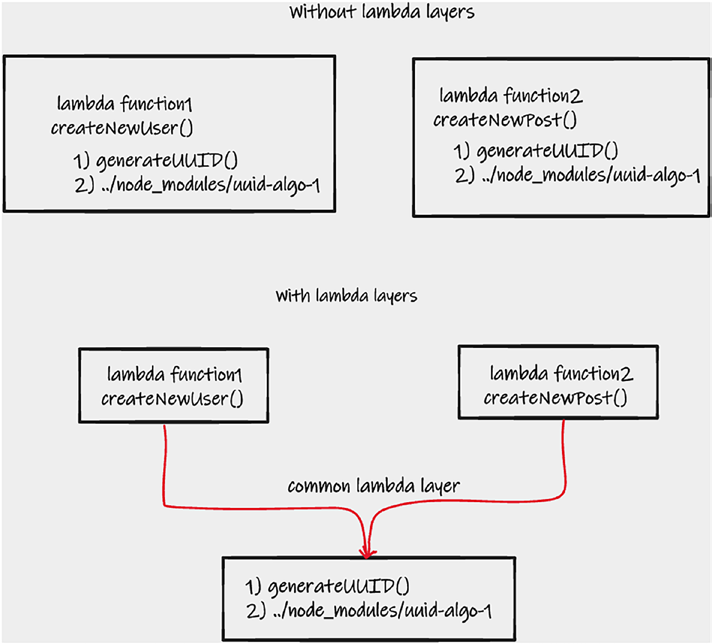
From AWS’s perspective, we need to upload the function to Lambda service, and that gets deployed to service handled by AWS. The larger the function, the more time it takes to upload and be deployed. Many times, we may want to share a piece of code or library among more than one Lambda function. For example, there is a util function that generates UUID (Universally Unique Identifier) based on some input, and it also depends on the third-party npm package. If we want the same util function of generating UUID in more than one Lambda function, instead of duplicating the function we can create a Lambda layer that contains this logic and npm package and reuse it in more than one function.
The Lambda layer (as shown in Figurbstraction of dependency or library, which can be further shared among more than one Lambda function. This is similar to creating a new npm module and using it in more than one project.
83
Chapter 3 CrUD anD reSt apIS – pIllarS of effICIent Data exChange
Figure 3-3. Reusing code with Lambda layers
Why Lambda Layers Are Useful
1. The function’s code becomes smaller.
Using Lambda layers, we are able to split the main business logic code and the pure functions in a different layer; this makes the
main individual function smaller and makes it lightweight.
2. Reuse code across multiple Lambda functions.
More than one Lambda function can reuse these layers.
3. Easy management and deployment of the main function.
Lambda layers make the root function smaller, and hence it takes
lesser time to upload and deploy the functions; the other util logic is referred to using the location of the Lambda layer and version which gets called after deployment.
84
Chapter 3 CrUD anD reSt apIS – pIllarS of effICIent Data exChange Working with REST APIs
Let’s get our hands dirty and see the REST APIs in action. In this section, we will create the REST APIs and create a Things Todo application. In this application, we should be able to do the following:
1. Get the list of todos
2. Create a new item in the list
3. Delete one item
To achieve these, we need the following APIs:
1. List of all todos:
GET /todos
2. Create new item:
POST /todos and metadata in the request body
3. Update the todo item:
PUT /todos and metadata in the request body
4. Delete one item:
DELETE /todos/{id}
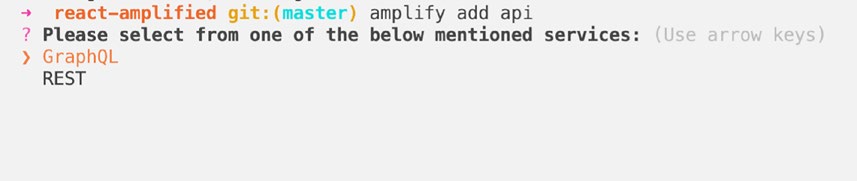
STEP 1: To create a set of APIs, we will use the Amplify CLI tool shown here: amplify add api
This will give us two options to choose from, as shown in Figure .
STEP 2: Let’s select REST and press enter.
Figure 3-4. Add a new API using AWS Amplify
85


Chapter 3 CrUD anD reSt apIS – pIllarS of effICIent Data exChange STEP 3: The CLI will ask to give a label to the set of APIs; let’s name it `todosapiàs shown in Figure .
Figure 3-5. Add a name to the API resource
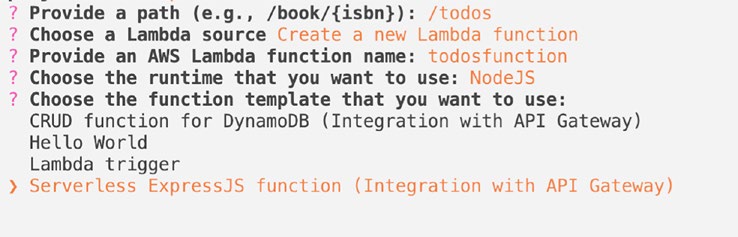
STEP 4: The CLI will ask for a path; as we know the best practices of REST APIs, we will name it `/todosàs shown in Figure .
Figure 3-6. Provide the path to the API
Now is the time to create a Lambda function; choose the option to create a new Lambda function, which will map all the CRUD API endpoints.
STEP 5: Add `todosfunctionàs the name of the Lambda function as shown in Figur
Figure 3-7. Select the template for the Lambda function Then, the CLI will ask which programming language you want to use to serve the APIs; as we are JavaScript enthusiasts, we will choose Node.js. Please note, you can choose other languages as well from the list.
86
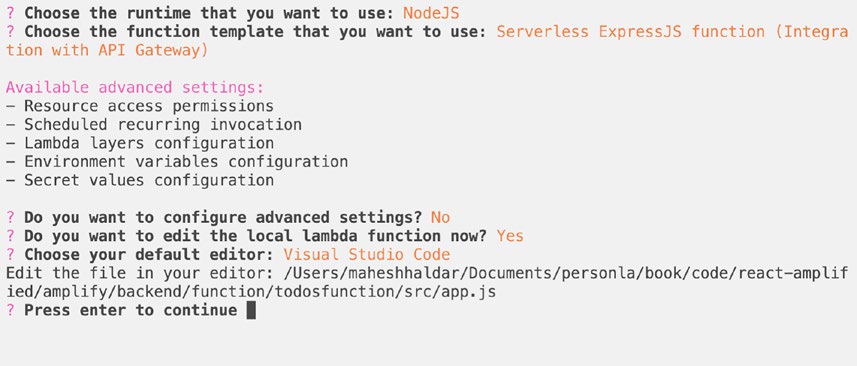
Chapter 3 CrUD anD reSt apIS – pIllarS of effICIent Data exChange STEP 6: The Amplify CLI autogenerates the template functions for the APIs, which can be modified easily.
As we intend to have the CRUD APIs, let’s choose the Express.js function.
Note express.js is a node.js framework, majorly used to serve web-based http apIs, where we write the apI path and attach a set of functions against that path to fulfill the apI request.
STEP 7: Select No for advanced settings for now.
STEP 8: Now we will like to see how our autogenerated function looks like; hence, select Yes for editing the Lambda function now and select your IDE.
The menu looks like Figure with selected options.
Figure 3-8. Final selection of Lambda function configuration STEP 9: The file where the Lambda function is written will open automatically; if it doesn’t open, you can navigate to the following location:
amplify/backend/function/todosfunction/src/app.js
If you note, we want to open the Lambda function generated by the Amplify CLI; hence, the directory structure depicts the same. Lambda function configurations are in the function directory, and we can create n number of APIs and functions to serve the API, hence there is todosfunction directory, this is the name we gave in STEP 5 and create a group of functions with this name.
87
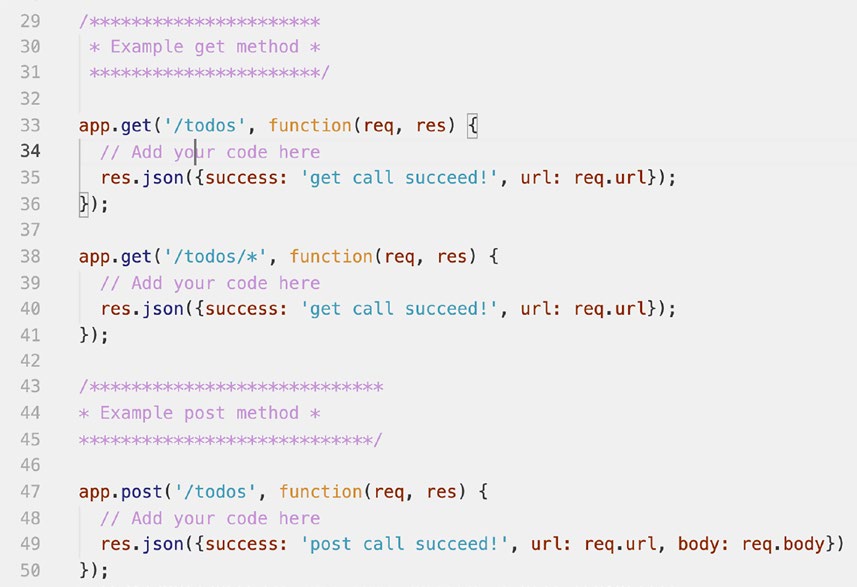
Chapter 3 CrUD anD reSt apIS – pIllarS of effICIent Data exChange Let’s check the autogenerated Lambda function and modify to achieve the required functionality as shown in Figur
Figure 3-9. The autogenerated Express.js template
As we selected the Express.js-based template, we have the app.get and path in line number 33.
LINE 33: This means whenever the get API with path `/todosìs requested, the response will be returned with a JSON object as
{
success: 'get call succeed!',
url: 'request string url'
}
LINE 38: This means whenever the GET API call with path `/todos/*ìs requested, it will run the function and return the object. Thè*ìs from the regex family and means any string is valid.
For example, if you hit `/todos/89òr `/todos/my-namè, it will call the same function.
88
Chapter 3 CrUD anD reSt apIS – pIllarS of effICIent Data exChange LINE 47: This means whenever the POST API call with path `/todoìs requested, it will call the callback function. In this case, it will return the JSON object, with the success key, the URL from the request using req.url, and the request body using req.body.
STEP 10: Press enter on your console to continue on the Amplify CLI.
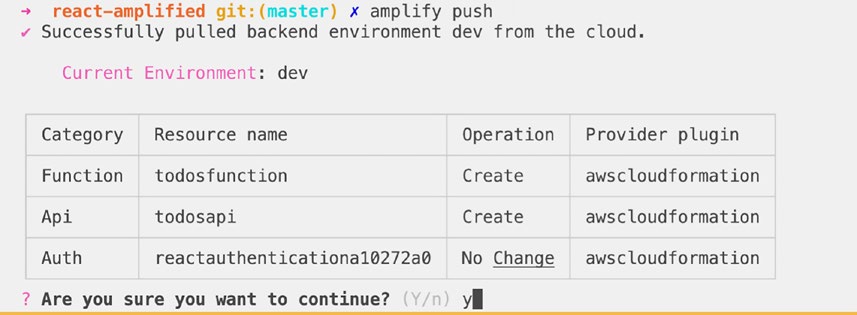
STEP 11: Let’s push these REST APIs and Lambda functions, so that we can check the working APIs as shown in Figur.
amplify push
Figure 3-10. Push the Lambda function to the cloud
The AWS Amplify CLI will ask for confirmation on pushing the changes; enter yes.
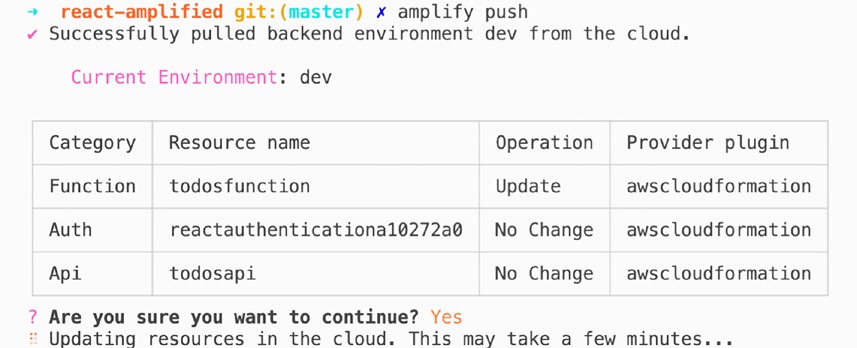
What we are pushing here is `todosapiànd the Lambda function `todosfunction`; hence, you see these two resources have create operations, while Auth has no change in operation.
Let’s wait for CloudFormation changes, and we should be really good with REST APIs and running our first Lambda function.
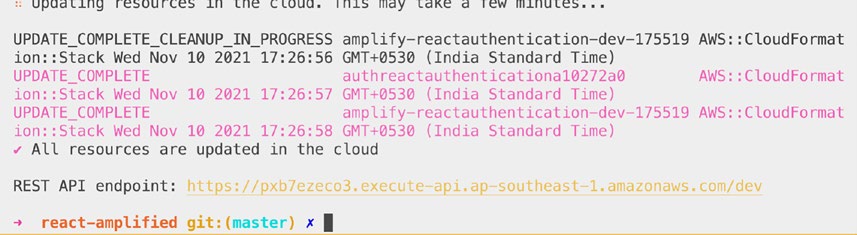
When the push operation is successfully finished, you will be prompted with the REST API endpoint as shown in Figur.
89
Chapter 3 CrUD anD reSt apIS – pIllarS of effICIent Data exChange
Figure 3-11. Successful prompt when the Lambda function is pushed Let’s copy this endpoint and try to request our new created REST APIs.
Basically, our frontend React app will consume the todos REST APIs, but even before we jump into React code to call get or POST APIs, let’s try to test if the APIs are working or not.
If you don’t have the Postman application, you can download from the website. Just googlèdownload postman`.
Click New and select HTTP request.
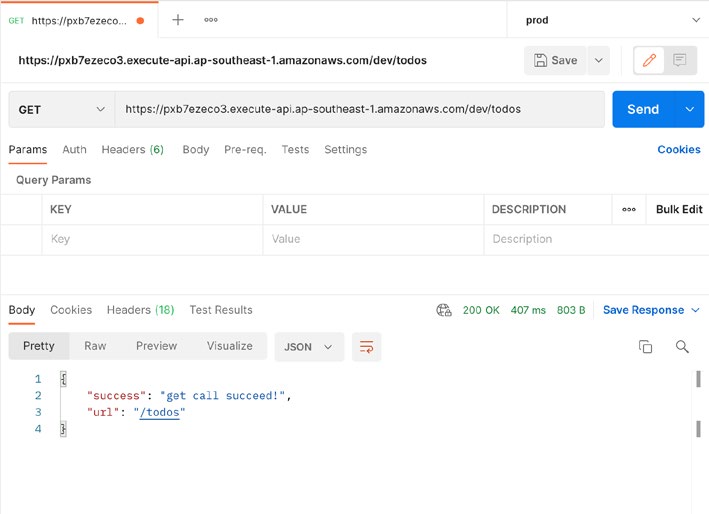
Enter the REST API endpoint in the URL section and append `/todos`.
Please click the blue Send button to request the GET API call as shown in Figur
90
Chapter 3 CrUD anD reSt apIS – pIllarS of effICIent Data exChange
Figure 3-12. Response from the REST API
You will see the response, as this is what we sent from the Lambda function.
Similarly, you can try the DELETE, PUT, or POST APIs, and you will get the expected response from all of these APIs.
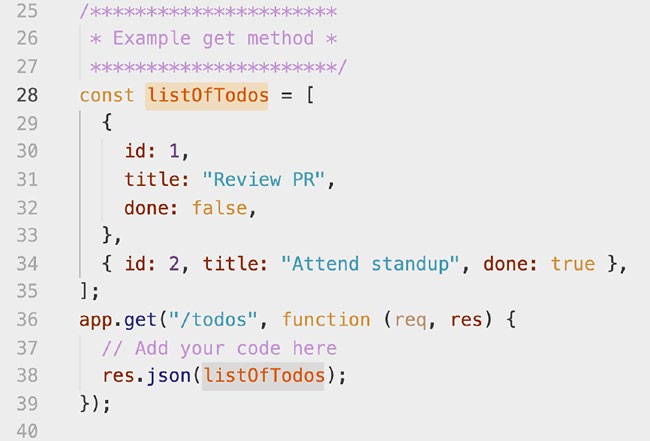
STEP 12: Let’s modify our Lambda functions to return a list of data, and also on the POST API call, we will add one item in the array. Open the todosfunction file to modify the Lambda functions as shown in Figur
91
Chapter 3 CrUD anD reSt apIS – pIllarS of effICIent Data exChange
Figure 3-13. Return the hardcoded response from the function LINE 28: Add a variable listOfTodos which is an array of object with id, title, and done status.
Note We have declared the variable which has the list of items; ideally, the data should be stored in any database; we will modify this function when we learn about using databases in later chapters.
LINE 38: Instead of static strings, return the array of todo items.
Saving the File
STEP 13: Now that the function is modified, we need to save the file and push the changes to AWS also shown in Figure .
amplify push
92
Chapter 3 CrUD anD reSt apIS – pIllarS of effICIent Data exChange
Figure 3-14. Confirmation dialog when pushing the changes As you can see in the confirmation section, the function has an update operation.
Once pushed, let’s wait for the changes to be applied on AWS cloud.
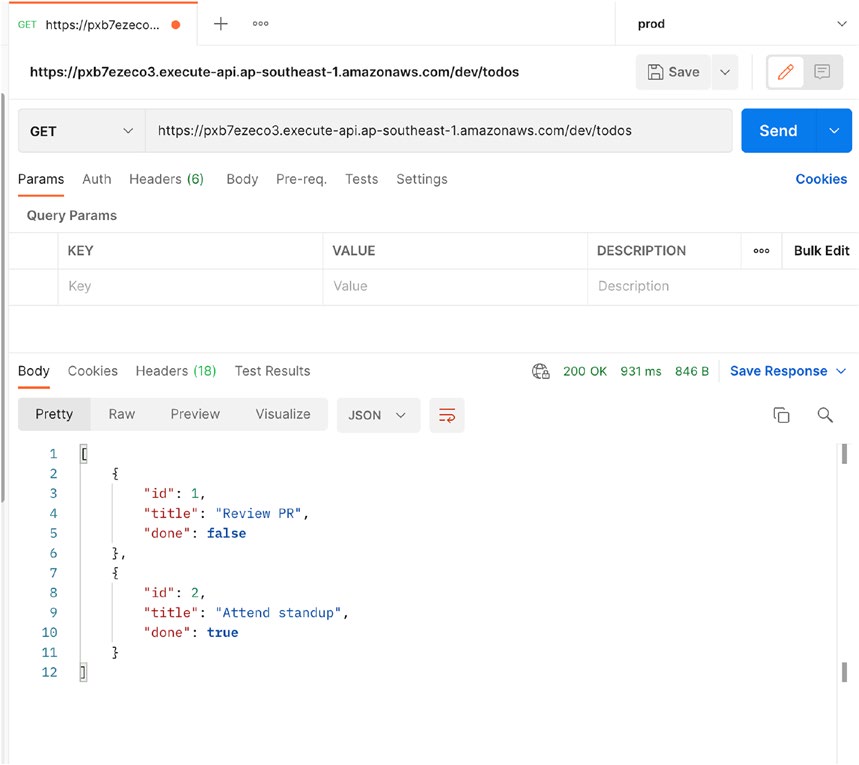
STEP 14: Let’s test our API again on Postman as shown in Figure .
93
Chapter 3 CrUD anD reSt apIS – pIllarS of effICIent Data exChange
Figure 3-15. Response on Postman from the REST API
Voila, as we can see, the changes are reflected on the same APIs.
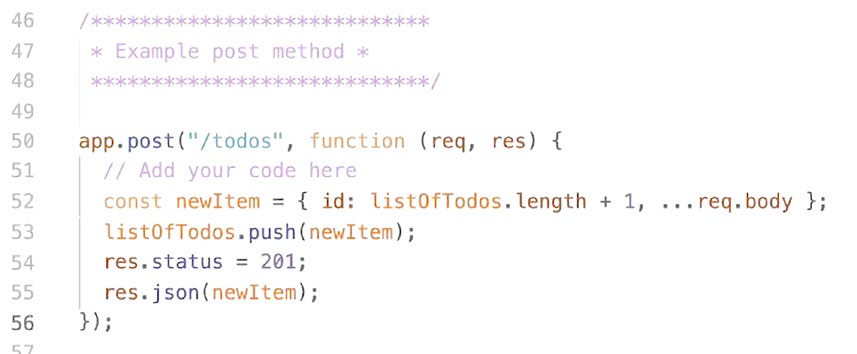
STEP 15: Let’s modify the add new item POST API.
94
Chapter 3 CrUD anD reSt apIS – pIllarS of effICIent Data exChange Note We have used a variable and updated the data in the variable which is in memory. please be aware the new data added using the poSt apI will only be persisted until the same server is up and running; the moment you restart the server, the data will be reset to the actual value declared initially. please note, we are running the lambda functions which run the same functions in different machines; hence, if you hit the get all item apI after some time, you will not receive the data added using the poSt apI, because the server picked to run the function by aWS will change, and hence the variable will return the initial value assigned to it.
To resolve this issue, as discussed earlier, we should have a database, which we will learn in later chapters, and we will replace the datasource from variable to database.
LINE 52: Get the request body and add a dummy id, using the total length of the array.
LINE 53: Push this new item in the same array.
LINE 54: Because we know the best practices of REST APIs, we are setting the HTTP
response status code as 200, because technically this API is going to create a todo item resource.
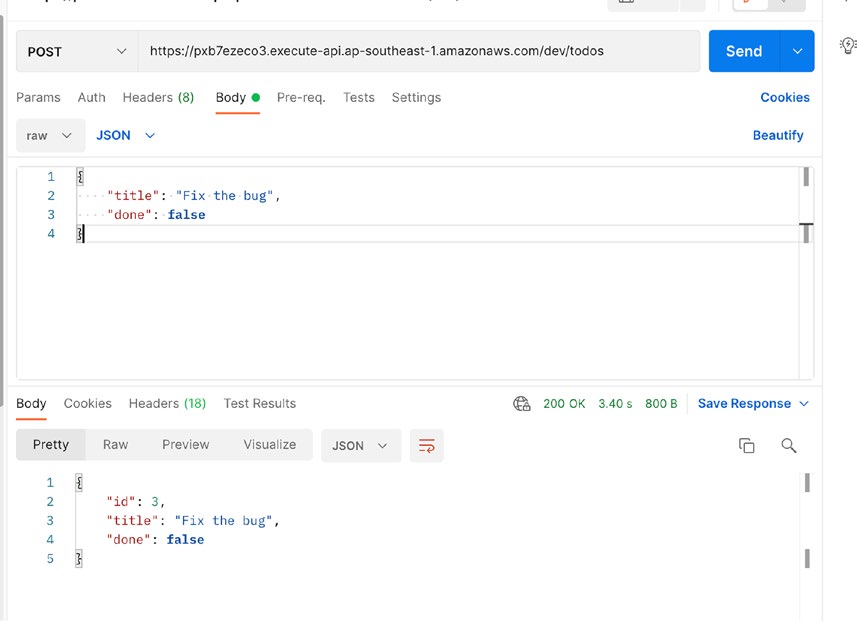
STEP 16: Let’s push the changes and test the API in Postman.
Change the request type to POST from GET in Postman, and add the request body as shown in Figure
95
Chapter 3 CrUD anD reSt apIS – pIllarS of effICIent Data exChange
Figure 3-16. Response from the REST API after the modification of the response structure
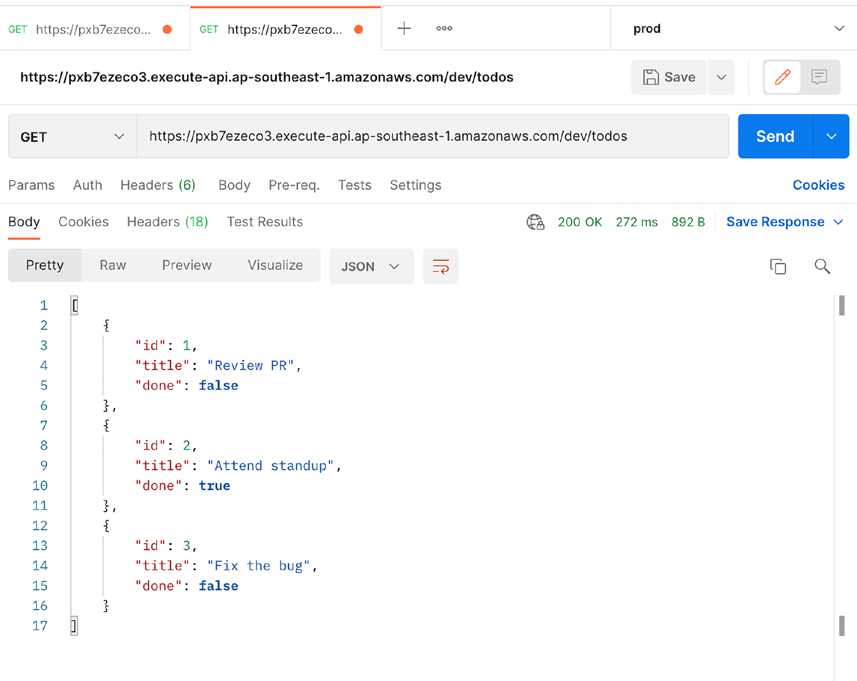
As we get the response 200 with the expected JSON response, let’s test the get all todos; we are expecting to get one more item now.
96
Chapter 3 CrUD anD reSt apIS – pIllarS of effICIent Data exChange
Figure 3-17. Response when requesting all the todos
As you can see in Figure got the new item in getting all API.
PUT API to Update Items
Now that we can get all list of items, and add a new item in the list, let’s try to update existing todo items.
The following function template is where we will customize it, so that we can edit the items by passing the id:
app.put("/todos/*", function (req, res) {
// Add your code here
res.json({ success: "put call succeed!", url: req.url, body: req.body });
});
97
Chapter 3 CrUD anD reSt apIS – pIllarS of effICIent Data exChange Modify the put function with the following function:
01: app.put("/todos/:uid", function (req, res) {
02: const itemIndex = listOfTodos.findIndex((item) => item.id == req.
params.uid);
03: if (itemIndex >= 0) {
04: listOfTodos[itemIndex] = {
05: ...listOfTodos[itemIndex],
06: ...req.body,
07: };
08:
09: res.json({
10: success: "put call succeed!",
11: url: req.params.uid,
12: body: req.body,
13: });
14: } else {
15: res.json({
16: failed: "Put call failed, as the id not found", 17: });
18: }
19: });
To update the item by id, we have done the following changes in the preceding code snippet:
• LINE 1: We have replaced `*` with :uid; we are capturing the id of the item to be edited in a variable named uid.
For example, when we want to update any item, we will hit the
PUT API as follows:
```
PUT /todos/3
Request body: title to be updated
```
Now we need the id in one variable, in this case, 3.
98
Chapter 3 CrUD anD reSt apIS – pIllarS of effICIent Data exChange
• LINE 2: We are finding the index of the item which has the id passed by the client; we can easily capture the id from the URL by req.
params.uid, where uid is the named variable.
Note We are using `==ìnstead of`===`, as the uid will be in string and will fail if we use the triple equal operator. either we can usè==òr transform the types from string to int or vice versa before comparison.
• LINE 3: If the item with the id is found, the function findIndex returns the index of the item from the array, and if not found, it returns –1.
• LINE 4: If the index is greater than or equal to zero, we know the item with the id is found, and now we can handle the positive edge case.
• LINE 5: We are updating the object in the found index with the request body data.
• LINE 9: Return with the success message.
• LINE 15: This case is a negative case when the passed item id is not found in the list.
Once you have modified the function, save the file and push the Lambda function changes to the AWS cloud so that we can test the API.
You can try the API in Postman to update the items.
Using the Delete API to Delete an Item by ID
Now that we can get all list of items and add and edit items in the list, let’s try to delete existing todo items.
The following function template is where we will customize it, so that we can delete the items by passing the id:
app.delete("/todos/*", function (req, res) {
// Add your code here
res.json({ success: "delete call succeed!", url: req.url });
});
99
Chapter 3 CrUD anD reSt apIS – pIllarS of effICIent Data exChange The following is the modified function:
01: app.delete("/todos/:uid", function (req, res) {
02: const itemIndex = listOfTodos.findIndex((item) => item.id === req.
params.uid);
03:
04: if (itemIndex >= 0) {
05: list.splice(itemIndex, 1);
06:
07: res.json({ success: "delete call succeed!", url: req.url }); 08: } else {
09: res.json({
10: failed: "Delete call failed, as the id is not found", 11: });
12: }
13: });
• LINE 1: Capture the id in the variable named uid.
• LINE 2: Find the index of the item, searching by id.
• LINE 5: Remove the item from the index, using the splice function.
• LINE 7: Return a success message.
• LINE 9: This is handling a negative case when the item is not found in the datasource against the id passed in the delete API.
Once you have modified the function, save the file and push the Lambda function changes to the AWS cloud so that we can test the API.
Summary
Congratulations, you have now successfully created a CRUD REST API and saw it working end to end. In this chapter, we explored on what REST APIs are and created CRUD APIs. We also discussed the best practices of REST APIs. We used Node.js and Express.js to create a sample CRUD REST API. We also discussed in depth about Lambda functions and what value they generate.
Throughout the chapter, we emphasized the importance of testing and showed how to use tools like Postman to verify whether our goal is achieved or not.
100
CHAPTER 4
Integrating REST APIs
with a Frontend
React App
Building a powerful frontend is an art, but it becomes a masterpiece when it is integrated seamlessly with APIs.
—Akshat Paul
In the previous chapter, we have created REST APIs which is ready to be consumed by client apps and client apps can render the user interface using these APIs. The next step is to add security enhancements, and we’ll be ready to distribute our APIs to third-party apps as well. In this chapter, we will focus on React application to consume these APIs and render the UI components. In order to integrate these APIs with a React app, we will first create a basic todo application.
Creating a Basic React ToDo App
Let’s create a new file in the React app, where we will achieve the following: 1. Call the get all items API and render the items in an ordered list.
2. Strike the items, which are marked done.
3. Add a create new item button; on clicking it, we should be able to add one item to the todo list.
4. Add the check box button to update the status from done to not done and vice versa.
5. Add a delete button to delete one item.
101
© Akshat Paul, Mahesh Haldar 2023
A. Paul and M. Haldar, Serverless Web Applications with AWS Amplify,
Chapter 4 IntegratIng reSt apIS wIth a Frontend reaCt app
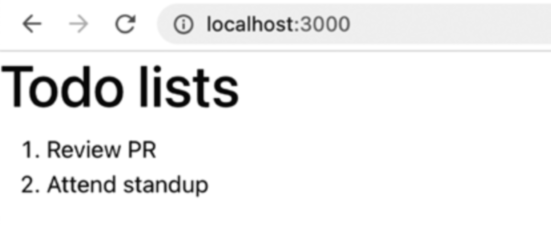
STEP 1: Let’s start with basic API integration; we will call the get all API and show the title in an ordered list in the UI. Figurws what we want to achieve.
Figure 4-1. User interface for a todo application
Let’s create TodoPage.js and add the following code. Let’s discuss the code line by line:
01: import React, { useState, useEffect } from "react"; 02: import { API } from "aws-amplify";
03:
04: const TodoPage = () => {
05: const [todoList, setTodoList] = useState([]);
06:
07: useEffect(() => {
08: API.get("todosapi", "/todos").then((data) => {
09: setTodoList(data);
10: });
11: }, []);
12:
13: return (
14: <>
15: <h1>Todo lists</h1>
16: <ol>
17: {todoList.map((item) => {
18: return <li>{item.title}</li>;
19: })}
20: </ol>
21: </>
102
Chapter 4 IntegratIng reSt apIS wIth a Frontend reaCt app 22: );
23: };
24:
25: export default TodoPage;
26:
LINE 1: Importing dependencies from React, we will use useState to manipulate the state, namely, after calling the API, we want to set it in React state to reflect in the UI. And useEffect to add a hook to call the API instantly after loading the page.
LINE 2: Import the API from aws-amplify; this will help us in the integration with the REST API we created and deployed in Chapto acts as the HTTP client to call the REST API and return the data asynchronously.
LINE 5: Define useState with a default empty array value. The setTodoList is the function which will help in setting the new data after we receive the data from the GET
API call.
LINES 7 and 11: Consuming the useEffect React hook, this gets triggered as soon as the React page is loaded, as we want to call the API instantly. When we pass an array as the second parameter, the hook is triggered on change on the variables passed in the array. If you don’t pass anything as the second parameter, the hook will be triggered infinite times, in this case, the get all API will be called infinite times, and we don’t want this. We passed an empty array to call the API only once; technically, the array is empty; hence, the array will never change, guaranteeing the API to be called once.
LINE 8: Use the API from the aws-amplify package to call the API, by mentioning the HTTP method API we want to call. The first parameter is the API name, as we created by the name of todosapi, and the second parameter is the path of the API; in the case of get all, it is going to be /todos.
Note the hostname will change with different environments, that is, different for the dev environment and different for production. Similarly, if we kill the awS
backend config and recreate in a new awS account, the hostname will change; the apI from aws-amplify handles this, so that the base host is not hardcoded in our application.
LINE 9: When the API call is finished or succeeded, the data is to be set in React state using the setTodoList function, so that the UI can rerender with the items.
103
Chapter 4 IntegratIng reSt apIS wIth a Frontend reaCt app
LINE 17: Until the API call is not a success, the value of items will be an empty array; hence, nothing will be rendered on the UI.
Note here, you can show a loader component until the value of itemList is empty, and when the itemList is not empty, show the title. In this way, we can achieve the functionality of showing loader whenever there is an apI call happening in the background.
LINE 18: Render the title from the item to show on the UI.
Run the server and load the page on the browser; you will see the list.
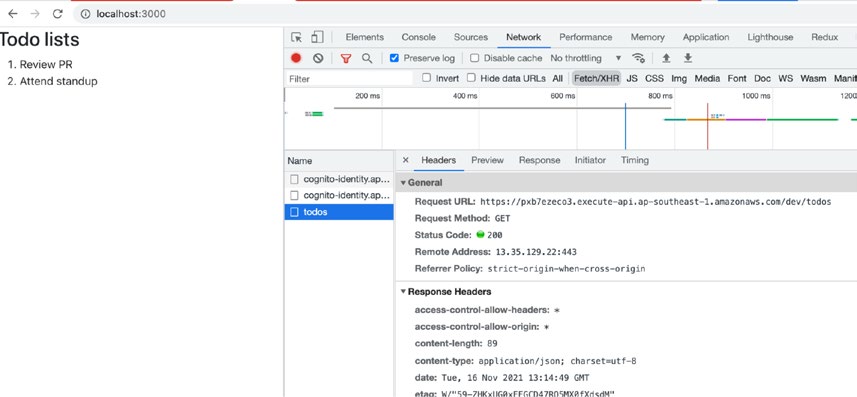
If you want to see the API getting called and response, open the Network tab, as shown in Figure .
Figure 4-2. List of data from REST APIs
Let’s modify our application further to show the status of which item is done and which is not:
17: {todoList.map((item) => {
18: return (
19: <li>{item.done ? <strike>{item.title}</strike> : item.
title}</li>
20: );
21: })}
104
Chapter 4 IntegratIng reSt apIS wIth a Frontend reaCt app
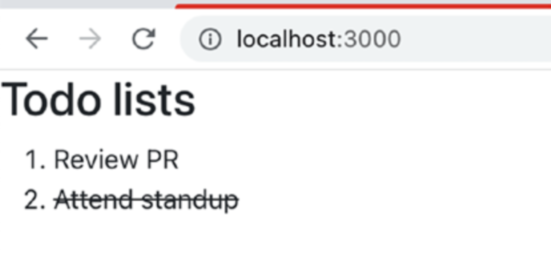
LINE 19: Add a ternary operator, and check if the item’s status is done, then wrap the title in an HTML <strike> tag; if not done, then render without the strike tag.
The output will be like Figure .
Figure 4-3. UI change indicating a completed todo task Adding a New Item
Let’s add a new button so that we can add a new item using the POST API call.
STEP 1: Add the button to add a new item.
24: <div>
25: <input type="text" />
26: </div>
27: <div>
28: <button>+ Add new item</button>
29: </div>
105
Chapter 4 IntegratIng reSt apIS wIth a Frontend reaCt app
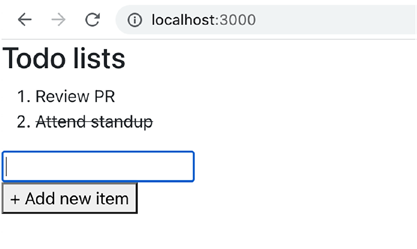
The preceding input field and button will render as shown in Figure .
Figure 4-4. Button addition to the UI
STEP 2: Let’s now add the functionality on what happens on clicking this button.
01: import React, { useState, useEffect } from "react"; 02: import { API } from "aws-amplify";
03:
04: const TodoPage = () => {
05: const [newItemField, setNewItemField] = useState(""); 06: const [todoList, setTodoList] = useState([]);
07:
08: const addNewItem = (title) => {
09: API.post("todosapi", "/todos", { body: { title, done: false } }) 10: .then((data) => {
11: console.log("Creation success with data", data); 12: })
13: .catch((err) => {
14: console.log("ERROR while calling POST api call"); 15: });
16: };
17:
18: useEffect(() => {
19: API.get("todosapi", "/todos").then((data) => {
106
Chapter 4 IntegratIng reSt apIS wIth a Frontend reaCt app 20: setTodoList(data);
21: });
22: }, []);
LINE 5: We want to create a new item, and the title is to be picked from the input box; hence, we need a variable to store the value of the new title typed in the input box.
Hence, we use the useState.
LINE 8: We are writing an addNewItem function, which will call the POST API with the title passed to the function as a parameter. This function will be called when the add button is clicked.
LINE 9: We are going to use the API from AWS-amplify and pass the request body as a JSON object as a parameter.
LINE 11: If the response is a success, for now, let’s log the response in the console.
LINE 14: The catch part will be triggered if the API fails; let’s also log the failure.
STEP 3: Integrate the input box, and call the POST API on button click.
33:
34: <div>
35: <input
36: type="text"
37: onChange={(event) => {
38: setNewItemField(event.target.value);
39: }}
40: />
41: </div>
42: <div>
43: <button onClick={() => addNewItem(newItemField)}>
+ Add new item
</button>
44: </div>
45: </>
46: );
47: };
48:
49: export default TodoPage;
50:
107
Chapter 4 IntegratIng reSt apIS wIth a Frontend reaCt app
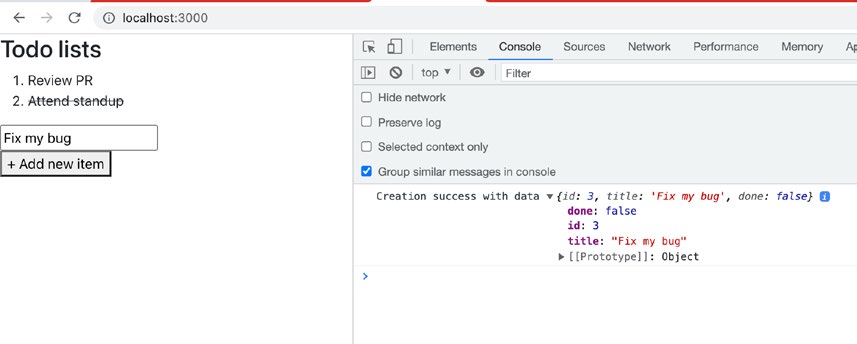
Now run your React app and try to add a new item; the expectation is we should be able to create a new item, and on success, it should show the result in the console.
Figurws the screenshot of the application.
Figure 4-5. UI updated allowing a new todo item to be added from the page Enhancing the User Experience
Now that API integration of getting all the data and adding new items is done, let’s enhance the user experience.
As an end user, when I add a new item, I want the experience to be better than what we have achieved so far.
1. When I add a new item, the new item should be added in the list.
2. The text field should get clear so that I can add a new item.
Let’s achieve these one by one.
Enhancement 1
If we want to add the new item, when the POST API call is successful we will add the response in our list of todo item variables. Let’s change what we should do in our React app:
108
Chapter 4 IntegratIng reSt apIS wIth a Frontend reaCt app 08: const addNewItem = (title) => {
09: API.post("todosapi", "/todos", { body: { title, done: false } }) 10: .then((data) => {
11: console.log("Creation success with data", data); 12: setTodoList([...todoList, data]);
13: })
14: .catch((err) => {
15: console.log("ERROR while calling POST api call"); 16: });
17: };
LINE 12: We will use the function by the useState React hook to push the new item we received from the POST API call. And we achieve what we wanted. What it does is, as the list of todos is in the state, when the list gets updated, React also rerenders and shows our new item in the list.
Enhancement 2
We want to reset the text field value when the POST API call is successful. Let’s see how the React code will change to achieve this enhancement:
08: const addNewItem = (title) => {
09: API.post("todosapi", "/todos", { body: { title, done: false } }) 10: .then((data) => {
11: console.log("Creation success with data", data); 12: setTodoList([...todoList, data]);
13: setNewItemField("");
14: })
15: .catch((err) => {
16: console.log("ERROR while calling POST api call"); 17: });
18: };
LINE 13: For capturing the value of text from the input field, we have used the useState hook; we will use the same set function to set the value of the field to an empty string.
109
Chapter 4 IntegratIng reSt apIS wIth a Frontend reaCt app
The preceding change will have no impact on our text field because we are so far only capturing the value from the text field, but we have not set the value of the text field.
Let’s set the value:
37: <div>
38: <input
39: type="text"
40: onChange={(event) => {
41: setNewItemField(event.target.value);
42: }}
43: value={newItemField}
44: />
45: </div>
LINE 43: We are using the HTML attribute name ‘value’ to set the value from the state.
Let’s run our React app and see the app in action.
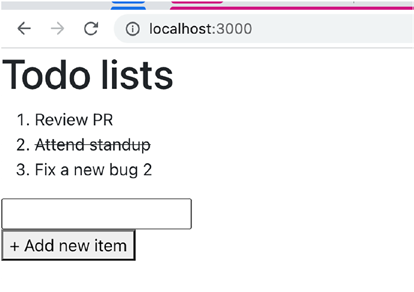
Figure 4-6. Input box emptied to add new item
Now if you see, the moment an add new button is clicked, the item gets added in the preceding list as a third item and the input box is cleared to be ready to accept the new item.
Congrats, you have implemented a basic feature and also enhanced the user experience. Next, we will add delete and update features to our React application.
110
Chapter 4 IntegratIng reSt apIS wIth a Frontend reaCt app Do It Yourself (DIY): Deleting and Updating
Still, our app is not complete; we have to add the feature of deleting one item and updating the status of the item from done to not done, so that the strike on the item goes off and on, depending on the item.
Please write your function to implement the APIs and write the React code to achieve the update status and delete one item functionality.
GraphQL API
GraphQL is a powerful and flexible query language and runtime for APIs that was developed by Facebook. It allows clients to request and receive only the data they need, which can help solve the problem of overfetching and underfetching of data that occurs with traditional REST APIs.
With GraphQL, clients can send dynamic queries that specify exactly what data they want, and the server will respond with only that data. This gives clients greater control and power over the data they receive and can lead to faster and more efficient application performance.
In addition to its query capabilities, GraphQL also provides a strongly typed schema that defines the types of data that can be queried. This can help catch errors early in the development process and make it easier to maintain and evolve APIs over time.
GraphQL has gained widespread adoption in recent years and is now supported by many popular programming languages and frameworks. It’s a powerful tool for building modern, scalable APIs, and I highly recommend it to anyone looking to build APIs for their applications. Let us understand GraphQL with the help of an example:
{
author {
firstName
twitterHandle
}
}
111
Chapter 4 IntegratIng reSt apIS wIth a Frontend reaCt app This schema will return the following structure data:
{
author {
"Andrew",
"some_handle"
}
}
if the query is modified to the following query:
{
author {
lastName
}
}
This will return the following:
{
author {
"James"
}
}
Note graphQL was initially developed by Facebook (now Meta) in 2012 and later published as open source in 2015.
Why GraphQL?
• It simplifies backend and frontend communication.
• Frontend developers can get exactly what they want, no under- or overfetching.
• Reduced number of HTTP API calls, compared to REST APIs.
• GraphQL allows an API to evolve by adding more keys without
breaking existing queries. Not required to maintain versions like in REST APIs.
112
Chapter 4 IntegratIng reSt apIS wIth a Frontend reaCt app Why not GraphQL?
• Learning curve: GraphQL can have a steeper learning curve than traditional REST APIs, especially if you’re not familiar with the GraphQL query language and its concepts.
• Small APIs: If you have a small API with simple data requirements, it may be overkill to use GraphQL. In such cases, a traditional REST API or a simpler solution may be sufficient.
• Caching: Caching can be more complex with GraphQL than with
REST, as GraphQL queries are often dynamic and can have a wide
range of possible responses. This can make it harder to implement effective caching strategies.
• Lack of tooling: While GraphQL has gained widespread adoption, some tools and libraries may not yet support it, which could make development more difficult.
• Security concerns: As with any API, security is a concern, and GraphQL has its own unique security considerations, such as query depth limits and input validation.
• Performance: While GraphQL can offer improved performance in
certain cases, it can also have performance issues if queries are too complex or too many requests are made. This can require additional optimization and caching strategies to be implemented.
Now that we deeply understand the GraphQL APIs well, let’s create all APIs for the todo list in GraphQL and run those in action, and we will modify our React app to consume the GraphQL APIs instead of REST APIs.
113

Chapter 4 IntegratIng reSt apIS wIth a Frontend reaCt app
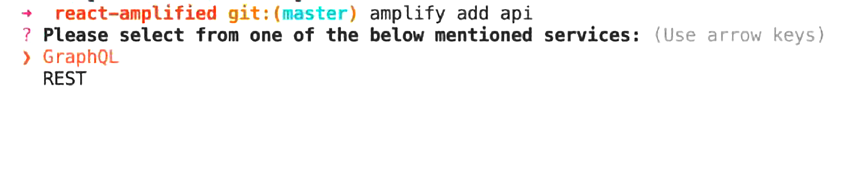
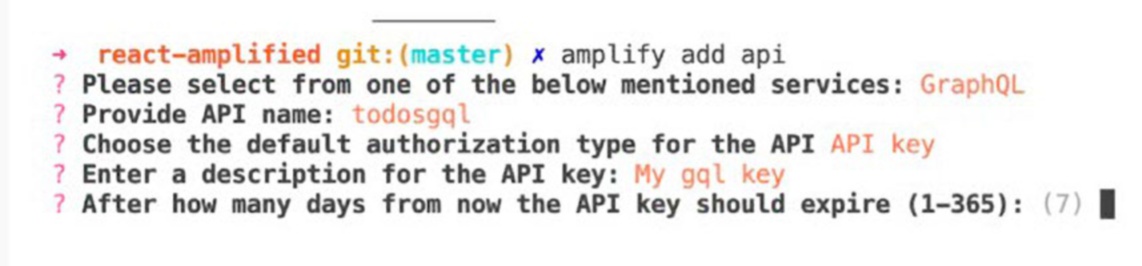
To create a set of APIs, we will use the Amplify CLI tool:
amplify add api
This will give us two options to choose from, namely:
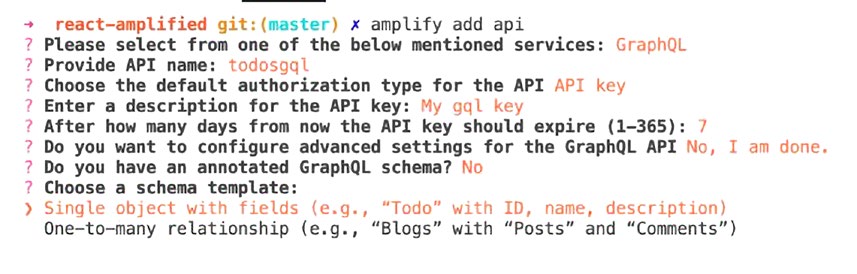
STEP 2: Let’s select GraphQL and press enter.
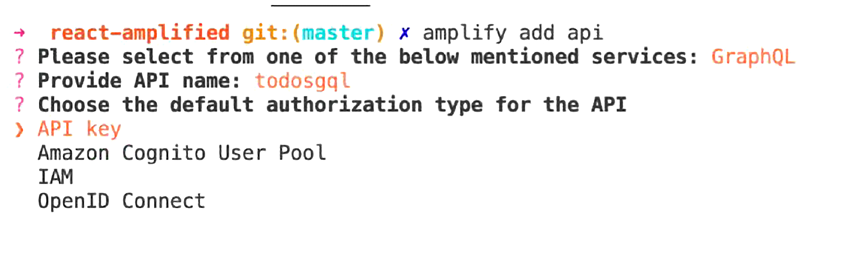
STEP 3: The CLI will ask to give a label to the set of APIs; let’s name it todosgql.
STEP 4: The CLI will ask the type of API authorization; let’s choose the API key.
There are other ways to authorize, but let’s select the quickest of all options.
114
Chapter 4 IntegratIng reSt apIS wIth a Frontend reaCt app
STEP 5: The CLI tool will ask for a description of the key; provide some text.
STEP 6: The CLI will ask for the number of days, after which one API key will expire.
Select the default number, namely, 7.
STEP 7: Select no for additional settings option.
STEP 8: When asked if you have annotated GraphQL schema, select no. This will autogenerate from a template, which we can modify to fit our todo application use case.
Though if you already have some schema you want to migrate to Amplify, you can select Yes and add your schema.
This will lead to choose the template option; let’s go simple with a single object and choose the todo template GraphQL schema.
STEP 9: The tool will ask if you want to edit the schema, select no. As from the previous section we know where this API file will be generated, we will navigate to the directory and edit the GraphQL API.
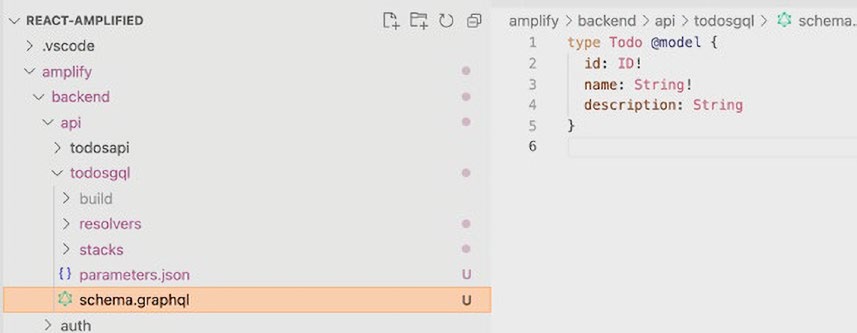
Let’s check our amplify directory and check what code has been generated.
115
Chapter 4 IntegratIng reSt apIS wIth a Frontend reaCt app
Given we want to modify the GraphQL API, it should be placed in the API directory.
Follow the following path:
./amplify/backend/api/todosgql
Note todosgql is the name we gave to this new gql apI, hence the directory name. we can have more than one graphQL apI with different names, and the name of the directory will be created.
Open the schema.GraphQL file.
And we see the basic GraphQL schema is generated for Todo:
1: type Todo @model {
2: id: ID!
3: name: String!
4: description: String
5: }
6:
LINE 1: The @model directive in the schema tells AWS to create a similar database schema in DynamoDB, so that the data can be stored and read from the database.
We will discuss in detail about database integration in later chapters; let’s remove the
@model directive from this schema.
116
Chapter 4 IntegratIng reSt apIS wIth a Frontend reaCt app Modify the schema to add a done field of type boolean for our todo item status and rename “name” field to “title”, as our React app is using “title” key: 1: type Todo {
2: id: ID!
3: title: String!
4: done: Boolean!
5: }
Let’s add some operation type in our GraphQL schema so that the clients can perform some operations on the GraphQL API, like getting data, creating, deleting, etc.
In GraphQL, the operations can be of following types:
1. Query
This operation is equivalent to the GET HTTP verb, where any get
operations are grouped.
2. Mutation
This operation is responsible for all the operation which mutates or changes the resource data, for example, all the creation,
deletion, and update operations are written under this keyword.
3. Subscription
This operation enables the clients to create a socket connection
with the server, and any change on the resource will be delivered on real time to the clients.
We want to get a list of all todo items. Let’s modify our schema using the keyword
‘query’:
6: type Query {
7: todos: [Todo] @function(name: "")
8: }
LINE 7: The query returns a field ‘todos’ which returns the array of Todo items.
The @function directive helps us to quickly connect a Lambda function with a GraphQL API.
117
Chapter 4 IntegratIng reSt apIS wIth a Frontend reaCt app To explain further, the client will request ‘todos’, and to operate on this request, we need to connect a function, and @function helps us.
We also need a Lambda function, the following command will add a Lambda function and we need to pass the name of that function:
amplify add function
Provide a name to the function; you can give ‘todosfunctiongql’.
Select Node.js and select a basic Hello World template:
amplify add function
? Select which capability you want to add: Lambda function (serverless function)
? Provide an AWS Lambda function name: todosfunctiongql
? Choose the runtime that you want to use: NodeJS
? Choose the function template that you want to use: Hello World
Now we have the Lambda function, and we need to add the name of this in GraphQL
API configuration, and this Lambda function will be our custom resolver.
Open the schema.GraphQL file, and modify as follows:
6: type Query {
7: todos: [Todo] @function(name: "todosfunctiongql-${env}") 8: }
9:
LINE 7: @function expects the name of the function as a parameter to be able to resolve the query, and we need to provide ‘-${env}’.
Custom Resolver
We want to control our function, so that we can have the confidence of ownership in our API. As we have already connected the GraphQL API controller layer with our custom Lambda function, let’s modify the function to respond to the GraphQL query.
We will modify the Lambda function in a way, so that it returns some list of todo items from in-memory datasource.
118
Chapter 4 IntegratIng reSt apIS wIth a Frontend reaCt app Navigate to open the function file:
./amplify/backend/function/todosfunctiongql/src/index.js
01: const listOfTodos = [
02: {
03: id: 1,
04: title: "Review PR",
05: done: false,
06: },
07: { id: 2, title: "Attend standup", done: true },
08: ];
09:
10: const resolvers = {
11: Query: {
12: todos: (ctx) => listOfTodos,
13: },
14: };
LINE 1: This is our in-memory variable, which will hold the items of todos.
LINE 10: The resolver map, which will have the GraphQL operation keywords like query, mutation, and subscription as keys and resolver function as value.
In this case, when the query todos is requested, it should resolve to return the list of todos.
The ctx variable holds the request contexts like header, params, or auth info.
Modifying the Lambda Handler
To be able to resolve the GraphQL query, we need to handle the operation type in the Lambda handler.
Please replace the autogenerated handler with the following:
16: exports.handler = async (event) => {
17: const typeHandler = resolvers[event.typeName];
18: if (typeHandler) {
19: const resolver = typeHandler[event.fieldName];
20: if (resolver) {
119
Chapter 4 IntegratIng reSt apIS wIth a Frontend reaCt app 21: return await resolver(event);
22: }
23: }
24: throw new Error("Resolver not found.");
25: };
Let’s take the following two sample GraphQL queries to understand the preceding handler:
01: query {
02: products {
03: name
04: }
05: }
06:
07: mutation {
08: deleteCategory(id: 2) {
09: name
10: }
11: }
12:
LINE 17: The event contains some information about the incoming request, so that we can identify the GraphQL operation types.
event.typeName will return one of the operations, for example, query, mutation, or subscription, event.typeName would be query and mutation if the preceding two queries are passed.
LINE 19: The field name from the event map returns the field under an operation the client is requesting to. For example, the value of event.fieldName will be products and deleteCategory for the preceding two sample queries.
LINE 21: The same event is passed as ctx to our custom resolver function, so that in our resolver function we can get the request metadata like header, auth information, etc.
Congratulations, now we have successfully created a GraphQL API and connected a customer Lambda function to resolve the query. Let’s push this change and test the API by running the following command:
amplify push
120
Chapter 4 IntegratIng reSt apIS wIth a Frontend reaCt app
Testing the API
There will be some configuration preference asked by the CLI tool; you can answer as follows:
? Do you want to generate code for your newly created GraphQL API Yes
? Choose the code generation language target javascript
? Enter the file name pattern of graphql queries, mutations and
subscriptions src/graphql/*
*/*.js
? Do you want to generate/update all possible GraphQL operations - queries, mutations and s
subscriptions No
And wait for the CloudFormation script to generate the resources in AWS cloud.
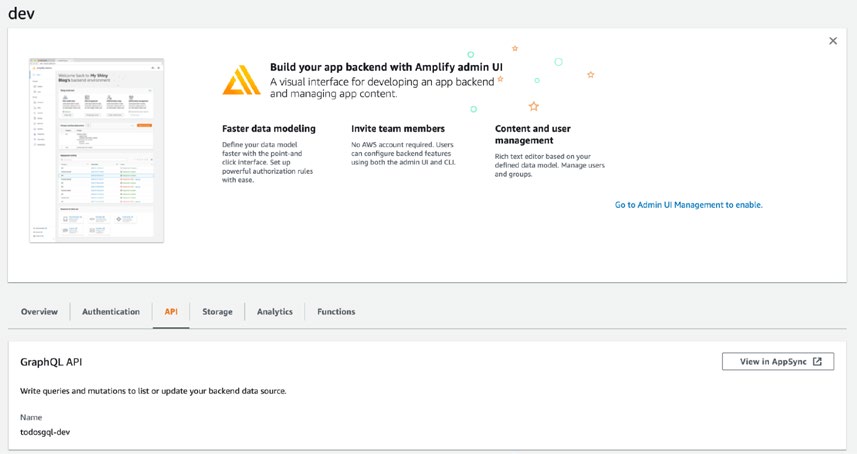
Let’s test our new GraphQL API; navigate to the Amplify console:
amplify console
You can choose the console option from the menu. This will open the console on the browser.
Figure 4-7. Amplify console
121
Chapter 4 IntegratIng reSt apIS wIth a Frontend reaCt app
Navigate to the API and click the View in AppSync button under the GraphQL API.
Click the Run a query option, which will open a console to add the GraphQL query.
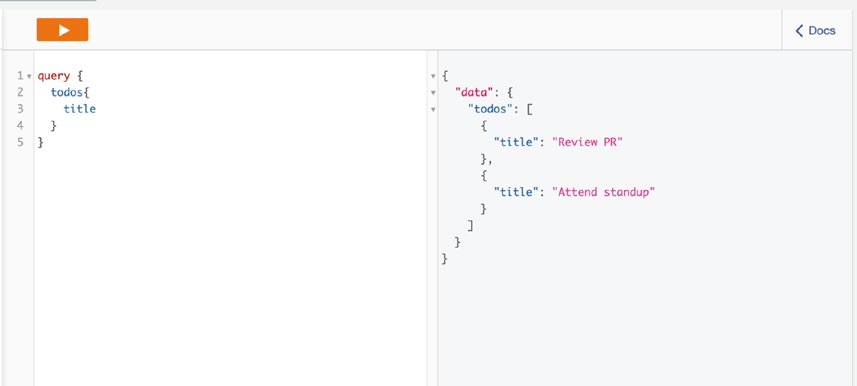
Enter the todos query and hit the run button, the result is shown in Figur
Figure 4-8. AppSync to run the GraphQL query
Congratulations, we have our first GraphQL API. You can play around with the query and check the response.
Creating New Item – Mutation Query
Let’s proceed further with our GraphQL API development; let’s navigate to the GraphQL
schema file and register the mutation operation:
./amplify/backend/api/todosgql/schema.graphql
10: type Mutation {
11: addItem(title: String!, done: Boolean!): Todo!
12: @function(name: "todosfunctiongql-${env}")
13: }
14:
122
Chapter 4 IntegratIng reSt apIS wIth a Frontend reaCt app LINE 10: Add the operation type as mutation to be able to mutate the resource.
LINE 11: The addItem is the subfield name in the mutation query, which expects two arguments title and done, and both of them need to be a valid value; it cannot be null.
This returns an object of type Todo.
LINE 12: Connect the same Lambda function we created which has all the resolvers using the @function directive.
Modify the Lambda resolver function.
After connecting the Lambda function with the gql API, we need to add the support for the mutation operation and addItem field.
Navigate to the Lambda function, and let’s start the modification: 10: const addNewItem = (title, done) => {
11: const newItem = { id: listOfTodos.length + 1, title, done }; 12: listOfTodos.push(newItem);
13: return newItem;
14: };
15:
16: const resolvers = {
17: Query: {
18: todos: (ctx) => listOfTodos,
19: },
20: Mutation: {
21: addItem: (ctx) => addNewItem(ctx.arguments.title, ctx.
arguments.done),
22: },
23: };
24:
LINE 10: Create a new function, so that we pass the title and boolean value from the query to add the new item in our datasource, in this case the in-memory variable.
LINE 11: Generate the ID and create a new item object.
LINE 20: Add the mutation operation in the resolver map to be able to resolve whenever adding a new item in the list.
123
Chapter 4 IntegratIng reSt apIS wIth a Frontend reaCt app
LINE 21: Read the arguments passed in the ctx variable and pass to the resolver function.
Let’s push the changes and test the GraphQL mutation API:
amplify push
Testing the Mutation
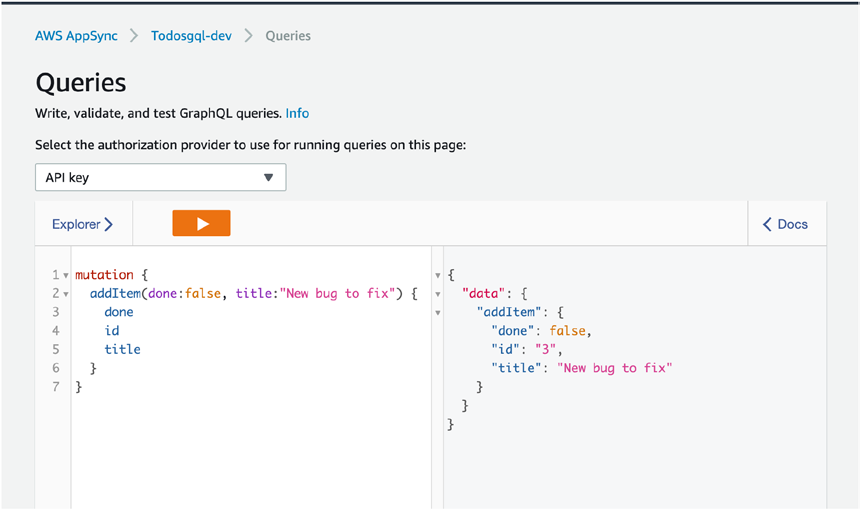
Please navigate to the GraphQL API console on a browser, and let’s try to hit the mutation query. This is shown in Figur.
Figure 4-9. AppSync console
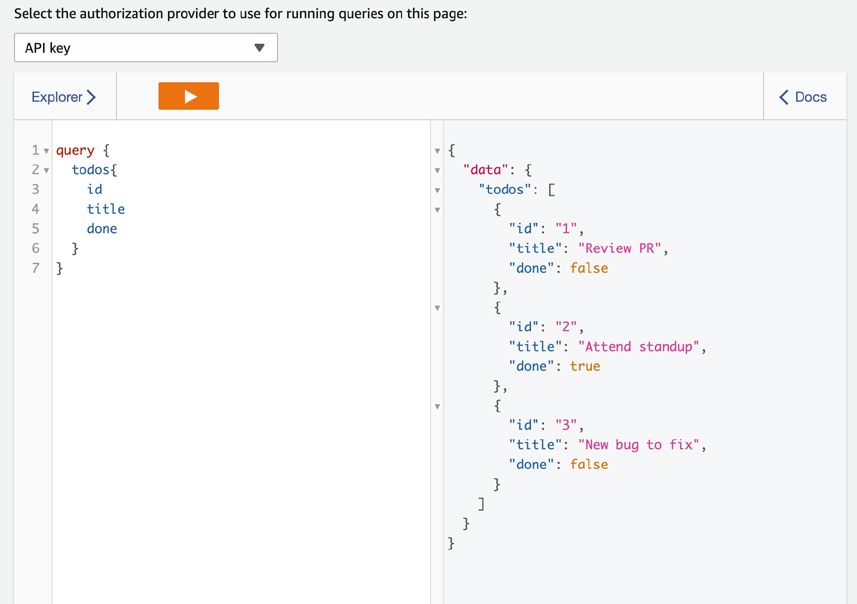
In response, we created the new item. Let’s again hit the get all items query, and the expectation is we should receive three items now.
124
Chapter 4 IntegratIng reSt apIS wIth a Frontend reaCt app
Figure 4-10. Query to get all the items
We now are able to add new items using the GraphQL API.
Updating the Item by ID – Mutation Query
Let’s now create one more mutation query, which should take the ID of the item, and we should be able to update the status of the item, with a boolean value.
Let’s start with modifying the GraphQL schema:
10: type Mutation {
11: addItem(title: String!, done: Boolean!): Todo!
12: @function(name: "todosfunctiongql-${env}")
13: updateItem(id: ID!, done: Boolean!): Todo!
14: @function(name: "todosfunctiongql-${env}")
15: }
125
Chapter 4 IntegratIng reSt apIS wIth a Frontend reaCt app LINE 13: Add the updateItem field in the mutation schema, which takes id and done values as arguments, and connect the same Lambda function as the resolver using the
@function directive.
Let’s modify the resolver function to act on this operation.
Navigate to the gql Lambda function:
15: const updateItem = (id, done) => {
16: const itemIndex = listOfTodos.findIndex((item) => item.id ===
Number(id));
17: if (itemIndex > 0) {
18: listOfTodos[itemIndex] = {
19: ...listOfTodos[itemIndex],
20: done,
21: };
22: return listOfTodos[itemIndex];
23: } else {
24: throw new Error("Id not found");
25: }
26: };
27:
28: const resolvers = {
29: Query: {
30: todos: (ctx) => listOfTodos,
31: },
32: Mutation: {
33: addItem: (ctx) => addNewItem(ctx.arguments.title,
ctx.arguments.done),
34: updateItem: (ctx) => updateItem(ctx.arguments.id,
ctx.arguments.done),
35: },
36: };
LINE 15: Add the function which takes id and done values to update the item from the datasource.
126
Chapter 4 IntegratIng reSt apIS wIth a Frontend reaCt app
The implementation is pretty much the same as we did in the REST API Lambda function. Find the item by id and update the value and throw an error if the id is not found.
LINE 16: Please note the type of id has changed from number to string, hence transposing to a number type using the Number keyword and then comparing to find the index.
Alternatively, we could use the == operator instead of === so that only a comparison could happen, ignoring the type.
LINE 34: In the mutation map, create a key with the same name as the query field, and read the arguments from the GraphQL query and pass to the function.
Let’s push the changes to Amplify and test the GraphQL API in the AWS console.
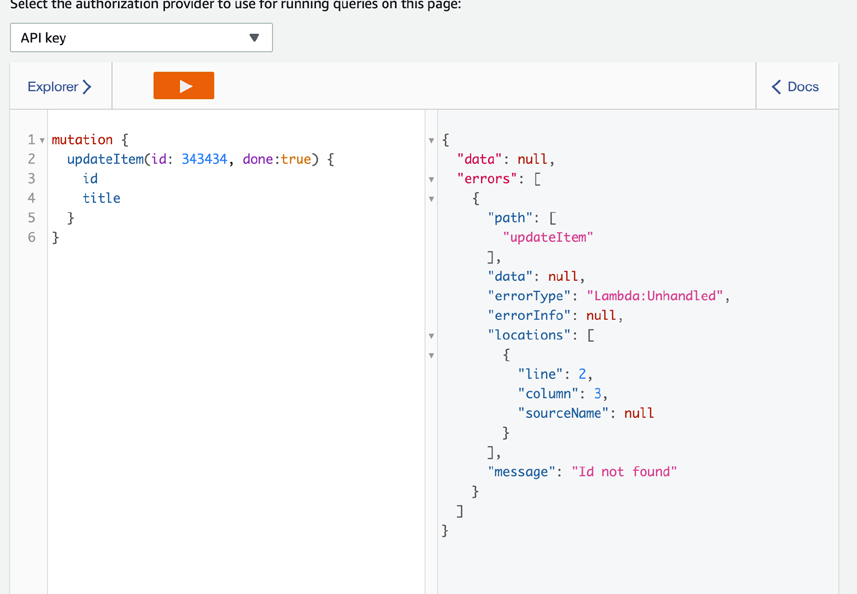
The following is the negative scenario: when the id is not found, it should return an error; let’s pass the id as a random number, which we are confident that it doesn’t exist.
Figure 4-11. Execute query with incorrect ID
127
Chapter 4 IntegratIng reSt apIS wIth a Frontend reaCt app
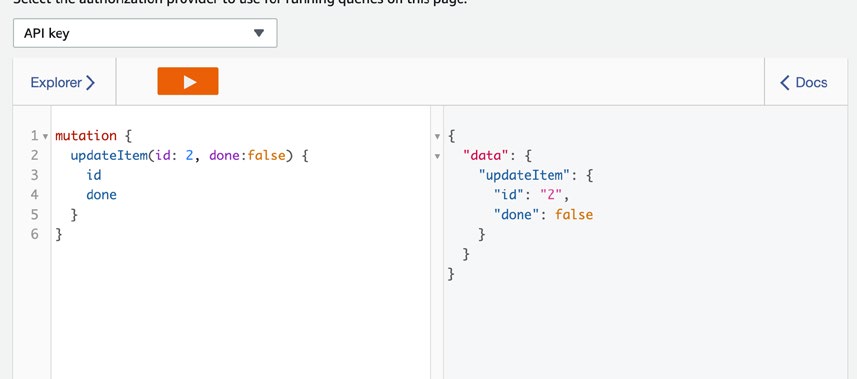
As expected, it throws an error. Let’s pass the correct id to update the value.
Figure 4-12. Execute query with correct ID
Congratulations, our update GraphQL query is working fine.
Deleting the Item – Mutation Query
We want to write a mutation query which will take the id and remove it from the list. Let’s start by modifying the GraphQL schema:
10: type Mutation {
11: deleteItem(id: ID!): Boolean! @function(name:
"todosfunctiongql-${env}")
12: }
Add the same field in the Lambda function resolver to handle the mutation operation:
28: const deleteItem = (id) => {
29: const itemIndex = listOfTodos.findIndex((item) => item.id ===
Number(id));
30:
31: if (itemIndex >= 0) {
32: listOfTodos.splice(itemIndex, 1);
33: return true;
128
Chapter 4 IntegratIng reSt apIS wIth a Frontend reaCt app
34: } else {
35: throw new Error("Id not found");
36: }
37: };
38:
39: const resolvers = {
40: Query: {
41: todos: (ctx) => listOfTodos,
42: },
43: Mutation: {
44: addItem: (ctx) => addNewItem(ctx.arguments.title, ctx.
arguments.done),
45: updateItem: (ctx) => updateItem(ctx.arguments.id, ctx.
arguments.done),
46: deleteItem: (ctx) => deleteItem(ctx.arguments.id),
47: },
48: };
LINE 28: Add the delete function, which finds the item by id and removes it from the list.
LINE 46: Update the mutation resolver map with a field name and connect the resolver function.
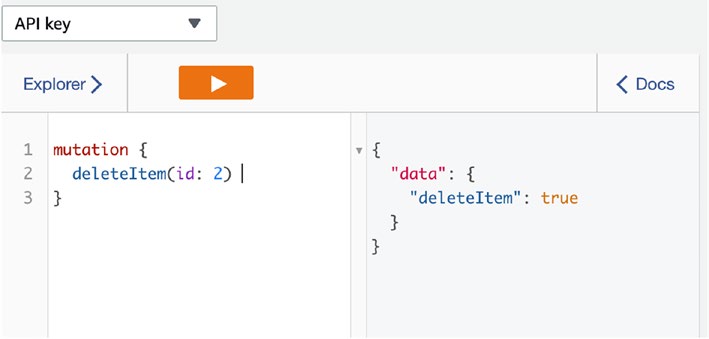
Let’s push the change to AWS and open the console to test the GraphQL API.
Figure 4-13. Execute query to delete record
129
Chapter 4 IntegratIng reSt apIS wIth a Frontend reaCt app
The API returns a boolean true value, as expected, and let’s hit get all todo items.
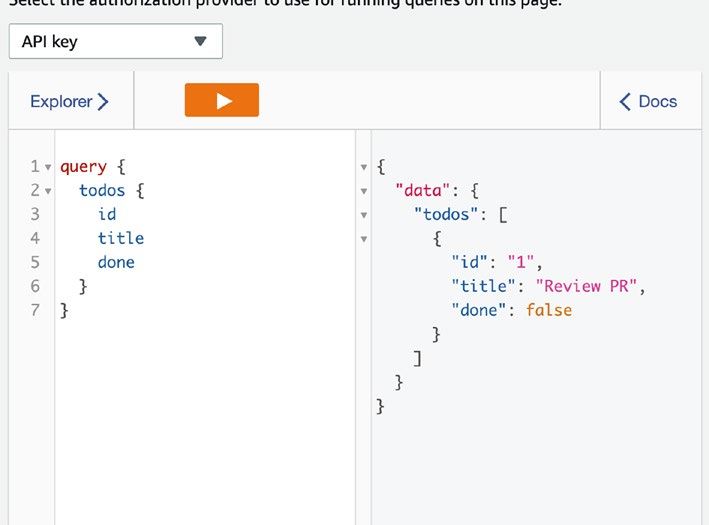
Now we should get only one item.
Figure 4-14. Get all todo records
Congratulations, now we are confident we have been able to delete an item.
Integrating GraphQL API in React
As we have already learned, an API is a mode of communication between two parties, in this case, a client app and a server. Just like human communication, the language or interface can be of any type; the core requirement is that the message should be transferred and understood by both parties. Whether the API is REST or GraphQL, the actual data should be requested and transferred to the client. In both cases, the client sends a request to the server, which then responds with the requested data. The key 130
Chapter 4 IntegratIng reSt apIS wIth a Frontend reaCt app difference between REST and GraphQL is in how the data is requested and how the server responds. With REST, the client specifies the endpoint, and the server responds with all the data at that endpoint. With GraphQL, the client specifies the data it needs using a query language, and the server responds with only the requested data. Both REST and GraphQL have their own strengths and weaknesses, and the choice between the two will depend on the specific needs of a given project.
Now that we have all the required set of GraphQL APIs for our todo application, we should integrate these in our application, we will not rewrite the React code from scratch, we will modify the existing client app to consume the GraphQL API, and the application should work as is.
Let’s begin with our React hook where on load we call the API to get all lists of Todos and show them on the UI:
33: useEffect(() => {
34: API.get("todosapi", "/todos").then((data) => {
35: setTodoList(data);
36: });
37: }, []);
The preceding code is the React hook integration to call the get all REST API; let’s modify this so that it consumes the GraphQL query:
33: useEffect(() => {
34: API.graphql({
35: query: `query {
36: todos {
37: id
38: title
39: done
40: }
41: }`,
42: }).then((data) => {
43: setTodoList(data);
44: });
45: }, []);
46:
131
Chapter 4 IntegratIng reSt apIS wIth a Frontend reaCt app
LINE 34: Call the GraphQL function from the API to request the GraphQL query.
LINE 35: Pass the exact query from our query console.
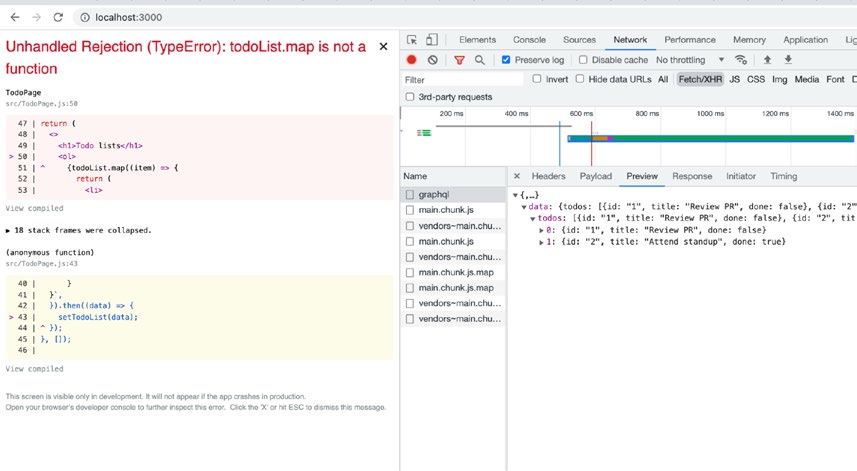
Let’s run, start the React server, and keep our eye on the Network tab of the browser.
Figure 4-15. Integrating GraphQL with the React app
Please note the GraphQL API is requested by the React hook; if you check the response, you will see we received the response.
But something failed on our React code.
It’s nothing but the response structure. In the REST API, we got the response as an array; in GraphQL, we are getting the data wrapped in the data key and todos key.
Let’s modify our response handler from the React hook:
37: id
38: title
39: done
40: }
41: }`,
42: }).then((data) => {
43: setTodoList(data.data.todos);
44: });
45: }, []);
132
Chapter 4 IntegratIng reSt apIS wIth a Frontend reaCt app LINE 43: We are modifying to read the list of todos from the todos key wrapped under the data key.
Save and restart; voila, our new list of todos is getting fetched from the GraphQL API.
Integrating GraphQL Mutation API
Let’s start modifying the function on click of add item to call the mutation query, which will create a new item using our GraphQL mutation API:
08: const addNewItem = (title) => {
09: API.graphql({
10: query: `
11: mutation {
12: addItem(done:false, title: "${title}") {
13: id
14: title
15: done
16: }
17: }
18: `,
19: })
20: .then((data) => {
21: console.log("Creation success with data", data); 22: setTodoList([...todoList, data.data.addItem]);
23: setNewItemField("");
24: })
LINE 10: Call the GraphQL function from the API to pass the GraphQL
mutation query.
LINE 11: Pass the same mutation query for adding a new item, as we ran in the previous section from the AWS console.
LINE 12: Use the backtick to create a dynamic mutation query to pass the title to the query.
LINE 22: Read the response from the addItem key wrapped under the data key which is the response structure from GraphQL.
Save the file and run the server; voila, we are now able to add new items using the GraphQL mutation query.
133
Chapter 4 IntegratIng reSt apIS wIth a Frontend reaCt app Do It Yourself (DIY): Modifying the React App
Modify the React application to integrate the update and delete mutation GraphQL
queries.
Subscription API
So far, we have implemented and consumed the traditional request-response model-based client-server interaction APIs, which uses the HTTP protocol. In this model, the client opens an HTTP connection to the server and sends a request, and the server responds with the requested data on the same connection. Once the response is complete, the HTTP connection is closed. This is true for all the methods of REST APIs, as well as for GraphQL queries and mutations.
Many times, we require receiving real-time data pushed from the server to the client.
For example, while booking a cab on Uber, we want to receive notifications from the server when the cab is near us or receive messages on a chatting application. If the server does not push the data to the client, we would be required to refresh again and again to get the new status of the cab or get new messages.
Outside of the GraphQL realm, this can be achieved in various ways. One common approach is setting up a WebSocket connection between the server and client. This creates a two-way connection and enables the server to send the data without requiring the client to poll the data.
Now, given that we want to discuss GraphQL functionalities, let me introduce you to GraphQL subscription APIs. Subscriptions are a GraphQL feature that enables real-time data streaming from the server to the client over a WebSocket connection. With GraphQL subscriptions, the client can specify a subscription query to the server, which the server uses to push relevant data to the client in real time. Subscriptions provide a powerful and efficient way to implement real-time features in GraphQL APIs and can be particularly useful for applications like chat apps, stock tickers, and real-time gaming.
The GraphQL team has done an amazing job by providing the subscription feature.
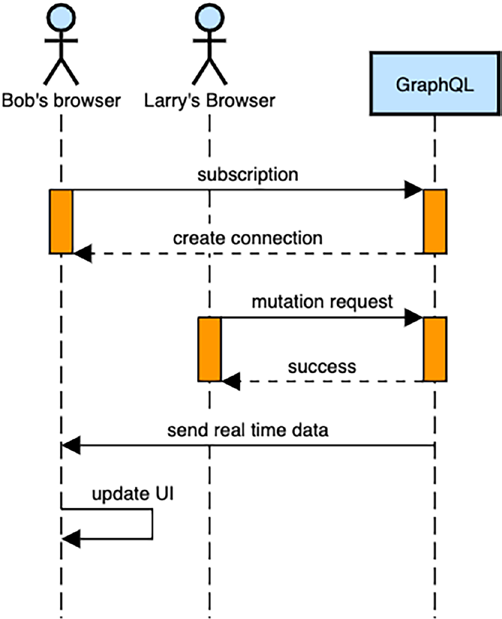
As the name suggests, clients can subscribe to events and receive real-time data from those events. For example, a client could subscribe to a Todo item mutation event. Every time a new Todo item is created, the subscribed client will receive the data in real time and can choose to update the list on their UI.
134
Chapter 4 IntegratIng reSt apIS wIth a Frontend reaCt app
GraphQL subscriptions are a wrapper of WebSockets and handle all the edge cases under the hood. The client initiates a WebSocket connection with the server, and the server uses the connection to push data to the client in response to subscription queries.
GraphQL subscriptions provide a powerful and efficient way to implement real-time features in GraphQL APIs and can be particularly useful for applications that require live updates, such as chat apps, social networks, and stock tickers.
With GraphQL subscriptions, clients have greater control over the data they receive and can choose to receive only the data they need. This can help reduce the amount of data transferred over the network, leading to faster and more efficient application performance. Overall, GraphQL subscriptions are a great addition to the GraphQL
ecosystem and provide a powerful tool for building real-time applications.
As you can see in Figur’s assume Mr. Bob subscribed to a Todo item mutation event, and Larry from a different browser created a new item in todo; Mr. Bob will instantly receive the details of the new item created.
Figure 4-16. GraphQL subscription high-level workflow
135
Chapter 4 IntegratIng reSt apIS wIth a Frontend reaCt app Let’s create the subscription API and see the end-to-end flow in action.
We need to add the subscription in our GraphQL schema and connect to the event.
Open the schema.GraphQL file from the following location:
```
./amplify/backend/api/todosgql/shema.graphql
``Ànd add the following in the schema:
18: type Subscription {
19: OnCreateTodo: Todo @aws_subscribe(mutations: ["addItem"]) 20: }
Let’s discuss what we wrote in the schema.
LINE 18: We are mentioning that we want to define a subscription type operation in our schema.
LINE 19: OnCreateTodo is the name of the operation; we can have n numbers of such subscriptions with different names. This returns a Todo type object. @aws_
subscribe is a directive provided by AWS Amplify which automatically adds some functionalities and binds the mutation events. The directive takes an array of mutation, which returns the data in real time to subscribed clients when the mutation events are triggered.
Here, we have added the addItem mutation. Please note we have already defined the addItem mutation, which we used to create Todo items.
Please save and amplify push to deploy our subscription GraphQL API.
Once done, let’s see the subscription in action.
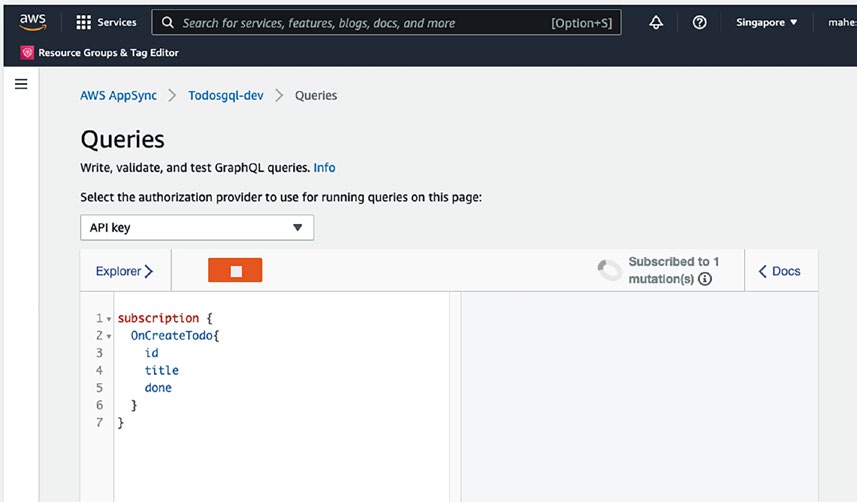
Open the AppSync GraphQL console from the AWS console.
136
Chapter 4 IntegratIng reSt apIS wIth a Frontend reaCt app
Figure 4-17. AppSync GraphQL console
Enter the subscription query and click the play button, and please note on the right top, it shows the client is subscribed to one mutation.
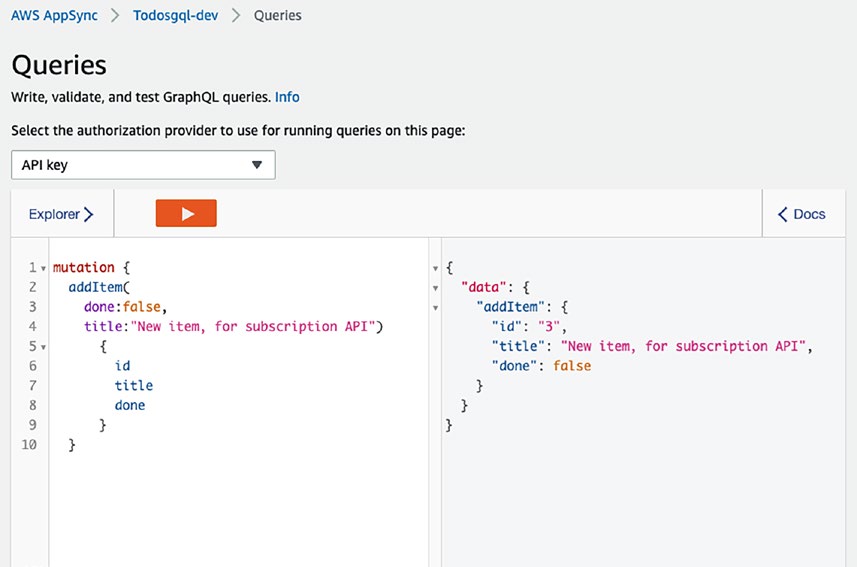
Now open the same console on a new tab. We will run the mutation and create a new Todo item.
137
Chapter 4 IntegratIng reSt apIS wIth a Frontend reaCt app
Figure 4-18. Creates new Todo record
Add a new item using the addItem mutation and click play; as you can see, the new item is created and new id has been assigned.
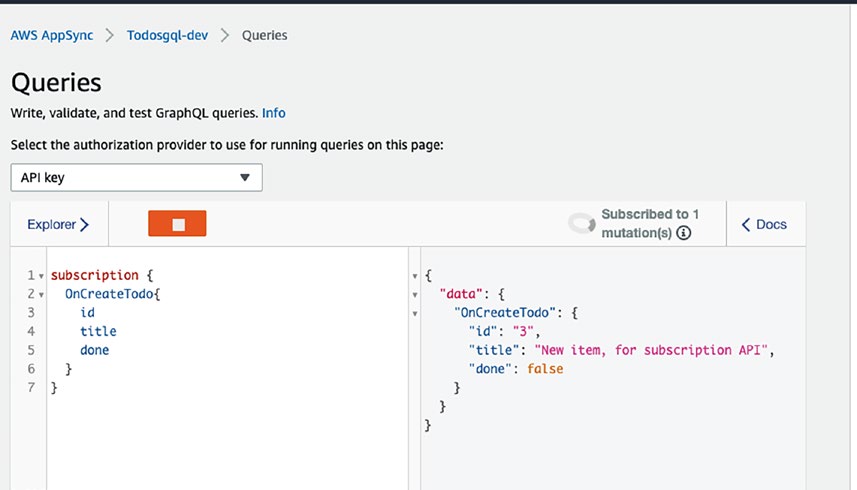
Let’s switch to the tab, which has subscribed to the addItem mutation.
138
Chapter 4 IntegratIng reSt apIS wIth a Frontend reaCt app
Figure 4-19. Subscribed tab to see data
Voila, as you can see, the same item is shown here, which was created now.
This is the magic of subscription.
Integrating Subscription API with React
In the previous section, we tested the GraphQL subscription API over two different clients. Let’s modify our React code to list real-time changes.
Let’s switch to our React code and add the subscription in the useEffect hook: 43: useEffect(() => {
44: API.graphql(
45: graphqlOperation(`
46: subscription {
47: OnCreateTodo{
48: id
49: title
50: done
51: }
139
Chapter 4 IntegratIng reSt apIS wIth a Frontend reaCt app 52: }
53: `)
54: ).subscribe({
55: next: ({ value }) => {
56: setTodoList((currentTodoList) => [
57: ...currentTodoList,
58: value.data.OnCreateTodo,
59: ]);
60: setNewItemField("");
61: },
62: error: (error) => console.warn(error),
63: });
LINE 44: Similar to consuming the mutation API, we need to use the API.GraphQL
function and pass our query, in this case subscription query.
LINE 46: This is the same subscription query we wrote in the previous section, and we tested it from the AppSync query console in the browser.
LINE 54: As this query is subscription based, there would be some events, and we need to react on certain events; hence, we would subscribe using the subscribe function and attach a listener, in this case, next and error.
LINE 55: On success event, we would receive a value; there are also other metadata we receive on success event, but for now we are not going to discuss those.
LINE 56: When we receive a new item on success event, we need to reflect it on the UI; hence, we are using the useState hook function to set the value, so that it can reflect on the UI.
LINE 60: We are setting newItemField to empty to clear the item label that we type.
140
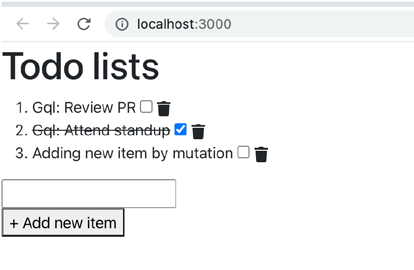
Chapter 4 IntegratIng reSt apIS wIth a Frontend reaCt app
Figure 4-20. Updated user interface for the Todo app
Once you add via the mutation subscription event, the new item gets reflected to the list.
We can use this trigger point to notify or for a bunch of other activities.
Use cases of subscription:
• All sort of real-time updates
Let’s assume you are building your own Facebook; when the
user’s friends like or comment on a post, the user should instantly get the notification of who has liked or commented on the post,
and instantly the like count should increase. If you are live
streaming videos, and you want to continuously show the current
number of live users watching the video.
• Payment status updates
Whenever you are integrating a payment system via banks or
cards, you will definitely be integrating the application with a
third-party system, and payment APIs may take more than five
seconds, and there may be a retry required due to failures, so
keeping the customer waiting on the loading screen is not a good
idea; hence, we might use the subscription APIs to notify the
customer from the server to the client app when the payment
status changes to success or failure.
141
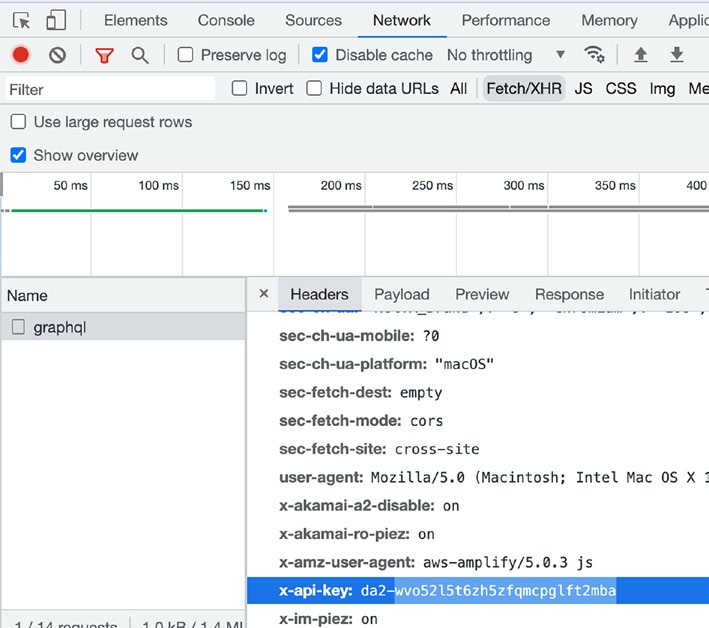
Chapter 4 IntegratIng reSt apIS wIth a Frontend reaCt app
Why APIs Throw 401 Error
APIs pushed via Amplify are exposed via AppSync service by AWS. For security purposes, APIs need to have an API key.
If you inspect the element and check the Network tab from the React app, you will see the API key in action.
Figure 4-21. Network tab in DevTools
If you recall, this was also shown on the console when you pushed the new API via amplify push.
142
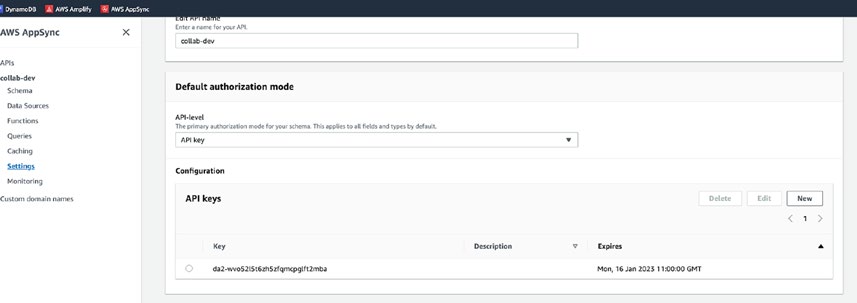
Chapter 4 IntegratIng reSt apIS wIth a Frontend reaCt app
This API key comes with an expiry date; when the key is expired, the application will stop working, and the APIs will throw a 401 error.
To check the current API key and its expiry
1. Open and log in to the AWS console.
2. Open the AWS AppSync service.
3. Click the Amplify project.
4. From the left pane, open the Settings tab.
5. Scroll down to authorization mode; you will see the API keys and expiry date.
Figure 4-22. Amplify project settings
If the API key is expired, we need to rotate the keys.
Follow the steps to recreate the key:
1. Open the parameters.json file located in amplify/backend/
api/<api-name>.
2. Add a key with “CreateAPIKey”: 0.

