specified path. The tests are organized hierarchically within the context, providing a clear structure for understanding and running tests related to file removal behavior in different scenarios.
Unlocking Efficiency: Data-Driven Testing
with -ForEach in Pester
Now, let’s explore the concept of data-driven tests in Pester. This
methodology involves supplying a construct with an array of different
input data sets, ensuring our code functions correctly across diverse
scenarios. Typically implemented using -ForEach on an It block, this technique can also ascend to the Describe block level for data-driven tests on multiple It blocks within the Describe or Context blocks.
To leverage -ForEach, we structure the test data as an array of hashtables, as seen in the following example:
@(
@{ key = 'value' }
@{ key = 'value' }
# etc
)
65
Chapter 5 Data-Driven tests
The -ForEach construct in Pester streamlines our testing approach by executing one test for each item in the specified array. In Listine utilize this feature to enhance the efficiency of our tests.
Listing 5-3. Using -ForEach for data-driven tests
Describe "Remove-Files" {
Context "when removing files from the specified path" {
It "should remove all the correct files" -foreach @(
@{ FileType = 'txt'; Path = 'C:\Temp' }
@{ FileType = 'log'; Path = 'C:\Temp' }
@{ FileType = 'tmp'; Path = 'C:\Temp' }
) {
$files = Get-ChildItem -Path $path
-Filter $filetype
Remove-Files -FileType $filetype -Path $path
$files | Should -BeNullOrEmpty
}
}
}
We leverage the capability to use multiple keys when creating array
data. Specifically, in this instance, we employ two keys: FileType and Path.
These keys correspond to the parameters of our function Remove-Files (you can name the keys according to your preference) forming the basis of our test data. It’s important to note that each key-value pair is separated by a semi-colon in the array.
By implementing this approach, we consolidate our test code into
a single block within the -ForEach construct. The array contains sets of data for three distinct tests, each representing a unique file type and path combination.
66
Chapter 5 Data-Driven tests
In this test structure, each key within the hashtable item serves
as a variable in the test code. For instance, $filetype and $path used as parameters when calling the function Remove-Files represent the keys “filetype” and “path” in the hashtable, dynamically adapting to the associated values during each test execution. The test is run three times, once for each hashtable.
This consolidated test structure not only enhances the readability of
our code but also promotes scalability. It simplifies the process of adding new test scenarios by extending the array with additional key-value sets, demonstrating the flexibility and power of data-driven testing in Pester.
Let’s finish this section with our tried-and-tested theater analogy:
Imagine our testing journey as a theatrical production. The stage is set with a powerful concept – Data-Driven Testing with -ForEach in Pester.
As the curtain rises, we explore the intricacies of this methodology, akin to supplying a stage with diverse props and settings. The star of our show,
-ForEach, takes center stage in the ‘It’ block, but its performance extends to the grandeur of the ‘Describe’ block, orchestrating a symphony of tests across various scenarios.
In this theatrical script, our test data, elegantly structured as an array of hashtables, plays a crucial role. Each key and value in this array is like a well-rehearsed actor, ready to deliver a stellar performance. As the plot unfolds in Listin-ForEach construct takes its cue, executing tests with precision, enhancing the efficiency of our testing production.
Just like skilled actors adapting to different roles, our test code
gracefully transforms. Variables such as $filetype and $path, representing the heart of our test data, dynamically adjust during each test execution.
This consolidated test structure becomes the script that not only captivates with its readability but also showcases the scalability of our production.
Adding new test scenarios is like introducing new characters, extending the array with additional key-value sets.
67
Chapter 5 Data-Driven tests
In this testing theater, the flexibility and power of data-driven testing in Pester take the spotlight, delivering a performance that resonates with efficiency and scalability.
Introduction to Templates in Pester
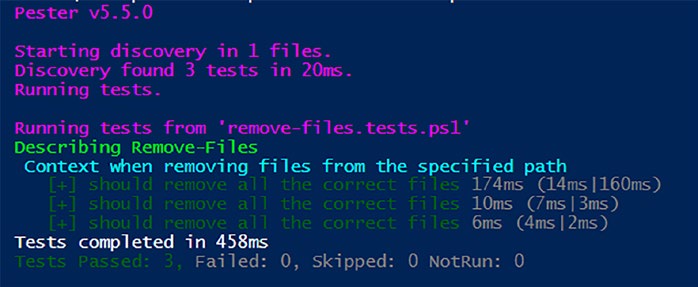
In our journey through Pester, the significance of crafting efficient and informative tests cannot be overstated. As we delve into the realm of data-driven testing with Pester’s -foreach construct, we encounter scenarios where the output, while functional, lacks clarity. This brings us to the invaluable concept of templates, a tool that elevates the visibility and comprehensibility of our test results.
Templates Unveiled
When running data-driven tests, as demonstrated in Listineviously, the output might leave us wanting more. While it informs us that tests were completed, the specifics of what each test evaluated remain elusive as shown in Figure .
Figure 5-1. Not overly helpful test results
68
Chapter 5 Data-Driven tests
This is where templates come into play. In Pester, a template is defined by enclosing values within < > . For example, <myValue> , where Pester seamlessly expands these placeholders to their true values during test execution.
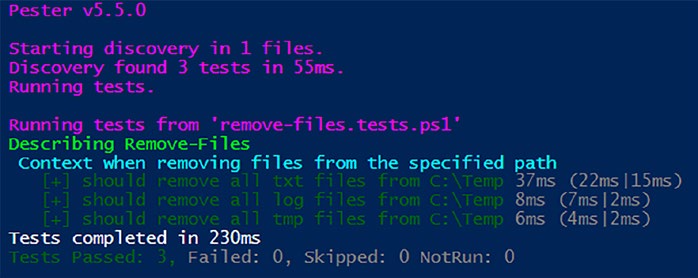
Utilizing Templates in Tests
Let’s consider Listing , a refined version of our previous data-driven test. Here, we employ the template format < > to represent the hashtable’s
“FileType” and “Path” within the It description. <FileType> dynamically expands to the current hashtable FileType value and <Path> to the Path value.
Listing 5-4. Using templates for variable expansion
Describe "Remove-Files" {
Context "when removing files from the specified path" {
It "should remove all <FileType> files from <path>"
-foreach @(
@{ FileType = 'txt'; Path = 'C:\Temp' }
@{ FileType = 'log'; Path = 'C:\Temp' }
@{ FileType = 'tmp'; Path = 'C:\Temp' }
) {
$files = Get-ChildItem -Path $path
-Filter $filetype
Remove-Files -FileType $filetype -Path $path
$files | Should -BeNullOrEmpty
}
}
}
69
Chapter 5 Data-Driven tests
Figurtrates running the test with templates, resulting in a clear and informative output.
Figure 5-2. Using templates: resulting in a clear and
informative output
Expanding Template Scope
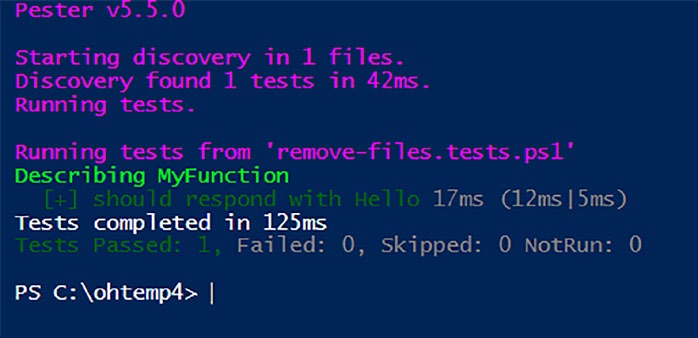
The beauty of templates lies in their versatility. While initially introduced in the context of -foreach, templates can extend beyond. In Listing , we showcase a valid use of templates outside a -foreach construct, where the variable $response is referenced within the It block description.
Listing 5-5. Any valid variable that is in-scope may be used in a template
Describe "MyFunction" {
BeforeAll {
$response = "Hello"
}
It "should respond with <response>" {
# tests go here...
}
}
70
Chapter 5 Data-Driven tests
The output of Listing is a testament to the flexibility of templates as shown in Figure .
Figure 5-3. The template expands as expected
A Note on Template Presentation
If you find the need to display < or > in your block descriptions without triggering template evaluation, simply escape each using the backtick, as illustrated in the following example:
It "Should `<not`> evaluate as a template" {
# test code
}
When running the test, this results in a block description that reads as follows:
It "Should <not> evaluate as a template" {
# test code
}
71
Chapter 5 Data-Driven tests
Templates in Pester not only enhance the readability of our code but
also offer a powerful mechanism for scaling our tests, making them a
valuable asset in our testing arsenal.
Summary
In this chapter, we delved into advanced Pester testing techniques,
focusing on efficiency and scalability. Let’s recap the key highlights of our exploration.
We introduced the crucial Remove-Files function, designed for
targeted file deletion. Tests were crafted to thoroughly evaluate its
functionality. A cautious approach was emphasized due to the impactful nature of Remove-Files in deleting files, paving the way for future
enhancements.
We ventured into the realm of data-driven tests using Pester’s -ForEach parameter. Test data was structured as an array of hashtables, enhancing test efficiency and readability. Multiple keys, such as FileType and
Path, were leveraged to conduct tests across diverse scenarios within a consolidated structure.
Addressing the challenge of unclear output in data-driven tests,
we introduced templates. Templates, defined with < >, dynamically expanded values in test descriptions, providing clarity. The versatility of templates was showcased beyond -ForEach, enriching the narrative of our testing script.
As this chapter concludes, your Pester toolkit has expanded, equipping you with advanced techniques for efficient and scalable testing. In Chapter
we’ll delve into the intricacies of Pester’s Discovery and Run phases, further refining your testing skills.
72
CHAPTER 6
Navigating the Pester
Phases: Discovery
and Run
Welcome to this chapter, where we delve into a thorough examination of the core phases that shape the Pester testing framework: Discovery and Run.
Comprehending these phases is paramount for crafting impactful tests.
Our journey commences with a deep dive into Discovery, the stage
where Pester discerns and readies the ground for testing. Following that, we seamlessly transition to the Run Phase, where the real performance
materializes as tests are executed, and results assume the spotlight.
Prepare for an exploration into the inner workings of Pester’s
backstage, equipping you with the understanding required to proficiently navigate these indispensable testing phases.
Pester’s Discovery Phase
Pester orchestrates its tests in two essential phases: Discovery and Run.
The Discovery Phase kicks off the process by thoroughly scanning your
test files, identifying Describes, Contexts, Its, and other critical Pester blocks that lay the groundwork for your tests; its purpose is to identify and categorize Pester blocks and tests.
© Owen Heaume 2024
73
O. Heaume, Getting Started with Pester 5
Chapter 6 NavigatiNg the pester phases: DisCovery aND ruN
The Significance of Discovery
Discovery serves as the bedrock for various features in Pester 5 and sets the stage for potential advancements. Understanding why we adhere to certain practices during this phase is crucial for beginners. Let’s dive deeper into the significance:
1. Test Code Placement
– Constrain your test code within It, BeforeAll, BeforeEach, AfterAll, or AfterEach blocks to ensure a clear and structured organization of your tests.
– Why? Placing test code within these specific blocks provides a logical structure to your tests. It helps Pester identify the
scope and purpose of each block, making it easier to manage
and execute tests selectively.
2. Avoid Misplacement
– Any displaced code runs during Discovery, with results
remaining elusive during the Run Phase, leading to confusion.
– Why? During Discovery, Pester is scanning your script to
identify and categorize various blocks and tests. Placing code
outside the designated blocks can lead to unintended execu-
tion during Discovery, resulting in unexpected outcomes and
difficulty in troubleshooting.
Illustrative Example
Consider the following script demonstrated in Listing .
74
Chapter 6 NavigatiNg the pester phases: DisCovery aND ruN
Listing 6-1. Misplaced code outside of Pester blocks
# Misplaced code outside Pester blocks
Write-Host "This code runs during Discovery but may lead
to confusion."
Describe "PowerShell Wonders" {
It "Performs Marvelous Feats" -ForEach @(
@{ Action = "Sparkle"; Expected = 'Success'}
@{ Action = "Thunder"; Expected = 'Powerful'}
) {
Invoke-Wonder -Action $Action | Should -Be $Expected
}
}
# More misplaced code outside Pester blocks
Write-Host "This code also runs during Discovery,
potentially causing unexpected outcomes."
Write-Host "Discovery Phases Completed."
In this example, all the Write-Host statements are placed outside the Pester blocks, violating the recommended practice. When running this
script, the Write-Host statements will be executed during the Discovery Phase. Now, imagine these Write-Host statements were variables instead; any variable defined directly in the body of the script will be available during Discovery, but it won’t be available during the important Run
Phase. This can lead to confusion as these statements and variables might interfere with the intended setup or test execution.
It’s crucial to confine code to the designated Pester blocks to ensure that it’s executed in the appropriate context during the Run Phase and to avoid unexpected behaviors during the Discovery Phase.
75
Chapter 6 NavigatiNg the pester phases: DisCovery aND ruN
Harnessing BeforeDiscovery
In certain scenarios where intentional code placement outside of Pester-controlled blocks is necessary, Pester provides a valuable script block: BeforeDiscovery. This special script block serves as a signaling mechanism to convey that specific code is intentionally placed outside the controlled leaf-blocks, such as on top of files or directly in the body of Describe/Context.
This becomes particularly relevant when dealing with dynamic code
generation or setup activities that need to occur before Pester identifies and categorizes the various blocks and tests in your script.
Consider the following example shown in Listine BeforeDiscovery is utilized.
Listing 6-2. Using BeforeDiscovery
BeforeDiscovery {
# Code intentionally placed outside Pester-controlled
blocks to run during Discovery
$scriptsToTest = Get-ChildItem -Path $PSScriptRoot
-Filter '*.ps1' -Recurse
}
Describe "Script Validation - <_>" -ForEach $scriptsToTest
{
Context "Code Structure" {
It "Follows Best Practices" {
# Test the script for adherence to coding
standards
# Example: Ensure proper indentation, naming
conventions, etc.
}
It "Contains Proper Comments" {
76
Chapter 6 NavigatiNg the pester phases: DisCovery aND ruN
# Test the script for the presence of meaningful
comments
# Example: Ensure the inclusion of helpful
comments for clarity
}
}
}
Breaking Down the Magic
1. BeforeDiscovery Block
– The BeforeDiscovery block houses code crucial for the
Discovery Phase. This is where we strategically perform setup
activities before Pester identifies and organizes tests. While it’s
technically possible to omit code from the BeforeDiscovery
script block, adhering to Pester best practices and enhancing
code readability is recommended. Essentially, we’re affirming,
“Yes, there is code outside of conventional script blocks, but
it’s intentionally placed here for a reason.”
2. Discovery Phase Dynamics
– As Pester journeys through the Discovery Phase, it evaluates
the entire script, including the BeforeDiscovery block. This
ensures that the code within BeforeDiscovery actively
contributes to identifying and categorizing tests and setups.
– All parameters provided to It are evaluated.
– The -ForEach is evaluated.
– The script block of It is saved but not executed. Tests are
generated, one for each item in the -foreach array.
77
Chapter 6 NavigatiNg the pester phases: DisCovery aND ruN
At the end of Discovery, Pester has collected all the tests and setups nestled within the script. These gems of information are securely stored in the internal data of the Pester module, ready for the spotlight in the upcoming Run Phase.
Tip Note in the example Listing , we used the template <_> . _
is the template equivalent of $_, which represents the current object.
This comprehension not only forms the bedrock of proficient
testing practices but also guides us seamlessly into the next chapter of our exploration – the Run Phase, our dynamic companion in the realm
of Pester.
Pester’s Run Phase
In this section of our exploration of Pester phases, we transition from the Discovery Phase to the Run Phase. We will delve into the dynamic
execution of tests, witnessing the real magic unfold. Understanding
the Run Phase is vital for turning your PowerShell tests into actionable insights.
Run Phase Dynamics
While the Discovery Phase lays the groundwork, the Run Phase is where
the action happens: Pester executes your tests based on the information gathered during Discovery. Let’s unravel the dynamics of the Run Phase.
78
Chapter 6 NavigatiNg the pester phases: DisCovery aND ruN
Execution Order Complexity
Pester version 5 introduces a more intricate execution order compared to its predecessor, Pester version 4. This complexity enhances the flexibility and capabilities of your test scripts but demands a deeper understanding.
Let’s break it down:
1. Run the BeforeAll ScriptBlock
– Imports necessary modules or performs initial setup.
– Establishes the foundation for the subsequent tests.
2. Create New Scope
– Isolates the test from other tests.
– Ensures a clean and independent execution environment.
3. Invoke the It ScriptBlock
– Executes the first test within the isolated scope.
– Validates the outcome based on the Should statement.
4. Return to Previous Scope
– Steps back to the outer scope after completing the first test.
5. Create New Scope (Again)
– Prepares the stage for the next test.
– Maintains isolation between tests for consistent results.
6. Invoke the It ScriptBlock (Again)
– Executes the second test within the new isolated scope.
– Validates the outcome based on the Should statement.
7. Return to Previous Scope (Again)
– Reverts to the outer scope after completing the second test.
79
Chapter 6 NavigatiNg the pester phases: DisCovery aND ruN
8. Repeat Until All Tests Complete
– Continues this pattern for each test in the script.
9. Return to Outermost Scope
– Concludes the Run Phase.
Common Gotchas
The Run Phase introduces some potential pitfalls that are essential to navigate: 1. BeforeAll and -ForEach
– -ForEach is evaluated during Discovery, but BeforeAll won’t run until the Run Phase.
– Using variables set in BeforeAll in -ForEach won’t work since
the variable won’t be defined until after -ForEach is
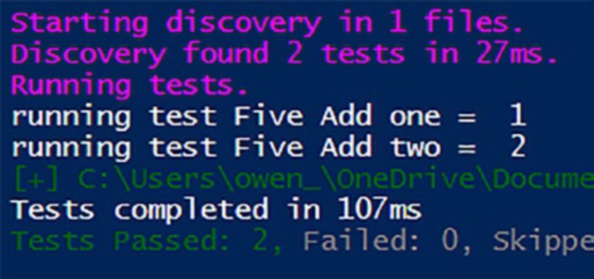
evaluated. For example, the following code in Listing ill not work as expected.
Listing 6-3. Ignoring Pester rules results in unexpected outcomes BeforeAll {
$result = 5
}
Describe "Unexpected Results" {
It "Adds numbers" -ForEach @(
@{ Action = "Add one"; Expected = ($result + 1)}
@{ Action = "Add two"; Expected = ($result +2)}
) {
#Invoke-Wonder -Action $Action | Should
- Be $Expected
write-host "running test Five $action = $expected"
}
}
80
Chapter 6 NavigatiNg the pester phases: DisCovery aND ruN
Running this test would result in the output shown
in Figure .
Figure 6-1. Unexpected results
That’s definitely not the desired outcome. To fix this,
replace the BeforeAll block with BeforeDiscovery,
and you’re good to go.
2. Generating Tests via ForEach Keyword
– If using -ForEach to generate tests based on external data,
ensure that the code generating tests is defined in the
BeforeDiscovery block. We saw an example of this in
Listing earlier.
Note an exploration of pester Behavior
The official Pester documentation provides an illustrative example:
$name = "Jakub"
Describe "d" {
It "My name is: $name" {
$name | Should -be "Jakub"
}
}
81
Chapter 6 NavigatiNg the pester phases: DisCovery aND ruN
The documentation clarifies that executing this test will result in
failure. According to the explanation, the $name variable is evaluated during the Discovery Phase but becomes unavailable during the Run
Phase. Interestingly, in my experience, the test passed, possibly indicating a version-specific behavior or bug in my Pester version.
However, it’s crucial to adhere to best practices. Even if the test
currently passes, defining variables outside of appropriate script blocks may lead to unexpected behavior in different Pester versions. To ensure consistent and reliable test outcomes, it’s recommended to follow best practices and confine variable definitions within the designated script blocks. This approach aligns with the principles of robust testing and minimizes the risk of potential issues in diverse Pester environments.
Navigating the Run Phase
Let’s continue delving into the Run Phase with the insightful example
provided in Listine’re equipped with the illustrative function Invoke-Wonder and two data-driven tests.
Listing 6-4. Exploring the Run Phase
function Invoke-Wonder {
param (
[string]$Action
)
# Perform some marvelous action based on the input
# For the sake of this example, let's simplify it
switch ($Action) {
"Sparkle" { 'Success' }
"Thunder" { 'Powerful' }
default { 'Unknown' }
}
82
Chapter 6 NavigatiNg the pester phases: DisCovery aND ruN
}
BeforeAll {
# Set up your environment or import necessary modules
}
Describe "PowerShell Wonders" {
It "Performs Marvelous Feats" -ForEach @(
@{ Action = "Sparkle"; Expected = 'Success'}
@{ Action = "Thunder"; Expected = 'Powerful'}
) {
Invoke-Wonder -Action $Action | Should -Be $Expected
Write-host "Run phase complete"
}
}
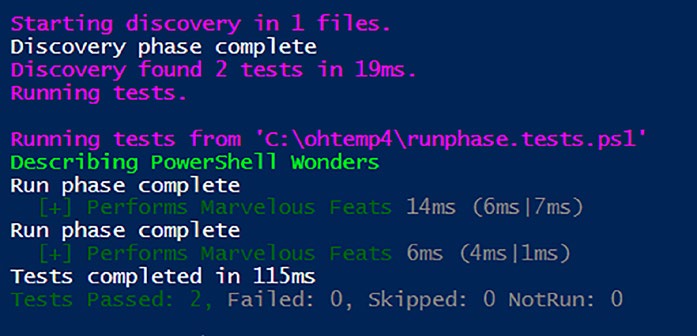
Write-Host "Discovery phase complete"
Here’s what happens:
1. The script file is invoked, triggering the Run Phase.
2. The
BeforeAll script block executes to prepare the
testing environment before any tests are run.
3. The
Describe block encapsulates our tests,
specifically the It block, which performs the
“marvelous feats” using the Invoke-Wonder
function.
4. For each data-driven test specified in the -ForEach
loop, the It block runs, invoking Invoke-Wonder
with the provided parameters and validating the
outcome using Should -Be.
83
Chapter 6 NavigatiNg the pester phases: DisCovery aND ruN
5. The
Write-Host “Run phase complete” statement
confirms the completion of the Run Phase for each
iteration of the data-driven test.
The output of running these tests is shown in Figure .
Figure 6-2. Run Phase output
Now you have a solid understanding of the Run Phase, you gain insight
into the sequential execution of your script, enabling you to navigate the intricacies of test scenarios and ensure a robust and predictable testing environment.
Visualizing the Phases: Discovery and Run
We have explored the intricacies of Pester’s Discovery and Run Phases
now, so let’s visualize their interplay through a concise table and a simple yet meaningful code sample.
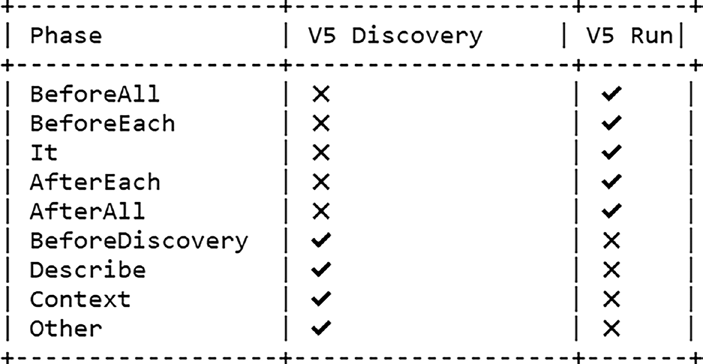
The table in Figure provides a quick reference to the execution behavior of script blocks in both the Discovery and Run Phases.
84
Chapter 6 NavigatiNg the pester phases: DisCovery aND ruN
Figure 6-3. Execution of script blocks in Pester phases
Note “other” represents anything outside of the BeforeAll, BeforeEach, AfterEach, AfterAll, and It blocks.
Script Showcase: The Choreography
of Discovery and Run
Let’s illustrate the seamless transition from Discovery to Run with a
meaningful code sample. In Listing , we use Write-Host to clearly show the path taken during both the Discovery and Run Phases of our fictitious test suite evaluating an imaginary authentication function.
85
Chapter 6 NavigatiNg the pester phases: DisCovery aND ruN
Listing 6-5. The trajectory followed by the Discovery and Run Phases
Write-Host "Commencing the journey of discovery."
BeforeDiscovery {
Write-Host "Tasks unfold during discovery."
}
Describe "User Authentication Tests" {
Write-Host "Setting the stage for user authentication
tests."
It "Validates user login" {
Write-Host "Test1: I am in the run phase"
Write-Host "Executing user login validation."
# Actual test logic goes here
}
It "Verifies user access rights" {
Write-Host "Test2: I am in the run phase"
Write-Host "Executing user access rights
verification."
# Actual test logic goes here
}
Write-Host "Completed setup for user authentication
tests."
}
Write-Host "Discovery phase concludes. Preparing for the run."
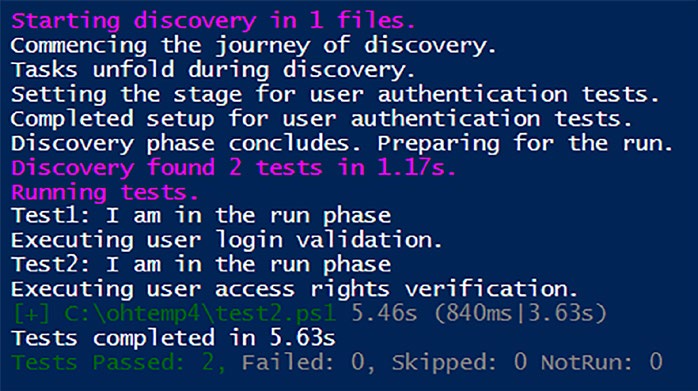
If you were to run this test (and you can, should you wish), then the
following output shown by Figuresented on screen.
86
Chapter 6 NavigatiNg the pester phases: DisCovery aND ruN
Figure 6-4. Note that any code in the Write-Host statements outside of the allowed script blocks comes under “Other” and are executed
during Discovery
As I embarked on my journey to master Pester, I encountered the
frustration of seemingly inexplicable test failures. It didn’t take long to realize that my struggles were rooted in a lack of understanding of Pester’s phases. With the insights gained from this chapter, I aim to pass on those hard-earned lessons, ensuring that any future missteps in your Pester
coding journey will be uniquely yours!
Summary
In this chapter, we embarked on a comprehensive exploration of the
fundamental phases that define the Pester testing framework: Discovery and Run. Much like a skilled director plans each scene in a play,
understanding these Pester phases is crucial for orchestrating effective tests. The chapter delved into the intricacies of the Discovery Phase, where Pester identifies and prepares the stage for testing, and the Run Phase, where the actual performance unfolds.
87
Chapter 6 NavigatiNg the pester phases: DisCovery aND ruN
The Discovery Phase, the bedrock for Pester 5 features, was thoroughly examined. The significance of adhering to certain practices during this phase was highlighted, emphasizing best practices in test code placement.
An illustrative example showcased the impact of misplaced code during
Discovery, underlining the importance of following recommended
practices. The introduction of BeforeDiscovery marked a pivotal point
in intentional code placement outside controlled blocks, with a unique example illustrating its role in dynamic test generation.
Transitioning to the Run Phase, the chapter highlighted its role in
executing tests and unraveled the execution order complexity introduced in Pester version 5. Common pitfalls, such as the evaluation timing of BeforeAll and -ForEach, were explored, reinforcing the importance of
BeforeDiscovery. Pester behavior exploration discussed an illustrative example from official documentation, emphasizing the need to adhere to best practices for consistent and reliable test outcomes.
A practical example using Invoke-Wonder and data-driven tests was
provided to showcase the sequential flow of tests during the Run Phase.
The importance of understanding the Run Phase was underscored for
creating robust and predictable testing environments.
The interplay between Discovery and Run Phases was visualized
through a concise table, providing a quick reference to the behavior of script blocks in both phases.
A meaningful code sample in Listintrated the seamless transition from Discovery to Run using Write-Host to clearly show the path taken during both phases of a fictitious test suite evaluating an imaginary authentication function.
As we conclude this chapter, armed with a solid understanding
of Discovery and Run Phases, you are well prepared to navigate the
complexities of Pester testing. In Chapte’ll delve into TestDrive and TestRegistry, empowering you with tools to take your Pester expertise to the next level.
88
CHAPTER 7
TestDrive
and TestRegistry
In this chapter you will discover two invaluable tools – TestDrive and TestRegistry. They’ll transform your testing practices from a free-for-all into a carefully orchestrated symphony.
TestDrive, your personal testing sandbox, provides a safe haven to test your scripts without fear of collateral damage. Think of it as a magical playground where you can create temporary files, modify them freely, and test interactions at will, only to have everything vanish neatly afterward, leaving your actual file system pristine.
TestRegistry, on the other hand, offers a temporary, isolated space within the Windows registry for your tests to interact with. Imagine it as a virtual registry sandbox, allowing you to safely test registry-related functions without worrying about unintended changes to your real system.
So fire up your ISE of choice and let’s take your testing game to the
next level!
TestDrive
Have you ever dreamed of a testing playground where you can unleash
your scripts with reckless abandon, knowing your real system remains
untouched? (And no, I don’t mean your production environment!) Well,
say hello to TestDrive! This powerful tool creates a temporary, isolated
© Owen Heaume 2024
89
O. Heaume, Getting Started with Pester 5
Chapter 7 testDrive anD testregistry
environment where you can create, modify, and delete files at will, all vanishing like smoke when your test concludes. Imagine it as a sandbox for all of your file testing needs, where you can experiment freely without fear of breaking the real-world file system.
Behind the TestDrive Curtain
TestDrive might appear like a magical land for file-based testing, but it’s actually powered by a clever trick under the hood. Instead of a separate physical drive, it utilizes a temporary directory within your system,
creating a controlled and isolated environment for your tests. Here’s how it works:
1. Creating the temporary space: When you
activate TestDrive, PowerShell generates a unique
folder nestled within your temporary (%temp%)
directory (C:\Users\<username>\AppData\Local\
Temp\<guid>). This folder acts as the root of your
TestDrive “drive,” housing any directories and files
you create within it.
2. Weaving the drive illusion: PowerShell creates
a symbolic link in your system’s “drive space,”
connecting it to the hidden temporary folder.
This link makes the temporary folder appear as a
separate drive called TestDrive:. Now, when you
interact with files and directories within TestDrive,
you’re actually manipulating files inside this special
<guid> folder.
90
Chapter 7 testDrive anD testregistry
3. Maintaining the sandbox: TestDrive ensures your
test actions are isolated from your real system. Files
created within TestDrive won’t affect your existing
files or folders as it is dynamically created. As an
added bonus, the temporary folder and its contents
are automatically removed after each test run,
leaving no trace of your testing.
There are multiple benefits to this approach:
– Isolation: Each test has its own dedicated sandbox,
preventing accidental modifications to your real system
and ensuring consistent testing conditions.
– Efficiency: No physical drive creation or removal is
involved, making TestDrive lightweight and efficient.
– Transparency: While the internal mechanism is unique,
you interact with TestDrive as a regular drive, simplifying
test code and keeping things easy to use.
Setting Up Your TestDrive Playground
Ready to create your temporary file haven? Here’s how you do it:
Inside a Pester test block: Ensure you’re within a Describe or Context block in your Pester test script. (TestDrive is designed to work within these testing structures.)
Activate the TestDrive by using the command:
New-Item -Path TestDrive:\YourDirName -ItemType Directory
This creates a new temporary drive named TestDrive:, ready for your file experiments.
The code snippet in Listintrates this.
91
Chapter 7 testDrive anD testregistry
Listing 7-1. Creating TestDrive
Describe "Using TestDrive" {
BeforeEach {
New-Item -Path TestDrive:\myDir -ItemType Directory
}
It "Creates a temporary file" {
# Your file creation code here
}
}
Playing with Files in Your Sandbox
Now that your TestDrive is open for business, let’s play with some files!
Creating files: Use standard PowerShell commands
like New-Item or Out-File to create files within the
TestDrive: directory.
Modifying files: Edit file contents using commands
like Set-Content, Add-Content, or even good old
text editors.
Reading files: Use Get-Content or other file reading
techniques to access file data within TestDrive.
Deleting files: Employ Remove-Item to delete files
from the sandbox.
Listinple demonstrating file creation and reading.
Listing 7-2. Creating a file in TestDrive and reading its contents Describe "Using TestDrive" {
BeforeEach {
New-Item -Path TestDrive:\file.txt -ItemType File
92
Chapter 7 testDrive anD testregistry
# Create the file
}
It "Creates a temporary file and writes content" {
Set-Content -Path TestDrive:\file.txt -Value
"Hello, TestDrive!"
$fileContent = Get-Content -Path TestDrive:\file.txt
# Use full path
$fileContent | Should -Be "Hello, TestDrive!"
}
}
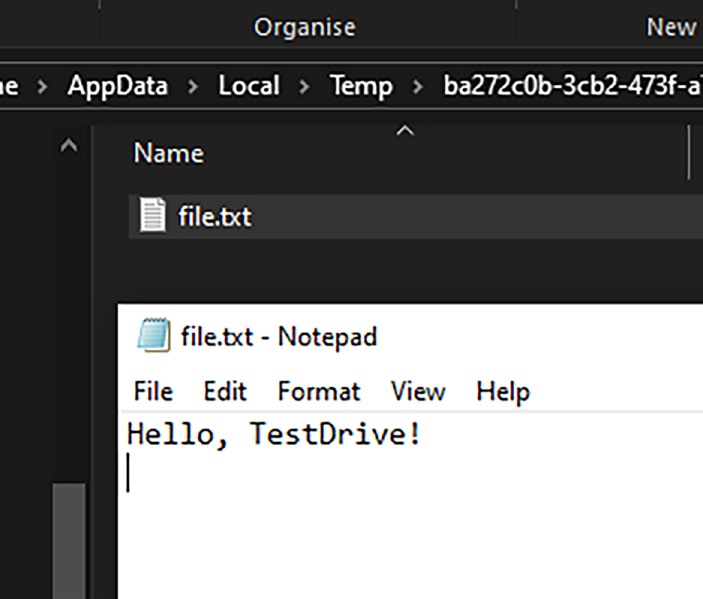
If we navigate to the temporary location of our TestDrive (C:\
Users\<username>\AppData\Local\Temp\<guid>) as shown in Figure
we can see the directory named after a random guid and the created file.
Once the test has finished running, the whole thing is removed, and it was like it was never there in the first place.
93
Chapter 7 testDrive anD testregistry
Figure 7-1. The magic of TestDrive!
Creating Directories and Files in the Sandbox
While TestDrive automatically sets up a temporary drive, explicitly creating directories within it is crucial for organization and reliability. Here’s how you do it:
New-Item -Path TestDrive:\myDir -ItemType Directory -Force
The -Force parameter ensures directory creation even if a folder with
the same name already exists, preventing potential conflicts.
Use the BeforeEach block to set up the TestDrive environment before each test, guaranteeing a clean slate and consistent conditions. This
includes creating both directories and files as shown in Listing .
94
Chapter 7 testDrive anD testregistry
Listing 7-3. Creating both a directory and a file
BeforeEach {
New-Item -Path TestDrive:\myDir -ItemType Directory -Force
New-Item -Path TestDrive:\myDir\file.txt -ItemType File
# Create the file
}
Treat TestDrive as a separate drive within your tests, using paths like TestDrive:\myDir\file.txt to work with files and directories within it. This is demonstrated in the test shown in Listin
Listing 7-4. Referencing files within TestDrive
Describe "Using TestDrive" {
BeforeEach {
# Explicitly create the TestDrive directory
New-Item -Path TestDrive:\myDir -ItemType Directory
-Force
New-Item -Path TestDrive:\myDir\file.txt
-ItemType File # Create the file
}
It "Creates a temporary file and writes content" {
Set-Content -Path TestDrive:\myDir\file.txt
-Value "Hello, TestDrive!"
$fileContent = Get-Content -Path TestDrive:\myDir\
file.txt
$fileContent | Should -Be "Hello, TestDrive!"
}
}
95
Chapter 7 testDrive anD testregistry
Keeping It Simple
For simplicity and flexibility, you may wish to assign a variable to the file path used by TestDrive. In Listing , we assign the $path variable and reuse it in the code for clarity.
Listing 7-5. Using a variable to reference the path
Describe "Using TestDrive" {
BeforeEach {
# Explicitly create the TestDrive directory
New-Item -Path TestDrive:\myDir -ItemType
Directory -Force
$path = New-Item -Path TestDrive:\myDir\file.txt
-ItemType File # Create the file
}
It "Writes content to a temporary file" {
Set-Content -Path $path -Value "Hello, TestDrive!"
$fileContent = Get-Content -Path $path
$fileContent | Should -Be "Hello, TestDrive!"
}
}
Using a variable with TestDrive is considered a good practice for
several reasons:
Readability and Maintainability
– Explicit path storage: Using $path to store the file path makes the code more readable and easier to understand.
– Centralized path management: You can update the path
in one place if needed, rather than changing multiple
occurrences throughout the code.
96
Chapter 7 testDrive anD testregistry
– Reduced redundancy: It eliminates the need to repeat
the same path string multiple times, making the code
cleaner and less prone to errors.
Flexibility and Reuse
– Variable manipulation: You can manipulate the path
variable using string operations if needed, such as
constructing dynamic paths for different scenarios.
– Reuse in multiple tests: The same path variable can be easily reused across different tests that work with the same file or
directory, promoting consistency and reducing code duplication.
Consistency
– Enforced path usage: Using a variable ensures that the same
path is always used consistently throughout the test code,
reducing the risk of errors due to typos or inconsistencies.
You can see now how the standard PowerShell best practices can also
be applied to your Pester code. Don’t lose sight that at the end of the day, it’s all just PowerShell.
Cleaning Up with a Snap
Once your test concludes, TestDrive automatically vanishes, taking all its temporary files with it – it’s like a magical self-cleaning kitchen! However, for super-robust tests, consider the following:
1. Error checking: Add try-catch blocks to handle
potential TestDrive creation failures.
2. Manual cleanup: Implement an AfterEach
block with Remove- Item -Path TestDrive:\
myDir -Recurse -Force -ErrorAction
SilentlyContinue to remove any leftover files,
especially when dealing with concurrent tests,
external processes, or file permissions.
97
Chapter 7 testDrive anD testregistry
Let’s dive into Listing to witness how PowerShell accommodates these robust testing practices.
Listing 7-6. Creating robust tests with error checks and cleanups Describe "Using TestDrive" {
BeforeEach {
try {
# Explicitly create the TestDrive directory
New-Item -Path TestDrive:\myDir -ItemType
Directory -Force -ErrorAction stop
New-Item -Path TestDrive:\myDir\file.txt
-ItemType File -ErrorAction Stop # Create the file
} catch {
Write-Error "Failed to create TestDrive
directory or file: $($_.Exception.Message)"
throw
}
}
AfterEach {
Remove-Item -Path TestDrive:\myDir -Recurse
-Force -ErrorAction SilentlyContinue
}
It "Creates a temporary file and writes content" {
Set-Content -Path TestDrive:\myDir\file.txt
-Value "Hello, TestDrive!"
$fileContent = Get-Content -Path TestDrive:\myDir\
file.txt
$fileContent | Should -Be "Hello, TestDrive!"
}
}
98
Chapter 7 testDrive anD testregistry
Let’s decipher Listiny line, to reveal TestDrive’s magic in action!
Scene 1: Setting the Stage (BeforeEach)
– “try { ... } catch { ... }”: This vigilant duo guards against unexpected mishaps during setup.
– New-Item -Path TestDrive:\myDir -ItemType Directory
-Force: With a wave of its wand, TestDrive conjures a
temporary directory named “myDir” within its realm.
The -Force ensures no obstacles stand in its way.
– New-Item -Path TestDrive:\myDir\file.txt -ItemType
File: A blank text file, aptly named “file.txt”, materializes
within “myDir”, ready to serve as a testing canvas.
Scene 2: Cleaning Up the Act (AfterEach)
– Remove-Item -Path TestDrive:\myDir -Recurse -Force
-ErrorAction SilentlyContinue: Like a diligent
stagehand, this command sweeps away all traces of
“myDir” and its contents, restoring TestDrive to its
pristine state. No lingering props or forgotten lines here!
Scene 3: The Main Performance (It)
– Set-Content -Path TestDrive:\myDir\file.txt -Value
“Hello, TestDrive!”: The script takes center stage, scribing
the message “Hello, TestDrive!” onto the blank canvas of
“file.txt”.
– $fileContent = Get-Content -Path TestDrive:\myDir\
file.txt: Like an attentive audience member, this line
absorbs the contents of “file.txt”, storing them within the
“$fileContent” variable.
99
Chapter 7 testDrive anD testregistry
– $fileContent | Should -Be “Hello, TestDrive!”: The grand
finale! A critical assertion verifies that the message written
to the file matches the expected text, ensuring a flawless
performance.
And thus, the curtain falls on a successful test, leaving TestDrive’s stage empty and ready for the next act!
Key Points to Remember
– TestDrive is scoped to the test block where it’s created.
Files in one block won’t be visible in another.
– Explicitly create subdirectories within TestDrive.
– TestDrive works seamlessly with relative paths for easy file
navigation.
– Perform error checking and manual cleanup for even
greater confidence in your tests.
With these insights, you’re now fully equipped to conquer TestDrive!
Let’s move on to its sibling: TestRegistry next.
TestRegistry
TestDrive may have swept you off your feet with its temporary file haven but prepare to be further enraptured by TestRegistry! This magnificent tool grants you a secluded space within the Windows registry, a virtual playground where your tests can interact with registry keys and values without a trace on your actual system. It’s like a sandbox, cloaked from the prying eyes of your real registry, ensuring uninhibited testing without fear of unintended modifications.
100
Chapter 7 testDrive anD testregistry
Behind the TestRegistry Curtain
Similar to TestDrive, TestRegistry operates under a clever disguise. While it appears to interact directly with the registry, it actually constructs a temporary key within the registry’s HKEY_CURRENT_USER\Software\
Pester\<RandomGUID> location.
This key serves as the foundation for your virtual registry sandbox,
mirroring the structure of your real registry for seamless interaction during testing.
Let’s Craft Your Virtual Registry Sandbox
To create your own isolated TestRegistry sandbox, include the following line within either an It, BeforeEach, or BeforeAll block of your Pester test script:
New-Item -Path "TestRegistry:\" -Name MyTestKey
This command lays the groundwork for your virtual registry sandbox,
ready to accommodate your testing endeavors.
Interacting with Your Virtual Realm:
A Practical Demonstration
Now that your TestRegistry is ready, let’s try it out! Listinws how you can create a registry key and set a value within your virtual sandbox.
Listing 7-7. Creating a registry key and value using TestRegistry Describe "Using TestRegistry" {
BeforeEach {
New-Item -Path "TestRegistry:\" -Name MyTestKey
}
101

Chapter 7 testDrive anD testregistry
It "Creates a registry key and sets a value" {
New-ItemProperty -Path "TestRegistry:\MyTestKey"
-Name 'MyValue' -Value "Hello, TestRegistry!"
$value = Get-ItemProperty -Path
"TestRegistry:\MyTestKey" -Name 'MyValue' | select
-ExpandProperty 'myvalue'
$value | Should -Be "Hello, TestRegistry!"
}
}
Figurws TestRegistry in action. Once the tests have finished, it’s all cleaned up.
Figure 7-2. TestRegistry creates a random GUID key while testing. It’s deleted when the tests have completed
Listing Under Scrutiny
In this example
1. Create a test block named “Using TestRegistry.”
2. Ensure a clean test key before each test using
BeforeEach.
102
Chapter 7 testDrive anD testregistry
3. The
New-ItemProperty command creates the
MyValue value within the MyTestKey key of the
TestRegistry hive.
4. The
Get-ItemProperty command retrieves
the value of MyValue, and the Select-Object
-ExpandProperty 'MyValue' part extracts the
actual value from the resulting object.
5. The retrieved value is then compared to the
expected text using the Should assertion.
Remember testregistry is a powerful tool for safe registry testing.
always use testregistry for registry-related tests.
Like a self-cleaning oven, TestRegistry automatically vanishes once
your test concludes, taking all its created keys and values with it.
Cleaning Up with a Snap
While TestRegistry typically cleans up after itself, incorporating robust error handling and manual cleanup is wise for exceptional reliability.
Here’s how you can add an AfterEach block for extra reassurance: AfterEach {
Remove-Item -Path "TestRegistry:\" -Recurse -Force
-ErrorAction SilentlyContinue
}
103
Chapter 7 testDrive anD testregistry
This command ensures that any leftover traces of your TestRegistry
activities are removed, leaving your virtual sandbox spotless for the next test encounter.
Key Points to Remember
– Each test block receives its own isolated TestRegistry hive,
ensuring pristine conditions for every test.
– You can create, modify, and delete registry keys and values
within the TestRegistry hive just like you would in the real
registry.
– Once your test concludes, the entire TestRegistry hive
vanishes, leaving no trace of your testing adventures
within the real registry.
With TestRegistry as your ally, you can confidently venture into registry testing, knowing that your actual system remains safe and sound. It doesn’t get much better than that!
Summary
In this chapter, we discovered TestDrive and TestRegistry, unlocking their powers to elevate your Pester testing practices.
TestDrive emerged as your personal testing haven, a temporary file system where you can unleash your scripts without fear of repercussions.
You learned how to create, modify, and delete files within this secluded sandbox, ensuring your actual system remains pristine. We explored the BeforeEach and AfterEach blocks, mastering the art of setting up and
cleaning up your testing environment.
104
Chapter 7 testDrive anD testregistry
Next, we ventured into the hidden depths of the registry with
TestRegistry. This magnificent tool granted you a virtual registry sandbox, a playground for interacting with keys and values without jeopardizing your real system’s stability, empowering you to tailor your virtual registry environment to match your testing needs.
With TestDrive and TestRegistry as your allies, you’re now equipped to tackle even the most intricate testing scenarios with confidence. No longer are you confined by the boundaries of your real system; you can freely explore, experiment, and gain valuable insights, all while safeguarding the delicate balance of your core environment.
As we turn the page to Chapter , prepare to delve into the captivating world of Tags and Invoke-Pester.
105
CHAPTER 8
Tags and
Invoke-Pester
Your Pester test suite is growing and, with it, the complexity of managing its execution. Running every test every time becomes impractical,
hindering agility and efficiency.
This chapter introduces two powerful tools, tags and Invoke-Pester, that transform your test suite into a finely tuned instrument for targeted and controlled execution.
Imagine this: Categorize your tests with intuitive tags, then effortlessly run only the tests relevant to your current needs. No more wading through irrelevant scripts or wasting time on unnecessary runs. Invoke-Pester acts as your conductor, seamlessly orchestrating the execution of specific tagged groups, freeing you from manual effort and empowering
streamlined testing workflows.
Beyond basic runs, this chapter opens up a world of possibilities for
optimized testing strategies. Learn how to
– Design efficient testing scenarios focused on specific
areas or functionalities.
– Reduce overall test run time by eliminating irrel-
evant tests.
Dreaming of a test suite that’s organized, flexible, and efficient? This chapter holds the key to unlocking an efficient testing experience.
© Owen Heaume 2024
107
O. Heaume, Getting Started with Pester 5
Chapter 8 tags and Invoke-pester
Tag Along! Organizing Your Pester Tests
with Tags
Imagine your test suite as a bustling library – shelves upon shelves filled with books (tests) covering various topics. Finding the specific book (test) you need amid this vast collection can be overwhelming. Thankfully, just like libraries categorize their books with genres and labels, Pester offers tags to organize and manage your tests effectively.
What Are Tags?
Think of tags as simple keywords or labels that you can assign to your tests. Imagine them as sticky notes categorizing your test’s purpose,
functionality, or target area.
These tags become powerful filters, allowing you to
Group-related tests: Have tests for different modules
in your application? Tag them with the corresponding
module name, allowing you to run just the tests
relevant to that specific module. For example, you
could tag tests for user authentication with “UserLogin”
and module-specific functionality with “ModuleA”.
Focus on specific functionalities: Need to verify a
particular feature? Add a “feature_X” tag to relevant
tests and run them independently. This allows you to
focus your testing efforts on specific areas of concern.
Identify and exclude outdated tests: Mark
deprecated tests with a “deprecated” tag and easily
filter them out during execution. This keeps your
test suite clean and organized, ensuring you’re
testing relevant functionalities.
108
Chapter 8 tags and Invoke-pester
Why Use Tags?
Whether you’re a beginner or an experienced tester, using tags offers
significant benefits:
Reduced complexity: Organize your tests with tags
improves clarity and make your test suite easier to
understand and navigate. This is especially helpful
as your test suite grows more complex.
Focused testing: Run only the tests relevant to
your current needs, saving you time and resources.
Imagine being able to quickly test a newly added
feature without running the entire suite!
Efficient debugging: Quickly identify and isolate
failing tests based on their tags. This helps you
pinpoint the root cause of issues much faster.
Enhanced collaboration: Shared tagging
conventions improve communication and
understanding within testing teams. Everyone
involved can easily understand what each test
covers and why it’s tagged the way it is.
Adding Tags to Your Tests
Adding tags is simple! You can assign them to your Describe, Context, and It blocks, similar to labeling different sections of a book as demonstrated in Listin
109
Chapter 8 tags and Invoke-pester
Listing 8-1. Tag! You’re it!
# Tagging a Describe block
Describe "Module A Tests" -Tag 'ModuleA' {
# Tests for Module A here
}
# Tagging a Context block
Context "Feature X Functionality" -Tag 'FeatureX' {
# Tests for Feature X here
}
# Tagging an It block
It "Checks user login functionality" -Tag 'UserLogin' {
# Test for user login here
}
Now, imagine you only need to verify FeatureX functionality. Using Invoke-Pester with the -TagFilter parameter, you can specifically run
just the tests tagged with “FeatureX”:
Invoke-Pester -Path .\mytestfile.tests.ps1 -TagFilter
'FeatureX'
This command executes only the tests within the Context block tagged
with “FeatureX,” saving you time and effort.
Case-Insensitivity and Multi-tagging: Supercharging
Your Test Organization
Tags in Pester offer powerful flexibility, not only in grouping functionalities but also in how you use them. Let’s delve into two key advantages.
110
Chapter 8 tags and Invoke-pester
Case-Insensitivity: Freedom from Typo Worries
Imagine accidentally typing “usercreation” instead of “UserCreation” for a tag. Don’t fret! Pester treats tags as case-insensitive. Whether you write
“usErCrEaTiOn” or “USERCREATION,” Pester recognizes them all as the
same tag, ensuring your tests remain easily discoverable and executable regardless of capitalization variations. This flexibility saves you from headaches and wasted time due to minor typos.
Multi-tagging: Granular Organization at Your Fingertips
Tags aren’t limited to one-dimensional categorization. You can leverage multiple tags separated by a comma (-Tag 'Tag1', 'Tag2'), to create a
more fine-grained organization within your test suite.
This empowers you to
Combine broad and specific tags: Tag a test with
“UserManagement” for its general category and
“ResetPassword” for its specific functionality.
Combine platform-specific tags: Test functionality
on different platforms. Add tags like “Windows” or
“Linux” alongside your core functionality tags.
Refine test selection: By using multiple tags, you
can construct precise filters for test execution.
Need to run all tests related to user management
on Linux? Simply use Invoke-Pester
-Path .\mytestfile.tests.ps1 -TagFilter
'UserManagement', 'Linux'.
111
Chapter 8 tags and Invoke-pester
Tagging in Action: Unleashing Efficiency
Let’s venture into a practical example, applying tags to organize your user management tests:
– UserCreation: Tag relevant tests with “UserCreation,”
further categorized by “Success” and “Validation” to
differentiate between successful scenarios, validations,
and preventing invalid user creation attempts. This
granular organization provides clear insights into
different aspects of user creation.
– RoleAssignment: Employ tags like “RoleAssignment”
and “DefaultRole” to categorize tests for assigning
default or custom roles. This makes it easy to under-
stand and test each role assignment scenario.
– PasswordReset: Tag tests with “PasswordReset” and
“Complexity” to group those verifying password reset
functionality and password complexity enforcement.
This helps ensure robust password security measures
are in place.
– ProfileUpdate: Include tags like “ProfileUpdate” and
“ContactInformation” to identify tests verifying profile
updates and specific data changes. This targeted
approach allows you to focus on specific user profile
functionalities.
Listinwcases tagged tests.
Listing 8-2. A tagging example
Describe "User Creation Tests" -Tag 'UserCreation' {
Context "Successful User Creation" -Tag 'Success' {
It "Should create a user with valid inputs"
112
Chapter 8 tags and Invoke-pester
-Tag 'Validation' {
# Test logic for successful user creation
}
}
Context "Invalid User Creation Attempts"
-Tag 'Invalid' {
It "Should prevent duplicate usernames"
-Tag 'Validation' {
# Test logic for preventing duplicate usernames
}
It "Should reject invalid email formats" {
# Test logic for validating email format
}
}
}
Describe "Role Assignment Tests" -Tag 'RoleAssignment' {
It "Should assign new users to the default role" {
# Test logic for default role assignment
}
It "Should allow assigning custom roles to users" {
# Test logic for custom role assignment
}
}
Describe "Password Reset Tests" -Tag 'PasswordReset' {
It "Should allow password reset via email" {
# Test logic for password reset via email
}
It "Should enforce password complexity rules"
113
Chapter 8 tags and Invoke-pester
-Tag 'Complexity' {
# Test logic for password complexity enforcement
}
}
Describe "Profile Update Tests" -Tag 'ProfileUpdate' {
It "Should allow updating contact information"
-Tag 'ContactInformation' {
# Test logic for updating contact information
}
It "Should prevent unauthorized profile changes" {
# Test logic for security measures in profile updates
}
}
Excluding Tests: The Magic of -Skip and Tags
We’ve explored the power of tags to categorize and organize your Pester tests. But what if you want to temporarily silence certain tests or groups?
Enter the -Skip parameter and its tag-based companion, offering you
precise control over test execution.
Excluding with -Skip
The -Skip parameter lets you temporarily disable whole Describe or Context blocks or individual tests:
It "Test for feature X (currently disabled)" -Skip {
# Test code here
}
114
Chapter 8 tags and Invoke-pester
Note It’s important to use this feature responsibly and avoid
skipping large portions of your test suite for extended periods.
however, the ability to skip describe and Context blocks can be
helpful for temporarily disabling noncritical tests or excluding tests that are incompatible with specific environments.
Now when you run your test suite with Invoke-Pester, anything
with -skip will be skipped as demonstrated in Listin
Listing 8-3. Demonstrating skipping tests with the -Skip tag in Invoke-Pester
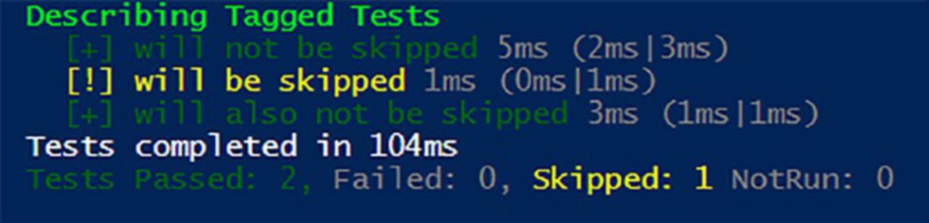
Describe "Tagged Tests" {
it "will not be skipped" {
$true | should -BeTrue
}
it "will be skipped" -Skip {
$true | should -BeTrue
}
it "will also not be skipped" {
$true | should -BeTrue
}
}
And the resulting output shown in Figure clearly shows tests were skipped.
115
Chapter 8 tags and Invoke-pester
Figure 8-1. Skipped tests are still displayed in the output While simple, this approach can become cumbersome for excluding
multiple tests.
Leveraging Tags for Exclusion
Here’s where tags shine! Create a “skip” tag and assign it to tests you want to exclude:
It "Test for feature Y (skipped)" -Tag 'Skip' {
# Test code here
}
Now, you can use Invoke-Pester with the -ExcludeTag parameter to
exclude all tests with the “Skip” tag:
Invoke-Pester -Path .\mytestfile.tests.ps1 -ExcludeTag 'Skip'
This effectively excludes all tests marked with “Skip,” while other
tagged or untagged tests run normally.
Advanced Exclusion Strategies
Combining -Skip and -ExcludeTag: Combine both for granular control.
Exclude entire tagged groups while still skipping specific tests within other groups.
116
Chapter 8 tags and Invoke-pester
Dynamic exclusion: Use variables or external data sources to
determine exclusion criteria based on your testing needs. (Although this is beyond the scope of this beginner’s book.)
Remember excluded tests are skipped, not hidden. their existence is still reported, allowing you to track them for future inclusion.
By mastering exclusion techniques, you can
– Temporarily disable unstable or in-progress tests
without affecting others.
– Focus testing efforts on specific areas while excluding
irrelevant or outdated tests.
– Simplify large-scale test suites by keeping them orga-
nized and manageable.
Start employing tags and exclusion strategies to transform your Pester test suite into a well-oiled testing machine, ensuring focused, efficient, and controlled testing practices!
Unleash Granular Testing Power: Running
Specific Test Types with Ease
Imagine yourself standing before a vast testing landscape, eager to
delve into specific areas. Perhaps you yearn to scrutinize the intricate interactions between components (integration tests) or carefully examine individual units in isolation (unit tests). While manually executing
each test might be feasible for a small test suite, it quickly becomes cumbersome and inefficient as your tests multiply.
Let’s see how Pester can help us to tackle these problems.
117
Chapter 8 tags and Invoke-pester
Running Specific Tests with Ease: Your Guide
to Pester Efficiency
Let’s face it, testing every single test every time can be like searching for a specific snowflake in a blizzard! Especially when your test suite grows, targeting only the tests you need becomes crucial. Thankfully, Pester has some tricks up its sleeve to help you focus your testing efforts.
Naming Your Tests for Clarity
Imagine your test files as labeled boxes in a storage unit. To quickly find the boxes you need, clear labels are key. This is where naming conventions come in!
Add a prefix: Use a prefix before .tests.ps1 with a word that tells you what kind of tests they are. For example, use “integration.tests.ps1” for tests that check how different parts of your code work together and “unit.
tests.ps1” for tests that examine individual pieces of code in isolation. For instance, MyFunction. unit. tests.ps1 or MyFunction. integration.
tests.ps1
Keep it descriptive: Don’t just write “test1.tests.ps1” – give each test a meaningful name that explains what it does. This will make it much easier to understand what you’re testing, even if you haven’t seen the code in a while.
Finding Tests with “Invoke-Pester”
Now that your tests are clearly labeled, let’s unleash the power of
Invoke-Pester to pinpoint the exact tests you need!
118
Chapter 8 tags and Invoke-pester
Wildcards for File-Based Filtering
Zero in on specific file types: Imagine you want to run all integration tests.
Simply use Invoke-Pester -Path "*integration.tests.ps1". The asterisk (*) acts as a wildcard, matching any test file name that begins with
“integration.tests”.
Tags for Cross-file Execution
Organize tests beyond file boundaries: Assign common tags to related
tests, even if they reside in different .tests.ps1 files. This grants you the flexibility to group and execute tests based on their purpose, not location.
Targeted execution across files: Use Invoke-Pester with the -Tag
parameter to execute tests bearing a specific tag, regardless of their file. For example, Invoke-Pester -Tag "Integration" -Path *.tests.ps1 runs all “Integration” tagged tests found within any .tests.ps1 file in the current directory.
Key Points
Both wildcards and tags provide distinct ways to filter and execute tests effectively.
Wildcards focus on file names, while tags offer a more functional
grouping approach that transcends file boundaries. Choose the method
that best suits your testing needs and preferences.
Benefits of Targeted Testing
Running specific tests has some awesome advantages:
Faster testing: No more waiting for hundreds of
tests to run when you only need a few. This saves
you valuable time and resources.
119
Chapter 8 tags and Invoke-pester
Sharper focus: By targeting specific types of
tests, you can concentrate on pinpointing issues
in specific areas. This makes debugging and
understanding problems much easier.
Organization matters: A well-structured test suite
with clear naming and tagging is easier to navigate
and maintain, especially as it grows.
By using these techniques, you can transform your Pester testing from
a blizzard of tests to a focused and efficient process, ensuring your code is rock-solid!
Summary
This chapter has equipped you with the power to navigate your Pester test suite with ease and efficiency. We explored the magic of tags, transforming them from simple labels into powerful tools for organizing, filtering, and running specific tests. You’ve also learned:
Excluding with finesse: Temporarily silence
specific tests or groups with -Skip and -ExcludeTag,
keeping your suite organized.
The art of naming: Clear and descriptive test file
names and individual test labels make your suite
intuitive and easy to navigate.
Wielding wildcards: Target entire categories of
tests based on file names using wildcards like
*integration.tests.ps1
Tagging for power: Group related tests across
different files using tags, enabling focused execution
based on functionality, not location.
120
Chapter 8 tags and Invoke-pester
Harnessing these techniques doesn’t just save you time and resources:
it transforms your entire testing approach. Instead of waiting for hundreds of tests to run, you can zoom in on specific areas of concern, executing only the tests that matter most. This sharpens your focus, allowing you to debug issues with greater ease.
But the benefits extend beyond immediate execution. Clear naming,
tagging, and exclusion strategies foster a well-organized and manageable test suite. As your suite grows, this structure becomes invaluable, ensuring clarity and maintainability.
Ultimately, targeted testing isn’t just about efficiency; it’s about
building a rock-solid foundation for confident code. By using the tools outlined in this chapter, you empower yourself to write better code,
identify problems faster, and deliver a higher-quality product, one focused test at a time.
Now that you’ve mastered targeted execution, let’s delve deeper into
the world of mocking. Imagine isolating specific parts of your code and manipulating their behavior for testing purposes. This is the magic of mocking covered in the next chapter. I’ll forewarn you now, it’s a long chapter, so ensure you are well rested and hydrated, and get ready to learn how to elevate your testing to a whole new level!
121
CHAPTER 9
Mocking Your Way to
Success
When I first ventured into the world of Pester and stumbled upon the
concept of mocking, I have to admit, it left me scratching my head. It was one of those things that I knew existed, but I couldn’t quite grasp why or when I should use it. It felt like I was missing a crucial piece of the puzzle.
But fear not! In the chapter ahead, we’re going to take a deep dive
into the world of mocking. I won’t sugarcoat it; this is going to be a bit of a marathon chapter. However, by the time we’re through, you’ll know not only what mocking is but also why it’s an essential tool in your testing toolkit. So, let’s roll up our sleeves and get ready to demystify mocking together.
What Is Mocking?
Mocking is like creating a mimic of a function or cmdlet. When you employ mocking in your Pester test, let’s say for the sake of illustration, you’re dealing with something like Test-Path, essentially, you’re telling your test that when your function runs and would typically call upon Test-Path,
substitute it with the mock instead. In other words, it prevents the actual execution of the real Test-Path cmdlet when you call the function from within your Pester test.
© Owen Heaume 2024
123
O. Heaume, Getting Started with Pester 5
Chapter 9 MoCking Your WaY to SuCCeSS
In unit tests, the goal is to avoid touching any real services or file systems. It’s crucial to maintain a controlled and predictable testing environment. Think of it as having a stand-in actor take the stage while the real star takes a break – all part of making your tests more controlled and precise.
Why Use Mocks to Avoid Real Services?
Mocking is like having a double for a superstar, but its significance extends beyond just improving the accuracy of your tests. In a world where
software interacts with various services, databases, or external systems, using mocks becomes paramount for several reasons.
Let’s consider a scenario where your code interacts with an external
service, like a file system. In a typical testing environment, making actual calls to these services could lead to several challenges:
1. Test environment independence: Real services
can introduce dependencies that make your
tests environment specific. Your tests may work
perfectly on one machine but fail on another due to
differences in the environment.
2. Data consistency: When you touch the file system
or interact with external services, you may alter data
unintentionally. This can lead to unpredictable test
outcomes and potentially destructive side effects.
3. Speed and efficiency: Real services can be slow
or unreliable. Waiting for file system operations or
external service responses can significantly slow
down your tests, making them inefficient and less
productive.
124
Chapter 9 MoCking Your WaY to SuCCeSS
This is where mocks come to the rescue. When you substitute a real
service call with a mock, you gain control and predictability over your tests.
Imagine your code is expected to fetch data from a remote API. Instead of making actual requests to that API, you create a mock that simulates the API’s behavior. You instruct the mock to return specific responses under various conditions.
For instance, you can configure the mock to return mock data when
your code requests it. This allows you to simulate different scenarios, such as successful responses, timeouts, or error conditions, without ever making a real network request, allowing your code to be tested for each scenario.
By using mocks, you ensure that your tests remain independent
of external factors, maintain data consistency, execute swiftly, and
consistently deliver reliable results. It’s like having a rehearsal for a high-stakes performance – you control the script, and the show goes on flawlessly, no matter the complexities of the real world.
Continuing the previous example of mocking Test-Path, in your
function, you might be dynamically sending a path to be tested and
executing different code depending on whether the path exists or not.
Now, let’s think about why using mocks, in this case, is incredibly valuable.
Imagine you have a function that’s responsible for processing files.
Before it takes any action on a file, it needs to determine if the file exists using Test-Path. Based on whether the file is there or not, your function makes decisions like whether to process it, skip it, or perform some other action, and it is these decisions that we are interested in testing.
Now, during testing, you don’t want your Pester tests to actually touch the file system. That’s where the power of mocking shines. By substituting Test-Path with a mock, you gain control over the testing environment.
You can instruct the mock to behave as if the file exists or doesn’t exist, simulating various scenarios without altering the real file system.
Remember, we are interested in testing the branching conditions of our code which take place depending on the output of Test-Path without
conducting a “real” Test-Path call to a real file system.
125
Chapter 9 MoCking Your WaY to SuCCeSS
For instance, if you’re testing how your function handles a missing file scenario, you can set up the mock to always return “false” for Test-Path. This ensures that your function’s logic for handling missing files is thoroughly tested, without the need for actual files to be present or deleted during testing. The pester test calls your function, and your
function executes Test-Path (the mock, not the real thing) which has been configured to output “false,” and now you can test if the function logic handles the false response correctly.
On the flip side, when you’re testing the case when the file does exist, you can configure the mock to return “true” for Test-Path, allowing you to verify that your function behaves correctly in that situation.
So, in essence, mocks in your Pester tests act as directors on a film
set, guiding the actors (functions and cmdlets) and scripting the scenes (testing scenarios) to ensure that your code performs flawlessly under various conditions, all while keeping the real world safely at bay.
Let’s consolidate this with some example code. Listing shows an example function: Invoke-FileOperation.
Listing 9-1. Invoke-FileOperation
function Invoke-FileOperation {
param (
[string] $filePath
)
# Check if the file exists using Test-Path
if (Test-Path -Path $filePath) {
# File exists, perform processing
Write-Host "Processing file: $filePath"
# Additional processing logic here
return $true
126
Chapter 9 MoCking Your WaY to SuCCeSS
} else {
# File does not exist, handle accordingly
Write-Host "File not found: $filePath"
# Additional handling for missing files
return $false
}
}
In this example, the Invoke-FileOperation function takes a $filePath parameter and performs a file operation. It uses Test-Path to check
whether the specified file exists in the file system. Based on the result of this check, the function makes decisions:
– If the file exists (Test-Path returns $true), it outputs a
message indicating that it’s processing the file and may
perform additional processing logic. Finally, it returns
true to indicate a successful operation.
– If the file doesn’t exist (Test-Path returns $false), it
outputs a message stating that the file was not found
and may include additional handling for missing files.
It returns false to indicate that the operation encoun-
tered an issue due to the file’s absence.
This function serves as an example of how real services, like file
system interactions, can be incorporated into your code. However, it also illustrates the need for mocking when testing, as you don’t want your tests to depend on the actual file system’s state. Mocking Test-Path in your tests allows you to simulate different file existence scenarios and thoroughly test how your code handles them. With that said, I’m going to throw you into the deep end now. Listing ws what Pester tests might look like for this function.
127
Chapter 9 MoCking Your WaY to SuCCeSS
Listing 9-2. Our Pester tests for the Invoke-FileOperation function BeforeAll {
. $PSCommandPath.Replace('.tests',"")
Mock Write-Host
}
Describe "Invoke-FileOperation function" {
Context "When the file exists" {
It "Should process the file" {
Mock Test-Path { return $true }
$result = Invoke-FileOperation -filePath
"C:\sample.txt"
$result | Should -BeTrue
}
}
Context "When the file does not exist" {
It "Should handle the missing file" {
Mock Test-Path { return $false }
$result = Invoke-FileOperation -filePath
"C:\nonexistent.txt"
$result | Should -BeFalse
}
}
}
In this example shown in Listing e have a Pester test script designed to validate the behavior of the Invoke-FileOperation function we discussed earlier. Let’s break down the various sections.
128
Chapter 9 MoCking Your WaY to SuCCeSS
BeforeAll Block
BeforeAll {
. $PSCommandPath.Replace('.tests',"")
Mock Write-Host
}
The BeforeAll block sets up some initial conditions for the tests. It includes two key actions:
1. $PSCommandPath.Replace('.tests',""): We’ve
covered this earlier in the book so I’ll just jog your
memory: this line dot sources the main PowerShell
script that contains the function by replacing “.tests”
in the script’s path with an empty string. This step
ensures that the main script is loaded into memory
and available for testing.
2. Mock Write-Host: Here, we are mocking the Write-
Host cmdlet. In Pester tests, it’s a common practice
to mock cmdlets that produce output to prevent
unnecessary console output during testing.
Note in this case, the Write-host cmdlet is not mocked with any specific behavior or replacement action. instead, it’s set up to be
“quiet” by returning nothing. When Write-host is called within the
function being tested, the mock will take over, but it essentially does nothing.
Why Mocking Write-Host Matters: The significance of this mock lies in its silence. By using this mock, you ensure that when the Write-Host cmdlet is called within your function, it doesn’t produce any actual output during testing. This helps maintain a clean and focused testing environment.
129
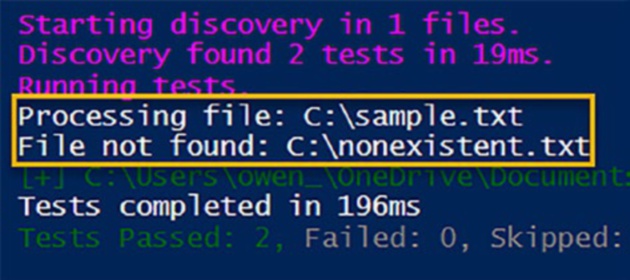
Chapter 9 MoCking Your WaY to SuCCeSS

