Getting Started with
Pester 5
A Beginner’s Guide
Owen Heaume
Getting Started with Pester 5: A Beginner’s Guide
Owen Heaume
West Sussex, UK
ISBN-13 (pbk): 979-8-8688-0305-5
ISBN-13 (electronic): 979-8-8688-0306-2
Copyright © 2024 by Owen Heaume
This work is subject to copyright. All rights are reserved by the Publisher, whether the whole or part of the material is concerned, specifically the rights of translation, reprinting, reuse of illustrations, recitation, broadcasting, reproduction on microfilms or in any other physical way, and transmission or information storage and retrieval, electronic adaptation, computer software, or by similar or dissimilar methodology now known or hereafter developed.
Trademarked names, logos, and images may appear in this book. Rather than use a trademark symbol with every occurrence of a trademarked name, logo, or image we use the names, logos, and images only in an editorial fashion and to the benefit of the trademark owner, with no intention of infringement of the trademark.
The use in this publication of trade names, trademarks, service marks, and similar terms, even if they are not identified as such, is not to be taken as an expression of opinion as to whether or not they are subject to proprietary rights.
While the advice and information in this book are believed to be true and accurate at the date of publication, neither the authors nor the editors nor the publisher can accept any legal responsibility for any errors or omissions that may be made. The publisher makes no warranty, express or implied, with respect to the material contained herein.
Managing Director, Apress Media LLC: Welmoed Spahr
Acquisitions Editor: Smriti Srivastava
Development Editor: Laura Berendson
Editorial Assistant: Kripa Joseph
Cover designed by eStudioCalamar
Cover image designed by Cover image from Pixabay
Distributed to the book trade worldwide by Springer Science+Business Media New York, 1
New York Plaza, Suite 4600, New York, NY 10004-1562, USA. Phone 1-800-SPRINGER, fax (201) 348-4505, e-mail [email protected], or visit www.springeronline.com. Apress Media, LLC is a California LLC and the sole member (owner) is Springer Science + Business Media Finance Inc (SSBM Finance Inc). SSBM Finance Inc is a Delaware corporation.
For information on translations, please e-mail [email protected]; for reprint, paperback, or audio rights, please e-mail [email protected].
Apress titles may be purchased in bulk for academic, corporate, or promotional use. eBook versions and licenses are also available for most titles. For more information, reference our Print and eBook Bulk Sales web page at http://www.apress.com/bulk-sales.
Any source code or other supplementary material referenced by the author in this book is available to readers on GitHub. For more detailed information, please visit https://www.apress.
com/gp/services/source-code.
If disposing of this product, please recycle the paper
Table of Contents
About the Author ���������������������������������������������������������������������������������xi About the Technical Reviewer �����������������������������������������������������������xiii Chapter 1:
Chapter 2:
iii
Table of ConTenTs
Chapter 3:
Chapter 4:
iv
Table of ConTenTs
Chapter 5:
Chapter 6:
v
Table of ConTenTs
Chapter 7:
Chapter 8:
Chapter 9:
vi
Table of ConTenTs
vii
Table of ConTenTs
viii
Table of ConTenTs
Index �������������������������������������������������������������������������������������������������245
ix

About the Author
Owen Heaume is a seasoned PowerShell
programmer with a passion for crafting
efficient solutions in the dynamic landscapes
of Intune and Azure. Having recently
embarked on a professional journey in
PowerShell programming for a prominent
company within their automation team, Owen
is dedicated to mastering the intricacies of
Pester, Azure DevOps, and adhering to best
practices.
Owen has published books on deploying
applications in Intune using PowerShell,
deploying applications in ConfigMgr using PowerShell, and deploying
language and regional settings using ConfigMgr. In this book, Owen
shares insights gained from real-world experiences, providing readers
with practical knowledge and a glimpse into the mind of a multifaceted professional thriving in the realms of technology.
xi

About the Technical Reviewer
Kasam Shaikh is a prominent figure in
India’s artificial intelligence (AI) landscape,
holding the distinction of being one of the
country’s first four Microsoft Most Valuable
Professionals (MVPs) in AI. Currently he
serves as a senior architect. Kasam boasts an
impressive track record as an author, having
authored five best-selling books dedicated to
Azure and AI technologies. Beyond his writing
endeavors, Kasam is recognized as a Microsoft
Certified Trainer (MCT) and an influential
tech YouTuber (@mekasamshaikh). He also leads the largest online Azure AI community, known as DearAzure | Azure INDIA, and is a globally
renowned AI speaker. His commitment to knowledge sharing extends to
contributions to Microsoft Learn, where he plays a pivotal role.
Within the realm of AI, Kasam is a respected subject matter expert
(SME) in generative AI for the cloud, complementing his role as a senior cloud architect. He actively promotes the adoption of No Code and Azure OpenAI solutions and possesses a strong foundation in Hybrid and
Cross-Cloud practices. Kasam Shaikh’s versatility and expertise make
him an invaluable asset in the rapidly evolving landscape of technology, contributing significantly to the advancement of Azure and AI.
xiii
abouT The TeChniCal RevieweR
In summary, Kasam Shaikh is a multifaceted professional who
excels in both technical expertise and knowledge dissemination. His
contributions span writing, training, community leadership, public
speaking, and architecture, establishing him as a true luminary in
the world of Azure and AI. Kasam was recently awarded as top voice
in AI by LinkedIn, making him the sole exclusive Indian professional
acknowledged by both Microsoft and LinkedIn for his contributions to the world of artificial intelligence!
xiv
CHAPTER 1
Unveiling the Power
of Pester
Welcome to the exciting world of Pester! In this chapter, we will embark on a journey to demystify the art of testing in PowerShell using the powerful tool called Pester. If you are new to PowerShell or testing frameworks, fear not; this guide is designed especially for you. Pester is not just any testing framework – it’s your key to ensuring your PowerShell scripts are robust, reliable, and perform exactly as you intend.
In the upcoming sections, we will unravel the fundamentals of Pester.
We’ll begin by understanding what Pester is and why it holds a crucial place in the toolkit of every PowerShell developer. You’ll learn about the compelling reasons to incorporate Pester into your scripting workflow, empowering you to write code with confidence.
We’ll guide you through the installation process, ensuring you have the latest version of Pester ready to use.
But our exploration doesn’t conclude there. In this chapter, we’ll
introduce you to the diverse spectrum of testing: unit tests, acceptance tests, and integration tests. These tests, much like different roles in a theatrical script, serve distinct purposes. Just as a director carefully selects actors for different scenes, you’ll learn to choose the right test type for various scenarios in your coding journey. Whether you’re validating
individual components, interacting with real systems, or staging integrated functions, you’ll have the tools to script tests that match your specific needs.
© Owen Heaume 2024
1
O. Heaume, Getting Started with Pester 5
Chapter 1 Unveiling the power of pester
We’ll then navigate the intricate landscape of Pester files and their
structure. By understanding the anatomy of these files, you’ll lay a sturdy foundation for crafting well-organized and potent tests.
Whether you’re a novice stepping into the PowerShell realm or a
seasoned developer eager to refine your testing expertise, this chapter promises to furnish you with vital insights to kickstart your Pester journey.
What Is Pester?
Pester, in the realm of PowerShell, is not just a testing framework; it’s a game-changer. Imagine having a reliable assistant by your side, carefully checking your PowerShell scripts for errors, ensuring they perform as
expected, and providing you with the peace of mind that your code is
robust. That assistant is Pester.
At its core, Pester is a testing framework specifically tailored for
PowerShell. It’s designed to simplify the process of writing and running tests for your PowerShell scripts and functions. But it’s not just about spotting bugs; Pester encourages a mindset of proactive development.
With Pester, you can validate your code’s functionality, ensure it handles various scenarios, and confirm it responds correctly to different inputs.
Pester operates on a simple yet profound principle: automated
testing is your safety net. It allows you to write tests that mimic real-world interactions with your scripts. By simulating different usage
scenarios, input variations, and edge cases, you can be confident that your PowerShell code behaves as intended under diverse conditions.
Why Use Pester?
In the early days of my PowerShell journey, the notion of incorporating Pester into my workflow seemed like an unnecessary complication. I had already carefully crafted my scripts, ensuring they worked flawlessly on my 2
Chapter 1 Unveiling the power of pester
system. The prospect of investing more time in writing additional code for testing felt daunting. I questioned, “Why add this layer of complexity when my scripts were already running smoothly?”
What I didn’t realize then was that Pester isn’t just about finding bugs or ensuring basic functionality. It’s a powerful ally that elevates your scripts from functional to exceptional. Here’s why taking that initial step to embrace Pester can transform your PowerShell experience:
1. Automated assurance: Pester acts as your
automated quality control mechanism. It tirelessly
validates your code, freeing you from the burden of
manual testing. With Pester, you can be confident
that your scripts are always in top-notch condition,
no matter how many times you modify them.
2. Confidence in code changes: As your scripts
evolve, ensuring they remain stable becomes vital.
Pester empowers you to confidently refactor and
enhance your code. By running a suite of tests, you
can instantly identify if any recent changes have
unintended consequences, enabling you to catch
issues before they escalate.
3. Effective collaboration: Imagine sharing your
scripts with team members or contributors. Pester
ensures that your code behaves consistently across
different environments. It becomes the common
language that bridges the gap between developers,
fostering collaboration and collective progress.
4. Saves time in the long run: Initially, writing tests
might seem like an additional effort, but it’s an
investment that pays off over time. Detecting and
fixing issues early prevents potential disasters down
3
Chapter 1 Unveiling the power of pester
the line. The time saved by avoiding manual bug
hunting far outweighs the time spent crafting tests.
5. Quality documentation: Pester tests serve as living
documentation for your code. They provide clear
examples of how your functions and modules are meant
to be used. This documentation becomes invaluable,
especially when revisiting your own code after a
considerable time gap or when onboarding new team
members.
6. Proactive problem solving: Pester doesn’t just find
problems; it anticipates them. By simulating various
scenarios and inputs, you can proactively identify
potential weaknesses in your code. Addressing these
vulnerabilities before they manifest in real-world
usage enhances the resilience of your scripts.
In essence, Pester isn’t merely about testing; it’s about empowering your scripts to reach their full potential. The beauty of Pester lies in its seamless integration with PowerShell. If you’re already familiar with PowerShell, learning Pester is a natural next step in enhancing your scripting arsenal.
Embracing Pester equips you with the tools to create robust, reliable, and maintainable PowerShell solutions. So, take the plunge, invest a bit of time now, and watch your scripts shine in the long run. Pester isn’t just a testing framework; it’s your ticket to PowerShell excellence.
Installing Pester
Installing Pester is a straightforward process, ensuring you have a robust testing environment for your PowerShell scripts. Pester can be installed on any Windows computer with PowerShell version 3 or higher, although it’s advisable to use PowerShell version 5 or 7 for the best experience.
4
Chapter 1 Unveiling the power of pester
Microsoft recognized the power of Pester and included it by default in Windows 10 and 11. However, the default versions might not always be the latest, and updating them can be tricky. Here’s the recommended method to ensure you have the most up-to-date and easily maintainable version of Pester installed.
1. Removing the Preinstalled Version: If you’re
dealing with an older version of Pester, it’s best
to remove it completely. Run the following
script shown in Listintrative
PowerShell window.
Listing 1-1. Uninstalling legacy Pester
$module = "C:\Program Files
\WindowsPowerShell\Modules\Pester"
takeown /F $module /A /R
icacls $module /reset
icacls $module /grant "*S-1-5-32-544:F"
/inheritance:d /T
This script ensures the clean removal of the
preinstalled Pester version, leaving your system
ready for the latest installation.
2. Installing the Latest Version: With the old version
removed, installing the latest Pester version is a
breeze. Execute the following command in an
administrative PowerShell window:
Install-Module Pester -Force
5
Chapter 1 Unveiling the power of pester
This command fetches and installs the latest version of
Pester, ensuring you have the most advanced features
at your fingertips.
3. Easy Updates: Managing updates is now hassle-
free. To update Pester, simply run the following
command in an administrative PowerShell window:
Update-Module Pester
This one-liner keeps your Pester framework current,
incorporating any improvements or bug fixes seamlessly.
By following these steps, you ensure that Pester is not just installed on your system, but it’s the latest, most potent version, and ready to empower your PowerShell testing endeavors. Now, let’s dive into understanding
Pester’s file structure and its core components.
Navigating the Testing Landscape
in PowerShell: Test Types
Welcome to the realm of testing in PowerShell, where scripts transform into robust and dependable solutions. Developers fine-tune their scripts through a series of carefully planned tests, much like orchestrating a captivating theater performance. Understanding the diverse landscape
of testing methodologies is akin to exploring the varied techniques in the world of theater, each designed to bring out the best in a production.
In this section, we embark on a journey through the fundamental
pillars of testing: unit tests, acceptance tests, and integration tests. Each test type is a unique lens through which developers can scrutinize their code, ensuring it not only meets its functional requirements but also
weathers the challenges of real-world execution.
6
Chapter 1 Unveiling the power of pester
I’ll employ a theater analogy (throughout this book) alongside
conventional explanations to simplify the topic. Understanding these test types can be a bit overwhelming at first, so likening them to elements in a theater production might make the concepts more digestible.
Unit Tests
Unit tests focus on individual components or “units” of your code, typically functions or cmdlets. A unit test evaluates a specific piece of functionality in isolation. For example, if you have a function that converts lowercase text to uppercase, a unit test for this function would provide it with specific input and check if the output matches the expected result. The goal is to validate that the function performs as intended in various scenarios. Unit tests are isolated from the broader system and do not rely on external resources or dependencies.
The Analogy: Precision on Stage
Unit tests are the fundamental building blocks, akin to rehearsing scenes with precision in a theater production. Just as each actor and prop must be scrutinized for readiness and quality, unit tests meticulously examine individual components of your PowerShell script. These tests isolate
functions, methods, or cmdlets, subjecting them to rigorous evaluations to ensure they perform their designated tasks flawlessly.
Integration Tests
Integration tests assess the interactions between different components or systems within your script. In the context of PowerShell, integration tests frequently involve connecting to external resources, databases, APIs, or other modules.
7
Chapter 1 Unveiling the power of pester
Unlike unit tests, integration tests focus on how these components
collaborate and whether they work correctly when integrated. For
example, if your script communicates with a database, an integration test would verify that the script can successfully connect, retrieve data, and handle responses. Mocking, where certain components are simulated to
mimic real behavior, is often used in integration testing to isolate different parts of the system.
This book centers on both unit tests and integration tests, with a
dedicated exploration of mocking for our integration tests, a topic that will be covered in a later chapter.
The Analogy: Orchestrating Script Performances
Integration tests resonate with the orchestration of diverse roles in a theater production. In a play, actors collaborate to bring characters to life, each contributing a unique essence to the overall performance.
Similarly, integration tests explore how different components of your
script interact. Whether it’s connecting with databases, APIs, or external services, these tests ensure that the script functions seamlessly in a connected environment, much like the synergy required among actors for a compelling stage production.
Acceptance Tests
Acceptance tests evaluate the overall behavior of your script within the real system, simulating user interactions or system operations. Unlike unit tests, acceptance tests are less concerned with the internal logic of individual functions and more focused on the script’s end-to-end
functionality. These tests often deal with real-world scenarios, covering the entire application workflow. However, acceptance tests might not cover all edge cases, as their purpose is to validate general system behavior rather than specific conditions.
8
Chapter 1 Unveiling the power of pester
The Analogy: The Grand Stage Performance
Acceptance tests are the final act on stage, equivalent to presenting the complete play. Here, the entire script is performed, mirroring the way a theater production reaches the audience. These tests focus on the end-to-end functionality, mimicking real-world scenarios and user interactions.
Just as the audience evaluates a play based on its presentation,
engagement, and impact, acceptance tests gauge your script’s
performance, ensuring it satisfies user requirements and expectations.
Each type of test serves a specific purpose in ensuring the reliability of your PowerShell code. By employing a combination of unit tests to validate individual functions, acceptance tests to assess overall system behavior, and integration tests to test component interactions, you can create a robust testing strategy that thoroughly evaluates your scripts’ functionality and performance.
As we delve into the intricacies of each test type, remember that testing is not merely a quality assurance task; it’s a theatrical journey where developers refine their craft. So, prepare for a captivating exploration of PowerShell testing, where precision, completeness, and harmony are the guiding principles.
Pester Test Naming Convention
and File Structure
In the world of Pester, naming conventions and file structures are your allies. Pester operates under the assumption that any file ending with .tests.
ps1 is a test file – a convention we highly recommend adhering to. While it’s theoretically possible to alter this behavior, diving into such complexity is beyond the scope of this beginner’s guide.
Why does Pester have this preference? Because Pester adores
functions, and it challenges you to become a better coder by crafting
functions that perform singular tasks. Writing functions this way not only 9
Chapter 1 Unveiling the power of pester
aligns with PowerShell best practices but also makes your code highly
testable. Consider a function like Get-User. It deserves its own file, aptly named Get-User.ps1. Correspondingly, your Pester test for this function should be named Get-User.tests.ps1. This clean separation ensures clarity in your project structure.
However, the naming standard can be further enhanced for
differentiation. Adding a descriptor about the type of test being conducted is a common practice. For instance, if you’re writing unit tests for Get-User, your test file could be named Get-User.unit.tests.ps1. Similarly, for integration tests, it could be Get-User.integration.tests.ps1, and for acceptance tests, Get-User.acceptance.tests.ps1.
This categorization not only clarifies the test type but also enables
selective test execution – a topic we’ll explore later in this book.
Keeping your .tests files in the same directory as the code they are
testing is a wise choice. This organization fosters coherence and ensures that your tests are always in sync with your code. For example,
Get-User\
Get-User.ps1
Get-User.tests.ps1
If you’re working with modules, a structured approach within module-
related directories is advisable:
Get-User\
Get-User\Public\
Get-User.ps1
Get-User\Tests\
Get-User.tests.ps1
This modular arrangement facilitates a seamless workflow, making
your tests as integral a part of your project as the code they validate. As you progress through this guide, you’ll gain deeper insights into how such meticulous structuring can optimize your PowerShell projects.
10
Chapter 1 Unveiling the power of pester
Summary
In this introductory chapter, we delved into the fascinating world of Pester, the testing framework designed to empower PowerShell developers. We
embarked on a journey to demystify testing in PowerShell, exploring the essential concepts that underpin Pester’s functionality.
We began by understanding what Pester is and why it’s indispensable
for every PowerShell developer. Pester emerged as more than just a testing framework; it became the key to ensuring that PowerShell scripts are
robust, reliable, and precisely execute their intended tasks. By embracing Pester, you unlock the potential to write code with confidence, fostering a culture of reliability and efficiency.
The chapter continued by addressing various types of tests, each
serving a distinct purpose in the realm of software testing. We deciphered the nuances between unit tests, acceptance tests, and integration tests, employing a theatrical analogy to simplify these concepts.
Next, we navigated the intricacies of Pester files and their structures.
Understanding the anatomy of these files laid the groundwork for crafting well-organized and potent tests. We also explored Pester’s naming
conventions and file structures, emphasizing the importance of clear
categorization for different test types. This structuring ensures that tests are always in harmony with the code they validate.
This chapter provided a comprehensive foundation for the Pester
journey ahead. By comprehending the core concepts of Pester, including its purpose, types of tests, and file structures, you are equipped with the foundational knowledge required to harness the full potential of this
powerful testing framework.
In Chapter , we will focus on the key building blocks of Pester: Describe, Context, and It. These constructs provide the framework for structuring tests effectively, enabling us to validate different aspects of our scripts with precision. Let’s get cracking!
11
CHAPTER 2
Mastering Pester
Fundamentals
Welcome to the heart of Pester! In this chapter, we will delve deep
into the fundamental building blocks that empower Pester to work its
magic in the world of PowerShell testing. Understanding these core
elements – Describe, Context, It, BeforeAll, AfterAll, BeforeEach, and AfterEach – is akin to mastering the essential chords in music or the basic strokes in painting. They form the foundation upon which your Pester tests will stand strong and resilient.
We will demystify the structure and purpose of these elements, guiding you through their application. By the end of this chapter, you’ll not only comprehend the syntax and usage of Pester’s fundamental components
but also grasp their significance in crafting robust and reliable tests for your PowerShell scripts. So, let’s embark on this journey of mastering Pester fundamentals, where you will gain the skills needed to wield the testing power of Pester effectively.
Understanding Blocks in Pester
In the realm of Pester, every test script revolves around a fundamental structure comprising various special script blocks. Each of these blocks plays a specific role, some obligatory and others optional. Let’s start by unraveling the very cornerstone of a Pester test: the Describe block.
© Owen Heaume 2024
13
O. Heaume, Getting Started with Pester 5
Chapter 2 Mastering pester FundaMentals
Describe: The Pillar of Logical Organization
The Describe block stands as the foundational element, a compulsory presence in every Pester test. Its primary purpose is to encapsulate your tests within a coherent, logical group. Think of it as the opening act in a play, setting the stage for the performances to follow. This block fosters clarity and unity, making your tests not only functional but also visually organized.
Within the Describe block, you have the flexibility to nest other Describe blocks, although this practice is less common. Instead, there are more refined methods to create subgroups within your tests which we will explore shortly.
Furthermore, the Describe block can house any number of Context or It blocks, essential components we’ll also delve into shortly.
Syntax
Describe "Function Name" { }
Typically, the first Describe block encapsulates the name of the function being tested, offering a clear context for the ensuing tests. For instance,
Describe "Get-User" {
# Code continues here
}
Beyond its fundamental structure, the Describe block supports various parameters, some of which we’ll explore in more depth later in this book.
Understanding the nuances of the Describe block lays the foundation for well-organized and comprehensible Pester tests.
Next, we will uncover its sibling components – Context and It blocks – each adding a layer of specificity and detail to your tests.
14
Chapter 2 Mastering pester FundaMentals
Context: Adding Contextual Relevance
While Describe blocks create overarching categories, Context blocks add contextual relevance. They enable you to define specific scenarios within a Describe block. Think of a Context block as an act within the aforementioned play, breaking down the drama into distinct scenes.
Like the Describe block, it also supports several other parameters we’ll see later; however, unlike the Describe block, Context blocks are optional, and you can choose to use them or not. If you do use them, you can have any number of them nested within your Describe block.
Syntax
Context "Scenario Description" { }
Listinws how you might use Context blocks.
Listing 2-1. Using multiple Context blocks for added clarity Describe "Get-User" {
Context "When User Exists" {
# Tests for scenarios where user exists go here
}
Context "When User Doesn't Exist" {
# Tests for scenarios where user doesn't exist go here
}
}
It: Defining Specific Tests
At the heart of your Pester tests are the It blocks. These mandatory blocks define specific tests, encapsulating individual assertions about your code’s behavior. Each It block represents a unique test case, akin to pivotal moments within an act, providing detailed information about the unfolding drama.
15
Chapter 2 Mastering pester FundaMentals
Syntax
It "Specific Test Description" { }
Listintrates It blocks in action.
Listing 2-2. Each It block represents a test case for your code Describe "Get-User" {
Context "When User Exists" {
It "Should Retrieve User Information" {
# Specific test assertions go here
}
It "Should Return User's Full Name" {
# More test assertions go here
}
}
}
Understanding the roles of Describe, Context, and It blocks is akin to mastering the grammar of a language. With these foundational
elements, you can articulate precise, reliable, and informative tests for your PowerShell scripts. In the upcoming sections, we’ll explore these blocks in greater depth, unveiling their nuances and best practices. Let’s continue our exploration, building the expertise needed to wield the full power of Pester in your testing endeavors by looking at four other optional script blocks.
Setting the Stage with BeforeAll
In Pester, preparing the ground for your tests is crucial. That’s where the BeforeAll block steps in. This specialized script block acts as a backstage manager, ensuring everything is in order before the main performance
begins. Here’s a closer look at how it operates.
16
Chapter 2 Mastering pester FundaMentals
The nonmandatory BeforeAll block is designed to handle
preconditions necessary for your Describe or Context blocks. It executes once for the entire Describe or Context and runs only once, providing an efficient way to initialize essential elements for your tests.
The BeforeAll block can be used to set up anything your subsequent tests will require as a one-time operation, be that initializing variables to creating objects. Commonly, the BeforeAll block is used to import the function under scrutiny by dot sourcing it, setting the stage for subsequent tests. Here’s an example of its usage at different levels:
At the Container Level
BeforeAll {
# Dot source the function to be tested
}
Describe "Get-User" {
# Tests go here
}
At the Describe or Context Level
Describe "Get-User" {
BeforeAll {
# Set up specific conditions for this
# Describe or Context
$Name = "Owen"
}
It "Should Test Something" {
# Test using the initialized conditions
Get-User -Name $Name
}
}
17
Chapter 2 Mastering pester FundaMentals
In this way, the BeforeAll block acts as the backstage crew, ensuring a smooth performance for your tests by handling the necessary setup before the curtain rises.
Clearing the Stage with AfterAll
In the intricate theater of Pester testing, the performance isn’t truly over until the stage is spotless. Enter the AfterAll block, akin to the dedicated crew that tidies up after the grand spectacle. This nonmandatory
specialized script block ensures a seamless cleanup operation after all the tests have had their moment in the spotlight.
The AfterAll block is your backstage cleanup crew, responsible for removing any traces left behind after the tests have run their course. Just as the BeforeAll block sets the stage, the AfterAll block ensures that the stage is left pristine, ready for the next act. It executes once, after all the tests in the Describe or Context block have concluded, providing a singular opportunity to perform essential cleanup tasks.
Imagine this scenario: your tests create temporary files or databases to simulate real-world conditions. The BeforeAll block sets the scene, while the AfterAll block, much like a diligent cleaning crew, sweeps away these temporary constructs, leaving your system in a pristine state. Listing
shows an example of the AfterAll block in action.
Listing 2-3. The AfterAll block
BeforeAll {
# Code to set up resources for testing
New-Item -Path C:\Temp\TestFile.txt -ItemType File
}
Describe "Sample Test Suite" {
It "Should do something" {
# Test code
}
18
Chapter 2 Mastering pester FundaMentals
# More tests...
}
AfterAll {
# Code to clean up resources after testing
Remove-Item -Path C:\Temp\TestFile.txt -Force
}
In this scenario, the BeforeAll block stages the necessary resources, and the AfterAll block ensures a meticulous cleanup, even if some acts didn’t go as planned (i.e., some of the tests failed), leaving the testing environment as pristine as it was before the performance began. With the AfterAll block in place, your tests conclude with a flourish, leaving no trace of their existence behind.
Preparing the Ground with BeforeEach
When testing, consistency and reliability are paramount. The show must go on smoothly, regardless of the number of acts or performers. That’s where the BeforeEach block takes its cue, ensuring that every act is set up perfectly before it takes the stage. Let’s explore its crucial role in the Pester performance.
The BeforeEach block acts as the backstage crew of your tests,
diligently preparing the stage for each individual performance. It executes once before every It block within the current Context or Describe block.
Since It blocks are where the actual tests unfold, the BeforeEach block ensures that whatever is contained within its script block is executed right before each test. For example, if you have two It blocks within your Describe block, the BeforeEach block will execute twice, once for each It.
This block is commonly used to create prerequisites for the current
tests. Whether it’s initializing variables, setting up mock functions, or establishing connections, the BeforeEach block guarantees that each test starts on a level playing field, ensuring consistent and reliable outcomes.
19
Chapter 2 Mastering pester FundaMentals
Here’s an example of its implementation:
Describe "Testing Something" {
BeforeEach {
# Setup code here
}
It "should perform a specific task" {
# Test code here
}
It "should handle another task" {
# Test code here
}
}
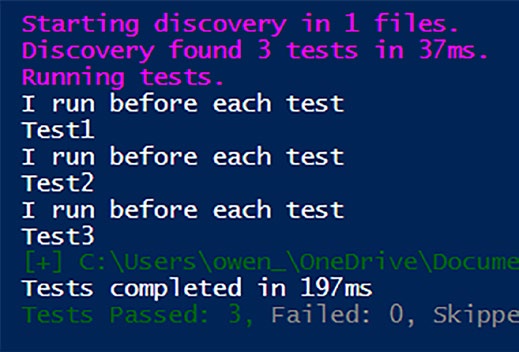
BeforeEach executes before any block within the current block or any of its child blocks. To illustrate, consider Listine the BeforeEach block will run before “Test1,” “Test2,” and “Test3,” ensuring each one starts on a level playing field.
Listing 2-4. BeforeEach in Action
Describe "Scope Test" {
BeforeEach {
# Code for setting up the stage
Write-host "I run before each test"
}
It "test1" {
Write-Host "Test1"
}
20
Chapter 2 Mastering pester FundaMentals
Context "The Context block" {
It "Test2" {
Write-Host "Test2"
}
It "test3" {
Write-Host "Test3"
}
}
}
Running Listinesents the following output as shown in Figur
Figure 2-1. The Write-Host output runs before every test
In this way, the BeforeEach block ensures that each test begins its performance with the same meticulously prepared stage, leading to a
consistent and flawless Pester production.
21
Chapter 2 Mastering pester FundaMentals
Nurturing Cleanliness with AfterEach
In the world of testing, ensuring a pristine environment after every trial is as crucial as the test itself. Enter AfterEach, your trusted cleanup crew in the Pester theater. Just as BeforeEach sets the stage, AfterEach ensures that the stage is left spotless after each performance, providing a fresh start for every subsequent test.
Much like its counterpart BeforeEach, AfterEach possesses the same attributes and operates with similar precision. AfterEach diligently follows every individual test within its current block or any of its child blocks.
It’s akin to a diligent janitor, swiftly tidying up the aftermath of each test, ensuring no residue is left behind.
By cleaning up any resources or setups used during the tests,
AfterEach maintains the integrity of your testing environment. Imagine it as a backstage team ensuring that every prop is back in its place and every costume is neatly hung after each act.
Note like its counterpart, AfterAll, AfterEach will run even if a test fails, guaranteeing test cleanup!
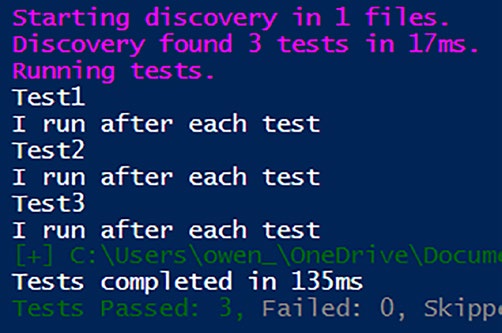
Listintrates AfterEach via Write-Host statements to show the execution flow.
Listing 2-5. AfterEach will run after each test
Describe "Scope Test" {
AfterEach {
# Code for setting up the stage
Write-host "I run after each test"
}
22
Chapter 2 Mastering pester FundaMentals
It "test1" {
Write-Host "Test1"
}
Context "The Context block" {
It "Test2" {
Write-Host "Test2"
}
It "test3" {
Write-Host "Test3"
}
}
}
Running Listin results in the following output as shown in Figur
Figure 2-2. The results of AfterEach
In the grand play of testing, AfterEach ensures that the stage is reset to its original state, ready for the next captivating performance.
23
Chapter 2 Mastering pester FundaMentals
Summary
In this chapter, we navigated through the foundational elements that
empower Pester. These essential building blocks, including Describe,
Context, It, BeforeAll, AfterAll, BeforeEach, and AfterEach, serve as
the fundamental chords in the symphony of Pester, forming the robust
foundation for crafting reliable tests.
We unraveled the structure and purpose of each element, emphasizing
their significance in creating tests for PowerShell scripts. By the chapter’s end, readers not only gained a comprehensive understanding of the syntax and usage of these components but also grasped their role in building
resilient and effective tests.
The chapter commenced with a focus on the Describe block, the
pillar of logical organization in Pester tests. Analogous to the opening act in a play, it sets the stage for performances by encapsulating tests within coherent, logical groups. We explored its syntax and nuances, laying the groundwork for the subsequent exploration of its siblings – Context and It blocks.
Context blocks were introduced as tools to add contextual relevance,
breaking down the drama into distinct scenes within a Describe block.
Their optional nature and ability to nest within Describe blocks were
highlighted, providing readers with a deeper understanding of their role in structuring tests.
The heart of Pester tests, the It block, was then spotlighted. As
mandatory components, It blocks define specific tests, encapsulating
individual assertions about code behavior. Each It block represents a
unique test case, contributing to the detailed narrative of the script’s performance.
Moving beyond these foundational elements, we explored four
optional script blocks – BeforeAll, AfterAll, BeforeEach, and AfterEach –
each playing a crucial role in orchestrating the testing performance.
24
Chapter 2 Mastering pester FundaMentals
BeforeAll, acting as the backstage manager, prepares the ground for
tests, executing once for the entire Describe or Context. It is a powerful tool for initializing essential elements for subsequent tests, ensuring a smooth performance.
AfterAll, the backstage cleanup crew, ensures a seamless cleanup
operation after all tests in the Describe or Context block have concluded. It removes any traces left behind, leaving the testing environment pristine for subsequent acts.
BeforeEach, likened to the backstage crew, diligently prepares the
stage for each individual performance. Executing before every It block within the current Context or Describe, it ensures consistent and reliable outcomes by setting up prerequisites for each test.
AfterEach, similar to BeforeEach, operates as a cleanup crew. It
maintains the integrity of the testing environment by swiftly tidying up after each test, ensuring a fresh start for subsequent performances.
With these fundamental elements and their detailed exploration,
readers are equipped to harness the full power of Pester in their testing endeavors. The chapter provided not only syntax insights but also practical examples, directing readers toward mastering the essentials of Pester.
Chaptwaits, guiding you through the practical aspects of Pester testing.
25
CHAPTER 3
Writing Your First
Tests
With a solid understanding of the fundamental concepts, it’s time to roll up your sleeves and start writing your first Pester tests. But before we dive into the practical aspects, let’s familiarize ourselves with some essential Pester cmdlets.
Pester Cmdlets
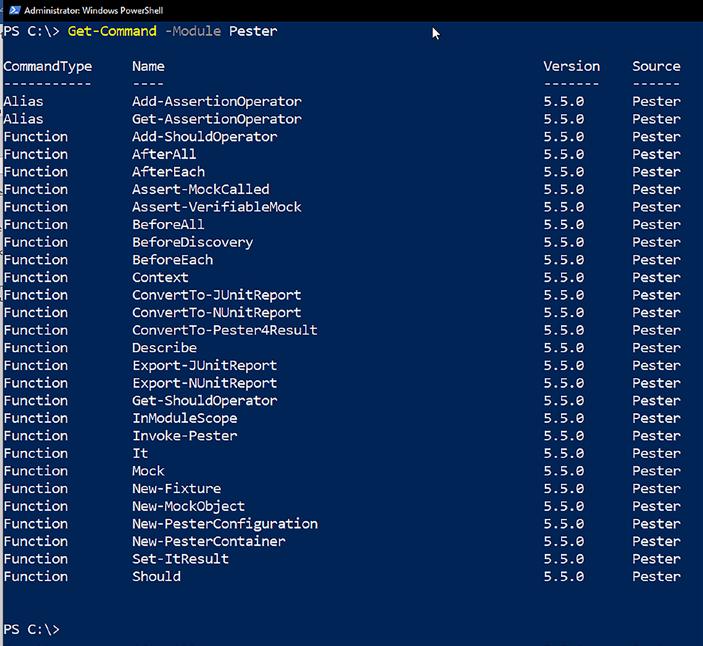
Pester, the PowerShell testing framework, features a collection of 28
cmdlets, including two aliases, as depicted in Figure . You will find yourself concentrating on approximately 13 or 14 of these cmdlets initially, streamlining the learning process. That’s under half the available cmdlets and very manageable!
© Owen Heaume 2024
27
O. Heaume, Getting Started with Pester 5
Chapter 3 Writing Your First tests
Figure 3-1. The available Pester cmdlets
To get a firm grip on their functionalities, I highly recommend
investing 10 minutes to explore the help documentation for each cmdlet.
You can do this by typing help <cmdlet> -full in a PowerShell window.
Although some of these cmdlets will be explored in later chapters, for now, let’s focus on three vital ones: It, Should, and Get-ShouldOperator.
28
Chapter 3 Writing Your First tests
It
The It command finds its home inside a Describe or Context block. If you’re well acquainted with the AAA pattern (Arrange-Act-Assert), (if not then do not fret – we will go over this shortly), the body of the It block is where assertions should be placed.
The convention here is to have one clear expectation per It block.
Any code inside the It block should throw a terminating error if the test’s expectation isn’t met, subsequently causing the test to fail. The name of the It block should explicitly express what the test is expecting.
The It block follows this structure:
It "tests something" { }
Should
In addition to creating your own logic for testing expectations and
throwing exceptions, Pester also provides the Should command, allowing you to perform assertions in plain language.
Should is a keyword specifically used to define assertions within an It block. It offers assertion methods to validate expectations, such as comparing objects. If an assertion isn’t met, the test fails, and an exception is thrown.
You can use Should multiple times within an It block if you have more than one assertion to verify. Each Should keyword should be on a separate line, and the test will only pass if all assertions are met.
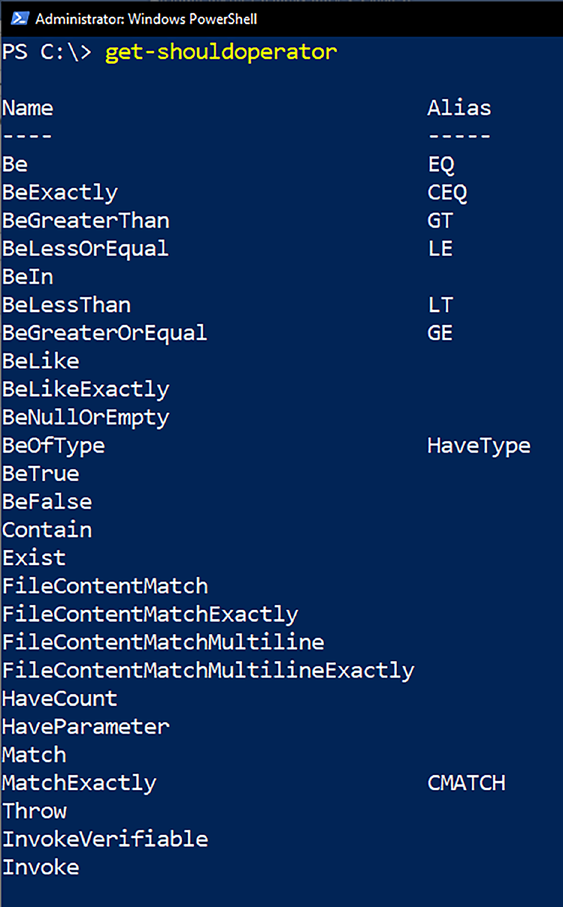
Get-ShouldOperator
Get-ShouldOperator returns a list of available Should parameters, their aliases, and examples to help you craft the tests you need. Especially beneficial for beginners, you can leverage it as a convenient reminder of which parameters are permissible and which are not.
29
Chapter 3 Writing Your First tests
Figurws the output of Get-ShouldOperator.
Figure 3-2. A list of all the valid Should operators
30
Chapter 3 Writing Your First tests
This knowledge will lay a strong foundation for you to start crafting
your own Pester tests. Let’s move forward and put these concepts into
action using It, Should and a few should operators.
The Structure of a Test
At its core, a test comprises at least one Describe block and one It block, with the It block encapsulating the actual test logic. The fundamental syntax is demonstrated in Listing .
Listing 3-1. Basic test syntax
Describe "The function being tested" {
it "tests something" {
# The test goes here
}
}
To illustrate, let’s craft a sample test using a straightforward function, Get-Boolean (shown in Listing ). This function returns either true or false based on the supplied parameter.
Listing 3-2. The Get-Boolean function to be tested
function Get-Boolean {
param (
[ValidateSet ('True','False')]
$myBoolean
)
if ($myBoolean -eq 'True') {
$true
31
Chapter 3 Writing Your First tests
} else {
$false
}
}
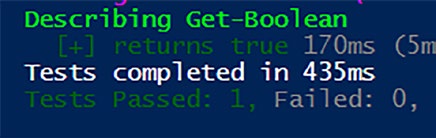
Now, we can construct tests for this function, as demonstrated in
Listinith the test execution result shown in Figure .
Listing 3-3. Testing the function logic. It should return True Describe "Get-Boolean" {
it "returns true" {
$expectedResult = Get-Boolean -myBoolean True
$expectedResult | should -BeTrue
}
}
Figure 3-3. The test result
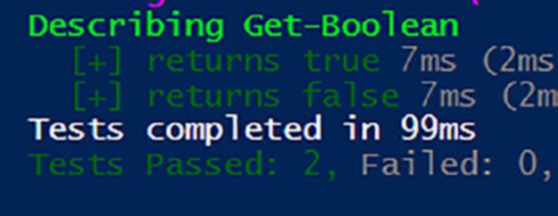
Testing True and False Scenarios
To expand our test coverage for the Get-Boolean function, we can introduce additional tests to verify its behavior for both true and false scenarios. In Listing , two tests are implemented.
32
Chapter 3 Writing Your First tests
Listing 3-4. Adding another test
Describe "Get-Boolean" {
it "returns true" {
$expectedResult = Get-Boolean -myBoolean True
$expectedResult | should -BeTrue
}
it "returns false" {
$expectedResult = Get-Boolean -myBoolean False
$expectedResult | should -BeFalse
}
}
In the first test, we ensure that the function returns true when provided with the parameter True. The $expectedResult is then piped to Should -BeTrue for assertion.
Conversely, the second test examines the behavior of the function
when the parameter is set to False. The expected result is piped to Should -BeFalse for verification. Figurws the test results.
Figure 3-4. The test results
33
Chapter 3 Writing Your First tests
By incorporating these tests, we establish a more comprehensive
examination of the Get-Boolean function, validating the function logic in both true and false scenarios. This approach aligns with the AAA pattern –
Arranging the test, Acting on the code, and Asserting the expected
outcome. As we progress, we’ll explore more complex scenarios and
assertions to fortify our testing practices.
The AAA Pattern: Arrange, Act, Assert
Adhering to a structured testing methodology enhances the clarity and
effectiveness of your tests. The AAA pattern – Arrange, Act, and Assert – is a widely adopted approach in writing meaningful and maintainable tests.
Arrange
In the Arrange phase, you set up the necessary preconditions for your test.
This includes initializing variables, defining inputs, and configuring the environment to mimic the conditions under which your code will run. This phase is crucial for isolating the specific functionality you want to test.
In the Listing , the creation of $expectedResult is part of the Arrange phase. Here, we’re preparing the context for the subsequent
action and assertion.
Listing 3-5. Arrange
Describe "Get-Boolean" {
It "returns true" {
# Arrange
$expectedResult = Get-Boolean -myBoolean True
$expectedResult | Should -BeTrue
}
}
34
Chapter 3 Writing Your First tests
Act
The Act phase involves executing the specific functionality or code that you are testing. This is where you perform the actions that will produce the result you intend to evaluate as shown in Listin.
Listing 3-6. Act
Describe "Get-Boolean" {
It "returns true" {
# Arrange # Act
$expectedResult = Get-Boolean -myBoolean True
$expectedResult | Should -BeTrue
}
}
The invocation of Get-Boolean -myBoolean True represents the Act phase. We are triggering the function with a specific input to observe its behavior.
Assert
The Assert phase is where you verify the outcome of the executed code. It checks whether the actual result aligns with the expected result. In Pester, this is often done using the Should command with various operators as demonstrated in Listing .
Listing 3-7. Assert
Describe "Get-Boolean" {
It "returns true" {
# Arrange # Act
$expectedResult = Get-Boolean -myBoolean True
35
Chapter 3 Writing Your First tests
# Assert
$expectedResult | Should -BeTrue
}
}
In this example, Should -BeTrue is the assertion, confirming that the result obtained in the Act phase meets our expectations.
Adopting the AAA pattern provides a systematic and clear structure to
your tests, making it easier to understand, maintain, and extend your test suite as your code evolves. To summarize AAA, let’s relate it to the theater analogy used throughout this book so far.
The AAA Theater: A Pester Production
Imagine your test scenario as a theatrical performance – an intricate play unfolding on the stage of your development environment. In this theatrical setting, the AAA pattern takes center stage as the director, orchestrating a flawless performance.
Act 1: Arrange – Setting the Stage
The curtain rises on the Arrange phase, where actors (variables and environment setup) take their positions on the stage. Props are arranged, costumes are donned, and the scene is meticulously prepared. This is the moment when the backstage crew ensures that everything is ready for the upcoming act.
Act 2: Act – The Main Performance
As the lights focus on the main stage, the Act phase commences. The lead actors (your code) step forward, delivering their lines and executing their roles. The plot unfolds as the code comes to life, performing the actions that will shape the narrative of your test.
36
Chapter 3 Writing Your First tests
Act 3: Assert – The Grand Finale
The grand finale arrives in the Assert phase, akin to the climactic scene of the play. The audience (your test suite) eagerly awaits the resolution. Did the actors (code) deliver the expected performance? The assert phase is the critical moment of truth, where the success or failure of the production is revealed.
Just as a well-orchestrated theater production requires seamless
coordination between the arrangement of actors, the execution of the play, and the final judgment of its success, the AAA pattern ensures a structured and effective performance in the theater of testing. Each act plays a vital role, contributing to the overall quality of the show. So, let the AAA Theater guide your testing endeavors, ensuring a standing ovation for your code.
A Glimpse into Should Operators
In our exploration of Pester’s Should command, the diverse array of operators, as showcased earlier in Figurght have caught your eye.
While many of them are quite intuitive, a few might benefit from a bit more clarification. Let’s delve into a couple of these operators.
-HaveParameter Operator
If your aim is to verify that your function boasts the expected parameters, then the -HaveParameter operator is your go-to. Consider our example function, Get-Boolean, which features a lone parameter, $MyBoolean.
To ensure this parameter persists and hasn’t undergone any unintended
alterations in future code revisions, we can employ PowerShell’s
Get-Command cmdlet, as illustrated in Listing .
37
Chapter 3 Writing Your First tests
Listing 3-8. Testing for parameters
Describe Get-Boolean {
It "Should contain the correct parameters" {
Get-Command Get-Boolean | Should -HaveParameter
"myBoolean"
}
}
In this snippet, we assert that our function contains the $MyBoolean parameter. Now, let’s unpack what’s happening here.
Explanation
1. Get-Command Get-Boolean: Utilizes the Get-
Command cmdlet to retrieve information about the
Get-Boolean function.
2. Should -HaveParameter “myBoolean”: Employs
the -HaveParameter operator to check whether
the function includes the specified parameter,
in this case, “myBoolean”. (Note the quotes
around myBoolean are optional, and there is no
preceding “$”.)
Note if you wish to check that the function parameter is mandatory, then add -Mandatory to the end of the assertion like so: Get-Command Get-Boolean | Should -HaveParameter
-Mandatory
38
Chapter 3 Writing Your First tests
What Have We Accomplished?
By crafting this test, we’ve established a validation mechanism to ensure that the critical parameter, $MyBoolean, is intact within our function.
This guards against accidental removal or renaming, contributing to
the robustness and reliability of our code. In the broader context of your testing arsenal, leveraging operators like -HaveParameter adds precision to your tests, safeguarding the integrity of your functions as they evolve over time.
-BeOfType Operator
As we navigate the realm of Pester’s Should command, the -BeOfType operator emerges as a valuable tool for verifying the type of object
returned by a function. This proves especially handy when you want to
ensure that your function delivers an object of a specific type, be it a string, a PSCustomObject, or another data type.
-BeOfType Operator in Action
Let’s apply this operator to our familiar companion, the Get-Boolean function, which we know yields a Boolean result. In Listing , we craft a test to confirm this expected outcome.
Listing 3-9. Should Operator -BeOfType
Describe Get-Boolean {
It " Should contain the correct parameters" {
$expectedResult = Get-Boolean -myBoolean True
$expectedResult | Should -BeOfType Bool
}
}
39
Chapter 3 Writing Your First tests
Explanation
1. $expectedResult = Get-Boolean -myBoolean
True: Invokes the Get- Boolean function, capturing
its result in the $expectedResult variable.
2. $expectedResult | Should -BeOfType Bool: Uses
the -BeOfType operator to assert that the type of
the result stored in $expectedResult is indeed a
Boolean.
A Note on Syntax Following -BeOfType, you have flexibility in specifying the data type. in this instance, we use “Bool” to indicate
a Boolean type. alternatively, you could employ “Boolean,” “system.
Boolean,” or even “[system.Boolean]” – all achieving the same
validation.
What Have We Accomplished?
This test ensures that the Get-Boolean function adheres to its expected behavior by returning a result of the correct data type. Verifying the type of output becomes crucial as it adds an extra layer of certainty to the function’s performance. With -BeOfType and similar operators in your arsenal, you establish a robust defense against unexpected changes in
your code’s behavior. As our exploration advances, we’ll continue to
uncover additional operators that enhance the precision and reliability of your tests.
40
Chapter 3 Writing Your First tests
Running Your Tests
Writing tests is one thing, but executing them is the crucial next step in ensuring the reliability of your code. Let’s explore a couple of methods to set your tests in motion.
Inline Execution
The simplest method involves embedding your tests directly within the
script containing the functions under examination. In this approach, tests follow the functions they scrutinize, as demonstrated in Listing
Listing 3-10. Inline testing
function Get-Boolean {
param (
[ValidateSet ('True','False')]
$myBoolean
)
if ($myBoolean -eq 'True') {
$true
} else {
$false
}
}
Describe Get-Boolean {
It " Should contain the correct parameters" {
$expectedResult = Get-Boolean -myBoolean True
$expectedResult | Should -BeOfType Bool
}
}
41
Chapter 3 Writing Your First tests
Dot Sourcing
Another strategy involves segregating each function into its individual file, such as MyFunction1.ps1 and MyFunction2.ps1. With dot sourcing, you
can then incorporate the functions and tests for execution, as illustrated in Listin
Listing 3-11. Dot sourcing the function
BeforeAll {
. $PSCommandPath.Replace('.Tests.ps1', '.ps1')
}
Describe Get-Boolean {
It " Should contain the correct parameters" {
$expectedResult = Get-Boolean -myBoolean True
$expectedResult | Should -BeOfType Bool
}
}
Decoding the BeforeAll Section
The BeforeAll block plays a pivotal role in the dot sourcing method.
Specifically, it ensures the execution of the script containing the functions before the tests commence. Here, $PSCommandPath comes into play, containing the full path and name of the script that is currently being run.
Of course, your .tests file needs to be located in the same directory as the function script being tested, or it won’t work.
In the context of Listinath is manipulated to replace
‘.Tests.ps1’ with ‘.ps1,’ ensuring that the correct script is sourced before the tests are initiated.
42
Chapter 3 Writing Your First tests
Feel free to dot source the functions any way you like if you prefer to use . $PSScriptRoot/myFunction.ps1 or a more long-winded method
then go ahead.
Caution ensure that you wrap the dot source command within the BeforeAll script block; otherwise, it won’t work.
If your function.ps1 file is in a different location to your .tests, you could still dot source it by explicitly naming the path like this:
BeforeAll {
$scriptPath = "C:\Path\To\Your\Script.ps1
. $scriptPath
}
This careful orchestration guarantees that the functions are
seamlessly integrated into the testing environment, setting the stage for comprehensive evaluations.
Import-Module
When working with PowerShell modules and aiming to test the functions
encapsulated within them, the process involves importing the module
before executing the tests. This method proves invaluable for assessing the behavior and correctness of functions within the modular structure of your scripts.
In the following example, presented in Listin, we showcase how to seamlessly import a module to facilitate testing. This becomes
particularly relevant when your script is organized into modular
components, and you want to test each function’s functionality
independently.
43
Chapter 3 Writing Your First tests
Listing 3-12. Importing the module before tests
BeforeAll {
$moduleName = 'yourModuleName'
Get-Module -Name $moduleName -All | Remove-Module -Force
$module = Get-Module -Name $moduleName -ListAvailable
Import-Module -Name $module -Force
}
Describe "A function in the module" {
It "tests something" {
# test code
}
}
Note it’s crucial to recognize that with this approach, you can exclusively test functions that have been exposed publicly by the
module. this won’t work for private functions, and we’ll address this
later in the book.
Decoding the BeforeAll Section
The BeforeAll block plays a crucial role in the process of importing modules. In this context, it ensures the designated module, identified by
‘yourModuleName,’ is removed and then imported before the tests begin.
This guarantees a clean slate for testing the specific module functions.
Integrating Testing into Your Workflow
By embracing different execution methods, you gain the flexibility to
seamlessly integrate testing into your development workflow. Whether
you opt for the straightforward approach of inline execution, leverage 44
Chapter 3 Writing Your First tests
the organizational advantages of dot sourcing, or harness the modular
structure by importing modules, the decision is entirely yours. Each
method caters to various preferences and project requirements.
Invoke the Magic
While it’s convenient to press the “play,” “execute,” or “Run Script” button in your chosen IDE to run tests, consider leveraging the power of the
Invoke-Pester command for a more insightful experience.
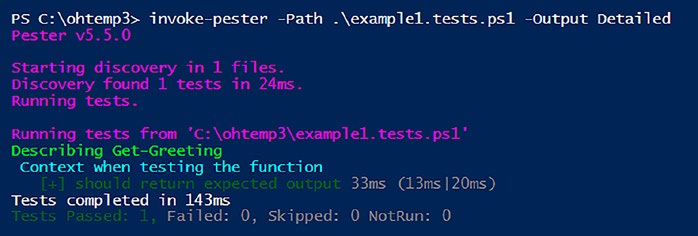
Executing tests through Invoke-Pester offers a deeper understanding of the various structures of your tests. For instance, if you opt for the traditional “run scripts” method or press F5 in the integrated Windows PowerShell IDE, you’ll receive an output similar to what’s shown in
Figur
Figure 3-5. Basic test output
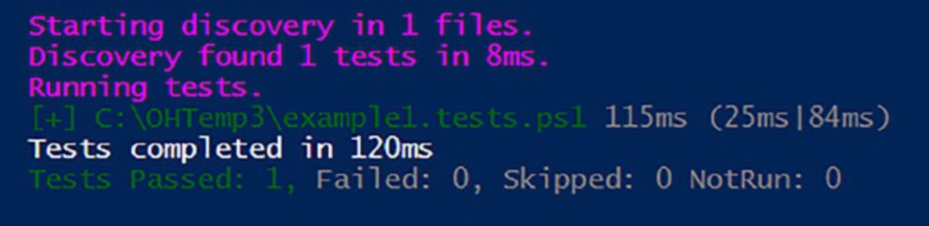
However, using Invoke-Pester introduces a wealth of parameters, including the powerful -Output option. When set to “detailed,” this parameter transforms the output significantly, providing a more
comprehensive test analysis, as illustrated in Figure for the same set of tests.
45
Chapter 3 Writing Your First tests
Figure 3-6. Detailed output. Use the -Path parameter to point to the
.tests.ps1 file location
Now, you can visualize a detailed breakdown of the different blocks the tests have passed through.
In later chapters, we’ll delve into some of the other valuable
parameters offered by Invoke-Pester.
Summary
In this chapter, you embarked on the practical journey of writing your initial Pester tests, laying a foundation for robust and reliable PowerShell scripts. You explored essential Pester cmdlets, focusing on It, Should, and Get-ShouldOperator. The chapter delved into the fundamental structure of a test, featuring the Describe and It blocks, and illustrated the process with a sample test for the Get-Boolean function.
The AAA pattern – Arrange, Act, and Assert – emerged as a guiding
principle for structuring tests systematically. Through theatrical analogies, the chapter compared testing phases to a well-orchestrated play,
emphasizing the importance of setting the stage, executing the main
performance, and delivering a grand finale.
The introduction of two vital Should operators, -HaveParameter and
-BeOfType, added precision to your tests. You explored testing parameters’
existence and validating object types, enhancing the reliability of your scripts.
46
Chapter 3 Writing Your First tests
Execution methods, including inline execution, dot sourcing, and
module importing, were thoroughly examined. Each method was
explained, decoded, and contextualized within the broader framework of integrating testing into your development workflow.
Additionally, the chapter touched upon the power of Invoke-Pester,
providing a deeper insight into test structures and paving the way for a more comprehensive understanding of your script’s performance.
In Chapter , you will delve into the nuanced world of block scope within Pester. Understanding how variables and scopes behave in different blocks is crucial for writing effective and maintainable tests. As you master block scope in Pester, you’ll gain insights that elevate your testing practices, contributing to the overall excellence of your PowerShell scripts.
Get ready to enhance your skills and refine your testing prowess in the upcoming chapter!
47
CHAPTER 4
Mastering Block
Scope in Pester
As we journey through Pester testing, mastering the concept of block
scope is paramount for ensuring the accuracy and reliability of your tests.
This chapter delves deep into the intricacies of block scope, unraveling its nuances and clarifying its importance in Pester scripting. Through meticulous examination and hands-on exploration, we will navigate the
terrain of block scope, providing you with the insights and understanding necessary to craft robust and precise tests in Pester.
Defining Block Scope
Consider our illustrative function, Get-Greeting (Listinigned to greet users based on their names.
Listing 4-1. The function being tested
function Get-Greeting {
param (
[string]$Name
)
if ($name -eq "Owen") {
write-host "Hello $name" -ForegroundColor green
© Owen Heaume 2024
49
O. Heaume, Getting Started with Pester 5
Chapter 4 Mastering BloCk sCope in pester
return 5
} elseif ($name -eq "Judith") {
write-host "Hello, Judith" -ForegroundColor Cyan
return 6
} else {
write-host "Who are you?" -ForegroundColor Magenta
return 7
}
}
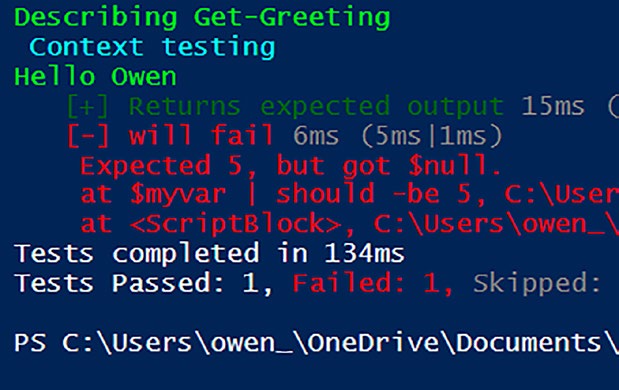
When testing this function with Pester (Listing ou encounter an issue: the variable $myvar, declared in the Arrange phase within the first It block, is invisible to subsequent blocks within the same context, causing a test failure.
Listing 4-2. The second test will fail
Describe "Get-Greeting" {
context "testing" {
It "Returns expected output" {
# Arrange
$myvar = 5
# Act
$expected = Get-Greeting -Name 'Owen'
# Assert
$expected | Should -Be $myvar
}
50
Chapter 4 Mastering BloCk sCope in pester
it "will fail" {
# Assert
$myvar | should -be 5
}
}
}
In Figurou can see the results of the Pester test – note the second test has failed.
Figure 4-1. The second test failed because of a scoping issue Elevating Scope with BeforeAll
To grant accessibility of $myvar to all It blocks within the context, you can employ the BeforeAll block, as demonstrated in Listing .
Importantly, BeforeAll will now apply to all child blocks of the context level, ensuring the smooth execution of tests and underscoring the
necessity of defining code elements at appropriate scope levels.
51
Chapter 4 Mastering BloCk sCope in pester
By defining BeforeAll at the Context level, any code elements within it become visible to all tests within that context.
Listing 4-3. Moving BeforeAll to the Context block
Describe "Get-Greeting" {
context "testing" {
BeforeAll {
$myvar = 5
}
It "Returns expected output" {
# Act
$expected = Get-Greeting -Name 'Owen'
# Assert
$expected | Should -Be $myvar
}
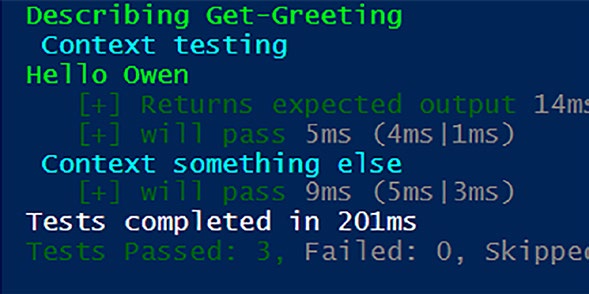
it "will pass" {
# Assert
$myvar | should -be 5
}
}
}
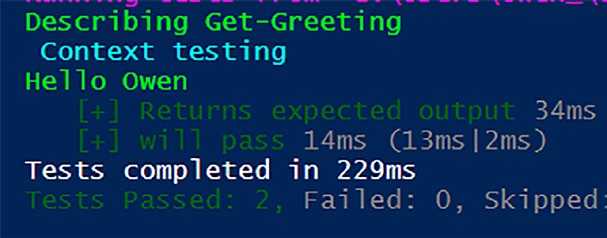
With the scope changed, the tests both pass as shown in Figur
52
Chapter 4 Mastering BloCk sCope in pester
Figure 4-2. All tests now pass
Note keen-eyed readers might have noticed the somewhat
unattractive inclusion of “hello owen” within the test output. Fear
not, for this less-than-ideal embellishment in the test results can be effortlessly addressed. Further insights into this matter will unfold in the forthcoming chapter dedicated to the art of mocking.
Contextual Hierarchies and Limitations
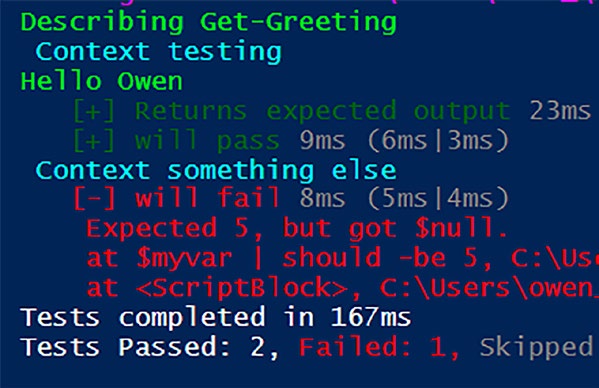
Navigating through different contexts reveals a crucial aspect of block scope: BeforeAll is inherited only by child scopes of its context. Listing
demonstrates this: the test within the second context block will fail.
Listing 4-4. Tests in the second Context block will fail Describe "Get-Greeting" {
context "testing" {
BeforeAll {
$myvar = 5
}
53
Chapter 4 Mastering BloCk sCope in pester
It "Returns expected output" {
# Act
$expected = Get-Greeting -Name 'Owen'
# Assert
$expected| Should -Be $myvar
}
it "will pass" {
# Assert
$myvar | should -be 5
}
}
Context "something else" {
it "will fail" {
# Assert
$myvar | should -be 5
}
}
}
In Figurou can see that the test within the second context block has failed.
54
Chapter 4 Mastering BloCk sCope in pester
Figure 4-3. Oh no – an unexpected test failure due to scope definition To broaden the variable's scope across all contexts, you move the
BeforeAll block to the parent scope, the Describe block, as shown in Listinow, every context (and its child blocks) within the Describe block has access to the top-level variables because the BeforeAll will apply to any and all child blocks of the Describe block.
Listing 4-5. BeforeAll has moved up a level. All tests now pass Describe "Get-Greeting" {
BeforeAll {
$myvar = 5
}
context "testing" {
It "Returns expected output" {
55
Chapter 4 Mastering BloCk sCope in pester
# Act
$expected = Get-Greeting -Name 'Owen'
# Assert
$expected | Should -Be $myvar
}
it "will pass" {
# Assert
$myvar | should -be 5
}
}
Context "something else" {
it "will pass" {
# Assert
$myvar | should -be 5
}
}
}
After shifting the scope up a level, the tests now pass as expected as shown in Figure .
56
Chapter 4 Mastering BloCk sCope in pester
Figure 4-4. The scope is in the Describe block and all tests pass The Perils of Unbounded Scope
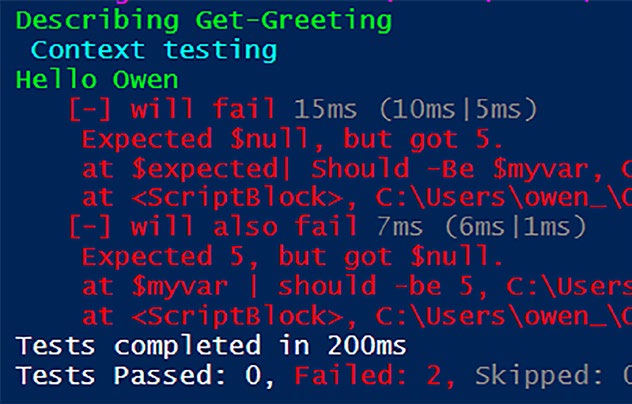
Attempting to declare $myvar outside the allowed blocks as shown in Listinads to unexpected outcomes. All tests fail because $myvar has not been declared within a valid script block.
Listing 4-6. Doomed to failure
Describe "Get-Greeting" {
context "testing" {
$myvar = 5
It "will fail" {
# Act
$expected = Get-Greeting -Name 'Owen'
# Assert
$expected| Should -Be $myvar
}
57
Chapter 4 Mastering BloCk sCope in pester
it "will also fail" {
# Assert
$myvar | should -be 5
}
}
}
In the code examples for this chapter, we have been using BeforeAll although other blocks may be used. Your various code elements must be encapsulated within designated script blocks, such as It, BeforeAll, BeforeEach, AfterAll, or AfterEach. Straying from these guidelines results in unpredictable behavior, as shown in Figurphasizing the importance of adhering to specified scopes.
Figure 4-5. All your code elements must be encapsulated within a valid script block. In Listin , $myvar has been declared in the context block but is not within its own script block, such as BeforeAll or BeforeEach, causing all tests to fail
58
Chapter 4 Mastering BloCk sCope in pester
Our Ubiquitous Theater Analogy
In software testing, understanding block scope is akin to directing a
multifaceted stage production. Each script block – be it It, BeforeAll, BeforeEach, AfterAll, or AfterEach – represents a distinct act in the play.
Within these acts, variables, commands, and other testing elements
are performers, each playing a role crucial to the overall performance.
The director (tester) ensures that every element, from simple variables to complex commands, understands their place and purpose within their
designated acts.
Just as actors seamlessly transition between scenes, variables and
commands flow flawlessly from one block to another, creating a cohesive and impactful testing narrative.
This orchestration ensures that when the curtains rise (tests run),
the entire production unfolds with precision and effectiveness, leaving the audience (developers and stakeholders) in awe of the seamless
performance on the testing stage.
Summary
In this chapter, we delved into the critical concept of block scope within Pester testing. The chapter meticulously explored the nuances of block scope, clarifying its intricacies and highlighting its pivotal role in crafting accurate and reliable tests. Through hands-on exploration, we navigated the landscape of block scope, offering insights and understanding to
empower you in the creation of robust and precise Pester tests.
The journey began with the definition of block scope, using the
illustrative function Get-Greeting to demonstrate the challenges posed by variable scope within Pester. The chapter emphasized the importance of defining code elements at appropriate scope levels for smooth test
execution.
59
Chapter 4 Mastering BloCk sCope in pester
We explored the introduction of BeforeAll to elevate scope, ensuring
variables are accessible to all It blocks within a context. The contextual hierarchies and limitations were uncovered, emphasizing the inheritance of BeforeAll only by child scopes of its context. The solution was presented by moving the BeforeAll block to the parent scope, the Describe block.
The chapter highlighted the perils of unbounded scope, illustrating
the unexpected outcomes of declaring variables outside valid script
blocks. The importance of encapsulating code elements within designated script blocks, such as It, BeforeAll, BeforeEach, AfterAll, or AfterEach, was underscored for predictable behavior.
Finally, our ubiquitous theater analogy portrayed understanding block
scope as directing a multifaceted stage production. Each script block
represented a distinct act, and variables and commands played crucial
roles akin to performers. The director (tester) orchestrated a seamless flow of elements between acts, ensuring a cohesive and impactful testing narrative.
Next, in Chapter , we'll explore the efficiency of Pester's -ForEach parameter and delve into the world of data-driven testing, enhancing the scalability and readability of your Pester test suite.
60
CHAPTER 5
Data-Driven Tests
Efficiency in testing is not just about ensuring the functionality of
individual components but also about managing your testing suite
intelligently. As your PowerShell scripts evolve and diversify, you may encounter scenarios where numerous tests share a common structure or
objective. Writing these tests individually can be time-consuming and may lead to redundancy in your codebase.
Drawing inspiration from the principles of data-driven testing, this
chapter explores how to leverage the -ForEach parameter in Pester. We’ll guide you through its application, demonstrating how it enables you to create concise and maintainable tests. By the end of this chapter, you’ll not only understand the mechanics of -ForEach but also appreciate its role in enhancing the efficiency and readability of your Pester test suite.
Testing the Waters: Rigorous Evaluation
of Remove-Files Functionality
In the journey of mastering Pester, we encounter scenarios where a
function, like the illustrative Remove-Files in Listinecomes a pivotal element of our PowerShell arsenal. This function adeptly deletes files based on specified parameters, showcasing the functionality that we want to subject to rigorous testing.
© Owen Heaume 2024
61
O. Heaume, Getting Started with Pester 5
Chapter 5 Data-Driven tests
Listing 5-1. Remove-Files – our sample function
function Remove-Files {
param (
[ValidateSet ('txt', 'log', 'tmp')]
[string]$FileType,
[Parameter(Mandatory = $true)]
[string]$Path
)
switch ($FileType) {
'txt' { Remove-Item -Path $Path\*.txt -Force }
'log' { Remove-Item -Path $Path\*.log -Force }
'tmp' { Remove-Item -Path $Path\*.tmp -Force }
}
}
As diligent testers, we start by crafting tests for Remove-Files, as depicted in Listing . Each test focuses on a specific file type, ensuring our function behaves as expected.
Listing 5-2. Initial tests
Describe 'Remove-Files' {
Context 'when removing files from the specified path' {
It 'should remove all txt files' {
Remove-Files -FileType 'txt' -Path 'C:\Temp'
$files = Get-ChildItem -Path 'C:\Temp'
-Filter '*.txt'
$files | Should -BeNullOrEmpty
}
62
Chapter 5 Data-Driven tests
it 'should remove all log files' {
Remove-Files -FileType 'log' -Path 'C:\Temp'
$files = Get-ChildItem -Path 'C:\Temp'
-Filter '*.log'
$files | Should -BeNullOrEmpty
}
it 'should remove all tmp files' {
Remove-Files -FileType 'tmp' -Path 'C:\Temp'
$files = Get-ChildItem -Path 'C:\Temp'
-Filter '*.tmp'
$files | Should -BeNullOrEmpty
}
}
}
Warning it’s essential to be aware that executing Listing
would result in the deletion of files. We plan to address this scenario in a later chapter. Kindly refrain from running this in a production
environment or any environment where you want to keep your files!
Reviewing Chapter Insights with Listing
Before we proceed with adapting our test to embrace a data-driven
approach, let’s pause and reinforce our understanding of previous
chapters by dissecting the details of Listing .
63
Chapter 5 Data-Driven tests
Describe ‘Remove-Files’
This initiates a test suite or group named ‘Remove-Files’, providing a logical container for related tests.
Context ‘when removing files
from the specified path’
Within the ‘Remove-Files’ suite, there is a context defined. A context is a way to further organize tests within a suite based on specific scenarios or conditions. In this case, the context is ‘when removing files from the specified path’, indicating that the following tests will focus on the behavior of Remove-Files under this circumstance.
It ‘should remove all txt files’
Inside the context, there is an individual test defined using the It statement. This test checks the behavior of the Remove-Files function
when instructed to remove all ‘.txt’ files from the ‘C:\Temp’ path.
Remove-Files -FileType 'txt' -Path 'C:\Temp'
$files = Get-ChildItem -Path 'C:\Temp' -Filter '*.txt'
$files | Should -BeNullOrEmpty
1. Remove-Files -FileType ‘txt’ -Path ‘C:\Temp’:
This line calls the Remove-Files function with
the parameters set to delete ‘.txt’ files from the
specified path.
2. $files = Get-ChildItem -Path ‘C:\Temp’ -Filter
‘*.txt’: This line retrieves all ‘.txt’ files in the
‘C:\Temp’ directory and assigns them to the
variable $files.
64
Chapter 5 Data-Driven tests
3. $files | Should -BeNullOrEmpty: This line uses
the Pester Should statement to assert that the $files
variable should be null or empty. In other words,
it checks that all ‘.txt’ files have been successfully
removed.
The subsequent tests for log and tmp files follow a similar structure, each verifying that the corresponding file types are removed from the

