Pixel Engine
This is a good brush engine to begin with since it is similar to other painting applications. With brush editors in other applications, you generally start out choosing a brush tip. This might be a leaf shape, a rock texture, or a simple circle. From there, you start to add settings such as opacity, scattering, or rotation. This is a similar process to how the Pixel engine works in Krita.
The Pixel engine gives you the most options when creating a brush. This is why you find so many brush presets that use this brush engine.
To avoid being redundant, we will go over many of the settings only once while explaining the Pixel engine. For the rest of the brush engines, we will only go over the unique settings that haven’t been covered. I try to provide examples for settings that are hard to describe.
If you really want to understand what these settings do, I encourage you to actively play around with the brush engine settings as they are being explained. Let’s start with the first setting for the Pixel engine.
Brush Tip Setting
Determine what you want the tip of your brush to look like. You can only have one type of brush tip selected. Changing the type will reset any settings that might have been done in other brush tip types. The different brush tip types are seen below.
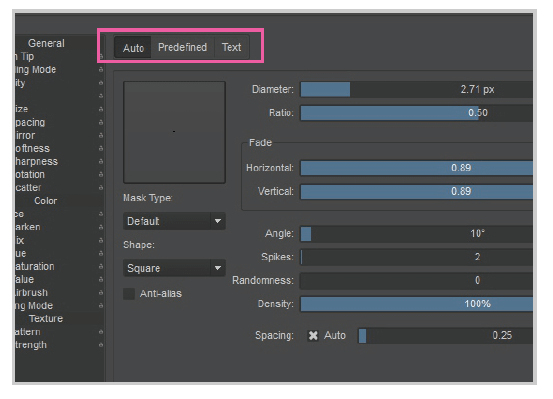
The brush tip can only have one type. There are three different brush tip types you can choose from.
Auto Brush Tip
Define your brush tip with a series of sliders and checkboxes. Many brushes need simple tips, so this can be a quick option. In the following example, I am slowly adding more properties.
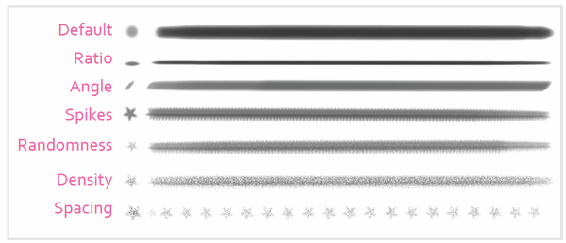
The Spikes setting will only be visible if your brush is noncircular. Also notice the similarity between the Randomness and Density settings.
The Randomness slider takes the pixel information and randomizes it on the canvas. The Density slider takes pixel information away as the slider is decreased.

Warning
The Randomness setting is significantly more computer intensive than the Density setting. Try to avoid the Randomness setting at all cost. It can make your brush strokes very slow.
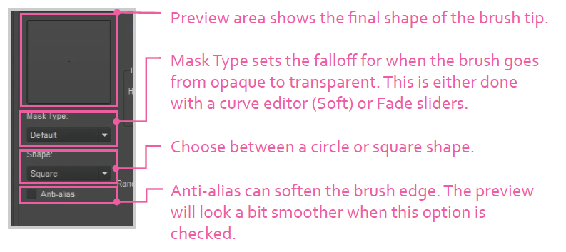
There are some basic shapes you can select on the left side of the Brush Tip setting. These allow you to see a preview of the shape and specify a mask.
Precision Setting
When it comes to creating brushes, sometimes quality comes at the expense of performance. Having a really large brush can slow your computer down. The Precision setting tries to solve this quality versus performance issue. The precision values range from 1 to 5. When Precision is set to 5, the brushes will be drawn at maximum quality. When Precision is set to 1, the brush quality decreases, but the performance will increase. By performance increase, I mean that the brush will have less lag and keep up with your pen movements better.

There is also an Auto checkbox to the left of Precision. This lets you configure a couple of settings to determine the precision level. There is a little bit of math that goes on with how this works.
- Starting Brush Size – 0 to 99 px. This will be the starting pixel size when the quality will be reduced. If you use line art and your brush will usually stay under 20, you would set this to 20.
- Delta – 0 to 99 px. This is used as an incremental variable. If set to 10, and your Starting Brush Size is set to 20, the precision will change when these brush size increments are reached.
As an example, say you set your Starting Brush Size to 20 and your Delta value to 15. This is how your brush quality would change:
- Precision 5 – brush size of 20 pixels or below.
- Precision 4 – brush size of 35 pixels to 50 pixels.
- Precision 3 – brush size of 50 pixels to 65 pixels.
- Precision 2 – brush size of 65 pixels to 80 pixels.
- Precision 1 – brush size of 80 pixels and higher.
Brush sizes can be as large as 1,000 px, so make sure your Delta value is large enough to give a nice distribution between high and low quality. Some presets have the Starting Brush Size set to 0 px and only have a Delta value. This will use the Delta value to determine what breakpoints will be used. For example, if we set the Starting Brush Size to 0 px and the Delta to 10 px, the breakpoints will be the following:
- Precision 5 – brush size of 10 pixels or below.
- Precision 4 – brush size of 20 pixels to 30 pixels.
- Precision 3 – brush size of 30 pixels to 40 pixels.
- Precision 2 – brush size of 40 pixels to 50 pixels.
- Precision 1 – brush size of 50 pixels and higher.
While the Auto setting is better because it has more “intelligence”, it is sometimes easier to permanently set the Precision slider to a specific value.
Predefined Brush Tip
Predefined tips store an assortment of brush shapes. If you want to use a custom brush shape like leaves for a tree or stars for a night sky, this will be your destination.
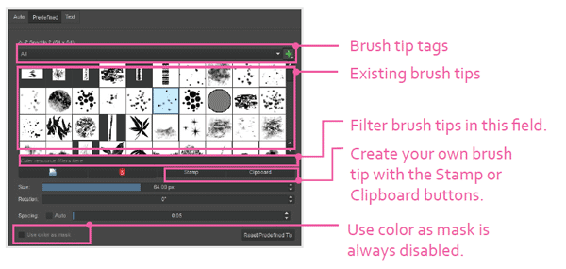
The text field below the brush tip shapes allows you to filter the current brush tip by name. If you have a Photoshop ABR file, you can load it in through the Import resource button. You can also load other formats such as PNG and GBR(GIMP). When you import outside brush packs like ABR files, new tags will automatically appear in the brush tip Tag drop-down.
In addition to the shape, you can set starting values of the Size, Rotation, and Spacing sliders. Remember that these are starting values. You can add variability and randomness with the other settings. Don’t forget that we are mostly dealing with the shape of the brush right now.
Create a Brush Tip from a Stamp
Create your own brush tip from the canvas. All of your layers are combined and the result is used. You probably don’t want your entire canvas to be the brush tip though. To use part of the canvas, you will need to draw a selection around your brush shape.
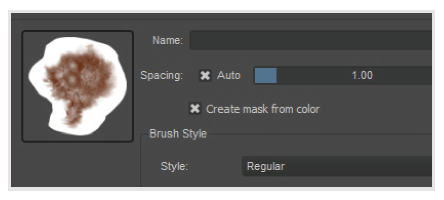
The Stamp brush dialog: I created a selection around the brush tip to determine what is used.
Once you have your brush shape selected, go back to the brush editor. You will see a Stamp button in the Predefined Brush Tip area. A dialog will open to show you the options (like image above). The stamp preview shows you what the final brush tip will look like. When you are done, click OK. The brush tip will be added to your predefined brush tips.
The options for the Stamp dialog are the following:
- Name – The name of the tip when it is saved to the predefined brush tips.
- Spacing – Determines how much space will be used between brush dabs.
- Create mask from color – Converts the tip shape to black and white colors. This grayscale image will be used to determine the mask. White areas will become transparent, while black areas will become opaque.
- Brush Style – Pick between a normal (Regular) brush or an animated one.
- Selection mode – Only used if Brush Style is set to Animated. This will determine which brush is selected. See below for more details about the animated brush style.
Animated Brush Styles
Add variety to your brush tips by using more than one. This brush style is called animated, but calling it something like multiple brush tips would be more accurate.
The animation brush style does not understand selections when the tip is being created, so it is easiest to start a new document. For this example, we start with a 100 px x 100 px document. I created four layers that each have a different brush tip. I drew numbers so you can understand the concept better. Make sure all of the layers are visible.
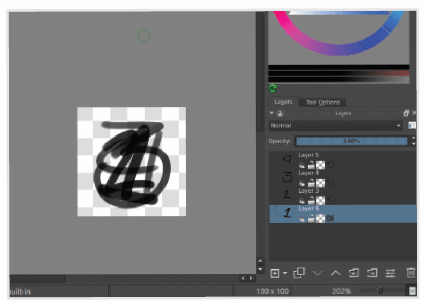
Setup for an animated brush tip: This is done in a separate document.
Now go into the brush editor in the Stamp dialog and set the Brush Style to Animated. You will see a few different selection modes.
- Constant – Only shows the first brush tip of the sequence.
- Random – Randomly uses a brush tip from the layers.
- Incremental – Goes through each tip sequentially when determining which brush tip to use.
- Pressure – Maps the pen pressure to the layer order. The lowest pressure will apply the top layer graphic, while the hardest pressure will apply the bottom layer graphic.
- Angular – Brush tip will change based off movement angle of the pen.
There are not many brush presets that use the animated brush tip. You can see that using multiple brush tips can create some randomness and make your strokes more interesting.
Create a Brush Tip from the Clipboard
Create a brush tip from the clipboard data. This is accessed from the Predefined Brush Tip area. Selections that are copied via Edit > Copy or Ctrl + C will be used to determine the brush tip shape. When you open up the brush editor after copying a shape to the clipboard, you will see the thumbnail in the Clipboard dialog. If you don’t have anything copied to the clipboard, you will get a message in the thumbnail area. This can be useful for copying images from the Internet or other graphic editors.
Text Brush Tip
Use text for a brush tip. This is the last brush tip type. The Pipe mode option will use one character at a time while painting. Fonts sometimes are made up of designs like Wingdings, so there is an opportunity for creativity here. There is no brush size for this. You will need to change the font size manually from the brush editor.
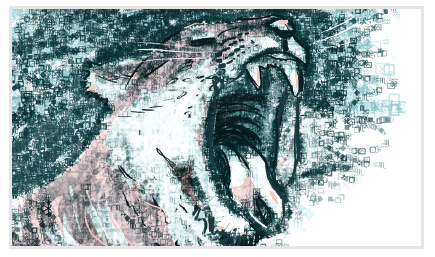
Using a shape font instead of text: Websites like
have a good selection of these under the Dingbats category.
Blending Mode Setting
Blending modes tell your paint strokes how to interact with the layer below. The normal blending mode will apply your brush strokes in a natural way. Selecting other blending modes like Multiply will darken the image. The blending modes are organized into categories based on their effect.
The Eraser button is a toggle button that will change between your current blending mode and the Erase blending mode. It is Krita’s way of erasing things. This setting is a frequently used feature, so you can toggle it on the top toolbar as well.
It is required to have a blending mode. This is why there is no checkbox next to the setting. Whatever you select is also used for the Blending Mode on the toolbar (to the left of the Eraser mode button).
Strength Property
Many of the settings on all of the brush engines have a Strength slider property on the top.

Control the overall effect of the setting. The values normally range from 0 to 1.
The strength will make your effect more or less prominent. A strength of 1 is similar to 100%. A strength of 0 will be like turning the setting off. The range of numbers can be different for the slider.
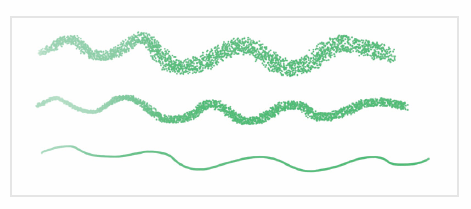
Change the strength of the Scatter setting. The top stroke shows full strength. The bottom stroke shows no strength.

