Brush Editor User Interface
The brush editor is available from the top toolbar. Click the Edit brush settings icon to reveal the editor. The brush editor is organized into five areas.
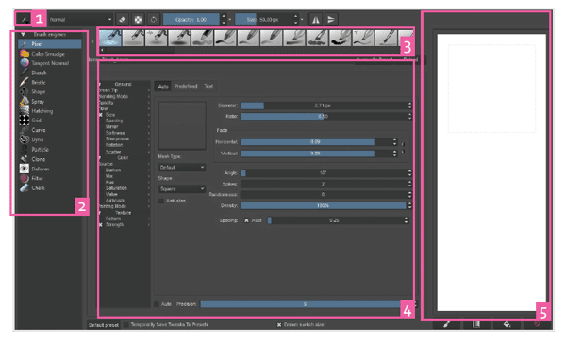
- Brush editor – Toggle the visibility of the brush editor from the toolbar.
- Brush engine – Determines the type of behavior of the brush.
- Preset strip – A list of brush presets that exist for the brush engine. Selecting one will change the preset editor values to match the preset.
- Preset editor – Edit the settings that exist for each preset.
- Scratchpad – A blank canvas to test out your brushes. The top dotted square is the area that is used for the preset thumbnail.
The left side of the brush editor is where you select a brush engine. You can see there are quite a few engines to choose from. The preset strip along the top has all of the brushes that are currently installed for that brush engine. The left and right arrows will scroll through the presets if there are more of them.
If you change the brush engine at this point, the preset strip, settings, and setting details all change. All of the settings are tied to the brush engine. As you select presets, the selected brush name is shown below as well as the settings that define the preset.
Most of your time editing brushes will be in the preset editor. The settings on the preset editor are organized with attributes like General and Color. Each setting has its own setting details shown on the right. Selecting a setting on the left will update the setting details on the right. Most of the settings are optional.
Some settings like Spacing have a checkbox by them. When a checkbox is enabled, your brush stroke will start using that setting. If you modify the setting details but do not have the checkbox enabled, the effect will not be applied. If there is no checkbox by a setting like the Brush Tip, it means the setting is always used.
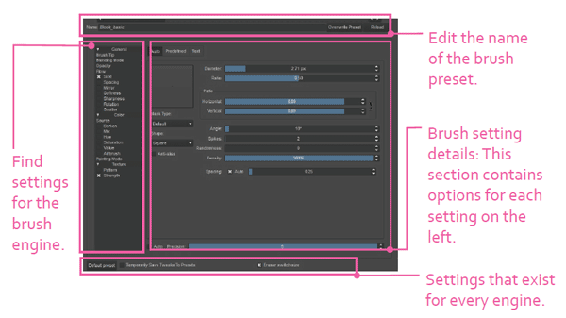
Every brush engine has a list of settings that are available. Some are common; others are unique to the engine.
There is a small lock icon that appears to the right of each setting. Double-clicking the icon will lock all of the setting details. To see this effect, select the Brush Tip setting, then change the presets by clicking through different thumbnails. You will see the setting details change every time you change to a different brush. Double-click the lock icon that is shown in the image below. Click through the different presets. The setting detail values will not change between presets. This can be helpful when wanting to keep the same settings across different brushes.

Lock setting across presets.
If a setting is locked and you right-click the lock icon, you will be presented with two ways to unlock the setting: restore settings from preset or keep current settings.
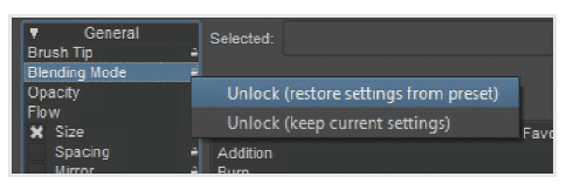
Right-clicking the icon gives options for unlocking the settings.
Scratchpad
On the right side of the brush editor, you will see an empty canvas area. This blank area is called the scratchpad. It is designed for you to experiment with your brushes. On the top area of the scratchpad, you will see a dotted rectangle, as seen in the image below. This area is called the preset thumbnail. If you modify a brush and want to save the new version, the preset thumbnail area is used for the thumbnail. If nothing is added, your brush preset will have a white thumbnail.
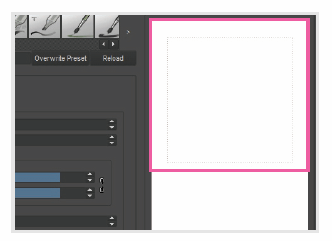
Preview thumbnail area: This is used when creating or editing brushes. This will be used as the thumbnail for the brush in the preset strip and Brush Presets docker.
The scratchpad has a few buttons on the bottom. The options, from left to right, are the following:

Fill preset area with current icon – Load the current preset icon and fill it into the preset thumbnail. If you are modifying a brush preset and want to keep the current thumbnail, make sure to click this before saving.

Fill area with gradient – Fill the scratchpad with the current gradient.

Fill area with background color – Fill the scratchpad with the current background color.

Reset area to white – Fill the scratchpad with white.
Global Settings
There are a few settings on the bottom of the brush editor that sometimes are overlooked. These settings exist on all brush engines.

- Default preset – Reset the brush settings to generic settings. This does not reset the preset to its previous values. You will usually want the Reload button instead.
- Temporarily Save Tweaks to Presets – Read explanation below.
- Eraser switch size – Eraser mode saves its own brush size. This can be useful when doing inking or line work.
Temporarily Save Tweaks to Presets
In general, when you make edits to a brush preset, they will be reset when you change brushes. If you change brush presets a lot, this can be inconvenient. You might only want your settings to be temporary, so you don’t want to save over the default brushes. This is sometimes referred to as dirty presets in the documentation.
When you click the Temporarily Save Tweaks to Presets checkbox, nothing happens. When you decide to start making changes to the preset by changing a property, like rotation, you will notice two things happen. First, the preset in the preset strip will add a pencil icon. Second, a Reload button will appear next to the brush name as the image below shows.

If you change to a different preset, you will notice the first preset will still have the pencil icon by it. When you return to the brush, your rotation value is still saved.
The Reload button will reset the preset to its original settings. If you start changing settings and you realize you messed stuff up, you can hit the Reload button to start over.
Brush Editor Context Menu Options
When you have the brush editor open, you can right-click over it and get a few options.
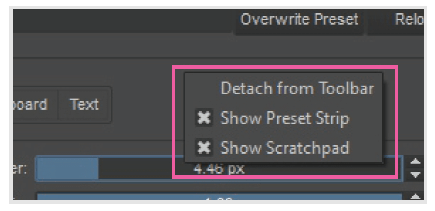
Right-clicking on the editor gives additional view options.
- Detach from Toolbar – Detaches the brush editor from the toolbar. This will make the editor a floating window you can move around. This option changes to Attach to Toolbar when floating.
- Show Preset Strip – Show or hide the brush presets that appear on the top.
- Show Scratchpad – Show or hide the scratchpad area on the right.
Shared and Unique Properties
A shared property is a setting in the brush editor that is available in multiple brush engines. Brush Tip, for example, is available on almost half of the brush engines.
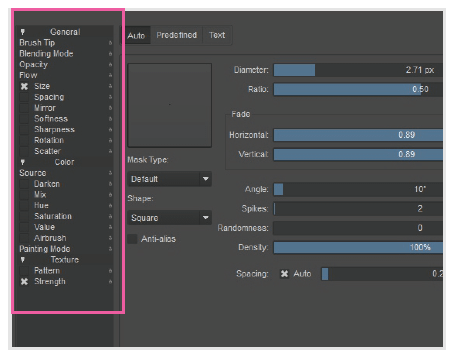
These are the available settings for the Pixel brush engine. The Brush Tip setting appears in most of the brush engines.
Each setting functions the same across different brush engines. Learning how a setting works on one brush engine means knowing how it works on all of them. You can test this out by going to a few brush engines on the left like Color Smudge or Bristle. After playing around with the settings for a bit, you will notice that the sliders and knobs are identical between the engines.
Once you understand the concept of shared properties, it will make working with brushes easier. Some common shared properties are the following:
- Blending Mode – Change how your painting will interact with the layers below. This is tied to your brush. The blending modes that are used for layers are calculated separately.
- Opacity – The transparency your brush strokes will have.
- Flow – The transparency your brush dabs will have. If you don’t remember the difference between opacity and flow, refer back to the Painting Fundamentals chapter.
- Sharpness – Removes the smoothing of the brush. This is useful if you are creating pixel art.
- Hue – Shift the hue of the color. Hue identifies the name (red, blue, green).
- Spacing – Change the spacing between brush dabs. Setting the spacing too small may slow down your computer.
- Texture – Assign a pattern for each brush stroke.
There are a lot of properties and settings to play around with. The best way to find out what a brush engine supports is to experiment. Referencing existing brushes is a good way to learn as well.
Pen Settings Overview
Many of the brush editor parameters have options to customize your pen settings. All tablets support different levels of control, so some settings might not work for your graphics tablet. Your pen might not support tilting or tangential pressure. If you are unsure of what your pen tablet supports, visit the manufacturer’s site.
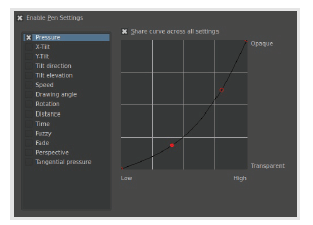
The pressure curve exists for many of the brush engine settings. You can set a global curve by checking the Share curve across all settings checkbox.
Many of the setting details have a curve that you can change. This allows you to modify how your pen pressure will be used. The pen settings can be overwhelming to look at, so let’s take a look at a couple of the settings. Go to an Air-brush pressure preset from the Pixel engine. Then go to the Opacity setting. Before we do anything, draw a few strokes on the scratchpad to see how the brush currently behaves. Make sure to use your pen to get varying results.
Every pen setting has a different curve to adjust your pressure. While this allows a great amount of freedom, it can be tedious to have to set each one. If you have a curve that you want to apply to all settings, check the Share curve across all settings checkbox. When checked, there will be only one curve to control them all.

You can see in the above image that the harder you press, the more paint is applied. The paint is directly related to how hard you are pressing. Now let’s go back to the brush editor and click on the Enable Pen Settings option under the Opacity setting. This will uncheck the box and disable all of the pen controls. Make a few strokes and see what we have done.

Our brush size is still being affected by the pen, but the brush opacity is always opaque. Disabling the setting doesn’t turn the pen pressure off for everything—just opacity. Before we turn the Enable Pen setting checkbox back on, let’s do one more thing. Above the pen settings is an Opacity setting. Change the opacity to 0.25 (25%) and try to paint again. The brush strokes will now be lighter than they were before.
There is no pen pressure, so your strokes will apply an even 25% opacity. If you paint over the lines, you will see that the colors start building on each other.
While this was a good learning exercise, I doubt you would want to keep these settings for your everyday painting. To reset your settings, click the Default preset button at the bottom of the brush editor. You can also select another preset and come back to reset the settings. Click through different settings in the Pixel brush engine to see how common this pen pressure setting is.
That takes care of the pen settings overview. Now let’s take a look at each pen capability to see how they will affect our stroke. Remember that your pen might not support these settings, so don’t curse your computer and throw it out the window if a setting is having no effect.

