Multibrush Tool
Create kaleidoscope and other mirror-type effects. This is great for coming up with unique patterns, textures, or symbols that would otherwise be difficult to generate. You will have to enable the Show Axes checkbox in the Tool Options to see the crosshair and guide lines.

Multibrush Tool – Use multiple instances of your brush at a time. Each stroke will be offset by a specific amount of degrees. Shortcut: Q.
Even though it shows a vertical and horizontal line by default, that doesn’t mean that the image will be split into four. You need to look at the Tool Options to determine how many slices the final result will give.

These are a few examples using the Multibrush Tool. You can use any type of brush preset with this tool. Symmetry is the default mode. It gives you a kaleidoscope effect. The options will allow you to move the axis, hide it, change the amount of slices, and rotate it. The available types of multibrush modes are as follows:
- Symmetry (default) – Divides the axis into multiple segments. The guides will only show you the vertical and horizontal axes though.
- Mirror – Accomplishes the same thing as the mirror tools on the toolbar with additional options.
- Translate – Gives your brush multiple tips that are spaced apart.
- Snowflake – Combines the mirror and symmetry options. This can give your end result a snowflake type of effect.
This shows rotation of the axes with the Multibrush Tool. This cannot be achieved with the basic symmetry/mirror tools on the toolbar.
With all of these tools, you can show or hide the axes. They are usually helpful, but can occasionally get in the way.
The Mirror mode is a powerful option because you can rotate and move the axes where you want. Keep in mind that when you are working with the Multibrush Tool, you are still able to paint. It is common when starting out with this tool to set up your settings, then select the Freehand Brush Tool. Doing this will deactivate the Multibrush Tool and turn off your settings. Thankfully the tool remembers your settings, so reselecting the Multibrush Tool will get you back to where you left off.
The Translate mode will create multiple brush tips. This will create a bristle-type effect. In the following example, I simply changed the brush count. The placement of the different brushes will be the same every time, so there is no randomness applied to where each brush tip will be. Depending on what type of brush you have, this might slow down your computer.
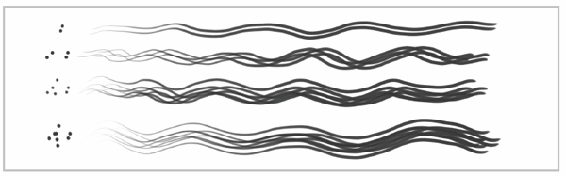
Translate Mode for Multibrush Tool
The radius property will determine how much distance will be allowed between all of the different brush strokes. With a small radius, you will have a tight grouping. You can also change the brush size with the normal shortcut (Shift + pen drag), which will make each brush tip larger.
When you have the Multibrush Tool set to the Translate option, the mirroring options do nothing. The guides will still appear on your canvas but will have no effect.

