Main Menu Selection Tools
While the toolbox contains the most commonly used selection tools, you will find the main menu contains a few gems. Many of these options need an existing selection before they can be used. Here is a summary of what the Select main menu options do:
- Select All – Discards any existing selections and changes the selection to fill your entire canvas. Shortcut: Ctrl + A.
- Deselect – Discards any existing selection. This is used frequently when you are done using a temporary selection and want to get rid of it. Shortcut: Ctrl + Shift + A.
- Invert Selection – Changes your selection to be the inverse of what it currently is.
- Reselect – Bring back the last selection you had. This is independent of the Undo stack, so you can perform operations and later regain your selection.
- Convert to Vector Selection– Change a pixel selection to a vector selection.
- Convert Shapes to Vector Selection – Vector objects will be turned into a selection. You will need a vector layer with vector objects for this to work.
- Convert to Shape – Takes your selection outline and creates a vector object out of it. The object is put on a new vector layer.
- Display Selection – Shows and hides the selection on the canvas.
- Show Global Selection Mask – Shows the current selection as a layer on the Layers docker. You can toggle the display by toggling the circle icon.
- Scale – Resize your selection numerically.
- Select from Color Range– Select a color on the canvas to use as a selection.
- Select Opaque – Make a selection based off all pixel information that has content. Only the active layer is used.
- Feather Selection – Soften edges for the selection.
- Grow Selection – Expand your selection to make it larger.
- Shrink Selection– Shrink your selection to make it smaller.
- Border Selection– Make a border around your selection. Specify how many pixels wide the border will be.
- Smooth – Quickly blur the edges of a selection to remove the aliasing.
Invert Selection Example
Reverse your current selection. Sometimes it is easier to select the areas you don’t want, then inverse the selection. For this example, we are going to paint a mountain range. We start with painting in the sky. We then invert the selection to paint in the mountains. The advantage of inverting the selection is we can add more details where the mountain meets the sky without having to worry about painting into it.
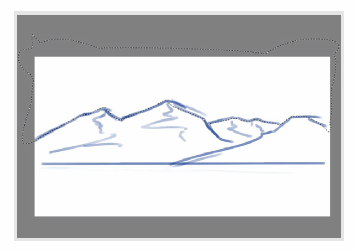
A quick sketch of the mountain is followed by making a selection for the sky area.
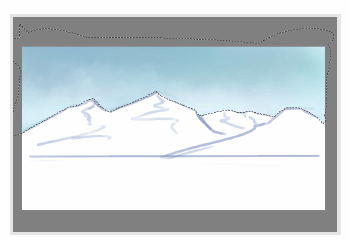
After a quick painting of the sky, invert the selection. The selection will be flipped to only include the mountains and landscape.
I also applied a feather to the selection with 5 px. This will help smooth the transition between the mountains and sky.
Paint in the mountains with the reversed selection. It is nice to paint the tops of mountains without have to worry about “bleeding” into the sky. The feathering creates softer lines.

Paint the mountains after feathering the selection.
If seeing the selection is distracting, you can hide it by pressing Ctrl + H. Don’t forget that your selections are hidden. This can be confusing when you need them later.

Tip
The Smooth selection option has no configuration. When you work with larger images, you will want control over the amount of smoothing, so I always prefer to use Feather Selection.

