Some Other Nice Layer Options
Before we finish, I want to highlight a few features that are sometimes overlooked. All of the features can either be accessed through the right-click menu when you are on a layer or through the options in the Layer main menu.
Split Alpha
Split alpha takes the color information from the selected layer and creates a transparency mask. Splitting alpha is similar to the lock transparency feature. If you paint a few strokes and click the Split Alpha option, you will get a transparency mask of the area that you painted on. You can use this mask on the existing layer or move it to another layer that might need it.
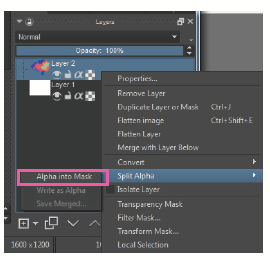
Once you create a transparency mask with split alpha, the other two options will be enabled to Write as Alpha or Save Merged.
When you are done working with a transparency mask, you can use the Split Alpha > Write as Alpha option from the layer’s right-click menu. This will merge the mask back into the layer.
Merge Selected Layers
This option takes your selected layers and combines them. Combining layers will speed up the performance of Krita as well as making it easier to manage your layers. This option is only available with a shortcut. Shortcut:
Ctrl + Alt + E.
Isolate Layer
Hide all other layers in your document and only show the current layer. This will automatically be deactivated as soon as you select another layer. This can make it easy to spot transparency or masking issues. It can be accessed through the layer’s right-click menu. You can quickly do this by Alt + clicking a layer. You can also hide all other layers by Ctrl + clicking an eye icon. If you are isolating a layer, you might want to change the checkerboard pattern. You can do this from Settings > Configure Krita under the Display area.
Pass Through Mode
With Pass Through mode on, the effects of your layer groups carry through to lower layers. A common scenario is applying a filter layer. With Pass Through mode on, the filter layer will affect all layers underneath it. With Pass Through mode off, the filter layer will only affect layers in the layer group.
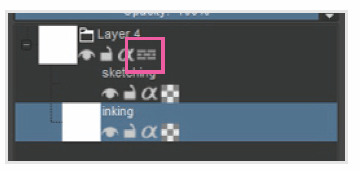
Layer groups will have an additional Pass Through option. This will apply blending modes and filter layer effects to layers below the layer group.
Another use is with layers inside of your layer group. If your bottom layer is set to Multiply, it normally would not affect the layer outside of the group. With Pass Through mode on, the multiply effect would be applied to the layer below.
Select Opaque
This option creates a selection based off the current layer’s contents. Krita will look at the alpha information to determine what to select. This is in the layer’s right-click menu as the last item. Select Opaque captures multiple levels of transparency. Your soft edges will be preserved if they exist.
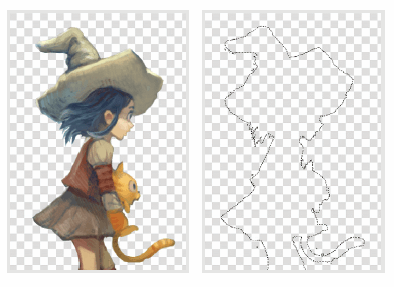
Artwork by David Revoy
Here is the selection that is created when using Select Opaque. I turned the image off beneath so you can see the selection.
Flatten Layer
This option merges all of your masks for the layer together. Your masks will be applied to the normal layer and be removed. It can be accessed through the main menu Layers > Flatten Layer or from the layer’s right-click menu. Shortcut: Ctrl + Shift + E.

Tip
If the transparent checkerboard pattern isn't working for you, you can change it to a color through the main menu Image > Image Background Color and Transparency. You can also change the checkerboard square sizes through the main menu Settings > Configure Krita in the Display section.
Merge with Layer Below
This takes the current layer and combines it with the layer below. Access it through the main menu Layer > Merge with Layer Below. Shortcut: Ctrl + E.
Compositions Docker
Save the visibility state of your layers. If you make changes to a composition, you can right-click the composition and select Update Composition. Double-clicking the composition will apply the composition. This docker is not visible by default. You will need to open this from the main menu Settings > Dockers > Compositions.
Compositions do not retain the layer’s position. You can also import and export compositions. You can rename a composition by right-clicking and selecting Rename Composition.
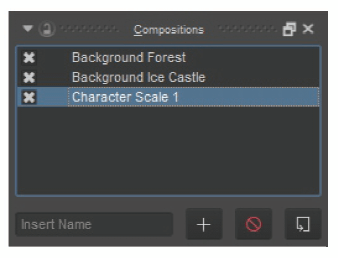
Turn layers on or off to save the arrangements in the Compositions docker.

Raghukamath
http://www.raghukamath.com

