Layers Docker
Layers are one of the most heavily used features in digital painting, so it will be shown by default when Krita starts. The following screenshot shows the basic areas of the Layers docker:

Right-clicking a layer will give you additional options and shortcuts for commonly used layer functions.
You normally start off with two layers when you create a new document. You can change the name of the layer by double-clicking the layer from the layer list. You can hover over a layer and see a larger preview for it. This will also show you other layer properties. I haven’t really found a use for this preview, but some artists like to see the thumbnail a little larger.

Note
Changing the blending mode or opacity can only be done with one layer at a time. If you have more than one layer selected, only the last layer will be affected.
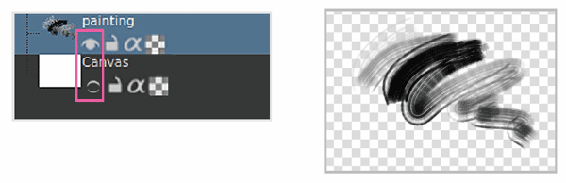
If you look at your canvas, it will probably be white. This means the layer already has white "painted" on it. For this example, I deleted Layer 2, which has nothing on it. You can paint on the canvas layer and the results are what you expect. Now try to go to the eraser mode (E key) and start erasing. You will notice that the background turns into a gray and white checkerboard pattern. That isn’t the white background we had before. What happened?

Erasing an area from your canvas shows the transparency pattern underneath.

Tip
Use the Page Up and Page Down keys to quickly move up and down layers. If you are in Canvas-Only mode, you will get a notification with what layer you are on.
When Krita created the document, it filled the canvas layer with white. Layers do not usually start out with a color filled in. Most people are familiar with drawing on paper, so Krita fills the canvas layer to white for convenience. Having a layer that has nothing on it will be transparent. When we switched to the eraser, not only are we erasing the black strokes we made, but we are also deleting the white that Krita originally added. All of the color on the layer is removed. If there is no color to show, Krita will show the area as a white and gray checkerboard pattern, as we see in the previous example.
To get us back to a blank canvas, we are going to use a shortcut that fills the layer with the background color. Press the Backspace key. By default, the background color is set to white in Krita, so your layer will revert back to its original state. You can also repeatedly undo the last actions (Ctrl + Z) to get back to where you were. After you are back to your original state, rename the layer "Canvas". You can rename the layer by double-clicking the layer name and entering your text.
If we want to draw and erase like we would expect, we need to create a new layer above the canvas layer. This allows us to paint and erase without deleting the canvas color. In the Layers docker, click the "+" icon. You will see a new layer appear in your layer list. You can rename this to "Painting" since we will be painting it. With this new layer selected, try to paint and erase like we did previously. You will notice that the white background remains, even as we are erasing. This is why Krita creates new documents with two layers.
Make sure layers are in the correct order. If you have your paint layer on the bottom and start to paint, it won’t look like anything is happening. Keep in mind that the "painting" layer has nothing in it originally, even though we still see the white background like before. We can test this by hiding the canvas. To hide a layer, click the eye icon right underneath it.
This idea of transparent areas will help us compose our painting elements together. It is pretty distracting to paint with a transparent pattern behind everything. Show the "Canvas" layer again by pressing the eye icon by it.
Show the painting layer while hiding the canvas layer.
There are more icons by each layer that are commonly used. You can toggle each of these icons on and off. Here is a brief overview of each icon.

Visibility – Show or hide the layer contents.

Lock – Disable moving or editing the layer. This will help you from accidently changing the layer when you don’t want to.

Alpha lock – When enabled you will not be able to paint on areas that are transparent for the selected layer.

Inherit alpha – Disables the alpha channel for the layer. This can be confusing to understand. We will go over this in more detail shortly.
Visibility
Show and hide the layer. You cannot move, delete, or manage your layer while it is hidden. Many of the layer actions are disabled while a layer is invisible. Interestingly, you can still change the blending mode and the opacity for an invisible layer.
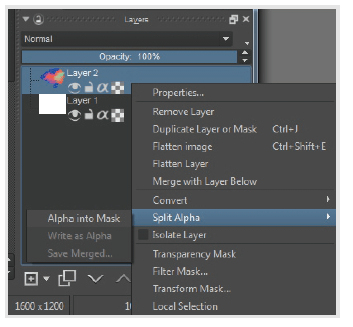
There are even more options for each layer. Right-click on a layer to see what is available. Many of these options are also available from the main menu under Layer.
Lock Layer
When a layer is locked, its editing ability is frozen. You can still change the opacity, blending mode, and duplicate the layer for locked layers—but that is about it. A l ot of artists like to use this feature when they have a reference image that they don’t want to accidentally paint over. This will stop you from editing or moving the layer. In our previous example, it might be helpful to lock the "Canvas" layer. That way, you don’t have to worry about accidentally painting on it. This is quite useful when you are working fast and switching layers frequently. It is easy to forget which layer you are on.
Tip
To quickly change layers, you can hold down R and click on the canvas. The layer that contains the element under your cursor will be selected.
Alpha Lock
This is useful for staying in the lines with your art. You can paint a boundary for your character and enable the alpha lock icon. Now all of your painting, airbrushing, or other effects will stay inside that boundary. When you work close to the edges, or use brushes that have overspray like airbrushes, this is very useful. You can see the results in the figures below.

Tip
You can select more than one layer, but the only thing you can do with multiple layers is delete.
Inherit Alpha
This functionality is similar to the alpha lock. Inherit alpha will use all of the layers below the Inherit alpha–enabled layer to determine what can be painted on. An example might make this concept more clear.
Look at the following illustration. We have a canvas layer that we are hiding. We have a figure and an outfit layer that have a character design on them. The shading layer exists with Inherit alpha enabled. If we were to start painting on the shading layer, we would only be able to paint on areas that also are in the outfit and figure layer. Having the canvas layer invisible is important. If we were to make the canvas layer visible, the shading layer would paint on everything.
To explain it in a different way, look at your canvas. What areas have color on it? What areas are transparent? The areas that have color will be painted on. More technically, it merges all of the visible layers and uses it as a transparency mask.
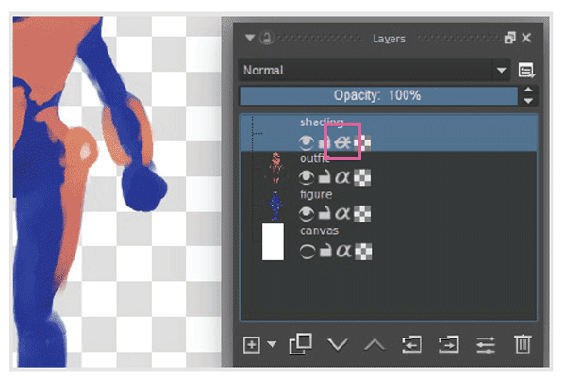
The bottom three layers determine what can be painted on.
The only catch to this feature is that this mask effect only works on layers below the current layer. Look at the example above again. If we were to move the shading layer below the outfit, our painting would no longer use the outfit layer to paint on.
Opacity
Opacity controls how transparent a layer will be. This slider ranges from 0% to 100%. A few common uses for changing the opacity are listed below.
- Painting under a sketch – It is common to create sketches before you start adding color. One common way to use opacity is to add your paint layer under your sketch layer. This way, you will be able to see your construction lines as you paint. As time goes on, though, your line work gets in the way. You want to only show a ghost of the lines. This is a great opportunity to reduce the opacity of your pencil layer. As your painting progresses and you add more detail, you can progressively make your pencil layer fade away.
- Superimposing – Say you are combining multiple images. It is going to be difficult to do exact placement since your images will start getting in the way. If you reduce the opacity, you will be able to see through the image and more accurately place everything. When you use the Move Tool in Krita, it automatically does something similar.
There are other ways that opacity is used, but those are the most common I have found. Most of the compositing techniques that are done use blending modes.
Blending Modes
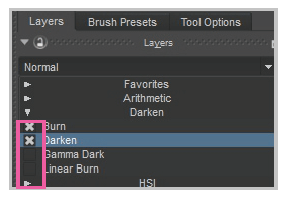
Blending modes are selected from the first drop-down in the Layers docker. It doesn’t have a label, so it will be confusing for artists who aren’t familiar with it. This determines how the selected layer content will interact with the layers underneath it. If you are doing simple paintings, you probably won’t have to worry about this. There are some nice effects and workflow improvements that use blending modes. The blending modes are organized into different categories based off the algorithm that they use. The first category in the blending modes is your Favorites. Favorites can be managed by clicking the checkboxes to the left of each category. A few of the most common blending modes and their usages are as followed:
- Normal (default) – Your top painting color will replace color on lower layers. This is how you would expect color to work. Coloring over something replaces it.
- Multiply – Add darkness to the existing layer. Take the existing layer content and make it darker. If you paint with white on a layer set to Multiply, nothing will happen since white has no darkness values. People use Multiply layers to do things like add tattoos to their figures or add shadows. It is also common to make your pencil sketch layer set to Multiply. This will hide the white background and only show your pencil sketch.
- Screen – The opposite of the Multiply blending mode. Think of this as your lighten mode. Painting pure black on a layer with Screen will have no effect.
- Overlay – Combines the Multiply and Screen blending modes. This allows you to lighten and darken the image at the same time.
Blending modes can get complicated. If you follow David Revoy on his YouTube channel, he has a helpful tutorial on explaining blending modes called Painting with Blending-modes.
Mark a blending mode as a favorite. This will add it to the Favorites category on the top grouping.
Note
Changing the blending mode doesn’t actually change any of the color information of the layer. It only changes how the color interacts with the layer around it.

