Preset Brushes
Krita comes preinstalled with a number of brushes. Other artists have created these default brushes throughout the years so you can start painting right away. These brushes are referred to as presets in some parts of the applications. They are occasionally called resources as well as paintoppresets.
Before you can start painting, make sure you have the Freehand Brush Tool selected.

Freehand Brush Tool (default tool) – Paint with the numerous brushes that are available from the Brush Presets docker. Shortcut: B.
Draw a few strokes on the canvas with your pen to see the results. The stroke should become more opaque the more pressure that is applied. If the stroke is a solid opaque color, that means your tablet isn’t set up correctly. Make sure you have your tablet drivers installed and configured.
By default, Krita uses the Basic_tip_default brush. While it looks okay, it doesn’t really have a lot of painterly qualities to it. We are going to pick another brush from the Brush Presets docker. Go to the brush presets icon in the top toolbar and take a look at what is available.
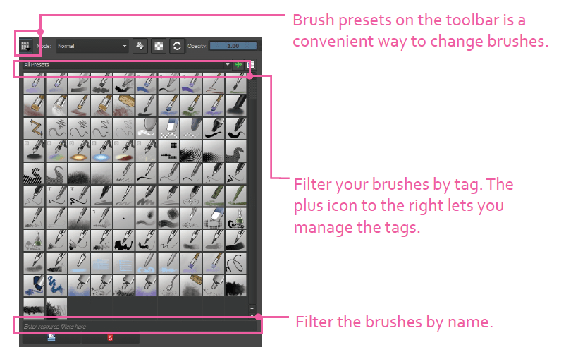
As you can see, Krita comes with a pretty good assortment of presets. The drop-down box right above the brushes is the tagging system. The tagging system allows you to pick your favorite brushes and assign them to a tag. You might have one tag for inking, another tag for sketching, and another tag for effects.
To the right of the tagging filter you will see a view options icon that controls how the presets are displayed.
- Thumbnails (default) – Show a grid of thumbnails with all of the brushes.
- Details – A list display of the brushes. You can see the name of the brush to the right.
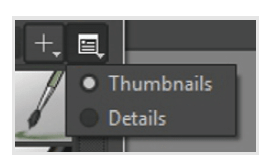
Change the way the brush presets are viewed.
While in Thumbnails mode, you can hover the pen over a preset thumbnail and it will reveal the brush name as a tooltip. The brush name is a nice hint, but you will need to test it out.
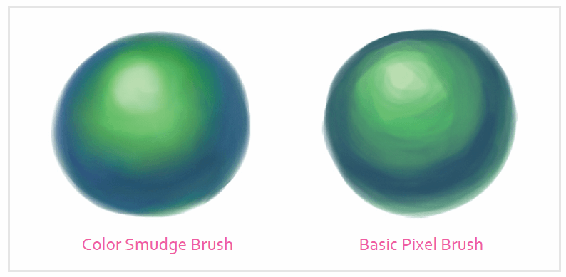
For now, select the basic_wet brush. Draw a few brush strokes with it and compare it to the previous brush we had. You will notice it feels softer and behaves a little differently. One of the biggest differences is the wet brush uses a different brush engine than the basic default brush. The basic brush uses the Pixel engine, while the wet brush is using the Color Smudge engine.