The Toolbar
The toolbar is the top bar that spans horizontally across the interface. It has common operations that you may need to perform on a regular basis. You can also customize the toolbar by right-clicking the toolbar and clicking Configure Toolbars.

Document Options

Create, open, or save a document. There are common shortcuts to do these as well, but these icons can be useful if you are using Krita on a tablet.
Gradient and Pattern Selection and Editing

Create, edit, and manage a gradient or pattern. Your Fill and Gradient tools will use these options for filling.
Foreground and Background Colors

As you change your colors through the Color Selector Tool, Advanced Color Selector, or other means, this color will update. The bottom left black-and-white swatches will reset the colors to black and white. The top right arrows will swap your background and foreground colors.
Brush Settings Editor

Edit your current brush. This option might be disabled if you don’t have a brush tool selected. The brush editor is complex but powerful. We will be spending a lot of time customizing brushes in the Brush Editor and Brush Engines chapters.
Brush Presets

This contains all of the brush presets that are installed for Krita. You can also organize and manage your brushes through here.
Painting Blending Mode

This changes the blending mode while painting. Blending modes affect how your painting will interact with other layers. This is not linked to the blending mode on the layer.
Eraser Mode

Switch between painting and erasing. If you look at the toolbox, you will notice that there is no eraser tool. The Eraser mode tool concept is the primary way to erase things in Krita. When you toggle this feature, the blending mode will switch between Erase and Normal. Shortcut: E.
Preserve Alpha

Lock what areas can be painted on. When enabled, the transparent part of your layer cannot be painted on. This is useful as a masking technique. This is a separate setting than the layer’s alpha lock.
Reload Original Preset

Reset any changes that have been done to the brush. This ties into a concept discussed later called Dirty Presets.

Note
Right-clicking on a docker title will give you a list of dockers to show or hide. This is quicker than going through the main menu. Locked dockers cannot be shown or hidden.
Brush Opacity

Determine how transparent your brush stroke will be. A value of one is opaque, and a value of zero is transparent.
Brush Size

Change your brush size. Shortcut: Shift + left-click, then drag left or right.
Flow

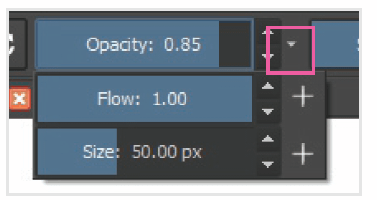
There is another slider on the toolbar, but it is hidden. If you look at the two sliders, you will notice a drop-down arrow. If you click it, a menu will appear that will allow you to select a third option, the Flow setting.

Change what is shown on the slider slot. The add button (+) will replace what currently exists.
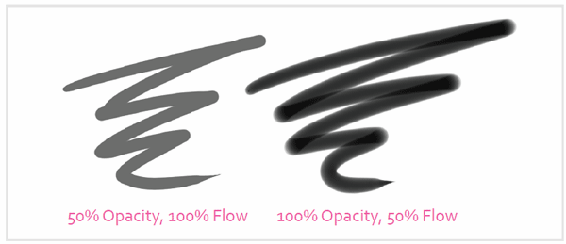
Flow is often confused with opacity since it will give similar results. The biggest difference is that flow controls transparency of each dab from the brush. Opacity controls the transparency with the entire stroke. In the following example, you can see that reducing the flow creates a softer edge. This effect is similar to having a marker that is low on ink. The marker still writes but has less ink coming out. The lines also build and interact with each other differently.

Mirror X and Y

The symmetry buttons allow you to create mirrored drawings or paintings. You can move the axis center by dragging the circle icon on the axis. The angles must be perfectly horizontal or vertical. You will need to use the Multibrush Tool for angled mirroring.
Workspace Chooser

Workspaces are predefined user interface layouts. Workspaces will save which dockers are open and where they are located. Selecting a workspace from the toolbar will apply the workspace. If you create a setup that you like and want Krita to remember it, you can open the workspace drop-down menu. At the bottom, there is an option to enter a name and save it.

Tip
You can right-click on any slider to input your own numbers. For example, if you want your brush size to be exactly 83 px, you can rightclick the Size slider. The input will turn to a textbox where you can enter your values. When you are done, click the Enter key. All number sliders work this way in the application.

