Chapter 14
A Look Inside the Blender Open Movies
It’s hard to overstate the benefits to Blender and the Blender community that have arisen from the Blender Foundation’s Open Movie Project and its resulting movies, Elephants Dream, Big Buck Bunny, and Sintel. Not the least of these benefits are the opportunities to learn about animated filmmaking in Blender afforded by the free release of the original “source” files—the .blend files used to produce the movie—to the public. Online blogs for the projects are also a wonderful way to keep up with the developments as the projects progress. In this chapter, you’ll take a peek into the process and look at some of the techniques behind the scenes.
- Learning from Elephants Dream
- Nonhuman Rigs in Big Buck Bunny and Sintel
- The Production Pipeline
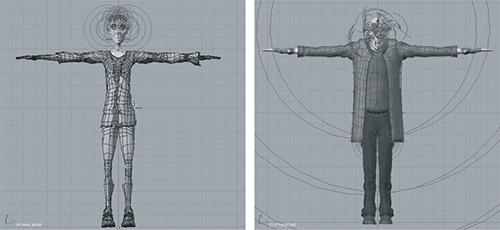
) are anything but your typical cuddly animated film stars. The characters are unsettling and off-putting; Proog is an irritable, domineering, and very likely insane old man, whereas Emo is a sniveling, somewhat diseased-looking man-child. Both of them are awkward, edgy, incongruous people, and these characteristics are expressed in the way the characters are modeled. The production files are available as .torrent downloads from the official web page of the project at .
Proog and Emo in Elephants Dream
As you can see in the wireframe depictions of the two characters shown in , the mesh structure of each character’s body is deliberately jagged and shaky-looking. The mesh structure of the character’s clothing, in particular, stretches and bunches and tugs in a way that suggests the material is about to break apart. Proog’s trousers are tired and slack, bunching up slightly around his ankles and shins, whereas Emo’s jacket appears to be so ill-fitting and constricting as to call to mind a straightjacket.
The circles you see all over these .blend files indicate forces. In particular, you see many curve guides used to guide the character’s hair. With the Captain Blender rig, you only scratched the surface of what can be done with particle hair and curve guides, using a few guides to create a very simple hairstyle. Curve guides are a powerful but painstaking tool. When you need slightly more complicated or realistic hair effects, such as in these blends, you will quickly find that you need a large number of curve guides. To learn about how the Elephants Dream hair effects are accomplished, I suggest you spend some time with these files, editing and adjusting the various curve guides.
Emo and Proog meshes
shows a few examples of shape keys on Emo. (It also provides a very clear view of the curve guides influencing Emo’s hairstyle in the bad old days before the hair particle system was updated for Big Buck Bunny. As you can see, at the time, even fairly rudimentary hair effects were extremely difficult to obtain.) The approach to facial animation taken by the Elephants Dream character modelers is analogous to the approach I described in Chapter 8, using driven shape keys to get most of the expressions.
Some facial shape keys on Emo
Even though the armature and rigging system in Blender has been much improved and commonly used rigging techniques have been refined in subsequent open movies, it’s instructive to look at the rigging techniques used in Elephants Dream for insight into how to solve more advanced rigging problems.
shows Emo’s armature. The first image shows only the bones needed to do basic full-body posing; the second image shows the full armature with all bone layers displayed. An animator never needs to touch or see many of these bones. They are used for a variety of functions. Some of them are used as “fan bones,” which move based on the movements of other bones to help give more control over joint deformations; other bones are used for other functional purposes within the armature.
Emo’s armature
Note the use of custom bone shapes here. The bone to control the swivel of Emo’s hips, for example, is shaped like a flattened box around his hips. The root bone of the armature appears as a compass-like circular base to the character, and the foot controls are shaped like the parts of the feet that they control.
Another Approach to Hand and Foot Rigging
For the Captain Blender rig, you created the rig automatically using the Rigify add-on. That functionality wasn’t available to the creators of Elephants Dream, and they approached the challenge of hand and foot rigging in a different way from the way they are done in Rigify. The hand and foot rigs in Elephants Dream are very simple and afford a high degree of control and ease of posing. For ordinary biped character rigging, I still recommend Rigify, but understanding the rigs described here will be very useful to you when you need to solve a rigging problem that is not dealt with automatically by Rigify.
Hands
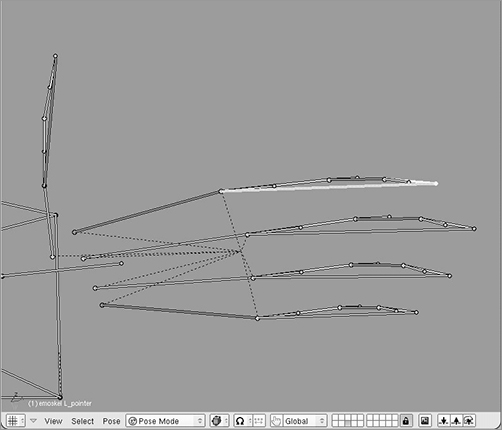
In , you can see the basic deform bones of the fingers. The three bones of each finger make up an inverse kinematic (IK) chain, with the fingertip bone as the IK solver (indicated by the dotted line extending from the highlighted bone to the base of the index finger—in , the IK targets are not shown). Note that the smaller bones you see branching off at the knuckles are fan bones used to correct mesh deformations. I’ll talk about fan bones shortly, but for now you can disregard them.
Finger deform bones form an IK chain.
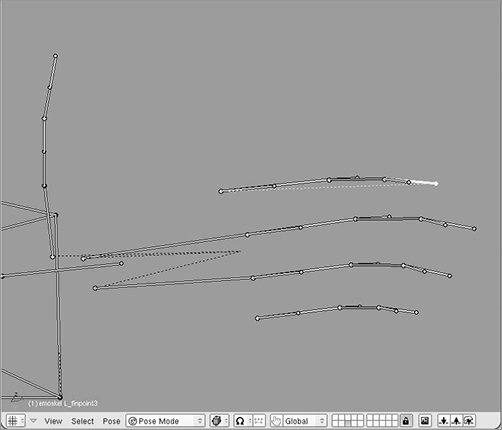
IK target bones are connected to the base of the fingers.
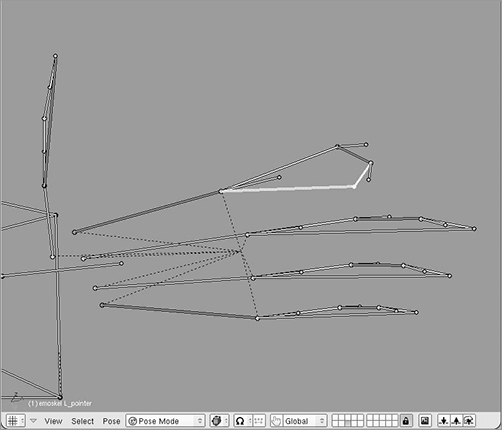
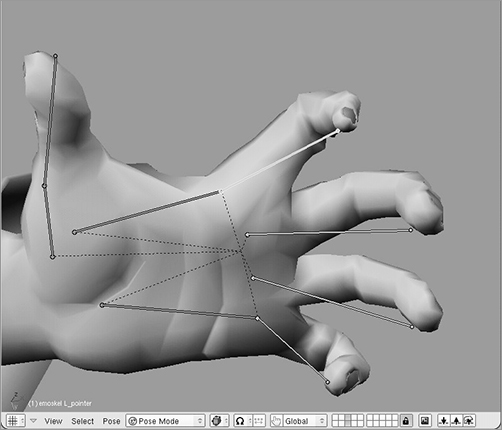
Using IK chains for fingers is not a bad idea, but it can make it difficult to get the fingers to bend consistently in the correct manner. What makes the Elephants Dream hand rig interesting is how the IK target is used. In , you see the IK target. The fingertip IK solver is IK constrained to the finger-length highlighted bone, which in turn is connected/parented to the same hand bone to which the root of the finger IK chain is parented. With this setup in place, it is possible to simply rotate this finger controller to have the entire finger follow the rotation. What’s more, scaling this bone in pose mode with the S key results in bending or extending the finger, as you can see in . shows a hand pose with the deforming bones hidden—only the bones that are necessary to pose the hand are shown. This is a very nice solution to finger posing.
Scaling the IK target bends the finger.
Posing is simple with this IK setup.
Feet
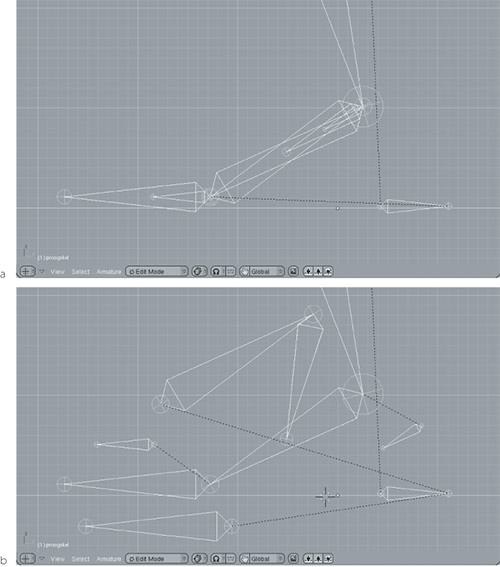
As with the hand rig, the foot rig for the Elephants Dream characters accomplishes a lot with a relatively simple setup—without using Action constraints. shows the full bone structure of the feet in B-bones view. The most immediately notable aspect of the feet is the use of custom bone shapes to identify the toes bone, the foot bones represented by the heel portion, and the ankle bones represented by the small, roundish custom bones to the rear of the ankle joint. (I am dropping the preceding L_ and R_ from the names of the bones here.) These custom bones are the only bones that the animator needs to touch.
Foot rigs for Proog
In , you can see a view of the foot rig from the side and in octahedron view. In the figure, Figure 14-10a shows the foot rig as it actually is, and Figure 14-10b shows it exploded and labeled to clarify the placement and relationships of the bones. Dotted lines indicate nonconnected parenting. Connected bones are shown in their correct positions, attached by joints to their parent bones. The principal parent relationships here are between the foot bone and its nonconnected children. These include the toes bone and the ankle bone. Note the placement and position of the ankle bone. Its actual location is somewhat different from where the custom bone shape appears. Parenting the toes bone to the foot bone enables the tip of the foot to follow the overall movement of the foot and also enables the tip of the foot to be raised and lowered by rotating the foot bone. The ankle bone controls the angle of the foottop bone through a Copy Rotation constraint on the foottop bone, targeted to ankle. The foottop bone is also constrained to point to the ankle by an IK constraint. The ankle bone is also the connected parent of the legIK bone; in this way, raising or lowering the foot bone controls the position of the IK target for the leg, enabling the foot to be moved around.
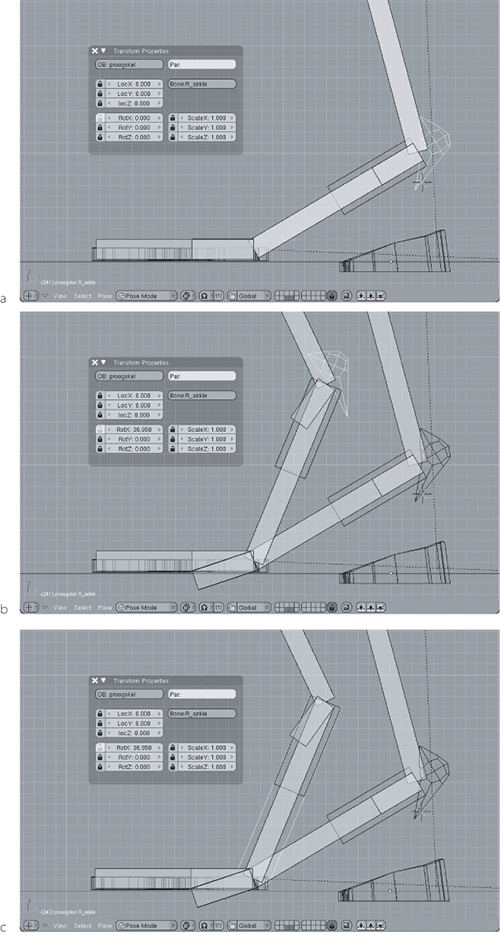
The ankle bone, being a child of foot, can also be rotated independently, as you can see in . In Figure 14-11a and b you can see the rest pose and the heel-up pose of this bone; Figure 14-11c shows the actual position of the bone (because custom bones can be arbitrary shapes, it is not always possible to see where the pivot and influence of a bone are without looking at the bone in its original shape). Note that in the Transform Properties window all transforms are locked on this bone except for X rotation. Rotating this bone has two main effects: it raises the upper end of the bone, thus raising legIK and bending the leg to accommodate the raised ankle, and it rotates the foot top, which is constrained to follow the ankle’s rotation. In , you can also see the behavior of the fan bones of the foot, which I’ll discuss shortly.
Bones of the foot
Ankle rotation: a) no rotation, b) in a heel-up pose, c) displayed without custom bone shape
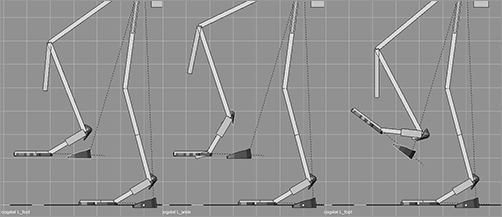
shows a few simple leg poses that involve moving the foot with the foot bone, raising the heel with the ankle bone, and raising the toe by rotating the foot bone. Recall that these last two are the same motions for which you used Action constraints in the Captain Blender rig created in Chapter 4.
Leg poses involving the foot bone
Fan Bones
Fan bones are bones used to improve deformations by mitigating the localized effect of a sharply angled joint in an armature. In some cases, they can be used in place of or in addition to the bone-driven shape key approach in order to improve joint deformations, as discussed in Chapter 5.
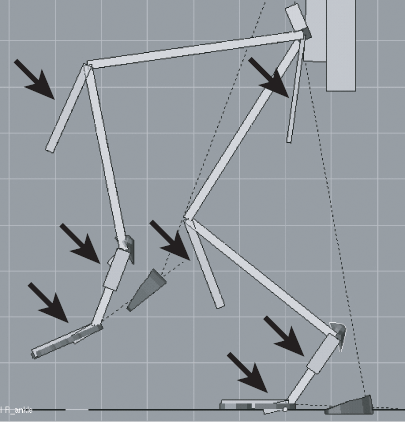
In the leg poses shown in , visible fan bones are indicated with arrows. The fan bone in the right (rearmost in the figure) ankle is not visible because the bone it is constrained to is not rotated. The most obvious fan bones in this image are the ones extending down from the knees; fan bones are also visible at the left (raised) ankle and slightly visible at the balls of the feet where the toe bends. The two fan bones of the foot are named footmid and anklerot. Although these bones are constrained to copy the rotation of footbot and foottop, respectively, the influence of the Copy Rotation constraint is set at 0.5 instead of 1.0. The same is true of the fan bone extending from the knee, which is aligned to the lower leg bone in rest pose and set to copy the lower leg’s rotation with a 0.5 influence. This provides an intermediate level of rotation, as you can see in the figure. These bones must be deform bones, of course, because their purpose is to soften the effect of the joint on the mesh.
Fan bones
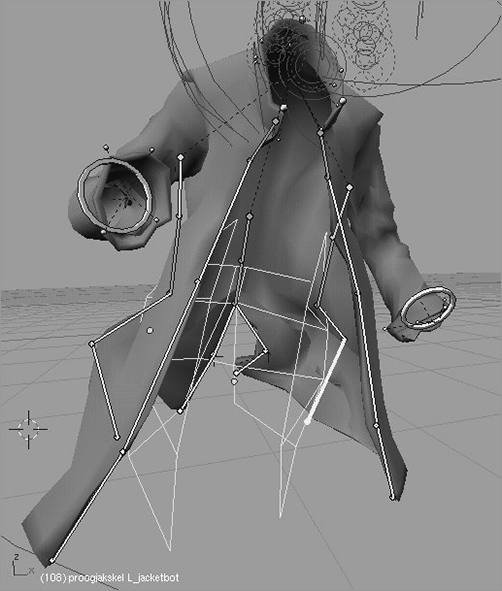
Proog’s Jacket
Living characters aren’t the only things that often need armatures. In Elephants Dream, Proog’s jacket has something of a life of its own. In addition to being modified by the Proog armature to follow the movements of Proog’s body, the jacket has its own armature to govern the way the cloth hangs and responds to movement, as you can see in .
Proog’s jacket in action
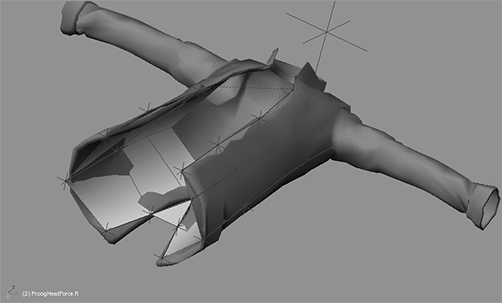
One of the most interesting things about this setup is how the jacket incorporates a softbody modifier to assist in its cloth simulation. In Blender, cloth simulation is not yet fully implemented (although the work is underway). Ordinary Blender softbodies currently lack the capability to calculate for self-collision and are furthermore slow to compute with large numbers of vertices.
Proog’s jacket’s rig works around these problems by doing the softbody calculations on an invisible, low-poly “lining” for the jacket, which is shown selected in . It has very few vertices to compute, so you can do softbody calculations very quickly with it, but it is placed in relation to the coat so that it mimics the way the actual jacket should hang if it were soft.
Low-poly softbody “lining” for the jacket
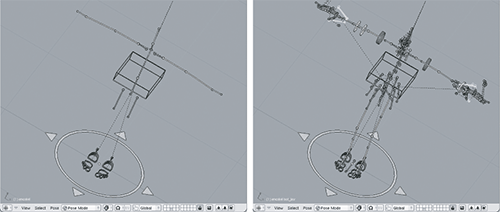
To allow the drape of this low-poly lining to control the drape of the actual jacket, empties are vertex-parented to verts in the lining, as shown in . The highlighted empty is vertex-parented to the coattail vertex. Finally, this empty is assigned as an IK target for the highlighted IK solver bone shown in . This armature controls the movement of the actual jacket mesh. By using this method of vert-parenting IK target empties to the softbody jacket liner in several key places, a softbody effect can be approximated for the jacket without dealing with the various problems that would come with putting a softbody modifier onto the jacket directly.
An empty is vertex-parented to the tail of the lining.
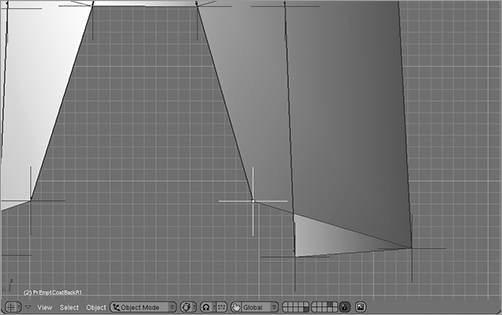
The empty is then made the IK target for the tailbone of the jacket.
In future versions of Blender, it is likely that the roundabout approach of parenting IK solvers to empties to vertices will no longer be necessary to achieve a similar effect because the coders are currently working on a system that will allow one mesh, such as the low-poly liner, to directly deform another mesh, such as the high-poly coat in this example. This would be a practical improvement and make this approach even more attractive.
Texturing Proog
Without a doubt, one of the most striking and distinguishing features of Elephants Dream is the almost obsessive attention to textures. Well-done texturing adds an entirely new dimension of realism to any 3D scene, and it’s clear that the creators of Elephants Dream were keenly aware of the increase in production value that can be attained by texturing.
In terms of the characters, Emo’s texturing is probably the most immediately obvious because of its strange discoloration and incongruous wrinkling, which is striking on such a young-looking face shape, but it is the more subtle and natural texturing of the Proog character that I find particularly interesting.
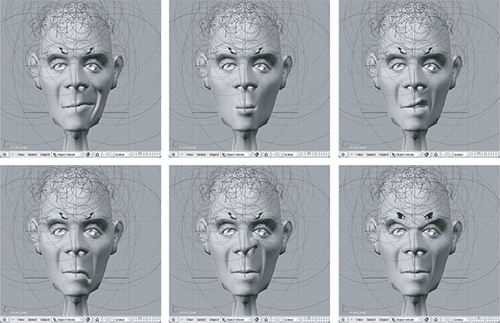
In , you see the three main texture images for Proog’s head: the color texture (unfortunately reproduced here in black and white), the bump map texture, and the specularity texture. In the color texture, various pinks, reds, and blues lie over a layer of pinkish skin tone. Veins are drawn lightly in blue, and light and dark areas represent variations in skin stress.
Texture images for Proog’s head: color, bump mapping, specularity
The bump map texture shows areas of depression and elevation on the face, creating wrinkles, bumps, and indentations. The light veins in the forehead coincide with the blue-tinted veins in the color map to raise them slightly from the surface. Neutral gray has no effect on the normal value of the base mesh.
The light areas on the specularity map appear in the final render as shinier than the dark areas. When creating this texture, the artist took into account factors such as oiliness of skin, tautness of skin, and closeness of skin to bone. This texture follows the other two but is less highly contrasted than the bump map. Also, attention is given to areas such as the rims of the ears, which will have a slightly higher specularity than other areas but are not of particular interest for bump mapping.
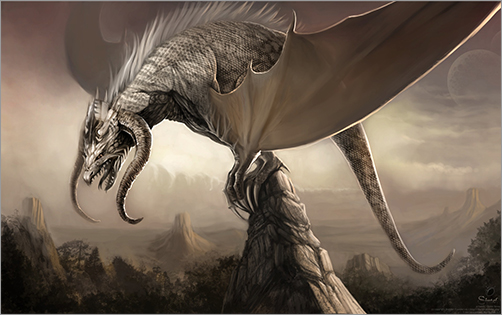
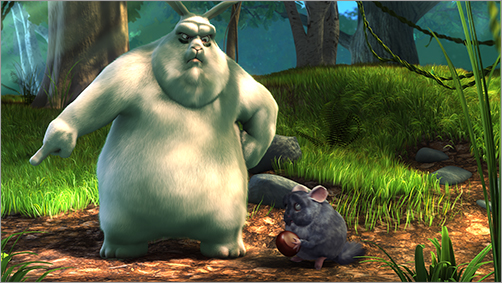
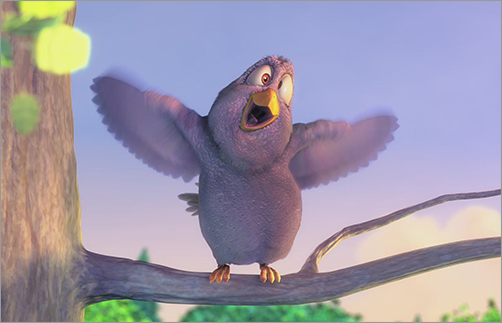
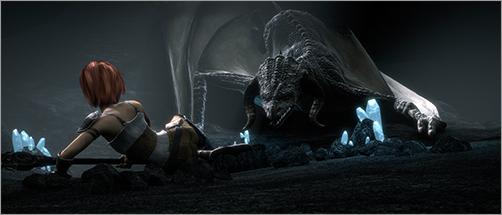
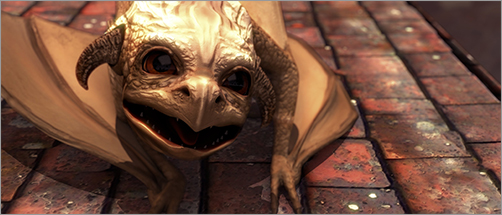
. The proportions of these characters were nonhuman, and rigging involved special considerations such as dealing with the movement of ears and fat. In addition, winged characters began to make an appearance, such as the bird shown in . Sintel took things a step further by featuring fantasy dragon characters (the adult dragon shown in and the baby dragon shown in ) that were without precedent in nature in major, highly active roles.
Big Buck Bunny and the chinchilla
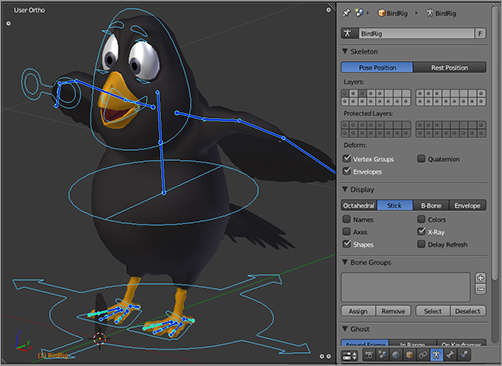
The bird from Big Buck Bunny
Sintel and the dragon
Sintel’s baby dragon
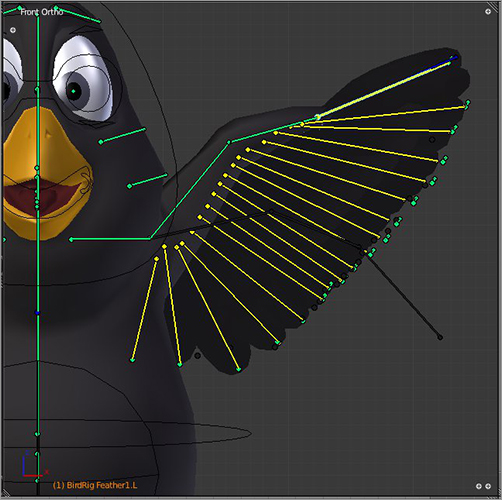
The bird rig for Big Buck Bunny actually had a Blender-based predecessor from the Argentine feature film Plumiferos, which you’ll read about in Chapter 16. The bird rig here was inspired in large part by the rig you’ll read about in that chapter. As you can see, the animator controls shown in are simple, but the wing deformation is more complex, as shown in . See Chapter 16 for a more in-depth look at rigging birds.
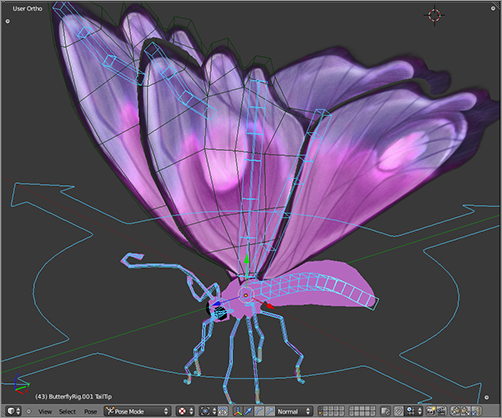
Some other rigs worth looking at from Big Buck Bunny are the butterfly rig shown in and the Frankie the Flying Squirrel rig. You can download both of these rigs (like all Big Buck Bunny rigs) individually at in the downloads section. The butterfly rig is notable for its extensive use of B-bones, a type of bone that unfortunately is not discussed in this book. B-bones enable you to segment individual bones in a way that makes them bendable. This can create more flexible, bouncy rigs.
Animator controls for the bird
Wing bones for the bird
Butterfly rig
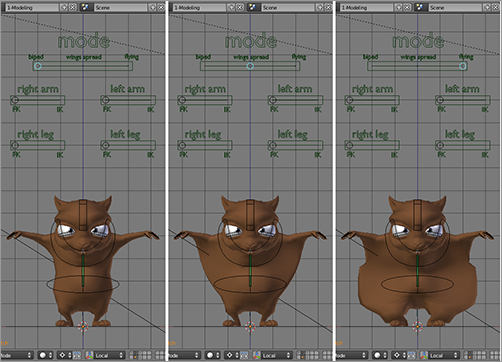
The flying squirrel rig is notable because it enables easy switching between different character shapes for when the squirrel is behaving as a biped walking on the ground and for when he’s behaving as a flying animal; the rig also enables you to alter the pivot point of the spine in order to animate a full range of motion as it does things like swing from trees, flip around, fly, and walk. shows the rig with the IK controls for all four limbs, the spine pivot control, and the mode control. shows the different positions for the mode control, from fully biped to fully flying.
Animator controls for the flying squirrel

Switching modes for the flying squirrel
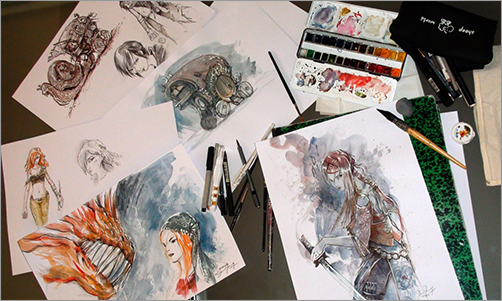
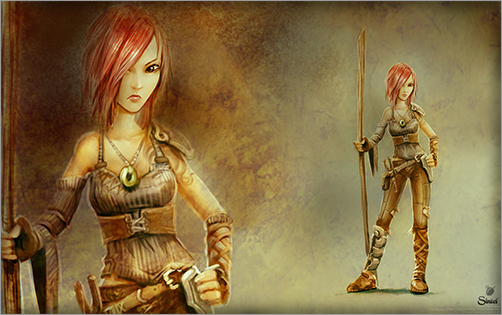
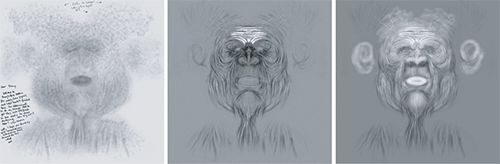
Early character and concept artwork for Sintel by David Revoy