Chapter 12: Lamps and Lighting

Even though there are five different types of lamps to chose from, Cycles can only use four.
If you set a lamp to hemi, Cycles will treat it as a sun lamp. Point lights emit light equally in all directions. Spot lights emit light in a cone. The sun lamp is also called directional light in other programs. It will cast parallel rays into the scene. The direction of the rays depends on the rotation of the sun, its position is irrelevant.
Lamp objects are different from mesh lights. A mesh light is an object with an actual surface that has an emission shader in its material. Also their emission behaves different relative to their size, because the strength is specified in Watts / m², while the lamp strength refers to Watts / lamp.
Lamp objects do not have an actual surface, so they do not get rendered directly. However they can be of great importance to a scene.
Since lamps have no physical surface, they need to have an emission output in their node tree - provided you are using nodes. For most lamps it is sufficient to use the lamp tab to set the relevant properties. But if you want to use , or other nodes, you need to go to the compositor as well. To read more about how the strength of a lamp or sun works, please see the node.
Size
Increasing the size of a lamp will make the lamp act as if it was bigger. Since it still does not get rendered, you cannot see the effect directly, but it will appear bigger in reflections and the shadows will be much softer. Since the strength of a lamp is in Watts, lamps with an increased size value will appear darker, because there is less light emitted per surface area. This also counts for the sun light.
This is not to be confused with scaling the lamp in the viewport using the S key, that method will have no effect on the lamp in render.
Cast Shadow
Whether the light of the lamp can be blocked by objects or shines through them. This is a global setting, meaning no object will be able to cast a shadow from this lamp.
If you prefer turn off shadows for individual objects, use the shadow tick box in the options of the objects.
Max Bounces
You can also limit the maximum bounces for the light emitted by a lamp object. If the max bounce value exceeds the settings in the , the latter will be used.
Multiple Importance Sample
Normally lamps are only visible to shadow rays, by turning on MIS they will become visible to normal rays as well. Thus turning this on will make lamps show up in sharp glossy reflections and glossy reflections with roughness of 0. It will also make the lamp appear in caustics and result in less noise for large lamp sizes. Beware that this setting can also lead to more noise for smaller lamp sizes.
Point
This lamp type acts like a sphere that sends out light rays from its center equally in all directions.
Sun
The sun casts parallel rays across the entire scene. This is simulating the light of the earth’s sun. Of course the rays from a real sun are cast in all directions, but it is so big and far away from earth that the rays actually appear to be parallel. Therefore:
- 2 similar objects in the scene will cast the same shadow in terms of size and direction, no matter where they are.
- The sun’s location in your scene does not matter, only its rotation is taken into account.
Spot
Just like you would expect the Spotlight sends rays in the shape of a cone into your scene. You can choose the size of the cone by adjusting its angle at the tip. By adjusting the blend value, you can soften the rim around the center of the spot. However the blend value will not alter the softness of the shadows cast by the lamp, it is - again - altered by the size of the lamp, which will in turn not influence the size of the cone’s base.
Area
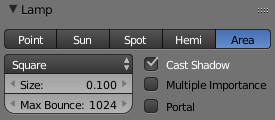
The area light behaves somewhat similar to a plane with an emission material. The key differences are:
- The shadows can be used in the shadow pass in post processing.
- The shadows can be eliminated on a per-object basis using its when MIS is turned off.
- You can limit the amount of bounces for each lamp individua lly.
- Increasing the size will decrease the brightness per area, making the light look darker.
- Area lamps can act as light portals.
Once you choose the area type lamp the size option will be extended by a drop down menu, where you can decide if your lamp should be square or if you want to change the x size independently from the y dimension.
With this lamp type the size does not only alter the softness of the shadows, but also the size of the area illuminated by the lamp.
For extreme values the size can behave kind of odd. Try not to set it below 0.01, because it will result in too little and very noisy light.
Also for this lamp scaling actually has an effect that is similar to increasing the lamp size.
Square / Rectangle
When setting the area lamp to square, all sides will have the length specified in size while you can set the lengths for x and y separately when setting the lamp to be of rectangular shape.
Portal
This setting is unique to area lamps. When turned on, the area lamp will no longer emit light but act as a guide for shadow rays pointing them towards environment light. Use it for interior scenes to guide Cycles shadow rays towards the windows by placing them inside the windows, pointing straight inwards. The area lamps should cover the entire window area. Now noise should clear up a lot faster. Every portal comes with a slight performance penalty so try to use as few as possible by covering multiple windows with one portal at once if possible. You should also turn off MIS on the world background when using portals because MIS and portal cross pathes.

Fig. 12.1) The test scene as an interior with two windows, solely lit by the world background. In the windows two area lamps are placed. On the bottom the scene is rendered two times with 200 samples each. Left: Portal is turned off for the lamps, render time was 15.67. Right: Portal is turned on, render time was 20.71 sec. but the noise was reduced considerably.

