Setting up a basic computer, or putting your Pi to work as an Ethernet gadget or WiFi hotspot, are things that you can figure out how to do with few additional skills beyond a basic working understanding of your computer. The possibilities of a Pi stretch far beyond these basic functions, however. If you’ve mastered the projects in the previous chapter and are ready to move to the next level, there are plenty of directions you can go.
When it comes to getting into more advanced applications of the Pi, you are also likely to run into situations that require the use of more specialized skills. Those could be along the lines of programming or coding skills, or more in the hardware and tinkering area, as you build custom casings to hold your computer projects. The best choice is to match your projects to your skill set until you’re comfortable pushing your limits.
The project ideas in this chapter are all very do-able with a little bit of time and effort, and a bit of experience working with a Pi. They may also require more additional parts or supplies in comparison to the starter projects in the previous chapter.
Arcade
One of the most popular uses for the Pi is to create a gaming station or arcade. The processing power of the Pi isn’t high enough for modern console games, but it can easily handle earlier console, PC, and arcade games, making it perfect for “retro” arcade stations.
The main thing you’ll need to turn your Pi into an arcade is the operating system EmulationStation. You can get this for free from GitHub, or go to EmulationStation.org. Download the file then install it onto your SD card and transfer it to the Pi using the same basic procedures outlined above. Once you have the operating system up and running, you can install a whole variety of emulators to give you all the games you’re looking for.
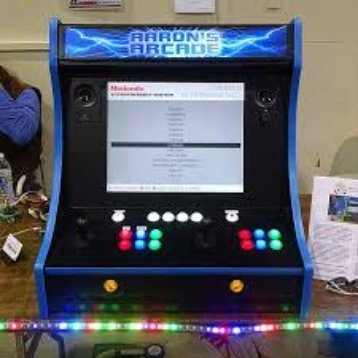
Maybe the most comprehensive and popular emulator for the Pi is RetroPie. It’s incredibly easy to set this up; simply download it onto your Pi and you’ll be able to play games from a whole host of systems, including Atari, Game Boy, Game Cube, SegaGenesis, Nintendo 64, NES/SNES, PlayStations 1 and 2, and even some games from modern systems like the Wii, along with PC games and tons of other less well-known retro systems. RetroPie doesn’t include any copyrighted games, but it still has a huge variety of fun things to play.
As for the physical components, your options are wide open. It will work with a wide array of different classic controllers. If you want to go totally simple, hook up your Pi to a monitor and a couple joysticks and you’ll be ready to start playing. You can use the joystick to control it once it’s set up, so you won’t even necessarily need a mouse and keyboard.
You can get creative with the design, too, if you’d prefer. People have used a Pi to build an arcade station into the top of their coffee table, or make a portable gaming station with the Pi computer included inside an existing joystick or console controller.
Jukebox
The set-up of this one will require you to make some use of the command line, which can actually be a helpful introduction to that process if you’ve never used the terminal window on a computer before. You will also learn how to mount a drive, which can be a helpful skill to know for other applications, like using the Pi as a back-up drive.
Once it’s finished, this music streamer will be essentially a Pi-based jukebox with a touch-screen interface. This makes it easy for even non-techy people to interact with it. Put it out at a party and your guests will be able to search for their favorite artists and songs in your collection and play them through the stereo. Since it works on its own network, you won’t even have to worry about pairing devices.
There are several different options for touch-screen Pi interfaces out there, all of which are equally as affordable as the Pi itself. There’s a display called PiTFT you can get online for around $45 that’s ideal for this project. You’ll probably also want to put the computer in a case since you’ll be touching and interacting with it.
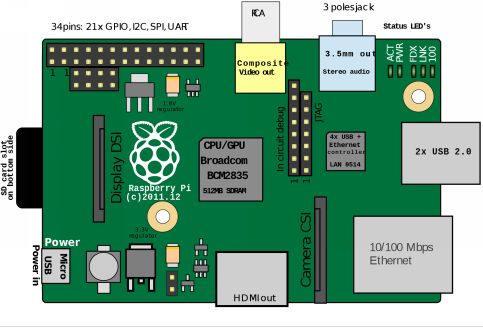
The touch screen interface will plug into the general-purpose input/output (GPIO), which is the set of pins in the corner of the Pi board. Plug it in first, then plug in your keyboard, Ethernet cable or WiFi adapter, and power cable, in that order.
For the software and content side of things, you’ll start with the operating system Raspbian as a base. The core of the project is the application Music Player Daemon (MPD) and the associated Music Player Controller (MPC). A quick internet search for “Pi touchscreen jukebox” will show you a variety of different ways to install, configure, and use these programs.
Streaming radio
If you’d rather just play tunes through a service like Spotify or Pandora instead of setting the Pi up to access your home media files, you can do that, too. This same set-up could be used to play podcasts, too, or to play music from Google Music or other online media outlets.
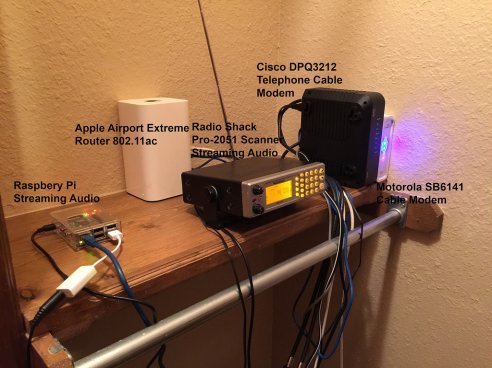
As with the arcade and other projects mentioned above, you can put the Pi and its associated components into pretty much any case that you want, and this can make for some really fun applications. One user built a streaming radio inside an old analog radio, both re-purposing an outdated object and giving his streaming radio an attractive, antique cover. You can find instructions for how to make that version of the radio at 2dom.github.io/the-radio.
Pi-controlled RC car
Lots of people have used Raspberry Pi computers in conjunction with small electronics, especially toys, to give them a fun new function. Thanks to the use of a Raspberry Pi you ca now control any RC car with your phone or any web browser, completely wirelessly and without needing to be even close or on the same WiFi network.
This project was designed by the website 24 Rush (you can find the detailed instructions by going to ). You can use any version of the Raspberry Pi that you want, as well as any RC toy car, and can get the required software for free; the step by step instructions on the website will show you how.
Because you’ll be using the Pi on a moving object, the standard plug-in power source won’t work for this project. Instead, you can get a battery pack for the Pi. These are available from a variety of different manufacturers, with different versions giving you a variety of battery life and size options.
You will need to do both wiring and soldering for this project, something that newcomers to the tinkering world might find intimidating. The steps you have to follow with both are very basic, however, making it a great project for branching out into these kinds of techniques.
Automatic drink dispenser
One of the ways you can utilize a Pi computer is by adding a level of computerization or automation to everyday objects, in much the way a smart plug can be used to give voice control ability to any appliance. The automatic drink dispenser created by Hacker House is a from-scratch way to make perfect drinks more quickly for your next party or social gathering.
This one is certainly not on the easier side of the spectrum. You will need to take multiple design steps to attach the flow meters and complete the internal wiring. Some knowledge of both physical construction techniques and software coding will be helpful, as well, though you can teach yourself the necessary processes using their step-by-step guide.
If you want to make a drink dispenser of your own, or just want to scope out what all is involved, head over to . You’ll find a list of all the supplies you need and what to do with them from start to finish.

