When you’re using the Raspberry Pi as a stand-alone computing device, you’ll want to have a dedicated monitor, keyboard, and mouse for it. This is true of DIY projects like arcades and media centers as well, which will run far too slowly when accessed remotely to be of practical use.
For some projects, though, the main function of the Pi is to control electronic devices in the background, in a way that won’t require much interfacing directly with the operating system once it’s been set up. In these projects, accessing the Pi remotely for the initial set-up or changes to the settings is often the best option, saving you the clutter of a full set-up. It can also be useful for those who only have a laptop in their house, or otherwise, don’t have access to a dedicated monitor.
There are two main methods for connecting to your Pi remotely: secure shell (SSH) and Virtual Network Computing (VNC). The first will require you to utilize the command line for all changes and controls, while the second offers a full graphical interface on a separate screen.
The exact set-up and most viable uses for each of these remote access methods will be slightly different. For most people and projects, SSH is the better option, but VNC can be especially useful for those who don’t want to invest in new hardware but aren’t comfortable enough with code to use the command line. The sections that follow in this chapter will walk you through setting up remote access using both of these methods, as well as the typical best uses for each.
SSH
Using Secure Shell will allow you to connect to the Raspberry Pi’s command line from any computer. Whatever you type into the terminal application on the other computer will execute on the Pi as though it were an action performed on the Pi itself.
If you’re not familiar with SSH, it’s a feature offered by most Linux-based electronics that allows you to set up one computer as a host to open terminal sessions on remote devices. It is not exclusive to Pi computers, though if you’re not typically a user of Linux-based systems, the Pi will probably be your main use for the feature.

The most recent updates of the Raspbian operating system do not have SSH enabled by default. You can enable it in two ways: either using the raspi-config command in the terminal window, or by creating a blank boot file.
To use the terminal window method, you will need to have already set up your Pi. This means you will need to have a monitor, keyboard, and mouse that can be connected to the Pi for at least the initial set-up, though you won’t need to dedicate them to this purpose once SSH is enabled.
Start by opening the terminal window in the Pi, then enter the command “sudo raspi-config” and scroll down to the SSH option. This may be located under “Interfaces” or under “Advanced” depending on which version of the Pi you have. Hit enter then select “Enable” and re-boot your Pi to make the change.
If you can’t or don’t want to use a monitor even for the initial set-up, you can instead enable SSH using the boot file method. Create a file called SSH, then save it in the “boot” folder on your SD card. This file can be empty. The system will look for it when it boots; if it’s there, SSH will be enabled and the file will be deleted.
Using SSH to interface with your Pi will follow a different procedure depending on what operating system you have installed on your host computer. If that computer has a Linux-based or Apple-made operating system, you can enter the following command into the terminal window:
ssh IP address –l pi
Replace the words “IP address” with the physical IP address of your Pi; if you don’t know it, you can find it by running the command “sudo ifconfig” in the terminal window. The “-l pi” at the end specifies that you want to log in to the Pi as the user “pi.” You will get a security warning about being unable to verify the identity of the machine the first time you do this. Press continue; you’ll be prompted to enter a password. If you haven’t set one of your own, it will be “raspberry” by default.
If you want to use a Windows-based system as your host computer, you will need to download the program PuTTY () onto the host computer. This is a free program that is easy to download and install. Once it’s on your host computer, run the file putty.exe, then enter the Pi’s IP address and click “Open.” You’ll likely get the same security warning mentioned above, and can follow the same steps to get past it.
VNC
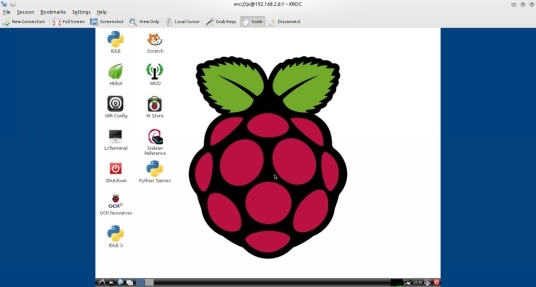
For many people who aren’t programmers or developers, the graphical interface is the most familiar and comfortable way to interact with a computer. If you use VNC for remote control of your Pi, you can see the Pi’s desktop as a window on your host computer and control it as though you’re sitting in front of the Pi, which can be far more intuitive for users who rarely use the terminal window.
Compared to SSH, connecting to the Pi with VNC will be an even slower process. It isn’t recommended for even simple programs if you’re planning on using remote access on a daily basis, but if you only need to get in for the initial set-up or occasional tweaks, it should work well enough.
There are two different ways you can enable VNC: graphically or at the command line. To enable graphically, you’ll need to boot into the desktop of the Pi through a monitor hooked up to the device. Select “Menu” followed by “Preferences,” then find the line that says “Raspberry Pi Configuration” and go to “Interfaces.” Check to make sure that VNC is enabled.
If you don’t have a monitor that you can use, you’ll need to enable VNC at the command line. Don’t worry if you’re not terribly familiar with the terminal window; this process is very simple, even for those who aren’t technologically inclined. Simply type “sudo raspi-config” at the command line then navigate to “Interfacing Options.” Scroll down until you find VNC, then make sure it’s set to “yes.”
Once you’ve enabled VNC, you’ll need to connect to it from your host computer. The easiest way to do this is by forming a direct connection, so long as you’re connected to the same private local network as the Pi itself. Download the program VNC Viewer on the device you plan to use to take control of the Pi, then enter the Pi’s IP address and you’ll be connected.
If you’re not on the same secure network as the Pi, you can also connect through the Cloud. This will create a connection that’s encrypted from end to end to ensure its security. The other benefit of this method is that you don’t need to know the Pi’s IP address—or even provide a static IP address—to make the connection.
The first step is to sign up for an account with RealVNC (https://www.realvnc.com/raspberry pi/#sign-up). On the Pi, sign in to the VNC server using the same credentials you used in your newly-created RealVNC account. Next, download the VNC Viewer on the device you’ll be using to take control, then sign into the VNC Viewer with those same credentials.

