shows the sequence of bytes in this example graphically. shows this example graphically. shows an example. The first instruction in this 4-byte sequence is a 2-byte jmp instruction. The target of the jump is the second byte of itself. This doesn’t cause an error, because the byte FF is the first byte of the next 2-byte instruction, inc eax. shows an example that operates on the same principle as the prior one, where some bytes are part of multiple instructions.The first instruction in this sequence is a 4-byte mov instruction. The last 2 bytes have been highlighted because they are both part of this instruction and are also their own instruction to be executed later. The first instruction populates the AX register with data. The second instruction, an xor, will zero out this register and set the zero flag. The third instruction is a conditional jump that will jump if the zero flag is set, but it is actually unconditional, since the previous instruction will always set the zero flag. The disassembler will decide to disassemble the instruction immediately following the jz instruction, which will begin with the byte 0xE8, the opcode for a 5-byte call instruction. The instruction beginning with the byte E8 will never execute in reality.
The disassembler in this scenario can’t disassemble the target of the jz instruction because these bytes are already being accurately represented as part of the mov instruction. The code that the jz points to will always be executed, since the zero flag will always be set at this point. The jz instruction points to the middle of the first 4-byte mov instruction. The last 2 bytes of this instruction are the operand that will be moved into the register. When disassembled or executed on their own, they form a jmp instruction that will jump forward 5 bytes from the end of the instruction.
When first viewed in IDA Pro, this sequence will look like the following:
66 B8 EB 05 mov ax, 5EBh 31 C0 xor eax, eax 74 FA jz short near ptr sub_4011C0+2 loc_4011C8: E8 58 C3 90 90 call near ptr 98A8D525h
Since there is no way to clean up the code so that all executing instructions are represented, we must choose the instructions to leave in. The net side effect of this anti-disassembly sequence is that the EAX register is set to zero. If you manipulate the code with the D and C keys in IDA Pro so that the only instructions visible are the xor instruction and the hidden instructions, your result should look like the following.
66 byte_4011C0 db 66h B8 db 0B8h EB db 0EBh 05 db 5 ; ------------------------------------------------------------ 31 C0 xor eax, eax ; ------------------------------------------------------------ 74 db 74h FA db 0FAh E8 db 0E8h ; ------------------------------------------------------------ 58 pop eax C3 retn
This is a somewhat acceptable solution because it shows only the instructions that are relevant to understanding the program. However, this solution may interfere with analysis processes such as graphing, since it’s difficult to tell exactly how the xor instruction or the pop and retn sequences are executed. A more complete solution would be to use the PatchByte function from the IDC scripting language to modify remaining bytes so that they appear as NOP instructions.
This example has two areas of undisassembled bytes that we need to convert into NOP instructions: 4 bytes starting at memory address 0x004011C0 and 3 bytes starting at memory address 0x004011C6. The following IDAPython script will convert these bytes into NOP bytes (0x90):
def NopBytes(start, length): for i in range(0, length): PatchByte(start + i, 0x90) MakeCode(start) NopBytes(0x004011C0, 4) NopBytes(0x004011C6, 3)
This code takes the long approach by making a utility function called NopBytes to NOP-out a range of bytes. It then uses that utility function against the two ranges that we need to fix. When this script is executed, the resulting disassembly is clean, legible, and logically equivalent to the original:
90 nop 90 nop 90 nop 90 nop 31 C0 xor eax, eax 90 nop 90 nop 90 nop 58 pop eax C3 retn
The IDAPython script we just crafted worked beautifully for this scenario, but it is limited in its usefulness when applied to new challenges. To reuse the previous script, the malware analyst must decide which offsets and which length of bytes to change to NOP instructions, and manually edit the script with the new values.
With a little IDA Python knowledge, we can develop a script that allows malware analysts to easily NOP-out instructions as they see fit. The following script establishes the hotkey ALT-N. Once this script is executed, whenever the user presses ALT-N, IDA Pro will NOP-out the instruction that is currently at the cursor location. It will also conveniently advance the cursor to the next instruction to facilitate easy NOP-outs of large blocks of code.
import idaapi idaapi.CompileLine('static n_key() { RunPythonStatement("nopIt()"); }') AddHotkey("Alt-N", "n_key") def nopIt(): start = ScreenEA() end = NextHead(start) for ea in range(start, end): PatchByte(ea, 0x90) Jump(end) Refresh()
Назад: Defeating Disassembly Algorithms
Дальше: Obscuring Flow Control
Войти в систему
Войти с помощью соц. сетей:


jmp instruction. The target of the jump is the second byte of itself. This doesn’t cause an error, because the byte FF is the first byte of the next 2-byte instruction, inc eax.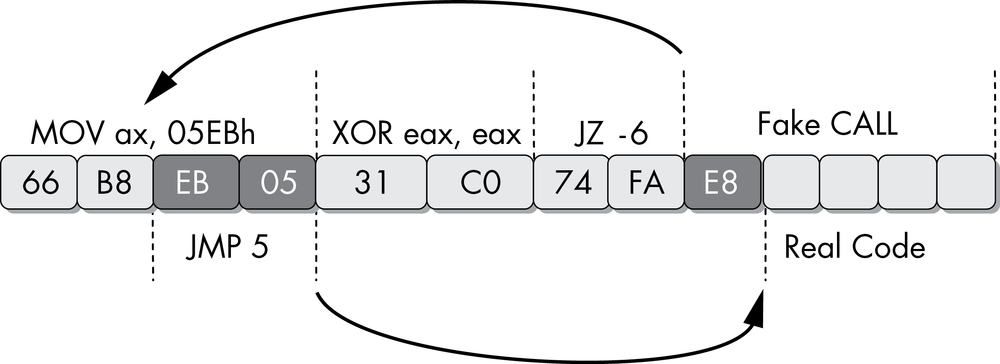
The first instruction in this sequence is a 4-byte mov instruction. The last 2 bytes have been highlighted because they are both part of this instruction and are also their own instruction to be executed later. The first instruction populates the AX register with data. The second instruction, an xor, will zero out this register and set the zero flag. The third instruction is a conditional jump that will jump if the zero flag is set, but it is actually unconditional, since the previous instruction will always set the zero flag. The disassembler will decide to disassemble the instruction immediately following the jz instruction, which will begin with the byte 0xE8, the opcode for a 5-byte call instruction. The instruction beginning with the byte E8 will never execute in reality.
The disassembler in this scenario can’t disassemble the target of the jz instruction because these bytes are already being accurately represented as part of the mov instruction. The code that the jz points to will always be executed, since the zero flag will always be set at this point. The jz instruction points to the middle of the first 4-byte mov instruction. The last 2 bytes of this instruction are the operand that will be moved into the register. When disassembled or executed on their own, they form a jmp instruction that will jump forward 5 bytes from the end of the instruction.
When first viewed in IDA Pro, this sequence will look like the following:
66 B8 EB 05 mov ax, 5EBh 31 C0 xor eax, eax 74 FA jz short near ptr sub_4011C0+2 loc_4011C8: E8 58 C3 90 90 call near ptr 98A8D525h
Since there is no way to clean up the code so that all executing instructions are represented, we must choose the instructions to leave in. The net side effect of this anti-disassembly sequence is that the EAX register is set to zero. If you manipulate the code with the D and C keys in IDA Pro so that the only instructions visible are the xor instruction and the hidden instructions, your result should look like the following.
66 byte_4011C0 db 66h B8 db 0B8h EB db 0EBh 05 db 5 ; ------------------------------------------------------------ 31 C0 xor eax, eax ; ------------------------------------------------------------ 74 db 74h FA db 0FAh E8 db 0E8h ; ------------------------------------------------------------ 58 pop eax C3 retn
This is a somewhat acceptable solution because it shows only the instructions that are relevant to understanding the program. However, this solution may interfere with analysis processes such as graphing, since it’s difficult to tell exactly how the xor instruction or the pop and retn sequences are executed. A more complete solution would be to use the PatchByte function from the IDC scripting language to modify remaining bytes so that they appear as NOP instructions.
This example has two areas of undisassembled bytes that we need to convert into NOP instructions: 4 bytes starting at memory address 0x004011C0 and 3 bytes starting at memory address 0x004011C6. The following IDAPython script will convert these bytes into NOP bytes (0x90):
def NopBytes(start, length): for i in range(0, length): PatchByte(start + i, 0x90) MakeCode(start) NopBytes(0x004011C0, 4) NopBytes(0x004011C6, 3)
This code takes the long approach by making a utility function called NopBytes to NOP-out a range of bytes. It then uses that utility function against the two ranges that we need to fix. When this script is executed, the resulting disassembly is clean, legible, and logically equivalent to the original:
90 nop 90 nop 90 nop 90 nop 31 C0 xor eax, eax 90 nop 90 nop 90 nop 58 pop eax C3 retn
The IDAPython script we just crafted worked beautifully for this scenario, but it is limited in its usefulness when applied to new challenges. To reuse the previous script, the malware analyst must decide which offsets and which length of bytes to change to NOP instructions, and manually edit the script with the new values.
With a little IDA Python knowledge, we can develop a script that allows malware analysts to easily NOP-out instructions as they see fit. The following script establishes the hotkey ALT-N. Once this script is executed, whenever the user presses ALT-N, IDA Pro will NOP-out the instruction that is currently at the cursor location. It will also conveniently advance the cursor to the next instruction to facilitate easy NOP-outs of large blocks of code.
import idaapi idaapi.CompileLine('static n_key() { RunPythonStatement("nopIt()"); }') AddHotkey("Alt-N", "n_key") def nopIt(): start = ScreenEA() end = NextHead(start) for ea in range(start, end): PatchByte(ea, 0x90) Jump(end) Refresh()
Войти в систему
Войти с помощью соц. сетей: