Deconstructing the Xbox
Now that we’ve discussed some of the tools you’ll need to hack, let’s do some hacking. The first step in hacking your Xbox is opening the box. Here are the tools you will need to take the cover off:
- T10 and T20 Torx bits (six-pointed star shaped bits)
- A screwdriver handle for the bits
- Antistatic safety gear (see “Static Electricity: The Circuit Killer”)
- Small flathead screwdriver (helpful, but not required)
Note
 Before you start taking apart your Xbox, keep a few things in mind: first, there is always some risk of permanent damage when taking things apart, and taking apart the Xbox voids your warranty. Second, be sure to read through the entire section before proceeding. And third, have fun.
Step 1: Safety First
Unplug the Xbox. Leaving the Xbox plugged in will expose you to hazardous, possibly lethal, voltages.
Step 2: Remove Case Screws
Flip the Xbox upside-down and inspect the bottom. There are six screws that hold the top and bottom halves of the outer shell together, and they are all hidden underneath labels or the rubber feet. Figure 1-2 illustrates the position of all the screw locations.
The rubber feet are glued onto the Xbox with a strong adhesive. Removing the feet will usually require a little bit of help from a flathead screwdriver. Figure 1-3 illustrates this procedure. Once you have pried up an edge of the rubber foot, peel it back as evenly as possible so as to preserve the adhesive backing on the foot. If you are careful, you will be able to re-attach the foot later on, although after a couple of removal cycles the adhesive will lose its tack. As a replacement, you can buy rubber feet at any hardware store and attach them if you use your Xbox on a surface that is slippery or sensitive to scratching.
Use the T20 size Torx bit to remove the four screws that were underneath the rubber feet. The screws are fairly long, but their threads are short so removal should be quick.
The last two screws are hidden underneath the serial number label and the product certification label. Figure 1-4 illustrates the location of these screws.
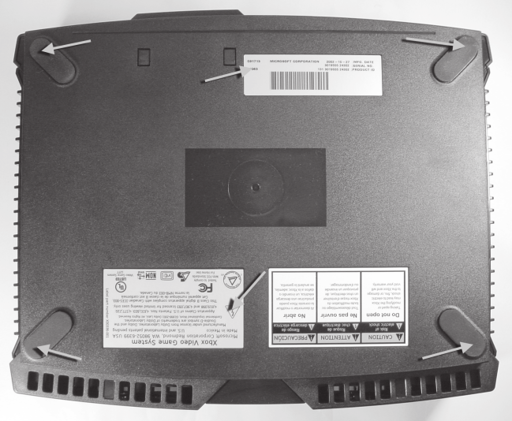
Figure 1-2: Location of the Xbox case screws. This is a view of the bottom of the Xbox.
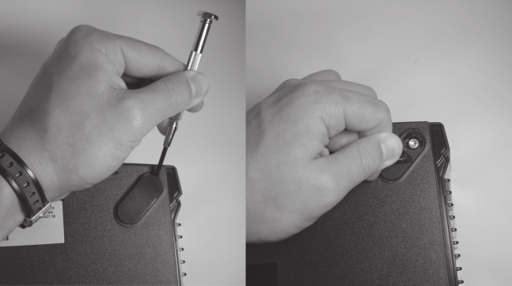
Figure 1-3: Use a small flathead screwdriver to pry up an edge of the Xbox’s rubber feet, then carefully peel them back.
In order to locate them, rub a finger firmly over the general region where the screws should be. The label will indent slightly over the screw holes. Puncture the label with the bit and slide or rotate the bit around until it catches in the screw hole, and proceed to remove the screw. If you care about the cosmetic integrity of the labels, hold the label down while you remove the screw, otherwise the label will peel back or tear.
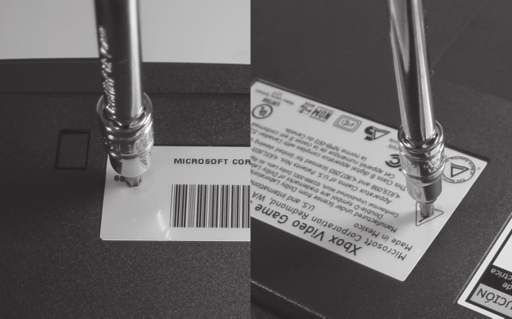
Figure 1-4: Location of the screws hidden by the serial number and product certifications labels.
Tip
 Keep a small tray or plastic bag around to store your screws so you don’t lose them. The screws that hold the Xbox together are fairly unique and you may find it difficult to purchase a suitable substitute at the local hardware store.
Step 3: Remove the Top Cover
You should have removed six identical long screws at this point. Turn the Xbox right side up, and gently grasp the box by the sides using the open palms of your hands, and attempt to lift the cover off with a gentle shake. If the cover does not come off with this method, you may need to “start” the cover by prying the case with your fingers from the back. In some rare cases, you will also have to pry with a screwdriver from the front, but be careful and gentle when you do this. Figure 1-5 illustrates some of the points you can use to help remove the case.
Do not force the case cover off. If the prying methods described above yield no progress on the case cover, an extra screw may have been added since the publication of this book. Attempt to locate the screw by feeling the labels on the back of the Xbox.

Figure 1-5: Some places where you can pry to work open a stubborn cover.
Step 4: Move the Disk Drives
Now that you’re inside, you should see two drives mounted on black plastic carriers. In order to access the motherboard, you will need to move (not necessarily remove) the disk drives. You do not have to disconnect the drive cables, but you will need to unscrew the drive carriers.
Three T10 Torx screws hold down the carriers. Figure 1-6 illustrates the location of these screws. One is hidden underneath the gray IDE ribbon cable near the back of the case, and two are recessed about an inch below the surface of the drives near the front of the case. You may need a flashlight or direct overhead lighting to see the recessed screws.
The recessed screws may prove to be a bit challenging if your screw driver does not have a magnetized bit holder, as the bit will tend to slide out as you position it over the screw. The bit is also small enough so that it can engage the space between the screw and the plastic carrier. If the drive carriers remain stiff even though you think you have removed the screws, double-check to make sure they are actually unscrewed. You should be able to lift up the carriers slightly without undue force.
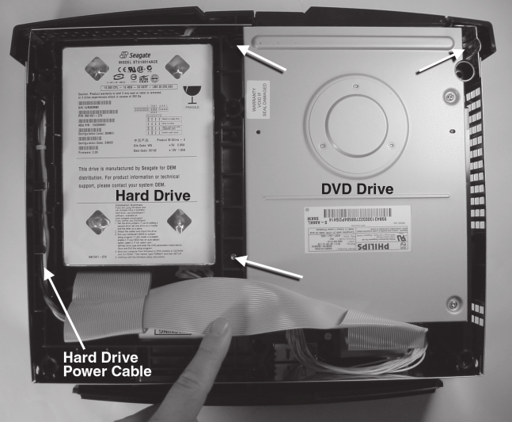
Figure 1-6: Location of the three drive carrier screws. Note that the gray IDE ribbon cable is being lifted for the photograph. The box on the left is the hard drive, and the box on the right is the DVD drive.
Once you have removed the screws, you will need to free the hard drive power cable, or it will interfere with the removal of the drive carriers. The power cable is a black, yellow, and red bundle of wires to the outside of the hard drive. The hard drive is the device on the left in Figure 1-6. It is held in a notch along the edge of the carrier. Gently work the cable free of the notch so that there is a couple inches of slack on the cable. Figure 1-7 illustrates about how much slack you should have when you are done.
Once the cable is free, you will be able to lift the hard drive out of its storage position. Lift the hard drive up and rest it over the DVD drive. With both hands, lift the DVD and hard drives out of the case, and fold them outward so they hang off to the side as shown in Figure 1-8. The cables connecting the drives should fold over easily with no resistance. (Be mindful of the yellow cable coming from the back of the DVD drive; it can be easily pulled out of its socket if you are not careful.)
You now have a ful view of the Xbox motherboard and power supply, without having disconnected any of the drives. This arrangement will be advantageous for testing the Xbox following any hardware modifications.
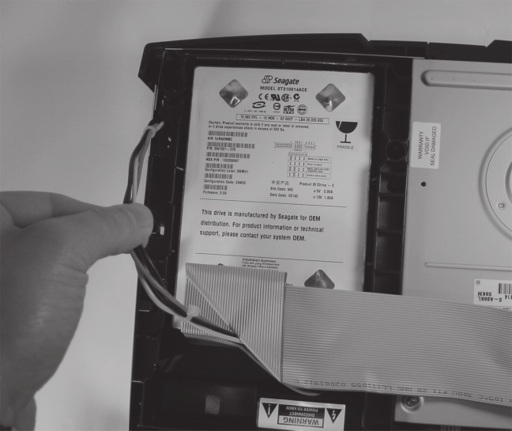
Figure 1-7: Free the hard drive cable from its retaining notch. Once it is free, you should have a couple inches of slack on the cable.
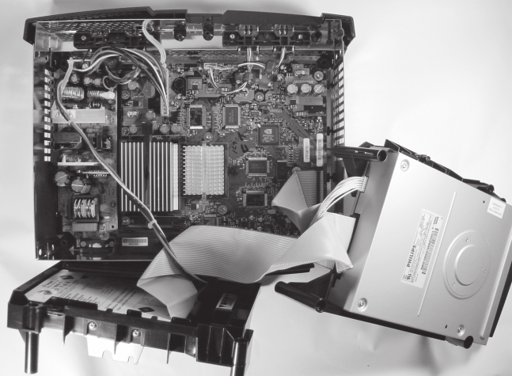
Figure 1-8: Position of the disk drives, preserving electrical connections for testing and experimentation.
Always be mindful of the power supply; it has voltages that could injure or kill you if you touch it. Remember that it is “live” as long as the Xbox is plugged in, even if the Xbox is turned off. Also note that the bottom of the hard drive carrier and the DVD drive have a secondary use as air ducting inside the Xbox. Running the Xbox with the drives off at the sides for extended periods of time could lead to your Xbox overheating. Likewise, be mindful of the large aluminum heat sinks on the CPU and the GPU. They can get unpleasantly hot — potentially hot enough to burn you — while the Xbox is operating.
For the project in the next chapter (replacing the LED on the front panel of the Xbox), you will not need to disconnect the hard drives, although it is preferable that you do. This will prevent you from placing undue stresses on the cables when manipulating the Xbox’s case.
Step 5: Remove the Disk Drives (Optional)
In many cases, you will find it more convenient and safer for your hardware to remove the disk drives entirely.
To do so, first unplug the gray IDE ribbon cable from the Xbox motherboard. Next, unplug the yellow discrete wire cable connected to the DVD drive from the motherboard. This yellow cable carries power to the DVD and communicates information about the state of the DVD drive’s tray to the motherboard. Do not yank on any single wire in the yellow discrete wire cable, or you could unseat a wire from the cable head. The preferred method of removing the cable is to grip it by the white connector and pull; however, if your fingers are not small enough to fit in the tight space, you can grip the entire bundle of wire and pull gently to remove the connector. Set the DVD drive aside.
Next, unplug the hard drive’s power connector. You will find that the connector is very firmly seated in the hard drive. If you simply pull on the connector directly, you risk injuring yourself on the sharp edges of the case when the connector comes free of the drive. To avoid injury, use a small flathead screwdriver to gently pry the connector off of the hard drive’s body, as shown in Figure 1-9.
You can now remove the disk drive assembly entirely. The gray IDE ribbon cable will still span the separate drive units; you may remove them if you wish, but remember its orientation so you can later re-attach the drives to the Xbox.
Reassembling the Xbox
Now that you’ve taken the Xbox apart, skip to the next sections for some fun projects that you can try. When you are finished, read this section for notes on how to reassemble your Xbox.
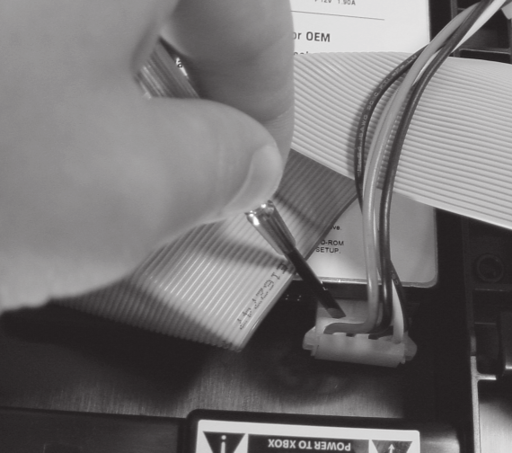
Figure 1-9: Prying the hard drive power connector off with a flathead screwdriver.
Before attaching anything to the Xbox, turn it upside-down and shake it gently to ensure that there are no loose screws or parts that you might have accidentally dropped into the Xbox. A loose screw will spell the end of your video game console and presents a potential fire hazard, so this is a worthwhile check if you have any doubt in your mind.
The first step in reassembling your Xbox is to re-attach the disk drives. If you followed the procedure from the previous section, your DVD drive and your hard drive should already be attached by the gray IDE ribbon cable. If they are not, attach the end of the cable with the fewest creases to the hard drive, and then attach the middle connector of the cable to the DVD drive. The cables will only attach in one direction; pay attention to the bump on the connector and the position of the notch on the drive connectors.
Plug the remaining free end of the gray IDE ribbon cable into the Xbox motherboard. The cable will only plug into the motherboard in one direction; note the bump in the middle of the IDE plug and the notch on the motherboard receptacle. Now, attach the yellow DVD cable to the Xbox motherboard. This cable also will plug into the motherboard connector in only one orientation, and it too has bumps on the cable and corresponding notches on the motherboard receptacle. Now, set the DVD drive into the Xbox. Check that it is flush and level by observing how the Xbox-logo DVD drive tray sits with respect to the edge of the case. It is likely that you will need to try to place the drive a couple of times before it sits just right. Use the creases in the gray IDE ribbon cable to help guide you if you are confused about the orientation of the various parts.
You’re almost done. Drop the hard drive into place next to the DVD drive. Again, this drive will probably require a bit of jiggling about in order to get it to settle into place. The drive should be level with the DVD drive and flush with the edges of the metal EMI radiation shieldaround the Xbox case. Thread the hard drive power cable through its retaining notch in the drive tray, and plug it into the hard drive. You will need to apply a fair bit of force on the connector to create a solid connection; you should feel a gentle snap when the connector is fully engaged. Finally, thread the gray IDE ribbon cable through its original retaining hook on the drive carriers.
At this point, it is a good idea to plug the Xbox in, connect it to a TV and check to make sure that the Xbox starts up properly. You can run the Xbox indefinitely with the cover off like this, as all of the cooling ducts formed by the bottom of the drive carriers and the DVD drive are in place. If the drives are not properly connected to the Xbox, the console will still boot, but it wil display a message that your console requires service. Check your connections carefully if this message appears.
It is now time to screw the drives in place. You should have nine screws at this point: three short T10-drive screws for the drive carriers, and six long T20-drive screws for the case cover. Don’t panic if you are missing a couple of screws, or if you have a couple extra. The Xbox will still hold together even if you’re short a screw or two. Attach the screws and the case cover in the reverse order of removing them. (See the pictures earlier in this section if you need a reminder as to where they go.)
Once the case cover is attached, you are ready to use your Xbox again!

