Chapter 6 -
The Best Xbox Game: Security Hacking
The next step beyond modifying and tweaking the Xbox hardware is taking control of the Xbox hardware. Unfortunately, gaining control of the hardware is not as easy as one might think. The designers of the Xbox put a great deal of thought into securing the hardware against sophisticated software attacks as well as most simple hardware attacks. The Xbox’s security mechanisms are an artifact of its digital rights management architecture.
Note

In principle, applying hardware to “fair-use” purposes, such as running your own homebrew programs, should not be illegal. However, the relationship between fair use, secured hardware, and the relatively new copyright control circumvention laws is still unclear. Chapter 12, “Caveat Hacker,” discusses the legal issues of hacking in more detail.
There are many ways around the Xbox’s security measures. In this chapter and in Chapter 8, “Reverse Engineering Xbox Security,” I tell the story of my adventures mapping out the Xbox security system. I write not only about the successes, but also about the failures I encountered, so that you can learn from my experiences. Chapter 9, “Sneaking in the Backdoor,” explains some approaches taken by others to get around the Xbox’s security measures. Chapter 7, “A Brief Primer on Security,” provides the background necessary to appreciate Chapters 8 and 9.
First Encounters with a Paranoid Design
When the Xbox was announced in the Spring of 2000, excitement rippled through the hardware enthusiast community. The cause for this excitement was not just the Xbox’s gaming potential, but its potential for use as a high performance, network-enabled x86-architecture PC at the affordable price of $300. Price cuts a few months after its introduction have since dropped the cost of an Xbox to below $200. The similarity of the Xbox to an x86 PC meant that a huge base of existing applications and expertise could, in theory, be easily ported to the console.
My first look inside an Xbox was in late November 2001 when my girlfriend (now fianceé) gave it to me as an early Christmas gift. I immediately got down to business. In order to take control of the Xbox hardware, the first task is to extract the boot ROM and analyze its contents: Recall from the discussion on Xbox architecture in Chapter 2 that the boot ROM of the Xbox contains all of the code for establishing the Xbox’s operating environment.
To Snarf a ROM
The type of ROM used in the Xbox is an electrically erasable and programmable variety known as FLASH ROM. FLASH ROM typically comes in one of a few package types, and the Xbox uses one of the most popular packages, the TSOP (Thin Small Outline Package). It is located in sector U7 on the top side of the Xbox motherboard, and the reference designator for the part is U7D1. The TSOP package is very recognizable because it is one of the few chip packages that is rectangular and has pins only on the narrow edges of the package. Most other packages put pins on the long edge or all edges to maximize connectivity, but FLASH ROM has relatively low I/O requirements per silicon area. A quick check on the base part number, 29F080, with a Web search engine verifies that this part is indeed an 8 Mbit FLASH ROM.
There are a few techniques that one can use to read out ( snarf) the contents of the FLASH ROM. The no-solder approach is to buy a test clip that snaps onto the FLASH ROM, and read out its contents by powering up and controlling the ROM through the test clip, while the rest of the Xbox is powered off. A suitable test clip for this purpose can be purchased from Emulation Technology, www.emulationtechnology.com. (The test clip override approach has a few problems with it, the biggest being the possibility of permanently damaging chips connected to the FLASH ROM that are not receiving power through the test clip. However, in the case of the Xbox, this does not seem to be a problem and those who attempted this approach did meet with success.1 I did not initially take this approach as I did not want to risk damaging the motherboard, and because I could not afford the $300 test clip required for the job.)
Another ingenious approach is to solder wires to the test points around the FLASH ROM to eavesdrop on the Xbox as it reads the ROM’s contents. Eavesdropping can be accomplished by either connecting the wires to a custom board that can interface with the ROM, or by using a logic analyzer to capture the data as it is accessed by the Xbox CPU. The latter approach was used with success as well, and in fact some back doors in the Xbox boot sequence were discovered as a consequence of this methodology.2 I chose not to use this approach either, as I did not have a logic analyzer when I got my first Xbox, and because soldering all the wires down can be very tedious, difficult, and error-prone. My approach was more traditional: just remove the FLASH ROM and drop it into a ROM reader. I also placed a socket on the motherboard, so that future removal and programming of the ROM would be very quick and reliable.

Figure 6-1: Removing the Xbox FLASH ROM with a tweezer-style soldering iron.
Removing the FLASH ROM in a manner that preserves the integrity of its fine-pitched pins simple if you have the right tools, and nearly impossible with the wrong tools. The key is to heat all of the pins of the FLASH ROM simultaneously; once uniform heating is achieved, the FLASH ROM will fall right off the motherboard. Clearly, the standard pencil-style soldering iron is not going to be able to heat all of the pins simultaneously. The proper tool for the job is a “tong” or “tweezer” style soldering iron as shown in Figure 6-1 below. These soldering irons have two heating elements, so they can heat both sides of the chip simultaneously. Furthermore, the soldering iron must have a paddle-tip that is wide enough to heat the length of the chip all at once.
A soldering iron with these features can cost quite a bit (hundreds of dollars), but it is a worthwhile investment as it comes in handy in all kinds of situations. I use an Ersa SMT Unit 60A soldering iron that I bought for a good discount on the floor of a tradeshow, and it quickly paid for itself through the few board assembly jobs that I picked up on the side while finishing my degree. A more affordable iron by Xytronic can be purchased through Jameco (#168410) for about $70, but I have not used it so I cannot vouch for its quality. Another budget approach that is very simple and straightforward is to use a desoldering alloy, as described in Appendix B, “Soldering Techniques.” (Note that a suitable socket for the ROM3 is relatively cheap — under $20 — although installing it does require a steady hand and an optical magnifying device of some kind.)
Once the ROM is removed and its pins cleaned and inspected, its contents can be read out in a ROM reader. Of course ROM readers can be purchased, but it is always a good learning experience to build your own. You can read up a little bit on ROM programmers that I’ve built at my website, http://www.xenatera.com/bunnie. My original Flashburner4 programmer is a simple device that is easier to understand and build than its second revision5, but it is less powerful.
However, if your goal is to read out ROMs as quickly as possible, just purchase a ROM reader outright. A good ROM reader is an essential tool in any serious hardware hacker’s toolbox. Needham’s Electronics (http://www.needhams.com) makes a great line of ROM programmers/readers that fit a wide range of budgets.
An Encounter with Microsoft
After extracting the ROM contents, the next step is to share its contents with fellow hackers for analysis. Or is it? Within twelve hours of posting the contents of the ROM to my website, I received a call from an engineer at Microsoft politely requesting that I remove their copyrighted content from my website. Of course, I immediately removed their content from my website; I should have known better before posting it in the first place.
This first brush with Microsoft was a sobering warning that reverse engineering the Xbox was not going to be like any other home appliance reverse engineering project. There are laws that protect aspects of reverse engineering, and a vast body of copyright law that protects the intellectual property (IP) owner. Collaborative reverse engineering of the Xbox while respecting Microsoft’s rights is a legal minefield.
On the one hand, Microsoft should be able to invest in a product and take a risk in hopes of a profit. However, profitability is not guaranteed by law. For example, selling the consoles at a huge loss, as Microsoft has done, in hopes of selling software to make up the difference (as a “loss leader”) is a risky proposition, and there is no guarantee by law that Microsoft has to come out ahead in the end. On the other hand, we as hackers have the right to tinker (“fair use”) with hardware purchased with our own hard-earned cash, and if Microsoft wants to basically sell PCs at a huge discount to us, that’s fine. Whether or not we purchase enough games (around ten or more) to compensate for Microsoft’s losses on the Xbox is entirely up to Microsoft’s business and marketing strategy.
In my view, Microsoft’s large loss-to-revenue ratio is a bit of an anomaly in this industry. Sony and Nintendo roughly break-even on the cost of their console hardware. Also, cell phone providers often sell their phones at a loss comparable to that of the Xbox, but require the subscriber to enter a contract to ensure that the cost of the phone is recouped; breaking the contract implies termination fees. Perhaps this is a reflection of Microsoft’s confidence in the Xbox Live business model.
Somewhere in the middle of all of this is the interplay of cryptographic copyright protection mechanisms and the right to fair use. It turns out that the Xbox makes extensive use of cryptography to enforce copy protections as well as console usage policies, which brings us to the Digital Millennium Copyright Act of 1998 (DMCA), a relatively new, untested body of law. With little established court precedent and plenty of gray area in between the letters of the law, you as a hacker must assess the potential liabilities that you could face. Chapter 12, “Caveat Hacker,” explores in greater detail the legal issues of hacking in the new millennium.
Analyzing the ROM Contents
Rebuffed by Microsoft, but ROM contents still in hand, I proceeded to analyze the ROM contents. One would expect that the boot ROM contains a hardware initialization procedure, followed by instructions that load up the operating system, and possibly the operating system code itself. But where to start?
The program inside the ROM can be thought of as a ball of yarn: Once you find the starting point of the thread, it is just a matter of time and perseverance until you unwind the ball of yarn to its core.
Fortunately, the starting point of the Xbox’s Pentium processor is very well documented by Intel. On power-up, the processor starts running code at a special hard-wired location, called the reset vector. This reset vector is at address 0xFFFF.FFF0, near the top of memory. Let’s look at the data contained at this location (in hexadecimal):
0xFFFF.FFF0 EBC6 8BFF 1800 D8FF FFFF 80C2 04B0 02EE
// key initialization routine unsigned char K[256]; // 0xFFFFC80 in flash unsigned char S[256]; // 0x10000 in SDRAM for( i = 0; i < 256; i++ ) { S[i] = i; } j = 0; for( i = 0; i < 256; i++ ) { // RC-4 would do j = (j + K[i] + S[i]) % 256 j = (j + K[i] + S[j]) % 256; // swap S[i], S[j] temp = S[i]; S[i] = S[j]; S[j] = temp; } // decryption routine unsigned char cipherText[16384]; // 0xFFFFA000 in FLASH unsigned char plainText[16384]; // 0x400000 in SDRAM for( index = 0x4000, i = 0, k = 0; index > 0; index— ) { // xbox version t = (S[i] ^ cipherText[k]) % 256; plainText[k] = t; // swap( S[i], S[t] ); temp = S[i]; S[i] = S[t]; S[t] = temp; i = (i + 1) % 256; k++; } Listing 6-1: Decompilation of the dummy cipher found in the FLASH ROM.
The first two bytes, EBC6, are a jump instruction to location 0xFFFF.FFB8. The first byte, EB, is the specific opcode for a “jump, short, relative, displacement relative to next instruction;” the second byte, C6, is the 8-bit signed offset of the jump. In other words, the first thing the processor does is jump to another location — something every boot program does, since you only have 16 bytes of runway in the reset vector before you fall off the high end of memory. Since this code is typical for a reset vector, it is okay to reprint the code here for educational purposes.
The next chunk of code is a piece that initializes the processor’s GDT (Global Descriptor Table) and IDT (Interrupt Descriptor Table) state. The GDT and IDT set up the processor’s memory management scheme and interrupt handling scheme. You do not need to understand exactly what these registers do, but if you are curious, Intel’s “IA-32 Intel Architecture Software Developer’s Manual, Volume 3: System Programming Guide” explains the function of these registers in detail. This manual is available at Intel’s developer website, http://developer.intel.com.
After setting up these registers, the processor gets kicked into protected mode and jumps to 0xFFFF.FE00 — a region exactly 512 bytes below the top of memory — and this is where things start to get interesting. After a short snippet of code that sets up the segment registers, a program called a jam table interpreter (also known as the X-Code interpreter in the Xbox community) is executed. A jam table is industry vernacular for a table of values that contains opcodes for reads, writes, and simple decision operations, used in the context of hardware initializations. Hundreds of operations are required to initialize a typical PC, and jam tables help cope with this complexity without bloating the core initialization code base. Using jam tables also helps make initialization more flexible and capable of dealing with user-configurable hardware parameters, such as the type and amount of memory installed. In the case of the Xbox, the jam table interpreter starts fetching jam table opcodes from a location near the bottom of the FLASH ROM. (Keep in mind that the opcodes implemented by the jam table interpreter are quite powerful; one can write and read data from any location in the Xbox using jam table opcodes.)
Once the terminal opcode is executed by the jam table interpreter, the processor clears the MTRRs (Memory Type Range Registers, used to declare the cacheability of various regions of memory) and starts to decrypt a 16 kB region of memory starting at 0xFFFF.A000. The cipher used to decrypt this region of memory looks very similar to RC-4, with some subtle differences. Listing 6-1 shows the cipher reverse-engineered into C code, with the help of a tool called IDA Pro by Data Rescue corporation (more about this tool in the next couple of chapters).
The data decrypted by this cipher is actually a block of code that is executed at the end of the decryption process, but something goes very wrong here. The decrypted code is garbage. It doesn’t work.
Memory Address Decoding Tricks
A number of tricks exist that can be used to make regions of memory appear different in some way than their physical representation would indicate. The two tricks relevant to the analysis of the Xbox boot sequence are aliasing and overlaying.
Memory locations are aliased when two addresses refer to the same memory location, typically accomplished by ignoring a few address bits. To illustrate aliasing, consider a system using a 3-bit address. There are only 23 = 8 unique locations addressable in a 3-bit system: 000, 001, 010, 011, 100, 101, 110, and 111. Now suppose that you have a memory with four locations; it requires only two bits to distinguish each of the four locations: 00, 01, 10, and 11. If you use our 3-bit address scheme to talk to this four-location memory, one of the address bits must be ignored. If the highest bit is ignored, then address 000 and 100 will both map to location 00 in memory. In other words, location 00 is aliased to addresses 000 and 100.
Memory overlaying is a technique where out-of-band information is used to select between different banks of memory. Let’s suppose that we wish to have a bank of secret memory. To do this, we insert a selector between our public and secret memories, and the CPU. This selector can choose to present the CPU with data from either the secret memory or the public memory, as indicated in Figure 6-2. As a result, the program that controls the address selector also controls who has access to the secret block. If the computer starts up running code located in the secret bank of memory, a program in the secret code region can use this mechanism to hide itself by setting the selector to point at public memory before running programs located in public memory.
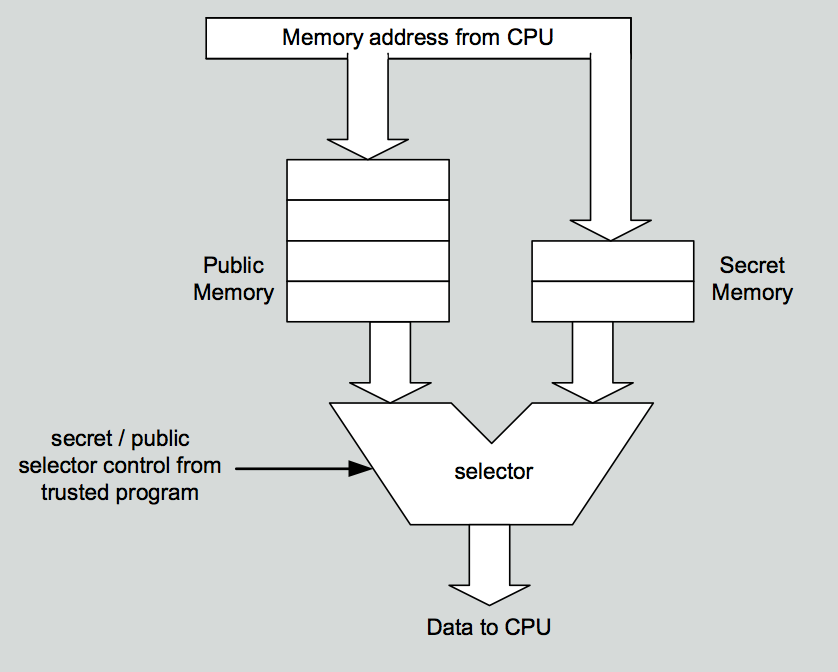
Figure 6-2: Memory overlaying to hide secret regions.
Furthermore, the jam table opcodes seem to be corrupted. This phenomenon was corroborated by other hackers working on the problem, thus ruling out a code translation error. Clearly, there is more to the Xbox than meets the eye.
Theories and rumors started to emerge to explain this strange behavior. Some of the popular theories included:
• Address and/or data line scrambling. Somewhere, the address or data lines were being inverted or permuted with some 1:1 mapping function. The scrambling function could be programmed into the chipset as part of the initialization procedure, so that the initial boot block would read like plaintext while the rest of the data would be scrambled.
• Secondary crypto processor. Another processor on the Xbox was actual y handling the Xbox’s initialization, and the boot code in the ROM is bogus.
• Boot code contained in the processor. The processor is actually initialized by a chunk of code sitting on the processor die, and the boot code in the ROM is bogus.
• Boot code contained in the chipset. The processor functions identically to a standard Pentium, but the chipset contains boot code that overrides the bogus code inside the ROM.
For almost all of these theories, the only way to prove or disprove them is to perform experiments on the hardware. For example, in order to ensure that the SMC (System Management Controller, an 8-bit self-contained processor that is always on when the Xbox is plugged in) played no role in the secure boot sequence of the machine, hackers captured traces of the waveforms on al of the SMC’s pins and analyzed them against the expected sequence of events if the SMC were to play a crucial role in machine initialization.
A crucial observation from a fellow hacker was that the Xbox booted perfectly even when the reset vector code at 0xFFFF.FFF0 was changed. One would expect that if the first instruction executed by the processor at 0xFFFF.FFF0 were corrupted, then the machine would crash. Rather, the machine operated flawlessly. This observation was verified by a set of experiments where various parts of the FLASH ROM were intentionally corrupted. The results were that corrupting surprisingly large regions of the FLASH ROM had no effect on the booting of the Xbox. In particular, the entire boot initialization sequence from 0xFFFF.FE00 to 0xFFFF.FFFF could be nulled out and the Xbox would boot just fine.
This finding alone strongly supported the theory of a bogus boot block in FLASH ROM. The question remained, however, about where the real boot code was stored. There were three options: in a secondary crypto-processor, in the processor, and in the chipset. The secondary crypto-processor theory was discounted on the basis that there were no chips on the motherboard that were powerful enough or active enough at boot time to play the role of a crypto processor. Storing the boot block in the processor was also deemed a less likely option than storing the boot block in the chipset.
The rationale for this analysis is based on the economics of building chips. A Pentium III processor is very complex with many handcrafted blocks, and modifying the silicon to include a secure boot block would require significant engineering resources as well as an upfront investment of about a quarter of a million dollars just for the masks needed to produce the custom silicon. In addition, it was rumored that Microsoft had originally chosen an AMD processor for the Xbox, and switched to Intel at the last minute. If custom blocks were integrated into the processor core, Microsoft could not have switched between CPU vendors so easily. On the other hand, nVidia’s chipsets are designed modularly using silicon compilers, so it is technically easier to add warts like a secure boot block. Furthermore, the chipset in the Xbox is a custom build of the nForce made just for Microsoft, tailored specifically for an Intel front-side bus (FSB). As a result, the cost of adding a secure boot block could be rolled into the engineering resources and the mask sets already allocated to such a project.
Operating under the theory that the real boot code is located in a secret ROM overlay in the chipset, the challenges remaining were to determine in which chip (Northbridge or Southbridge) the code was stored, and how to extract this secret ROM. A few strategies for extracting the secret ROM presented themselves:
• Use the JTAG “boundary scan” feature on the Pentium to try to capture the initial boot code. JTAG is a diagnostic bus that allows you to read and set the state of every pin on a chip through a special serial port. It is a very powerful and versatile debugging tool.
• Probe the processor FSB (Front Side Bus) to try and capture the boot code as it enters the processor.
• Install a memory sniffer to try and capture the decrypted data stream as it is written into memory.
• Use microscopy to read out the contents of the secure boot area from the chip surface.
• Probe the bus between the Southbridge and the Northbridge chips to try and capture the boot code being sent to the processor by the chipset. This would only work if the boot data is stored somewhere in the Southbridge chip.
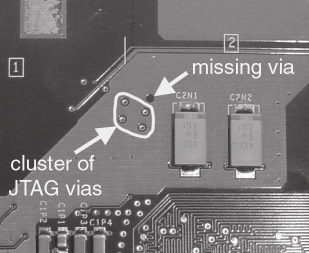
Figure 6-3: Missing JTAG via. Note how the fil ed in copper region (lighter area) has a hole where a via used to be. This is the result of a last-minute change to the board layout without recalculation of the fill regions.
None of these theories were trivial to test, so the Xbox hacking effort slowly ground down to a halt as frustrated hackers gave up trying to cryptanalyze the FLASH ROM image. I would have been one of the quitters (after all, I had a doctoral thesis to finish and write in just a few months) had it not been for the community of determined hackers feeding me encouragement. Over Christmas break in December 2001, I kept in touch with my hacker friends via IRC channels and web fora. Hackers from all over the world and all walks of life pervaded the Xbox hacking IRC channel, and I enjoyed learning from them and chatting with them about their various experiences, both technical and personal.
Even though I was determined to spend all of January writing my PhD thesis6 and avoiding Xbox hacking, I was still pulled in by the intriguingly complex security employed by the Xbox. As time went on, the need for a hardware guy to join the small group of hardcore hackers hanging out on the IRC channel became increasingly clear. By the end of January, the reports I was hearing about the Xbox security scheme were too interesting to ignore.
I purchased a second Xbox and I started removing all of its key parts using a hot air gun. Stripping down the Xbox served many purposes. First, removing the chips exposed all of the traces and connections on the Xbox so that I could easily follow the connections between chips using the continuity test mode on my multimeter. Second, I was able to drop all of the interesting chips into a hot acid bath and remove their plastic encapsulation for analysis under a microscope. Finally, buying an Xbox and totally ripping it apart gave me a sort of peace of mind when it comes to probing and modifying a working Xbox. (Reverse engineering is like gardening. Planting a garden is much more challenging if you’re trying to keep your hands and knees clean, so you might as well get over it and start rolling in the dirt.)
The results of the Xbox tear-down revealed some of the measures that Microsoft took to secure the box against hardware hackers. For example, I first checked the JTAG connections on the Pentium CPU. All of the JTAG signals were conveniently routed to a set of easy-to-tap resistors near the processor, except for one, the TRST# signal. TRST# plays a critical role in initializing the JTAG interface. Interestingly, TRST# was tied to the internal ground plane, in a difficult to access area, permanently deactivating the JTAG mechanism. Further inspection of the Xbox motherboard revealed hints that the TRST# signal was stripped out at the last minute. (The biggest hint of a missing via is a hole in a power trace perfectly sized for a via near a cluster of vias dedicated to JTAG signals, as shown in Figure 6-3.)
Another blow to the JTAG approach for extracting the secret ROM is the fact that Intel’s JTAG scan codes are proprietary. Reverse engineering the codes to a level where I could use them for extracting the secret boot data was a major project on its own.
Giving up on the JTAG approach, the next method for extracting the secret ROM was to strip the packaging off of the CPU, GPU, and MCPX and to inspect the bare die with a microscope and search for any candidate ROM structures. Package removal or “decapsulation” was accomplished by bathing the chips in fuming hot sulfuric acid. (I don’t recommend trying this approach at home; one time I spilled the toxic, corrosive solution all over myself and thankfully, my protective gear was consumed instead of my skin. Fuming sulfuric consumes organic material faster than a burning flame.) Fuming nitric, also very toxic and dangerous, can also be used. While I have not tried it myself, reports indicate that fuming nitric is more effective at removing the epoxy encapsulation, especially in situations where selective package removal is desired.
The manual inspection approach using a traditional visible light microscope offered some hope; however, the technique is limited by the physics of light. Not even the best visible microscopy technology can resolve a 150 nm transistor, since the shortest wavelength of light is 450 nm (corresponding to the color blue). I was hoping the secret code would be stored on the chips using a traditional array ROM structure, with the metal lines defining a 1 or a 0 etched into the top metal layers which can be identified with an optical microscope. The use of a hard-wired ROM structure is motivated by cost: FLASH ROMs and fuse-based PROMs require extra processing and manufacturing steps that can add significantly to the cost of the system, whereas the use of top metal layers would be motivated by risk management on the designer’s part. Top metal layers are the coarsest layers (so coarse that an optical microscope may resolve them), and are thus the cheapest layers to change if there is a bug in the ROM code. Also, during initial bring-up, the top layer is the easiest to cut and jumper using a chip repair machine knows as a FIB (focused ion beam) machine. Unfortunately, a quick glance at the chip under the microscope revealed no such structures.
At this point, the only remaining option for extracting the secret ROM was to probe the live Xbox hardware, in an effort to capture the code during loading into the Xbox processor. Eavesdropping for code upstream of the Southbridge chip and the FLASH ROM meant probing either the Front Side bus, the Northbridge-Southbridge bus, or the main memory bus. We’ll discuss the trade-offs of executing these probing approaches in Chapter 8, after a short introduction to basic security concepts in the next chapter.
1 Andy Green has an excellent page that documents his experiences with the test clip approach at http://www.warmcat.com/milksop/milksop.html
2 Visor has written up his experiences with the logic analyzer snooping approach at http://www.xboxhacker.net/visor/aXventure1.txt
3 Emulation Technologies (http://www.emulation.com) makes a wide line of affordable sockets for purposes just like these. The specific model for the Xbox is the S-TS-SM-040-A.
4 http://www.xenatera.com/bunnie/proj/flashburn/fb.html
5 http://www.xenatera.com/bunnie/proj/fb2/
6 For those interested in supercomputer architecture, data and thread migration, fault tolerance, high speed low-latency networks, or massively multithreaded machines, check out my thesis at http://www.xenatera.com/bunnie/phdthesis.pdf.

