Книга: Vue.js Advanced Concepts (Learn by example: 1 block of code => 1 screenshot Book 3)
Назад: 1 – Introduction
На главную: Предисловие
2 - Create components
Vue allows you to break down a global application into a set of components, which are then assembled to form the application. The advantage is to be able to split the application into several subsets managed independently.
The components created can also be reused in other parts of the application, or even in other applications.
We use the following structure of the HTML page, in which we create the div#root element which will contain the HTML elements of the template associated with the Vue object.
Basic index.html file
<html>
<head>
<script src="https://cdn.jsdelivr.net/npm/vue/dist/vue.js"></script>
</head>
<body>
<div id="root"></div>
</body>
<script>
var vm = new Vue({
el : "#root",
template : `
<div>
</div>
`
});
</script>
</html>
Create a Timer component with Vue.component()
A Vue component is created using the Vue.component(name, options) method:
- The name parameter is a character string corresponding to the name of the component,
- The options parameter is an object describing the options for creating the component. We will see that many of these options are the ones used when creating the Vue object (by new Vue() ).
Let's create a Timer component to display the remaining time, in the form MM:SS. It is assumed that this timer is initialized at 10 seconds, that is to say 00:10.
Create a Timer component displaying 00:10
Vue.component("Timer", {
data() {
return {
min : 0,
sec : 10
}
},
computed : {
time() {
var min = this.min;
var sec = this.sec;
if (min < 10) min = "0" + min;
if (sec < 10) sec = "0" + sec;
return min + ":" + sec;
}
},
template : `
<div>
Remaining time {{time}}
</div>
`
});
The Vue.component() method uses almost the same options that were used when creating the Vue object:
- The data property is replaced by a function that returns reactive variables. This makes it possible to use the Timer component several times without these reactive variables being the same for all the components. Thanks to the data() function, each variable defined (here min and sec ) will be specific to each component.
- Use the computed time property to display the time as MM:SS.
- The template property represents the template that will be displayed when using this component.
We can therefore see that the creation of a Vue component is very similar to what we did previously (see the Vue.js Basic Concepts book from same author). The only difference for now is:
- The data property which is used as a function which returns the reactive variables,
- The non-use of the el property in the component. Indeed, this property is used when creating the Vue object, which we will see below.
We have seen the definition of the Timer component using the Vue.component() method. It remains to use this component in an HTML page.
Use the Timer component
<html>
<head>
<script src="https://cdn.jsdelivr.net/npm/vue/dist/vue.js"></script>
</head>
<body>
<div id="root"></div>
</body>
<script>
Vue.component("Timer", {
data() {
return {
min : 0,
sec : 10
}
},
computed : {
time() {
var min = this.min;
var sec = this.sec;
if (min < 10) min = "0" + min;
if (sec < 10) sec = "0" + sec;
return min + ":" + sec;
}
},
template : `
<div>
Remaining time {{time}}
</div>
`
});
var vm = new Vue({
el : "#root",
template : `
<div>
<Timer />
</div>
`
});
</script>
</html>
The Vue object is created as before, by indicating in the el property the DOM element of the page in which we will insert the indicated template. The template integrates the component by using it in XML form, here <Timer /> or also <Timer></Timer> .

Bring the component to life
The previous Timer component remains frozen at the initial values, therefore at 00:10. The seconds and minutes should be reduced until 00:00.
To do this, all you have to do is trigger a timer with the setInterval() function of JavaScript. This function can be integrated into the created() method called during the creation of each component.
Use the created() method in the component
Vue.component("Timer", {
data() {
return {
min : 0,
sec : 10
}
},
computed : {
time() {
var min = this.min;
var sec = this.sec;
if (min < 10) min = "0" + min;
if (sec < 10) sec = "0" + sec;
return min + ":" + sec;
}
},
created() {
var timer = setInterval(() => {
this.sec -= 1;
if (this.sec < 0) {
this.min -= 1;
if (this.min < 0) {
this.min = 0;
this.sec = 0;
clearInterval(timer);
}
else this.sec = 59;
}
}, 1000);
} ,
template : `
<div>
Remaining time {{time}}
</div>
`
});
var vm = new Vue({
el : "#root",
template : `
<div>
<Timer />
</div>
`
});
The created() method calls the callback function specified in setInterval (callback) every second. The processing of the callback function consists in decrementing the variable sec then, if necessary, the variable min , until reaching 0 for both. In this case, the timer is stopped by the clearInterval() function.

The timer starts and the seconds decrease until it reaches 00:00.

Pass properties to the component
The Timer component is currently initialized at 00:10. It would be good to be able to indicate in parameters the minutes and seconds that you want to count down.
The Timer component would then be used in the following form:
Use the Timer component by initializing the starting minutes and seconds
var vm = new Vue({
el : "#root",
template : `
<div>
<Timer minutes="1" seconds="10" />
</div>
`
});
We now indicate in the attributes of the Timer component:
- The minutes attribute to indicate the initial number of minutes,
- The seconds attribute to indicate the initial number of seconds.
Pay attention to the names of the attributes! If we use min and sec for the attribute names, Vue will confuse them with the names of the reactive min and sec variables, which will cause an error.
The attributes of a component are called the properties of the component. In short, we also say "props".
The Timer component must now use these two attributes. We indicate them in the props section of the component. This props section is used to describe the names of the component attributes, in the form of an array of strings.
Describe the props in the component's props section
Vue.component("Timer", {
data() {
return {
min : 0,
sec : 10
}
},
props : [
"minutes",
"seconds"
] ,
computed : {
time() {
var min = this.min;
var sec = this.sec;
if (min < 10) min = "0" + min;
if (sec < 10) sec = "0" + sec;
return min + ":" + sec;
}
},
created() {
var timer = setInterval(() => {
this.sec -= 1;
if (this.sec < 0) {
this.min -= 1;
if (this.min < 0) {
this.min = 0;
this.sec = 0;
clearInterval(timer);
}
else this.sec = 59;
}
}, 1000);
},
template : `
<div>
Remaining time {{time}}
</div>
`
});
var vm = new Vue({
el : "#root",
template : `
<div>
<Timer minutes="1" seconds="10" />
</div>
`
});
Once the names of the props are indicated in the props section, our component should use the values that are passed to it (it currently uses the values indicated in the data section). The min and sec variables should therefore no longer be initialized with the values 0 and 10, but rather with the values of the props transmitted.
Vue allows you to know the values transmitted in the props using this.minutes and this.seconds . One thus initializes the reactive variables min and sec with these values.
Use the values of the props in the component
Vue.component("Timer", {
data() {
return {
min : this.minutes,
sec : this.seconds
}
},
props : [
"minutes",
"seconds"
],
computed : {
time() {
var min = this.min;
var sec = this.sec;
if (min < 10) min = "0" + min;
if (sec < 10) sec = "0" + sec;
return min + ":" + sec;
}
},
created() {
var timer = setInterval(() => {
this.sec -= 1;
if (this.sec < 0) {
this.min -= 1;
if (this.min < 0) {
this.min = 0;
this.sec = 0;
clearInterval(timer);
}
else this.sec = 59;
}
}, 1000);
},
template : `
<div>
Remaining time {{time}}
</div>
`
});
var vm = new Vue({
el : "#root",
template : `
<div>
<Timer minutes="1" seconds="10" />
</div>
`
});
The reactive variables min and sec are now initialized with the values of the transmitted props.
We see here why the names of the props should not be the same as those of the reactive variables defined in the data section. Indeed they are both used by prefixing them with this , hence the confusion if they are the same names.
The timer is decremented from the values indicated in the props.

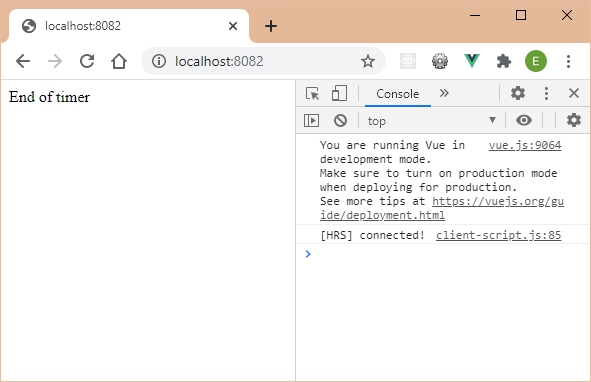
Display a message when the timer has reached 00:00
Rather than leaving the display at 00:00 when the timer has expired, let's display the message "End of timer" when this is the case.
The component template is modified using the v-if and v-else directives.
Display an "End of timer" message
Vue.component("Timer", {
data() {
return {
min : this.minutes,
sec : this.seconds
}
},
props : [
"minutes",
"seconds"
],
computed : {
time() {
var min = this.min;
var sec = this.sec;
if (min < 10) min = "0" + min;
if (sec < 10) sec = "0" + sec;
return min + ":" + sec;
}
},
created() {
var timer = setInterval(() => {
this.sec -= 1;
if (this.sec < 0) {
this.min -= 1;
if (this.min < 0) {
this.min = 0;
this.sec = 0;
clearInterval(timer);
}
else this.sec = 59;
}
}, 1000);
},
template : `
<div>
<div v-if="sec||min"> Remaining time {{time}} </div>
<div v-else>End of timer</div>
</div>
`
});
var vm = new Vue({
el : "#root",
template : `
<div>
<Timer minutes="0" seconds="5" />
</div>
`
});
When the sec and min variables are both at 0, the message is displayed, otherwise the remaining time is displayed.
Nesting components
Consider the previous Timer component. We want to associate it with a Start button to start the timer:
- The Start button turns into a Stop button as soon as the timer is started, so that it can be stopped at any time.
- If you press Stop , the button redisplays Start so that it can be restarted.
To explain the operating principle more easily, it is assumed that the timer displays for the moment "00:10", without the possibility of modifying the time remaining every second. The code of the Timer component is kept to a minimum, with only the template showing the result!
Timer component (minimized)
Vue.component("Timer", {
template : `
<div>
00:10
</div>
`
});
The Timer component therefore displays 00:10 continuously.
Now let's write the StartStop component corresponding to the Start button becoming Stop when it is clicked (and vice versa).
StartStop component corresponding to the Start / Stop button
Vue.component("StartStop", {
data() {
return {
stopped : false
}
},
template : `
<div>
<button v-if="stopped" v-on:click="stopped=!stopped">Start</button>
<button v-else v-on:click="stopped=!stopped">Stop</button>
</div>
`
});
The StartStop component has a reactive stopped variable indicating whether the timer is stopped ( true ) or not ( false ). This variable is modified by clicking on the button, which thus allows the button caption to be modified.
It now remains to use the two components Timer and StartStop . We create the two components in the template of the final Vue object:
Use the Timer and StartStop components
<html>
<head>
<script src="https://cdn.jsdelivr.net/npm/vue/dist/vue.js"></script>
</head>
<body>
<div id="root"></div>
</body>
<script>
Vue.component("StartStop", {
data() {
return {
stopped : false
}
},
template : `
<div>
<button v-if="stopped" v-on:click="stopped=!stopped">Start</button>
<button v-else v-on:click="stopped=!stopped">Stop</button>
</div>
`
});
Vue.component("Timer", {
template : `
<div>
00:10
</div>
`
});
var vm = new Vue({
el : "#root",
template : `
<div>
<Timer />
<StartStop />
</div>
`
});
</script>
</html>
We check by clicking on the Start button that it becomes Stop , then Start , etc. Everything seems to work (except that the timer does not start, but this is normal given the minimal code we wrote).
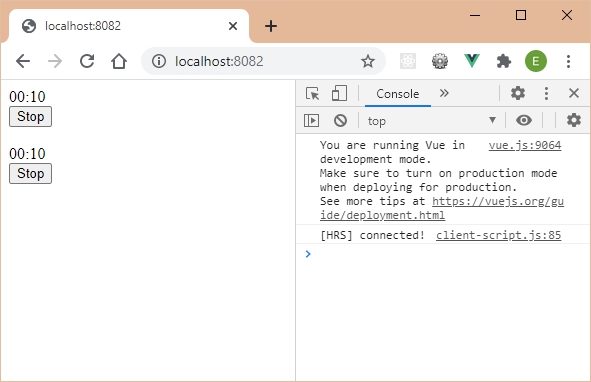
Let's use another timer below the first one. The code of the Vue object becomes:
Use two timers in the page
var vm = new Vue({
el : "#root",
template : `
<div>
<Timer />
<StartStop />
<br>
<Timer />
<StartStop />
</div>
`
});
We use two Timer components and two StartStop components, each associated with the one with which it is contiguous in the template.
We now display:
The problem, even if for the moment everything is going well, is that we have to explain the use of these two components Timer and StartStop , by explaining that the StartStop component manages the Timer component which precedes it (and especially not the one following it!).
In fact it would have been better to write the final template in the following form, nesting the components:
Nesting of the Timer and StartStop components
var vm = new Vue({
el : "#root",
template : `
<div>
<Timer>
<StartStop />
</Timer>
<br>
<Timer>
<StartStop />
</Timer>
</div>
`
});
Each Timer component includes a StartStop component in its body. So there is no longer any possible ambiguity. Each button manages the timer in which it is registered.
The page display is then as follows:
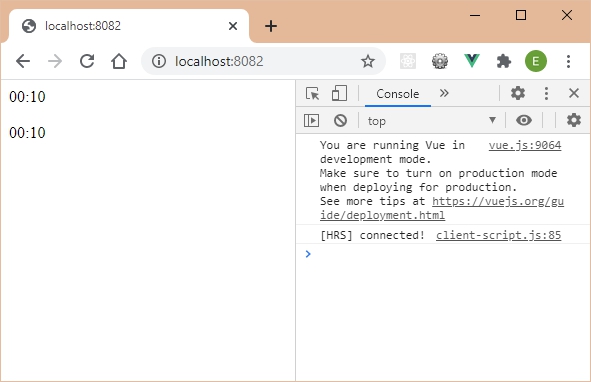
The Timer components are displayed, but not the buttons associated with the StartStop ...
In fact this is normal, because the Timer component is not planned (for the moment) to integrate a body inside it.
Vue proposes in this case to use an HTML element named <slot> , which we study in detail in the following section.
Use slots
A slot will allow you to create a body in a Vue component. A slot can be used in different ways to adapt to all situations:
- Using the slot minimally,
- By indicating a default content (if the component that uses it has not mentioned a body).
- You can also pass parameters to the slot.
Let us see below these different forms of use of the slot.
Minimal use of a slot
A slot used in its minimal form is used in the form <slot /> , which can also be written in the form <slot></slot> .
This HTML element ( <slot> ) is used in the component which is supposed to receive content, here the Timer component which will effectively contain the <StartStop> content.
We could have done the opposite, namely that it is the StartStop component which contains the Timer component. In this case, the slot should have been nested in the StartStop component.
The Timer component is therefore modified to indicate to it that it can receive any content by means of the slot.
Indicate a slot in the Timer component
Vue.component("Timer", {
template : `
<div>
00:10
<slot/>
</div>
`
});
Indeed, when we display the HTML page using the same code for the Vue object template as before (two Timer components each including a StartStop component), we obtain a display that now meets our expectations:
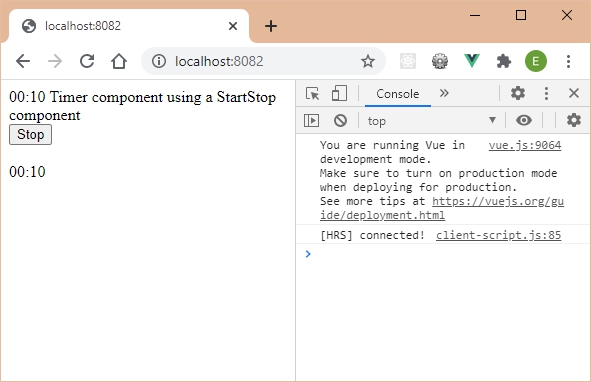
The slot is well taken into account. Note that the function of the slot is just being replaced by the body specified in the component that uses it. We could have several different bodies for the use of the Timer component. For example :
Use different bodies for the Timer component
var vm = new Vue({
el : "#root",
template : `
<div>
<Timer>
Timer component using a StartStop component
<StartStop />
</Timer>
<br>
<Timer>
</Timer>
</div>
`
});
The preceding code shows that:
- The first Timer component includes a text and a StartStop component: the text and the StartStop component will therefore be displayed after the Timer component.
- While the second Timer component does not integrate anything: only the Timer component will therefore be displayed.
The display therefore becomes:
It is therefore clear that the principle of the slot is to integrate any content into the body of the component that uses it. This content can be empty, or different depending on the uses you want to make of the component.
Indicate default content in a slot
Since a component does not necessarily have content when it is used (for example the second use of the previous Timer component), it may be interesting to indicate one by default.
Suppose the rule here is to integrate a StartStop component into the Timer component if the content of the Timer component is empty during its use. The StartStop component therefore becomes a default content of the Timer component when the latter is used in the form <Timer /> (or <Timer></Timer> ).
The code for the Timer and StartStop components, as well as their use, becomes:
Use default content in the body of the Timer component
Vue.component("Timer", {
template : `
<div>
00:10
<slot><StartStop/></slot>
</div>
`
});
Vue.component("StartStop", {
data() {
return {
stopped : false
}
},
template : `
<div>
<button v-if="stopped" v-on:click="stopped=!stopped">Start</button>
<button v-else v-on:click="stopped=!stopped">Stop</button>
</div>
`
});
var vm = new Vue({
el : "#root",
template : `
<div>
<Timer>
<StartStop />
</Timer>
<br>
<Timer>
</Timer>
</div>
`
});
The slot indicated in the Timer component is now written with content that will be displayed if the Timer component is used without a body (as is the case when it is used the second time in the example above).
The general form for writing default content in a slot is as follows:
Indicate default content in a slot
<slot>
Default content that will be used if the component is used without a body
This can be text, HTML, or even Vue components.
</slot>
The default content of the slot is therefore written in the body of the <slot> tag itself.
The default content of the slot will be used if the component that integrates the slot is used without a body. If no default content was specified, the component body would be left empty if no body was specified during use.
We now get two Timer components with associated StartStop components even if the Timer component is empty:
Transmission of information to a slot
We want the Timer component to transmit information to the StartStop component using the props (attributes) that can be specified in the slots.
For example, each Timer component has a name, and that name can then be used in the StartStop component. This would allow for example:
- In the first Timer component, we indicate the props name equal to "Timer 1". This timer is therefore called "Timer 1".
- This props is then used in the associated StartStop component by indicating on the corresponding button "Start Timer 1" or "Stop Timer 1" (instead of "Start" / "Stop" as previously).
- Of course, for the second timer we would have the props name which would be equal to "Timer 2", with the corresponding display on the StartStop button ("Start Timer 2" or "Stop Timer 2").
This therefore makes it possible to show how to exchange information between a component and the slot included in it.
To achieve this, we will modify:
- The Timer component, so that it now includes the props name which must be used in the slot in order to be used in the StartStop component.
- The StartStop component, which now receives a new props associated with the name property passed from the slot.
- Finally the template for using the Timer and StartStop components in the Vue object, in order to indicate the values of the name property for each of the timers. We will see that the way of using the components is a little different from that used previously.
Here are the changes made in each section. Let's start with the Timer component.
Edit the Timer component
Vue.component("Timer", {
props : [
"name"
],
template : `
<div>
<b>{{name}}</b> : 00:10
<slot v-bind:timerSlot="name"></slot>
</div>
`
});
We have seen that the Timer component will be used in the form <Timer name="Timer 1"> . This means that we pass it in the props the name property, which can be used in the template in the form {{name}} , or indicated as a parameter in the slot in the form <slot v-bind:timerSlot="name "></slot> . This form of slot writing means that we create a timerSlot props which will have the value of the name props transmitted to the Timer component.
The name timerSlot is used here so that we understand where the exchanged parameters go. But it would have been possible to call this new props name instead of timerSlot .
The StartStop component is also modified, in order to integrate the new timerSlot props received from the slot.
Modify the StartStop component
Vue.component("StartStop", {
data() {
return {
stopped : true
}
},
props : [
"timerStartStop"
],
methods : {
start_stop() {
this.stopped = !this.stopped;
}
},
template : `
<div>
<button v-if="stopped" v-on:click="start_stop">
Start {{timerStartStop}}
</button>
<button v-else v-on:click="start_stop">
Stop {{timerStartStop}}
</button>
</div>
`
});
The StartStop component receives the timerStartStop props which is then used in the component's template. This prop corresponds to the name of the timer that is indicated in the slot (the timerSlot prop).
We therefore see that we will have to make the correspondence between the name of the props in the slot (which is timerSlot ) and the name used in the StartStop component (which is timerStartStop ). This correspondence occurs during the final use of the components in the Vue object.
Use components in the Vue object
var vm = new Vue({
el : "#root",
template : `
<div>
<Timer name="Timer 1">
<template slot-scope="{timerSlot}">
<StartStop v-bind:timerStartStop="timerSlot"/>
</template>
</Timer>
<br>
<Timer name="Timer 2">
<template slot-scope="{timerSlot}">
<StartStop v-bind:timerStartStop="timerSlot"/>
</template>
</Timer>
</div>
`
});
Let's analyze the elements of the previous template:
- The Timer component is used in the form <Timer name="Timer 1"> , which is what we wanted.
- The StartStop component is used in the form <StartStop v-bind:timerStartStop="timerSlot" /> . , which means passing a prop named timerStartStop which will have the value of the timerSlot props. The timerStartStop prop is indeed the one used in the StartStop component, which we wrote above.
On the other hand, the timerSlot property seems to come out of nowhere! So that Vue knows how to link these two properties, it uses the <template> tag with the slot-scope attribute of value "{timerSlot}" :
- The <template> element is an HTML element that allows it not to be integrated into the DOM tree, but still allows to encapsulate other HTML elements. This allows you to specify the slot-scope attribute here. The <template> element could here be replaced by a <div> element for example, but in this case this <div> element would be integrated in the DOM, unlike the <template> element which is not. .
- The slot-scope attribute indicated in the form "{timerSlot}" makes it possible here to retrieve the value of the timerSlot property (hence the braces), which is the one indicated in the <slot> , namely the value of the props name (so the strings "Timer 1" or "Timer 2" depending on the Timer component used). If we had simply indicated "timerSlot" (without the braces), we would have obtained the string "{timerSlot:'Timer 1'}" for the first timer, hence the use of braces to access the value of the timerSlot property.
The general program that encompasses these components and the Vue object is therefore the following (it is the simple assembly of the three pieces of previous programs):
Timer and StartStop components and use in the Vue object
Vue.component("Timer", {
props : [
"name"
],
template : `
<div>
<b>{{name}}</b> : 00:10
<slot v-bind:timerSlot="name"></slot>
</div>
`
});
Vue.component("StartStop", {
data() {
return {
stopped : true
}
},
props : [
"timerStartStop"
],
methods : {
start_stop() {
this.stopped = !this.stopped;
}
},
template : `
<div>
<button v-if="stopped" v-on:click="start_stop">
Start {{timerStartStop}}
</button>
<button v-else v-on:click="start_stop">
Stop {{timerStartStop}}
</button>
</div>
`
});
var vm = new Vue({
el : "#root",
template : `
<div>
<Timer name="Timer 1">
<template slot-scope="{timerSlot}">
<StartStop v-bind:timerStartStop="timerSlot"/>
</template>
</Timer>
<br>
<Timer name="Timer 2">
<template slot-scope="{timerSlot}">
<StartStop v-bind:timerStartStop="timerSlot"/>
</template>
</Timer>
</div>
`
});
Let's see if we get the expected result in the browser:

The name of the timer is now integrated into the label of the button (which is itself integrated into the StartStop component).
Writing simpler for the previous program
When writing the previous program, we wanted to show the use of each of the variables used (for this reason, none of the variables or props has a name that we could find elsewhere):
- The name props is used to retrieve the name of the timer in the Timer component,
- The timerSlot props is used to transfer the name of the timer to a child component, and thus to make the link between parent and child,
- The timerStartStop props are used to retrieve the name of the timer in the StartStop component.
That's a lot of different property names that ultimately serve to convey the name of the timer. Would it be possible to simplify all this by keeping, for example, the name timername wherever possible?
Replace the name, timerSlot and timerStartStop props with timername
Vue.component("Timer", {
props : [
"timername"
],
template : `
<div>
<b>{{timername}}</b> : 00:10
<slot v-bind:timername="timername"></slot>
</div>
`
});
Vue.component("StartStop", {
data() {
return {
stopped : true
}
},
props : [
"timername"
],
methods : {
start_stop() {
this.stopped = !this.stopped;
}
},
template : `
<div>
<button v-if="stopped" v-on:click="start_stop">
Start {{timername}}
</button>
<button v-else v-on:click="start_stop">
Stop {{timername}}
</button>
</div>
`
});
var vm = new Vue({
el : "#root",
template : `
<div>
<Timer timername="Timer 1">
<template slot-scope="{timername}">
<StartStop v-bind:timername="timername"/>
</template>
</Timer>
<br>
<Timer timername="Timer 2">
<template slot-scope="{timername}">
<StartStop v-bind:timername="timername"/>
</template>
</Timer>
</div>
`
});
Let's check that the operation is identical:
Communication from the child component to its parent
We saw previously that the communication from the parent component (here Timer ) to the child component (here StartStop ) was carried out via the props. We now want to show how a child component can communicate with its parent.
Let's improve our program so that the click on the Start / Stop button is taken into account. For the moment, only the text on the button is modified when the button is clicked (thanks to the reactive stopped variable updated in the StartStop component).
We therefore want the Timer component to react when clicking on the button, by displaying (for the moment) in the console the name of the timer clicked and its state (stopped or in progress).
The interest here will therefore be to show how an internal component (here the StartStop component) can communicate with a parent component (here the Timer component). Communication from the child to the parent will take place through events.
Two steps are necessary to perform this treatment:
- We must first modify the StartStop component (the child, which manages the click on the button) by sending an event (here called startstop ) to the Timer component (the parent).
- We must then retrieve in the Timer component (the parent) the event transmitted by the StartStop component (the child) in order to process it (by displaying the button state here: stopped or in progress).
Now let's see these two steps.
StartStop child component that sends a startstop message to the Timer parent component
Vue.component("StartStop", {
data() {
return {
stopped : true
}
},
props : [
"timername"
],
methods : {
start_stop() {
this.stopped = !this.stopped;
this.$parent.$emit("startstop", this.stopped);
}
},
template : `
<div>
<button v-if="stopped" v-on:click="start_stop">
Start {{timername}}
</button>
<button v-else v-on:click="start_stop">
Stop {{timername}}
</button>
</div>
`
});
Only the start_stop() method is affected here. The this object here symbolizes the StartStop component in which the methods are written. Vue allows you to access the parent component using this.$parent (so here the Timer component). Once you have access to the parent component, all you have to do is send it an event using the $emit() method proposed by Vue on each component.
The $emit() method is used with at least one parameter which is the name of the event transmitted, and any parameters which correspond to the arguments that we wish to transmit. Here we only transmit the state of the button which is stored in the reactive variable stopped .
For the moment, the transmission of the event is of little use if this event is not listened to by the receiver, here the Timer component. It is therefore necessary to modify the Timer component to make it process the reception of this event. For the moment, the state of the button will be displayed ("stopped" or "in progress").
Parent component Timer that receives the startstop event from the child StartStop component
Vue.component("Timer", {
props : [
"timername"
],
created() {
this.$on("startstop", function(stop) {
console.log(this.timername + " " + (stop ? "stopped" : "in progress"));
});
},
template : `
<div>
<b>{{timername}}</b> : 00:10
<slot v-bind:timername="timername"></slot>
</div>
`
});
The Timer component must listen to the startstop event as soon as it is created. For this, we use the created() method called when creating the component. The created() method here calls the $on() method:
- The $on() method defined by Vue on a component is used to process the received event, indicated as the first parameter of the method (here "startstop" ).
- The second parameter of the $on() method is a callback function called to process the receipt of the indicated event. This callback function takes as parameters the arguments indicated during the emission of the event by $emit() (in the StartStop component, see above). Here it will be the stop argument (or any other name) which represents the state of the button (if true : the timer is stopped, if false : the timer is in progress). If no argument passed is used, it suffices not to specify any parameters in the callback function.
The complete program including all modified components is as follows:
Full program
<html>
<head>
<script src="https://cdn.jsdelivr.net/npm/vue/dist/vue.js"></script>
</head>
<body>
<div id="root"></div>
</body>
<script>
Vue.component("Timer", {
props : [
"timername"
],
created() {
this.$on("startstop", function(stop) {
console.log(this.timername + " " + (stop ? "stopped" : "in progress"));
});
},
template : `
<div>
<b>{{timername}}</b> : 00:10
<slot v-bind:timername="timername"></slot>
</div>
`
});
Vue.component("StartStop", {
data() {
return {
stopped : true
}
},
props : [
"timername"
],
methods : {
start_stop() {
this.stopped = !this.stopped;
this.$parent.$emit("startstop", this.stopped);
}
},
template : `
<div>
<button v-if="stopped" v-on:click="start_stop">
Start {{timername}}
</button>
<button v-else v-on:click="start_stop">
Stop {{timername}}
</button>
</div>
`
});
var vm = new Vue({
el : "#root",
template : `
<div>
<Timer timername="Timer 1">
<template slot-scope="{timername}">
<StartStop v-bind:timername="timername"/>
</template>
</Timer>
<br>
<Timer timername="Timer 2">
<template slot-scope="{timername}">
<StartStop v-bind:timername="timername"/>
</template>
</Timer>
</div>
`
});
</script>
</html>
Let's display the corresponding page and click on the two buttons to check the texts displayed in the console.
We thus verify that a child component can communicate with its parent by using the $emit() and $on() methods provided by Vue in the components.
Integrate the Timer component and the StartStop component
Now that we have seen the use of slots and their usefulness in our case, let's continue the integration of the two components Timer and StartStop written previously. In fact, for simplicity, we have removed the time reduction aspect by leaving the timer immobilized on a fixed time which is 00:10.
This is the moment when we can finally integrate the variation of the time, as well as the click on the Start / Stop buttons to start or stop the countdown. We take part of the code that we had voluntarily deleted to focus only on the new concepts studied.
Timer managed by the Start / Stop button
Vue.component("Timer", {
data() {
return {
min : this.minutes,
sec : this.seconds
}
},
props : [
"timername",
"minutes",
"seconds"
],
computed : {
time() {
var min = this.min;
var sec = this.sec;
if (min < 10) min = "0" + min;
if (sec < 10) sec = "0" + sec;
return min + ":" + sec;
}
},
created() {
var timer;
this.$on("startstop", function(stop) {
if (stop) {
if (timer) clearInterval(timer);
}
else {
timer = setInterval(() => {
this.sec -= 1;
if (this.sec < 0) {
this.min -= 1;
if (this.min < 0) {
this.min = 0;
this.sec = 0;
clearInterval(timer);
}
else this.sec = 59;
}
}, 1000);
}
console.log(this.timername + " " + (stop ? "stopped" : "in progress"));
});
},
template : `
<div>
<b>{{timername}}</b> :
<span v-if="sec||min"> {{time}} </span>
<span v-else>End of timer</span>
<slot v-bind:timername="timername"></slot>
</div>
`
});
Vue.component("StartStop", {
data() {
return {
stopped : true
}
},
props : [
"timername"
],
methods : {
start_stop() {
this.stopped = !this.stopped;
this.$parent.$emit("startstop", this.stopped);
}
},
template : `
<div>
<button v-if="stopped" v-on:click="start_stop">
Start {{timername}}
</button>
<button v-else v-on:click="start_stop">
Stop {{timername}}
</button>
</div>
`
});
var vm = new Vue({
el : "#root",
template : `
<div>
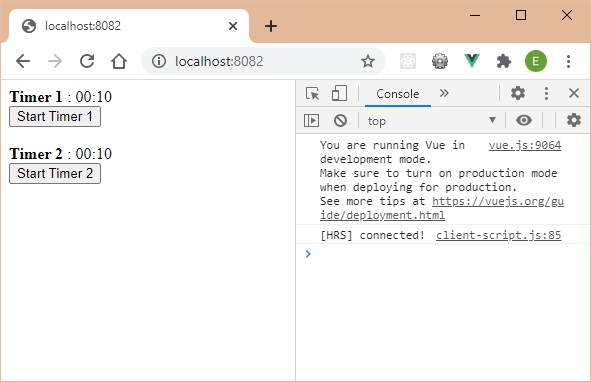
<Timer timername="Timer 1" minutes="5" seconds="10">
<template slot-scope="{timername}">
<StartStop v-bind:timername="timername"/>
</template>
</Timer>
<br>
<Timer timername="Timer 2" minutes="0" seconds="5">
<template slot-scope="{timername}">
<StartStop v-bind:timername="timername"/>
</template>
</Timer>
</div>
`
});
The code is similar to what we have already written:
- We simply added the minutes and seconds props in the Timer component, as well as the created() method which allows to start or stop the timer.
- The reactive min and sec variables of the Timer component are retrieved from the minutes and seconds props transmitted in the Timer component.
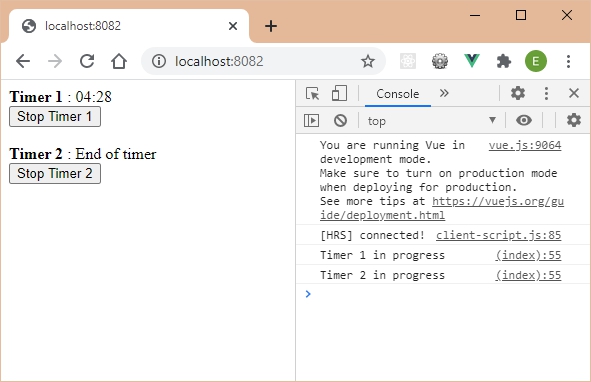
Let's check that everything is working correctly: when the program is launched, none of the timers are active:

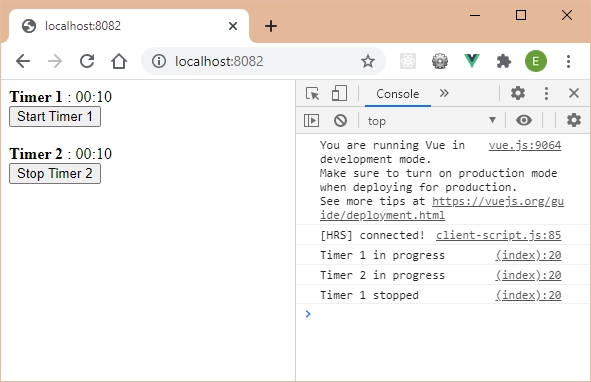
Let's click on the two buttons successively: the timers start:
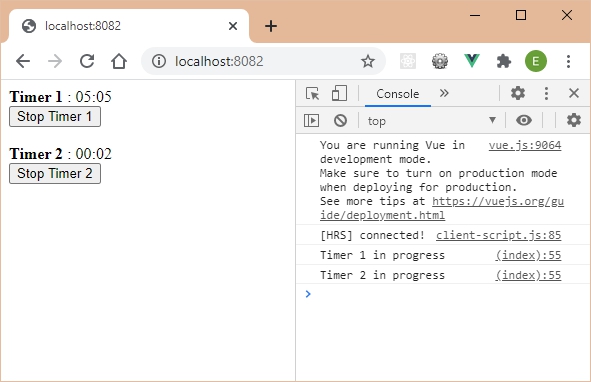
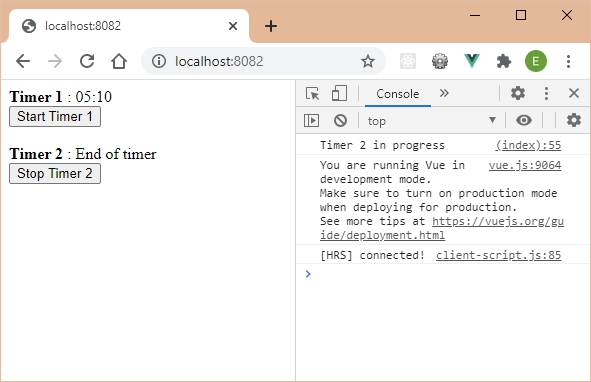
When timer 2 expires, the message End of timer is displayed:
We can see some possible areas for improvement:
- Be able to start a timer (as soon as it is displayed) if the associated button is set to Stop when it is initialized (so the timer can be stopped by clicking on the button),
- When a timer is at 00:00, you must be able to restart it and change its label from Stop to Start .
- If a Timer component does not have StartStop content, start the timer automatically as soon as the timer is created.
These improvements will be those made in the following sections.
Start a timer if the associated button is set to Stop when it is initialized
The Start / Stop button of each timer is set to Start because the reactive variable stopped of the StartStop component is set to true . Setting this variable to false in the data section displays the Stop button but the timer does not start. This shows that improvements are desirable ...
Here we want to be able to manage the state of each button independently, and not by directly initializing the reactive variable stopped to true or false (because the configuration chosen would in this case be the same for all the timers).
For this we introduce a new props in the StartStop component, namely the stop props allowing to indicate if the timer is stopped ( stop="1" ) or started ( stop="0" ).
The StartStop component would then be used as follows:
Start the timer as soon as it is created
<StartStop v-bind:timername="timername" stop="0" />
Stop the timer as soon as it is created
<StartStop v-bind:timername="timername" stop="1" />
Positioning the props stop to 0 or 1 therefore allows the StartStop component to know whether the timer should start or not.
The StartStop component must be modified to handle this new props. When creating the component, we see if the timer is on ( stop="0" ), and if so we must start the timer.
StartStop component including the stop props
Vue.component("StartStop", {
data() {
return {
stopped : parseInt(this.stop)
}
},
props : [
"timername",
"stop"
],
created() {
if (!this.stopped) {
this.stopped = !this.stopped;
this.start_stop();
}
},
methods : {
start_stop() {
this.stopped = !this.stopped;
this.$parent.$emit("startstop", this.stopped);
}
},
template : `
<div>
<button v-if="stopped" v-on:click="start_stop">
Start {{timername}}
</button>
<button v-else v-on:click="start_stop">
Stop {{timername}}
</button>
</div>
`
});
The reactive variable stopped is now initialized from the stop props. The parseInt() instruction used allows you to retrieve the integer value of the props, because it is indicated in the form of a character string when it is used.
The stop props is also added in the list of component props (in addition to the timername props), while the created() method allows processing (starting or not the timer by simulating a click on the button).
The following program takes all the code by setting the props stop to "1" for the first timer and to "0" for the second.
Use the stop props to start or not the timer
Vue.component("Timer", {
data() {
return {
min : this.minutes,
sec : this.seconds
}
},
props : [
"timername",
"minutes",
"seconds"
],
computed : {
time() {
var min = this.min;
var sec = this.sec;
if (min < 10) min = "0" + min;
if (sec < 10) sec = "0" + sec;
return min + ":" + sec;
}
},
created() {
var timer;
this.$on("startstop", function(stop) {
if (stop) {
if (timer) clearInterval(timer);
}
else {
timer = setInterval(() => {
this.sec -= 1;
if (this.sec < 0) {
this.min -= 1;
if (this.min < 0) {
this.min = 0;
this.sec = 0;
clearInterval(timer);
}
else this.sec = 59;
}
}, 1000);
}
console.log(this.timername + " " + (stop ? "stopped" : "in progress"));
});
},
template : `
<div>
<b>{{timername}}</b> :
<span v-if="sec||min"> {{time}} </span>
<span v-else>End of timer</span>
<slot v-bind:timername="timername"></slot>
</div>
`
});
Vue.component("StartStop", {
data() {
return {
stopped : parseInt(this.stop)
}
},
props : [
"timername",
"stop"
],
created() {
if (!this.stopped) {
this.stopped = !this.stopped;
this.start_stop();
}
},
methods : {
start_stop() {
this.stopped = !this.stopped;
this.$parent.$emit("startstop", this.stopped);
}
},
template : `
<div>
<button v-if="stopped" v-on:click="start_stop">
Start {{timername}}
</button>
<button v-else v-on:click="start_stop">
Stop {{timername}}
</button>
</div>
`
});
var vm = new Vue({
el : "#root",
template : `
<div>
<Timer timername="Timer 1" minutes="5" seconds="10">
<template slot-scope="{timername}">
<StartStop v-bind:timername="timername" stop="1" />
</template>
</Timer>
<br>
<Timer timername="Timer 2" minutes="0" seconds="5">
<template slot-scope="{timername}">
<StartStop v-bind:timername="timername" stop="0" />
</template>
</Timer>
</div>
`
});

The second timer is started directly, unlike the first for which you must click on the button.
Restart a timer that has expired
When timer 2 has expired, the button text is not refreshed:
Timer 2 has expired and yet the associated button text is still Stop . It should be set to Start and also reset the initial values of the timer.
To achieve this:
- The Timer component, which knows that the timer has expired, should be able to access the start_stop() method of the StartStop child component. Calling this method will refresh the button text automatically.
- Updating the displayed minutes and seconds can be done directly in the Timer component by resetting them with the values transmitted in the props (this.minutes and this.seconds ).
Use the created() method or the mounted() method?
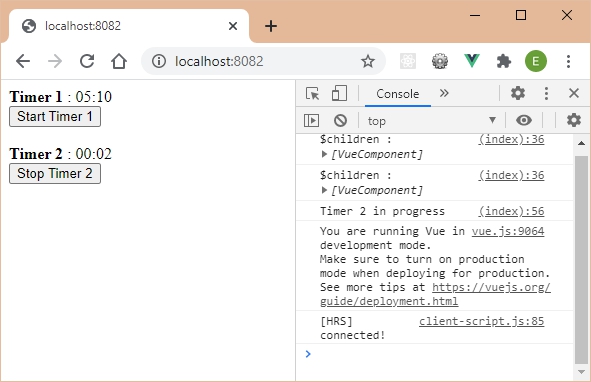
A parent component (here the Timer component) can have access to its child components (here the StartStop component) by means of the this.$children instruction which is an array accessible in each component. This $children array is however accessible only when the component is in the mounted state, and not just created: this means that you have to wait until the component is registered in the DOM to be able to have access to its children.
You can easily check this by displaying in the console the content of the this.$children object in the created() method of the Timer component:
Display this.$children in the created method of the Timer component
Vue.component("Timer", {
data() {
return {
min : this.minutes,
sec : this.seconds
}
},
props : [
"timername",
"minutes",
"seconds"
],
computed : {
time() {
var min = this.min;
var sec = this.sec;
if (min < 10) min = "0" + min;
if (sec < 10) sec = "0" + sec;
return min + ":" + sec;
}
},
created() {
console.log("$children : ", this.$children);
var timer;
this.$on("startstop", function(stop) {
if (stop) {
if (timer) clearInterval(timer);
}
else {
timer = setInterval(() => {
this.sec -= 1;
if (this.sec < 0) {
this.min -= 1;
if (this.min < 0) {
this.min = 0;
this.sec = 0;
clearInterval(timer);
}
else this.sec = 59;
}
}, 1000);
}
console.log(this.timername + " " + (stop ? "stopped" : "in progress"));
});
},
template : `
<div>
<b>{{timername}}</b> :
<span v-if="sec||min"> {{time}} </span>
<span v-else>End of timer</span>
<slot v-bind:timername="timername"></slot>
</div>
`
});
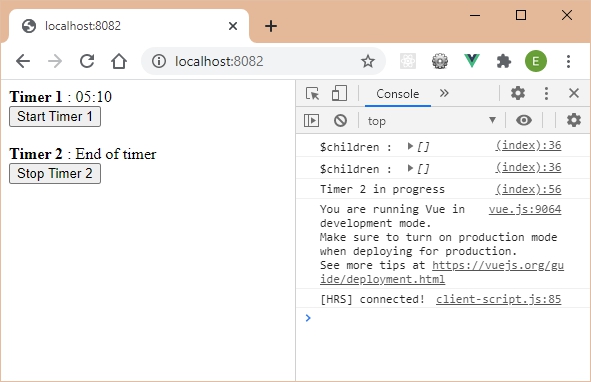
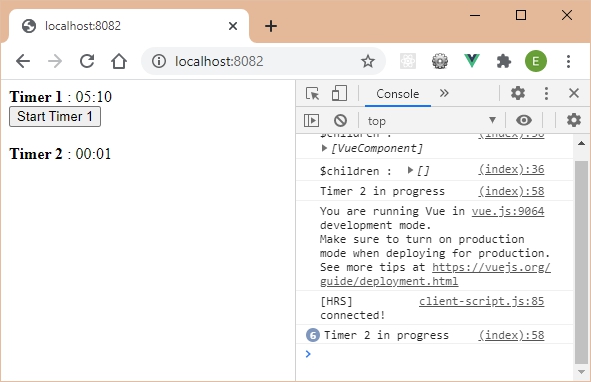
Launching the program displays the contents of the $ children array of each Timer component in the console. We can see that this content is an empty array [] for each of the timers. The reason is that we are accessing the $ children array while the component is only in the created state, and not yet mounted.
All you have to do is change the name of the method in the Timer component: created() becomes mounted() .
Replace created() with mounted() in the Timer component
Vue.component("Timer", {
data() {
return {
min : this.minutes,
sec : this.seconds
}
},
props : [
"timername",
"minutes",
"seconds"
],
computed : {
time() {
var min = this.min;
var sec = this.sec;
if (min < 10) min = "0" + min;
if (sec < 10) sec = "0" + sec;
return min + ":" + sec;
}
},
mounted() {
console.log("$children : ", this.$children);
var timer;
this.$on("startstop", function(stop) {
if (stop) {
if (timer) clearInterval(timer);
}
else {
timer = setInterval(() => {
this.sec -= 1;
if (this.sec < 0) {
this.min -= 1;
if (this.min < 0) {
this.min = 0;
this.sec = 0;
clearInterval(timer);
}
else this.sec = 59;
}
}, 1000);
}
console.log(this.timername + " " + (stop ? "stopped" : "in progress"));
});
},
template : `
<div>
<b>{{timername}}</b> :
<span v-if="sec||min"> {{time}} </span>
<span v-else>End of timer</span>
<slot v-bind:timername="timername"></slot>
</div>
`
});
Once done, we get:
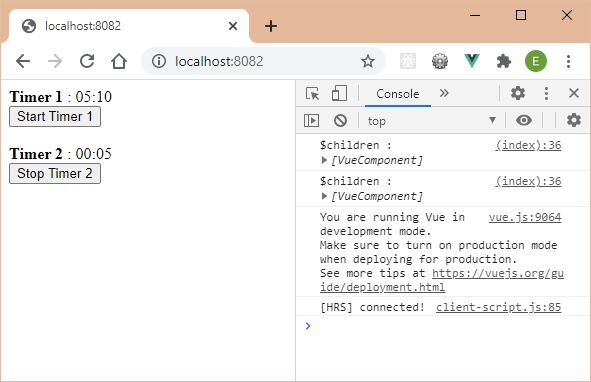
The components included in the $children array are now accessible.
However, if you look closely you will see that the second timer did not start automatically as it was before ... Starting the timer in the mounted() method instead of created() messed up the operation ... Here is the reason:
The created() method of the StartStop component executes before the mounted() method of the Timer component is executed, so executing the start_stop() method in the StartStop component does indeed send a startstop message to the Timer component , but this one is not yet ready to process it. The StartStop component should wait until its parent component is ready before sending it the startstop message. For that, we will use the $nextTick() method.
Use the $nextTick() method
Vue has foreseen these extreme cases. If you read the Vue API https://vuejs.org/v2/api/#mounted you see that Vue says to wait for the "next tick" so that the parent component and the child are both in the mounted state. For this, we use, as indicated, the method this.$nextTick(callback) in which the callback function is executed when both components are in the mounted state.
Let's use the $nextTick() method in the start_stop() method of the StartStop component. The startstop message will only be issued when both components are in the mounted state.
Use the $nextTick() method in the StartStop component
Vue.component("StartStop", {
data() {
return {
stopped : parseInt(this.stop)
}
},
props : [
"timername",
"stop"
],
created() {
if (!this.stopped) {
this.stopped = !this.stopped;
this.start_stop();
}
},
methods : {
start_stop() {
this.$nextTick(function() {
this.stopped = !this.stopped;
this.$parent.$emit("startstop", this.stopped);
});
}
},
template : `
<div>
<button v-if="stopped" v-on:click="start_stop">
Start {{timername}}
</button>
<button v-else v-on:click="start_stop">
Stop {{timername}}
</button>
</div>
`
});
Now let's check that the second timer starts correctly when the page loads.
Access the $children array
Each $children array contains a VueComponent class component that actually corresponds to the StartStop component:
- Access to this component is via this.$children[0] ,
- Then we access the start_stop() method of the component by means of the this.$children[0].start_stop() instruction.
Let's modify the program to incorporate these changes. The Timer and StartStop components are impacted.
Modification of components
Vue.component("Timer", {
data() {
return {
min : this.minutes,
sec : this.seconds
}
},
props : [
"timername",
"minutes",
"seconds"
],
computed : {
time() {
var min = this.min;
var sec = this.sec;
if (min < 10) min = "0" + min;
if (sec < 10) sec = "0" + sec;
return min + ":" + sec;
}
},
mounted() {
console.log("$children : ", this.$children);
var timer;
this.$on("startstop", function(stop) {
if (stop) {
if (timer) clearInterval(timer);
}
else {
timer = setInterval(() => {
this.sec -= 1;
if (this.sec < 0) {
this.min -= 1;
if (this.min < 0) {
this.min = this.minutes;
this.sec = this.seconds;
this.$children[0].start_stop();
clearInterval(timer);
}
else this.sec = 59;
}
}, 1000);
}
console.log(this.timername + " " + (stop ? "stopped" : "in progress"));
});
},
template : `
<div>
<b>{{timername}}</b> :
<span v-if="sec||min"> {{time}} </span>
<span v-else>End of timer</span>
<slot v-bind:timername="timername"></slot>
</div>
`
});
Vue.component("StartStop", {
data() {
return {
stopped : parseInt(this.stop)
}
},
props : [
"timername",
"stop"
],
created() {
if (!this.stopped) {
this.stopped = !this.stopped;
this.start_stop();
}
},
methods : {
start_stop() {
this.$nextTick(function() {
this.stopped = !this.stopped;
this.$parent.$emit("startstop", this.stopped);
});
}
},
template : `
<div>
<button v-if="stopped" v-on:click="start_stop">
Start {{timername}}
</button>
<button v-else v-on:click="start_stop">
Stop {{timername}}
</button>
</div>
`
});
var vm = new Vue({
el : "#root",
template : `
<div>
<Timer timername="Timer 1" minutes="5" seconds="10">
<template slot-scope="{timername}">
<StartStop v-bind:timername="timername" stop="1" />
</template>
</Timer>
<br>
<Timer timername="Timer 2" minutes="0" seconds="5">
<template slot-scope="{timername}">
<StartStop v-bind:timername="timername" stop="0" />
</template>
</Timer>
</div>
`
});
Let's start the program and wait for the end of the second timer: once the end of it, the second timer is repositioned on Start and the remaining time is displayed again.

Start the timer automatically if the StartStop component is missing
We want to be able to use the Timer component without necessarily inserting a StartStop component in its body. In this case, the timer must start automatically and restart at each end of the expiry date (perpetual timer).
The Timer component must test for the presence of a child in its $children array:
- If a child is present, we assume that it is the StartStop component, and in this case we use the start_stop() method on this child (as before).
- Otherwise, the StartStop component is absent, and in this case, the startstop message must be sent in the Timer component to start it directly (you cannot use the start_stop() method because the StartStop component is absent).
Let's write the corresponding program.
Start the timer if the StartStop component is missing
Vue.component("Timer", {
data() {
return {
min : this.minutes,
sec : this.seconds
}
},
props : [
"timername",
"minutes",
"seconds"
],
computed : {
time() {
var min = this.min;
var sec = this.sec;
if (min < 10) min = "0" + min;
if (sec < 10) sec = "0" + sec;
return min + ":" + sec;
}
},
mounted() {
console.log("$children : ", this.$children);
var timer;
this.$on("startstop", function(stop) {
if (stop) {
if (timer) clearInterval(timer);
}
else {
timer = setInterval(() => {
this.sec -= 1;
if (this.sec < 0) {
this.min -= 1;
if (this.min < 0) {
this.min = this.minutes;
this.sec = this.seconds;
if (this.$children.length) this.$children[0].start_stop();
else this.$emit("startstop", 0);
clearInterval(timer);
}
else this.sec = 59;
}
}, 1000);
}
console.log(this.timername + " " + (stop ? "stopped" : "in progress"));
});
if (!this.$children.length) this.$emit("startstop", 0);
},
template : `
<div>
<b>{{timername}}</b> :
<span v-if="sec||min"> {{time}} </span>
<span v-else>End of timer</span>
<slot v-bind:timername="timername"></slot>
</div>
`
});
Vue.component("StartStop", {
data() {
return {
stopped : parseInt(this.stop)
}
},
props : [
"timername",
"stop"
],
created() {
if (!this.stopped) {
this.stopped = !this.stopped;
this.start_stop();
}
},
methods : {
start_stop() {
this.$nextTick(function() {
this.stopped = !this.stopped;
this.$parent.$emit("startstop", this.stopped);
});
}
},
template : `
<div>
<button v-if="stopped" v-on:click="start_stop">
Start {{timername}}
</button>
<button v-else v-on:click="start_stop">
Stop {{timername}}
</button>
</div>
`
});
var vm = new Vue({
el : "#root",
template : `
<div>
<Timer timername="Timer 1" minutes="5" seconds="10">
<template slot-scope="{timername}">
<StartStop v-bind:timername="timername" stop="1" />
</template>
</Timer>
<br>
<Timer timername="Timer 2" minutes="0" seconds="5">
</Timer>
</div>
`
});
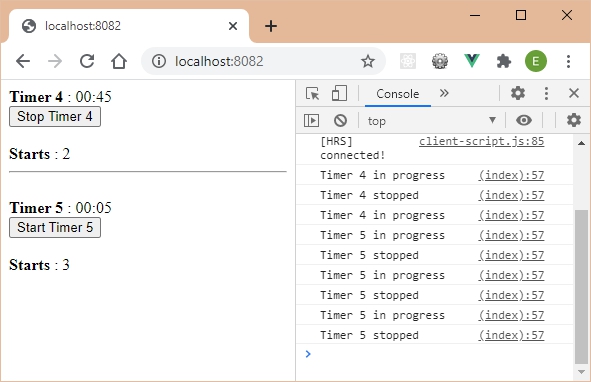
The second timer is now started at each end of the cycle (visible here in the display of the console, here 6 times).
Create new components from existing ones
Vue allows you to create new components from those already created. For example :
- The TimerStartStop component would combine the Timer component and the StartStop component into a single component,
- The TimerStartCount component would do the same, but additionally displaying the number of times the timer has been started.
Let's take a look at each of these new components.
TimerStartStop component
Let's start by creating a TimerStartStop component that would combine the Timer and StartStop components into one.
Its use would also be simplified, because it would no longer be necessary to surround the StartStop component with the <template> indicating the slot-scope attribute. We would use it as follows:
Using the new TimerStartStop component
<TimerStartStop timername="Timer 3" minutes="1" seconds="5">
</TimerStartStop>
Or also, since the TimerStartStop component has no body:
Using the new TimerStartStop component
<TimerStartStop timername="Timer 3" minutes="1" seconds="5" />
The props are the same as those used in the Timer component.
The TimerStartStop component is created as follows:
TimerStartStop component grouping the Timer and StartStop components
Vue.component("TimerStartStop", {
props : [
"timername",
"minutes",
"seconds"
],
template : `
<Timer v-bind:timername="timername"
v-bind:minutes="minutes"
v-bind:seconds="seconds">
<StartStop v-bind:timername="timername" v-bind:stop="1" />
</Timer>
`
});
The timer is supposed to be stopped on launch, because the stop props is set to "1" in the StartStop component. If you set it to "0", the timer starts immediately.
The code of the other components is not changed. The Vue object can use the different components created in the different forms.
Vue object using the created components
var vm = new Vue({
el : "#root",
template : `
<div>
<Timer timername="Timer 1" minutes="5" seconds="10">
<template slot-scope="{timername}">
<StartStop v-bind:timername="timername" stop="1" />
</template>
</Timer>
<br>
<Timer timername="Timer 2" minutes="0" seconds="5">
</Timer>
<br>
<TimerStartStop timername="Timer 3" minutes="1" seconds="5">
</TimerStartStop>
</div>
`
});
The Timer 3 timer is the one created from the new TimerStartStop component.
Let's check that these timers are working:

TimerStartCount component
This new component uses the same principle as the previous TimerStartStop . From the two components Timer and StartStop , we create this new component which also allows to display the number of times that we clicked on each button to start a timer.
You must therefore be warned that the timer has been started. The Timer component knows this because it receives the startstop event, with the stop argument as a parameter, which is 1 if the timer is stopped, 0 otherwise.
You just need to use the v-on:startstop directive on the Timer component to perform processing when this event is received.
TimerStartCount component that displays the number of timer starts
Vue.component("Timer", {
data() {
return {
min : this.minutes,
sec : this.seconds
}
},
props : [
"timername",
"minutes",
"seconds"
],
computed : {
time() {
var min = this.min;
var sec = this.sec;
if (min < 10) min = "0" + min;
if (sec < 10) sec = "0" + sec;
return min + ":" + sec;
}
},
mounted() {
var timer;
this.$on("startstop", function(stop) {
if (stop) {
if (timer) clearInterval(timer);
}
else {
timer = setInterval(() => {
this.sec -= 1;
if (this.sec < 0) {
this.min -= 1;
if (this.min < 0) {
this.min = this.minutes;
this.sec = this.seconds;
if (this.$children.length) this.$children[0].start_stop();
else this.$emit("startstop", 0);
clearInterval(timer);
}
else this.sec = 59;
}
}, 1000);
}
console.log(this.timername + " " + (stop ? "stopped" : "in progress"));
});
if (!this.$children.length) this.$emit("startstop", 0);
},
template : `
<div>
<b>{{timername}}</b> :
<span v-if="sec||min"> {{time}} </span>
<span v-else>End of timer</span>
<slot v-bind:timername="timername"></slot>
</div>
`
});
Vue.component("StartStop", {
data() {
return {
stopped : parseInt(this.stop)
}
},
props : [
"timername",
"stop"
],
created() {
if (!this.stopped) {
this.stopped = !this.stopped;
this.start_stop();
}
},
methods : {
start_stop() {
this.$nextTick(function() {
this.stopped = !this.stopped;
this.$parent.$emit("startstop", this.stopped);
});
}
},
template : `
<div>
<button v-if="stopped" v-on:click="start_stop">
Start {{timername}}
</button>
<button v-else v-on:click="start_stop">
Stop {{timername}}
</button>
</div>
`
});
Vue.component("TimerStartStop", {
props : [
"timername",
"minutes",
"seconds"
],
template : `
<Timer v-bind:timername="timername"
v-bind:minutes="minutes"
v-bind:seconds="seconds">
<StartStop v-bind:timername="timername" v-bind:stop="1" />
</Timer>
`
});
Vue.component("TimerStartCount", {
props : [
"timername",
"minutes",
"seconds"
],
data() {
return {
count : 0
}
},
methods : {
startstop(stop) {
if (!stop) this.count++;
}
},
template : `
<div>
<Timer v-bind:timername="timername"
v-bind:minutes="minutes"
v-bind:seconds="seconds" v-on:startstop="startstop">
<StartStop v-bind:timername="timername" v-bind:stop="1" />
</Timer>
<br>
<b>Starts</b> : {{count}}
</div>
`
});
var vm = new Vue({
el : "#root",
template : `
<div>
<TimerStartCount timername="Timer 4" minutes="1" seconds="15">
</TimerStartCount>
<hr><br>
<TimerStartCount timername="Timer 5" minutes="0" seconds="5">
</TimerStartCount>
</div>
`
});
When the startstop event is received by the Timer component, the startstop(stop) method is activated in which the stop parameter indicates whether the timer is stopped or not. If the timer is running, the reactive count variable is displayed which takes account of all the starts.
Here we use two timers in the page in order to count separately the number of starts of the two timers.
Count the number of starts of all timers
In addition to counting the number of individual starts of each timer, it is also possible to count the total number of starts.
It suffices that each TimerStartStop component of the page listens for the startstop event, and increments a reactive variable during each start click on one of the timers of the page. It's the same principle as the previous component but using this principle in the Vue object directly.
Only one problem will be encountered: the TimerStartStop component does not receive the startstop event, because it is only the Timer component (included in the TimerStartStop component) that receives it. The Timer component would therefore have to send this event back to its parent to prevent it, which is done by the this.$parent.$emit("startstop", stop) statement performed when this event is received in the Timer component.
An event received by a component does not go up by itself in the hierarchy of Vue components, we must send it ourselves to the parent so that it processes it if necessary.
Display the total number of starts of all timers
Vue.component("Timer", {
data() {
return {
min : this.minutes,
sec : this.seconds
}
},
props : [
"timername",
"minutes",
"seconds"
],
computed : {
time() {
var min = this.min;
var sec = this.sec;
if (min < 10) min = "0" + min;
if (sec < 10) sec = "0" + sec;
return min + ":" + sec;
}
},
mounted() {
var timer;
this.$on("startstop", function(stop) {
if (stop) {
if (timer) clearInterval(timer);
}
else {
timer = setInterval(() => {
this.sec -= 1;
if (this.sec < 0) {
this.min -= 1;
if (this.min < 0) {
this.min = this.minutes;
this.sec = this.seconds;
if (this.$children.length) this.$children[0].start_stop();
else this.$emit("startstop", 0);
clearInterval(timer);
}
else this.sec = 59;
}
}, 1000);
}
console.log(this.timername + " " + (stop ? "stopped" : "in progress"));
this.$parent.$emit("startstop", stop);
});
if (!this.$children.length) this.$emit("startstop", 0);
},
template : `
<div>
<b>{{timername}}</b> :
<span v-if="sec||min"> {{time}} </span>
<span v-else>End timer</span>
<slot v-bind:timername="timername"></slot>
</div>
`
});
Vue.component("StartStop", {
data() {
return {
stopped : parseInt(this.stop)
}
},
props : [
"timername",
"stop"
],
created() {
if (!this.stopped) {
this.stopped = !this.stopped;
this.start_stop();
}
},
methods : {
start_stop() {
this.$nextTick(function() {
this.stopped = !this.stopped;
this.$parent.$emit("startstop", this.stopped);
});
}
},
template : `
<div>
<button v-if="stopped" v-on:click="start_stop">
Start {{timername}}
</button>
<button v-else v-on:click="start_stop">
Stop {{timername}}
</button>
</div>
`
});
Vue.component("TimerStartStop", {
props : [
"timername",
"minutes",
"seconds"
],
template : `
<Timer v-bind:timername="timername"
v-bind:minutes="minutes"
v-bind:seconds="seconds">
<StartStop v-bind:timername="timername" v-bind:stop="0" />
</Timer>
`
});
Vue.component("TimerStartCount", {
props : [
"timername",
"minutes",
"seconds"
],
data() {
return {
count : 0
}
},
methods : {
startstop(stop) {
if (!stop) this.count++;
}
},
template : `
<div>
<Timer v-bind:timername="timername"
v-bind:minutes="minutes"
v-bind:seconds="seconds" v-on:startstop="startstop" >
<StartStop v-bind:timername="timername" v-bind:stop="1" />
</Timer>
<br>
<b>Starts {{timername}}</b> : {{count}}
</div>
`
});
var vm = new Vue({
el : "#root",
data() {
return {
count : 0
}
},
methods : {
startstop(stop) {
if (!stop) this.count++;
}
},
template : `
<div>
<TimerStartCount timername="Timer 4" minutes="1" seconds="15"
v-on:startstop="startstop" >
</TimerStartCount>
<hr><br>
<TimerStartCount timername="Timer 5" minutes="0" seconds="5"
v-on:startstop="startstop" >
</TimerStartCount>
<hr><br>
<b>Starts global</b> : {{count}}
</div>
`
});
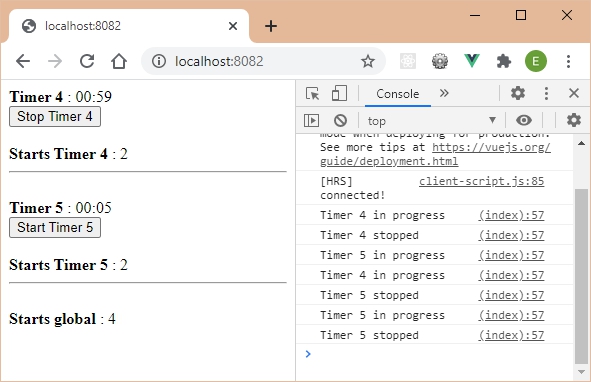
The global number of starts is updated in the reactive variable count of the Vue object, displayed in the page, when each startstop event is received (if the stop parameter is equal to 0).

TimerStartCounts component
The TimerStartCounts component is a generalization of the previous program. This component allows to encapsulate several TimerStartCount components and to display below the total number of starts of all timers.
In order to be able to count the total number of starts, we allow each TimerStartCount component to send a startstop message to its parent component, here the TimerStartCounts component. The startstop message therefore moves up the component hierarchy from the StartStop component.
TimerStartCounts component
Vue.component("Timer", {
data() {
return {
min : this.minutes,
sec : this.seconds
}
},
props : [
"timername",
"minutes",
"seconds"
],
computed : {
time() {
var min = this.min;
var sec = this.sec;
if (min < 10) min = "0" + min;
if (sec < 10) sec = "0" + sec;
return min + ":" + sec;
}
},
mounted() {
var timer;
this.$on("startstop", function(stop) {
if (stop) {
if (timer) clearInterval(timer);
}
else {
timer = setInterval(() => {
this.sec -= 1;
if (this.sec < 0) {
this.min -= 1;
if (this.min < 0) {
this.min = this.minutes;
this.sec = this.seconds;
if (this.$children.length) this.$children[0].start_stop();
else this.$emit("startstop", 0);
clearInterval(timer);
}
else this.sec = 59;
}
}, 1000);
}
console.log(this.timername + " " + (stop ? "stopped" : "in progress"));
this.$parent.$emit("startstop", stop);
});
if (!this.$children.length) this.$emit("startstop", 0);
},
template : `
<div>
<b>{{timername}}</b> :
<span v-if="sec||min"> {{time}} </span>
<span v-else>End of timer</span>
<slot v-bind:timername="timername"></slot>
</div>
`
});
Vue.component("StartStop", {
data() {
return {
stopped : parseInt(this.stop)
}
},
props : [
"timername",
"stop"
],
created() {
if (!this.stopped) {
this.stopped = !this.stopped;
this.start_stop();
}
},
methods : {
start_stop() {
this.$nextTick(function() {
this.stopped = !this.stopped;
this.$parent.$emit("startstop", this.stopped);
});
}
},
template : `
<div>
<button v-if="stopped" v-on:click="start_stop">
Start {{timername}}
</button>
<button v-else v-on:click="start_stop">
Stop {{timername}}
</button>
</div>
`
});
Vue.component("TimerStartStop", {
props : [
"timername",
"minutes",
"seconds"
],
template : `
<Timer v-bind:timername="timername"
v-bind:minutes="minutes"
v-bind:seconds="seconds">
<StartStop v-bind:timername="timername" v-bind:stop="0" />
</Timer>
`
});
Vue.component("TimerStartCount", {
props : [
"timername",
"minutes",
"seconds"
],
data() {
return {
count : 0
}
},
methods : {
startstop(stop) {
if (!stop) this.count++;
this.$parent.$emit("startstop", stop);
}
},
template : `
<div>
<Timer v-bind:timername="timername"
v-bind:minutes="minutes"
v-bind:seconds="seconds" v-on:startstop="startstop">
<StartStop v-bind:timername="timername" v-bind:stop="1" />
</Timer>
<br>
<b>Starts {{timername}}</b> : {{count}}
</div>
`
});
Vue.component("TimerStartCounts", {
data() {
return {
count : 0
}
},
created() {
this.$on("startstop", function(stop) {
if (!stop) this.count++;
});
},
template : `
<div>
<slot></slot>
<hr><br>
<b>Starts global</b> : {{count}}
</div>
`
});
var vm = new Vue({
el : "#root",
template : `
<div>
<TimerStartCounts>
<TimerStartCount timername="Timer 4" minutes="1" seconds="15" />
<hr><br>
<TimerStartCount timername="Timer 5" minutes="0" seconds="5" />
</TimerStartCounts>
</div>
`
});
We use the slot in the template of the TimerStartCounts component to allow the integration of any content into the TimerStartCounts component.
Props in components
Props are used to pass values into components. They are used like traditional attributes, but unlike HTML attributes, they can be of any type (character string, integer, boolean, array, object, or even function).
We have seen that components get and use props, which must be specified in the component's props section. Their names are listed as strings in a table.
However, Vue also offers to check that the type of props transmitted to the component is the expected one. If indeed the component expects a Boolean value for a prop (so true or false ) and something else is transmitted, the program will not work.
Use the Elements component to display a list of elements
Let's write the Elements component which allows to display a list of elements which is passed to it in the elements props represented by an array of strings.
Display a list of items
Vue.component("Elements", {
props : [
"elements"
],
template : `
<div>
<ul>
<li v-for="element in elements">
{{element}}
</li>
</ul>
</div>
`
});
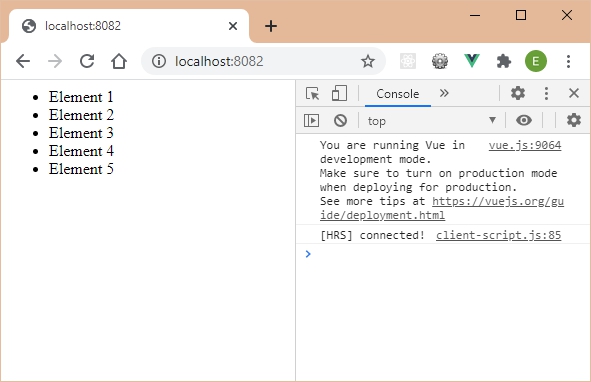
var vm = new Vue({
el : "#root",
data : {
elements : [
"Element 1",
"Element 2",
"Element 3",
"Element 4",
"Element 5"
]
},
template : `
<div>
<Elements v-bind:elements="elements" />
</div>
`
});
The reactive variable elements is passed to the component as an array. It is received in the Elements component via the elements props, to be then traversed as an array by the v-for directive.
What if the elements props passed to the component was not an array like above, but something else, for example a boolean value true or false ?
Let's modify the reactive elements variable to set it to true .
Set the reactive variable elements to true
var vm = new Vue({
el : "#root",
data : {
elements : true
},
template : `
<div>
<Elements v-bind:elements="elements" />
</div>
`
});
The result is the following:

Instead of the item list, we have a blank page, and no error message displayed.
To avoid this, and at least get an error message, Vue allows you to check the type of props that are used in components.
Check the type of props used
Vue allows you to indicate, for each props, its type. The most used are:
- String , for character strings,
- Number , for numeric values,
- Boolean , for Boolean values,
- Array , for arrays,
- Object , for objects,
- Function , for functions,
- Date , for dates.
Here we want to check that the elements props is of type Array . We therefore write in the definition of the Elements component which uses the elements props:
Elements component that checks the type of the elements props
Vue.component("Elements", {
props : {
"elements" : Array
},
template : `
<div>
<ul>
<li v-for="element in elements">
{{element}}
</li>
</ul>
</div>
`
});
var vm = new Vue({
el : "#root",
data : {
elements : true
},
template : `
<div>
<Elements v-bind:elements="elements" />
</div>
`
});
The component's props section is now defined as objects (and no longer as an array as before). Each property of the object is a props name, for which the value is the expected type (here the Array type).
Once this change has been made, let's check if it is taken into account:
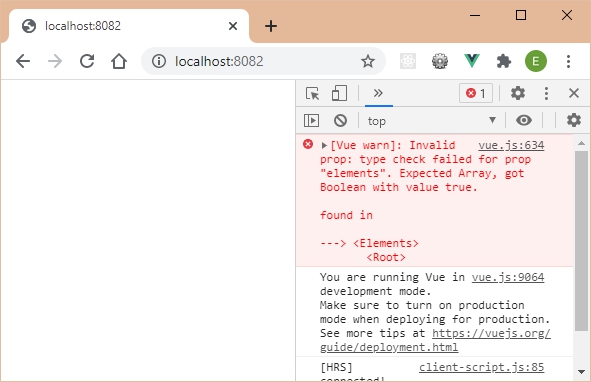
Vue automatically displays a message in the console indicating that the props type is not the expected one.
Using multiple types for a props
There are cases where a props can have multiple types, which allows more flexibility in using the component.
Suppose the elements props could be of type Array or Boolean , and use each of these possibilities in the Elements component. We then indicate elements: [Array, Boolean] to specify the possible types for this props.
Using an Array or Boolean props
Vue.component("Elements", {
props : {
"elements" : [Array, Boolean]
},
template : `
<div>
<ul v-if="elements instanceof Array">
<li v-for="element in elements">
{{element}}
</li>
</ul>
<div v-else-if="typeof elements == 'boolean'">
Boolean type value: {{elements}}</div>
<div v-else>Value of unknown type: {{elements}}</div>
</div>
`
});
var vm = new Vue({
el : "#root",
data : {
elements : true
},
template : `
<div>
<Elements v-bind:elements="elements" />
</div>
`
});
The Elements component template tests the type of the elements props:
- If it's an Array , it displays the list of elements,
- If it is a Boolean , it displays the Boolean value transmitted,
- Otherwise, it indicates an error.
By passing a boolean ( true ) in the elements prop:

Whereas if we indicate an array of elements, the array is displayed. And if we indicate something other than an array or a Boolean value, for example a String "Hello Vue":
Pass a "Hello Vue" String in the elements props
var vm = new Vue({
el : "#root",
data : {
elements : "Hello Vue"
},
template : `
<div>
<Elements v-bind:elements="elements" />
</div>
`
});
Since the String type is not accepted in the component, an error message (warning) is displayed in the console.
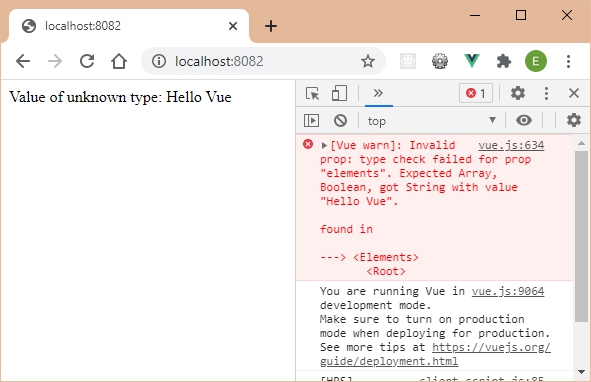
The program detected the error (thanks to the v-else directive) and Vue also displays an error message in the console because the type transmitted (here String ) is not one of the authorized types.
Another form of writing to define props in components
The previous program works, but does not allow to indicate several criteria for the same props. The value thus assigned to the props is its type, or an array of possible types.
Vue provides, as we will use in the next section, that other criteria are possible for a props (in addition to its type), for example: its default value, whether it is mandatory or not, etc.
For that, another form of writing to define a props in a component is necessary. We then write the program as follows:
Another form of writing to define a props
Vue.component("Elements", {
props : {
"elements" : {
type : Array
}
},
template : `
<div>
<ul>
<li v-for="element in elements">
{{element}}
</li>
</ul>
</div>
`
});
var vm = new Vue({
el : "#root",
data : {
elements : true
},
template : `
<div>
<Elements v-bind:elements="elements" />
</div>
`
});
The props elements is now worth an object that contains several properties, including the type property in order to be able to indicate the expected type for the props (which can also be worth an array of types).
We will subsequently enrich this structure by adding new properties for each of the props used.
Specify default values for props
Vue also allows you to specify default values for the props, when these are not transmitted when using the component.
For this we use the default property when defining the props in the component. All you have to do is use the default property, specifying its default value.
This rule is true only if the props is not an array or an object. In these last two cases, the indicated value must be a function which returns the default value. An example of this is discussed below.
Consider the two cases cited: the default is (or is not) an object or an array.
The default is neither an object nor an array
Let us indicate for example that the elements props is worth the Boolean value true by default, in the case where this props is not specified when using the component.
Indicate that the elements props is true by default
Vue.component("Elements", {
props : {
"elements" : {
type : [Array, Boolean], default : false
}
},
template : `
<div>
<ul v-if="elements instanceof Array">
<li v-for="element in elements">
{{element}}
</li>
</ul>
<div v-else-if="typeof elements == 'boolean'">
Boolean type value: {{elements}}</div>
<div v-else>Value of unknown type: {{elements}}</div>
</div>
`
});
var vm = new Vue({
el : "#root",
data : {
},
template : `
<div>
<Elements />
</div>
`
});
The Elements component is used here without specifying the elements props. This props will take the value false in this case.
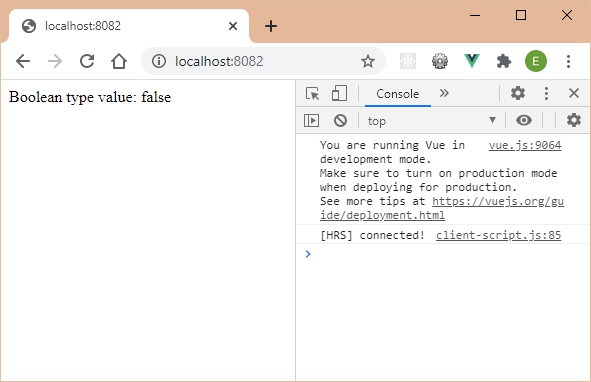
The default is an object or an array
In the case where the default value is an object or an array, the value of the default property is a function that returns the object or the array (otherwise Vue produces an error indicating to do so).
Suppose by default we want to display a list of five elements located in an array. We therefore write:
Indicate that the elements props is ["Element 1",…, "Element 5"] by default
Vue.component("Elements", {
props : {
"elements" : {
type : [Array, Boolean],
default : function() {
return [
"Element 1",
"Element 2",
"Element 3",
"Element 4",
"Element 5"
]
}
}
},
template : `
<div>
<ul v-if="elements instanceof Array">
<li v-for="element in elements">
{{element}}
</li>
</ul>
<div v-else-if="typeof elements == 'boolean'">
Boolean type value: {{elements}}</div>
<div v-else>Value of unknown type: {{elements}}</div>
</div>
`
});
var vm = new Vue({
el : "#root",
data : {
},
template : `
<div>
<Elements />
</div>
`
});

Indicate that a props is required
The required property set to true in a props definition is used to indicate that the props is mandatory, and it must therefore be specified when using the component.
In fact, even if a default value is set on this property, the fact of not indicating its value when using the component causes an error displayed in the console.
Indicate that the elements props is mandatory
Vue.component("Elements", {
props : {
"elements" : {
type : [Array, Boolean],
required : true,
default : function() {
return [
"Element 1",
"Element 2",
"Element 3",
"Element 4",
"Element 5"
]
}
}
},
template : `
<div>
<ul v-if="elements instanceof Array">
<li v-for="element in elements">
{{element}}
</li>
</ul>
<div v-else-if="typeof elements == 'boolean'">
Boolean type value: {{elements}}</div>
<div v-else>Value of unknown type: {{elements}}</div>
</div>
`
});
var vm = new Vue({
el : "#root",
data : {
elements : ['Element 1']
},
template : `
<div>
<Elements />
</div>
`
});
The value of the elements props is not specified, but its mention is mandatory ( required is true ).
The list is displayed (thanks to the default value indicated), but the console displays an error message (in fact a warning only).
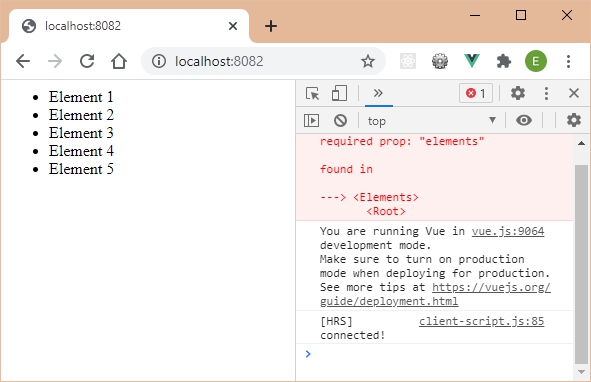
If you specify a value for the elements props while using the Elements component, the error message in the console disappears.
Use a value for the elements props
Vue.component("Elements", {
props : {
"elements" : {
type : [Array, Boolean],
required : true,
default : function() {
return [
"Element 1",
"Element 2",
"Element 3",
"Element 4",
"Element 5"
]
}
}
},
template : `
<div>
<ul v-if="elements instanceof Array">
<li v-for="element in elements">
{{element}}
</li>
</ul>
<div v-else-if="typeof elements == 'boolean'">
Boolean type value: {{elements}}</div>
<div v-else>Value of unknown type: {{elements}}</div>
</div>
`
});
var vm = new Vue({
el : "#root",
data : {
elements : ['Element 1']
},
template : `
<div>
<Elements v-bind:elements="elements" />
</div>
`
});
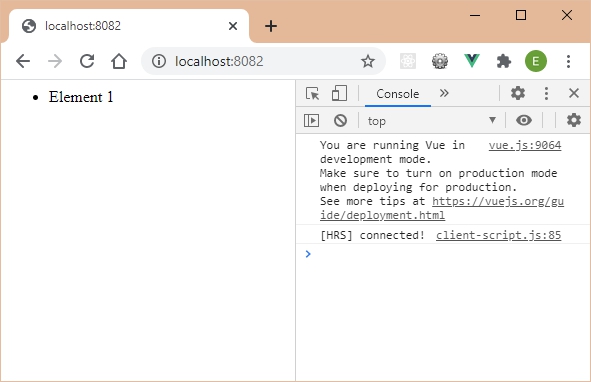
The list sent as props is displayed and Vue no longer displays the error message in the console.
Perform specific validation
In addition to indicating that a props is mandatory, we can also indicate that its value corresponds to certain criteria chosen by the programmer.
To do this, Vue allows, thanks to the validator property, to set a validation function which takes as parameter the current value of the props. This value of the props is then analyzed by the validation function which decides whether it is correct or not:
- If the props is considered correct, the validation function returns true ,
- If the props is found to be incorrect, the validation function returns false and an error message is displayed in the console (in fact a warning which does not prevent the program from continuing to operate).
Let's use the validator property to indicate that the elements props must contain at least two elements in the list.
Use the validator property to verify that the elements prop contains at least two elements
Vue.component("Elements", {
props : {
"elements" : {
type : [Array, Boolean],
required : true,
default : function() {
return [
"Element 1",
"Element 2",
"Element 3",
"Element 4",
"Element 5"
]
},
validator(value) {
return (value.length >= 2);
}
}
},
template : `
<div>
<ul v-if="elements instanceof Array">
<li v-for="element in elements">
{{element}}
</li>
</ul>
<div v-else-if="typeof elements == 'boolean'">
Boolean type value: {{elements}}</div>
<div v-else>Value of unknown type: {{elements}}</div>
</div>
`
});
var vm = new Vue({
el : "#root",
data : {
elements : [
"Element 1"
]
},
template : `
<div>
<Elements v-bind:elements="elements" />
</div>
`
});
Here we use the elements props with only one element in the list. An error is displayed in the console (but the list is still displayed).
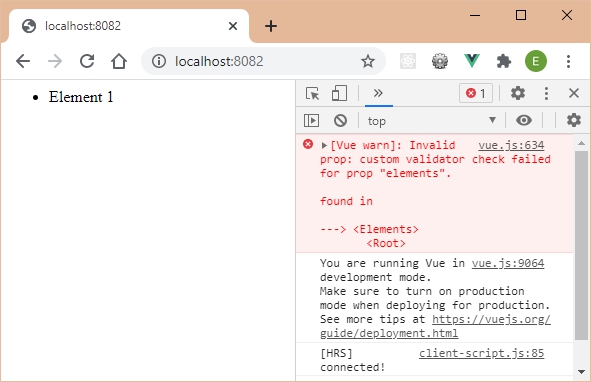
While if we add a second element in the list:
Use a list with two list items
var vm = new Vue({
el : "#root",
data : {
elements : [
"Element 1",
"Element 2"
]
},
template : `
<div>
<Elements v-bind:elements="elements" />
</div>
`
});
The list is displayed and the error message has disappeared from the console.
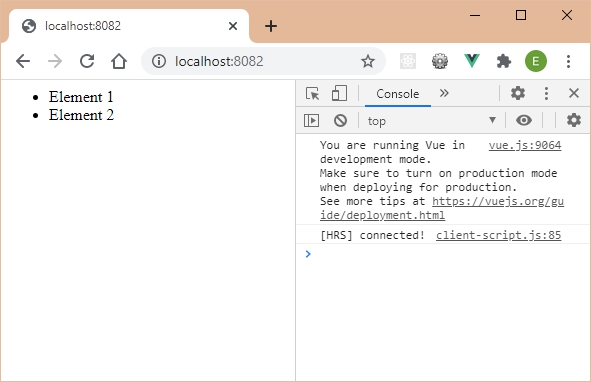
Component lifecycle
We saw previously some methods of the lifecycle of a component. For that, we used the created() and mounted() methods, which we had defined in the component.
These methods make it possible to carry out particular treatments at precise moments in the life of the component. For example, we observed that as long as the component is not "mounted" , it was impossible to access its parent in the tree structure.
Let's take a look at the methods that Vue calls in each component, depending on whether the component is created, updated, or destroyed.
To do this, we will create an App component in the template of the Vue object. We will enrich the component with the methods of the lifecycle as we go.
App component used to display the lifecycle
Vue.component("App", {
data() {
return {
count : 0
}
},
template : `
<div>
App component: count = {{count}}
</div>
`
});
var vm = new Vue({
el : "#root",
template : `
<div>
<App />
</div>
`
});
The App component uses a reactive count variable that will be incremented every second, allowing you to observe the lifecycle methods that handle the component update.
Component creation
When a component is created, the following methods are called in the component:
- beforeCreate() before creating the component,
- created() after creating the component,
- beforeMount() before the component is attached in the DOM tree,
- mounted() after the component is attached in the DOM tree.
Let's integrate these methods into the App component. A message is displayed for each of them in the console.
Use lifecycle methods for component creation
Vue.component("App", {
data() {
return {
count : 0
}
},
beforeCreate() {
console.log("beforeCreate");
},
created() {
console.log("created");
},
beforeMount() {
console.log("beforeMount");
},
mounted() {
console.log("mounted");
},
template : `
<div>
App component: count = {{count}}
</div>
`
});
var vm = new Vue({
el : "#root",
template : `
<div>
<App />
</div>
`
});
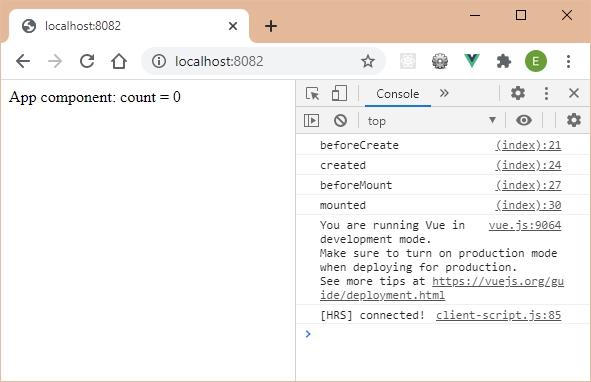
The name of each of the methods is displayed in the console, showing the sequencing of their call.
Component update
When updating a component (by modifying one of its reactive variables), the following lifecycle methods are also called:
- beforeUpdate() before updating the component,
- updated() after updating the component.
To update the App component, we modify the value of the reactive variable count . To do this, we insert in one of the methods used when creating the component, a timer which increments the count variable by 1 every second. Let's insert the management of this timer in the created() method for example.
Change the value of count every second and display lifecycle update methods
Vue.component("App", {
data() {
return {
count : 0
}
},
beforeCreate() {
console.log("beforeCreate");
},
created() {
console.log("created");
setInterval(() => {
this.count++;
}, 1000);
},
beforeMount() {
console.log("beforeMount");
},
mounted() {
console.log("mounted");
},
beforeUpdate() {
console.log("beforeUpdate");
},
updated() {
console.log("updated");
},
template : `
<div>
App component: count = {{count}}
</div>
`
});
var vm = new Vue({
el : "#root",
template : `
<div>
<App />
</div>
`
});
The counter is incremented from second to second, and the beforeUpdate() and updated() methods are called on each update.
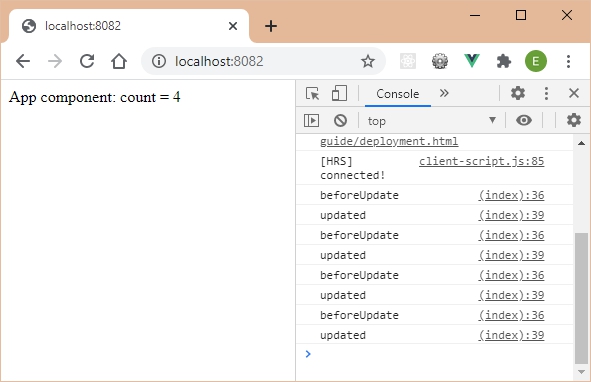
Component destruction
When a component is deleted, the following methods are called:
- beforeDestroy() before the component is destroyed,
- destroy() after destroying the component.
The deletion of a component can be done directly by calling its $destroy() method defined on the component (therefore accessible by this.$destroy() ).
For example, let's call this method when the reactive variable count reaches the value 3. We also implement the beforeDestroy() and destroy() methods in the component.
Component destruction
Vue.component("App", {
data() {
return {
count : 0
}
},
beforeCreate() {
console.log("beforeCreate");
},
created() {
console.log("created");
setInterval(() => {
this.count++;
if (this.count == 3) this.$destroy();
}, 1000);
},
beforeMount() {
console.log("beforeMount");
},
mounted() {
console.log("mounted");
},
beforeUpdate() {
console.log("beforeUpdate");
},
updated() {
console.log("updated");
},
beforeDestroy() {
console.log("beforeDestroy");
},
destroyed() {
console.log("destroyed");
},
template : `
<div>
App component: {{count}}
</div>
`
});
var vm = new Vue({
el : "#root",
template : `
<div>
<App />
</div>
`
});
When the value of count reaches the limit, the counting stops and the component is destroyed.
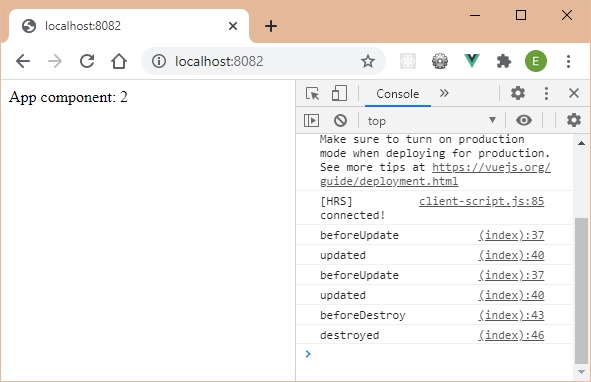
Global scheme
The page https://vuejs.org/v2/guide/instance.html#Lifecycle-Diagram shows the overall diagram of the lifecycle of a component, from its creation to its destruction.
We copy here the diagram provided by the official Vue documentation.
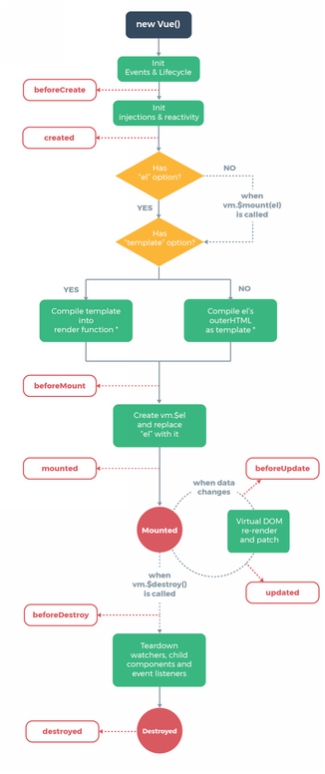
Назад: 1 – Introduction
На главную: Предисловие

