Setting up SolrCloud
Let us set up SolrCloud. We will look at two ways of setting up SolrCloud. One setup is the ZooKeeper service running inside SolrCloud. This can be considered as a dev or a test setup that can be used for evaluating SolrCloud or for running benchmarks. Another is the production setup where SolrCloud is set up as part of the Apache Tomcat application server and the ZooKeeper ensemble as a separate service. Let us start with the test setup.
Test setup for SolrCloud
We will create a test setup of a cluster with two shards and two replicas. The Solr installation directory comes inbuilt with the packages required to run SolrCloud. There is no separate installation required. ZooKeeper is also inbuilt in the SolrCloud installation. It requires a few parameters during Solr start-up to get ZooKeeper up and running.
To start SolrCloud, perform the following steps:
- Create four copies of the example directory in the Solr installation, namely
node1,node2,node3, andnode4:cp -r example/ node1 cp -r example/ node2 cp -r example/ node3 cp -r example/ node4
- To start the first node, run the following command:
cd node1 java -DzkRun -DnumShards=2 -Dbootstrap_confdir=./solr/collection1/conf -Dcollection.configName=myconf -jar start.jar
DzkRun: This parameter starts the ZooKeeper server embedded in the Solr installation. This server will manage the Solr cluster configuration.DnumShards: This parameter specifies the number of shards in SolrCloud. We have set it to 2 so that our cloud setup is configured for two shards.Dbootstrap_confdir: This parameter instructs the ZooKeeper server to copy the configurations from this directory and distribute them across all the nodes in SolrCloud.Dcollection.configName: This parameter specifies the name of the configuration for this SolrCloud to the ZooKeeper server.
- The output will be similar to the one shown in the following screenshot:
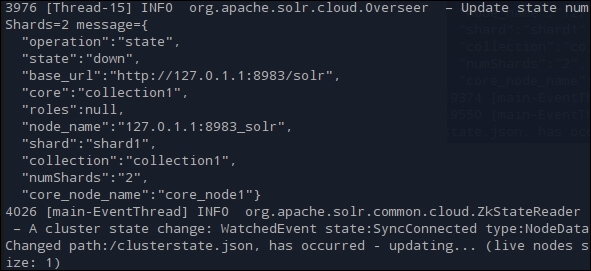
- We can see the information that we have provided. The shard is active and is named as shard1. The number of shards is specified as 2. Also, we can see that the status is updated as live nodes size: 1. This Solr instance will be running on port 8983 on the local server. We can open it with the following URL:
http://localhost:8983/solr/. - On the left-hand panel, we can see the link for Cloud:
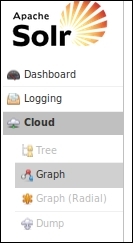
- This was not visible earlier. This option becomes visible when we start Solr with the parameters for SolrCloud. Clicking on the Cloud link yields the following graph:

- There are also options available to have a radial view of SolrCloud. This can be seen through the Graph (Radial) link. We will continue to examine the SolrCloud graph to know how nodes are being added to the cloud.
- The legend for color coding of the nodes of SolrCloud is visible on the right-hand side of the interface, as shown in the following image:

- As per the legend, the current node is Leader. All the other functionalities of the admin interface of SolrCloud remain the same as those of the Solr admin interface.
- To start the second node, let us enter the folder called
node2and run the following command:java -Djetty.port=8984 -DzkHost=localhost:9983 -jar start.jarDjetty.port: This parameter is required to start the Solr server on a separate port. As we are setting up all the nodes of SolrCloud on the same machine, the default port8983will be used for one Solr instance. Other instances of Solr will be started on separate custom ports.DzkHost: This parameter tells this instance of Solr where to find the ZooKeeper server. The port for the ZooKeeper server is Solr's port+ 1000. In our case, it is9983. Once the instance of Solr gets connected to the ZooKeeper server, it can get the configuration options from there. The ZooKeeper server then adds this instance of Solr to the SolrCloud cluster.
- On the terminal, we can see that the live nodes count has now increased to
2. We can see the graph on the SolrCloud admin interface. It now has two shards, one running on port 8983 and the other on port 8984:
- To add more nodes, all we have to do is change the port and start another Solr instance. Let us start the third node with the following commands:
cd node3 java -Djetty.port=8985 -DzkHost=localhost:9983 -jar start.jar
- We can see that the live nodes size is now 3 and the SolrCloud graph has been updated:

- This node is added as an active replica of the first shard.
- Let us now add the fourth node as well:
cd node4 java -Djetty.port=8986 -DzkHost=localhost:9983 -jar start.jar
- The live nodes size grows to 4, and the SolrCloud graph shows that the fourth node is added as an active replica of the second shard:

This setup for SolrCloud uses a single ZooKeeper instance running on port 9983, which is the same instance as the Solr instance running on port 8983. This is not an ideal setup. If the first node goes offline, the entire SolrCloud setup will go offline.
Note
It is not necessary to run the SolrCloud admin interface from the first Solr running on port 8983. We can open up the admin interface from any of the Solr servers that are part of SolrCloud. The options for cloud will be visible in all. Therefore, ideally, we can open SolrCloud from Solr servers running on ports 8984, 8985, and 8986 in our setup.
Setting up SolrCloud in production
The setup we saw earlier was for running SolrCloud on a single machine. This setup can be used to test out the features and functionalities of SolrCloud. For a production environment, we would want a setup that is fault tolerant and highly available. In order to have such a setup, we need at least three ZooKeeper instances. The more, the better. A minimum of three instances are required to have a fault tolerant and highly available cluster of ZooKeeper servers. As all communication between the Solr servers in SolrCloud happens via ZooKeeper, it is important to have at least two ZooKeeper instances for communication if the third instance goes down.
Setting up the Zookeeper ensemble
ZooKeeper can be downloaded from: .
We will set up three machines to run ZooKeeper. Let us name the machines zoo1, zoo2, and zoo3. The latest version of ZooKeeper is 3.4.6. Let us copy the zookeeper tar.gz file to the three machines and untar them over there. We will have a folder zookeeper-3.4.6 on all the three machines.
On all the nodes, create a folder named data inside the ZooKeeper folder:
ubuntu@zoo1:~/zookeeper-3.4.6$ mkdir data ubuntu@zoo2:~/zookeeper-3.4.6$ mkdir data ubuntu@zoo3:~/zookeeper-3.4.6$ mkdir data
Each ZooKeeper server has to be given an ID. This is specified in the myid file in the data directory. We will have to create a file called myid inside the data directory on each ZooKeeper server (zoo1, zoo2, and zoo3) and put the ID assigned to the ZooKeeper server there. Let us assign the IDs 1, 2, and 3 to the ZooKeeper servers zoo1, zoo2, and zoo3:
ubuntu@zoo1:~/zookeeper-3.4.6/data$ echo 1 > myid ubuntu@zoo2:~/zookeeper-3.4.6/data$ echo 2 > myid ubuntu@zoo3:~/zookeeper-3.4.6/data$ echo 3 > myid
Copy the ZooKeeper sample configuration zoo_sample.cfg to zoo.cfg inside the conf folder under the zookeeper folder. Open the ZooKeeper configuration file zoo.cfg and make the following changes:
dataDir=/home/ubuntu/zookeeper-3.4.6/data server.1=zoo1:2888:3888 server.2=zoo2:2888:3888 server.3=zoo3:2888:3888
Let the remaining setting remain as it is. We can see the clientPort=2181 setting. This is the port where the Solr servers will connect. We have specified the data directory, which we just created, as also the ZooKeeper servers that are part of the ensemble, as follows:
server.id=host:xxxx:yyyy
Note the following:
id: It is the ZooKeeper server ID specified in themyidfile.host: It is the ZooKeeper server host.xxxx: It is the port used to connect to other peers for communication. A ZooKeeper server uses this port to connect followers to the leader. When a new leader arises, a follower opens a TCP connection to the leader using this port.yyyy: It is the port that is used for leader election.
Let us now start the ZooKeeper instances on all three machines. The following command starts the ZooKeeper instance:
ubuntu@zoo1:~/zookeeper-3.4.6$ ./bin/zkServer.sh start We will have to run the command on all three machines. The output indicates that the ZooKeeper instance has started on all the three machines:

Check the logs in the zookeeper.out file to verify whether everything is running smoothly. ZooKeeper also comes with a client zkCli.sh, which can be found in the bin folder. In order to check whether everything is running fine, we can fire a ruok command via Telnet on any one of the ZooKeeper servers. If everything is running fine, we would get the output as imok. Another command mntr can be used to monitor the variables on the ZooKeeper cluster over Telnet.
We have a running ZooKeeper ensemble that we will use for setting up our SolrCloud. We will not delve into the advanced ZooKeeper settings.
Setting up Tomcat with Solr
Let's install Apache Tomcat on all the Solr servers in the /home/ubuntu/tomcat folder. On all the Solr servers (solr1, solr2, solr3, and solr4), start up Tomcat to check whether it is running fine:
ubuntu@solr1:~$ cd tomcat/ ubuntu@solr1:~/tomcat$ ./bin/startup.sh
We are using Tomcat version 7.0.53. Check the catalina.out log file inside the tomcat/logs folder to check whether Tomcat started successfully. We can see the following message in the logs if the start-up was successful:
INFO: Server startup in 2522 ms Now, on one server (say solr1), upload all the configuration files to the ZooKeeper servers. Our Solr configuration files are located inside the <solr_installation>/example/solr/collection1/conf folder. To upload the files onto ZooKeeper, we will have to use the ZooKeeper client. We can copy the zookeeper installation folder to one of the Solr servers in order to use the ZooKeeper client. Another option is to use the ZooKeeper client inside the SolrCloud installation. For this, we will have to extract the solr.war file found inside the <solr_installation>/dist folder. Let us extract it inside a new folder solr-war:
ubuntu@solr1:~/solr-4.8.1/dist$ mkdir solr-war ubuntu@solr1:~/solr-4.8.1/dist$ cp solr-4.8.1.war solr-war/ ubuntu@solr1:~/solr-4.8.1/dist$ cd solr-war/ ubuntu@solr1:~/solr-4.8.1/dist/solr-war$ jar -xvf solr-4.8.1.war
This will extract all the libraries here. We will need another library slf4j-api that can be found in the <solr_installation>/dist/solrj-lib folder:
ubuntu@solr1:~/solr-4.8.1/dist/solr-war/WEB-INF/lib$ cp ../../../solrj-lib/slf4j-api-1.7.6.jar . ubuntu@solr1:~/solr-4.8.1/dist/solr-war/WEB-INF/lib$ cp ../../../solrj-lib/slf4j-log4j12-1.7.6.jar . ubuntu@solr1:~/solr-4.8.1/dist/solr-war/WEB-INF/lib$ cp ../../../solrj-lib/log4j-1.2.16.jar .
Now run the following command in the Solr library path solr-war/WEB-INF/lib to upload the Solr configuration files onto zookeeper on all three servers, namely zoo1, zoo2, and zoo3:
java -classpath zookeeper-3.4.6.jar:solr-core-4.8.1.jar:solr-solrj-4.8.1.jar:commons-cli-1.2.jar:slf4j-api-1.7.6.jar:commons-io-2.1.jar org.apache.solr.cloud.ZkCLI -cmd upconfig -z zoo1,zoo2,zoo3 -d ~/solr-4.8.1/example/solr/collection1/conf -n conf1 We have specified all the required JAR files in the -classpath option.
We used the zookeeper built inside the Solr cloud with the org.apache.solr.cloud.ZkCLI package.
-cmd: This option specifies the action to be performed. In our case, we are performing the config upload action.-z: This option specifies the ZooKeeper servers along with the path (/solr) where the files are to be uploaded.-d: This option specifies the local directory from where the files are to be uploaded.-n: This option is the name of the config (thesolrconffile).
In order to check whether the configs have been uploaded, move to machine zoo1 and execute the following commands from the zookeeper folder:
ubuntu@zoo1:~/zookeeper-3.4.6$ ./bin/zkCli.sh -server zoo1 Connecting to zoo1 [zk: zoo1(CONNECTED) 0] ls /configs/conf1
This will list the config files inside the ZooKeeper servers:
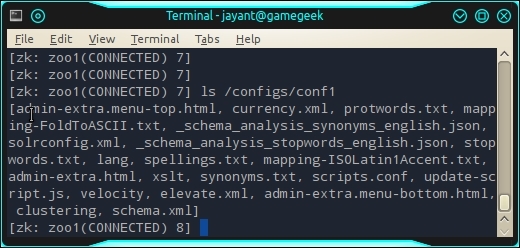
Let us create a separate folder to store the Solr index. On each Solr machine, create a folder named solr-cores inside the home folder:
ubuntu@solr1:~$ mkdir ~/solr-cores Inside the folder solr-cores, add the following code in the solr.xml file. This specifies the host, port, and context along with some other parameters for ZooKeeper and the port on which Tomcat or Solr will work. The values for these variables will be supplied in the setenv.sh file inside the tomcat/bin folder:
<?xml version="1.0" encoding="UTF-8" ?> <solr> <!-- Values are supplied from SOLR_OPTS env variable in setenv.sh -- > <solrcloud> <str name="host">${host:}</str> <int name="hostPort">${port:}</int> <str name="hostContext">${hostContext:}</str> <int name="zkClientTimeout">${zkClientTimeout:}</int> <bool name="genericCoreNodeNames">${genericCoreNodeNames:true}</bool> </solrcloud> <shardHandlerFactory name="shardHandlerFactory" class="HttpShardHandlerFactory"> <int name="socketTimeout">${socketTimeout:0}</int> <int name="connTimeout">${connTimeout:0}</int> </shardHandlerFactory> </solr>Now, to set these variables, we will have to define them in the setenv.sh file in the tomcat/bin folder. Place the following code inside the setenv.sh file:
JAVA_OPTS="$JAVA_OPTS -server" SOLR_OPTS="-Dsolr.solr.home=/home/ubuntu/solr-cores -Dhost=solr1 -Dport=8080 -DhostContext=solr -DzkClientTimeout=20000 -DzkHost=zoo1:2181,zoo2:2181,zoo3:2181" JAVA_OPTS="$JAVA_OPTS $SOLR_OPTS"
Note the following:
solr.solr.home: This is the Solr home for this app instancehost: The hostname for this serverport: The port of this serverhostContext: Tomcat webapp context namezkHost: A comma-separated list of the host and the port for the servers in the ZooKeeper ensemblezkClientTimeout: Timeout for the ZooKeeper client
Now, copy the solr.war file from the Solr installation into the tomcat/webapps folder:
cp ~/solr-4.8.1/dist/solr-4.8.1.war ~/tomcat/webapps/solr.war Also, copy the JAR files required for logging from the lib/ext folder into the tomcat/lib folder:
cp -r ~/solr-4.8.1/example/lib/ext/* ~/tomcat/lib/ Once done, restart Tomcat. This will deploy the application solr.war into the webapps folder.
We can see Tomcat running on port 8080 on machine solr1 and access Solr via the following URL:
http://solr1:8080/solr/
However, this does not have any cores defined.
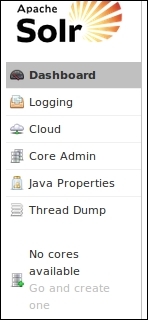
To create the core mycollection in our SolrCloud, we will have to execute the CREATE command via the following URL:
http://solr1:8080/solr/admin/collections?action=CREATE&name=mycollection&numShards=2&replicationFactor=2&maxShardsPerNode=2&collection.configName=conf1
Note
We require at least two running nodes to execute this command on SolrCloud. In order to start SolrCloud on multiple nodes, we can use VirtualBox and create multiple virtual machines on a single host.
The host name can be mapped onto the IP address in the /etc/hosts file on all the (virtual) machines participating in SolrCloud in the following format:
#<ip address> <hostname> 10.0.3.1 solr1 10.0.3.2 solr2
Note the following:
action:CREATEto create the core or collectionname: The name of the collectionnumShards: The number of shards for this collectionreplicationFactor: The number of replicas for each shardmaxShardsPerNode: Sets a limit on the number of replicas theCREATEaction will spread to each nodecollection.configName: Defines the name of the configuration to be used for this collection
The execution of the CREATE action yields the following output:
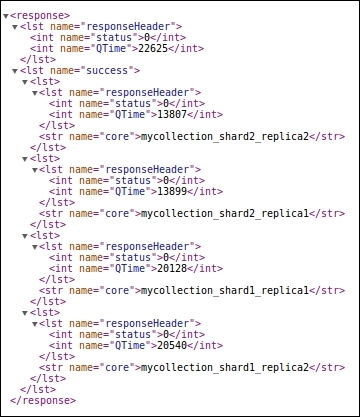
We can see that two shards and two replicas are created for mycollection. The naming of each core is self-explanatory <collection_name>_<shard_no>_<replica_no>. We can also see the SolrCloud graph that shows the shards for the collection along with the leader and replicas:

We can see that mycollection has two shards, shard1 and shard2. Shard1 has leader on solr1 and replica on solr2. Similarly, Shard2 has leader on solr3 and replica on solr4. The admin interface on each node of the Solr cluster will show the shard or core hosted on this node. Go to the admin interface on the node solr1 and select the core name from the drop-down on the left-hand panel. We should be able to see the details of the index on that node:

Let us also see what happened at the ZooKeeper end. Go to any of the ZooKeeper servers and connect to the ZooKeeper cluster using the zkCli.sh script:
ubuntu@zoo1:~/zookeeper-3.4.6$ ./bin/zkCli.sh -server zoo1,zoo2,zoo3 Connecting to zoo1,zoo2,zoo3
We can see that mycollection is created inside the /collections folder. On executing a get, mycollection is linked with the configuration conf1 that we specified in the collection.configName parameter while creating the collection:
[zk: zoo1,zoo2,zoo3(CONNECTED) 0] get /collections/mycollection {"configName":"conf1"}We can also see the cluster configuration by getting the clusterstate.json file from the ZooKeeper cluster:
[zk: zoo1,zoo2,zoo3(CONNECTED) 1] get /clusterstate.json {"mycollection":{ "shards":{ "shard1":{ "range":"80000000-ffffffff", "state":"active", "replicas":{ "core_node2":{ "state":"active", "base_url":"http://solr1:8080/solr", "core":"mycollection_shard1_replica1", "node_name":"solr1:8080_solr", "leader":"true"}, "core_node3":{ "state":"active", "base_url":"http://solr2:8080/solr", "core":"mycollection_shard1_replica2", "node_name":"solr2:8080_solr"}}}, "shard2":{ "range":"0-7fffffff", "state":"active", "replicas":{ "core_node1":{ "state":"active", "base_url":"http://solr3:8080/solr", "core":"mycollection_shard2_replica2", "node_name":"solr3:8080_solr", "leader":"true"}, "core_node4":{ "state":"active", "base_url":"http://solr4:8080/solr", "core":"mycollection_shard2_replica1", "node_name":"solr4:8080_solr"}}}}, "maxShardsPerNode":"2", "router":{"name":"compositeId"}, "replicationFactor":"2"}}This shows the complete cluster information—the name of the collection, the shards and replicas, as well as the base URLs for accessing Solr. It contains the core name and the node name. Other configuration information that we passed while creating the cluster are maxShardsPerNode and replicationFactor.

