Chapter 18
Security in the .NET Framework
What's in this chapter?
Concepts and definitions
Permissions
Roles
Principals
Code access permissions
Role-based permissions
Identity permissions
User Access Control (UAC)
Encryption
Hashing
Symmetric Key Encryption
Asymmetric Key Encryption
Digital Signatures
X.509 Certificates
SSL
on the Download Code tab. The code is in the chapter 18 download and individually named according to the code filenames throughout the chapter.
This chapter covers the basics of security and cryptography. It begins with a brief discussion of the .NET Framework's security architecture, because this affects all the solutions you may choose to implement. Note that this chapter goes into detail on security concepts, which in some cases aren't applicable to applications running under Windows RT. That operating system manages user access and permissions at a different level, and some of the capabilities from the past are simply prohibited.
The .NET Framework provides you with tools, and core functionality with regard to security. You have the System.Security.Permissions namespace, which enables you to manage runtime permissions along with role-based and identity permissions. Through your code, you can control access to objects programmatically, as well as receive information on the current permissions of objects. This security framework will assist you in determining whether you have permissions to run your code, instead of getting halfway through execution and having to deal with permission-based exceptions.
Cryptography is the cornerstone of the .NET Web Services security model, so the second half of this chapter discusses the basis of cryptography and how to implement it. Specifically, it covers the following:
- Hash algorithms
- SHA
- MD5
- Secret key encryption
- Public key cryptography standard
- Digital signatures
- Certification
- Secure Sockets Layer communications
Let's begin by looking at some security concepts and definitions.
describes the different types of security presented in this chapter and how they relate to real-world scenarios.
Types of Security
| Security Type | Related Concept in Security .Permissions Namespace | Purpose |
| NTFS | None | Allows for detailed file system rights, e.g., locking down of specific files. |
| Cryptographic | Strong name and assembly, generation, SignCode.exe utility | Use of public key infrastructure and certificates. |
| Programmatic | Groups and permission sets | For use in pieces of code that are being called into. Provides extra security to prevent users of calling code from violating security measures implemented by the programs that are not provided for on a machine level. |
| User Access Control | Users run without administrative permission | Provided by the operating system to help users protect their system from unexpected changes that might occur when logged in using the machine's administrator account. |
There are many approaches to providing security on the machines where your shared code is hosted. If multiple shared code applications are on one machine, each piece of shared code can be called from many front-end applications. Each piece of shared code will have its own security requirements for accessing environment variables—such as the registry, the file system, and other items—on the machine that it is running on. From an NTFS perspective, the administrator of your server can only lock down those items on the machine that are not required to be accessed from any piece of shared code running on it. Therefore, some applications require additional security built in to prevent application code from doing things it is not supposed to do.
To limit your Internet applications' access to the local file system, you create a permission set that limits that access and associates the Internet application group with this permission set. By default, the .NET environment provides one code group named All Code that is associated with the FullTrust permission set.
A permission set creates a combination of security configurations. This set defines what each authorized user has access to and what that user can do on that machine—for instance, whether the user can read environment variables or the file system, or execute other code.
Security that is used within the programming environment also makes use of permission sets. Through code you can control access to files in a file system, environment variables, file dialogues, isolated storage, reflections, registry, sockets, and UI. Isolated storage and virtual file systems are new operating-system-level storage locations that can be used by programs and are governed by the machine security policies. These file systems keep a machine safe from file system intrusion by designating a regulated area for file storage. The main access to these items is controlled through code access permissions.
Although many methods used in Visual Basic provide an identifiable return value, the only time you get a return value from security methods is when the method fails. When a security method succeeds, it does not provide a return value. If it fails, then it returns an exception object reflecting the specific error that occurred.
shows a newly created sample Windows Store application. This Visual Basic application includes a Package.appxmanifest file. After you open this file for editing, it is possible to modify many of the characteristics associated with your application—from UI elements associated with your application, and Packaging considerations, to a description of key capabilities aka system features—that your application will access. Defining Windows Store app access permissions
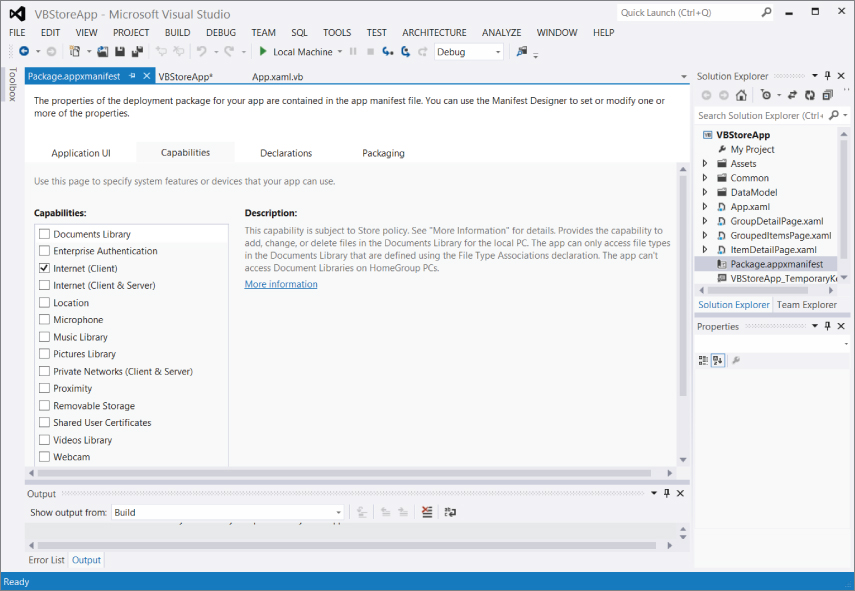
Defining Windows Store app access permissions

The Capabilities tab is selected in because it could also be labeled “Permissions.” This tab is where you must define what access to the file system and related system features your application will use. Unlike the other security elements that this chapter will discuss, this section defaults to no access with the exception of network access.
More important, because your application will deploy through the Windows Store and as such be tested for compatibility with the selections you make on this page—these become the first level of security within your application. Keep in mind that the Windows Store is going to publish exactly how much permission your application is requesting, so just defaulting to asking for everything isn't going to be well received.
The reality is that when you are developing a Windows Store application you are going to be working with an additional security layer not present for traditional .NET applications. This display is a good reflection of how as Windows moves to a more controlled runtime environment, you will need to be more explicit in providing the metadata that describes what capabilities your application provides and consumes. Of course these new limitations are in addition to the security controls that already exist for .NET applications.
lists the members of the System.Security.Permissions namespace that apply to Windows application programming. While there is a description accompanying each member, those classes that end with Attribute, such as EnvironmentPermissionAttribute, are classes that enable you to modify the security level at which your code is allowed to interact with each respective object. These objects create a declarative model for setting security that can be leveraged across multiple different implementation models.
Members of System.Security.Permissions
| Class | Description |
| CodeAccessSecurityAttribute | Base class for code access security attribute classes. |
| DataProtectionPermission | Controls access to the data protection APIs, T. |
| DataProtectionPermissionAttribute | Allows declarative control of DataProtectionPermssion via code. |
| EnvironmentPermission | Controls the capability to see and modify system and user environment variables. |
| EnvironmentPermissionAttribute | Allows security actions for environment variables to be added via code. |
| FileDialogPermission | Controls the capability to open files via a file dialogue. |
| FileDialogPermissionAttribute | Allows security actions to be added for file dialogs via code. |
| FileIOPermission | Controls the capability to read and write files in the file system. |
| FileIOPermissionAttribute | Allows security actions to be added for file access attempts via code. |
| GacIdentityPermission | Defines the identity permissions for files that come from the global assembly cache (GAC). |
| GacIdentityPermissionAttribute | Allows security actions to be added for files that originate from the GAC. |
| HostProtectionAttribute | Allows for the use of security actions to determine host protection requirements. |
| IsolatedStorageFilePermission | Controls access to a private virtual file system within the isolated storage area of an application. |
| IsolatedStorageFilePermissionAttribute | Allows security actions to be added for private virtual file systems via code. |
| IsolatedStoragePermission | Controls access to the isolated storage area of an application. |
| IsolatedStoragePermissionAttribute | Allows security actions to be added for the isolated storage area of an application. |
| KeyContainerPermission | Controls access to key containers. |
| KeyContainerPermissionAccessEntry | Defines the access rights for particular key containers. |
| KeyContainerPermissionAccess EntryCollection | Represents a collection of KeyContainerPermission-AccessEntry objects. |
| KeyContainerPermissionAccess EntryEnumerator | Represents the enumerators for the objects contained in the KeyContainerPermissionAccessEntryCollection object. |
| KeyContainerPermissionAttribute | Allows security actions to be added for key containers. |
| MediaPermission | The permission set associated with the capability to access audio, video, and images. WPF leverages this capability. |
| MediaPermissionAttribute | Allows code to set permissions related to the MediaPermission set. |
| PermissionSetAttribute | Allows security actions to be added for a permission set. |
| PrincipalPermission | Controls the capability to verify the active principal. |
| PrincipalPermissionAttribute | Allows verification of a specific user. Security principals are a user and role combination used to establish security identity. |
| PublisherIdentityPermission | Allows access based on the identity of a software publisher. |
| PublisherIdentityPermissionAttribute | Allows security to be defined for a software publisher. |
| ReflectionPermission | Controls access to nonpublic members of a given type. |
| ReflectionPermissionAttribute | Allows security to be defined for public and nonpublic members of a given type. |
| RegistryPermission | Controls access to registry keys and values. |
| RegistryPermissionAttribute | Allows security to be defined for the registry. |
| ResourcePermissionBase | Controls the capability to work with the code access security permissions. |
| ResourcePermissionBaseEntry | Allows you to define the smallest part of a code access security permission set. |
| SecurityAttribute | Controls which security attributes are representing code; used to control security when creating an assembly. |
| SecurityPermission | This collection is used in code to specify a set of permissions for which access will be defined. |
| SecurityPermissionAttribute | Allows security actions for the security permission flags. |
| StorePermission | Controls access to stores that contain X.509 certificates. |
| StorePermissionAttribute | Allows security actions to be added for access stores that contain X.509 certificates. |
| StrongNameIdentityPermission | Defines the permission level for creating strong names. |
| StrongNameIdentityPermissionAttribute | Allows security to be defined on the StrongNameIdentityPermission set. |
| StrongNamePublicKeyBlob | The public key information associated with a strong name. |
| TypeDescriptorPermission | Permission set that controls partial-trust access to the TypeDescriptor class. |
| TypeDescriptorPermissionAttribute | Allows security to be defined on the TypeDescriptorPermission set. |
| UIPermission | Controls access to user interfaces and use of the Windows clipboard. |
| UIPermissionAttribute | Allows security actions to be added for UI interfaces and the use of the clipboard. |
| UrlIdentityPermission | Permission set associated with the identity and related permissions for the URL from which code originates. |
| UrlIdentityPermissionAttribute | Allows security to be defined on the UrlIdentityPermission set. |
| WebBrowserPermission | Controls the capability to create the WebBrowser control. |
| WebBrowserPermissionAttribute | Allows security to be defined on the WebBrowser Permission set. |
| ZoneIdentityPermission | Defines the identity permission for the zone from which code originates. |
| ZoneIdentityPermissionAttribute | Allows security to be defined on the ZoneIdentity Permission set. |
The default environment will provide a given level of access. It is not possible to grant access beyond this level via code access security; however, when working with these classes you can specify exactly what should or should not be available in a given situation. Additionally, these classes have been marked to prevent inheritance. It really wouldn't be a very secure system if you could inherit from one of these classes. Code could be written to override the associated security methods and grant unlimited permissions.
also deals with security in regard to software publishers. A software publisher is a specific entity that is using a digital signature to identify itself in a Web-based scenario.
Code Access Permissions
Code access permissions are controlled through the CodeAccessPermission class within the System.Security namespace. The code access permissions are used extensively by the common language runtime (CLR) to manage and secure the operating environment.
The code access permissions grant and deny access to portions of the operating system such as the file system, but although your code can request permission changes, there is a key limit. Code using this API can request to reduce the rights of the user currently executing the code, but the API will not grant rights that a user does not have within his or her current context or based on those available from the CLR.
When code is downloaded from a website, and the user then attempts to run the code, the CLR can choose to limit the rights of that code given that it shouldn't by default be trusted. For example, requesting access to the system registry will be denied if the operating system does not trust that code. Thus, the primary use of code access security by application developers is to limit the permissions already available to a user given the current context of what the user is doing. Code access security leverages many of the same core security methods used across the various security categories, many of which are described in .
Methods of CodeAccessPermission
| Method | Description |
| Assert | Sets the permission to full access so that the specific resource can be accessed even if the caller hasn't been granted permission to access the resource. |
| Copy | Copies a permission object. |
| Demand | Returns an exception unless all callers in the call chain have been granted the permission to access the resource in a given manner. |
| Deny | In prior versions of .NET you would use this to explicitly deny access. This will still work, but it's becoming obsolete and should be avoided. |
| Equals | Determines whether a given object is the same instance of the current object. |
| FromXml | Establishes a permission set given a specific XML encoding. This parameter that this method takes is an XML encoding. |
| Intersect | Returns the permissions that two permission objects have in common. |
| IsSubsetOf | Returns a result indicating whether the current permission object is a subset of a specified permission. |
| PermitOnly | Specifies that only those rights within this permission set can be accessed even if the user of the assembly has been granted additional permission to the underlying objects. This is one of the more common permission levels when working with custom permission sets. |
| RevertAll | Reverses all previous assert, deny, or permit-only methods. |
| RevertAssert | Reverses all previous assert methods. |
| RevertDeny | Reverses all previous deny methods. |
| RevertPermitOnly | Reverses all previous permit-only methods. |
| Union | Creates a permission that is the union of two permission objects. |
Identity Permissions
Identity permissions are pieces of information, also called evidence, by which an assembly can be identified. Examples of the evidence would be the strong name of the assembly or the digital signature associated with the assembly.
Identity permissions are granted by the runtime based on information received from the trusted host, or the operating system's loader. Therefore, they are permissions that you don't specifically request. Identity permissions provide additional information to be used by the runtime. The identity information can take the form of a trusted host's URL or can be supplied via a digital signature, the application directory, or the strong name of the assembly. Identity permissions are similar to code access permissions, discussed in the preceding section. They derive from the same base class as the code access permissions.
Role-Based Permissions
Role-based permissions are permissions granted based on the user and the role that code is being called with. Users are authenticated within the operating system platform and hold a Security Identifier (SID) that is associated within a security context. The SID is associated with one or more roles or group memberships that are established within a security context. .NET supports those users and roles associated within a security context and has support for generic and custom users and roles through the concept of principals.
A principal is an object that holds the current caller's credentials. This includes the identity of the user. Principals come in two types: Windows principals and non-Windows principals. Windows-based principal objects are objects that store the Windows SID information regarding the current user context associated with the code that is calling into the module role-based permissions that are being used. Non-Windows principals are principal objects that are created programmatically via a custom login methodology and which are made available to the current thread.
Role-based permissions are not set against objects within your environment like code access permissions. They are checked within the context of the current user and user's role. The concepts of principals and the PrincipalPermission class are used to establish and check permissions. If a programmer passes the user and role information during a call as captured from a custom login, then the PrincipalPermission class can be used to verify this information as well.
The PrincipalPermission class does not grant access to objects, but has methods that determine whether a caller has been given permissions according to the current permission object through the Demand method. If a security exception is generated, then the user does not have sufficient permission. As an example of how you might use these methods, the following code snippet captures the current Windows principal information and displays it on the screen in a text box. It is included as part of the ProVB2012_Security project, which has the same basic structure as the ProVB_VS2012 project introduced in Chapter 1. Each element of the principal information could be used in a program to validate against, and thus restrict, code execution based on the values in the principal information. The following code example inserts Imports System.Security.Principal and Imports System.Security.Permissions lines at the top of MainWindow.xaml.vb so you can directly reference identity and principal objects without full namespace qualifiers:
Imports System.Security.Principal Imports System.Security.Permissions '<PrincipalPermissionAttribute(SecurityAction.Demand, Name:="WSheldon", Role:="Users")> _ Private Sub DisplayPrincipalIdentity() ' The attribute above can be used to check security declaratively ' similar to how you would check using WPF or Silverlight. ' The code below uses imperative commands to get security information. Dim objIdentity As WindowsIdentity = WindowsIdentity.GetCurrent() TextBoxResult.Text = "User Name: " & objIdentity.Name & Environment.NewLine TextBoxResult.Text &= "Is Guest: " & objIdentity.IsGuest.ToString() _ & Environment.NewLine TextBoxResult.Text &= "Is Authenticated: " _ & objIdentity.IsAuthenticated.ToString() & Environment.NewLine Dim objPrincipal As New Security.Principal.WindowsPrincipal(objIdentity) ' Determine if the user is part of an authorized group. TextBoxResult.Text &= "Is in Role Users? " & objPrincipal.IsInRole("Users") _ & Environment.NewLine TextBoxResult.Text &= "Is in Role Administrators? " _ & objPrincipal.IsInRole("Administrators") End Sub This code illustrates a few of the properties that could be used to validate against when a caller wants to run your code. The attribute at the top of this is commented out at this point by design. It represents a declarative security check similar to what you would use from the XAML in a WPF or Silverlight project. First, however, let's examine this code being run, as shown in .
Details of the current user
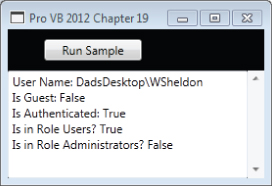
It starts by retrieving the user name of the currently authenticated Windows principal. Pay attention to the fact that this is a fully qualified username with the machine name included. It then uses the identity checks to see if the current identity is the Guest account, and ensures that the user was authenticated.
At this point the snippet creates a new WindowsPrincipal based on the current user's identity. This object allows you to query to see if the current user is in a role. In this case, our account is in the role of a user as a member of the Users security group, but is not in the role of an administrator even though it is part of the Administrators group.
Roles are typically defined via security groups, but it is important to not say that this method allowed you to determine if a user were in a given group. That's because under Windows Vista and Windows 7, the operating system keeps a user from running in the Administrator role even if they are part of the Administrators group. Thus, the check for whether the code is running in the role Administrators returns false—even though our WSheldon account is in fact a member of the Administrators group on this machine. Only if the user chooses to have their permission elevated will this query return true.
Now uncomment the attribute line that precedes this method. Notice that it is making a Demand security query and passing a user name, and a role name as part of this name. Because these are named optional parameters, the code could in theory check only for a role, which is a much more usable check in a real-world application. However, in this case use only a name and do not include the machine as part of the full user name. As a result, when ButtonTest is clicked this declarative check fails and the error shown in is displayed.
Security exception for nonexistent user running in the debugger
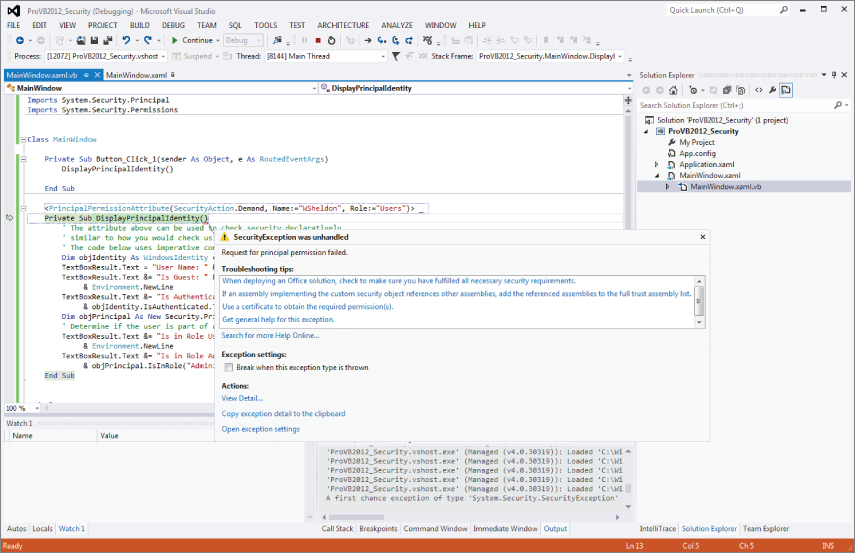
This illustrates how the same objects that have been available since the early versions of .NET are still used within XAML to enable the same level of security to declarative applications. The principal and identity objects are used in verifying the identity or aspects of the identity of the caller attempting to execute your code. Based on this information, your application can either lock down system resources or adjust the options available to users within your custom application. The Identity and Principal objects make it possible to have your application respond as changes to user roles occur within Active Directory. Note you'll want to comment this line back out so that this error isn't present as you work with the sample application later in this chapter.
. Note that there are only three Groups or usernames assigned permissions. Properties of target file for security checks
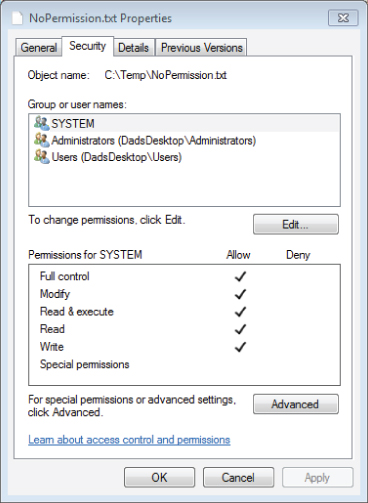
Properties of target file for security checks

Looking at the previous code snippet notice that the Sub TestFileIOPermission first grants FileIO write permissions to the current user and attempts to access both files. This will fail for the NoPermissions.txt file, because code access security can't grant additional access to a user at runtime. You can see this result in the error shown in .
Security access exception in Visual Studio debugger
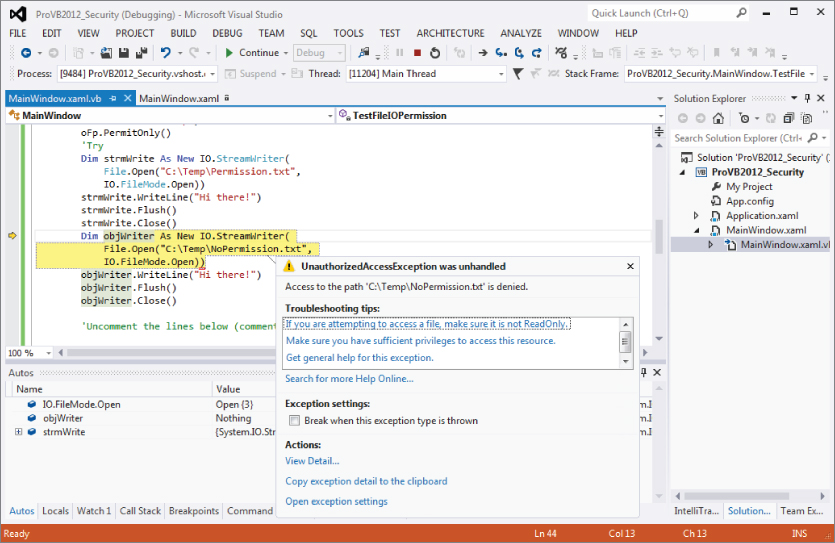
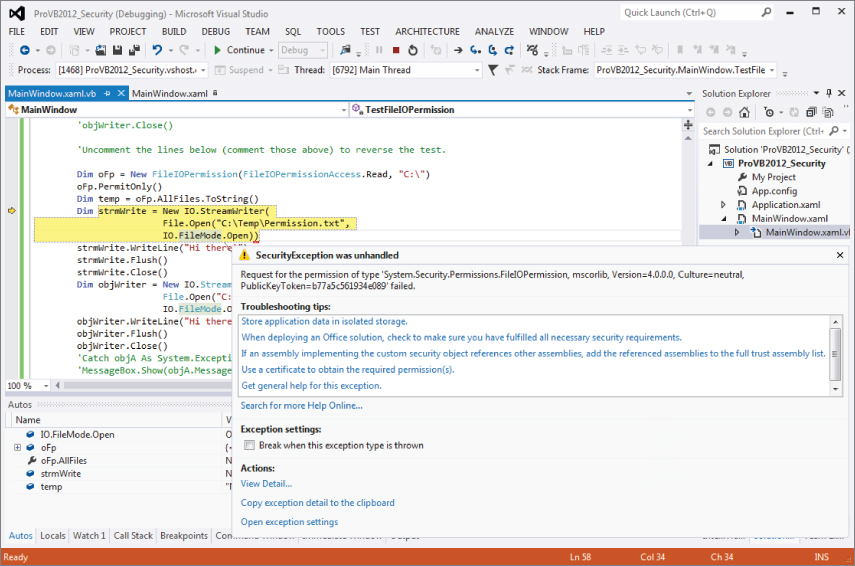
Now to test the reverse, comment out the top half of the preceding method and uncomment the bottom half. Now the method uses the PermitOnly assignment to limit the user to ReadOnly permissions for the FileIO permission set. In this case the code will fail when attempting to write to the Permission.txt file because of the stricter limits of this setting as opposed to what the operating system would allow. You can see this result in the error shown in .
Security exception related to permission not access
: Manifest Level Rights—My Project\app.manifest
<requestedPrivileges xmlns="urn:schemas-microsoft-com:asm.v3"> <!-- UAC Manifest Options If you want to change the Windows User Account Control level replace the requestedExecutionLevel node with one of the following. <requestedExecutionLevel level="asInvoker" uiAccess="false" /> <requestedExecutionLevel level="requireAdministrator" uiAccess="false" /> <requestedExecutionLevel level="highestAvailable" uiAccess="false" /> Specifying requestedExecutionLevel node will disable file and registry virtualization. If you want to utilize File and Registry Virtualization for backward compatibility then delete the requestedExecutionLevel node.--> <requestedExecutionLevel level="asInvoker" uiAccess="false" /> </requestedPrivileges>
The beauty of this XML is that Microsoft took the time to include meaningful XML comments about the requestedExecutionLevel setting. By default, as shown in the preceding snippet, your application requests to run asInvoker. Thus, as discussed earlier when looking at which group you are running as, this means you are running as a user, not an administrator.
As the comments make clear, it is possible to change this to requireAdministrator, so make this change. Next ensure that you have both the Sub DisplayPrincipalIdentity() and the Sub TestFileIOPermission() uncommented in the button's click event handler within the ProVB2012_Security project.
Finally, within the Sub TestFileIOPermission(), ensure that you have restored which block is commented out; the code should look like the previous listing where the bottom half of the method is commented and the top half is uncommented. Now that you have indicated that this application requires administrator privileges, you can repeat the first test where the user account didn't have permission to write to NoPermission.txt, but where the code attempted to grant permission. Note, this test depends on the Administrator having permission to access the file C:\Test\NoPermission.txt. Save your change to the app.manifest and attempt to run the application. If you are running on Windows 7 and didn't start Visual Studio using Run as Administrator, you should get the error shown in .
Elevated permissions dialogue
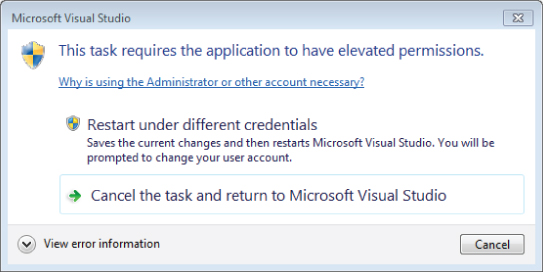
What happened? As noted previously, the error message in is dependent on having not started Visual Studio with the Run as Administrator option from the right-click context menu. Since Visual Studio is running under your downgraded rights at the level of user, when it attempts to create a new process with the rights for administrator, the system refuses.
Just as you can't use code access security to grant the running account additional rights, you can't use the application manifest for the same purpose. The operating system knows that the current process has only user rights, so when you attempt to have that process spawn a new debugging process with administrator rights, the operating system throws an error.
You can get around this in one of two ways. The first, obviously, is to start or restart Visual Studio running as Administrator. Alternatively, you can go to the bin/debug folder and manually start the ProVB2012_Security.exe executable outside of the debugger. In either case you should now be prompted to grant administrator rights to this assembly, because the current code does not sign the assembly. Accepting this grant of elevated privileges, the results should be similar to what is shown in .
Output when running as an administrator
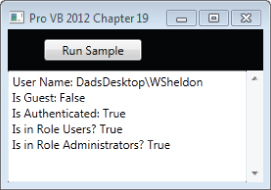
The successful completion of the Run Code button highlights two important points. First, as shown in , the fact that the WSheldon account is in fact an administrator is now reflected in the onscreen permission display. Second, no error was thrown in the attempt to write the NoPermission.txt because the application is now running with the rights of an Administrator.
Regarding the uiAccess setting within the application manifest, this Boolean value defaults to false, and in most cases this is the correct setting. Changing this value to true will allow your code to update the user interface that is part of another assembly. However, setting this to true means that the application must be signed and that it must run from a trusted location.
As noted, signing your application will make the elevated privileges warning more meaningful and user friendly. Application signing is typically done during deployment, as discussed in Chapter 17, “Assemblies and Reflection.” It is not suggested that you just go in and start marking all of your applications with the requireAdministrator flag. Instead, you should elevate a user's rights when those rights are needed. Unfortunately, this option is available only at the time your application starts, but there is an important capability involved. In short, if you mark your application as essentially requiring Administrator rights, only administrators will be able to run the application.
Thus, the third application activation alternative is to use the highestAvailable setting. This setting allows both users and administrators to run your application. Within your application code, you'll need to check what privileges are available to the current user. As demonstrated earlier in this chapter, this will allow you to enable or disable application features depending upon whether the current user is an administrator.
Security Tools
Microsoft provides many security tools in its .NET SDK. Most of these tools are console-based utility applications. These tools can be used to help implement the security processes outlined earlier. They are not described in great detail, though they do deserve a review. Basically, two groups of tools are provided with the SDK:
describes the permissions and assembly management tools. describes the certificate management tools.
Permissions and Assembly Management Tools
| Program Name | Description |
| Storeadm.exe | An administrative tool for isolated storage management. It restricts code access to the file system. |
| Peverify.exe | Checks whether the executable file will pass the runtime test for type-safe coding. |
| Sn.exe | Creates assemblies with strong names—that is, a digitally signed namespace and version information. |
Certificate Management Tools
| Program Name | Description |
| Makecert.exe | Creates an X.509 certificate for testing purposes. |
| Certmgr.exe | Assembles certificates into a CTL (Certificate Trust List). It can also be used for revoking certificates. |
| Cert2spc.exe | Creates an SPC (Software Publisher Certificate) from an X.509 certificate. |
Exceptions Using the SecurityException Class
Originally, using the .NET Framework versions 1.0/1.1, the SecurityException class provided very little information in terms of actually telling you what was wrong and why an exception was thrown. Due to this limitation, the .NET Framework 2.0 added a number of new properties to the SecurityException class. details some of these properties.
Common SecurityException Properties
| Property | Description |
| Action | Retrieves the security action that caused the exception to occur |
| Data | Gets a collection of key/value pairs that provide user-defined information about an exception |
| Demanded | Returns the permissions, permission sets, or permission set collections that caused the error to occur |
| DenySetInstance | Returns the denied permissions, permission sets, or permission set collections that caused the security actions to fail |
| FailedAssemblyInfo | Returns information about the failed assembly |
| FirstPermissionThatFailed | Returns the first permission contained in the permission set or permission set collection that failed |
| GrantedSet | Returns the set of permissions that caused the security actions to fail |
| HelpLink | Gets or sets a link to a help file associated with this error |
| InnerException | A reference to an earlier exception that triggered the current exception |
| Method | Returns information about the method connected to the exception |
| PermissionState | Returns the state of the permission that threw the exception |
| PermissionType | Returns the type of the permission that threw the exception |
| PermitOnlySetInstance | Returns a permission set or permission set collection that is part of the permit-only stack frame if a security action has failed |
| RefusedSet | Returns the permissions that were refused by the assembly |
| Source | Gets or sets the name of the application or object that triggered the error |
| Url | Returns the URL of the assembly that caused the exception |
| Zone | Returns the zone of the assembly that caused the exception |
Clearly, you can get your hands on a lot of information if a security exception is thrown in your application. For instance, you can use something similar to the following Catch section of code to check for security errors:
Dim myFile as FileInfo Try myFile = _ My.Computer.FileSystem.GetFileInfo("C:\Test\NoPermission.txt") Catch ex As Security.SecurityException MessageBox.Show(ex.Method.Name.ToString()) End Try , telling it to encrypt a copy of the source file TestHashKey.vb:
: Class TestHashKey—TestHashKey.vb
'TestHashKey.vb Imports System Imports System.IO Imports System.Security.Cryptography Imports System.Text Public Class TestHashKey Public Shared Function Main(ByVal pathToFileToProtect As String) As String Dim key() As Byte = Encoding.ASCII.GetBytes("My Secret Key".ToCharArray()) Dim hmac As HMACSHA1 = New HMACSHA1(key) Dim fs As FileStream = File.OpenRead(pathToFileToProtect) Dim hash() As Byte = hmac.ComputeHash(fs) Dim b64 As String = Convert.ToBase64String(hash) fs.Close() Return b64 End Function End Class Figure 18.9 Displaying the hash results
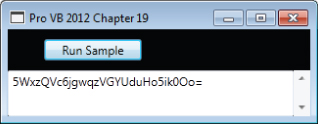
The preceding snippet creates the object instance of the .NET SDK Framework class with a salt (a random secret to confuse a snooper). The next four lines compute the hash, encode the binary hash into a printable Base64 format, close the file, and then return the Base64 encoded string. Running this will result in the hashed output shown in 18-9.
The previous example uses an instance of the HMACSHA1 class. The output displayed is a Base64 encoding of the binary hash result value. As noted earlier, Base64 encoding is widely used in MIME and XML file formats to represent binary data. To recover the binary data from a Base64-encoded string, you could use the following code fragment:
Dim orig() As Byte = Convert.FromBase64String(b64)
The XML parser, however, does this automatically, as shown in later examples.
SHA
Secure Hash Algorithm (SHA) is a block cipher that operates on a block size of 64 bits. However, subsequent enhancements of this algorithm have bigger key values, thus, increasing the value range and therefore enhancing the cryptographic utility. Note that the bigger the key value sizes, the longer it takes to compute the hash. Moreover, for relatively smaller data files, smaller hash values are more secure. To put it another way, the hash algorithm's block size should be less than or equal to the size of the data itself.
The hash size for the SHA1 algorithm is 160 bits. Similar to the HMACSHA1 code discussed previously, the code in shows an example of using this algorithm:
: Class TestSHA1—TestSHA1.vb
'TestSHA1.vb Imports System Imports System.IO Imports System.Security.Cryptography Imports System.Text Public Class TestSHA1 Public Shared Function Main(ByVal pathToFileToProtect As String) As String Dim fs As FileStream = File.OpenRead(pathToFileToProtect) Dim sha As SHA1 = New SHA1CryptoServiceProvider Dim hash() As Byte = sha.ComputeHash(fs) Dim b64 As String = Convert.ToBase64String(hash) fs.Close() Return b64 End Function End Class
The .NET Framework provides larger key size algorithms as well—namely, SHA256, SHA384, and SHA512. The numbers at the end of the name indicate the block size.
The class SHA256Managed extends the abstract class SHA256, which in turn extends the abstract class HashAlgorithm. The forms authentication module of ASP.NET security (System.Web.Security.Forms AuthenticationModule) uses SHA1 as one of its valid formats to store and compare user passwords.
MD5
Message-Digest algorithm 5 (MD5) is a cryptographic, one-way hash algorithm. The MD5 algorithm competes well with SHA. MD5 is an improved version of MD4, devised by Ronald Rivest of Rivest, Shamir and Adleman (RSA) fame. In fact, FIPS PUB 180-1 states that SHA-1 is based on principles similar to MD4. The salient features of this class of algorithms are as follows:
- It is computationally unfeasible to forge an MD5 hash digest.
- MD5 is not based on any mathematical assumption such as the difficulty of factoring large binary integers.
- MD5 is computationally cheap, and therefore suitable for low-latency requirements.
- It is relatively simple to implement.
MD5 was the de facto standard for hash digest computation, due to the popularity of RSA. The .NET Framework provides an implementation of this algorithm through the class MD5CryptoServiceProvider in the System.Security.Cryptography namespace. This class extends the MD5 abstract class, which in turn extends the abstract class HashAlgorithm. This class shares a common base class with SHA1, so the examples previously discussed can be easily replicated by updating the SHA1 source to reference the MD5CryptoServiceProvider instead of the SHA1 provider.
Dim md5 As MD5 = New MD5CryptoServiceProvider() Dim hash() As Byte = md5.ComputeHash(fs)
RIPEMD-160
Based on MD5, RIPEMD-160 started as a project in Europe called the RIPE (RACE Integrity Primitives Evaluation) project Message Digest in 1996. By 1997, the design of RIPEMD-160 was finalized. RIPEMD-160 is a 160-bit hash algorithm that is meant to be a replacement for MD4 and MD5.
The .NET Framework 2.0 introduced the RIPEMD160 class to work with this iteration of encryption techniques. As you should recognize from the preceding MD5 example, switching to this provider is also easily accomplished:
Dim myRIPEMD As New RIPEMD160Managed() Dim hash() As Byte = myRIPEMD.ComputeHash(fs)
Symmetric Key Encryption
Symmetric key encryption is widely used to encrypt data files using passwords. The simplest technique is to seed a random number using a password, and then encrypt the files with an XOR operation using this random number generator.
The .NET Framework provides an abstract base class SymmetricAlgorithm. Five concrete implementations of different symmetric key algorithms are provided by default:
Let's explore the SymmetricAlgorithm design. As indicated by the following example code, two separate methods are provided to access encryption and decryption. You can run a copy of symmetric encryption using the sample code. Uncomment the following line of code in the ButtonTest _Click event handler in MainWindow.xaml.vb. An example of this call is shown here:
SymEnc.Main(TextBoxResult, 0, "..\..\SymEnc.vb", "DESencrypted.txt", True)
illustrates the code that encrypts and decrypts a file, given a secret key:
: Class SymEnc—SymEnc.vb
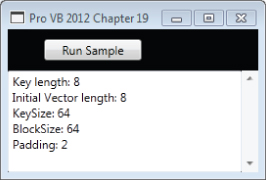
'SymEnc.vb Imports System.Security.Cryptography Imports System.IO Imports System.Text Imports System Public Class SymEnc Private Shared algo() As String = {"DES", "RC2", "Rijndael", "TripleDES"} Private Shared b64Keys() As String = {"YE32PGCJ/g0=", _ "vct+rJ09WuUcR61yfxniTQ==", _ "PHDPqfwE3z25f2UYjwwfwg4XSqxvl8WYmy+2h8t6AUg=", _ "Q1/lWoraddTH3IXAQUJGDSYDQcYYuOpm"} Private Shared b64IVs() As String = {"onQX8hdHeWQ=", _ "jgetiyz+pIc=", _ "pd5mgMMfDI2Gxm/SKl5I8A==", _ "6jpFrUh8FF4="} Public Shared Sub Main(ByVal textBox As TextBox, ByVal algoIndex As Integer, ByVal inputFile As String, ByVal outputFile As String, ByVal encryptFile As Boolean) Dim fin As FileStream = File.OpenRead(inputFile) Dim fout As FileStream = File.OpenWrite(outputFile) Dim sa As SymmetricAlgorithm = SymmetricAlgorithm.Create(algo(algoIndex)) sa.IV = Convert.FromBase64String(b64IVs(algoIndex)) sa.Key = Convert.FromBase64String(b64Keys(algoIndex)) textBox.Text = "Key length: " & CType(sa.Key.Length, String) & Environment.NewLine textBox.Text &= "Initial Vector length: " & CType(sa.IV.Length, String) & Environment.NewLine textBox.Text &= "KeySize: " & CType(sa.KeySize, String) & Environment.NewLine textBox.Text &= "BlockSize: " & CType(sa.BlockSize, String) & Environment.NewLine textBox.Text &= "Padding: " & CType(sa.Padding, String) & Environment.NewLine If (encryptFile) Then Encrypt(sa, fin, fout) Else Decrypt(sa, fin, fout) End If End Sub The parameters to Main provide the Textbox where the output will be displayed and the index from the array algo, which is the name of the algorithm to be used. It then looks for the input and output files, and finally a Boolean indicating whether the input should be encrypted or decrypted.
Within the code, first the action is to open the input and output files. The code then creates an instance of the selected algorithm and converts the initial vector and key strings for use by the algorithm. Symmetric algorithms essentially rely on two secret values: one called the key; the other, the initial vector, both of which are used to encrypt and decrypt the data. Both private values are required for either encryption or decryption.
The code then outputs some generic information related to the encryption being used and then checks which operation is required, executing the appropriate static method to encrypt or decrypt the file.
To encrypt, the code gets an instance of the ICryptoTransform interface by calling the CreateEncryptor method of the SymmetricAlgorithm class extender. The encryption itself is done in the following method:
Private Shared Sub Encrypt(ByVal sa As SymmetricAlgorithm, _ ByVal fin As Stream, _ ByVal fout As Stream) Dim trans As ICryptoTransform = sa.CreateEncryptor() Dim buf() As Byte = New Byte(fin.Length) {} Dim cs As CryptoStream = _ New CryptoStream(fout, trans, CryptoStreamMode.Write) Dim Len As Integer fin.Position = 0 Len = fin.Read(buf, 0, buf.Length) While (Len > 0) cs.Write(buf, 0, Len) Len = fin.Read(buf, 0, buf.Length) End While cs.Close() fin.Close() End Sub For decryption, the code gets an instance of the ICryptoTransform interface by calling the CreateDecryptor method of the SymmetricAlgorithm class instance. To test this you can uncomment the line of code which follows the method call to encrypt the file using the method Main and matches the following line:
SymEnc.Main(TextBoxResult, 0, "DESencrypted.txt", "DESdecrypted.txt", False)
The following snippet provides the decryption method:
Private Shared Sub Decrypt(ByVal sa As SymmetricAlgorithm, _ ByVal fin As Stream, _ ByVal fout As Stream) Dim trans As ICryptoTransform = sa.CreateDecryptor() Dim buf() As Byte = New Byte(fin.Length) {} Dim cs As CryptoStream = _ New CryptoStream(fin, trans, CryptoStreamMode.Read) Dim Len As Integer Len = cs.Read(buf, 0, buf.Length - 1) While (Len > 0) fout.Write(buf, 0, Len) Len = cs.Read(buf, 0, buf.Length) End While fin.Close() fout.Close() End Sub The class CryptoStream is used for both encryption and decryption. You'll find it listed both in the Decrypt method shown in the preceding code snippet and also in the earlier code snippet that showed the Encrypt method. Notice, however, that depending on if you are encrypting or decrypting, the parameters to the constructor for the CryptoStream differ.
You'll also notice if you review the code in SymEnc.vb, that this code supports testing of encryption and decryption using any of the four symmetric key implementations provided by the .NET Framework. The second parameter to Sub Main is an index indicating which algorithm to use. The secret keys and associated initialization vectors (IVs) were generated by a simple source code generator, examined shortly.
If you haven't done so yet, you should run the application and verify the contents of the DESencrypted.txt and DESdecrypted.txt files. If the new methods run to completion, the screen display should look similar to what is shown in .
Symmetric encryption characteristics as output
To generate the keys, a simple code generator is available in the file SymKey.vb. You can reference it by adding a call to the button click event as shown in the following line.
SymKey.SymKeyMain(TextBoxResult)
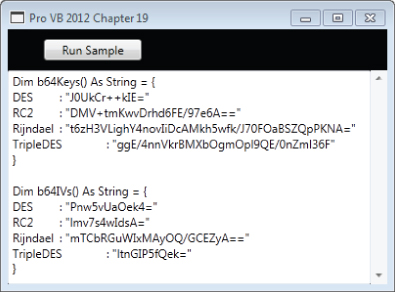
The code to generate the key and vectors is shown in .
: Class SymKey—SymKey.vb
'SymKey.vb Imports System.Security.Cryptography Imports System.Text Imports System.IO Imports System Imports Microsoft.VisualBasic.ControlChars Public Class SymKey Public Shared Sub SymKeyMain(ByVal textBox As TextBox) Dim keyz As StringBuilder = New StringBuilder Dim ivz As StringBuilder = New StringBuilder keyz.Append("Dim b64Keys() As String = { " & vbCrLf) ivz.Append(vbCrLf + "Dim b64IVs() As String = { " & vbCrLf) Dim algo() As String = {"DES", "RC2", "Rijndael", "TripleDES"} For i As Integer = 0 To 3 Dim sa As SymmetricAlgorithm = SymmetricAlgorithm.Create(algo(i)) sa.GenerateIV() sa.GenerateKey() Dim Key As String Dim IV As String Key = Convert.ToBase64String(sa.Key) IV = Convert.ToBase64String(sa.IV) keyz.AppendFormat(algo(i) & vbTab & ": """ & Key & """" & vbCrLf) ivz.AppendFormat(algo(i) & vbTab & ": """ & IV & """" & vbCrLf) Next i keyz.Append("}") ivz.Append("}") textBox.Text = keyz.ToString() & vbCrLf & ivz.ToString() End Sub End Class The preceding program creates a random key and an initializing vector for each algorithm. When run, the result are displayed as shown in . You can use the output from this call to create unique and thus secure keys that can be copied into the SymEnc.vb program.
Generating random encryption key values
PKCS
The Public Key Cryptographic System (PKCS) is a type of asymmetric key encryption. This system uses two keys, one private and the other public. The public key is widely distributed, whereas the private key is kept secret. One cannot derive or deduce the private key by knowing the public key, so the public key can be safely distributed.
The keys are different, yet complementary. That is, if you encrypt data using the public key, then only the owner of the private key can decipher it, and vice versa. This forms the basis of PKCS encryption.
If the private key holder encrypts a piece of data using his or her private key, any person with access to the public key can decrypt it. The public key, as the name suggests, is available publicly. This property of the PKCS is exploited along with a hashing algorithm, such as SHA or MD5, to provide a verifiable digital signature process.
The abstract class System.Security.Cryptography.AsymmetricAlgorithm represents this concept in the .NET Framework. Four concrete implementations of this class are provided by default:
The Digital Signature Algorithm (DSA) was specified by the National Institute of Standards and Technology (NIST) in January 2000. The original DSA standard, however, was issued by NIST much earlier, in August 1991. DSA cannot be used for encryption and is good only for digital signature. Digital signature is discussed in more detail in the next section.
Similarly, the ECDsa algorithm is also an elliptic curve algorithm, in this case combined with the Digital Signature Algorithm. This is then enhanced with a Cryptographic Next Generation algorithm.
RSA algorithms can also be used for encryption as well as digital signatures. RSA is the de facto standard and has much wider acceptance than DSA. RSA is a tiny bit faster than DSA as well.
RSA can be used for both digital signature and data encryption. It is based on the assumption that large numbers are extremely difficult to factor. The use of RSA for digital signatures is approved within the FIPS PUB 186-2 and is defined in the ANSI X9.31 standard document.
Digital Signature Example
Digital signature is the encryption of a hash digest (for example, MD5 or SHA-1) of data using a public key. The digital signature can be verified by decrypting the hash digest and comparing it against a hash digest computed from the data by the verifier.
As noted earlier, the private key is known only to the owner, so the owner can sign a digital document by encrypting the hash computed from the document. The public key is known to all, so anyone can verify the signature by recomputing the hash and comparing it against the decrypted value, using the public key of the signer.
The .NET Framework provides DSA and RSA digital signature implementations by default. This section considers only DSA, as both implementations extend the same base class, so all programs for DSA discussed here work for RSA as well.
First, you need to produce a key pair. To do this, you'll need the the following method which has been added to the ProVB2012_Security main window. This can be called once from the Button_Click_1 event handler to generate the necessary files in your application's folder.
     Private Sub GenDSAKeys()           Dim dsa As Security.Cryptography.DSACryptoServiceProvider =               New Security.Cryptography.DSACryptoServiceProvider
           Dim prv As String = dsa.ToXmlString(True)           Dim pub As String = dsa.ToXmlString(False)           Dim fileutil As FileUtil = New FileUtil           fileutil.SaveString("dsa-key.xml", prv)           fileutil.SaveString("dsa-pub.xml", pub)       End Sub
This method generates two XML-formatted files, dsa-key.xml and dsa-pub.xml, containing private and public keys, respectively. This code is dependent on an additional class, FileUtil, that is available in the project to wrap some of the common file I/O operations. This file is shown in .
: Class FileUtil—FileUtil.vb
'FileUtil.vb Imports System.IO Imports System.Text Public Class FileUtil Public Sub SaveString(ByVal fname As String, ByVal data As String) SaveBytes(fname, (New ASCIIEncoding).GetBytes(data)) End Sub Public Function LoadString(ByVal fname As String) Dim buf() As Byte = LoadBytes(fname) Return (New ASCIIEncoding).GetString(buf) End Function Public Function LoadBytes(ByVal fname As String) Dim finfo As FileInfo = New FileInfo(fname) Dim length As String = CType(finfo.Length, String) Dim buf() As Byte = New Byte(length) {} Dim fs As FileStream = File.OpenRead(fname) fs.Read(buf, 0, buf.Length) fs.Close() Return buf End Function Public Sub SaveBytes(ByVal fname As String, ByVal data() As Byte) Dim fs As FileStream = File.OpenWrite(fname) fs.SetLength(0) fs.Write(data, 0, data.Length) fs.Close() End Sub Public Function LoadSig(ByVal fname As String) Dim fs As FileStream = File.OpenRead(fname) ' Need to omit the trailing null from the end of the 0 based buffer. Dim buf() As Byte = New Byte(39) {} fs.Read(buf, 0, buf.Length) fs.Close() Return buf End Function End Class To create the signature for a data file, call the method SignMain in the class DSASign from the Button_Click_1 event handler. shows the code that signs the data:
: Class DSASign with Sub SignMain—DSASign.vb
'DSASign.vb Imports System Imports System.IO Imports System.Security.Cryptography Imports System.Text Public Class DSASign Public Shared Sub SignMain() Dim fileutil As FileUtil = New FileUtil Dim xkey As String = fileutil.LoadString("dsa-key.xml") Dim fs As FileStream = File.OpenRead("..\..\FileUtil.vb") Dim data(fs.Length) As Byte fs.Read(data, 0, fs.Length) Dim dsa As DSACryptoServiceProvider = New DSACryptoServiceProvider dsa.FromXmlString(xkey) Dim sig() As Byte = dsa.SignData(data) fs.Close() fileutil.SaveBytes("FileUtilSignature.txt", sig) End Sub End Class The two lines of code that reference the DSACryptoServiceProvider and dsa.FromXmlString method actually create the DSA provider instance and reconstruct the private key from the XML format. Next, the file is signed using the call to dsa.SignData while passing the file stream to be signed to this method. The FileStream is then cleaned up and the resulting signature is saved into the output file.
Now that you have a data file and a signature, the next step is to verify the signature. The class DSAVerify can be leveraged to verify that the signature file created is in fact valid. illustrates the contents of this class.
: Class DSAVerify with Function VerifyMain—DSAVerify.vb
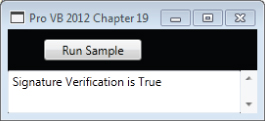
'DSAVerify.vb Imports System Imports System.IO Imports System.Security.Cryptography Imports System.Text Public Class DSAVerify Public Shared Function VerifyMain() As String Dim fileutil As FileUtil = New FileUtil Dim xkey As String = fileutil.LoadString("dsa-key.xml") Dim fs As FileStream = File.OpenRead("..\..\FileUtil.vb") Dim data(fs.Length) As Byte fs.Read(data, 0, fs.Length) Dim xsig() As Byte = fileutil.LoadSig("FileUtilSignature.txt") Dim dsa As DSACryptoServiceProvider = New DSACryptoServiceProvider dsa.FromXmlString(xkey) Dim verify As Boolean = dsa.VerifyData(data, xsig) Return String.Format("Signature Verification is {0}", verify) End Function End Class During testing you may want to ensure that both of these methods are enabled at the same time. This will ensure that you are encrypting and decrypting with the same keys. When working correctly, your display should look similar to what is shown in .
Validating the signature for a certificate
There are many helper classes in the System.Security .Cryptography and System.Security.Cryptography.Xml namespaces. These classes provide numerous features to help deal with digital signatures and encryption. They also provide overlapping functionality, so there is more than one way of doing the same thing.
X.509 Certificates
X.509 is a public key certificate exchange framework. A public key certificate is a digitally signed statement by the owner of a private key, trusted by the verifier (usually a certifying authority), that certifies the validity of the public key of another entity. This creates a trust relationship between two unknown entities. X.509 is an ISO standard specified by the document ISO/IEC 9594-8. X.509 certificates are also used in SSL (Secure Sockets Layer), which is covered in the next section.
Many certifying authority services are available over the Internet. VeriSign (www.verisign.com) is one of the most popular, and was founded by the RSA trio themselves. Other providers may cost less, but if you intend to make your certificate public, you'll want to investigate if they are default providers within the Windows operating system. Alternatively, at the low-cost end, and during development, you can run your own Certificate Authority (CA) service over an intranet using Microsoft Certificate Services.
The Microsoft .NET Framework SDK also provides tools for generating certificates for testing purposes. Using the Developer Command Prompt for VS2012, the following command generates a test certificate:
makecert -n CN=ProVB test.cer
The certificate is with the code at the solution directory level.
Three classes dealing with X.509 certificates are provided in the .NET Framework in the namespace System.Security.Cryptography.X509Certificates. The code in loads and manipulates the certificate created using makecert. Note you'll need to adjust the path to that certificate from the sample code.
: Class CertLoad with Sub CertMain—CertLoad.vb
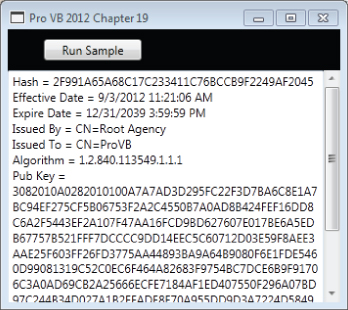
’ CertLoad.vb Imports System Imports System.Security.Cryptography.X509Certificates Public Class CertLoad Public Shared Sub CertMain(ByVal certFilePath As String, ByVal textbox As TextBox) Dim cert As X509Certificate = _ X509Certificate.CreateFromCertFile(certFilePath) textbox.Text = "Hash = " & cert.GetCertHashString() & Environment.NewLine textbox.Text &= "Effective Date = " & cert.GetEffectiveDateString() & Environment.NewLine textbox.Text &= "Expire Date = " & cert.GetExpirationDateString() & Environment.NewLine textbox.Text &= "Issued By = " & cert.Issuer & Environment.NewLine textbox.Text &= "Issued To = " & cert.Subject & Environment.NewLine textbox.Text &= "Algorithm = " & cert.GetKeyAlgorithm() & Environment.NewLine textbox.Text &= "Pub Key = " & cert.GetPublicKeyString() & Environment.NewLine End Sub End Class
The static method loads CreateFromCertFile (the certificate file) and creates a new instance of the class X509Certificate. When working correctly, the results are displayed in ProVB_Security as shown in . The next section deals with Secure Sockets Layer (SSL), which uses X.509 certificates to establish the trust relationship.
Displaying the contents of a certificate file
Secure Sockets Layer
The Secure Sockets Layer (SSL) protocol provides privacy and reliability between two communicating applications over the Internet. SSL is built over the TCP layer. In January 1999, the Internet Engineering Task Force (IETF) adopted an enhanced version of SSL 3.0 called Transport Layer Security (TLS). TLS is backwardly compatible with SSL, and is defined in RFC 2246. However, the name SSL was retained due to wide acceptance of this Netscape protocol name. This section provides a simplified overview of the SSL algorithm sequence. SSL provides connection-oriented security via the following four properties:
The SSL protocol provides the following features:
- Cryptographic security—Using a symmetric key for session data-encryption, and a public key for authentication
- Interoperability—Interpolates OS and programming languages
- Extensibility—Adds new data-encryption protocols that are allowed within the SSL framework
- Relative efficiency—Reduces computation and network activity by using caching techniques
Two entities communicating using SSL protocols must have a public-private key pair, optionally with digital certificates validating their respective public keys.
At the beginning of a session, the client and server exchange information to authenticate each other. This ritual of authentication is called the handshake protocol. During this handshake, a session ID, the compression method, and the cipher suite to be used are negotiated. If the certificates exist, then they are exchanged. Although certificates are optional, either the client or the server may refuse to continue with the connection and end the session in the absence of a certificate.
After receiving each other's public keys, a set of secret keys based on a randomly generated number is exchanged by encrypting them with each other's public keys. After this, the application data exchange can commence. The application data is encrypted using a secret key, and a signed hash of the data is sent to verify data integrity.
Microsoft implements the SSL client in the .NET Framework classes. However, the server-side SSL can be used by deploying your service through the IIS Web server.
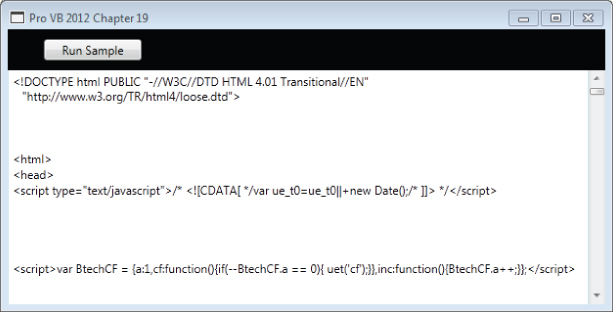
The following snippet demonstrates a method for accessing a secured URL. It takes care of minor details, such as encoding, and allows you to directly receive the results of a web request.
’ Cryptography/GetWeb.vb Imports System Imports System.IO Imports System.Net Imports System.Text Public Class GetWeb Dim MaxContentLength As Integer = 16384 ' 16k Public Shared Function QueryURL(ByVal url As String) As String Dim req As WebRequest = WebRequest.Create(url) Dim result As WebResponse = req.GetResponse() Dim ReceiveStream As Stream = result.GetResponseStream() Dim enc As Encoding = System.Text.Encoding.GetEncoding("utf-8") Dim sr As StreamReader = New StreamReader(ReceiveStream, enc) Dim response As String = sr.ReadToEnd() Return response End Function End Class Using this method from the ProVB_Security application allows you to retrieve the information associated with the selected Web page. In this case, you can pass the URL to the method from the ButtonTest click event handler. The resulting display should be similar to what is shown in .
Output from a programmatic HTTP request
Summary
This chapter covered the basics of security and cryptography. It began with an overview of the security architecture of the .NET Framework and an understanding of how managing access to system capabilities will introduce a new layer of security controls for applications that go through the Windows Store. The chapter introduced the four types of security within Windows and .NET: NTFS, User Access Control (UAC), cryptographic, and programmatic.
It then examined the security tools and functionality that the .NET Framework provides. You looked at the System.Security.Permissions namespace and learned how you can control code access permissions, role-based permissions, and identity permissions. You also learned how to manage code access permissions and UAC for your assembly.
The second half of the chapter looked at cryptography, both the underlying theory and how it can be applied within your applications. You looked at the different types of cryptographic hash algorithms, including SHA, MD5, symmetric key encryption, and PKCS. You should also understand how you can use digital certificates, such as X.509 and Secure Socket Layer (SSL) certificates.
In the next chapter you will move from security to threading. You will dig into how you can use multiple threads and coordinate those threads in your applications.

