Chapter 16
Application Services
What's in this chapter?
Modern, multitasking operating systems often need to run applications that operate in the background and that are independent of the user who is logged in. For example, an application that provides a service interface to obtain data needs to service external requests for data regardless of whether there is a current user.
Over time, the number of choices to implement application services has increased. Originally, the main choice was Windows Services, but other choices have been added as .NET and Windows have evolved. Keep in mind that Windows Services aren't something you are going to access in a purely client environment like Windows 8 RT.
shows the Service Control Manager in Windows 7. (Note it looks unchanged on Windows 8.) Service Control Manager
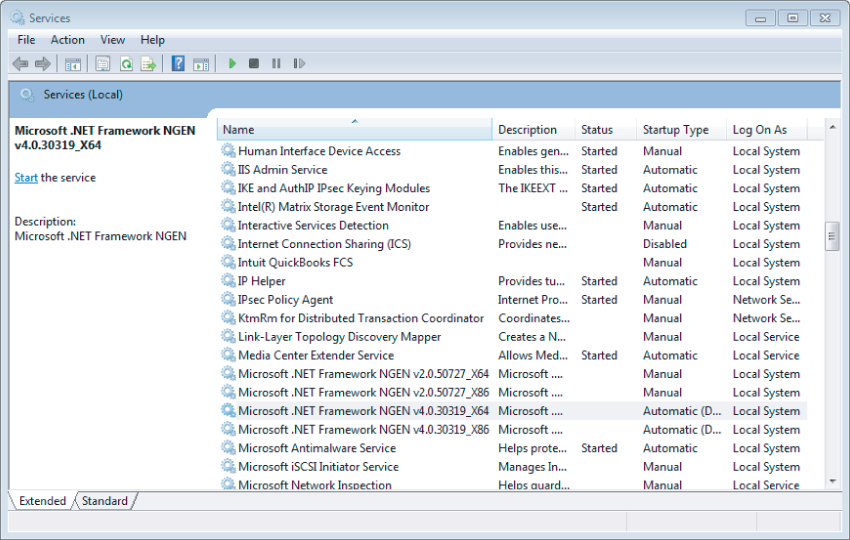
Service Control Manager

The Status column indicates the current state of the service. If this column is blank, then the service is not running. Other possible values for Status are Started and Paused. You can access additional settings and details concerning a service by double-clicking it.
When a service is started, it automatically logs in to the system using one of the following accounts:
- User account—A regular Windows account that allows the program to interact with the system; in essence, the service impersonates a user.
- LocalSystem account—Not associated with a particular user. This built-in account has a lot of privileges, and can roughly be thought of as the equivalent of an administrator account for services.
- LocalService account—Not associated with a particular user. This built-in account has a more limited set of privileges, and is commonly used for routine services.
- NetworkService account—Not associated with a particular user. This built-in account is similar to LocalService, but is designed for services that communicate across the local network rather than working only on the local system.
The Service Control Manager shown in is part of the operating system (OS), which is what supports Windows Services; it is not a part of the .NET Framework. Any service run by the OS is exposed through the Service Control Manager, regardless of how the service was created or installed. You can also examine the installed Windows Services via the Server Explorer in Visual Studio.
describes the most important of these methods.
Important ServiceBase Events
| Event | Description |
| OnStart | Occurs when the service is started. This is where the initialization logic for a service is usually placed. |
| OnStop | Occurs when the service is stopped. Cleanup and shutdown logic are generally placed here. |
| OnPause | Occurs when the service is paused. Any logic required to suspend operations during a pause goes here. |
| OnContinue | Occurs when a service continues after being paused. |
| OnShutdown | Occurs when the operating system is being shut down. |
| OnSessionChange | Occurs when a change event is received from a Terminal Session service. This method was new in .NET Framework 2.0. |
| OnPowerEvent | Occurs when the system's power management software causes a change in the power status of the system. This is typically used to change the behavior of a service when a system is entering or leaving a “suspended” power mode. This is more frequent with end users who are working on laptops. |
| OnCustomCommand | Occurs when an external program has told the Service Control Manager that it wants to send a command to the service. The operation of this event is covered in the section “Communicating with the Service.” |
The events used most frequently are OnStart, OnStop, and OnCustomCommand. The OnStart and OnStop events are used in almost every Windows service written in Visual Basic, and the OnCustomCommand is used when any special configuration of the service is needed while the service is running.
All of these are Protected events, so they are available only to classes that inherit from the ServiceBase class. Because of the restricted context in which it runs, a Windows Service component that inherits from ServiceBase often lacks a public interface. While you can add public properties and methods to such a component, they are of limited use, because programs running in a normal user context cannot obtain an object reference to running a Windows Service component, which is running in a special system context created by the System Control Manager.
To be active as a Windows Service, an instance of the ServiceBase class must be started via the shared Run method of the ServiceBase class. However, normally you don't have to write code to do this because the template code generated by a Visual Studio Windows Service project places the correct code in the Main subroutine of the project for you.
The most commonly used property of the ServiceBase class is the AutoLog property. This Boolean property is set to True by default. If True, then the Windows service automatically logs the Start, Stop, Pause, and Continue events to an event log. The event log used is the Application Event Log and the Source in the log entries is taken from the name of the Windows service. This automatic event logging is stopped by setting the AutoLog property to False.
Later in this chapter you will create a File Watcher example that will go into more detail about the automatic logging capabilities in a Windows service, and about event logs in general.
Installation-Oriented Classes
The Installer, ServiceProcessInstaller, and ServiceInstaller classes are quite simple to build and use if you are employing Visual Studio. After you create your Windows Service project, Visual Studio will create a class file called Service1.vb for you. To add the Installer, ServiceProcessInstaller, and ServiceInstaller classes to your project, simply right-click the design surface of this ServiceBase class, Service1.vb, and select Add Installer. This creates the code framework necessary to use them.
The Installer class (named ProjectInstaller.vb by default in a Windows Service project) generally needs no interaction at all — it is ready to use when created by Visual Studio. However, it may be appropriate to change some properties of the ServiceProcessInstaller and ServiceInstaller classes. You can do this by simply highlighting these objects on the design surface and changing their properties directly in the Properties window of Visual Studio. The properties that are typically modified for ServiceProcessInstaller include the following:
- Account—This specifies the type of account under which the entire service application will run. Different settings give the services in the application different levels of privilege on the local system. For simplicity, this chapter uses the highest level of privilege, LocalSystem, for most of the examples. If this property is set to User (which is the default), then you must supply a username and password when the service is installed. (You'll see more about that when InstallUtil.exe is discussed later in the chapter.) That user's account is used to determine privileges for the service. If there is any possibility that a service could access system resources that should be “out of bounds,” then using the User setting to restrict privileges is a good idea. Besides LocalSystem and User, other possible settings for the Account property include NetworkService and LocalService.
- HelpText—This specifies information about the service that will be displayed in certain installation options.
If the Account property is set to User, then it is good practice to set up a special user account for the service, rather than rely on some existing account intended for a live user. The special account can be set up with exactly the appropriate privileges for the service. This way, it is not as vulnerable to having its password or its privileges inadvertently changed in a way that would cause problems in running the service.
For the ServiceInstaller class, the properties you might change include the following:
- DisplayName—The name of the service displayed in the Service Manager or the Server Explorer can be different from the class name and the executable name if desired, though it is better to make this name the same as the class name for the service.
- StartType—This specifies how the service is started. The default is Manual, which means you must start the service yourself, as it will not start automatically after the system boots. If you want the service to always start when the system starts, then change this property to Automatic. The Service Manager can be used to override the StartType setting.
- ServiceName—The name of the service that this ServiceInstaller handles during installation. If you changed the class name of the service after using the Add Installer option, then you would need to change this property to correspond to the new name for the service.
ServiceProcessInstaller and ServiceInstaller are used as necessary during the installation process, so there is no need to understand or manipulate the methods of these.
Multiple Services within One Executable
It is possible to place more than one class that inherits from the ServiceBase class in a single Windows Service executable. Each such class then allows for a separate service that can be started, stopped, and so on, independently of the other services in the executable.
If a Windows Service executable contains more than one service, then it must contain one ServiceInstaller for each service. Each ServiceInstaller is configured with the information used for its associated service, such as the displayed name and the start type (automatic or manual). However, the executable still needs only one ServiceProcessInstaller, which works for all the services in the executable. It is configured with the account information that is used for all the services in the executable.
The ServiceController Class
Another important .NET Framework class used with Windows Services is System.ServiceProcess.ServiceController. This class is not used when constructing a service; it is used by external applications to communicate with a running service, enabling operations such as starting and stopping the service. The ServiceController class is described in detail in the section “Communicating with the Service.”
Other Types of Windows Services
The ServiceBase and ServiceController classes can be used to create typical Windows Services that work with high-level system resources such as the file system or performance counters. However, some Windows Services need to interact at a deeper level. For example, a service may work at the kernel level, fulfilling functions such as that of a device driver.
Presently, the .NET Framework classes for Windows Services cannot be used to create such lower-level services, which rules out both Visual Basic and C# as tools to create them. C++ is typically the tool of choice for these types of services. If the C++ is used, the code for such services would typically run in unmanaged mode.
Another type of service that cannot be created with the .NET Framework classes is one that interacts with the Windows desktop. Again, C++ is the preferred tool for such services.
You'll look at the types of services that are possible during the discussion of the ServiceType property of the ServiceController class, in the section “Communicating with the Service.”
shows how the properties should be set. Properties for FileSystemWatcher
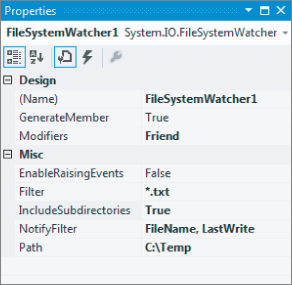
Adding FileSystemWatcher Code to OnStart and OnStop
Properties for FileSystemWatcher

Now that some properties are set, let's add some code to the OnStart event for FileWatcherService.vb. You want to start the FileSystemWatcher1 component so it will start triggering events when files are created or copied into the directory you are monitoring, so set the EnableRaisingEvents property to True. Choose to View Code on FileWatcherSErvice.vb and update the OnStart handler as shown in the following snippet:
Protected Overrides Sub OnStart(ByVal args() As String) ' Add code here to start your service. This method should set things ' in motion so your service can do its work. ' Start monitoring for files FileSystemWatcher1.EnableRaisingEvents = True End Sub
After the file monitoring properties are initialized, you are ready to start the monitoring. When the service stops, you need to stop the file monitoring process. Add the following code shown to the OnStop event.
Protected Overrides Sub OnStop() ' Add code here to perform any tear-down necessary to stop your service. ' Stop monitoring for files FileSystemWatcher1.EnableRaisingEvents = False End Sub
The EventLog Component
Now you are ready to place an EventLog component in the service to facilitate the logging of events. Event logs are available under the Windows operating system, and were discussed in Chapter 6. As with many other system-level features, the use of Event Logs is simplified in .NET because a .NET Framework base class does most of the work for you.
Depending on your system's configuration and installed software, there should be several Event Logs on the system. Normally, your applications should write only to the Application Log. A property of a log entry called Source identifies the application writing the message. This property does not have to share the same name as the executable of the application, but it is often given that name to make it easy to identify the source of the message.
You can look at the events in the Event Log by using the Event Viewer. On Windows 7 or Windows Server 2008, select Start ⇒ Control Panel ⇒ System and Maintenance ⇒ Administrative Tools ⇒Event Viewer. If you are on Windows 8 and turned on the administrative tiles, select the Event Viewer tile from your Start screen.
It was mentioned earlier in the chapter that the AutoLog property of the ServiceBase class determines whether the service automatically writes events to the Application Log. The AutoLog property instructs the service to use the Application event log to report command failures, as well as information for OnStart, OnStop, OnPause, and OnContinue events on the service. What is actually logged to the event log is an entry indicating whether the service started successfully and stopped successfully, and any errors that might have occurred.
You can turn off event log reporting by setting the AutoLog property to False in the Properties window for the service, but leave it set to True for this example. That means some events will be logged automatically (without you including any code for them). If desired, you can add some code to the service to log additional events not covered by the AutoLog property.
Drag and drop an EventLog control from the Components tab of the Toolbox onto the designer surface of FileWatcherService.vb. This control is automatically called EventLog1. Set the Log property for Eventlog1 to Application, and set the Source property to FileWatcherService.
The Created Event
Next, you will place some logic in the Created event of the FileSystemWatcher component to log when a file has been created. This event fires when a file has been placed or created in the directory that you are monitoring. It fires because the information last modified on the file has changed.
Bring up FileSystemWatcher1.vb in the code editor. Select FileSystemWatcher1 from the left-hand drop-down list and then select Created from the right-hand drop-down list. The Created event will be added to your code. Add the following code to the Created event:
Public Sub FileSystemWatcher1_Created(ByVal sender As Object, _ ByVal e As System.IO.FileSystemEventArgs) _ Handles FileSystemWatcher1.Created EventLog1.WriteEntry("File created in directory - file name is " & e.Name) End Sub Notice that the event argument's object (the System.IO.FilesSystemEventsArgs object named “e” in the event parameters) includes a property called Name. This property holds the name of the file that generated the event.
At this point, you could add the other events for FileSystemWatcher (Changed, Deleted, Renamed) in a similar way and create corresponding log messages for those events. To keep the example simple, you will just use the Created event in this service.
Build the service again to compile the new functionality. You are now ready to install the service and test it.
Installing the Service
The utility for installing the service, InstallUtil.exe, must be run from a command line. InstallUtil.exe is located in the .NET utilities directory, found at C:\Windows\Microsoft.NET\Framework\v4.0.xxxxx (“xxxxx” is a placeholder for the version number of the .NET Framework you have installed).
You'll need a Developer Command Prompt for VS2012 window to access this utility. You can start this by using the start menu and going to All Programs ⇒ Visual Studio 2012 ⇒ Visual Studio Tools. You should right-click on the link for the command window and select Run as Administrator. Note that if on Windows 8, you'll just want to select the “Developer Command Prompt for VS2012” tile that should be on your Start screen near the Visual Studio 2012 tile. Right-clicking that tile will display the option to ‘Run as Administrator” at the bottom of your screen.
In the command window, change to the directory that contains FileWatcherService.exe. Right click on your project in the solution explorer and select the “Open folder in File Explorer” menu item. From here you'll go to the bin folder. Next, if you are currently using a Debug configuration you will find it in the Debug folder; otherwise, you will find it in the Release folder. After navigating your command window to this location (cd <paste your path here>) run the following command:
InstallUtil ProVB_FileWatcherService.exe
Check the messages generated by InstallUtil.exe to ensure that installation of the service was successful. The utility generates several lines of information; if successful, the last two lines are as follows:
The Commit phase completed successfully. The transacted install has completed.
If the preceding two lines do not appear, then you need to read all the information generated by the utility to find out why the install didn't work. Reasons might include a bad pathname for the executable, or trying to install the service when it is already installed (it must be uninstalled before it can be reinstalled; the uninstall process is described later). Also, if you did not select Run as Administrator for the command window, you may get an error relating to insufficient security privileges.
Starting the Service
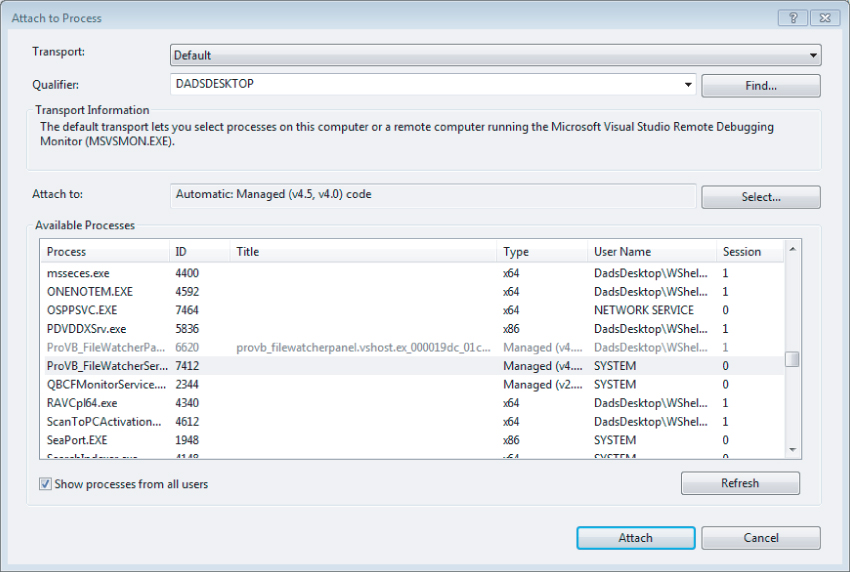
Later in this chapter, you will create your own “control panel” screen to start and stop the service. For now, to test the new Windows service, you will use the Service Control Manager built into Windows to start the FileWatcherService service. It was shown previously in . Open the Service Control Manager and locate the FileWatcherService service. If you already had the Service Control Manager open, you'll need to refresh it after installing the FileWatcherService.
If the FileWatcherService service does not appear in the list, then the installation failed. Try the installation again and check the error messages. Right-click the FileWatcherService service and select the Start menu option.
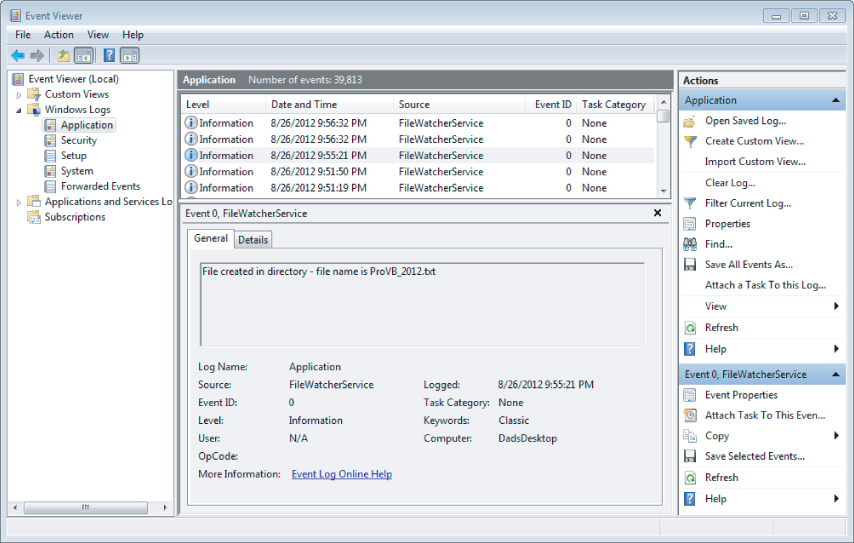
To test the service, copy or create a .TXT file in the C:/TEMP directory (or any other directory you decided to use). You should be able to see a corresponding event in the event log for your machine, using the Event Viewer as described earlier.
shows the Event Viewer with several example messages created by the service. Notice that the message corresponds to the event log message you constructed in the Created event of the FileSystemWatcher control in the service. Play with it a little; notice how if you create a new file and rename it, only the default new filename is shown. Similarly if you rename a file, no message is generated. The only action triggering those events is the creation of new files in that folder.
File watcher even for new ProVB_2012.txt file
Uninstalling the Service
Uninstalling the service is very similar to installing it. The service must be in a stopped state before it can be uninstalled, but the uninstall operation will attempt to stop the service if it is running. The uninstall operation is done in the same command window as the install operation, and the command used is the same as the one for installation, except that the option /u is included just before the name of the service. Remember that you need to navigate to the project folder and go to the \Debug (or the equivalent \Release folder, depending on your current configuration) to run the following command:
InstallUtil.exe /u FileWatcherService.exe
You can tell the uninstall was successful if the information displayed by the utility contains the following line:
Service FileWatcherService was successfully removed from the system.
If the uninstall is not successful, then read the rest of the information to determine why. Besides typing in the wrong pathname, another common reason for failure is trying to uninstall a service that is in a running state and could not be stopped in a timely fashion.
Once you have uninstalled FileWatcherService, it will no longer show up in the list of available services to start and stop (at least, after a refresh it won't).
describes the most important methods, followed by the most important properties in .
Important ServiceController Methods
| Method | Description |
| Start | A method to start the service. |
| Stop | A method to stop the service. |
| Refresh | A method to ensure that the ServiceController object contains the latest state of the service (needed because the service might be manipulated from another program). |
| ExecuteCommand | A method used to send a custom command to the service. This method is covered later in the section “Custom Commands.” |
Important ServiceController Properties
| Property | Description |
| CanStop | A property indicating whether the service can be stopped. |
| ServiceName | A property containing the name of the associated service. |
| Status | An enumerated property that indicates whether a service is stopped, started, in the process of being started, and so on. The ToString method on this property is useful for getting the status in a string form for text messages. The possible values of the enumeration are: ContinuePending — The service is attempting to continue. Paused — The service is paused. PausePending — The service is attempting to go into a paused state. Running — The service is running. StartPending — The service is starting. Stopped — The service is not running. StopPending — The service is stopping. |
| ServiceType | A property that indicates the type of service. The result is an enumerated value. The enumerations values are: Win32OwnProcess — The service uses its own process (this is the default for a service created in .NET). Win32ShareProcess — The service shares a process with another service (this advanced capability is not covered here). Adapter, FileSystemDriver, InteractiveProcess, KernelDriver, RecognizerDriver — These are low-level service types that cannot be created with Visual Basic because the ServiceBase class does not support them. However, the value of the ServiceType property may still have these values for services created with other tools. |
Integrating a ServiceController into the Example
To manipulate the service, you need to create a program with an appropriate user interface. For simplicity, the example presented will use WPF. Here are step-by-step instructions to create the example:
| Name | Content |
| ButtonStatus | Check Status |
| ButtonStart | Start Service |
| ButtonStop | Stop Service |
Imports System.ServiceProcess
Private myController As ServiceController
myController = New ServiceController("FileWatcherService") You now have a ServiceController class named myController that you can use to manipulate the FileWatcherService Windows service. The next step is to implement the click event handlers for each of the buttons on your form. The following illustrates the resulting code in your MainWindows.xaml.vb file to implement these simple controls.
Imports System.ServiceProcess Class MainWindow Private myController As ServiceController Private Sub Window_Loaded_1(sender As Object, e As RoutedEventArgs) myController = New ServiceController("FileWatcherService") End Sub Private Sub ButtonStatus_Click(sender As Object, e As RoutedEventArgs) Handles ButtonStatus.Click Dim sStatus As String myController.Refresh() sStatus = myController.Status.ToString MessageBox.Show(myController.ServiceName & " is in state: " & sStatus) End Sub Private Sub ButtonStart_Click(sender As Object, e As RoutedEventArgs) Handles ButtonStart.Click Try myController.Start() MessageBox.Show("Service Started.") Catch exp As Exception MessageBox.Show("Could not start service or is already running") End Try End Sub Private Sub ButtonStop_Click(sender As Object, e As RoutedEventArgs) Handles ButtonStop.Click If myController.CanStop Then myController.Stop() MessageBox.Show("Service Stopped.") Else MessageBox.Show("Service cannot be stopped or is already stopped.") End If End Sub End Class You can run and test the program, but remember if you've uninstalled the service you'll first need to reinstall it. Alternatively the service may already be running because of one of your previous tests. If your program cannot stop or start the service, your user account may not have sufficient security privileges. You can recognize this as an error that the application failed to open the service. There are two possible solutions; one is to start/restart Visual Studio with Run as Administrator privileges. The alternative is to navigate to the /bin/debug (or release) folder for your project and directly start your application using the Run as Administrator option.
More about ServiceController
ServiceController classes can be created for any Windows service, not just those created in .NET. For example, you could instantiate a ServiceController class that was associated with the Windows Service for Internet Information Services (IIS) and use it to start, pause, and stop IIS. The code would look just like the code used earlier for the application that controlled the FileWatcherService service. The only difference is that the name of the service would need to be changed in the line that instantiates the ServiceController (step 6).
Keep in mind that the ServiceController is not communicating directly with the service. It is working through the Service Control Manager. That means the requests from the ServiceController to start, stop, or pause a service do not behave synchronously. As soon as the ServiceController has passed the request to the Services Control Manager, it continues to execute its own code without waiting for the Service Control Manager to pass on the request, or for the service to act on the request.
. File Watcher Control Panel
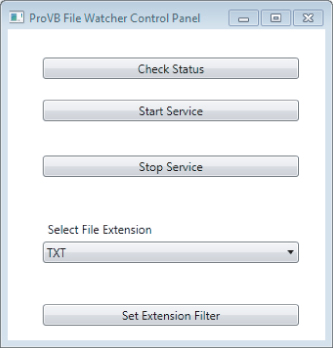
File Watcher Control Panel

Start the FileWatcherPanel control program and test the capability to change the filter by adding different file types with each filter setting and examining the resulting logged events.
