Chapter 11
Services (XML/WCF)
What's in this chapter?
Introduction to Web services and remoting
Overview of service-oriented architecture
WSDL, SOAP and WS-* protocols
Creating a WCF service
Creating a WCF TCP host
Creating a WCF client
Testing a WCF service with Visual Studio over HTTP
Creating a WCF client with a data contract
Testing a WCF service over TCP
on the Download Code tab. The code is in the chapter 11 download and individually named according to the code filenames throughout the chapter.
Over the years there has been an ongoing effort to make communication between distributed components as easy as communication between components and objects within a single executable.
WCF is a framework for building services. Originally introduced as part of the .NET 3.5 enhancements, WCF combines support for several different protocols. Microsoft wanted to provide its developers with a framework that would offer the fastest means to getting a service solution in place, while remaining somewhat agnostic of the underlying transport protocol. Using the WCF, you can take advantage of a variety of powerful protocols under the covers—everything from binary to basic XML Web Services can be supported with the same implementation. WCF is the successor to a series of different distributed communication technologies.
, but that link was retired. Now for WCF in .NET 4.5, you'll want to start at: . It's not that Web services have gone away or become less important, it's simply that Web services are a subset of the complete WCF communication framework.
The goal of WCF is to provide a loosely coupled, ubiquitous, universal information exchange format. Toward that end, SOAP is not the only mechanism for communicating with WCF services.
What Makes a WCF Service
A WCF service consists of three parts:
A service is a class that is written in (or in the case of Interop, wrapped by) one of the .NET-compliant languages. The class can contain one or more methods that are exposed through the WCF service. A service can have one or more endpoints, which are used to communicate through the service to the client.
Endpoints themselves are also made up of three parts. These parts are usually defined by Microsoft as the “ABC” of WCF. Each letter of WCF means something in particular in the WCF model. Similarly,
- “A” is for address
- “B” is for binding
- “C” is for contract
Basically, you can think of this as follows: “A” is the where, “B” is the how, and “C” is the what. Finally, a hosting environment is where the service is contained. This constitutes an application domain and process. All three of these elements (the service, the endpoints, and the hosting environment) together create a WCF service offering, as depicted in .
Logical diagram of the implementation layers of a service
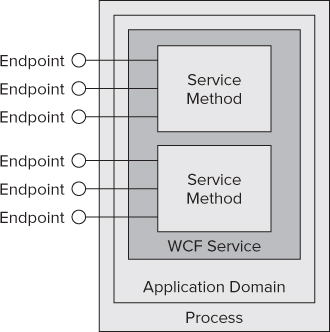
The core idea is that when you want to create an enterprise architecture supporting multiple different applications, the most appropriate protocol will vary depending on how a service is currently being used. Having a unified strategy that allows you, as a developer, to specify a given endpoint and how that endpoint communicates means that the same underlying implementation can power multiple different endpoints. Thus, questions of security and performance can be viewed on a per-connection basis. This enables an organization to create a service-oriented architecture (SOA).
. One word of warning, however—in order to host a WCF service you'll need Administrator rights. Before attempting to replicate all of the steps in the sample, make sure you've started Visual Studio using the ‘Run as Administrator' option from the context menu. New WCF project templates
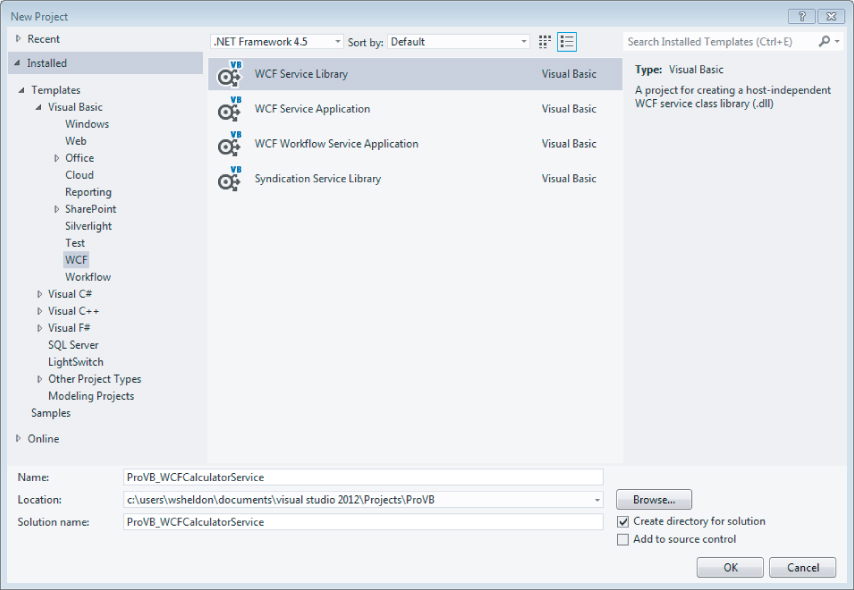
New WCF project templates

When you build a WCF project in this manner, the idea is that you build a traditional class library that is compiled down to a DLL that can then be added to another project. The separation of code and use of multiple projects is a powerful tool for managing complexity on larger projects. That said, though, you can also just as easily build a WCF service directly in your .NET project, whether that is a console application or a Windows Forms application.
This example will first create a new WCF service in a Service Library. It then demonstrates how to host the WCF service inside a console application. Start by creating a new Service Library with the name ProVB_WCFCalculatorLibrary.
Once you have created your new library project, Visual Studio will look similar to what is shown in .
WCF project template interface definition
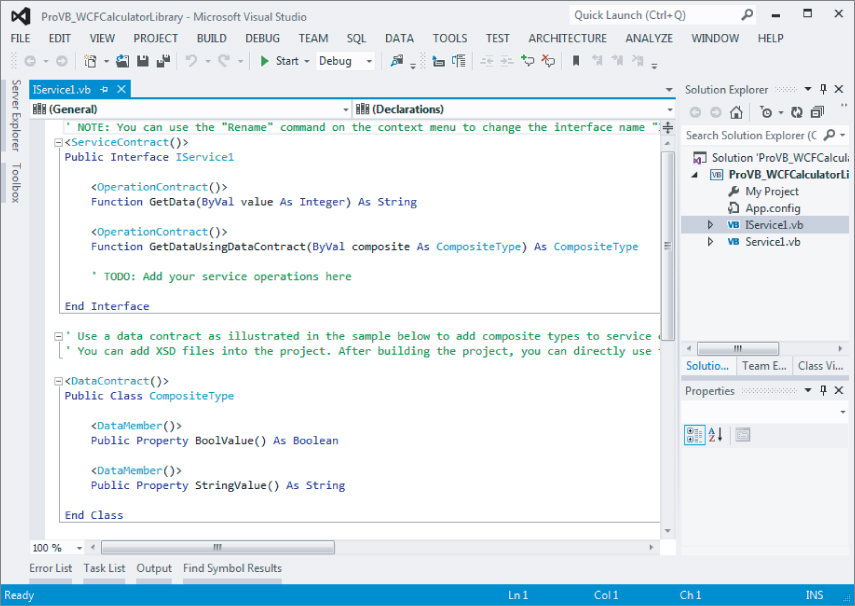
This example first demonstrates how to build the WCF service. It then demonstrates how to build a console application that will host this service, and finally demonstrates how to leverage Visual Studio 2010 to test this service.
Creating the Interface
To create your service, you need a service contract, which is the interface of the service. This consists of all the methods exposed, as well as the input and output parameters that are required to invoke the methods. To accomplish this task, rename the file IService1.vb to ICalculator.vb. Then replace the contents of the generated file with the code presented in .
: Service Interface Definition—ICalculator.vb
<ServiceContract()> Public Interface ICalculator <OperationContract()> Function Add(ByVal a As Integer, ByVal b As Integer) As Integer <OperationContract()> Function Subtract(ByVal a As Integer, ByVal b As Integer) As Integer <OperationContract()> Function Multiply(ByVal a As Integer, ByVal b As Integer) As Integer <OperationContract()> Function Divide(ByVal a As Integer, ByVal b As Integer) As Integer End Interface
This is pretty much the normal interface definition you would expect, but with a couple of new attributes included. The <ServiceContract()> attribute is used to define the class or interface as the service class, and it needs to precede the opening declaration of the class or interface.
Within the interface, four methods are defined. Each of these methods is going to be exposed through the WCF service as part of the service contract, so they all require that the <OperationContract()> attribute be applied to them.
Utilizing the Interface
The next step is to create a class that implements the interface. Not only is the new class implementing the interface defined, it is also implementing the service contract. From Solution Explorer, right-click on the generated Service1.vb file and rename this file as Calculator.vb. Next, replace the code in this file with the code shown in .
: Calculator Implementation—Calculator.vb
Public Class Calculator Implements ICalculator Public Function Add(ByVal a As Integer, ByVal b As Integer) As Integer _ Implements ICalculator.Add Return (a + b) End Function Public Function Subtract(ByVal a As Integer, ByVal b As Integer) As Integer _ Implements ICalculator.Subtract Return (a - b) End Function Public Function Multiply(ByVal a As Integer, ByVal b As Integer) As Integer _ Implements ICalculator.Multiply Return (a * b) End Function Public Function Divide(ByVal a As Integer, ByVal b As Integer) As Integer _ Implements ICalculator.Divide Return (a / b) End Function End Class
From these new additions, you can see that nothing is done differently with the Calculator class than what you might do otherwise. It is a simple class that implements the ICalculator interface and provides implementations of the Add, Subtract, Multiply, and Divide methods.
With the interface and the class available, you now have your WCF service built and ready to go. The next step is to get the service hosted. This is a simple service. One of the simplicities of the service is that it exposes only simple types, rather than a complex type. This enables you to build only a service contract and not have to deal with construction of a data contract. Constructing data contracts is presented later in this chapter.
Hosting the WCF Service in a Console Application
The next step is to take the service just developed and host it in some type of application process. You have many available hosting options, including the following:
- Console applications
- Windows Forms applications
- Windows Presentation Foundation applications
- Managed Windows Services
- Internet Information Services (IIS) 5.1
- Internet Information Services (IIS) 6.0
- Internet Information Services (IIS) 7.0 and the Windows Activation Service (WAS)
As stated earlier, this example hosts the service in a simple console application. There are a couple of ways to activate hosting—either through the direct coding of the hosting behaviors or through declarative programming (usually done via the configuration file).
For this example, the console application will define the host through coding the behaviors of the host environment directly. As mentioned at the start of this sample, in order to host a WCF service this way, you need to have started Visual Studio with the Run as Administrator menu link. If you are not running as administrator, you will get a permissions error when the console application attempts to start.
Using the File menu in Visual Studio, select Add ⇒ New Project to add a new Console Application to your solution. Name the new console application ProVB_ServiceHost. After creating the new project, right-click the project name in Solution Explorer and set this project to be the startup project.
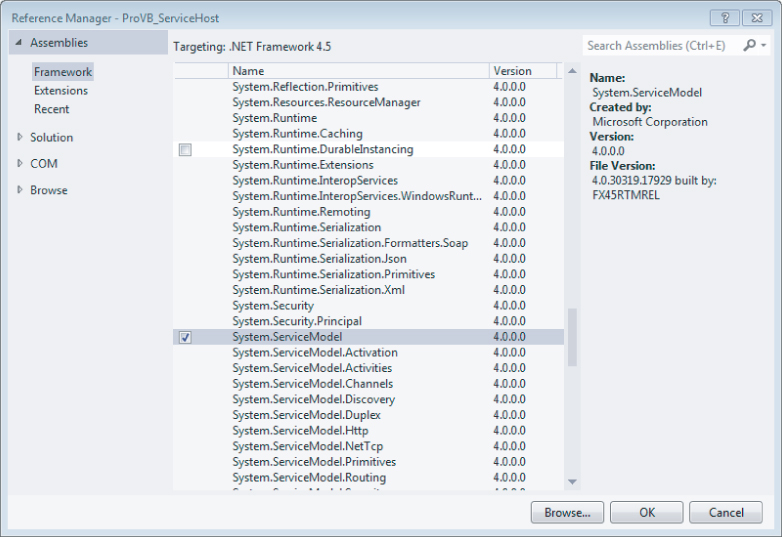
Next, right-click the project and select Add Reference. You need to add two references for this console application to act as a service host. The first is available from the Solution ⇒ Projects tab, Add a reference to the ProVB_WCFCalculatorLibrary. After adding this reference, open the dialog a second time and switch to the Assemblies ⇒ Framework tab. Scroll down and select System .ServiceModel.dll, as shown in .
Adding a reference to System.ServiceModel
You are now ready to start making changes to the code. The code shown in implements the console application:
: Calculator Host—ProVB_ServiceHost/Module1.vb
Imports System.ServiceModel Imports System.ServiceModel.Description Module Module1 Sub Main() Using svcHost As New ServiceHost( _ GetType(ProVB_WCFCalculatorLibrary.Calculator)) Dim netBind As New NetTcpBinding(SecurityMode.None) svcHost.AddServiceEndpoint( _ GetType(ProVB_WCFCalculatorLibrary.ICalculator), netBind, New Uri("net.tcp://localhost:8080/Calculator/")) Dim smb As New ServiceMetadataBehavior() smb.HttpGetEnabled = True smb.HttpGetUrl = New Uri("http://localhost:8000/Calculator") svcHost.Description.Behaviors.Add(smb) svcHost.Open() Console.WriteLine("Press <Enter> to close and end the Service Host") Console.ReadLine() End Using End Sub End Module A couple of things are going on in this file. First, in order to gain access to work with any of the WCF framework pieces, you need a reference to the System.ServiceModel and the System.ServiceModel.Description namespaces in the file. The System.ServiceModel gives you access to defining things such as the endpoints that you need to create, while the System.ServiceModel.Description namespace reference gives you access to defining things such as the WSDL file.
Remember that creating endpoints uses the ABC model (address, binding, and contract). The address part here is net.tcp://localhost:8080/Calculator. The binding is a TCP binding—NetTcpBinding—while the contract part is the ICalculator interface.
Many different bindings are available to you when coding WCF services. Here, this example makes use of the NetTcpBinding. The full list of available bindings is as follows:
- System.ServiceModel.BasicHttpBinding
- System.ServiceModel.Channels.CustomBinding
- System.ServiceModel.MsmqBindingBase
- System.ServiceModel.NetNamedPipeBinding
- System.ServiceModel.NetPeerTcpBinding
- System.ServiceModel.NetTcpBinding
- System.ServiceModel.WebHTTPBinding
- System.ServiceModel.WSDualHttpBinding
- System.ServiceModel.WSHttpBindingBase
Clearly, several bindings are available. In the preceding example, the NetTcpBinding class is the transport pipe being used. This means that the service being built will be delivered over TCP. At this point your development environment should look similar to what is shown in . However, before running the new console, let's look at the various commands it will use to host your custom service.
Editing the SecurityMode property in Visual Studio
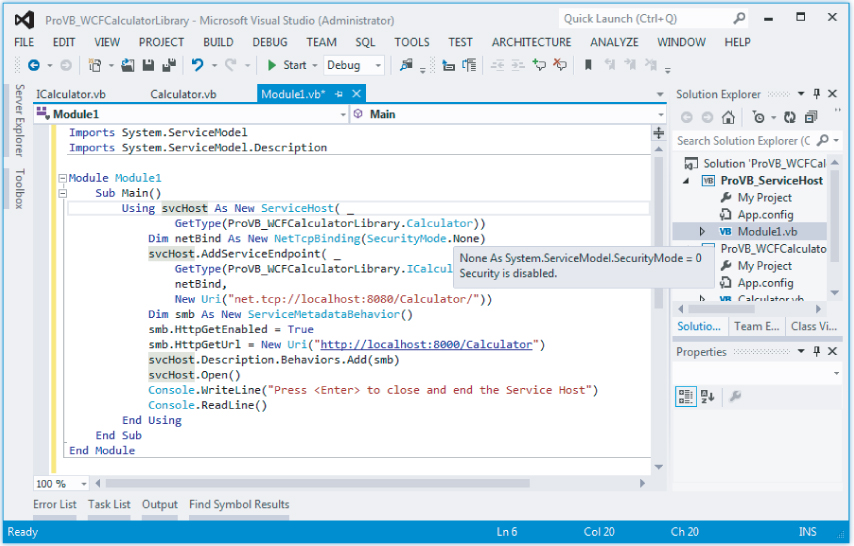
In the first step of the example, for the console-application code, a ServiceHost object is established:
Using svcHost As New ServiceHost( _ GetType(ProVB_WCFCalculatorLibrary.Calculator))
By working with the Using keyword, when the End Using statement is encountered, the ServiceHost object is destroyed. In the creation of the host, the Calculator type is assigned. From there, the endpoint is established. In this case, a NetTcpBinding object is created with a security setting of None through the command SecurityMode.None:
Dim netBind = New NetTcpBinding(SecurityMode.None)
This means that no security is applied to the message. The other options include Message, Transport, and TransportWithMessageCredential. The Message option signifies that the security credentials will be included in the message (in the SOAP header, for instance), whereas the Transport option indicates that the transport protocol provides the security implementation. The last option, TransportWithMessageCredential, means that the message contains some security credentials along with the transport protocol security provided by the transport protocol.
Once the NetTcpBinding object is in place, the next step is to finalize the endpoint creation. This is done through the use of the ServiceHost object's AddServiceEndpoint method:
svcHost.AddServiceEndpoint( _ GetType(ProVB_WCFCalculatorLibrary.ICalculator), netBind, New Uri("net.tcp://localhost:8080/Calculator/")) From this, you can see that the entire ABC statement is used in the creation of the endpoint, although not necessarily in ABC order; in fact, the first item defined is actually the “C”—the contract. This is done through the GetType(ICalculator)setting. The “B” is next (the binding) with the reference to the NetTcpBinding object. Then, finally, the “A” is defined through an instantiation of a Uri object pointing to net.tcp://localhost:8080/Calcuator/.
The next step is a process to bring forth the WSDL document so that it can be viewed by the developer consuming this service:
Dim smb As New ServiceMetadataBehavior() smb.HttpGetEnabled = True smb.HttpGetUrl = New Uri("http://localhost:8000/calculator") serviceHost.Description.Behaviors.Add(smb) This bit of code is the reason why the System.ServiceModel.Description namespace is imported into the file at the beginning. Here, a ServiceMetadataBehavior object is created, the object's HttpGetEnabled property is set to True, and the HttpGetUrl property is provided an address of . The documents can be located anywhere you like.
After the ServiceMetadataBehavior object is created as you wish, the next step is to associate this object with the ServiceHost through the serviceHost.Description.Behaviors.Add method.
After all of these items are defined, you need only open the ServiceHost for business, using the serviceHost.Open method. The console application is kept alive through the use of a Console .ReadLine method call, which waits for the end user to press the Enter key before shutting down the application. You want the Console.ReadLine command there because you want to keep the host open.
Compiling and running this application produces the results illustrated in . Note that you may initially get a firewall warning when you run this application, but you'll want to allow access for this application to communicate (at least locally) through your local firewall. Additionally, if you didn't start Visual Studio with Administrator rights as noted at the beginning of this step, you'll get a runtime error related to permissions.
Running ProVB_ServiceHost to host the service
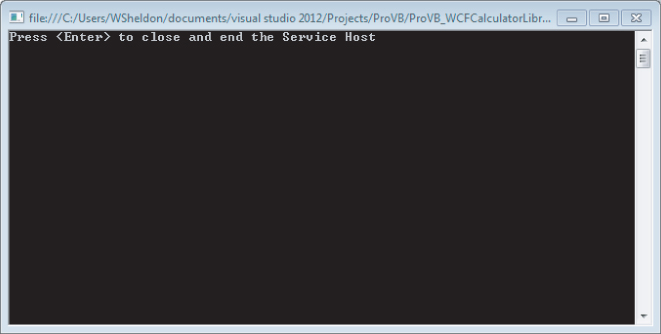
Keep in mind that your service is available only for as long as that console window is open and active; when you close the console you are stopping the listener for your new service. Also note that you aren't running the service within the Visual Studio's built-in tools. To do so you would need to edit the app.config file in the ProVB_WCFCalculatorLibrary project to properly reference your ICalculator interface.
Reviewing the WSDL Document
The preceding console-application code provides an instantiation of the ServiceMetadataBehavior object and defines a Uri object for it as well. You can simply type in that address to get at the WSDL file for the service you just built. Therefore, calling from your browser provides the WSDL file shown in .
Looking at the WSDL in Internet Explorer
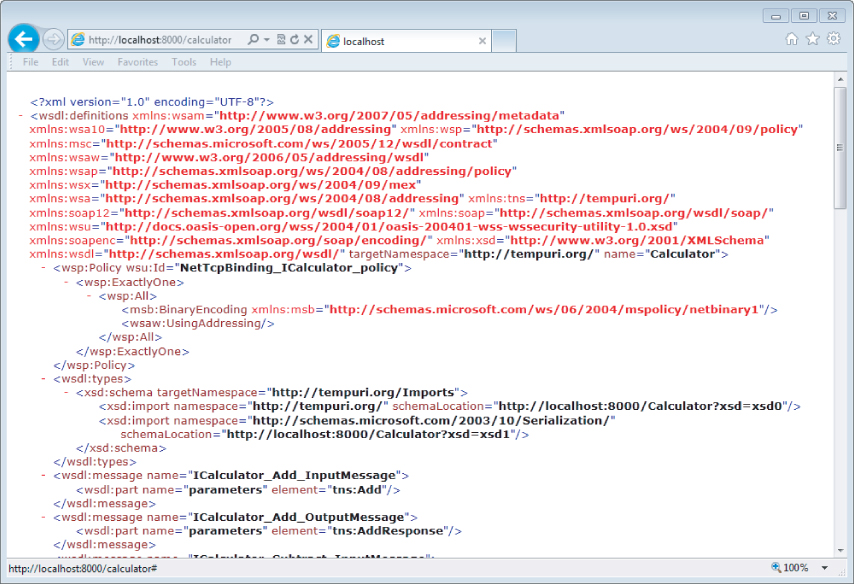
With this WSDL file, you can now consume the service it defines through TCP. Note the following element at the bottom of the document:
<wsdl:service name="Calculator"> <wsdl:port name="NetTcpBinding_ICalculator" binding="tns:NetTcpBinding_ICalculator"> <soap12:address location="net.tcp://localhost:8080/Calculator/" /> <wsa10:EndpointReference> <wsa10:Address>net.tcp://localhost:8080/Calculator/</wsa10:Address> </wsa10:EndpointReference> </wsdl:port> </wsdl:service>
This element in the XML document indicates that in order to consume the service, the end user needs to use SOAP 1.2 over TCP. This is presented through the use of the <soap12:address> element in the document. The <wsa10:EndpointReference> is a WS-Addressing endpoint definition.
Using this simple WSDL document, you can now build a consumer that makes use of this interface. Just as important, you have created not only a service that meets the standards for a Web service, but also a custom host that is communicating via standard protocols.
. The selections you make within this dialogue, and to some extent what you'll get at the other end, depends on how you've approached creating your project. You'll start with what you need to do if you have your client in a separate solution. Adding a reference to the service while it is running in your custom console application
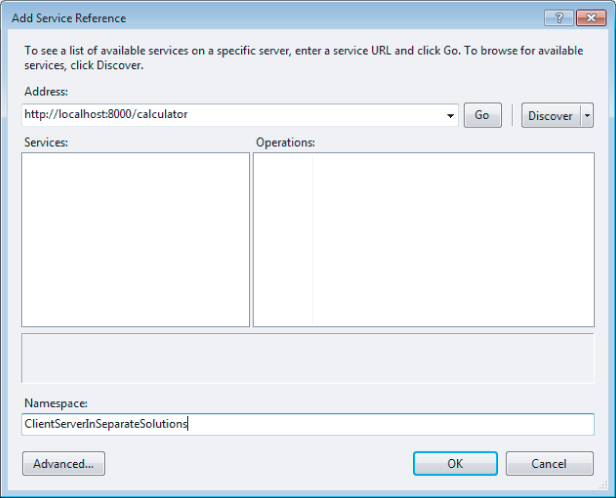
Adding a reference to the service while it is running in your custom console application

The Add Service Reference dialog asks you for two things: the Service URI (basically a pointer to the WSDL file) and the name you want to give to the reference. The name you provide the reference is the name that will be used for the instantiated object that enables you to interact with the service.
Referring to , you can see that the name provided for the Address text box is . Remember that this is the location you defined earlier when you built the service. This URI was defined in code directly in the service:
Dim smb As New ServiceMetadataBehavior() smb.HttpGetEnabled = True smb.HttpGetUrl = New Uri("http://localhost:8000/calculator") serviceHost.Description.Behaviors.Add(smb) Manually entering that URL is the difference between having your client in a separate solution and what you are about to do for a client in the same solution. Since in this case you are working with a service within the same solution, you are going to use the Discover button. The Discover button has a single option: Services in Solution. Using this button will trigger Visual Studio to look at the current solution, locate any services, and dynamically create a host for that service.
This is a great feature of Visual Studio, as it recognizes and supports the developer who needs to implement and test a WCF Service. Instead of needing that production URL, which you would need to track, it will simply create a runtime reference. illustrates the Add Service Reference dialog after having located the local service using the Discover button.
Adding a reference to the WCF service in the same solution
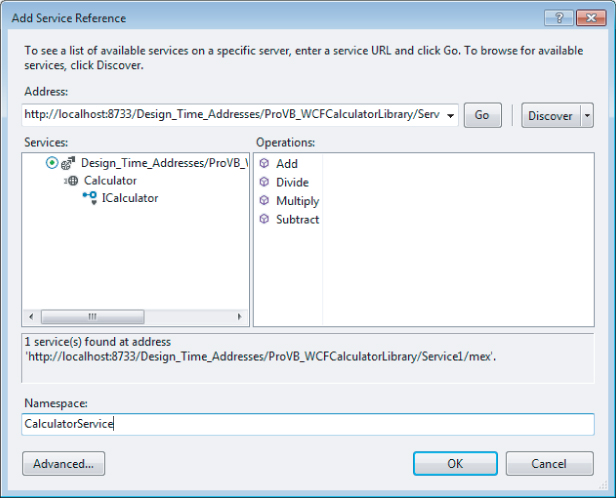
Notice that by expanding the top-level Calculator node within the Services pane in , a single interface is exposed, and selecting that interface populates the available operations in the Operations pane.
Rename the service reference to CalculatorService from ServiceReference1 (refer to ). Press the OK button in the Add Service Reference dialog.
Finally, a quick best practices note concerning the address. For this example and as a tester, you will of course have a generated or test URI. When the application is ready to deploy, you want this URI to reflect production. The best practice is to have a custom configuration setting in your app.config (or web.config) file that is updated with the production URI. This application setting is read at runtime, and then after the service reference is created, its uri property is updated with the correct value from the application configuration file.
Reviewing the Reference
You've now added a Service References folder to your project, which contains the proxy details for your Calculator service. This proxy is a collection of files, as shown in . Note that you'll need to show all the files in order to see the files shown in .
Solution Explorer displaying the Calculator service methods
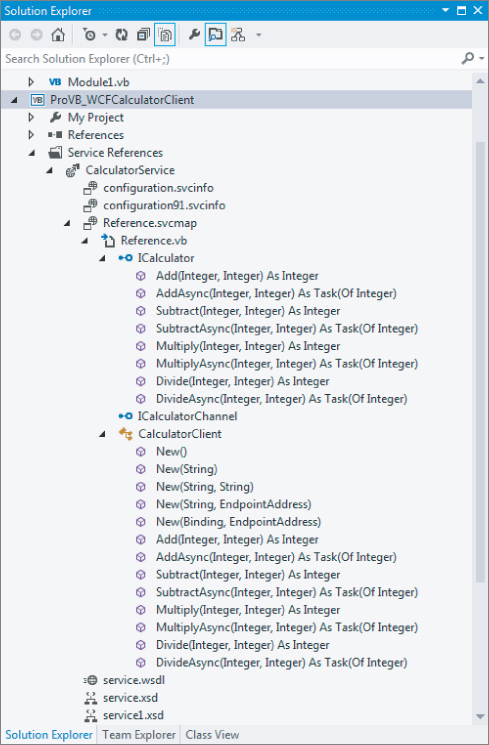
Digging down into these files, you will find Reference.svcmap and Reference.vb. The other important addition to note is the System.ServiceModel reference, made for you in the References folder.
Looking at the Reference.svcmap file, shown in , you see that it is a simple XML file that provides information about where the WSDL file is located, as well as the location of the service (referenced through the configuration.svcinfo file):
: Service Mapping—Reference.svcmap
<?xml version="1.0" encoding="utf-8"?> <ReferenceGroup xmlns:xsi=http://www.w3.org/2001/XMLSchema-instance xmlns:xsd="http://www.w3.org/2001/XMLSchema" ID="d5ec45e4-5a67-4609-840b-e332497cfb00" xmlns="urn:schemas-microsoft-com:xml-wcfservicemap"> <ClientOptions> <GenerateAsynchronousMethods>false</GenerateAsynchronousMethods> <GenerateTaskBasedAsynchronousMethod>true</GenerateTaskBasedAsynchronousMethod> <EnableDataBinding>true</EnableDataBinding> <ExcludedTypes /> <ImportXmlTypes>false</ImportXmlTypes> <GenerateInternalTypes>false</GenerateInternalTypes> <GenerateMessageContracts>false</GenerateMessageContracts> <NamespaceMappings /> <CollectionMappings /> <GenerateSerializableTypes>true</GenerateSerializableTypes> <Serializer>Auto</Serializer> <UseSerializerForFaults>true</UseSerializerForFaults> <ReferenceAllAssemblies>true</ReferenceAllAssemblies> <ReferencedAssemblies /> <ReferencedDataContractTypes /> <ServiceContractMappings /> </ClientOptions> <MetadataSources> <MetadataSource Address="http://localhost:8733/Design_Time_Addresses/ ProVB_WCFCalculatorLibrary/Service1/mex" Protocol="mex" SourceId="1" /> </MetadataSources> <Metadata> <MetadataFile FileName="service.wsdl" MetadataType="Wsdl" ID="b37c05b8-9185-433b-8138-c1ee6fff00e4" SourceId="1" SourceUrl="http://localhost:8733/Design_Time_Addresses/ ProVB_WCFCalculatorLibrary/Service1/mex" /> <MetadataFile FileName="service.xsd" MetadataType="Schema" ID="4558c7db-7585-4726-9b85-f8bdfc066c9c" SourceId="1" SourceUrl="http://localhost:8733/Design_Time_Addresses/ ProVB_WCFCalculatorLibrary/Service1/mex" /> <MetadataFile FileName="service1.xsd" MetadataType="Schema" ID="c532cecc-b644-4883-88b0-81ff697b608c" SourceId="1" SourceUrl="http://localhost:8733/Design_Time_Addresses/ ProVB_WCFCalculatorLibrary/Service1/mex" /> </Metadata> <Extensions> <ExtensionFile FileName="configuration91.svcinfo" Name="configuration91.svcinfo" /> <ExtensionFile FileName="configuration.svcinfo" Name="configuration.svcinfo" /> </Extensions> </ReferenceGroup>
Note that due to the length of many of the embedded strings, the preceding snippet has additional carriage returns embedded that are not part of the original file.
This file provides the capability to later update the reference to the service if needed, due to a change in the service interface. You can see this capability by right-clicking on the CalculatorService reference; an Update Service Reference option appears in the provided menu.
The other file in the reference collection of files, the Reference.vb file, is your proxy to interact with the service. The Reference.vb file, not shown, defines the four methods and the class CalculatorClient, which contains the method stubs to call the Calculator service built earlier in the chapter.
Configuration File Changes
Another addition to your project is the app.config file. After the service reference is made, the app.config file contains several new configuration settings. These configuration settings were automatically added by the Visual Studio WCF extensions. The new app.config file is presented in :
: Configuration—App.config
<?xml version="1.0" encoding="utf-8" ?> <configuration> <startup> <supportedRuntime version="v4.0" sku=".NETFramework,Version=v4.5" /> </startup> <system.serviceModel> <bindings> <basicHttpBinding> <binding name="BasicHttpBinding_ICalculator" /> </basicHttpBinding> </bindings> <client> <endpoint address= "http://localhost:8733/Design_Time_Addresses/ ProVB_WCFCalculatorLibrary/Service1/" binding="basicHttpBinding" bindingConfiguration= "BasicHttpBinding_ICalculator" contract="CalculatorService.ICalculator" name="BasicHttpBinding_ICalculator" /> </client> </system.serviceModel> </configuration>
The information in the basicHttpBinding section is greatly reduced from previous versions. Note that if you right-click on your service reference, another context menu option is to Configure Your Service Reference. The resulting dialogue has far fewer options then previous versions as most settings are now handled under the covers automatically.
The other key node in the configuration document is the <client> element. This element contains a child element called <endpoint> that defines the where and how of the service consumption process.
The <endpoint> element provides the address of the service—and it specifies which binding of the available WCF bindings should be used. In this case, the BasicHttpBinding is the required binding. Although you are using an established binding from the WCF framework, from the client side you can customize how this binding behaves. As noted, the settings that define the behavior of the binding are specified using the bindingConfiguration attribute of the <endpoint> element. In this case, the value provided to the bindingConfiguration attribute is BasicHttpBinding_ICalculator, which is a reference to the <binding> element contained within the <basicHttpBinding> element.
Note one important distinction here. If instead of using the built-in Visual Studio test engine to test your service declaration, you bound to the custom client, you would find that this configuration file would be subtly different. Instead of having a basicHttpBinding, you would have a netTCP binding. This binding would have different setting defaults and, more important, indicate a different transport protocol for your requests. If you play with these two different bindings, you'll find that the binary format used by netTCP responds much more quickly than the basicHttpBinding that Visual Studio has generated for you.
As demonstrated, the Visual Studio 2012 capabilities for WCF make the consumption of these services fairly trivial. The next step is to code the Windows Forms project to test the consumption of the service interface.
Writing the Consumption Code
The code to consume the interface is quite minimal. End users will merely select the radio button of the operation they want to perform. The default radio button selected is Add. The user places a number in each of the two text boxes provided and clicks the Calculate button to call the service to perform the designated operation on the provided numbers.
To accomplish this, add two text boxes, four radio buttons, one button, and one label to your window. The display (for labeling the controls) should look similar to what is shown in . Next, you want to create two event handlers; the first is on Form Load to prepopulate the text boxes with default numbers (to speed testing), and the second is an event handler for the button you've labeled Calculate.
Designing the calculator client
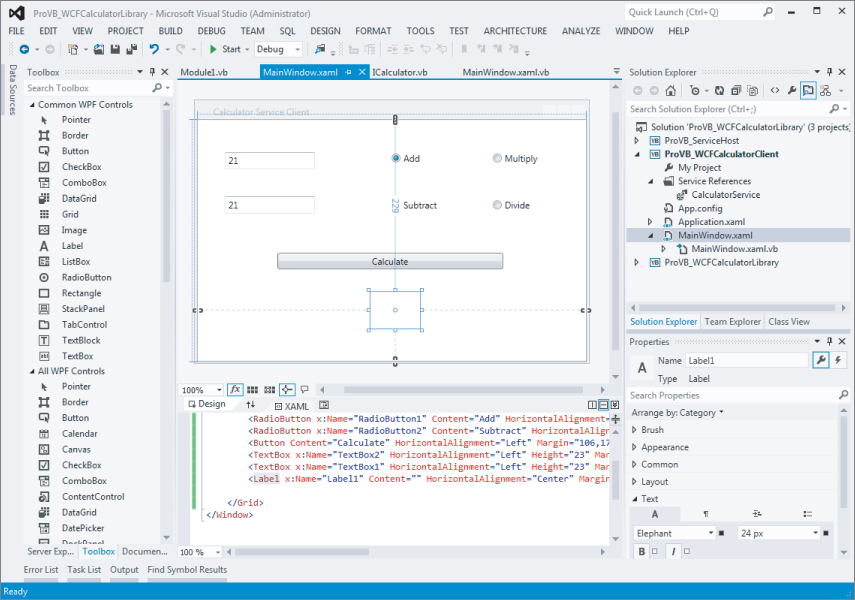
Clicking the Calculate button will create an instance of the service and then open a connection and make the appropriate call. In a production environment, you might keep a static instance of the service available in your application so you could create it once instead of for each event. Similarly, you'll want to follow the best practice mentioned earlier of assigning the URI at runtime based on an application setting.
To implement a call to the service add a button handler for the button labeled Calculate. Also note that you'll need to name each of the radio buttons and the text boxes used in the client. The button doesn't need a name. A copy of the code is shown in :
: Calculate Event Handler—MainWindow.xaml.vb
Class MainWindow Private Sub Button_Click_1(sender As Object, e As RoutedEventArgs) Dim result As Integer Dim ws As New CalculatorService.CalculatorClient() ws.Open() If RadioButton1.IsChecked = True Then result = ws.Add(Integer.Parse(TextBox1.Text), Integer.Parse(TextBox2.Text)) ElseIf RadioButton2.IsChecked = True Then result = ws.Subtract(Integer.Parse(TextBox1.Text), Integer.Parse(TextBox2.Text)) ElseIf RadioButton3.IsChecked = True Then result = ws.Multiply(Integer.Parse(TextBox1.Text), Integer.Parse(TextBox2.Text)) ElseIf RadioButton4.IsChecked = True Then result = ws.Divide(Integer.Parse(TextBox1.Text), Integer.Parse(TextBox2.Text)) End If ws.Close() Label1.Content = result.ToString() End Sub End Class
This is quite similar to the steps taken when working with Web references from the XML Web Services world. First is an instantiation of the proxy class, as shown with the creation of the svc object:
Dim ws As New CalculatorService.CalculatorClient()
Working with the ws object now, the IntelliSense options provide you with the appropriate Add, Subtract, Multiply, and Divide methods. Running this application provides results similar to those presented in .
Displaying the results of the service call in the client
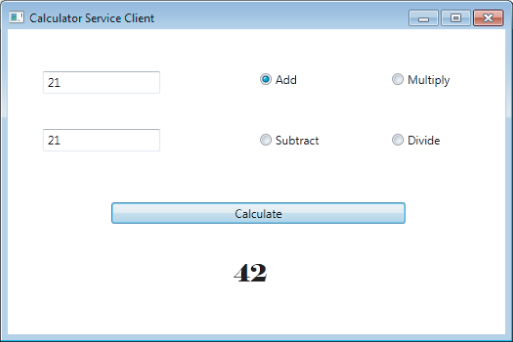
In this case, the Add method is invoked from the service when the form's Calculate button is pressed.
Another best practice is to get a tool such as Fiddler2 to track communication with your service. ( This free tool enables you to view messages sent across a HTTP/HTTPS connection.
Note that while this tool will work if you've used Visual Studio to configure your testing to be transported via HTTP, if you've relied on the custom client, you'll find that the requests are instead sent as binary data over TCP and are not available to Fiddler2.
Using a binding to the custom client means the requests and responses are sent over TCP as binary, dramatically decreasing the size of the payload for large messages. This is something that .NET Remoting was used for prior to the release of the WCF framework.
This concludes the short tutorial demonstrating how to build a single service that can support two different endpoints. Visual Studio 2012 can generate one such endpoint, which is based on the same XML and open standards as a traditional Web service. The other you built manually into your command-line application to support the TCP protocol and binary data transfer. Depending on how you map that service to your client, you can consume the service as either an XML-based data transfer or a binary data transfer that can map directly into your .NET Windows Forms application.
:
: Contract Definitions—IHelloCustomer.vb
<ServiceContract()> _ Public Interface IHelloCustomer <OperationContract()> _ Function HelloFirstName(ByVal cust As Customer) As String <OperationContract()> _ Function HelloFullName(ByVal cust As Customer) As String End Interface <DataContract()> _ Public Class Customer <DataMember()> _ Public FirstName As String <DataMember()> _ Public LastName As String End Class
Similarly, the project contains the file HelloCustomer.vb, which contains the implementation class as shown in :
: Service Implementation—HelloCustomer.vb
Public Class HelloCustomer Implements IHelloCustomer Public Function HelloFirstName(ByVal cust As Customer) As String _ Implements IHelloCustomer.HelloFirstName Return "Hello " & cust.FirstName End Function Public Function HelloFullName(ByVal cust As Customer) As String _ Implements IHelloCustomer.HelloFullName Return "Hello " & cust.FirstName & " " & cust.LastName End Function End Class
This class, the Customer class, has two members: FirstName and LastName. Both of these properties are of type String. You specify a class as a data contract as part of the interface definition through the use of the <DataContract()> attribute:
<DataContract()> _ Public Class Customer ' Code removed for clarity End Class
Now, any of the properties contained in the class are also part of the data contract through the use of the <DataMember()> attribute:
<DataContract()> _ Public Class Customer <DataMember()> _ Public FirstName As String <DataMember()> _ Public LastName As String End Class
Finally, the Customer object is used in the interface, as well as the class that implements the IHelloCustomer interface.
. Obviously, you do not want to go live with this default namespace. Instead, you need to define your own namespace.
To accomplish this task, the interface's <ServiceContract()> attribute enables you to set the namespace:
<ServiceContract(Namespace:="http://www.Wrox.com/ns/")> _ Public Interface IHelloCustomer <OperationContract()> _ Function HelloFirstName(ByVal cust As Customer) As String <OperationContract()> _ Function HelloFullName(ByVal cust As Customer) As String End Interface
Here, the <ServiceContract()> attribute uses the Namespace property to provide a namespace.
Building the Host
Next create a service host, using the same steps as before: Create a new Console Application project to act as the WCF service host. Name the new project ProVB_WCFWithDataContractHost and change the Module1.vb file so that it becomes the host of the WCF service you just built. Keep in mind that you'll need to add the appropriate project reference and System.ServiceModel references to the code. Once that is complete, the updated code will look similar to :
: Service Host Implementation—ProVB_WCFWithDataContractHost\Module1.vb
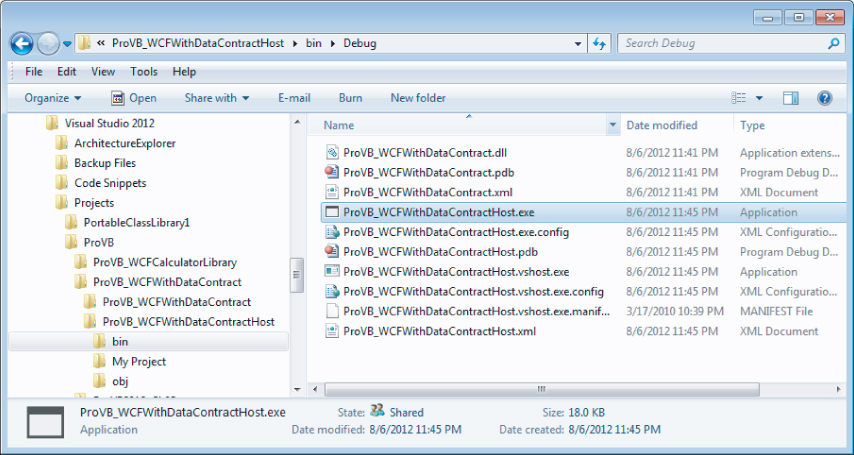
Imports System.ServiceModel Imports System.ServiceModel.Description Module Module1 Sub Main() Using svcHost = New ServiceHost(GetType(ProVB_WCFWithDataContract.HelloCustomer)) Dim netBind = New NetTcpBinding(SecurityMode.None) svcHost.AddServiceEndpoint(GetType(ProVB_WCFWithDataContract.IHelloCustomer), netBind, New Uri("net.tcp://localhost:8080/HelloCustomer/")) Dim smb = New ServiceMetadataBehavior() smb.HttpGetEnabled = True smb.HttpGetUrl = New Uri("http://localhost:8000/HelloCustomer") svcHost.Description.Behaviors.Add(smb) svcHost.Open() Console.WriteLine("Press the <ENTER> key to close the host.") Console.ReadLine() End Using End Sub End Module This host uses the IHelloCustomer interface and builds an endpoint at net.tcp://localhost:8080/HelloCustomer. This time, however, you'll have this running when you map your interface so you can see an example of the TCP binding. Build your solution and show all files in the Solution Explorer for your host project. You can then see the bin folder for your project, which contains the Debug folder. Right-click the Debug folder and from the context menu select Open Folder in Windows Explorer.
This should give you a view similar to what is shown in . Right-click on ProVB_WCFWithDataContractHost and run your application as Administrator (you may be prompted to resolve a firewall issue and to confirm that you want to elevate the privileges of this process) to start your WCF host outside of Visual Studio. By starting this application outside of Visual Studio, you can directly reference the TCP-based binding you created as part of your host console from the Add Service Reference dialogue. Just leave this running in the background as you continue this example.
Accessing the compiled assembly to test run as Administrator
Building the Consumer
Now that the service is running and in place, the next step is to build the consumer. To begin, add a new Console Application project to your Service Library solution called ProVB_HelloWorldConsumer. Right-click on the project and select Add Service Reference from the options provided. In short you are going to create another copy of the service host created in the previous example.
From the Add Service Reference dialog, target your custom service host by entering as the service URI. Then simply rename the default ServiceReference1 with the name HelloCustomerService as shown in .
Add a service reference to your running service
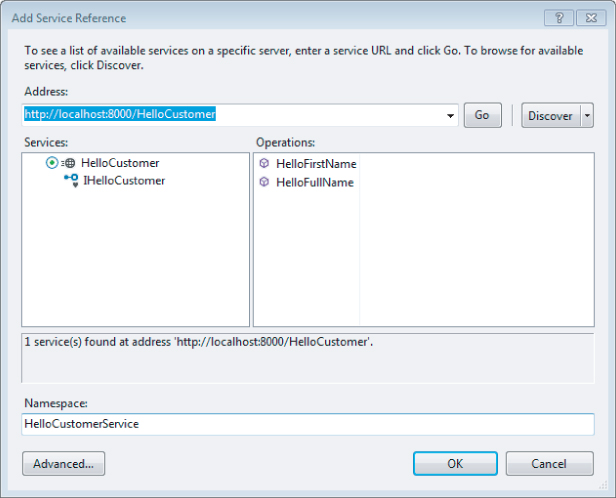
This will add the changes to the references and the app.config file just as before, enabling you to consume the service. You can use the steps to create the service host from the first sample, but update the connections to reference the new service, as shown in .
: Service Client Code—ProVB_HelloWorldConsumer\Module1.vb
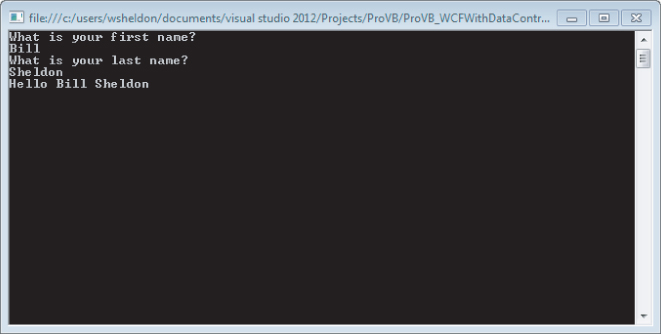
Module Module1 Sub Main() Dim svc As New HelloCustomerService.HelloCustomerClient() Dim cust As New HelloCustomerService.Customer() Dim result As String svc.Open() Console.WriteLine("What is your first name?") cust.FirstName = Console.ReadLine() Console.WriteLine("What is your last name?") cust.LastName = Console.ReadLine() result = svc.HelloFullName(cust) svc.Close() Console.WriteLine(result) Console.ReadLine() End Sub End Module As a consumer, once you make the reference, the service reference doesn't just provide a HelloCustomerClient object; you will also find the Customer object that was defined through the service's data contract.
Therefore, the preceding code block just instantiates both of these objects and builds the Customer object before it is passed into the HelloFullName method provided by the service. Running this bit of code will return the results shown in .
Consuming the service
Looking at WSDL and the Schema for HelloCustomerService
After you made the reference to the HelloCustomer service, it was possible for you to review the WSDL in your new reference. With the Solution Explorer showing all files, you'll see the HelloCustomer1.wsdl within your solution. You can open this file to look at the WSDL, where you will find the following XSD imports:
<wsdl:types> <xsd:schema targetNamespace="http://www.Wrox.com/ns/Imports"> <xsd:import schemaLocation="http://localhost:8000/HelloCustomer?xsd=xsd0" namespace="http://www.Wrox.com/ns/" /> <xsd:import schemaLocation="http://localhost:8000/HelloCustomer?xsd=xsd1" namespace="http://schemas.microsoft.com/2003/10/Serialization/" /> <xsd:import schemaLocation="http://localhost:8000/HelloCustomer?xsd=xsd2" namespace="http://schemas.datacontract.org/2004/07/ ProVB_WCFWithDataContract" /> </xsd:schema> </wsdl:types>
provides the details about your Customer object. The code from the file HelloCustomer2.xsd, which is part of your reference definition, is shown here:
<?xml version="1.0" encoding="utf-8"?> <xs:schema xmlns:tns="http://schemas.datacontract.org/2004/07/ProVB_WCFWithDataContract" elementFormDefault="qualified" targetNamespace= "http://schemas.datacontract.org/2004/07/ProVB_WCFWithDataContract" xmlns:xs="http://www.w3.org/2001/XMLSchema"> <xs:complexType name="Customer"> <xs:sequence> <xs:element minOccurs="0" name="FirstName" nillable="true" type="xs:string" /> <xs:element minOccurs="0" name="LastName" nillable="true" type="xs:string" /> </xs:sequence> </xs:complexType> <xs:element name="Customer" nillable="true" type="tns:Customer" /> </xs:schema>
This is an XSD description of the Customer object. Making a reference to the WSDL that includes the XSD description of the Customer object causes the auto-generated proxy class (located in the file Reference.vb) to create the following class as part of the proxy (this code follows the Namespace declaration in the downloadable sample):
<System.Diagnostics.DebuggerStepThroughAttribute(), _ System.CodeDom.Compiler.GeneratedCodeAttribute("System.Runtime.Serialization" _ , "4.0.0.0"), _ System.Runtime.Serialization.DataContractAttribute(Name:="Customer", _ [Namespace]:= _ "http://schemas.datacontract.org/2004/07/ProVB_WCFWithDataContract"), _ System.SerializableAttribute()> _ Partial Public Class Customer Inherits Object Implements System.Runtime.Serialization.IExtensibleDataObject, System.ComponentModel.INotifyPropertyChanged <System.NonSerializedAttribute()> _ Private extensionDataField As _ System.Runtime.Serialization.ExtensionDataObject <System.Runtime.Serialization.OptionalFieldAttribute()> _ Private FirstNameField As String <System.Runtime.Serialization.OptionalFieldAttribute()> _ Private LastNameField As String <Global.System.ComponentModel.BrowsableAttribute(false)> _ Public Property ExtensionData() As _ System.Runtime.Serialization.ExtensionDataObject _ Implements System.Runtime.Serialization.IExtensibleDataObject.ExtensionData Get Return Me.extensionDataField End Get Set Me.extensionDataField = value End Set End Property <System.Runtime.Serialization.DataMemberAttribute()> _ Public Property FirstName() As String Get Return Me.FirstNameField End Get Set If (Object.ReferenceEquals(Me.FirstNameField, value) <> _ true) Then Me.FirstNameField = value Me.RaisePropertyChanged("FirstName") End If End Set End Property <System.Runtime.Serialization.DataMemberAttribute()> _ Public Property LastName() As String Get Return Me.LastNameField End Get Set If (Object.ReferenceEquals(Me.LastNameField, value) <> _ true) Then Me.LastNameField = value Me.RaisePropertyChanged("LastName") End If End Set End Property As you can see, Visual Studio and WCF provide the tools you need to define and share complex data types across a distributed system. Combined with the other powerful features supported by WCF, you have the tools to build robust, enterprise-quality distributed solutions.
Summary
This chapter looked at one of the more outstanding capabilities provided to the Visual Basic world. Visual Studio 2012 and .NET are a great combination for building advanced services that take your application to a distributed level.
Though not exhaustive, this chapter broadly outlined the basics of the WCF framework. As you begin to dig more deeply into the technology, you will find strong and extensible capabilities.
From here you will transition to creating custom user interfaces. While we've placed simple applications user interfaces in many of the samples, you have now covered enough of what is needed to work behind complex user interfaces. The next block of chapters moves away from looking at business or application tier code and focuses firmly on the user interface.

