Chapter 10
Data Access with the Entity Framework
What's in this chapter?
What is Object-Relational Mapping?
What is the Entity Framework?
How the Entity Framework works with databases
Using the Entity Framework to edit data
on the Download Code tab. The code discussed throughout this chapter is contained in the EFSimpleExample project.
In the past, Microsoft has been known to change the recommended data access strategy relatively frequently. For example, Data Access Objects (DAO) was released in the Visual Basic 3.0 time frame, followed by RDO (Remote Data Objects) as an option in the Visual Basic 4 days, and ADO (Active Database Objects) with Visual Basic 6. Of course, all of these were COM libraries, so it was no surprise when they were superseded by ADO.NET when the .NET Framework shipped. There have been remarkably few changes to ADO.NET since then.
The Entity Framework (EF) does not replace ADO.NET. You can continue to use ADO.NET without fear of it going away, even as a recommended data access tool. The Entity Framework simply provides a different — richer and more flexible — model for working with data sources.
Beyond simply being a set of classes you use to access your data, Entity Framework enables you to work naturally with the data using the classes you have designed, while saving the data to the underlying database schema. The Entity Framework provides the mapping necessary to convert the data structures, variable types, and relationships between the Visual Basic data you work with in your applications to the SQL Server, Oracle, or other database. It offers a means of working with your database more easily and more naturally than with ADO.NET, without requiring you to manually build your own data access layer.
Compared to LINQ to SQL, Entity Framework provides most of the same functionality for rapidly accessing your data. Where it differs is that Entity Framework provides a great deal of functionality not provided by LINQ to SQL, such as the ability to use databases other than SQL Server, and the ability to use client-side classes that don't directly map to database tables.
shows the architecture used within the Entity Framework. As you can see from the diagram, the Entity Framework is composed of a number of logical layers. The lowest layer is related to the actual data access, and involves the familiar ADO.NET data providers. The Entity Framework is not an entirely new method of retrieving data, but is an extension of your existing knowledge of ADO.NET. The additional layers are intended to make your development experience easier and more flexible. At the data layer, Entity Framework does not differ from ADO.NET or LINQ to SQL, as it deals with the tables directly. Entity Framework Layer Diagram
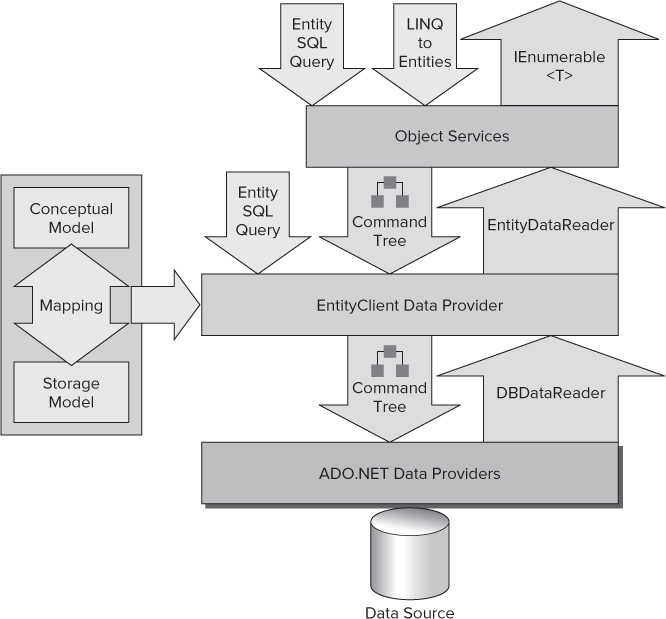
Entity Framework Layer Diagram

Above the actual data access layer is the storage layer. This is basically a representation of the structure of the database, using XML syntax. It includes any of the tables you've added to your model, as well as the relationships between them.
Above the storage layer is the mapping layer. This serves as a means of translating between the storage layer below and the conceptual layer above. You can think of it as a relatively thin layer, responsible for mapping the fields of the database tables to the appropriate properties of the classes used by your application.Next is the conceptual layer. This is the layer that provides the entities of your model, providing you with the classes you will work with in your applications — either the classes generated by the Entity Framework designer or your own classes, as you'll see later.
Finally, there is the object services layer. This serves to provide LINQ and Entity Query Language (Entity SQL) syntax over your conceptual model.
When you see a diagram like the one shown in , your first instinct may be to worry about the performance penalties that these additional layers cause to your application. Of course, every mapping, abstraction, or communication adds to the query and/or update time; this is to be expected. However, the decision to use Entity Framework should not be entirely based on whether it is faster or slower than classic ADO.NET. Rather, it should depend on a combination of “Is it fast enough for my needs?” and “How much more productive does it make me?” Because Entity Framework uses the core ADO.NET objects, there is no way it can be faster than, or even as fast as, using those classes themselves. However, working with Entity Framework can be a much more natural development process, meaning you can be much more productive in creating — and, more important, maintaining — your data access code.
Conceptual Model
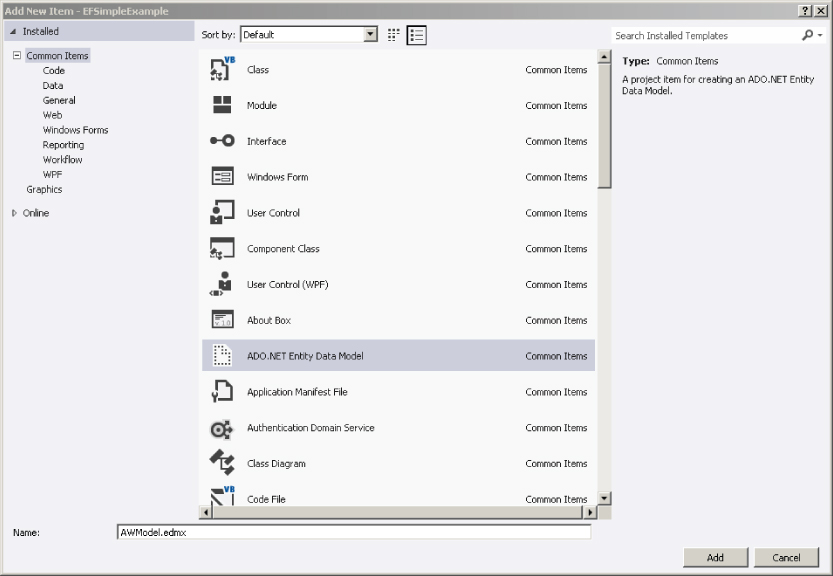
Your Entity Framework applications deal directly with the conceptual models you either generate or create. To see how these are constructed, create a simple console application (EFSimpleExample) and add an ADO.NET Entity Data Model to the application by selecting Project ⇒ Add New Item (see ).
Add ADO.NET Entity Data Model
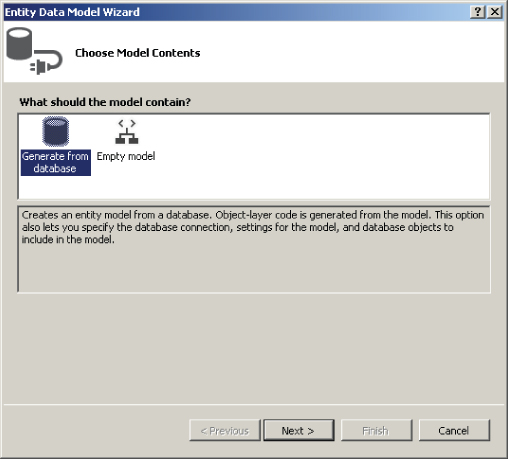
When you add an Entity Framework model to your application, it starts a wizard to generate the classes. The first step is to decide if you will generate your classes initially from a database or from a blank slate. For now, select to generate the classes from the database (see ). Select the AdventureWorks database.
Generate Model from Database
The connection string generated at this stage (see ) can look a little foreboding to anyone used to the simpler SQL Server or Access connection strings.
Choose Data Connection
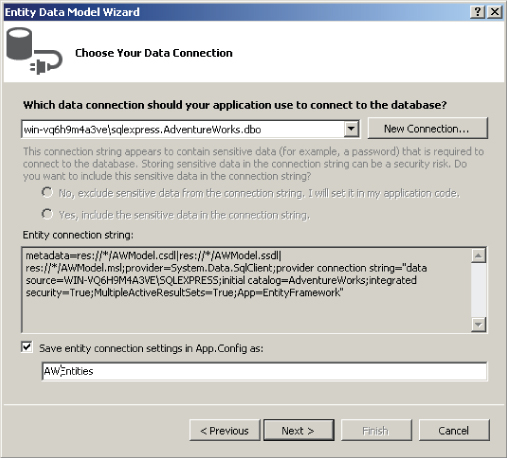
metadata=res://*/AWModel.csdl|res://*/AWModel.ssdl|res://*/AWModel.msl; provider=System.Data.SqlClient;provider connection string="data source=WIN-VQ6H9M4A3VE\SQLEXPRESS; initial catalog=AdventureWorks;integrated security=True; MultipleActiveResultSets=True;App=EntityFramework"
Ignoring the first few sections, you can see the “normal” connection string contained within this connection. The reason it has the additional sections is because this connection string will be used by all three layers (storage, conceptual, and mapping), not just the connection to the database. The three additional parts of the connection string identify the files that will define the structure of each layer.
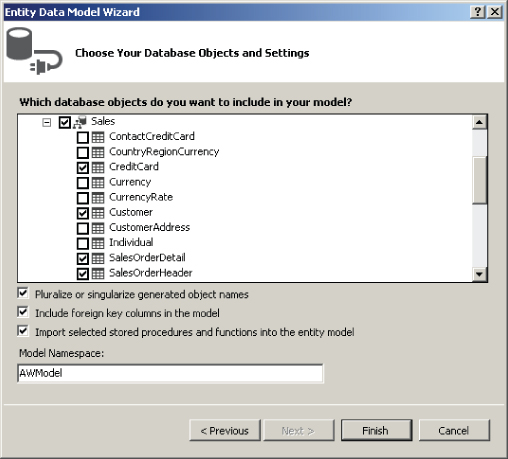
Next, just as with LINQ to SQL, you can choose the database objects you would like to include in your model. For now, just select the CreditCard, Customer, SalesOrderDetail, and SalesOrderHeader tables (see ) and click Finish.
Choose Database Objects
shows the resulting model in Visual Studio. Notice that it includes the relationships between the three tables in the model in addition to creating properties that represent the columns in the database.
New Data Model
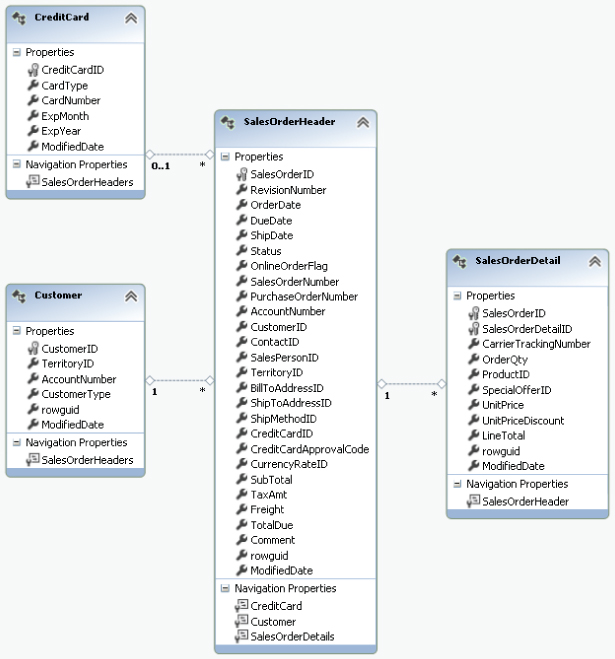
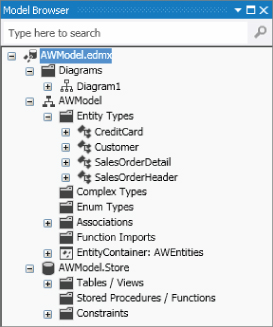
Finally, the wizard has created a number of navigation properties that represent the foreign key relationships. You can explore your model within this designer window or use the Model Browser pane that opens in Visual Studio (see ) which you can view by selecting View ⇒ Other Windows ⇒ Entity Data Model Browser.
Model Browser
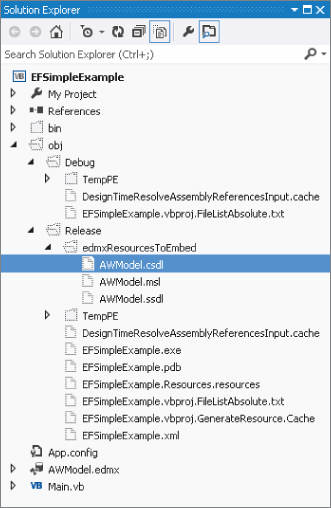
Build the application but don't run it yet. Once you have it built, select the Show All Files option in the Solution Explorer (see ). If you navigate into the generated obj folder, you will find the three generated XML files.
Generate XML Files
The following code shows a portion of the CSDL file, which is the conceptual model:
<?xml version="1.0" encoding="utf-8"?> <Schema Namespace="AWModel" Alias="Self" p1:UseStrongSpatialTypes="false" xmlns:annotation="http://schemas.microsoft.com/ado/2009/02/edm/annotation" xmlns:p1="http://schemas.microsoft.com/ado/2009/02/edm/annotation" xmlns="http://schemas.microsoft.com/ado/2009/11/edm"> <EntityContainer Name="AWEntities" p1:LazyLoadingEnabled="true"> <EntitySet Name="CreditCards" EntityType="AWModel.CreditCard" /> <EntitySet Name="Customers" EntityType="AWModel.Customer" /> <EntitySet Name="SalesOrderDetails" EntityType="AWModel.SalesOrderDetail" /> <EntitySet Name="SalesOrderHeaders" EntityType="AWModel.SalesOrderHeader" /> <AssociationSet Name="FK_SalesOrderHeader_CreditCard_CreditCardID" Association="AWModel.FK_SalesOrderHeader_CreditCard_CreditCardID"> <End Role="CreditCard" EntitySet="CreditCards" /> <End Role="SalesOrderHeader" EntitySet="SalesOrderHeaders" /> </AssociationSet> <AssociationSet Name="FK_SalesOrderHeader_Customer_CustomerID" Association="AWModel.FK_SalesOrderHeader_Customer_CustomerID"> <End Role="Customer" EntitySet="Customers" /> <End Role="SalesOrderHeader" EntitySet="SalesOrderHeaders" /> </AssociationSet> <AssociationSet Name="FK_SalesOrderDetail_SalesOrderHeader_SalesOrderID" Association="AWModel.FK_SalesOrderDetail_SalesOrderHeader_SalesOrderID"> <End Role="SalesOrderHeader" EntitySet="SalesOrderHeaders" /> <End Role="SalesOrderDetail" EntitySet="SalesOrderDetails" /> </AssociationSet> </EntityContainer> <EntityType Name="CreditCard"> <Key> <PropertyRef Name="CreditCardID" /> </Key> <Property Name="CreditCardID" Type="Int32" Nullable="false" p1:StoreGeneratedPattern="Identity" /> <Property Name="CardType" Type="String" Nullable="false" MaxLength="50" Unicode="true" FixedLength="false" /> <Property Name="CardNumber" Type="String" Nullable="false" MaxLength="25" Unicode="true" FixedLength="false" /> <Property Name="ExpMonth" Type="Byte" Nullable="false" /> <Property Name="ExpYear" Type="Int16" Nullable="false" /> <Property Name="ModifiedDate" Type="DateTime" Nullable="false" Precision="3" /> <NavigationProperty Name="SalesOrderHeaders" Relationship="AWModel.FK_SalesOrderHeader_CreditCard_CreditCardID" FromRole="CreditCard" ToRole="SalesOrderHeader" /> </EntityType> ...
This snippet shows some of the main terms you will see repeatedly throughout your work with the Entity Framework. The EntityType defines one of your objects — in this case, the CreditCard class. The collection of credit cards is defined as an EntitySet. There are AssociationSets that define the relationships between the various EntityTypes. Finally, there is an EntityContainer that groups everything. One point to notice is that each of the Property elements in the XML file has a Type attribute. This attribute uses Visual Basic data types, rather than database-specific types. This XML file will be updated as you change your conceptual model.
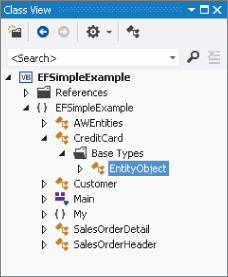
If you look at one of the generated types in the Class View window (see ), you will see that it inherits from EntityObject. The EntityObject class in turn inherits from StructuralObject and implements three interfaces (IEntityWithChangeTracker, IEntityWithKey and IEntityWithRelationships). The names of these three interfaces give you some idea of what the generated classes are capable of:
Class View
Storage Model
The storage model XML initially looks similar to the conceptual model XML (see the generated AWModel.ssdl file in the Solution Explorer View):
<?xml version="1.0" encoding="utf-8"?> <Schema Namespace="AWModel.Store" Alias="Self" Provider="System.Data.SqlClient" ProviderManifestToken="2008" xmlns:store="http://schemas.microsoft.com/ado/2007/12/edm/ EntityStoreSchemaGenerator" xmlns="http://schemas.microsoft.com/ado/2009/11/edm/ssdl"> <EntityContainer Name="AWModelStoreContainer"> <EntitySet Name="CreditCard" EntityType="AWModel.Store.CreditCard" store:Type="Tables" Schema="Sales" /> <EntitySet Name="Customer" EntityType="AWModel.Store.Customer" store:Type="Tables" Schema="Sales" /> <EntitySet Name="SalesOrderDetail" EntityType="AWModel.Store.SalesOrderDetail" store:Type="Tables" Schema="Sales" /> <EntitySet Name="SalesOrderHeader" EntityType="AWModel.Store.SalesOrderHeader" store:Type="Tables" Schema="Sales" /> <AssociationSet Name="FK_SalesOrderDetail_SalesOrderHeader_SalesOrderID" Association="AWModel.Store. FK_SalesOrderDetail_SalesOrderHeader_SalesOrderID"> <End Role="SalesOrderHeader" EntitySet="SalesOrderHeader" /> <End Role="SalesOrderDetail" EntitySet="SalesOrderDetail" /> </AssociationSet> <AssociationSet Name="FK_SalesOrderHeader_CreditCard_CreditCardID" Association="AWModel.Store.FK_SalesOrderHeader_CreditCard_CreditCardID"> <End Role="CreditCard" EntitySet="CreditCard" /> <End Role="SalesOrderHeader" EntitySet="SalesOrderHeader" /> </AssociationSet> <AssociationSet Name="FK_SalesOrderHeader_Customer_CustomerID" Association="AWModel.Store.FK_SalesOrderHeader_Customer_CustomerID"> <End Role="Customer" EntitySet="Customer" /> <End Role="SalesOrderHeader" EntitySet="SalesOrderHeader" /> </AssociationSet> </EntityContainer> <EntityType Name="CreditCard"> <Key> <PropertyRef Name="CreditCardID" /> </Key> <Property Name="CreditCardID" Type="int" Nullable="false" StoreGeneratedPattern="Identity" /> <Property Name="CardType" Type="nvarchar" Nullable="false" MaxLength="50" /> <Property Name="CardNumber" Type="nvarchar" Nullable="false" MaxLength="25" /> <Property Name="ExpMonth" Type="tinyint" Nullable="false" /> <Property Name="ExpYear" Type="smallint" Nullable="false" /> <Property Name="ModifiedDate" Type="datetime" Nullable="false" /> </EntityType> ...
One major difference between this file and the earlier conceptual model is that the types in the storage model are SQL Server data types. In addition, unlike the conceptual model file, this file will not change as you update your Entity Framework model, as it is tied to the database structure.
Mapping Model
Finally, you have the third XML file, the mapping schema language (MSL) file:
<?xml version="1.0" encoding="utf-8"?> <Mapping Space="C-S" xmlns="http://schemas.microsoft.com/ado/2009/11/mapping/cs"> <EntityContainerMapping StorageEntityContainer="AWModelStoreContainer" CdmEntityContainer="AWEntities"> <EntitySetMapping Name="CreditCards"> <EntityTypeMapping TypeName="AWModel.CreditCard"> <MappingFragment StoreEntitySet="CreditCard"> <ScalarProperty Name="CreditCardID" ColumnName="CreditCardID" /> <ScalarProperty Name="CardType" ColumnName="CardType" /> <ScalarProperty Name="CardNumber" ColumnName="CardNumber" /> <ScalarProperty Name="ExpMonth" ColumnName="ExpMonth" /> <ScalarProperty Name="ExpYear" ColumnName="ExpYear" /> <ScalarProperty Name="ModifiedDate" ColumnName="ModifiedDate" /> </MappingFragment> </EntityTypeMapping> </EntitySetMapping> ...
This may seem like a great deal of overhead, as it appears to map properties of the classes to the identical fields of tables. However, as you customize the conceptual model, the mapping model will change to reflect the new structure. As the Entity Framework supports mapping a single object to multiple tables, or vice versa, this mapping model increases in importance, and is the core benefit of using a framework such as Entity Framework.
LINQ to Entities
Just as there is LINQ to SQL, LINQ to XML, and LINQ to objects, there is also LINQ syntax for working with Entity Framework models. The syntax is very similar to that used by LINQ to SQL, in that a context object is used as your access point to the exposed classes. You first create an instance of that context object and then use it to access the entities in your model. The following shows a LINQ query to retrieve customers in territory 1:
Sub Main() Dim ctx As New AWEntities Dim customers = From c In ctx.Customers Where c.TerritoryID = 1 Order By c.AccountNumber Select c For Each c In customers.ToList Console.WriteLine("# {0} Last Updated: {1}", c.AccountNumber, c.ModifiedDate) Next Console.ReadLine() End Sub Here, the new context object (AWEntities) is defined within the routine, but you are more likely to create it once and use it throughout your application. The remainder of the query defines a restriction and a sort, and returns all the properties.
The ObjectContext
As you have seen from the preceding query, you use a context object as the root of all your queries. This context is the logical equivalent of the Connection object in ADO.NET, but it does much more. The context object is a class that inherits from ObjectContext. In addition to providing access to the database, the ObjectContext is also responsible for allowing you to retrieve metadata about the entities within your model and helping the objects track their changes.
Once you have made changes to one or more objects tracked by an object context, you can apply those changes back to the database using the ObjectContext. The SaveChanges method submits the changes you have made to the database. It iterates over all the added, updated, and deleted objects and submits these changes, and returns the number of records updated.
At this point, the objects do not know that they have been saved, so you must set them back to their unchanged state. There are two ways you can do this. First, you can call the SaveChanges method with a single Boolean parameter set to SaveOptions.AcceptAllChangesAfterSave. This automatically updates the changed objects. Alternately, you can call the AcceptAllChanges method of the ObjectContext. This also iterates through all the successful updates, resetting the change tracking. The following code shows these steps while adding and updating credit cards in the database:
Sub AddCreditCard() Dim ctx As New AWEntities ''Add New Credit Card Dim newCC = CreditCard.CreateCreditCard( 0, "Visa", "1234567890123456789012123", 10, 2015, DateTime.Now) ctx.CreditCards.AddObject(newCC) ''Edit Credit Card Dim editCC = (From cc In ctx.CreditCards Where cc.CardNumber = "33335500655096" Select cc ).Single editCC.ExpMonth = 12 editCC.ModifiedDate = DateTime.Now ''Save Changes Dim changeCount = ctx.SaveChanges(Objects.SaveOptions.AcceptAllChangesAfterSave) Console.WriteLine("{0} records changed.", changeCount) Console.WriteLine("Credit card state: {0} Date updated: {1}", editCC.EntityState.ToString(), editCC.ModifiedDate.ToString) Console.ReadLine() End Sub The output of this routine should be as follows:
2 records changed. Credit card state: Unchanged Date updated: 7/15/2012 10:19:08 AM
The update process operates within a single transaction, so if any of the changes fail, the entire SaveChanges will fail.
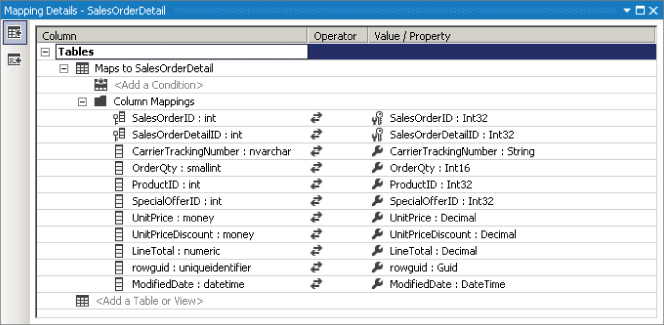
, the SalesOrderDetail object maps to the SalesOrderDetail table, and each property maps to the field with the same name. By changing the Name property for each field in the Properties pane, you can create a mapping that better explains what some of the fields represent (for example SalesOrder.SalesOrderId to SalesOrder.ID). Entity Mapping
Entity Mapping

In addition, once you've changed the mapping, the code used to access the types reflects the new mapping (see ):
Updated Entity Model
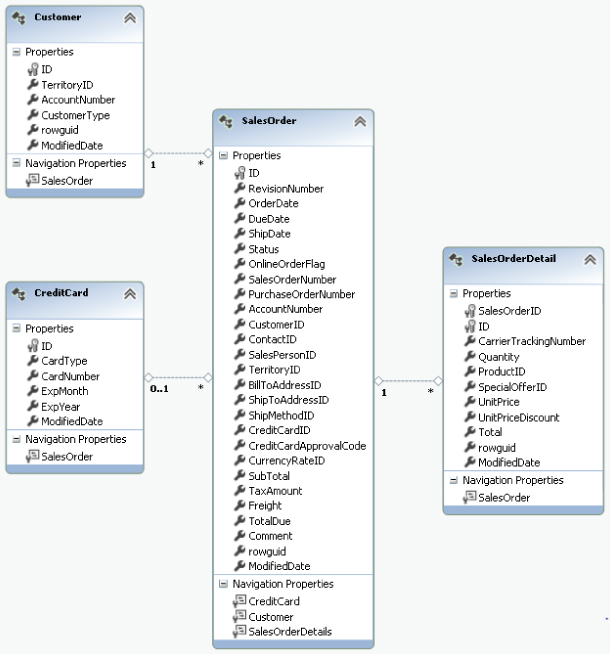
Sub DisplaySalesOrders() Dim ctx As New AWEntities Dim orders = From so In ctx.SalesOrders Where so.Status = 5 Select so For Each order In orders.ToList Console.WriteLine("#{0} Ordered On: {1}", order.SalesOrderNumber, order.OrderDate.ToString) Next Console.WriteLine("{0} orders", orders.Count.ToString) End Sub Recall that the Entity Framework model included a number of navigation properties that represented the relationships between the defined classes, such as the SalesOrder property on the Customer and CreditCard classes. These navigation properties — as their name implies — enable you to navigate between the classes in your queries. For example, you can query and return the sales orders that have a status of 5 with the following query:
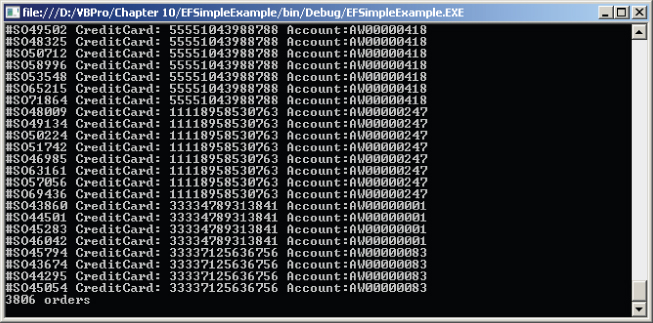
Sub DisplaySalesOrdersInfo() Dim ctx As New AWEntities Dim orders = From so In ctx.SalesOrders Where so.Status = 5 Select New With { .SalesOrderNumber = so.SalesOrderNumber, .CreditCardNumber = so.CreditCard.CardNumber, .AccountNumber = so.Customer.AccountNumber } For Each order In orders.ToList Console.WriteLine("#{0} CreditCard: {1} Account:{2}", order.SalesOrderNumber, order.CreditCardNumber, order.AccountNumber) Next Console.WriteLine("{0} orders", orders.Count.ToString) End Sub This query demonstrates the use of projections in a LINQ query. Rather than return the data that is queried, a new object is created using the Select New With {} syntax. This enables you to define a new object to be returned as a result of the query. Each of the properties in the new object are defined by including them in the braces, starting with a dot. In the preceding query, the new object will have three properties: SalesOrderNumber, CreditCardNumber, and AccountNumber, and the values of these properties come from the results of the query. This returned object is an anonymous object. That is, it does not have a usable name within the system (if you look at it in the debugger, it will have a name that has been generated by the compiler). Still, the returned object can be used normally. Because it is a collection, you can iterate over the collection using a For Each loop to display the list (see ).
Credit Card Information
Using a Single Table for Multiple Objects
Within your application design, you may have one or more classes that inherit from another. For example, you might have a SalesOrder base class, with online orders that inherit from them. The SalesOrder base class has the standard SalesOrderNumber, OrderDate, and other properties. The OnlineSalesOrder child class might add a property for ShipDate. These types of designs are traditionally very difficult to map to a database. If you were to save this structure to a database, you would have a couple of options. One, you might include all the properties, and add a property to identify the type of the resulting object, as shown in .
OnlineOrderFlag Properties
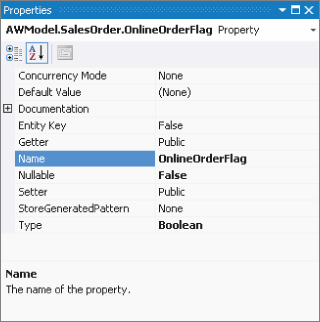
In this table, the OnlineOrderFlag field is true if the order was made online, and false if not. The identifier will indicate if the order was made online or not. shows the desired conceptual model (see the AWModel in the EFSimpleExample project).
Entity Model Inheritance
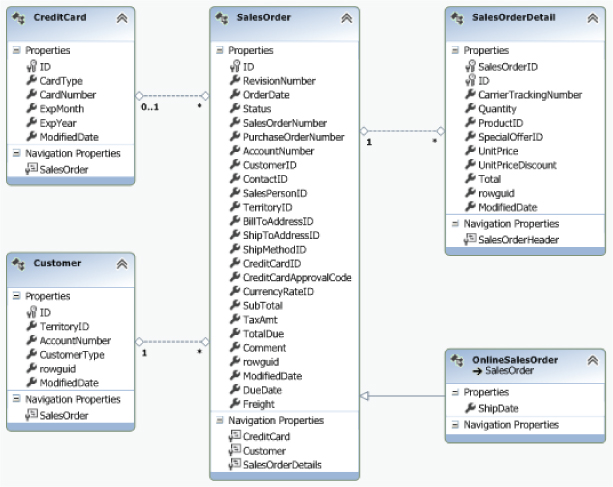
In this model, OnlineSalesOrder inherits from SalesOrder. Notice that the OnlineOrderFlag field is not on the model, and the OnlineSalesOrder has unique properties.
To create this structure, you use the Mapping Details pane of Visual Studio. After you have generated a model based on the SalesOrderHeader table (refer to ), add a new entity that will represent an OnlineSalesOrder. Remove the Id property that is created by default and create a new property called ShipDate. Set the Type property to DateTime. Select the Inheritance item from the Toolbox, and drag an inheritance from OnlineSalesOrder to SalesOrder.
Once the basic model is done, you're ready to add the mapping. Select the SalesOrder entity and delete the ShipDate property by right-clicking on them and selecting Delete. This will remove the mapping of the property to the SalesOrder object.
Select the OnlineSalesOrder entity. Select the SalesOrderHeader table under the Tables collection. Map the ShipDate field to the ShipDate property. Notice that above the field mapping is a Condition mapping. This is how you will distinguish sales orders from online sales orders. Select the OnlineOrderFlag field, and set the Condition's value to true (see ).
SalesOrderHeader Condition for OnlineOrderFlag
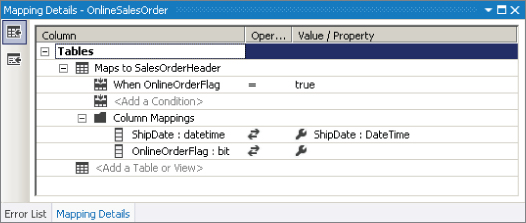
Do a similar mapping for the SalesOrder entity, but set the Condition to select the OnlineOrderFlag=false records. You should now be able to validate the model by right-clicking the designer and selecting Validate.
You can now work with the table as you would expect from the model. For example, you can create a new OnlineSalesOrder with the following code:
Sub CreateOnlineSalesOrder() Dim ctx As New AWEntities Dim order As New OnlineSalesOrder With order .RevisionNumber = 1 .OrderDate = DateTime.Now .DueDate = DateTime.Now .Status = 5 .SalesOrderNumber = "1234567890" .CustomerID = 1 .ContactID = 1 .BillToAddressID = 1 .ShipDate=DateTime.Now.Add(New TimeSpan(2,0,0,0) .ShipToAddressID = 1 .SubTotal = 100 .ShipMethodID = 1 .TaxAmt = 7.25 .Freight = 0 .TotalDue = 107.25 .ModifiedDate = DateTime.Now End With ctx.SalesOrders.AddObject(order) ctx.SaveChanges(Objects.SaveOptions.AcceptAllChangesAfterSave) Console.WriteLine("Online sales order created.") End Sub Here, you create a new sales order, assign some values to the properties, and save. Notice that you do not directly set the OnlineSalesFlag field. Instead, it is set based on whether you create either a SalesOrder or an OnlineSalesOrder. shows the newly added record in the SalesOrder table.
OnlineSalesOrder Data

Selecting records when using these types of models can be slightly confusing the first few times, as you will find that the context does not have an OnlineSalesOrder collection on them. If you look at the properties for these entities, it makes more sense; you will see that the EntitySetName property is SalesOrder (how they were defined in the EntitySetName for the SalesOrder collection). Therefore, you still query them as sales order, but you add an additional qualifier to the query to select for the desired child class:
Sub DisplayOnlineSalesOrders() Dim ctx As New AWEntities Dim orders = From so In ctx.SalesOrders.OfType(Of OnlineSalesOrder)() Where so.Status = 5 Order By so.OrderDate Select New With { .SalesOrderNumber = so.SalesOrderNumber, .CreditCardNumber = so.CreditCard.CardNumber, .AccountNumber = so.Customer.AccountNumber } For Each order In orders.ToList Console.WriteLine("#{0} CreditCard: {1} Account:{2}", order.SalesOrderNumber, order.CreditCardNumber, order.AccountNumber) Next Console.WriteLine("{0} orders", orders.Count.ToString) End Sub In this code, the OfType(Of OnlineSalesOrder) clause defines the type you are retrieving. The OfType clause limits the returned records to just those with the correct value in the Condition mappings you created.
Updating the Model
Eventually, you will have to make changes to your model, due to changes to the database or new requirements for your model. You can add new tables, change the data types of columns easily with the Entity Framework designer. You can update your model by right-clicking on the designer and selecting Update Model from Database. This will start up the Update Wizard (see ).
Data Model Update Wizard
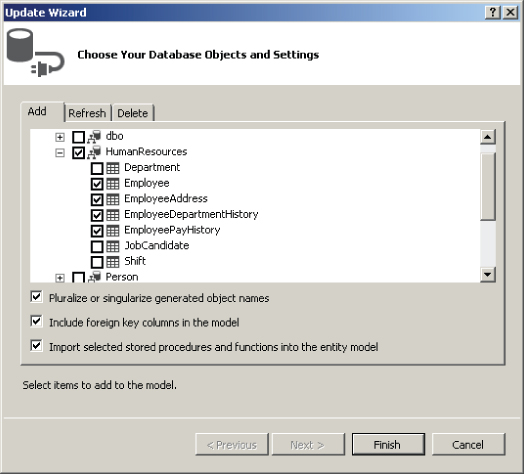
This dialog has three tabs, depending on what you'd like to update from your database. The Add and Delete tabs enable you to identify database items you'd like to add or delete from your model (tables, views or stored procedures, and function). The Refresh tab enables you to identify structures that may have changed in the database. The wizard will update the corresponding entities in your model.
. Also check out the website for a wealth of videos of Entity Framework examples.

