Книга: Linux Command Line: An Admin Beginners Guide
Назад: Important System Management Commands
Дальше: The Underpinning of Linux Security
System Management Command
The following commands are commonly used by IT professionals for managing computer systems inside an organization.
#
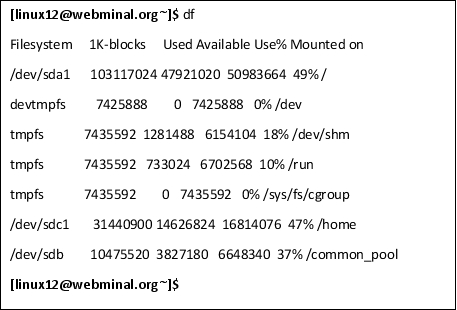
df
The df command stands for "display file" or "file system space" and allows you to display file system space that is being used and is available. To use it, all you have to do is type df and the folder name. If you only type df, an overview as shown below is given.
#
du
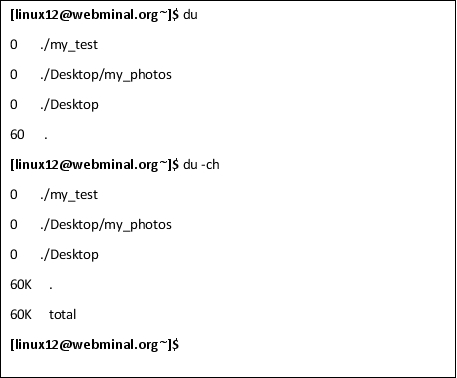
The du command is the "disk usage command," which allows you to see disk utilization for files and commands. To use this command, type du followed by the directory. This command may come in handy if you need to recycle data space used by a program, although it may give you a rounded up estimate instead of actual, real-time usage.
A common way to type this is “du -ch” which gives a summary (the -c) and human-readable output (the -h) which append the K for Kilobytes, M for Megabytes, or G for Gigabytes.
#
free
Use the free command to find out how much memory and system RAM is available. This may come in handy if you need to know if a program is eating up system resources or how much memory a program is using.

#
w
The w command shows information about users who are currently logged on to the system, including what they are doing. This potentially comes in handy if you want to check employee productivity or if you want to check which employee is running a task that puts a heavy load on the system memory.
If you work in IT, this command may be especially helpful for you because it may prevent you from working on the machine or installing programs during times where employee workloads are already putting a strain on the memory of the machine.
#
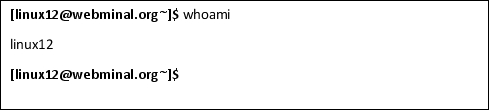
whoami
The whoami command quickly shows you which username and account you are logged in as. This may prove helpful if you are not sure what permissions your user account has and what commands you have the authority to run. It could also help you if you are logging yourself into different accounts with different permissions while testing features on the system.
To use this command, type whoami into the terminal and press Enter . You should see a readout with your username.
#
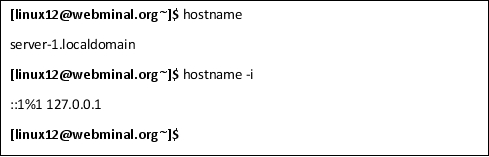
hostname
You can use the hostname command to find out the name of the host. You can also use it to print out the IP address with the -i option. In the result below, the ip address of 127.0.0.1 indicates a localhost meaning "this computer".
#
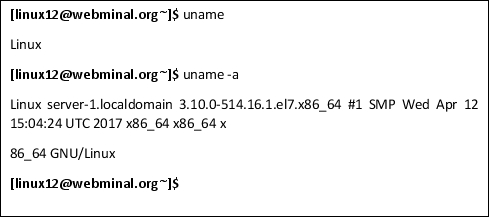
uname
This will give you a printout of information about the operating system and the machine it is installed on. Use the -a option to see all the kernel information including build date kernel version info.
#
Typical User Management Commands
The root user has administrative privileges, which means that the user with access to the root account can do nearly anything in the system, even bypassing security checks for normal users without the root privilege. While the root user always has administrative privileges, other users can have admin privileges or just standard privileges.
Having administrative privileges is a good thing if used properly, but it can be harmful if used carelessly. Administrative/root users can mess up the operating system or even harm others' accounts if they are not aware of what they are doing. That's why having root privileges is such as big deal in Linux.
Administrators, IT professionals, and anyone else who happens to have access to the root account have to make sure they enter the correct commands and know what they are doing to keep from accidentally deleting sensitive data or rendering programs non-functional. In addition to this, those with administrative privileges usually have the responsibility of looking after user accounts, fixing bugs, handling password issues, and maintaining a decent level of security.
Luckily, Linux has commands that make keeping track of data and users easier.
#
quota
Without a set data quota, users on a network could hog all the resources for themselves. They could start downloading unnecessary files and keeping bit and pieces of information, such as reports, instructional videos, and projects on their accounts as if it were their home machine, while not considering the needs of other users or the operating system.
With the quota command, limits for the user can easily be monitored. This command displays the user's disk usage and limits, and a user with administrator privileges can use this command to view the quotas of other users. To use this command, type, quota -s and the user ID of the user whose quota you want to check.
Editing Quotas
If you want to change the quota of a user or group, you can use the edquota command by typing edquota -u and a username or ID to edit the quota of an individual user. To edit the quota of a whole group, type edquota -g and the group name or group ID.
#
passwd
As mentioned previously, users with administrative privileges can do a lot with Linux if they know how. The following are a few more things you might have to do if your job grants you root user privileges.
Let's imagine that someone at work forgets his or her password. If you are the IT person in charge, you should know how to properly deal with that situation. Unless the company you are working for has an enhanced security add-on system that doesn't grant true admin privileges, this problem can be easily remedied by typing

There may also be situations in which the user will need to change his or her password but has not changed it yet. In this case, you may want to execute a command that will force a user to change his or her password (see the chage command below).
The passwd command is used to change a user's password. This command can only be used by someone with administrator access. An administrator can also use it with other options to do a variety of other things, such as -w to warn a user before their password expires, or the -n option to set the minimum number of days a user must wait before changing his or her password.
Exercise:
Experiment with the passwd command and its options. Log in as the target user to test and write your findings in your notebook.
#
chage
The chage command can be used in Linux to force a user to change a password by typing “chage -d 0 <username>”. Like the setting in the previous example, this command will also force the user to change his or her password upon next login.
If you want to make it so the user who refuses to change his or her password will be locked out of his or her account, use the -E option with the chage command instead. It should look something like chage -E <date or days until expiration> <username>. This will lock the user out of his or her account until he or she has it reset by an administrator or root user.
These features are important because they can serve to automatically enforce policies your company may have about users changing their passwords, so important information is not compromised.
Exercise:
Use the chage command on a user you created, so the user will have to change his or her password. Log in as the user to test this.
#
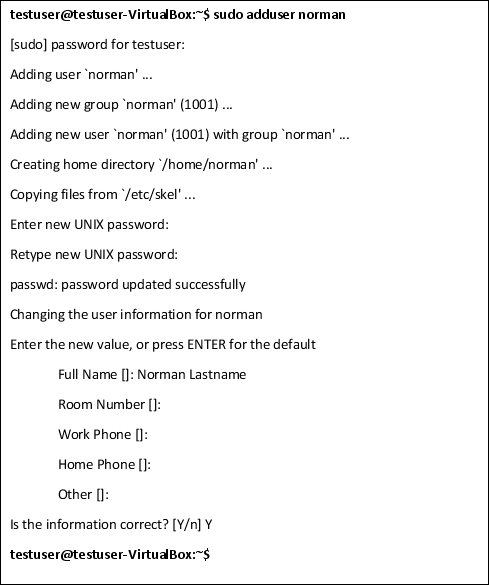
adduser
The adduser command can be used to create and add new users. Type, adduser and the username you want the new user to have to create a new user.
Adding a Normal User
To add a normal user, type adduser and the username you want the new user to have. The user will automatically be assigned an ID number and granted all the privileges a normal user on the system has.
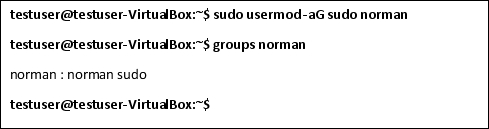
Adding an Administrative User
To add an administrative user with higher privileges like root access, follow the same process of adding a new normal user above. The difference is that the admin user is added to a group with higher privileges. For instance on Ubuntu, this is the sudo group.

Adding a System User
System users are accounts created when certain programs are installed and they perform certain jobs and run certain processes. They typically don't belong to actual human users, but instead to programs that run in the background. They have limited access to the system, enough so they can perform their tasks with minimal human interference.
Assigning these programs group IDs and privileges controlled by the administrator is one way Linux keeps the system safe from malicious software and unruly programs. Contrast this to a Windows system, in which an installed program is typically given admin privileges and has a greater chance of harming the system.
To add a system user, type adduser --system . The user will automatically be assigned a user ID, or you can specify a user ID. Choosing a user ID of an existing user will cause the adduser program to exit and show a warning.

System users are placed in the nogroup group by default, but you can edit a system user's group ID with the gid option.
Force New Password
To force a user to change his or her password via a command at the terminal, type passwd --expire <username>, which will cause the user's password to expire. The user will be prompted to change it upon the next login.

Exercise:
Create a new user using the adduser command. You can delete this user account using the deluser command later, or you can keep the account for future exercises in this chapter and extra practice.
#
usermod
Another powerful command you might find yourself needing to use as an admin is the usermod command. Use this command to change various details about a user's account, including their group IDs, whether or not the user's account is active, and a few other things.
Lock/Unlock
One thing you can do with the usermod command is "lock" and "unlock" user accounts. Let's pretend that you need to lock a user's account because he or she no longer uses that account. Simply type usermod -L to lock the account and usermod -U whenever you are ready to unlock the account.
Adding an Administrative User
To give an normal user higher privileges like root access, use the usermod command to add them to a higher privilege group. For instance on Ubuntu, this is the sudo group. You learned how to add the user to the sudo group using the adduser command, but the usermod command can also be used.
Expiry Date
You can also use the option -e to set an expiry date on a user account. This may come in handy when reminding a user to change his or her password.
Exercise:
Create a test user account and lock the password. Then, try to log in as the test user.
Remember, use -L to lock the user password so that it cannot be used. Use -U to unlock the password.
Exercise:
Give the password of your imaginary user an expiration date, then write your findings in your notebook.
#
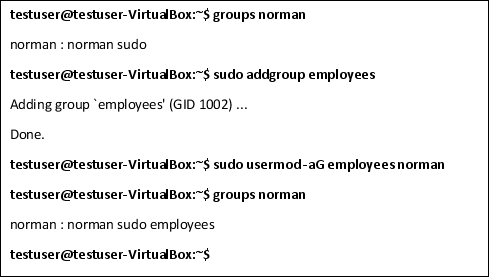
addgroup
The addgroup command is similar to the adduser command, except users who belong to a group can share documents and files and may have access to certain permissions and files that the rest of the users don't. It can also be a way to evenly set permissions for some users.
For example, let's pretend you have a group called "employees." Everyone added to the employee group can access project files and the chat feature to communicate with their teammates, but they do not have administrator rights and cannot go into the system and change crucial settings, re-assign programs to new directories, change others' passwords, allot themselves more data, among other things.
Exercise:
Create a group and add the user you created in the previous exercise to it.
#
userdel
If you accidentally create an extra user, need to get rid of a test user account, or need to get rid of a user account for other reasons, you can do so with the userdel command. If you want to force a delete of a user account, type userdel -f <username>. This will delete the account, even if the user is currently logged in (although that would be mean). If you want to make sure the account is gone, type deluser <username> --remove-all-files.
#
delgroup
Deleting a group is similar to deleting a user. If you want to delete a group, type delgroup and the group you want to be deleted. Keep in mind that you cannot remove a user from his or her primary group; if you want to delete a user from his or her primary group, you can delete the user first.
Exercise:
Create a new user using the adduser command. Then, create a new group using the addgroup command. Place the new user in the group, then remove the group and the user.
You can also use deluser with the --group option to delete a group.
Exercise:
Practice all the commands covered in this chapter and pair them with some of the mentioned options. Record all your findings in your notebook.
Generate a list of questions for further study based on your list, then record where or how you think you can gather this information.
Chapter Summary
In this chapter, we went over:
- Managing users and passwords.
- Setting data quotas for users and administrators.

