Книга: Linux Command Line: An Admin Beginners Guide
Назад: Typical User Management Commands
Дальше: Project Ideas
CHAPTER EIGHT: Understanding Linux Security
Linux is different, not just in how it is built, but also the way that it's maintained. Unlike Windows, which may need an update every week to remain stable, Linux operating systems are built to be stable and run with minimal patching and interference.
There's also a dedicated community of volunteers, many of which are computer programmers, who are constantly checking the software to make sure it's running properly. Linux systems also have built-in features that make it secure, which makes it incredibly difficult to hack into. With Linux systems, you would have very little use for virus protection.
However, have you ever wondered why Linux is so secure?
Like some other more secure operating systems, like Chrome OS, Linux has a closed file system and doesn't allow content from unauthorized sources or users. The concept is about the same as apps in the Apple or Chrome store--if you've ever used one of these systems, you've probably noticed that you can't just download any file from the internet and automatically use it one your computer, even if it's the proper format.
This is because Apple and Chrome OS not only check for the proper format, but they also have other security measures in place to make sure you don't accidentally download files that could potentially harm your computer. This is intended to keep your computer safe from viruses, malware, and spyware; the downside is that it can also make your software choices a bit more limited.
You may have to find alternative apps that will run on your OS instead of downloading familiar software to do the same job; for example, on a Chrome OS, you'll have much less trouble running Google Docs than Microsoft Office.
Fortunately, the Linux repository has lots of alternative software programs to choose from, and if you know what you want to do, you shouldn't have a lot of trouble choosing an alternative. Most popular software has other versions that are available to Linux users.
The Underpinning of Linux Security
Administrator/Root User
Linux users typically fall into two categories in regards to permissions - admin users and normal users. Admin users are commonly the most powerful users on the Linux system, having root access to every part of the operating system and being able to execute commands that could damage the operating system if not used properly.
Admin/root users can pretty much do anything they want on the computer, including viewing and changing other user accounts. The root user can access anyone's home directory and data, and they are usually an administrator, as they need to be able to create, delete, and manage all users on the system.
Normal Users
User accounts are the accounts that belong to people who are authorized to use the machine but may not have all the access an administrator has. A typical person can have access to a Linux machine as a user and not have full administrator privileges. The user can perform the tasks he or she is authorized to do while minimizing the chances that they will mess up the operating system.
Exercise:
Explain how a root user is different from other users. Write your answers in your notebook before going on to the next section.
sudo
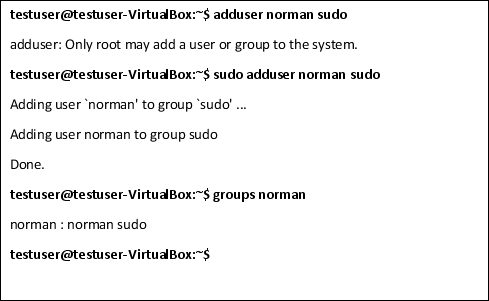
In Ubuntu, users may need to use a special command called sudo to gain root user access to certain files or privileges, such as downloading files or making major changes to the operating system.
As explained earlier in this book, sudo is short for "super user do."
In Ubuntu Linux, users are not in root user mode. For example, you may not be able to read or change some of the files in the root directory. The extra step of typing sudo in front of the command is one extra safeguard against accidentally damaging or deleting something important.
If you run into anything like this, you can try to use the sudo command to get access and run programs as the root user or administrator. Without typing sudo, you may not have the necessary permissions to run programs that only have administrator privileges and you may not be able to download files. See the example below to see how adduser on Ubuntu needs a sudo prefix.
apt-get
Explanation:
Repositories are places on the internet that house Linux programs. You don't need to use a USB stick or memory card or type in a special code to install the software. Instead, it's a lot like visiting the app store on a Chromebook or Kindle, except done at the command line.
All you need to do is type in
$ sudo apt-get install <software_name>
Where <software_name> is the name of the program you want to download.
To remove the software, just type in
$ sudo apt-get remove <software_name>
Where <software_name> is the name of the program you want to remove.
To update, type in sudo apt-get upgrade and the name of the program you want to update.
Here is a quick list of repo commands. Use your favorite search engine such as duckduckgo to discover all the variations available.
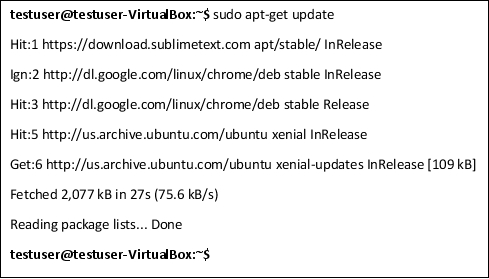
- apt-get update will update the list of repos.
- apt-get upgrade will update the program or all the installed programs if a single program is not specified.
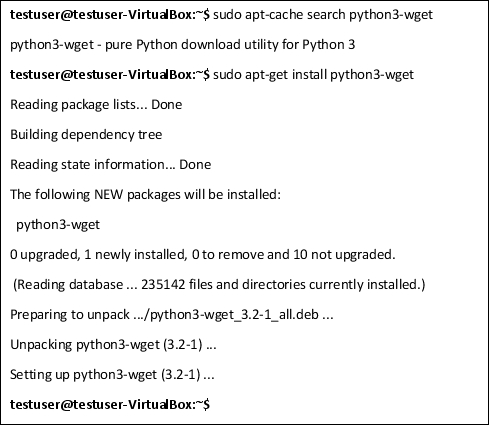
- apt-cache search will search for a program in the repo.
- apt-get install will install the program.
Let’s begin by updating the packages.
Now let’s search for the Python3 package.
Files and Directories
As mentioned earlier, not every user has administrative permissions. In some cases, a user's access to certain files may be limited. Certain commands in Linux can grant permissions to users that they wouldn't normally have, such as read, write, and execute. These commands can also change a user's permissions on certain files.
Let's take a look at the ls -al command again.
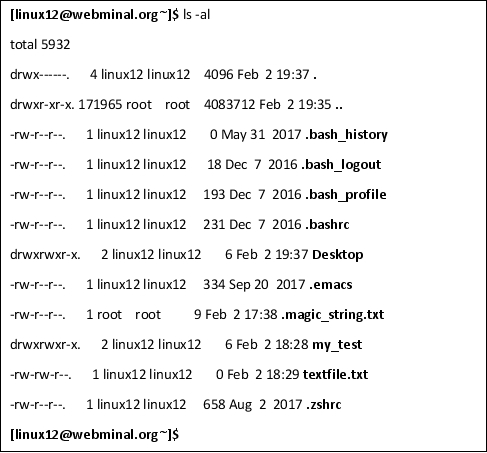
rwx
In Linux, rwx stands for "read, write, execute."
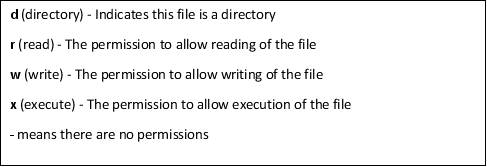
The first entry on the left will indicate whether this is a file or a directory. Notice that Desktop is a directory while hello3.txt has a - in the first entry and therefore is a file. There are 3 sets of rwx . Reading from left to right, the first set of rwx is for the owner or User. The second set is for the Group and the last set is for everyone else.
So if we're looking at the hello12.txt file, we can see that the linux12 user can read and write and people in the linux12 group can read and write. All others only have read access. No one has execute permissions. Since the file is a text, file, it isn't expected to be executable. However, this is a common issue with scripts - sometimes they don't work because they lack the execute permission. The solution is as simple as adding execute permissions.
In Linux, rwx is used to denote what permissions each user has for certain files. For example, in Ubuntu Linux, no one user has rwx permission for the root user's files so they need to use sudo to change to superuser mode to access these files.
chmod
This is used to change the access mode of a file and can be read as an abbreviation of "change mode."
The first argument after chmod selects whether user, group, others or all are going to change. The shorthand for this is u for users, g for groups, o for others, and a for all.
The second argument selects what is changing. Are you adding (+) or removing (-) permissions?
The third argument selects which of the 3 properties are changing. Are you changing read, write, or execute permissions?
Some people describe this as specifying who changes, what changes, and which is changing.
For example, suppose you create a script named bubba.sh but it doesn't run as shown below. Can you figure out why it doesn't run?
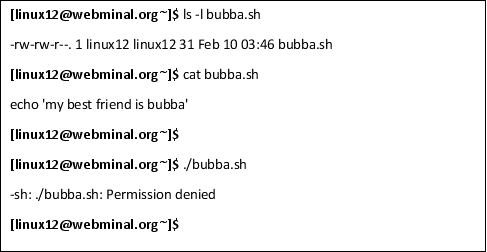
Yes, the problem is that it doesn't have execute permissions. So let's give execute permissions to ourselves and our group.
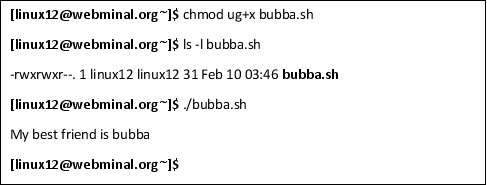
To execute this command, you may need to have administrator permissions in webinal. However, you should have some level of execute permissions on most Linux platforms. Webinal locks their permissions down because it is a shared browser shell.
Exercise:
Change one of the document files you created for an earlier exercise to "read-only" using the chmod command. If you aren't sure how to do this or receive an error message, make at least three attempts and record your findings each time.
#
chown
The chown command is similar to the chmod command, and using this command allows you to change the file owner and group by entering commands at the command line. To use this command, type chown, the user you want to own the file then a colon followed by the group and the file itself. For example, you would type, chown root:root file2 if you wanted the root user and root group to own the file named file2.

In the example above, the user root and group root were not allowed but you get the idea.
Exercise:
Change the ownership of a list you created in a prior exercise, so you do not have permission to access it via the terminal. Write down the steps you took.
#
setuid
Programs and scripts usually run with the permissions of the user id and group id. The setuid command allows someone to set the user ID or assign its privileges to another user. For example, if you wanted a program with normal user access to be run with admin access, the setuid command would be used.
Be very careful when using this command because it can cause security issues by circumventing the natural segmentation that Linux provides us.
How can you tell when setuid has been set? Look for the s in the place the x should be in the user field.

#
setgid
setgid can be read as "set group id," and is similar to the setuid label but for the group privileges and it covers both directories and files.
#
User Unique Directories
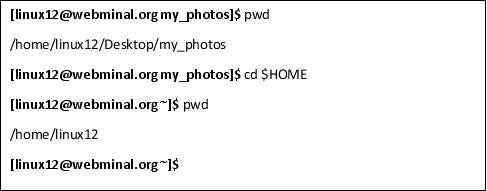
/home/${USER}
${HOME}
This is the home directory for a specific user. Since this is the user's home directory, the prompt will have a $ . A quick way to get here is to type cd $HOME or cd ~
/etc/passwd
This is not the directory where individual user passwords are kept; rather, it is where user accounts are defined. You can find the user's username and user account's ID number through this directory, and you can also find the account's group ID number here. In some cases, you can also access the user's full name, home directory, and the location of their default shell.
Passwords, along with other important user and system login information, are kept in /etc/shadow. Even though it might be tempting to try to edit some of these files manually, it's best not to. As mentioned earlier, Linux may store a program in many different places, and changing an individual file without changing the related files may result in files being out of sync and certain programs becoming damaged.
Processes and Jobs
In this section, we'll cover how to check the processes that are running, how to put processes that do not require user input into the background, and how to bring processes back to the foreground again. We'll also cover the difference between checking which processes are running and which jobs are running, and cover some different methods for killing jobs and processes.
A process is a single program that is executing. A job can consist of multiple processes.
#
ps
This command stands for "process status" and checks what processes are running. Using it is just as easy as typing any other command with options.
The ps command allows the user to view the status of processes currently running. To use this command, type ps into the terminal. You should get a printout that looks something like this:
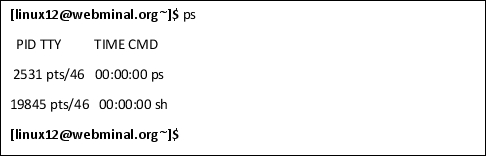
Let's go over each part we see on the chart individually. To the far left, you see the letters PID, which stands for "process ID." Next to it, are the letters TTY, which stands for "terminal type." Next to TTY is the TIME followed by CMD, which represents the commands that are running. Every program that executes has a process ID so in this case, we have 2 programs running.
Unfortunately, this isn't very useful. As you can see in the table above, this ps command is only showing us information about 1) itself and 2) the shell terminal that's open. This is okay if all we're doing is playing with the terminal and trying to learn the commands but we may need to add more options before this command becomes useful.
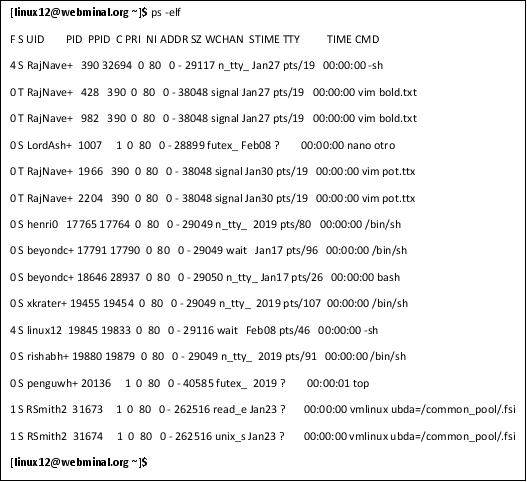
ps -elf
Instead of just settling for simply ps, we can add a few options to make it more useful for us. Adding -elf gives us a long listing of processes with a lot more detail. Let's go through the options that we've added to this command.
The -e stands for "extended." You can use this command in this case to view information that was not provided previously. Enter ps -e into your terminal and see what the results are. Can you understand the information given to you?
If not, try adding the -l option. The -l stands for "long listing." Type ps -el into the terminal. Now, compare it with just the table with the -e option. What differences do you notice?
Next, we will add the -f option, which stands for "force." Enter the entire command: ps -elf into your terminal. What's different about this table vs. the other two? Record your findings in your notebook.
Exercise:
Open a few programs and use the ps command by itself without any added options. What did you get?
Then, try adding the -e, -l, and -f options. Were your results any different? Do you see where you would possibly apply this? Write down your findings and your answers in your notebook.
Answer this question: how can I use options with commands to create even better commands?
#
top
This is like the "task manager" command in Windows. It shows you the programs and processes. Type top in the terminal to use it. To get a list of commands you can use with top, type top and a list of commands should show up. It even allows you to kill processes on the top screen by pressing k.
The top command is used to show Linux processes. You can also combine it with other commands to put it to different uses. For example, you can see active processes for only user processes, and you can also type in Shift+P to sort processes according to their CPU usage. This makes it much easier to spot the processes that gobble up memory and find and kill stubborn, hung up processes.
You can also set the top command to close after refreshing itself a certain number of times by using the -n option.
#
sleep
This command allows you to pause the system or an individual script by creating a dummy process for it to work on. This can come in handy when you're programming or testing the system for weaknesses. To use this command, type sleep and the amount of time you want the system to pause into the terminal, followed by s, m, h, or d for seconds, minutes, hours, or days, respectively.
If you need to pause the system by initiating the sleep command, it's a good idea to not have the sleep command run for more than one full day. Very few tasks would require you to put the system on hold for longer.
The sleep process is a way of pausing a running processes or script to give other processes time to complete. This command has many uses in programming. For example, if a script is interfering with launching a certain program, you could elect to put that script on hold while running the other program. It might also be helpful in situations where you are testing new software or hunting for bugs or weaknesses.
Options:
Like other commands we've explored, the sleep command can be given with other commands, or even used as part of a mini-program with the use of the while loop or other bits of Bash programming. Once you've mastered the basics, you may think of all sorts of uses for it, depending on what you use Linux shell scripting for.
Exercise:
Use the echo command with the sleep command. Type "time (echo "string"; sleep <time>; echo "string") and set the time for only a few seconds. Record the results in your notebook.
#
jobs
In Linux, a job refers to a group of processes. Rather than having to enter commands for each individual process, you can, instead, enter commands that affect the full job, saving you time and making the process more efficient.
Use the jobs command to display the status of jobs started in the terminal window. For each session, jobs are numbered starting from the number one. Instead of using PIDs, some programs use job numbers; the foreground and background commands are examples of this.
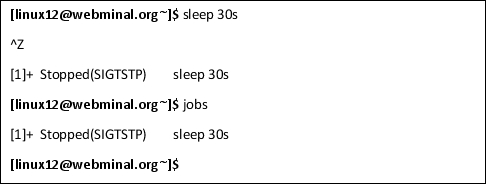
Suspend a Job
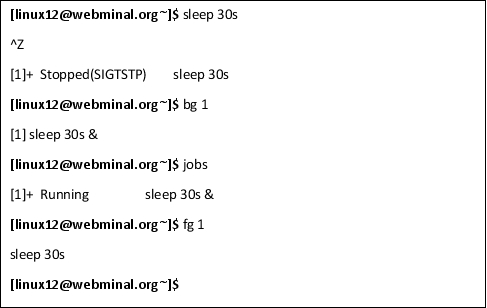
To pause a job, type Ctrl + z. Notice the ^Z in the output below - that is the Ctrl + z.
Note: there are times when you might want to use the ps command instead of the jobs command, like when you need to know what processes are running and eating up too much memory. The ps command gives more information than the jobs command.
Exercise:
As an exercise, let's start a couple of programs and suspend them.
#
Foreground vs. Background
Jobs typically run in the foreground. In other words, the job locks the terminal until it completes at which time you can start a new job. This can be inefficient if you have a job that takes a long time - you can do other stuff while that job is running. In another case, if you have a job that does not require user input, you have the option of moving it to the background. Since Linux is a multi-tasking operating system, it has the ability to do more than 1 task at a time.
Use & to Start Job in Background
You can also put the ampersand sign & at the end of the program to start the program in the background. Doing so would look something like:

To start a job as a background job, simply type a & at the end
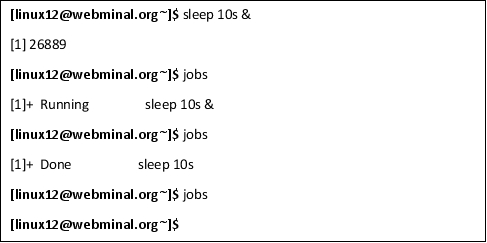
In the example above, we started a job in the background and then checked to see what jobs were running.
Put Paused Job in Background
To move a foreground job to the background, first type Ctrl+z to pause the job and then a prompt will appear. At the prompt type bg and the number of the job you want to be moved to the background.
bg <job #>
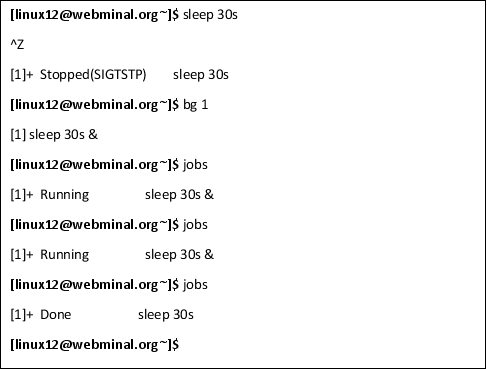
Notice how a job was started in the foreground above and then stopped with Ctrl-z before being put into the bg. Note how the # of the job was 1.
Move Background Job into Foreground
Use a similar method to move jobs from the background into the foregound.
fg <job #>
To move a job back into the foreground, you can use the fg command. Type the job ID number you want to move back into the foreground along with the command.
#
How to Kill a Job
Killing a Job
You can use the kill command to kill a job. You can also use the kill command to stop or end a process. To stop a process, type the word kill and the listed ID number of the process you want to stop. For example, if you want to stop a process that is marked as "1572," type k 1572, and the process should stop. The exception is if the process is something related to the kernel or something you don't have the rights to alter.
Kill Job in Foreground with CTRL + C
You can also pause a job in the foreground by pressing the Ctrl+c keyboard shortcut. This is the same as SIGINT or kill -2.
Remember that the kill command can be used in different levels of severity to stop programs, from "telling" it to stop itself to sending a signal to the program to terminate it. You can also use the kill command to restart a process.
Kill Job in Background
kill
What if you have a stubborn job or process that just won't quit? If you have a hung up program, you may want to try the kill command. The kill command is used to stop and end processes. In some cases, the kill command can be used with other instructions to resume processes as well.
To stop a process, use either ps or jobs to locate either the process ID or job ID number of the program or process you want to end, and then issue the kill command. Typing kill followed by the job ID number will cause a signal to be sent to the program to terminate. If the program refuses, you can type kill -9 and the process or job ID number. The process should terminate once you do.
You can also use the kill command to stop processes by typing kill -STOP and the process ID. If you would like, you can even resume a process by typing kill -CONT and the process ID number. This is another possible option if you do not want to use other options to stop and start processes.
Exercise:
Go and download a practice file, then kill the job in three different ways. Record your findings in your notebook. Refer to the previous paragraphs if you need to refresh yourself on the kill command.
Restarting, Stopping, or Removing Services
In Linux, individual programs can crash without taking the entire system offline. When this happens, you might want to restart, stop, or remove these services.
To do this, type in sudo /etc/init.d and the name of the service you want to restart, remove, or stop. Let's use Apache as an example, so a command to restart the service would look like:

Explanation:
Being able to restart only individual services prevents the need to reboot the whole operating system to clear small bugs in programs or receive needed updates. Not having to reboot a Linux machine saves time. Restarting the entire operating system could take minutes or more while restarting individual programs may only take a few seconds. This is helpful if you are using your machine to run web servers or perform other, more complicated tasks.
Chapter Summary
- In this chapter, we covered how the Linux security system works, the rights of the root user as compared to other users, how to change permissions of files, how to view the jobs and processes, and how to kill jobs.
What Did You Think of Linux Command Line: An Admin Beginners Guide?
First of all, thank you for purchasing this book Linux Command Line . I know you could have picked any number of books to read, but you picked this book and for that I am extremely grateful.
I hope that it added at value and quality to your everyday life. If so, it would be really nice if you could share this book with your friends and family by posting to and .
If you enjoyed this book and found some benefit in reading this, I’d like to hear from you and hope that you could take some time to post a review on Amazon. Your feedback and support will help this author to greatly improve his writing craft for future projects and make this book even better.
You can follow this link to now.
I want you, the reader, to know that your review is very important and so, if you’d like to leave a review , all you have to do is click and away you go.
I wish you all the best in your continued learning of Linux and the Linux Command Line!
Thank you!
Troy
Назад: Typical User Management Commands
Дальше: Project Ideas

