Transform Types
There are quite a few tool options for the Transform Tool. The top row presents different types of transform modes. Selecting one will present options that are specific to each transform type.
These transform type options are available with the Transform Tool. Only one mode can be selected at a time.
There are five types of transformations that you can do. They are listed from left to right:

Free – Simple operations include rotate, scale, and shear.

Perspective – Use handles to bend the image into perspective.

Warp – Subdivide selection to make changes.

Cage – Create a closed selection to make distortions.

Liquefy – Create distortions with different brush effects.
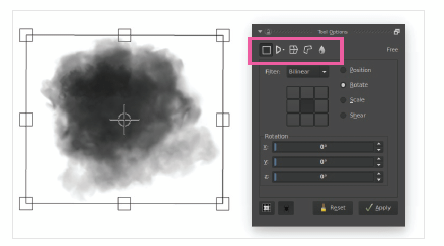
Free Transform
When you select the Transform Tool, it defaults to Free transform mode. While using the handles, you can move, rotate, scale, or shear the content. There are additional options available.
- Filter – Changes the scaling mode algorithm. See the explanation on the next page.
- Origin Position – Changes the anchor point with how the selection will transform and scale.
- Transform type – You can only do one type of transformation at a time. Select between Position, Rotate, Scale, or Shear.
- Transform type options – Each transform type has its own settings. Sliders are used for settings that have a limited value range.

Tip
You can do multiple transformations before applying the changes. This means you can rotate the image then click the Scale option to do scaling.
A small explanation for the Filter setting. When doing operations like scaling, there is pixel information that needs to be created or destroyed. When you scale something up, there needs to be more pixels added to fill the space. Likewise, when you shrink something, pixels have to be removed. The Filter mode uses different mathematical calculations for determining how pixels are created or removed. If you change the filter setting, you will see the differences are usually minor.
Once you are done with your transformation, you can click Apply on the bottom of the Tool Options. Reset will reset all of the settings back to their original values. You can also click the Enter key to apply the changes. The Esc key will reset all transformations.
Perspective Transform
When you switch to the Perspective mode, it appears to be identical to the Free transform mode. The only thing that happens is that the handles will be updated on your canvas. Switch back and forth and you will see the side handles disappear on the Perspective transform.
Perspective transform will show you vanishing point indicators.
In Perspective mode, you can grab the handles to deform the object. As two points start to converge, a vanishing point circle will appear. Not only is it nice to see where the points converge, but you can also interact with the vanishing point circle. As you might guess, moving the circle will update the corner handles. You can also have two vanishing points: one point going vertically, and one point going horizontally.
You can do further transformations by switching types. This can make transformations difficult to manage, so I generally apply one at a time.
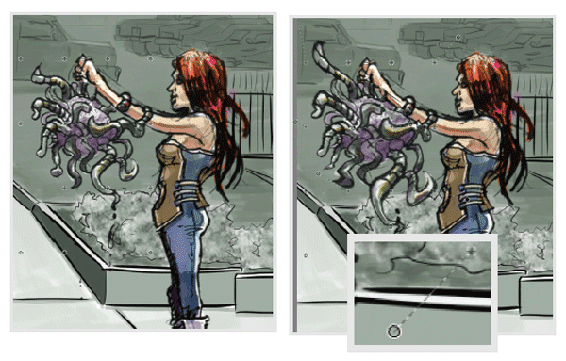
Warp Transform
Using the Warp transform is like turning your artwork into a piece of cloth. When you move or stretch part of the cloth, everything around it will bend and stretch. Everything will influence each other to some capacity. Like most settings, this is configurable.
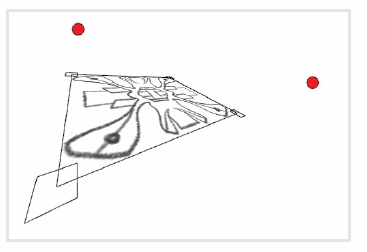
Warping takes evenly spaced points that can be moved around. The zoomed in area on the right image shows the position indicators.
In the above image, you can see the Warp transformation in action. While transforming, the plus signs by each point are the starting positions. The circle for each position is the ending point. Using this mode is an easy way to play around with proportions.
The Tool Options look a bit confusing, but there are only a few things that really matter. These options are inside the Anchor Points group box.
- Subdivide – Create anchor points equally spaced. Setting 3 will create 9 points. Setting 4 will create 16 points. Setting this higher than 5 or 6 starts to make it difficult to work with. You might want the Draw option or Cage transform if you think you need this much control.
- Draw – Manually draw points on the canvas to create the anchor points.
After you finish drawing points on the canvas, click the Lock Points button. Locking the points will allow you to drag the anchors and transform the content. If you find you need to modify the points, you can click the Unlock Points button. Keep in mind that unlocking the points will reset the transforms that you previously did. There is no way to remove one point. If you need to start deleting anchor points, you will need to click the Clear Points button, which resets everything.
The Anchor Strength property controls the formula for how the transformation points are interpolated. It is similar to how the Free transform has the Filter drop-down for scaling options. An option you probably won’t use much is the Flexibility property. This only has an effect if you have the anchor strength set to Strong (Rigid). Flexibility stretches the pixel information toward the anchors.
Tip
You can click outside of the anchor points to modify a transformation. If you are inside the selection, you can move the contents. If you are outside of the transform selection, you can rotate the layer.
Cage Transform
Similar to the Warp transform, this tool allows you to create anchor points on the layer. The biggest difference is that the points are more like a selection than arbitrary points that the Warp transform gives. When you are done adding points to your “cage” and want to start deforming, the points will create an outline connecting all of your points. You need at least 3 points to make a valid “cage” and start your deformations.
You do not have to “close” your points when you are done like when making selections. When you change to the Deform Layer option, the last point will automatically connect to the first point. Similar to the Warp transform, if you decide to add more points at a later time by going back to the Add/Edit Anchor Points option, your original deformations will be lost. Also, there is no good way to remove an anchor point from the Cage transform. If you need to remove any points, it is best to start over. The fastest way to remove all of your anchors and start over is by pressing the Esc key.
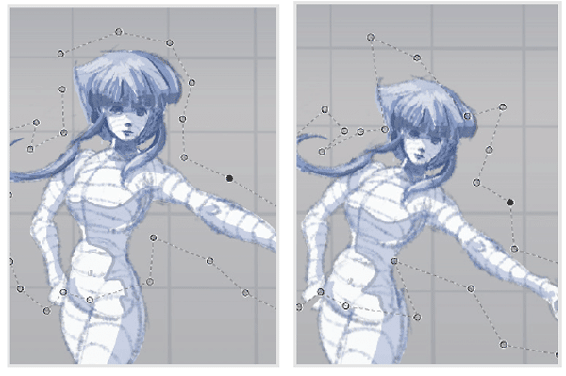
Creating anchor points around your object with the Cage transform can create natural deformations.
Only the areas inside of the cage will be affected. The stretched area will go outside the cage if you distort it enough. Like the other transforms, you can also move and rotate the entire selection.
As a last tip, you can select multiple anchor points when using the Warp and Cage transformations. If you hold down Ctrl, you are allowed to select multiple points. With multiple points selected, you can either move or rotate the points. There is a trick, though. If you try to select one of the points directly, only the last point will be moved. If you select inside of the cage and move it with the Move icon that appears, both of the points will be moved. Similarly, if you move your cursor outside of the selection and the Rotate icon appears, you are allowed to rotate the anchor points.
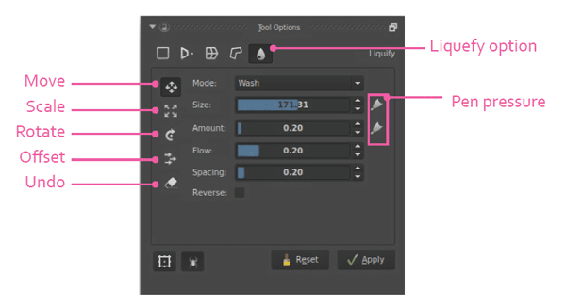
Liquefy Transform
While this tool is technically considered a transform, it will feel more like you are painting. There are five options you can use with the Liquefy mode.
Most of the Liquefy options will share the same settings. If a tool doesn’t support a certain property, it will be disabled.
- Move– Bends the painting with your brush stroke.
- Scale – Everything in the center of the brush will slowly move toward the outside. It creates a barrel distortion type of effect.
- Rotate – Rotate everything in the brush around the center point.
- Offset– Similar to the Move Tool. It is harder to use, though, since the direction will change depending on what direction your stroke is going.
- Undo – Undo any transformations that have already been applied.
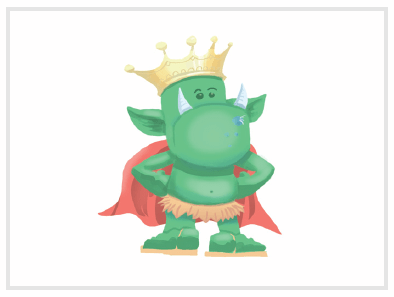
Original
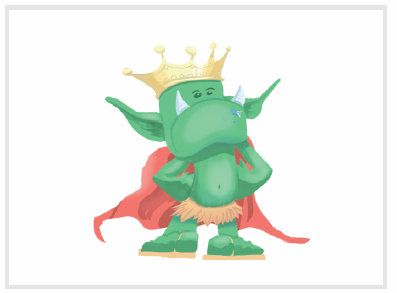
Liquefy Move
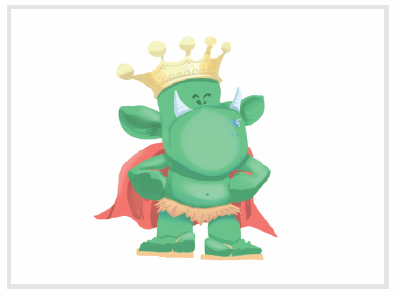
Liquefy Scale
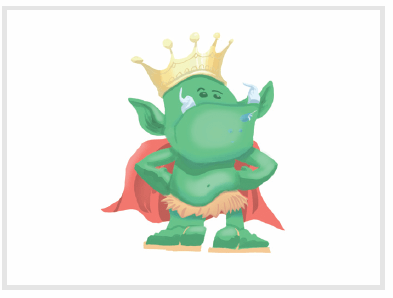
Liquefy Rotate
While doing the above example, the Reverse option was used quite a bit. This will swap out the way a Liquefy mode acts. For example, reversing the rotation will make the brush rotate the other direction. Reversing the scale will create a pincushion effect and make everything suck in like a black hole.
You can apply multiple Liquefy options in one pass. Do a little scaling and then apply some moving. Change to the Undo button if any of it doesn’t look right.
Build Mode
Choose between Build Up or Wash. This specifies how your brush stroke will act if it goes over an area again in the same brush stroke. Build Up will continue adding color in the same stroke. Wash mode will retain an even stroke.
Pressure Sensitivity Icons
On the right of the Size and Amount sliders, you will see pen nib icons. If you want to enable pressure sensitivity for these, you can toggle them on.
Show Decorations and Work Recursively
There are a couple of options on the bottom of the Transform Tool options. There is almost no reason to use these tools as they provide little value, but I will go over them in case you are curious.

Show Decorations – Shows the bounding box of the layer contents. This will be shown in a light gray, semitransparent box. This is enabled by default.

Work Recursively – This will apply the transforms to a group of layers or masks in a single pass. This is enabled by default.
Artwork by Banajune

