As soon as you allow your customer to pay later or in installments, you have to keep track of the dates by which your debt will get cleared. Odoo has a feature that can help you to track and follow up the payments. The follow-up can be manual or automatic. The payment follow-up feature can be activated from Accounting | Configuration | Settings:

Search for Enable payment followup management, under the Invoicing & Payment section, select it and click on the APPLY button.
To check the receivables from the customer by invoices, go to Accounting | Sales | Customers Statement, where you will see the customers with the list of invoices waiting for payments.

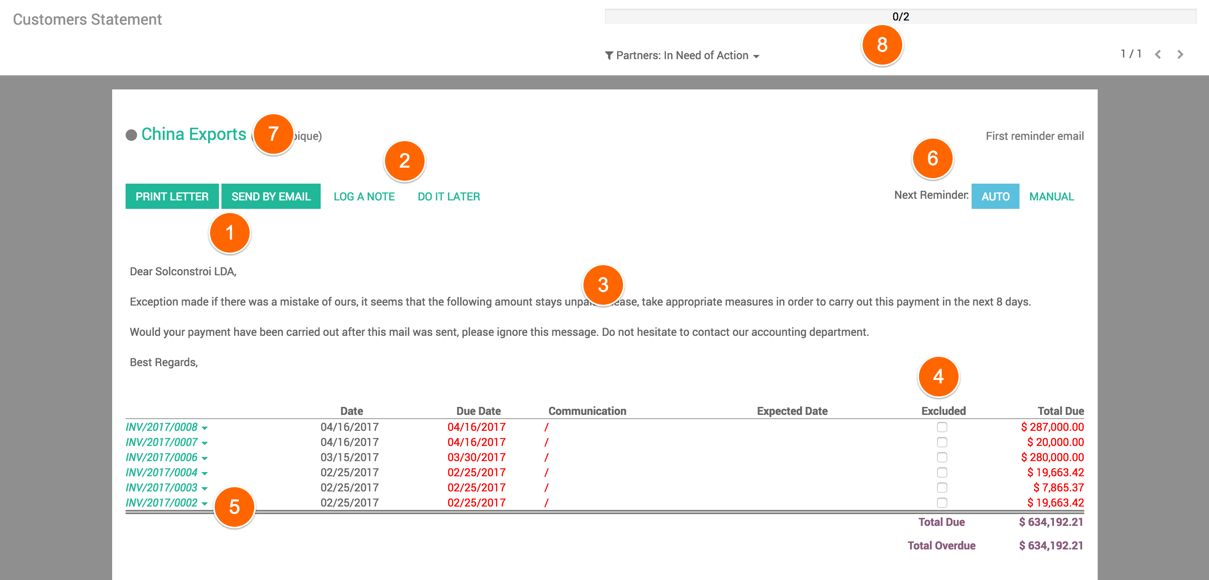
The Customers Statement has a nice interface; it is integrated with many business processes such as sending a reminder email, printing a letter, making a note of the customer or invoice regarding payment follow-ups. These are the options available to you:
- You can either print the follow-up letter or send it by email. Do not forget to select the list of invoices given to include in the follow-up letter or email.
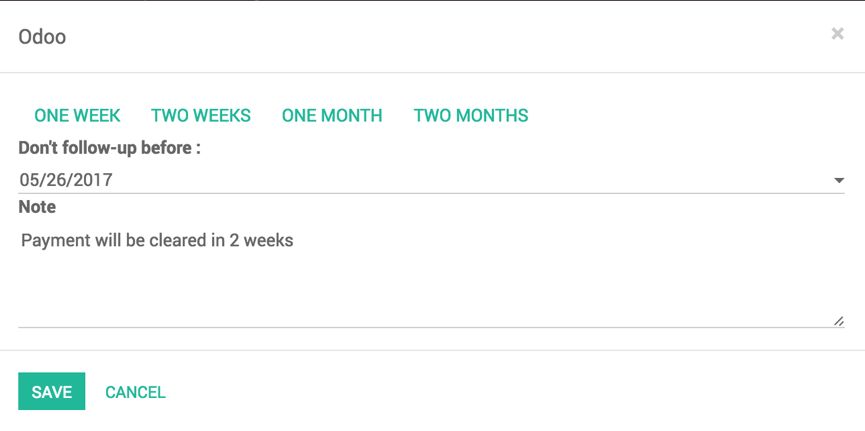
- You can click on the LOG A NOTE button; a popup will appear from where you can choose a quick date until which no follow-ups will be initiated by clicking on ONE WEEK, TWO WEEKS, ONE MONTH, or TWO MONTHS:

Enter a reason or commitment given by the customer to clear the dues in Note field and click on the SAVE button to save it. This will create a chatter history on the customer form view.
- You can customize the follow-up message; click on the pencil icon to change the message text.
- Select the list of invoices to be excluded in the follow-up email or printed letter.
- If you would like to make a note on an individual invoice or mention the expected date to receive the payment, you can open the details of the invoice or journal entries:

- You can set the next follow-up mode; it can be set to MANUAL or AUTO. If set to manual, this will appear in the Customer Statement, we have to do the follow-up manually, else an email will be sent automatically when it's set to AUTO.
- You can set the customer status beside the name of the customer:

Choose the customer status; this will help you to recognize the customer level during the follow-up and in the future sales.
- The progress bar shows you the number of follow-ups that are yet to be done, and the number of follow-ups completed.
The follow-up activity done for the customer or for an individual invoice are registered on the customer and invoice under the chatter.

