so one can stumble on the floor the raise is presently at, a restrict switch is used. because the elevate movements up or down it closes and opens a restriction turn on each floor. when the lift is at a specific ground the limit floor at that particular floor is closed indicating to the microcontroller the ground the elevate is at. because the carry actions the limit switch opens indicating to the microcontroller that the lift is transferring.
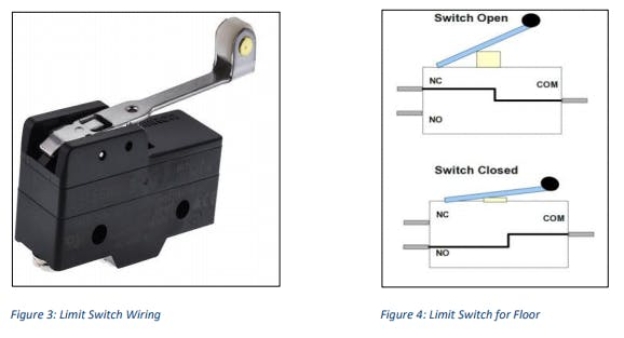
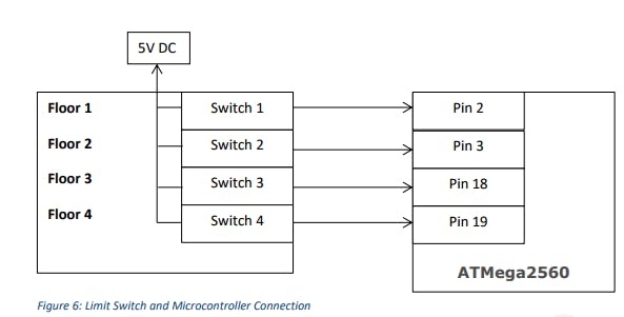
The transition from low to excessive signal produced with the aid of the limit transfer whilst the lift moves through a floor takes place in a fragment of a second and regularly too quick to be detected by way of the microcontroller. The restriction switches are related to a 5V DC supply and the output from the NO(commonly Open) terminal is hooked up to an IO pin of the microcontroller. 4 limit switches at four flooring ship facts to the microcontroller. This enables the microcontroller to determine the ground the elevate is at with the aid of checking which pin went from low to excessive. The transition of a restrict switch’s nation is proven inside the diagram underneath:

The problematic challenge is to permit the microcontroller to hit upon the transition from low to excessive. There are two methods to method this problem. First technique is to decide if a restrict transfer pin is going excessive in the loop characteristic using an if circumstance. the program basically whilst executing other code continually tests if a pin is going high. This takes up a variety of reminiscence as the application is continuously searching out a high sign from a limit transfer pin. every other problem is that occasionally the program might leave out this transition as the loop feature turned into executing a few other code while a transition takes place. if you want to avoid those troubles, Interrupts are used. Interrupts essentially pause the execution of code and execute a separate feature while a selected interrupt circumstance is satisfied. This is right for the carry operation. whilst a restriction transfer pin goes from low to excessive an interrupt characteristic is executed and this function tests if the lift is on the modern-day floor and stops the lift or allow it to move further. for the reason that application is forced to execute the interrupt feature whilst a restrict switch is switched the system can ensure that this system does now not intentionally skip detecting a ground.
The microcontroller used for this application is the Arduino Mega 2560 which has 6 digital pins usable for interrupts which is ideal to use for the 4 flooring. the first parameter to attachInterrupt is an interrupt quantity. usually you have to use digitalPinToInterrupt(pin) to translate the actual digital pin to the precise interrupt range. as an instance, in case you connect with pin 3, use digitalPinToInterrupt(3) because the first parameter to attachInterrupt. it's also critical to note that the put off() function received’t work in the function accomplished by way of the Interrupt provider habitual(ISR).
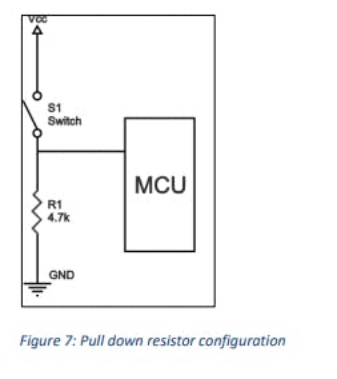
The diagram above shows how the restriction switches are related to the MCU. The pins in the MCU are related through a pull down resistor. This resistor pulls down the pin of the MCU to floor to ensure that a LOW voltage analyzing is examine through the MCU when the restriction switch is left open. The resistor configuration is proven within the diagram underneath.