The code is written in Arduino IDE with some AVR sign in Configurations. here's a flowchart of what essentially happens within the application:
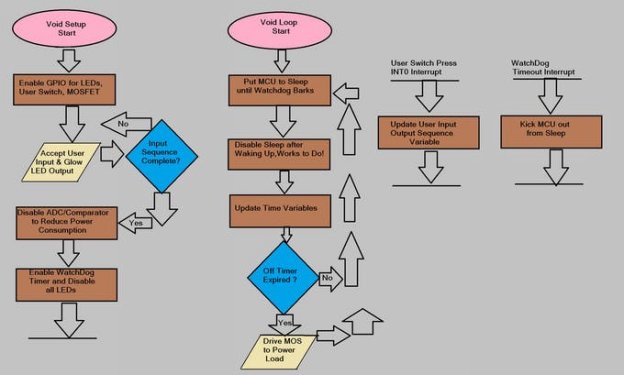
i've functionized agencies of responsibilities for ease of knowledge. inside the setup function, I/O initialization is achieved first. subsequent, user enter is taken for programming a custom timing of on and off instances. The user switch is connected to the INT0 which activates on the falling edge and increases a unstable variable for acting enter accepting mission and showing that output with LEDs.
The person switch works on each the clicking and press & preserve foundation to take seconds/minutes/hours of off time and on time. next the LED blinks to confirm the consumer that the input is ok.
Then the ADC is disabled, seeing that there may be no use for ADC here.
in the end the watchdog is configured to bark!
within the void loop, the CPU goes to sleep. whilst the watchdog timer expires, the CPU wakes up, disables sleep, updates time and exams if the off time has expired or now not. If the off time is over, then the MOSFET is grew to become on for the entire on time.
subsequent the CPU goes to sleep until the following watchdog timeout. right here, i have configured the timeout approx 1 2d. The LED blinks in short each 2d with purple, blinks inexperienced each minute and BLUE each hour. This guarantees the gadget is up and jogging.

