Part Three
Stopper Knots
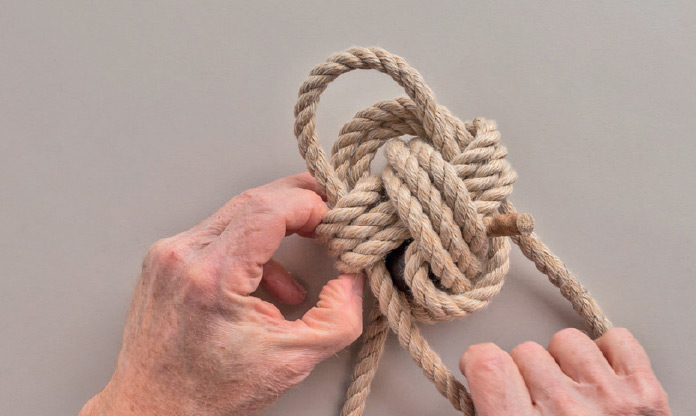
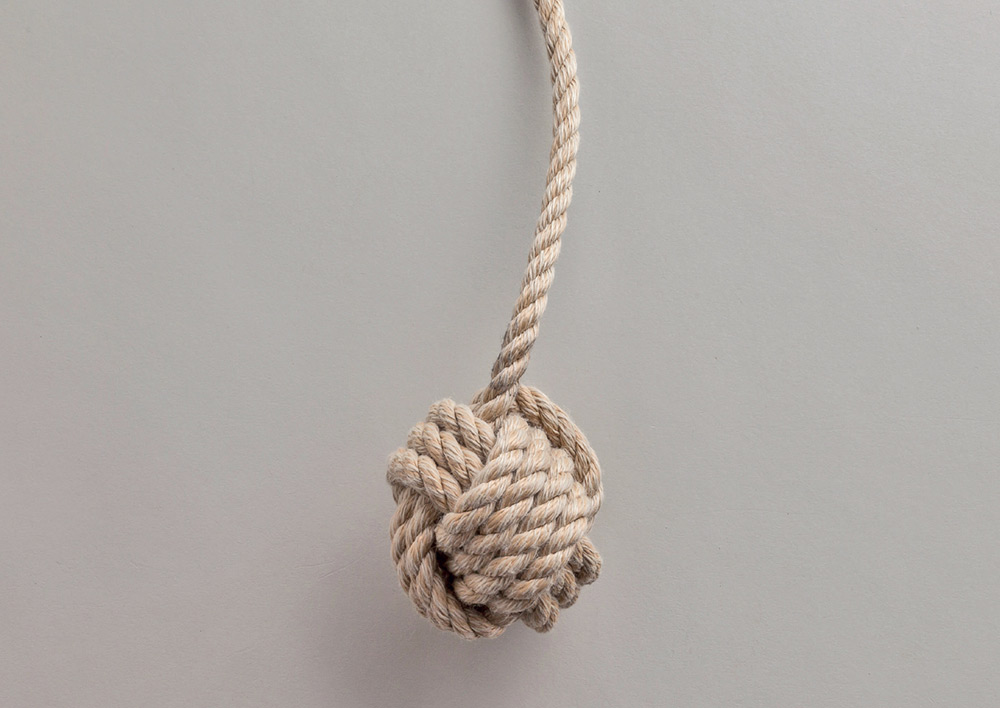
Stopper knots are “true knots”—structures tied within the rope itself and not to anything else. Most often tied at the end of a rope, stopper knots get their name from their common function of stopping a rope from running out through a small opening through which they pass, such as a pulley block, a fairlead on a boat, or a grommet on a tarp. Other common uses are to form “knobs” on the rope that can be easily held or pulled, or to add weight to the end so that it can be thrown.
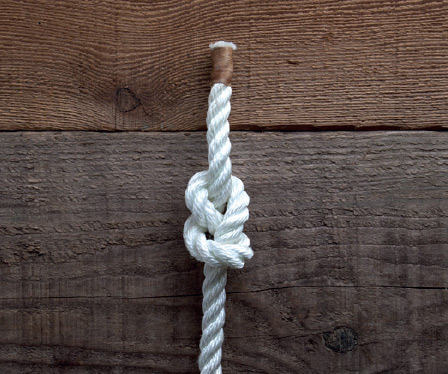
9., 10. (and )
Uses: stopper for sailboat sheets, fender pennants, tarp guylines; handhold
Pros: quick and easy to tie and untie; reduction of rope strength is small
Cons: will not stop a hole larger than Overhand Knot
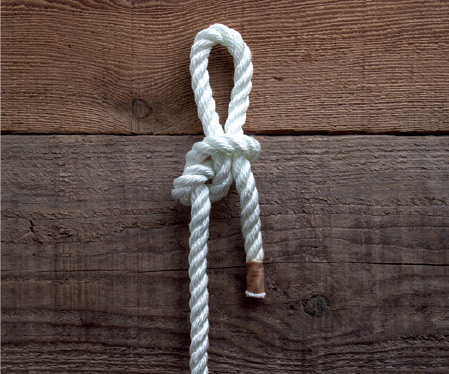
11.
Uses: stopper that can be quickly untied to pull through an opening
Pros: quick and easy to tie; nearly instantaneous to untie
Cons: will not stop a larger hole than Overhand Knot
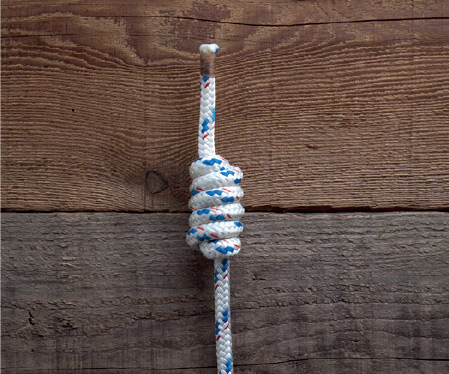
12.
Uses: stopper, handhold, heaving line
Pros: large, comfortable, attractive; easy to tie
Cons: only good for medium diameter rope; smaller and lighter than a Heaving Line Knot; can create kinks
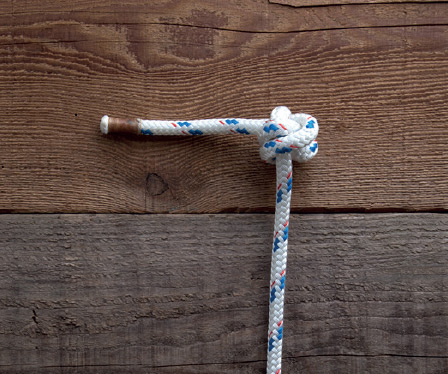
13.
Uses: stopper, especially in thinner rope
Pros: stops larger holes than many other stopper knots
Cons: very difficult to untie
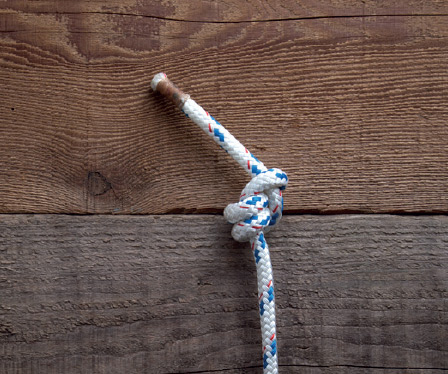
14.
Uses: stopper
Pros: large; easy to untie
Cons: smaller than a Sink Stopper
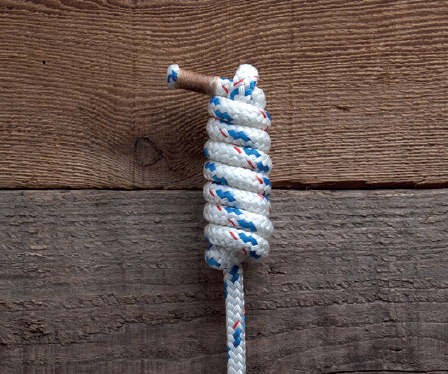
15.
Uses: add weight to the end of a heaving line
Pros: adjustable for size and weight; works with any size cordage
Cons: time-consuming

16.
Uses: add weight to the end of a heaving line; decorative pulls
Pros: easily thrown; weight adjustable with different cores
Cons: complicated and time-consuming
, placing a drawloop in the working end to “slip” it makes it easier and quicker still. Instructions
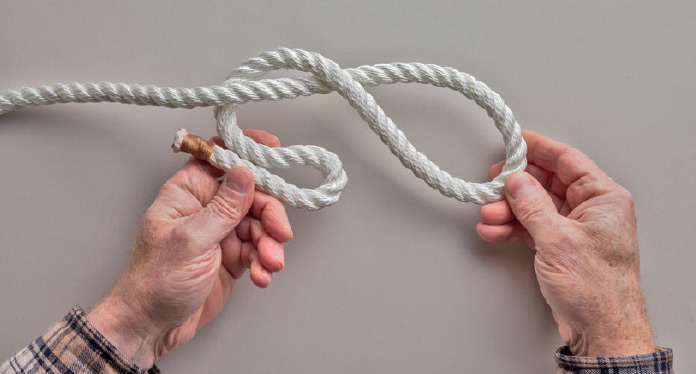
1. Make an overhand crossing turn, pass the working end back under the standing part, and form a bight in the working end.
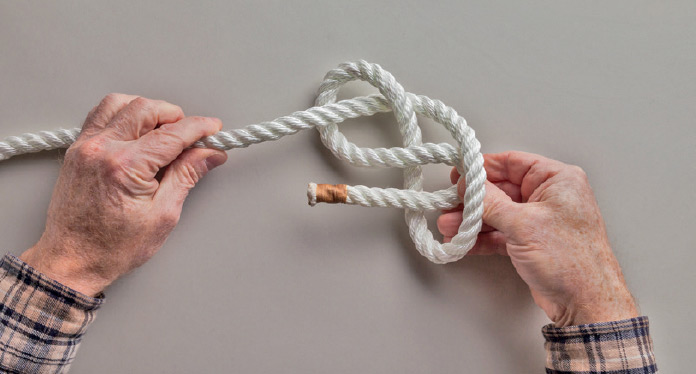
2. Bring the bight forward and partway through the crossing turn from front to back.
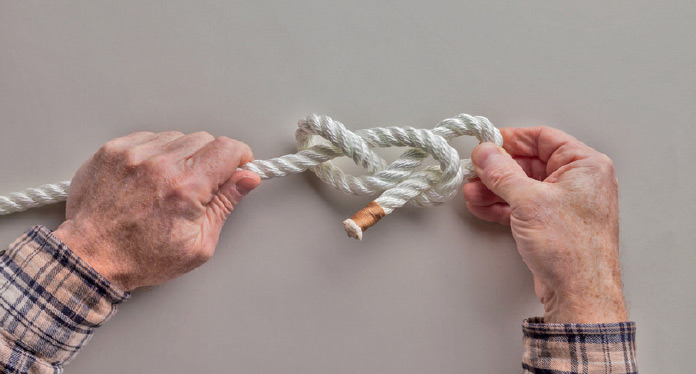
3. Pull the bight and the standing part, being careful not to pull the working end through the first crossing turn.
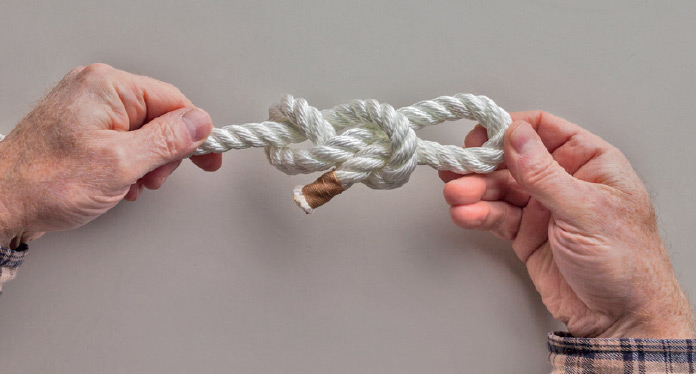
4. Continue pulling the bight and the standing part to tighten.
or , makes an attractive and comfortable “handle” at the end of a rope, and adds enough weight so that the end of the rope can be thrown. Instructions
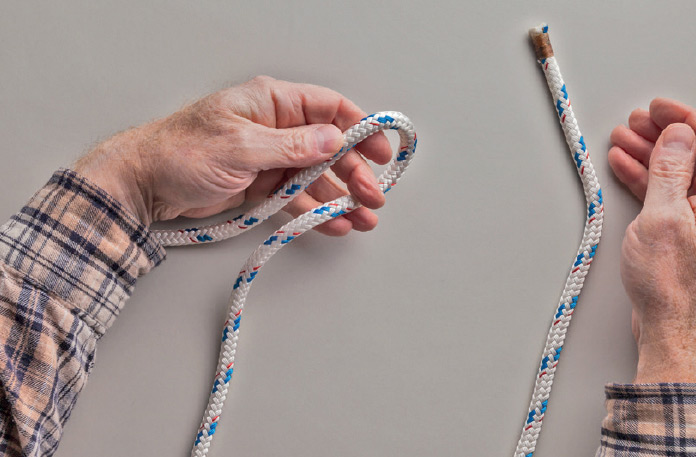
1. Form a bight around one or two fingers, leaving a long working end.
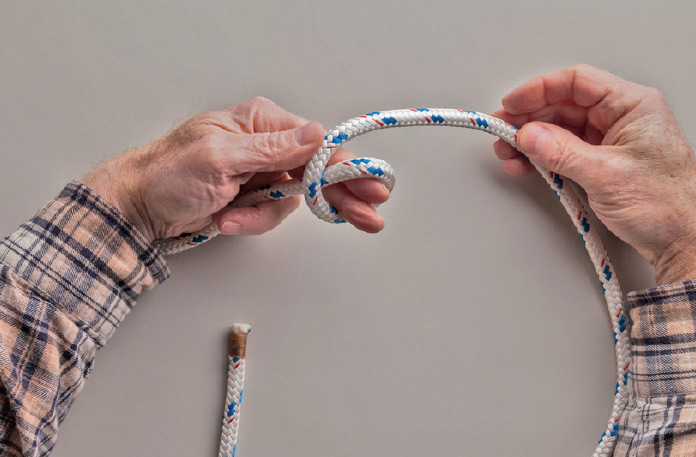
2. Bring the working end over the standing part, forming a crossing turn around your fingers.
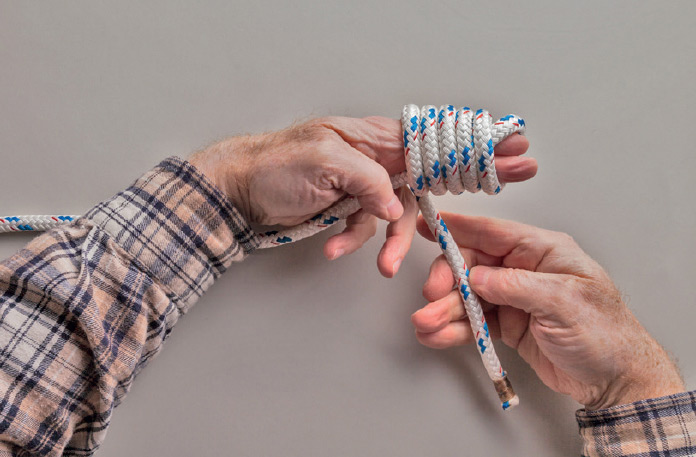
3. Continue wrapping the working end around your fingers, working toward the standing part. Make at least five round turns.
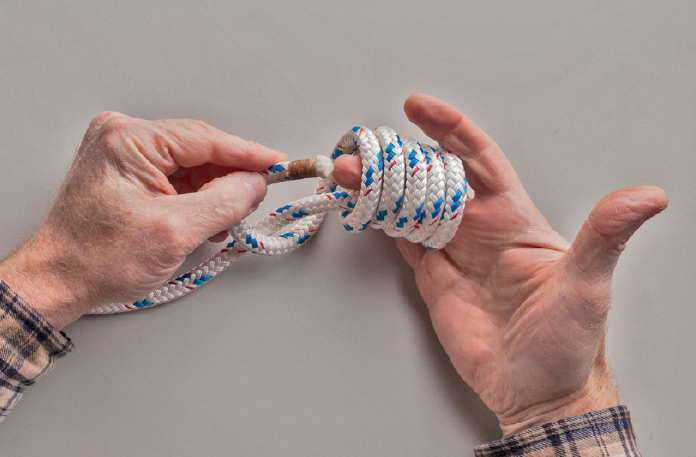
4. Slip the coil onto the fingers of your opposite hand, being careful that it doesn’t fall apart. Take a final turn with the working end around the standing part, then pass it up through the coil along your restraining fingers.
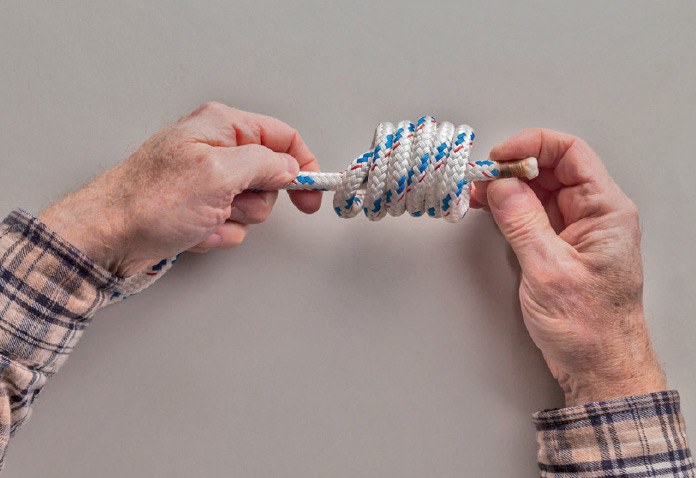
5. Pull the working end through.
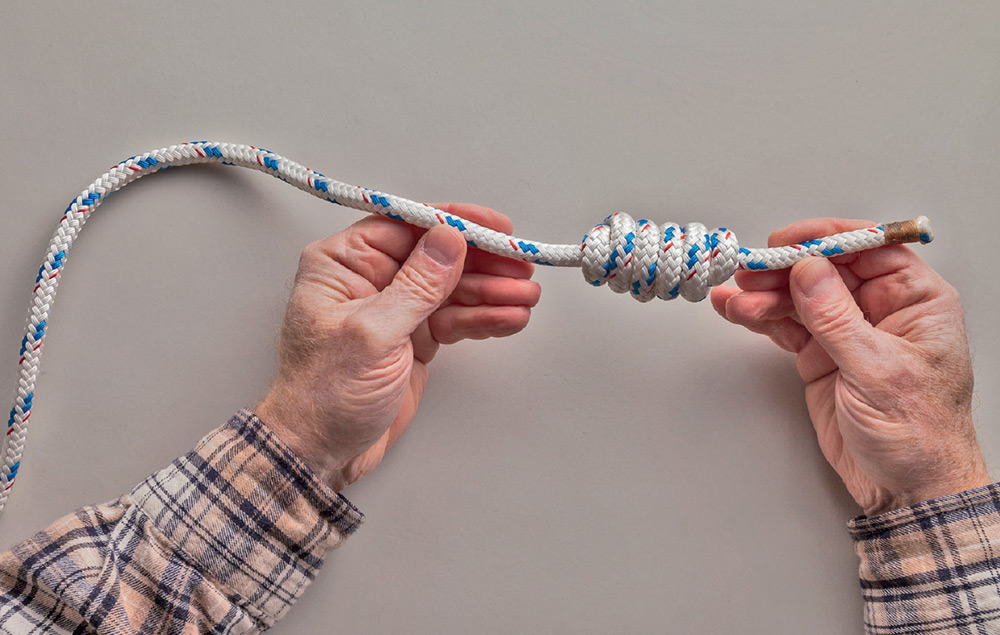
6. Pull both ends. The round turns will need to be worked into shape for a faired knot.
or and will stop a rope through a significantly larger hole, but it’s shorter and less obtrusive than the . Instructions
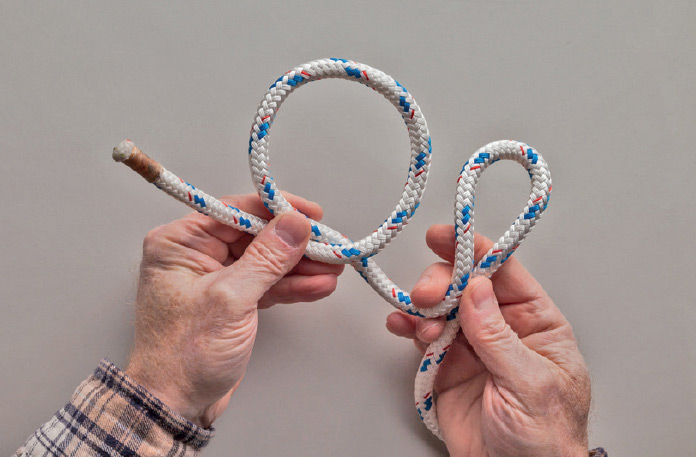
1. Make a counterclockwise overhand crossing turn. Form a bight in the standing part.
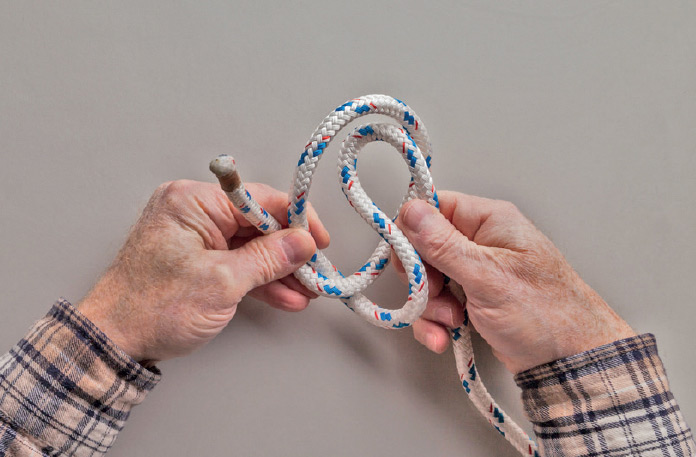
2. Pass the bight into the top of the crossing turn.
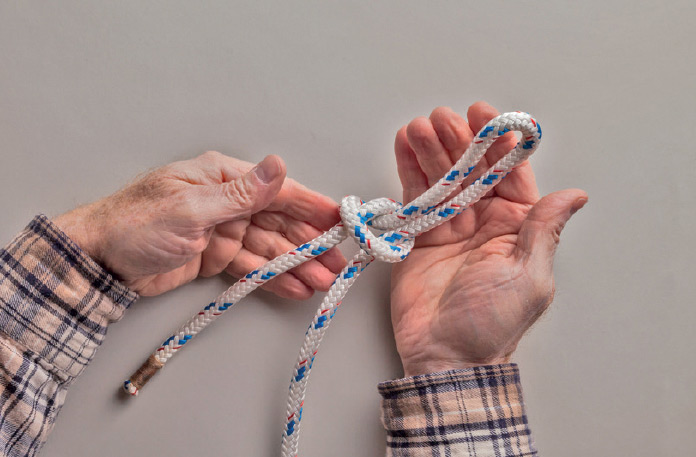
3. Pull the bight through to form a .
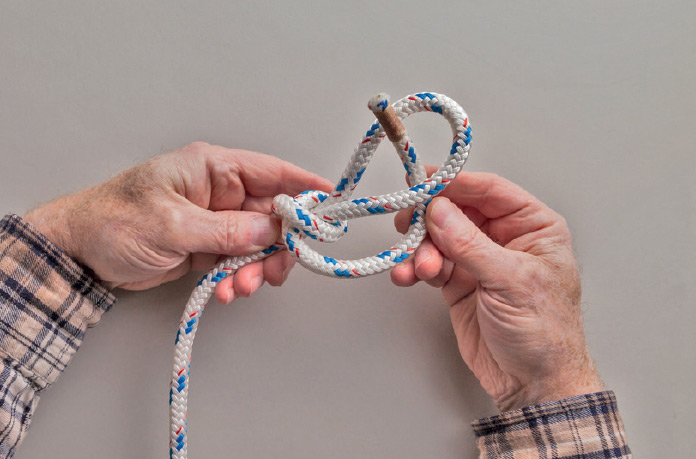
4. Pass the working end across the front of the standing part and through the back of the drawloop.
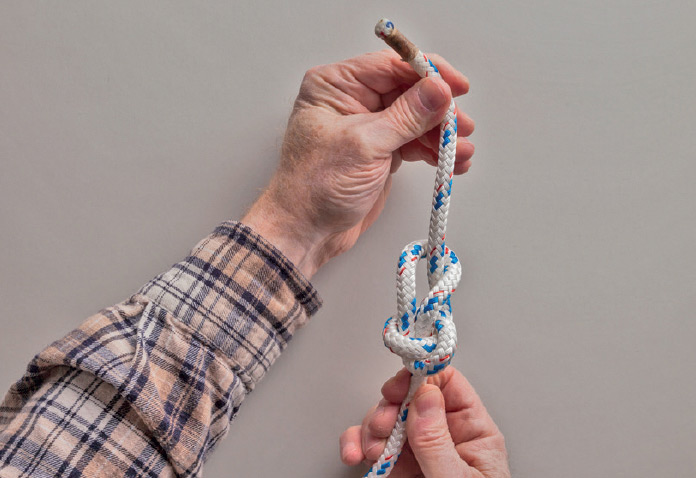
5. Pull both ends to tighten.
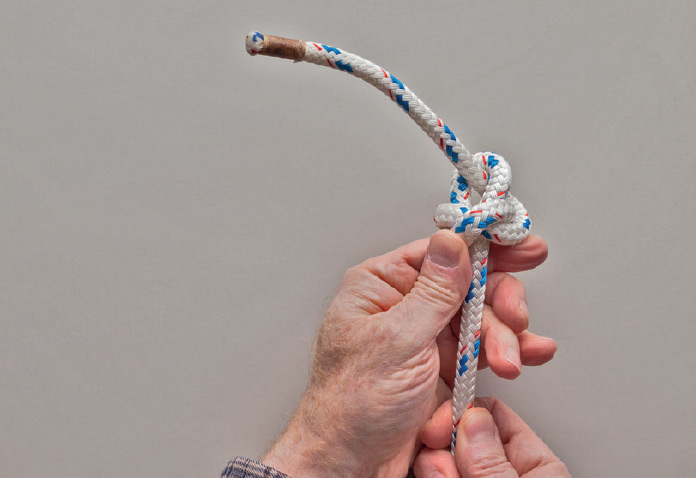
6. Push the knot up from the standing part to fair it.
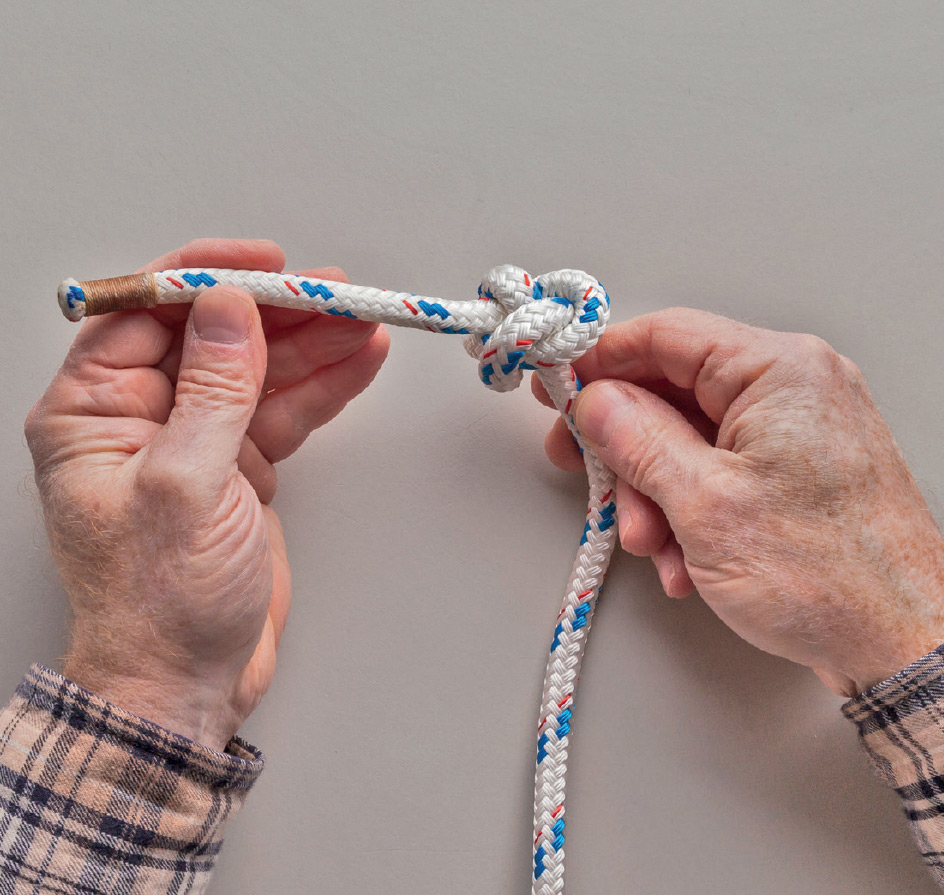
7. The finished knot.
but not as large as a . Instructions
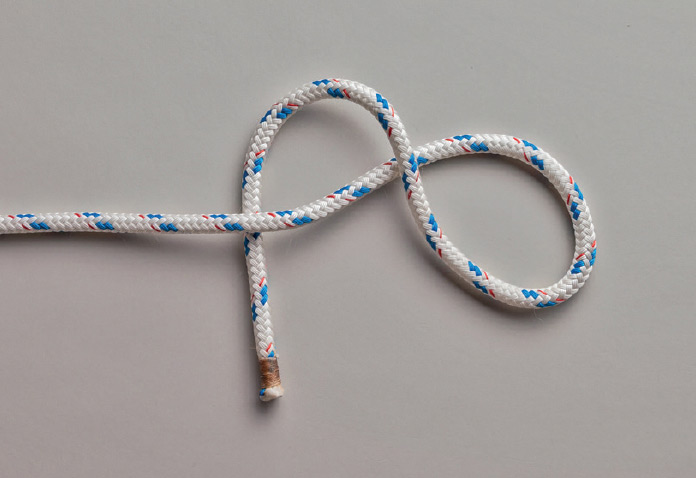
1. Make a clockwise overhand crossing turn and pass the working end back under the standing part, like the first steps in a .
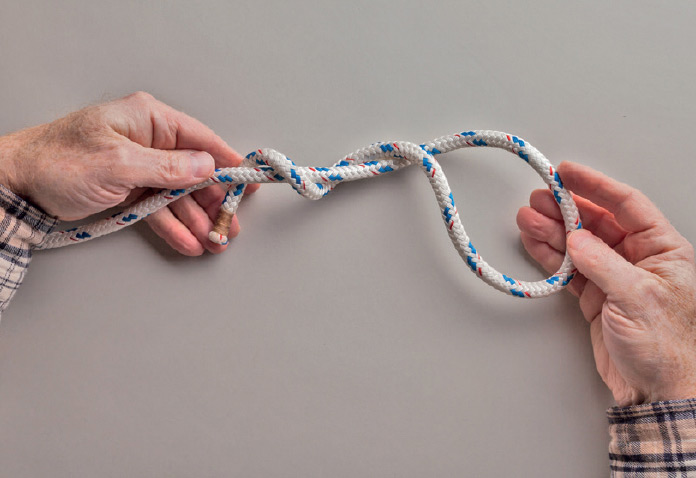
2. Wrap the working end in a round turn around the standing part.
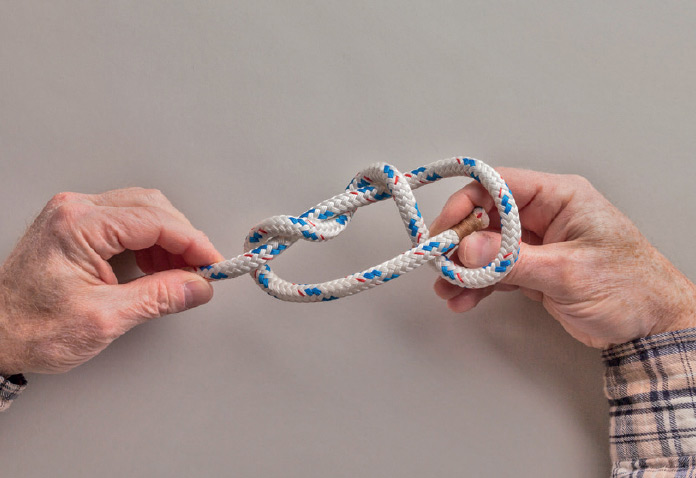
3. Bring the working end forward and pass it through the top of the crossing turn.
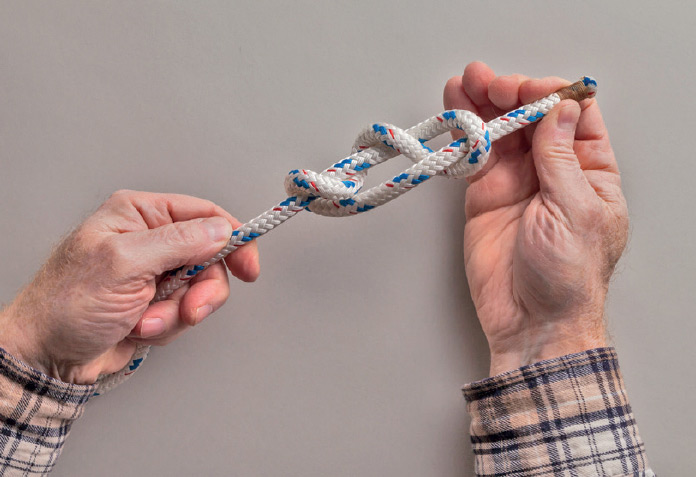
4. Pull both ends to begin tightening.
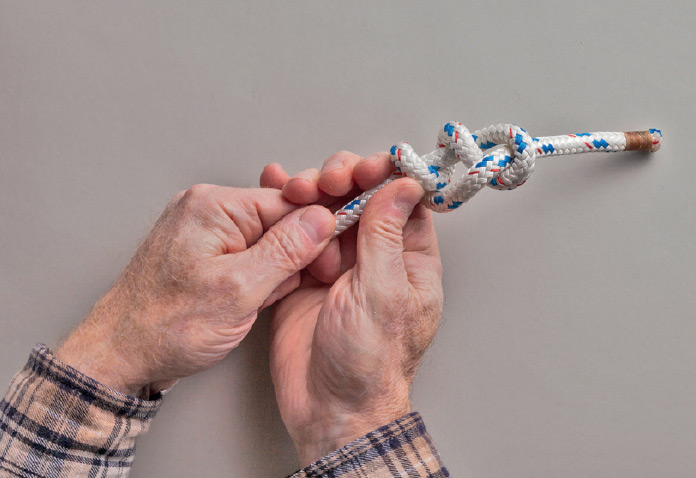
5. Push the knot up from the standing part to fair it.
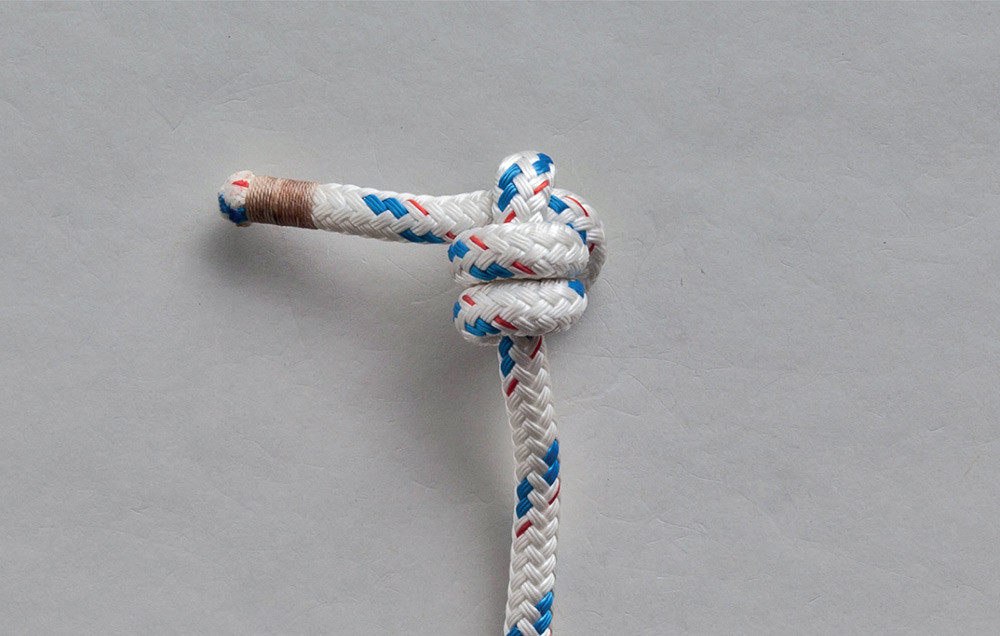
6. The finished knot.
. Both can add weight to the end of a rope so that it can be thrown, but the methods of tying are different, and the Heaving Line Knot can be made much larger by adding round turns. It can be made wider as well, by adding two or four additional, slightly shorter bights before beginning the round turns. Instructions
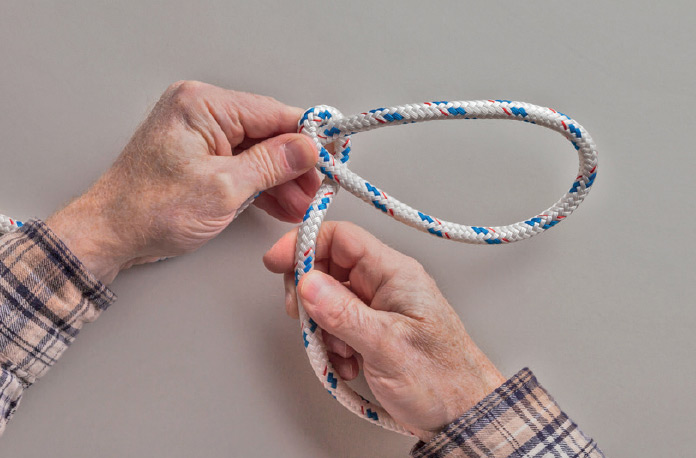
1. Make a clockwise overhand crossing turn and pass the working end back under both strands of the turn.
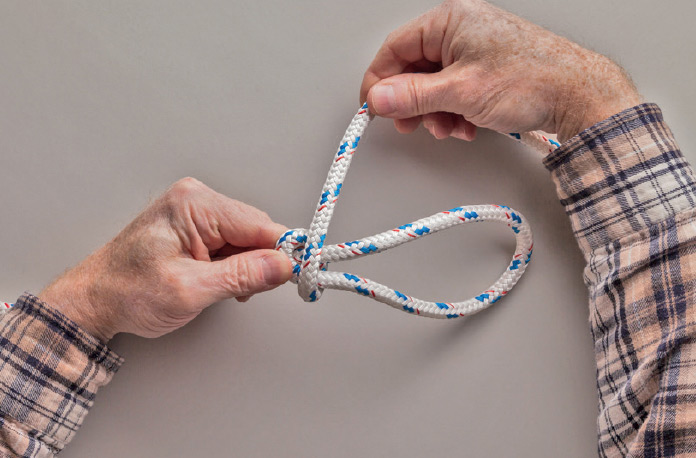
2. Begin wrapping the working end up toward the bight that is formed.
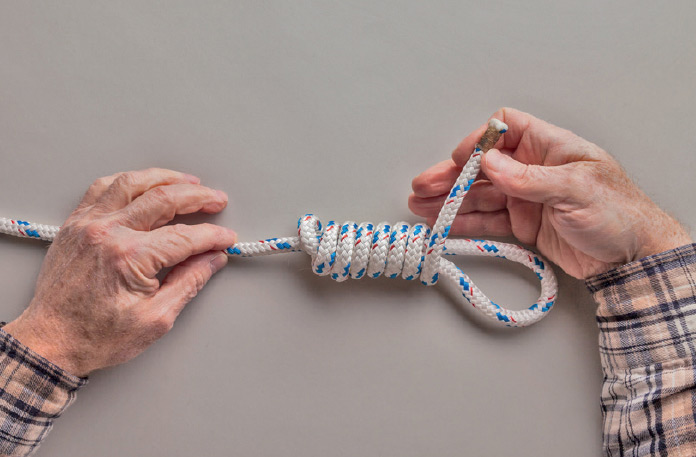
3. Make as many round turns around the bight as the working end allows while leaving a few inches to work with.
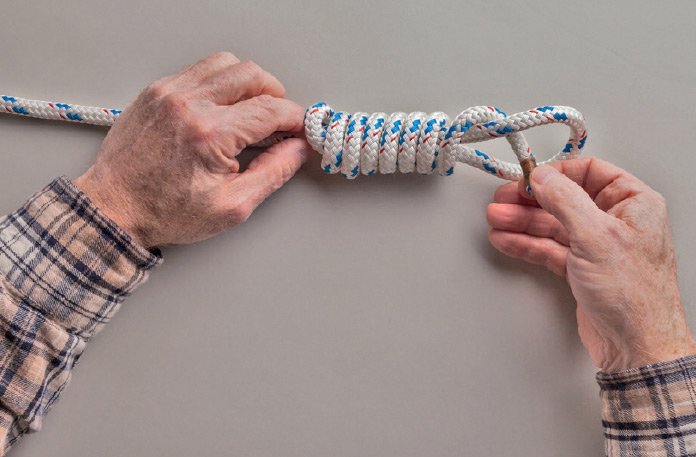
4. Pass the working end through the bight.
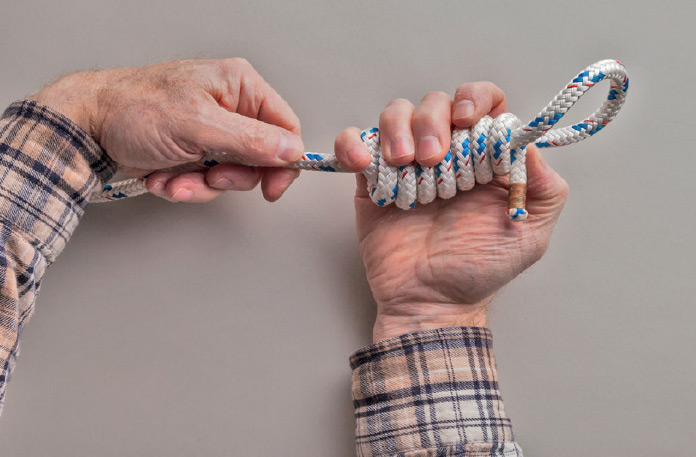
5. Holding the working end against the last round turn, begin pulling the standing part through the coil.
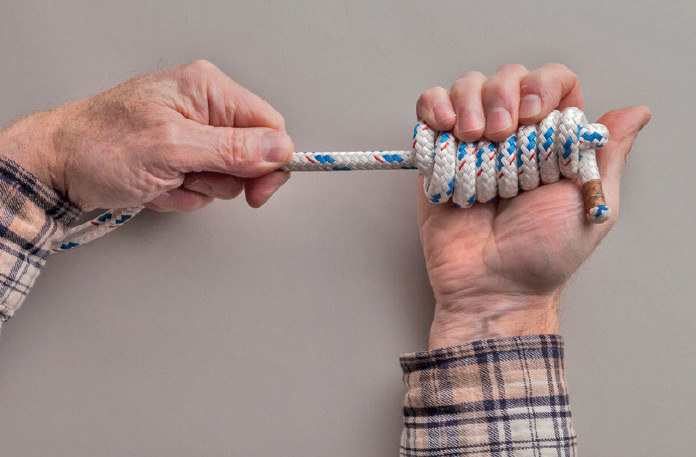
6. Keep pulling until the bight tightens over the working end, locking it in place.
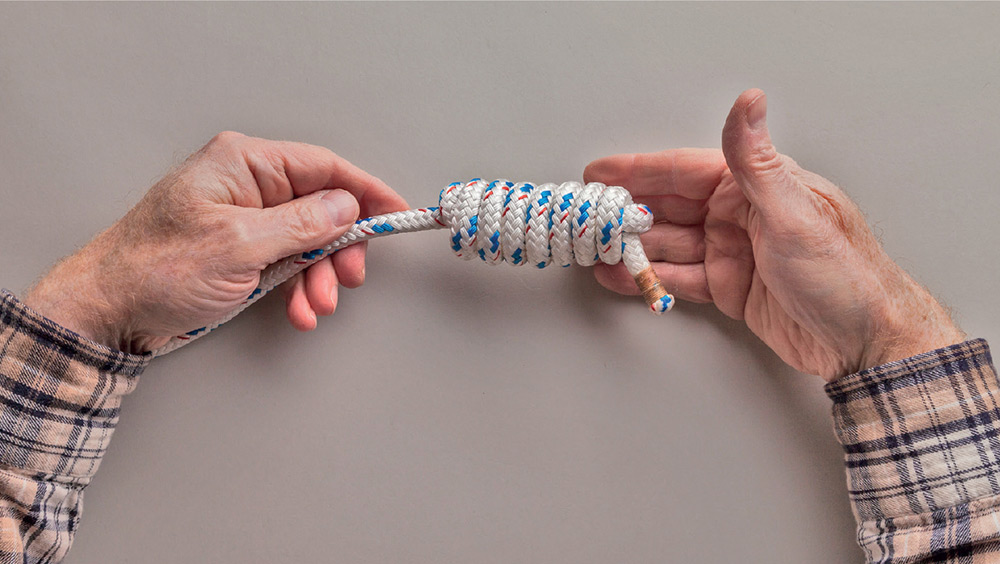
7. The finished knot.
.
Instructions

1. Make an overhand crossing turn, pass the working end back under the standing part, and form a bight in the working end.

2. Bring the bight forward and partway through the crossing turn from front to back.

3. Pull the bight and the standing part, being careful not to pull the working end through the first crossing turn.

4. Continue pulling the bight and the standing part to tighten.
Instructions

1. Form a bight around one or two fingers, leaving a long working end.

2. Bring the working end over the standing part, forming a crossing turn around your fingers.

3. Continue wrapping the working end around your fingers, working toward the standing part. Make at least five round turns.

4. Slip the coil onto the fingers of your opposite hand, being careful that it doesn’t fall apart. Take a final turn with the working end around the standing part, then pass it up through the coil along your restraining fingers.

5. Pull the working end through.

6. Pull both ends. The round turns will need to be worked into shape for a faired knot.
or and will stop a rope through a significantly larger hole, but it’s shorter and less obtrusive than the . Instructions

1. Make a counterclockwise overhand crossing turn. Form a bight in the standing part.

2. Pass the bight into the top of the crossing turn.

3. Pull the bight through to form a .

4. Pass the working end across the front of the standing part and through the back of the drawloop.

5. Pull both ends to tighten.

6. Push the knot up from the standing part to fair it.

7. The finished knot.
but not as large as a . Instructions

1. Make a clockwise overhand crossing turn and pass the working end back under the standing part, like the first steps in a .

2. Wrap the working end in a round turn around the standing part.

3. Bring the working end forward and pass it through the top of the crossing turn.

4. Pull both ends to begin tightening.

5. Push the knot up from the standing part to fair it.

6. The finished knot.
. Both can add weight to the end of a rope so that it can be thrown, but the methods of tying are different, and the Heaving Line Knot can be made much larger by adding round turns. It can be made wider as well, by adding two or four additional, slightly shorter bights before beginning the round turns. Instructions

1. Make a clockwise overhand crossing turn and pass the working end back under both strands of the turn.

2. Begin wrapping the working end up toward the bight that is formed.

3. Make as many round turns around the bight as the working end allows while leaving a few inches to work with.

4. Pass the working end through the bight.

5. Holding the working end against the last round turn, begin pulling the standing part through the coil.

6. Keep pulling until the bight tightens over the working end, locking it in place.

7. The finished knot.
.
Instructions

1. Make a counterclockwise overhand crossing turn. Form a bight in the standing part.

2. Pass the bight into the top of the crossing turn.

3. Pull the bight through to form a .

4. Pass the working end across the front of the standing part and through the back of the drawloop.

5. Pull both ends to tighten.

6. Push the knot up from the standing part to fair it.

7. The finished knot.
Instructions

1. Make a clockwise overhand crossing turn and pass the working end back under the standing part, like the first steps in a .

2. Wrap the working end in a round turn around the standing part.

3. Bring the working end forward and pass it through the top of the crossing turn.

4. Pull both ends to begin tightening.

5. Push the knot up from the standing part to fair it.

6. The finished knot.
. Both can add weight to the end of a rope so that it can be thrown, but the methods of tying are different, and the Heaving Line Knot can be made much larger by adding round turns. It can be made wider as well, by adding two or four additional, slightly shorter bights before beginning the round turns. Instructions

1. Make a clockwise overhand crossing turn and pass the working end back under both strands of the turn.

2. Begin wrapping the working end up toward the bight that is formed.

3. Make as many round turns around the bight as the working end allows while leaving a few inches to work with.

4. Pass the working end through the bight.

5. Holding the working end against the last round turn, begin pulling the standing part through the coil.

6. Keep pulling until the bight tightens over the working end, locking it in place.

7. The finished knot.
.
Instructions

1. Make a clockwise overhand crossing turn and pass the working end back under both strands of the turn.

2. Begin wrapping the working end up toward the bight that is formed.

3. Make as many round turns around the bight as the working end allows while leaving a few inches to work with.

4. Pass the working end through the bight.

5. Holding the working end against the last round turn, begin pulling the standing part through the coil.

6. Keep pulling until the bight tightens over the working end, locking it in place.

7. The finished knot.
