Element nodes are more complex than text nodes because they have attributes, styles, and event handlers and because they can have children. You’ll take care of patching the children of a node in section 8.2.6, which covers the case of fragment nodes. But you’ll focus on the attributes, styles (including CSS classes), and event handlers in this section.
The patchElement() function is in charge of extracting the attributes, CSS classes and styles, and event handlers from the old and new virtual nodes and then passing them to the appropriate functions to patch them. You’ll write functions to patch attributes, CSS classes and styles, and event handlers separately because they follow different rules:
patchAttrs()—Patches the attributes (such as id, name, value, and so on)
patchClasses()—Patches the CSS class names
patchStyles()—Patches the CSS styles
patchEvents()—Patches the event handlers and returns an object with the current event handlers
The event handlers returned by the patchEvents() function should be saved in the listeners property of the new virtual node so that you can remove them later. Recall
8.2
Patching the DOM
183
that when you implemented the mountDOM() function, you saved the event handlers in the listeners property of the virtual node.
Inside the patch-dom.js file, write the code for the patchElement() function as shown in the following listing. (You don’t need to include the // TODO comments shown in the listing; they’re simply reminders of the functions you need to write next.) Listing 8.11
Patching an element node (patch-dom.js)
function patchElement(oldVdom, newVdom) {
const el = oldVdom.el
const {
class: oldClass,
style: oldStyle,
on: oldEvents,
...oldAttrs
} = oldVdom.props
const {
class: newClass,
style: newStyle,
on: newEvents,
...newAttrs
} = newVdom.props
const { listeners: oldListeners } = oldVdom
patchAttrs(el, oldAttrs, newAttrs)
patchClasses(el, oldClass, newClass)
patchStyles(el, oldStyle, newStyle)
newVdom.listeners = patchEvents(el, oldListeners, oldEvents, newEvents)
}
// TODO: implement patchAttrs()
// TODO: implement patchClasses()
// TODO: implement patchStyles()
// TODO: implement patchEvents()
Now that we’ve broken the work of patching element nodes into smaller tasks, let’s start with the first one: patching attributes.
PATCHING ATTRIBUTES
The attributes of a virtual node are all the key-value pairs that come inside its props object—except the class, style, and on properties, which have a special meaning.
Now, given the two objects containing the attributes of the old and new virtual nodes (oldAttrs and newAttrs, respectively), you need to find out which attributes have been added, removed, or changed. In chapter 7, you wrote a function called objectsDiff() that did exactly that job.
The objectsDiff() function tells you which attributes have been added, removed, or changed. You can get rid of the attributes that have been removed by using the
184
CHAPTER 8
The reconciliation algorithm: Patching the DOM
removeAttribute() function, which you wrote in chapter 4 (inside the attributes.js file).
The attributes that have been added or changed can be set using the setAttribute() function, which you also wrote earlier.
At the bottom of the patch-dom.js file, write the code for the patchAttrs() function, as shown in the following listing. Don’t forget to include the new import statements at the top of the file.
Listing 8.12
Patching the attributes (patch-dom.js)
import {
removeAttribute,
setAttribute,
} from './attributes'
import { destroyDOM } from './destroy-dom'
import { DOM_TYPES } from './h'
import { mountDOM } from './mount-dom'
import { areNodesEqual } from './nodes-equal'
import { objectsDiff } from './utils/objects'
Finds out which
attributes have been
// --snip-- //
added, removed, or
changed
function patchAttrs(el, oldAttrs, newAttrs) {
const { added, removed, updated } = objectsDiff(oldAttrs, newAttrs) for (const attr of removed) {
Removes the attributes
removeAttribute(el, attr)
that have been removed
}
for (const attr of added.concat(updated)) {
setAttribute(el, attr, newAttrs[attr])
Sets the attributes
}
that have been added
}
or changed
PATCHING CSS CLASSES
Let’s move on to patching CSS classes. The tricky part of patching the CSS classes is that they can come as a string ('foo bar') or as an array of strings (['foo', 'bar']).
Here’s what you’ll do:
If the CSS classes come in an array, filter the blank or empty strings out and keep them as an array.
If the CSS classes come as a string, split it on whitespace and filter the blank or empty strings out.
This way, you work with two arrays of strings representing the CSS classes of the old and new virtual DOMs. Then you can use the arraysDiff() function that you implemented in chapter 7 to find out which CSS classes have been added and removed. The DOM element has a classList property (an instance of the DOMTokenList interface) that you can use to add CSS classes to, and remove CSS classes from, the element. Add the new classes by using the classList.add() method, and remove the old ones by
8.2
Patching the DOM
185
using the classList.remove() method. The classes that were neither added nor removed don’t need to be touched; they can stay as they are.
At the bottom of the patch-dom.js file, write the code for the patchClasses() function as shown in the following listing. Again, don’t forget to include the new import statements at the top of the file. Also, pay attention to a function that you’ll need to import: isNotBlankOrEmptyString().
Listing 8.13
Patching the CSS classes (patch-dom.js)
import {
removeAttribute,
setAttribute,
} from './attributes'
import { destroyDOM } from './destroy-dom'
import { DOM_TYPES } from './h'
import { mountDOM } from './mount-dom'
import { areNodesEqual } from './nodes-equal'
import {
arraysDiff,
} from './utils/arrays'
import { objectsDiff } from './utils/objects'
import { isNotBlankOrEmptyString } from './utils/strings'
// --snip-- //
Array of old
CSS classes
function patchClasses(el, oldClass, newClass) {
const oldClasses = toClassList(oldClass)
Array of new
const newClasses = toClassList(newClass)
CSS classes
const { added, removed } =
arraysDiff(oldClasses, newClasses)
Finds out which CSS classes
have been added and removed
if (removed.length > 0) {
el.classList.remove(...removed)
Adds the CSS classes
}
that have been added
if (added.length > 0) {
el.classList.add(...added)
Removes the CSS classes
}
that have been removed
}
function toClassList(classes = '') {
return Array.isArray(classes)
Filters blank and
empty strings
? classes.filter(isNotBlankOrEmptyString)
: classes.split(/(\s+)/)
.filter(isNotBlankOrEmptyString)
Splits the string on whitespace and
}
filters blank and empty strings
Now you need to write the isNotBlankOrEmptyString() function in the utils/strings.js file. This function takes a string as an argument; it returns true if the string is neither blank nor empty and false otherwise. Splitting that function is helpful. Use isNotEmptyString() to test whether a string is empty. isNotBlankOrEmptyString() uses
186
CHAPTER 8
The reconciliation algorithm: Patching the DOM
the former function, passing it a trimmed version of the string. Create a new file in the utils directory, name the file strings.js, and write the code for the isNotBlankOrEmptyString() function as shown in the following listing.
Listing 8.14
Filtering empty and blank strings (utils/strings.js)
export function isNotEmptyString(str) {
return str !== ''
}
export function isNotBlankOrEmptyString(str) {
return isNotEmptyString(str.trim())
}
PATCHING THE STYLE
Patching the style is similar to patching the attributes: you compare the old and new style objects (using the objectsDiff() function), and then you add the new or modified styles and remove the old ones. To set or remove styles, use the setStyle() and removeStyle() functions that you wrote in chapter 4.
Inside the patch-dom.js file, write the code for the patchStyle() function as shown in the following listing. Don’t forget to import the removeStyle() and setStyle() functions at the top of the file.
Listing 8.15
Patching the styles (patch-dom.js)
import {
removeAttribute,
setAttribute,
removeStyle,
setStyle,
} from './attributes'
import { destroyDOM } from './destroy-dom'
import { DOM_TYPES } from './h'
import { mountDOM } from './mount-dom'
import { areNodesEqual } from './nodes-equal'
import {
arraysDiff,
} from './utils/arrays'
import { objectsDiff } from './utils/objects'
import { isNotBlankOrEmptyString } from './utils/strings'
// --snip-- //
function patchStyles(el, oldStyle = {}, newStyle = {}) {
const { added, removed, updated } = objectsDiff(oldStyle, newStyle) for (const style of removed) {
removeStyle(el, style)
}
8.2
Patching the DOM
187
for (const style of added.concat(updated)) {
setStyle(el, style, newStyle[style])
}
}
PATCHING EVENT LISTENERS
Last, let’s implement the event-listeners patching. The patchEvents() function is a bit different in that it has an extra parameter, oldListeners (the second one), which is an object containing the event listeners that are currently attached to the DOM. Let’s see why having a reference to the current event listener is necessary.
If you recall, when you implemented the mountDOM() function, you wrote a function called addEventListener() to attach event listeners to the DOM. Currently, addEventListener() uses the function you pass it as the event listener, but remember that I said this situation would change. Indeed, in section 10.2, this function will wrap the event listener you pass it into a new function, and it’ll use that new function as an event listener, much like the following example:
function addEventListener(eventName, handler, el) {
// Function that wraps the original handler
function boundHandler(event) {
// -- snip -- //
handler(event)
}
el.addEventListener(eventName, boundHandler)
return boundHandler
}
You’ll understand soon why you want to do this. For now, know that the functions defined in the virtual DOM to handle events aren’t the same as the functions that are attached to the DOM. This situation is why the patchEvents() function needs the oldListeners object: the function is attached to the DOM. As you know, to remove an event listener from a DOM element, you call its removeEventListener() method, passing it the name of the event and the function that you want to remove, so you need the functions that were used to attach the event listeners to the DOM.
The second difference of the patchEvents() function compared with the previous ones is that it returns an object containing the event names and handler functions that have been added to the DOM. (The other functions didn’t return anything.) You save this object in the listeners key of the new virtual DOM node. Later, you use this listeners object to remove the event listeners from the DOM when the view is destroyed.
188
CHAPTER 8
The reconciliation algorithm: Patching the DOM
The rest of the job is a matter of using the objectsDiff() function to find out which event listeners have been added, modified, or removed and then calling the addEventListener() function and the el.removeEventListener() method as required.
In this case, though, when an event listener has been modified (that is, the event name is the same but the handler function is different), you need to remove the old event listener and then add the new one. Keep this detail in mind.
Pay attention to two important aspects of the code. First, you use the function in oldListeners[eventName] to remove the event listener, not the function in oldEvents[eventName]. I’ve already explained the reason, you must write this line of code correctly for your framework to work properly:
el.removeEventListener(eventName, oldListeners[eventName])
Second, you use your own implementation of the addEventListener() function to add the event listeners to the DOM, not the el.addEventListener() method of the DOM element. To remove the event listeners, you use the el.removeEventListener() method.
Write the code for the patchEvents() function as shown in the following listing.
Don’t forget to import the addEventListener function at the top of the file.
Listing 8.16
Patching the event listeners (patch-dom.js)
import {
removeAttribute,
setAttribute,
removeStyle,
setStyle,
} from './attributes'
import { destroyDOM } from './destroy-dom'
import { addEventListener } from './events'
import { DOM_TYPES } from './h'
import { mountDOM } from './mount-dom'
import { areNodesEqual } from './nodes-equal'
import {
arraysDiff,
} from './utils/arrays'
import { objectsDiff } from './utils/objects'
import { isNotBlankOrEmptyString } from './utils/strings'
// --snip-- //
function patchEvents(
el,
oldListeners = {},
oldEvents = {},
newEvents = {}
) {
Finds out which
event listeners
const { removed, added, updated } =
changed
objectsDiff(oldEvents, newEvents)
8.2
Patching the DOM
189
Removes removed or
modified event listeners
for (const eventName of removed.concat(updated)) {
el.removeEventListener(eventName, oldListeners[eventName])
}
const addedListeners = {}
Creates an object to store
the added event listeners
for (const eventName of added.concat(updated)) {
const listener =
addEventListener(eventName, newEvents[eventName], el)
Adds added or
addedListeners[eventName] = listener
modified event
}
listeners
return addedListeners
Returns the added
Saves the listener
}
event listeners
in the object
You’ve implemented the patchElement() function, which patched the DOM element and required four other functions to do so: patchAttrs(), patchClasses(), patchStyles(), and patchEvents(). Believe it or not, all you have to do now to have a complete implementation of the patchDOM() function is patch the children of a node.
8.2.6
Patching child nodes
Both element and fragment nodes can have children, so the patchDOM() function needs to patch the children arrays of both types of nodes. Patching the children means figuring out which children have been added, which ones have been removed, and which ones have been shuffled around. For this purpose, you implemented arraysDiffSequence() in chapter 7.
Figure 8.14 shows the patching of children in the algorithm’s flow chart. Remember that in the case of move and noop operations between children, the algorithm calls the patchDOM() function recursively, passing it the old and new children nodes. The add and remove operations terminate the algorithm.
Start by modifying the patchDOM() function to call the patchChildren() function after the switch statement. This function will execute the patchChildren() function for all types of elements except the text nodes, which return early from the patchDOM() function.
Modify the patchDOM() function by adding the code shown in bold in the following listing. This code imports arraysDiffSequence and ARRAY_DIFF_OP from the utils/arrays.js file and calls the patchChildren() function.
190
CHAPTER 8
The reconciliation algorithm: Patching the DOM
Start
Old node
New node
No
Yes
Equal?
Text
El ment
e
Fr gment
a
node?
destroyDOM()
no e?
d
no e?
d
mountDOM()
patchText()
patchAttrs()
patchClasses()
End
End
Patching the child nodes
patchStyles()
patchEvents()
End
Has
No
Yes
children?
Add?
mountDOM()
Remove?
destroyDOM()
End
patchChildren()
For
each
Move?
Move node
Noop?
Figure 8.14
Patching the children of a node
Listing 8.17
Patching the children of a node (patch-dom.js)
import {
removeAttribute,
setAttribute,
removeStyle,
setStyle,
} from './attributes'
import { destroyDOM } from './destroy-dom'
import { addEventListener } from './events'
import { DOM_TYPES } from './h'
import { mountDOM } from './mount-dom'
import { areNodesEqual } from './nodes-equal'
import {
arraysDiff,
arraysDiffSequence,
8.2
Patching the DOM
191
ARRAY_DIFF_OP,
} from './utils/arrays'
import { objectsDiff } from './utils/objects'
import { isNotBlankOrEmptyString } from './utils/strings'
export function patchDOM(oldVdom, newVdom, parentEl) {
if (!areNodesEqual(oldVdom, newVdom)) {
const index = findIndexInParent(parentEl, oldVdom.el)
destroyDOM(oldVdom)
mountDOM(newVdom, parentEl, index)
return newVdom
}
newVdom.el = oldVdom.el
switch (newVdom.type) {
case DOM_TYPES.TEXT: {
patchText(oldVdom, newVdom)
return newVdom
}
case DOM_TYPES.ELEMENT: {
patchElement(oldVdom, newVdom)
break
}
}
patchChildren(oldVdom, newVdom)
return newVdom
}
// TODO: implement patchChildren()
The patchChildren() function extracts the children arrays from the old and new nodes (or uses an empty array in their absence) and then calls the arraysDiffSequence() function to find the operations that transform the old array into the new one. (Remember that this function requires the areNodesEqual() function to compare the nodes in the arrays.) Then, for each operation, it performs the appropriate patching.
First, you need a function—which you can call extractChildren()—that extracts the children array from a node in such a way that if it encounters a fragment node, it extracts the children of the fragment node and adds them to the array. This function needs to be recursive so that if a fragment node contains another fragment node, it also extracts the children of the inner fragment node.
Inside the h.js file, where the virtual node-creation functions are defined, write the code for the extractChildren() function as shown in the following listing.
192
CHAPTER 8
The reconciliation algorithm: Patching the DOM
Listing 8.18
Extracting the children of a node (h.js)
export function extractChildren(vdom) {
if (vdom.children == null) {
If the node has no
return []
children, returns
}
an empty array
const children = []
for (const child of vdom.children) {
Iterates over the children
if (child.type === DOM_TYPES.FRAGMENT) {
children.push(...extractChildren(child, children))
If the child
} else {
is a fragment
children.push(child)
Otherwise, adds
node, extracts
}
the child to the
its children
}
array
recursively
return children
}
With this function ready, you can write the code for the patchChildren() function, shown in the following listing. Don’t forget to import the extractChildren() function at the top of the file.
Listing 8.19
Implementing the patchChildren() function (patch-dom.js)
import {
removeAttribute,
setAttribute,
removeStyle,
setStyle,
} from './attributes'
import { destroyDOM } from './destroy-dom'
import { addEventListener } from './events'
import { DOM_TYPES } from './h'
import { mountDOM, extractChildren } from './mount-dom'
import { areNodesEqual } from './nodes-equal'
import {
arraysDiff,
arraysDiffSequence,
ARRAY_DIFF_OP,
} from './utils/arrays'
import { objectsDiff } from './utils/objects'
import { isNotBlankOrEmptyString } from './utils/strings
// --snip-- //
Extracts the old
children array or
function patchChildren(oldVdom, newVdom) {
uses an empty array
const oldChildren = extractChildren(oldVdom)
8.2
Patching the DOM
193
const newChildren = extractChildren(newVdom)
Extracts the new children
const parentEl = oldVdom.el
array or uses an empty array
const diffSeq = arraysDiffSequence(
Finds the operations to transform
oldChildren,
the old array into the new one
newChildren,
areNodesEqual
)
Iterates over
the operations
for (const operation of diffSeq) {
const { originalIndex, index, item } = operation
switch (operation.op) {
Switches on the
case ARRAY_DIFF_OP.ADD: {
operation type
// TODO: implement
}
case ARRAY_DIFF_OP.REMOVE: {
// TODO: implement
}
case ARRAY_DIFF_OP.MOVE: {
// TODO: implement
}
case ARRAY_DIFF_OP.NOOP: {
// TODO: implement
}
}
}
}
All that’s left to do is fill in the switch statement with the code for each operation (where the // TODO comments are). This task is simpler than you think. Let’s start with the ARRAY_DIFF_OP.ADD operation.
THE ADD OPERATION
When a new node is added to the children array, it’s like mounting a subtree of the DOM at a specific place. Thus, you can simply use the mountDOM() function, passing it the index at which the new node should be inserted. Figure 8.15 shows that when a node addition is detected (an operation of type ARRAY_DIFF_OP.ADD), it’s inserted into the DOM.
Write the code shown in bold in the following listing to implement the first case of the switch statement.
194
CHAPTER 8
The reconciliation algorithm: Patching the DOM
Old vdom
New vdom
<form>
<form>
<input>
<button>
<input>
<p>
<button>
Text
Text
Text
"..."
"..."
"..."
DOM
<form>
<input>
<p>
Add node.
<button>
</form>
Figure 8.15
Adding a node to the children array
Listing 8.20
Patching the children by adding a node (patch-dom.js)
function patchChildren(oldVdom, newVdom) {
// --snip-- //
for (const operation of diffSeq) {
const { from, index, item } = operation
switch (operation.op) {
case ARRAY_DIFF_OP.ADD: {
mountDOM(item, parentEl, index)
break
}
case ARRAY_DIFF_OP.REMOVE: {
// TODO: implement
}
case ARRAY_DIFF_OP.MOVE: {
// TODO: implement
}
case ARRAY_DIFF_OP.NOOP: {
// TODO: implement
}
}
}
}
8.2
Patching the DOM
195
THE REMOVE OPERATION
Next comes the ARRAY_DIFF_OP.REMOVE operation. When a node is removed from the children array, you want to unmount it from the DOM. Thanks to the destroyDOM() function you wrote in chapter 4, this task is easy. Figure 8.16 illustrates removing a node from the children array (an operation of type ARRAY_DIFF_OP.REMOVE) and shows how it’s removed from the DOM.
Old vdom
New vdom
<form>
<form>
<input>
<p>
<button>
<input>
<p>
<button>
Text
Text
Text
Text
"..."
"..."
"..."
"..."
DOM
<form>
<input>
Remove node.
<button>
</form>
Figure 8.16
Removing a node from the children array
Write the code shown in bold in the following listing.
Listing 8.21
Patching the children by removing a node (patch-dom.js)
function patchChildren(oldVdom, newVdom) {
// --snip-- //
for (const operation of diffSeq) {
const { from, index, item } = operation
switch (operation.op) {
case ARRAY_DIFF_OP.ADD: {
mountDOM(item, parentEl, index)
break
}
case ARRAY_DIFF_OP.REMOVE: {
destroyDOM(item)
break
}
196
CHAPTER 8
The reconciliation algorithm: Patching the DOM
case ARRAY_DIFF_OP.MOVE: {
// TODO: implement
}
case ARRAY_DIFF_OP.NOOP: {
// TODO: implement
}
}
}
}
THE MOVE OPERATION
The ARRAY_DIFF_OP.MOVE operation is a bit more nuanced. When you detect that a node has moved its position in the children array, you have to move it in the DOM as well. To do so, you need to grab the reference to the DOM node and use its insertBefore() method to move it to the new position. The insertBefore() method requires a reference to a DOM node that will be the next sibling of the node you’re moving; you need to find the node that’s currently at the desired index.
NOTE
The browser automatically removes the node from its original position when you move it. You won’t end up with the same node in two places.
After moving the node, you want to pass it to the patchDOM() function to patch it. Nodes stay in the DOM from one render to the next, so they may not only have moved around, but also changed in other ways (had a CSS class added to them, for example).
Figure 8.17 shows a node moving its position. Here, when a node moves inside its parent node’s children array (an operation of type ARRAY_DIFF_OP.MOVE), the same movement is replicated in the DOM.
Old vdom
New vdom
<form>
<form>
<input>
<p>
<button>
<p>
<input>
<button>
Text
Text
Text
Text
Move nodes.
"..."
"..."
"..."
"..."
DOM
<form>
<p>
Move nodes.
<input>
<button>
</form>
Figure 8.17
Moving a node inside the children array
8.2
Patching the DOM
197
Write the code shown in bold in the following listing.
Listing 8.22
Patching the children by moving a node (patch-dom.js)
function patchChildren(oldVdom, newVdom) {
// --snip-- //
for (const operation of diffSeq) {
const { from, index, item } = operation
switch (operation.op) {
case ARRAY_DIFF_OP.ADD: {
mountDOM(item, parentEl, index)
break
}
case ARRAY_DIFF_OP.REMOVE: {
destroyDOM(item)
Gets the old
break
Gets the new virtual
virtual node at
node at the new index
}
the original index
case ARRAY_DIFF_OP.MOVE: {
Gets the
DOM element
const oldChild = oldChildren[originalIndex]
associated with
const newChild = newChildren[index]
the moved node
const el = oldChild.el
const elAtTargetIndex = parentEl.childNodes[index]
Finds the
element at the
parentEl.insertBefore(el, elAtTargetIndex)
target index
patchDOM(oldChild, newChild, parentEl)
inside the
parent
break
element
}
Inserts the moved
case ARRAY_DIFF_OP.NOOP: {
element before the
// TODO: implement
target element
}
}
Recursively patches
}
the moved element
}
THE NOOP OPERATION
The last operation is the ARRAY_DIFF_OP.NOOP operation. If you recall, some of the child nodes may not have moved, or they may have moved because other nodes were added or removed around them (a case that I call natural movements). You don’t need to move these nodes explicitly because they fall into their new positions naturally. But you do need to patch them because they may have changed in other ways, as noted earlier. Write the code shown in bold in the following listing.
Listing 8.23
Patching the children with a noop operation (patch-dom.js)
function patchChildren(oldVdom, newVdom) {
// --snip-- //
198
CHAPTER 8
The reconciliation algorithm: Patching the DOM
for (const operation of diffSeq) {
const { from, index, item } = operation
switch (operation.op) {
case ARRAY_DIFF_OP.ADD: {
mountDOM(item, parentEl, index)
break
}
case ARRAY_DIFF_OP.REMOVE: {
destroyDOM(item)
break
}
case ARRAY_DIFF_OP.MOVE: {
const el = oldChildren[from].el
const elAtTargetIndex = parentEl.childNodes[index]
parentEl.insertBefore(el, elAtTargetIndex)
patchDOM(oldChildren[from], newChildren[index], parentEl)
break
}
case ARRAY_DIFF_OP.NOOP: {
patchDOM(oldChildren[originalIndex], newChildren[index], parentEl) break
}
}
}
}
That’s it. You’ve implemented the reconciliation algorithm. Most remarkably, you’ve done the implementation from scratch. Next, you’ll publish the new, improved version of your framework to see it in action in the TODOs application.
8.3
Publishing the framework’s new version
In chapters 6 and 7, you implemented the patchDOM() function—the reconciliation algorithm. The job took quite a lot of code, but you did it. As a result, your framework can figure out what changed between two virtual DOM trees and patch the real DOM
tree accordingly. Now is a good time to publish a new version of your framework that you can use in the TODOs application. First, bump the version of the runtime package by incrementing the version field in the package.json file to 2.0.0:
{
"version": "1.0.0",
"version": "2.0.0",
}
Then run the npm publish command to publish the new version of the package.
That’s it! Your new and improved version of the framework is available on NPM and unpkg.com.
8.4
The TODOs application
199
8.4
The TODOs application
It’s time to put your improved framework to use. The nice thing is that the public API of your framework hasn’t changed, so you can use the TODOs application code from chapter 6.
Clone the examples/ch06/todos directory containing the code of the TODOs app into examples/ch08/todos. You can do this job in your preferred way, but if you’re using a UNIX-like operating system, the simplest way is to run the following commands:
$ mkdir examples/ch08
$ cp -r examples/ch06/todos examples/ch08/todos
Now the only line you need to change is the first line in the index.js file, where you import your framework. Change it to import the new version of the framework from unpkg.com:
import { createApp, h, hFragment } from 'https://unpkg.com/<fwk-name>@1'
import { createApp, h, hFragment } from 'https://unpkg.com/ <fwk-name> @2'
With that simple change, your TODOs application is using the new version of your framework. You can serve the application by running the following command at the root of the project:
$ npm run serve:examples
Open the application in your browser at http://localhost:8080/ch08/todos/todos
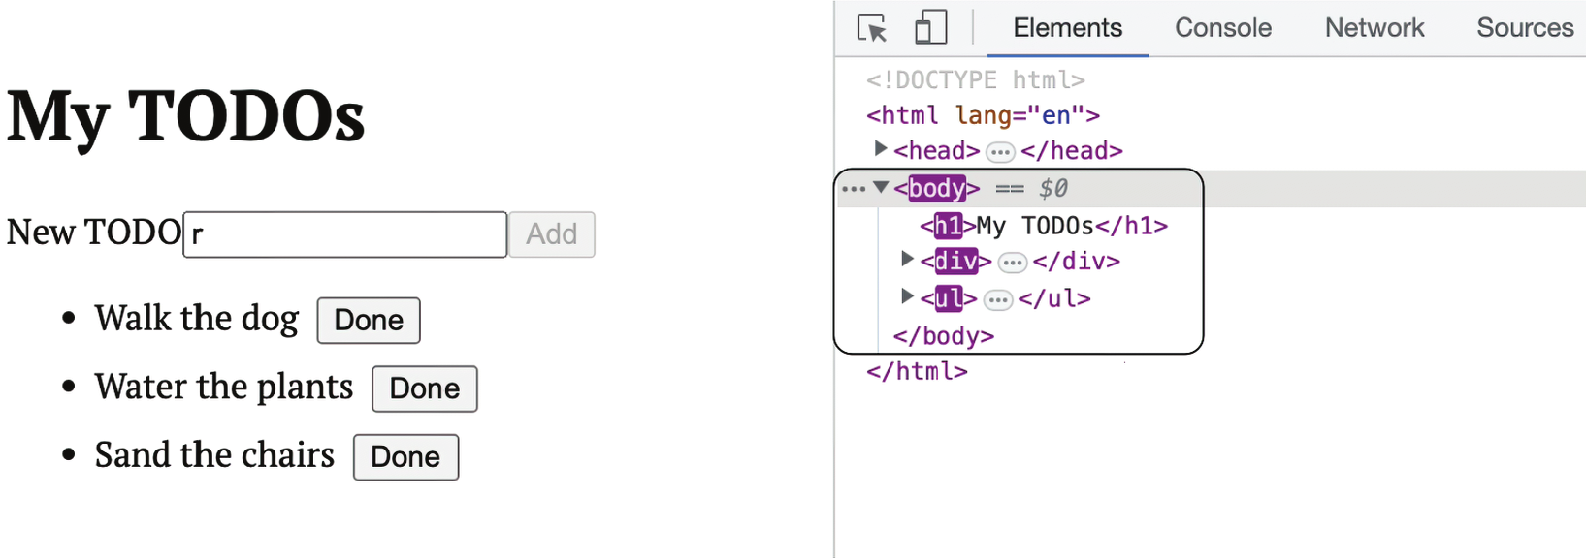
.html. Everything should work exactly as it did in chapter 6, but this time, when you type in the input field, its focus is preserved, as the DOM isn’t re-created every time you type a character. How can you make sure that your algorithm isn’t doing extra work—that it’s patching only what changed?
8.4.1
Inspecting the DOM tree changes
An interesting way to check whether the reconciliation algorithm is working as expected is to open the browser’s developer tools and inspect the DOM tree. (Use the Inspector tab in Mozilla Firefox or the Elements tab in Google Chrome.) This panel in the developer tools shows the DOM tree of the page you’re currently viewing, and when a node changes, it’s highlighted with a flashing animation.
If you open the TODOs application from chapter 6, where the DOM was re-created every time, and type a character in the input field, you’ll see that the entire DOM
tree is highlighted (figure 8.18). If you followed the folder-naming conventions in appendix A, your application from chapter 6 should be running at http://localhost
:8080/examples/ch06/todos/todos.html.
If you open the TODOs application from this chapter and type a character in the input field, nothing is highlighted because the DOM tree didn’t change—only the value
200
CHAPTER 8
The reconciliation algorithm: Patching the DOM
All the elements change.
Figure 8.18
With your previous version of the framework, the entire DOM tree is highlighted when you type a character in the input field.
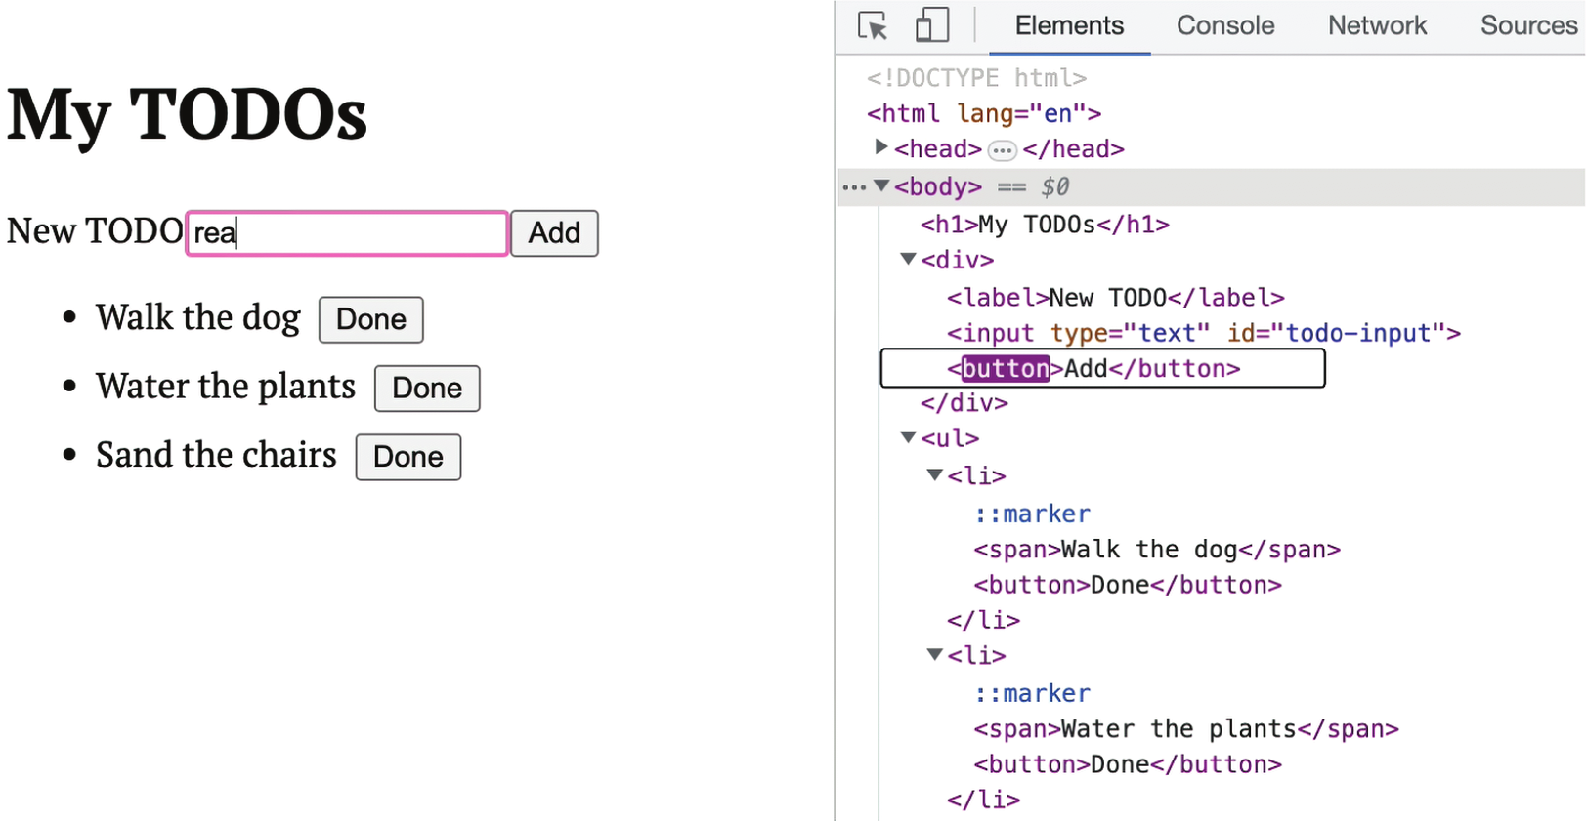
property of the input field. But after you type three characters, the disabled attribute is removed from the Add <button>, and you see this node flashing in the DOM tree (figure 8.19).
Only the button changes (by removing
the disabled attribute) when the text
in the input reaches a length of three
characters.
Figure 8.19
With the new version of your framework, nothing is highlighted when you type a character in the input field until you type three characters, at which point the disabled attribute is removed from the Add <button> .
8.4
The TODOs application
201
8.4.2
Using the paint-flashing tool (Chrome only)
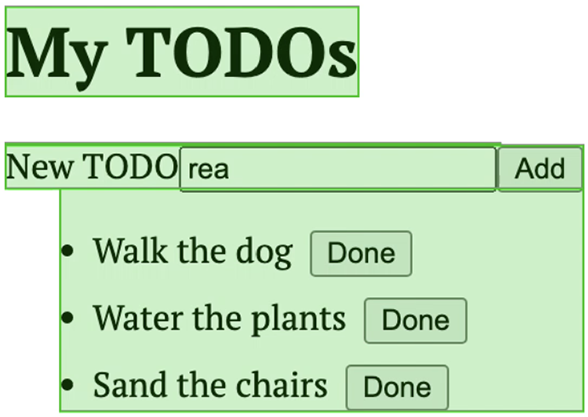
Chrome has a neat feature that allows you to see the areas of the page that are repainted. You can find this feature on the Rendering tab of the developer tools; it’s called paint flashing (). If you select it, green rectangles highlight the parts of the page that the browser repaints. Repeating the experiment by looking at the TODOs application from chapter 6, you see that the entire page is repainted every time you type a character (figure 8.20).
Figure 8.20
With your previous version of the
framework, the entire page is repainted every
time you type a character in the input field.
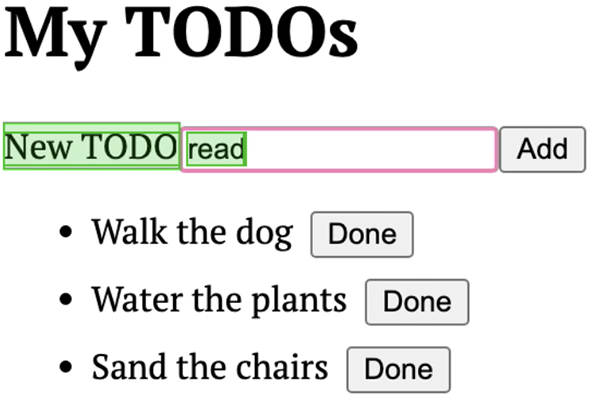
But if you look at the TODOs application from this chapter, you see that only the input field’s text and the field’s label are repainted (figure 8.21).
Figure 8.21
With the new version of your
framework, only the input field’s text and
the field’s label are repainted when you
type a character in the input field.
The fact that the New TODO label is repainted is a bit surprising, but it doesn’t mean that the framework patched something it shouldn’t have. As you saw in the DOM tree, nothing flashes there as you type in the input field. These “paint flashes” are a sign that the rendering engine is doing its job, figuring out the layout of the page and repainting the pixels that might have moved or changed. You have nothing to worry about.
Experiment a bit with the developer tools to understand how your framework patches the DOM. The exercises that follow give you some idea of the experiments you can do.
202
CHAPTER 8
The reconciliation algorithm: Patching the DOM
Exercise 8.3
Use the Elements tab in Chrome (or the Inspector tab in Firefox) to inspect the DOM
modifications (shown as flashes in the nodes) that occur when you add, modify, or mark a to-do item as completed. Compare what happens in the TODOs application from chapter 6 and the application from this chapter.
Find the solution
Exercise 8.4
Use the Sources tab in Chrome (or the Debugger tab in Firefox) to debug the patchDOM() function (you can set a breakpoint in the first line of the function) as you
Type a character in the input field.
Add a new to-do item.
Mark a to-do item as completed.
Edit the text of a to-do item.
Find the solution
Summary
The reconciliation algorithm compares two virtual DOM trees, finds the sequence of operations that transform one into the other, and patches the real DOM by applying those operations to it. The algorithm is recursive, and it starts at the top-level nodes of both virtual DOM trees. After comparing these nodes, it moves on to their children until it reaches the leaves of the trees.
To find out whether a DOM node can be reused, compare the corresponding virtual DOM nodes. If the virtual nodes are different types, the DOM node can’t be reused. If the virtual nodes are text or fragment nodes, they can be reused.
Element nodes can be reused if they have the same tag name.
When the nodes being compared aren’t equal—that is, they can’t be reused—
the DOM is destroyed and re-created from scratch. This operation makes sense in most cases because if the parent node of a subtree changes, it’s likely that the children are different as well.
You patch text nodes by setting the DOM node’s nodeValue property to the new node’s text.
You patch element nodes by separately patching their attributes, CSS classes and styles, and event listeners. You use the objectsDiff() and arraysDiff()
Summary
203
functions to find the differences between the old and new values of these properties; then you apply the changes to the DOM.
Both fragment and element nodes need to have their children patched. To patch the children of a node, you use the arraysDiffSequence() to find the sequence of operations that transform one array of children into the other; then you apply those operations to the DOM.
Part 3
Improving the framework
The groundwork has been laid, and your framework can successfully render a website based on a virtual DOM representation while keeping it in sync as users interact with it. But let’s be honest: having the entire application’s state confined to a single object managed by the application isn’t the most practical approach.
Wouldn’t it be more efficient if each component could take charge of its own piece of the state, focusing solely on the view it oversees?
In this final part of the book, you’ll delve into the world of stateful components—components that autonomously manage their own state and lifecycles.
They are responsible exclusively for the view they oversee and can be combined to create more intricate views. This enhancement empowers the application to bypass the reconciliation algorithm for every change, updating only the components that are affected by the modification.
You’ll explore how stateful components can incorporate other components within their view and establish communication among them. You’ll also implement a scheduler that enables the asynchronous execution of component lifecycle hooks—a potent feature that a robust framework should offer. Last but not least, you’ll master the art of performing thorough unit testing on components defined within your framework, even when they involve asynchronous behavior.
Stateful components
This chapter covers
Understanding the anatomy of a stateful
component
Implementing a factory function to define
components
Implementing the first version of a component
that manages its own state
Your framework works well; it manipulates the Document Object Model (DOM) so that the developer doesn’t need to, and it patches the DOM efficiently thanks to the reconciliation algorithm. But using stateless components (pure functions) forced us to move all the state to the top of the application along with the reducers.
This approach isn’t ideal for several reasons:
A component deep down in the hierarchy needs all the components above it to pass the state down to it, even when they don’t need it. As the number of levels increases, the number of components that need to pass the state down to their children gets unwieldy.
207
208
CHAPTER 9
Stateful components
As the application grows, the state gets bigger, and the amount of reducers increases as well. Having all these reducers together in a single place can become a bit messy.
When a component updates the state, all the application is re-rendered, even if the component that updated the state is deep down in the hierarchy. Your reconciliation algorithm traverses the entire application’s virtual DOM (vdom) every time the state changes.
To address these problems, you can have your components handle their own state—
that is, they can update their internal state and adjust their view accordingly when the state changes. By breaking the state into smaller parts at the component level, you avoid having a massive state object with numerous reducers at the application level.
Smaller state objects within components are more focused and simpler to understand.
Consequently, when a component’s state changes, only that specific component needs to be re-rendered, not the entire application. To create an application with your current framework, you have to pass the createApp() function a state object, the reducers object, and a root component (figure 9.1).
State
View
Reducers
reduce( , ) =
createApp({ state, view, reducers })
Figure 9.1
The current framework’s application instance requires the global state, reducers, and the root component.
The plan for the new version of the framework (version 3.0) is to have components that manage their own state and patch only the part of the DOM for which they are responsible. The application will be represented by a hierarchy of components, and the root component—that one at the top of the hierarchy—is passed to the createApp() function (figure 9.2). As you’ll see in this chapter, components won’t use the reducers system of handling the state; we’ll go for a simpler approach.
209
The root component, the one at the top of
the hierarchy, is passed to createApp().
Component
State
View
Component
Component
State
View
State
View
createApp(RootComponent)
Figure 9.2
The new version of the framework’s application instance requires only the root component.
With these changes (which will take four chapters to complete), you’re getting closer to the framework’s final architecture. You saw that architecture in chapter 1; it’s reproduced here in figure 9.3.
Before you start writing the code, let’s take a look at the anatomy of the stateful component you’ll implement—but only the parts that are relevant to this chapter.
You have many ways to implement a stateful component, but you’ll go for a simple yet powerful approach. Explaining the parts of a component will help you understand the code you’ll write.
NOTE
You can find all the listings in this chapter in the listings/ch09 directory of the book’s repository ( The code you write in this chapter is for the framework’s version v3.0, which you’ll publish in chapter 12. Therefore, the code in this chapter can be checked out from the ch12
label ): $ git switch --detach ch12.
Code catch-up
In chapter 8, you modified the mountDOM() function to insert nodes at a specific index in the child list of a parent node. You implemented a function called insert() to do the insertion. You modified the createTextNode() and createElementNode() functions to receive an index as their third parameter, enabling these functions to use the insert() function for appending nodes to the DOM. Then you implemented a function called areNodesEqual() to check whether two virtual DOM nodes are equal. This function is used by the patchDOM() function, which you implemented next.
210
CHAPTER 9
Stateful components
(continued)
The patchDOM() function—depending on the type of the virtual DOM node—called the patchText() or patchElement() functions to patch the DOM. The patchElement() function required you to break the logic into subfunctions: patchAttrs(), patchClasses(), patchStyles(), and patchEvents().
patchDOM() is recursive and calls itself to patch the children of the node it’s patching.
You implemented the work of patching the children in the patchChildren() function.
Browser
Render
Updates
cycle
Parent element
Application
Component
Private
Private
isMounted
component
vdom
parentEl
hostEl
parentComponent
riggers
Starts
Public
dispatcher
T
subscriptions
mount(parentEl)
unmount()
patch()
Public
props
state
Dispatcher
get elements
get firstElement
subscribe(name, handler)
get offset
afterEveryCommand(handler)
dispatch(name, payload)
updateProps(props)
updateState(state)
async onMounted()
async onUnmounted()
emit(eventName, payload)
render()
mount(hostEl, index)
unmount()
<<custom methods>>
Figure 9.3
The component in the framework’s architecture
9.1
Anatomy of a stateful component
211
9.1
Anatomy of a stateful component
Let’s extract the component from figure 9.3 and analyze its anatomy: the properties and methods of a component. Our discussion is based on figure 9.4. A stateful component can’t be a pure function anymore because the output of pure functions depends exclusively on their arguments; hence, they can’t maintain state. (For a discussion of how React’s stateful functional components work, see the nearby sidebar.) Anatomy of a stateful component
Whether the component
Component
is mounted
private
isMounted
The currently rendered vdom
vdom
hostEl
Host element where the
parentComponent
component is mounted
dispatcher
subscriptions
Re-renders the vdom and
patches the changes in the DOM
patch()
public
External data passed by the
props
parent component
List of DOM elements mounted
state
by the component
State of the component (data
get elements
First DOM element mounted
internal to the component)
get firstElement
by the component
get offset
Offset of the first DOM element
updateProps(props)
inside the host element
updateState(state)
Updates the state and triggers
async onMounted()
a render cycle
async onUnmounted()
emit(eventName, payload)
Renders the component’s vdom
Mounts the component into the
render()
based on the current props
DOM at the specified index
mount(hostEl, index)
and state
unmount()
Unmounts the component from
the DOM and removes all event
<<custom methods>>
handlers
Figure 9.4
The anatomy of a stateful component
DEFINITION
A stateful component maintains its own state. Stateful components can be instantiated, with each instance having a separate state and lifecycle. A stateful component updates its view when its state changes.
212
CHAPTER 9
Stateful components
React’s functional stateful components
React once used classes to define components:
import { Component } from 'react'
class Greeting extends Component {
render() {
return <h1>Hello, {this.props.name}!</h1>
}
}
Those classes can include a state property that can be updated by the setState() method. We’ll follow a similar approach. But React now encourages the use of functions (functional components) instead because they’re convenient:
function Greeting(props) {
return <h1>Hello, {props.name}!</h1>
}
As you can see, the component is the equivalent of implementing the render() method of the class. But, if to have stateful components we need to move away from pure functions, how can React make functional components stateful? The answer is that functional components in React aren’t pure functions (which is totally okay!) because to declare state, you need to use the useState() hook:
function Counter() {
const [count, setCount] = useState(0)
return (
<div>
<p>You clicked {count} times</p>
<button onClick={() => setCount(count + 1)}>Click me!</button>
</div>
)
}
The useState() hook, used to maintain state inside a functional component, has side effects. In this context, a side effect occurs when a function modifies something outside its scope. In this case, useState() is clearly storing the component’s state somewhere; thus, the component function where it’s used can’t be a pure function.
A pure function is deterministic: given the same input, it always returns the same output and doesn’t have any side effects. But you clearly don’t get the same result every time you call the component’s function because some state is maintained somewhere, and based on that state, the component returns a different virtual DOM.
When you use the useState() hook, React stores the state of that component inside an array at application level. By keeping track of the position of the state of each component, React can update the state of the component when you call the setState() method and get you the correct value when you ask for it.
9.1
Anatomy of a stateful component
213
You can find the source code for hooks at , in case you want to take a look. The ReactFiberHooks.js file inside the react-reconciler package (
is also worth looking at. The mountState<S>() function implements the functionality behind the useState() hook.
Let me finish this discussion by saying that what React has achieved with functional components and hooks is simply brilliant—the fruit of talented engineers working on designing a better way to build user interfaces. Kudos to them!
Here are the four main characteristics of the component system that you’ll implement:
The view of a component depends on its props and state. Every time one of these changes, the view needs to be patched.
Components can have other components as children as part of their view’s virtual DOM.
A component can pass data to its children, and the child components receive this data as props.
A component can communicate with its parent component by emitting events to which the parent component can listen.
We’ll focus on the first point in this chapter and leave the communication between components for chapter 10. Let’s take a look at figure 9.4 and briefly discuss the properties and methods of a stateful component that you’ll implement in this chapter.
The figure isn’t exhaustive, but it covers the most important properties and methods of a component. Some of the components are grayed out here; you’ll implement them in the following chapters.
9.1.1
The properties of a stateful component
The public properties of a stateful component (simply called component from now on) are
props—The data that the component receives from its parent component
state—The data that the component maintains internally
Even though these properties are public, they shouldn’t be modified directly. Why not? If they’re modified directly, the component won’t know that they have changed, so it won’t update its view. You’ll use the updateState() method to update the state of a component and updateProps() for the props; we’ll discuss these methods in section 9.1.2 and chapter 10, respectively. Apart from updating the state and props, the methods trigger the re-rendering of the component. A component also has three interesting get-only properties:
elements—A list of the DOM elements mounted by the component. When the top node of the view of a component is a fragment, this list consists of the DOM
214
CHAPTER 9
Stateful components
elements mounted by the component’s children. If the component has a single root node, the list has a single element.
firstElement—The first element of the elements list.
offset—The offset of the firstElement inside the component’s host element in the DOM. You need this offset to patch the component’s DOM correctly, as you’ll see in section 9.3.3.
The component also has three private properties:
isMounted—A Boolean that indicates whether the component is mounted
vdom—The virtual DOM of the component that’s currently rendered in the DOM
hostEl—The element in the DOM where the component is mounted
9.1.2
The methods of a stateful component
Let’s take a look at the methods of a component. A component has two methods that you’ll use to mount and unmount it:
mount()—Mounts the component in the DOM
unmount()—Unmounts the component from the DOM and unsubscribes all the subscriptions
To update the state that the component maintains internally, use updateState(), which also triggers the re-rendering of the component. This method should be called inside the component whenever the state of the component changes.
As you’ll see in this chapter and the following chapters, the state of a component can be the props of its children components; a component can pass its internal state to its children components as props. When new props are passed to a component, the component should re-render its view. To that end, the component uses two methods:
render()—Returns the virtual DOM of the component, based on the current props and state of the component.
patch()—Patches the DOM of the component with the new virtual DOM. This private method is called as part of updating the state or props of the component, but it isn’t meant to be called from outside the component.
The best way to understand how this component system works is to implement it, so let’s get started. We’ll start simply and add features as we go. Warm up your code editor and stretch your fingers, because you’ll write a lot of code in this chapter!
9.2
Components as classes
Start by creating a new file inside the src/ folder called component.js. We’ll write all the code in this section in this file. Now think about how you can define a component. You want to be able to instantiate components, and each component instance
9.2
Components as classes
215
should have its own state. Therefore, you can use classes to define the component like so (you don’t need to write this code yet; you’ll do that below): class Component {}
Now you can instantiate the component (new Component()), but it doesn’t do anything . . . yet. You want components to be able to render their view, and for that purpose, they need a render() method:
class Component {
render() {
// return the virtual DOM of the component
}
}
But here comes the first complication. Each component that the user defines is different; each render() method returns a different virtual DOM. In the TODOs app you wrote in chapter 8, for example, the CreateTodo() and TodoList() components return different virtual DOMs (which makes sense, right?). So how do you define the render() method of the Component class when you don’t know what the virtual DOM of the component will be beforehand? The solution is to define the defineComponent() function, which takes an object containing a render() function that creates the virtual DOM of that specific component and returns the component class:
export function defineComponent({ render }) {
class Component {
render() {
return render()
}
}
return Component
}
The defineComponent() function returns a class, so you can have as many component classes as you want simply by defining how each component renders its view: const CreateTodo = defineComponent({
render() {
// return the virtual DOM of the component
}
})
const TodoList = defineComponent({
render() {
// return the virtual DOM of the component
}
})
216
CHAPTER 9
Stateful components
In a sense, defineComponent() is a factory function that, given a render() function, creates a component class that uses that function to render its view. The returned component class can be instantiated as many times as you want, and all of its instances render the same view (figure 9.5). When we add state to the component instance, each component might render a different—although similar—view because as you know, the view of a component depends on its state.
Component
render()
render()
mount()
unmount()
defineComponent()
The function is a factory that, given a render
function, creates a component class that can
be instantiated and renders the same view.
Figure 9.5
The defineComponent() factory function creates component classes.
The component also needs mount() and unmount() methods so that their view can be added to the DOM and removed from it, so let’s add those methods to the Component class. Complete the Component class with the code in the following listing.
Listing 9.1
Basic component methods (component.js)
import { destroyDOM } from './destroy-dom'
The defineComponent()
import { mountDOM } from './mount-dom'
function takes an object
containing a render() function
export function defineComponent({ render }) {
and returns a component.
class Component {
Defines the
#vdom = null
Component as a class
#hostEl = null
The component’s render() method
render() {
returns its view as a virtual DOM.
return render()
}
Calls the render() method
and saves the result in the
mount(hostEl, index = null) {
#vdom private property
this.#vdom = this.render()
mountDOM(this.#vdom, hostEl, index)
Calls the mountDOM() function
to mount the component’s view
9.2
Components as classes
217
this.#hostEl = hostEl
}
unmount() {
destroyDOM(this.#vdom)
Calls the destroyDOM()
function to unmount the
this.#vdom = null
component’s view
this.#hostEl = null
}
}
Returns the
Component class
return Component
}
Great! But you could mount the same instance of a component multiple times, as follows const component = new MyComponent()
component.mount(document.body)
component.mount(document.body) // Same component mounted twice!
or unmount it before it is mounted:
const component = new MyComponent()
component.unmount() // Unmounting a component that's not mounted!
To prevent these situations, you need to keep track of the mounting state of the component. Add an #isMounted private property to the Component class and throw an error if you detect the aforementioned situations. Write the code shown in bold in the following listing.
Listing 9.2
Checking whether the component is already mounted (component.js)
export function defineComponent({ render }) {
class Component {
#isMounted = false
The #isMounted private
#vdom = null
property keeps track of
#hostEl = null
the component’s state.
render() {
return render()
}
A component can’t
be mounted more
mount(hostEl, index = null) {
than once.
if (this.#isMounted) {
throw new Error('Component is already mounted')
}
this.#vdom = this.render()
mountDOM(this.#vdom, hostEl, index)
When the component
is mounted, sets the
#isMounted property
this.#hostEl = hostEl
to true
this.#isMounted = true
}
218
CHAPTER 9
Stateful components
unmount() {
if (!this.#isMounted) {
A component can’t
throw new Error('Component is not mounted')
be unmounted if
}
it’s not mounted.
destroyDOM(this.#vdom)
When the component
this.#vdom = null
is unmounted, sets
the #isMounted
this.#hostEl = null
property to false
this.#isMounted = false
}
}
return Component
}
This code is a great start, but where’s the state of the component? So far, the Component class doesn’t have any state or external props, so the render() method always returns the same virtual DOM (unless it depends on global data defined outside the component, which it shouldn’t). Let’s add the state and props to the component.
Exercise 9.1
Using the defineComponent() function and the code it depends on (the mountDOM() and destroyDOM() functions), create a component that renders the following HTML:
<h1>Important news!</h1>
<p>I made myself coffee.</p>
<button>Say congrats</button>
The button should print the following message in the console when clicked: Good for you! Mount the component inside the web page of your choice (such as your local newspaper’s website). Click the button, and check whether the message is printed in the console. Last, unmount the component from the DOM, and verify that the component’s HTML is removed from the page.
Find the solution
9.3
Components with state
The components that the defineComponent() function creates are static; they always render the same virtual DOM. You haven’t implemented the state of the component yet, so the render() method inside your component can’t return different virtual DOMs. What you want to do is pass defineComponent(), a function that returns the initial state of the component (figure 9.6).
9.3
Components with state
219
Component
render()
state = state()
state()
render()
mount()
defineComponent()
unmount()
The initial state is created by calling
the passed-in state function.
Figure 9.6
The defineComponent() factory function uses the state() function to create the initial state of the component.
Inside the component’s constructor, you can call the state() function to create the initial state of the component and save it in the state property (you don’t need to write this code yet; you’ll do that below):
class Component {
constructor() {
this.state = state()
}
}
Here’s how you’d define the state() function that returns the initial state for a component that keeps track of the number of times a button is clicked: const Counter = defineComponent({
state() {
return { count: 0 }
},
render() { ... }
})
You may want to be able to set the initial state of a component’s instance when you instantiate it. Maybe you don’t want all instances of a component to have the same initial state. Consider the Counter component in the preceding example. By default, the count starts at 0, but you may want to start the count of a specific instance at 10. To sat-isfy this need, you can pass the state() function the props passed to the component’s constructor so that the initial state can be based on the props:
class Component {
constructor(props = {}) {
this.state = state(props)
}
}
220
CHAPTER 9
Stateful components
In the counter example, you could do something like this:
const Counter = defineComponent({
state(props) {
return { count: props.initialCount ?? 0 }
},
render() { ... }
})
const props = { initialCount: 10 }
const counter = new Counter(props)
Add the code shown in bold in the following listing to implement the component’s initial state and props.
Listing 9.3
Adding the state() method (component.js)
export function defineComponent({ render, state }) {
defineComponent() takes
class Component {
an object with a state()
#isMounted = false
function to create the
#vdom = null
initial state.
#hostEl = null
constructor(props = {}) {
this.props = props
The component can be
this.state = state ? state(props) : {}
instantiated with an object
}
containing the props.
render() {
return render()
The state() function
}
returns the initial state
of the component based
mount(hostEl, index = null) {
on the props.
// --snip-- //
}
unmount() {
// --snip-- //
}
}
return Component
}
Now the component has both state and props. You’ve used the props to initialize the state of the component, but now you’ll leave the props aside and focus on the state.
I’ll come back to props in chapter 10. In section 9.3.1, you’ll implement the updateState() function to update the state of the component and patch the DOM with the new view.
9.3
Components with state
221
9.3.1
Updating the state and patching the DOM
The state of the component evolves as the user interacts with it. Thus, you want to implement a function that updates the state of the component by merging the passed state with the current state. The code looks something like this:
this.state = { ...this.state, ...newState }
This way, those pieces of the state that aren’t updated are preserved.
After the state has been updated, the DOM needs to be patched with the new virtual DOM. Patching the DOM should be handled by a different method, #patch(), in the component. This process involves two steps:
1
Call the component’s render() method to get the new virtual DOM based on the new state.
2
Call the patchDOM() function to patch the DOM with the old and new virtual DOM trees. Save the result of the patchDOM() function in the #vdom property of the component.
A caveat: the component can’t be patched if it’s not mounted. Keep this fact in mind when implementing the #patch() method. Write the code shown in bold in the following listing to implement the updateState() and #patch() methods.
Listing 9.4
Update the state and the component’s DOM (component.js)
import { destroyDOM } from './destroy-dom'
import { mountDOM } from './mount-dom'
import { patchDOM } from './patch-dom'
export function defineComponent({ render, state }) {
class Component {
#isMounted = false
#vdom = null
#hostEl = null
constructor(props = {}) {
this.props = props
this.state = state ? state(props) : {}
}
updateState(state) {
Merges the new state
this.state = { ...this.state, ...state }
with the current state
this.#patch()
Calls the #patch()
}
method to reflect the
render() {
changes in the DOM
return render()
}
mount(hostEl, index = null) {
// --snip-- //
}
222
CHAPTER 9
Stateful components
unmount() {
// --snip-- //
}
If the component is not
mounted, the DOM
#patch() {
can’t be patched.
if (!this.#isMounted) {
throw new Error('Component is not mounted')
}
Calls the render() method
to get the new virtual DOM
const vdom = this.render()
this.#vdom = patchDOM(this.#vdom, vdom, this.#hostEl)
}
}
Calls the patchDOM() function to
patch the DOM and saves the result
return Component
in the #vdom property
}
Great! Now you have a component whose state can be updated, and the DOM is patched with the new virtual DOM. You can access the state property inside the render() method to render the virtual DOM based on the state of the component.
Also, the updateState() method can be called from within the component’s render() method as part of the event handlers. Let’s go back to the counter example. If next to the counter label, you have a button to increment the counter, you could do something like this:
const Counter = defineComponent({
state() {
return { count: 0 }
},
render() {
Accesses the state
return hFragment([
of the component
h('p', {}, [`Count: ${this.state.count}`]),
h(
'button',
{
Updates the state of
on: {
the component
click() {
this.updateState({ count: this.state.count + 1 })
},
},
},
['Increment'],
),
])
},
})
But if you tried this code right now, however—and I encourage you to do so—you’d get the following error:
Uncaught TypeError: Cannot read properties of undefined (reading 'count')
9.3
Components with state
223
Can you guess why? Here’s the problem: the this keyword inside the render() function that’s called inside the render() method isn’t bound to the component; rather, it’s bound to the Window object. (In strict mode, it would be undefined.) This happens because the render() function passed to the defineComponent() function isn’t a method of the class, in which case the this keyword would be bound to the component.
NOTE
You can read more about the this keyword in the MDN web docs at
. You need to understand the rules that dictate how this is bound in JavaScript so that you can follow the code in this book. I highly recommend that you also read the “This works” chapter of the Objects and Classes book from the You Don’t Know JavaScript series, by Kyle Simpson. You can read this chapter in Simpson’s GitHub account at This chapter contains everything you might need to know about the this keyword, which you’ll use in this chapter and the following chapters of the book. Trust me when I say that the chapter is worth your time.
To fix this problem, you need to use explicit binding to bind the this keyword inside the render() function to the component. The fix is simple, as shown in the following listing. Modify your code so that it matches the code in the listing.
Listing 9.5
Binding the call() function to the component (component.js) export function defineComponent({ render, state }) {
class Component {
// --snip-- //
render() {
return render()
return render.call(this)
}
// --snip-- //
}
return Component
}
9.3.2
Result
Let’s quickly review the code you’ve written so far. You’ve created a defineComponent() function that takes an object with a render() function to create a component. The render() function returns a virtual DOM based on the state of the component. The component’s state can be updated with the updateState() function, which merges the new state with the current state and patches the DOM
with the new virtual DOM. If you followed along, your component.js file should look like the following listing.
224
CHAPTER 9
Stateful components
Listing 9.6
The defineComponent() function so far (component.js)
import { destroyDOM } from './destroy-dom'
import { mountDOM } from './mount-dom'
import { patchDOM } from './patch-dom'
export function defineComponent({ render, state }) {
class Component {
#isMounted = false
#vdom = null
#hostEl = null
constructor(props = {}) {
this.props = props
this.state = state ? state(props) : {}
}
updateState(state) {
this.state = { ...this.state, ...state }
this.#patch()
}
render() {
return render.call(this)
}
mount(hostEl, index = null) {
if (this.#isMounted) {
throw new Error('Component is already mounted')
}
this.#vdom = this.render()
mountDOM(this.#vdom, hostEl, index)
this.#hostEl = hostEl
this.#isMounted = true
}
unmount() {
if (!this.#isMounted) {
throw new Error('Component is not mounted')
}
destroyDOM(this.#vdom)
this.#vdom = null
this.#hostEl = null
this.#isMounted = false
}
#patch() {
if (!this.#isMounted) {
throw new Error('Component is not mounted')
}
9.3
Components with state
225
const vdom = this.render()
this.#vdom = patchDOM(this.#vdom, vdom, this.#hostEl)
}
}
return Component
}
Now let’s discuss an interesting implication of patching the DOM owned by a component when those DOM elements are inserted into an element in which other elements are present. If you don’t take this subtle detail into account, you’ll patch the component’s DOM incorrectly. First, why don’t you try to solve the following challenge?
Exercise 9.2: Challenge
Using the defineComponent() function and the code it depends on (the mountDOM() and destroyDOM() functions), create a component called FlyingButton, which renders a <button> element absolutely positioned at a random position inside the browser’s viewport. The button’s label should be Move. When the button is clicked, the button should move to a random position inside the viewport. Bear in mind that the position of the button should be random but never be outside the viewport—at least, not entirely.
You can mount the button in the <body> element or in any other element you want (it’s absolutely positioned, so it shouldn’t affect the layout of the page) inside your favorite website.
Find the solution at .
9.3.3
The component’s offset
Suppose that you have a component whose HTML is mounted in the same <div> as a
<p> element. In this configuration, we say that the <div> is the component’s host element—the one that contains the component’s HTML. The view of this component consists of a fragment containing a <p> element and a <span> element (figure 9.7).
Here’s the thing that’s important to notice: because the component’s view is made of a fragment, all its elements are siblings of the <p> element that’s outside the component’s view. Now suppose that the component, after a change in its state, decides that it wants to swap the <p> element with the <span> element. Figure 9.8
shows the result.
After the state is changed, the updateState() method calls the #patch() method, which in turn calls the patchDOM() function, passing it its virtual DOM.
Recall that this virtual DOM is a fragment containing a <p> element and a <span> element, but not the first <p> element with the text A; that element is outside the component’s view. patchDOM() in turn asks arraysDiffSequence() to find the sequence of operations that transforms the current DOM into the new virtual DOM.
226
CHAPTER 9
Stateful components
<div>
The component’s host element
<p>
Component
<div>
<p>A</p>
<p>B</p>
<span>C</span>
Text
Fragment
</div>
"A"
The component’s HTML
<p>
<span>
Text
Text
"B"
"C"
Figure 9.7
A <div> element containing a <p> element and a component
<div>
Before
<div>
<p>A</p>
<p>
Component
<p>B</p>
<span>C</span>
</div>
Text
Fragment
"A"
After
<span>
<p>
<div>
<p>A</p>
<span>C</span>
<p>B</p>
Text
Text
</div>
"C"
"B"
Swap
Figure 9.8
Swap the <p> element with the <span> element inside the component.
Your robust and well-implemented arraysDiffSequence() function returns the following sequence of operations:
9.3
Components with state
227
1
Move the <span> element from i=1 to i=0.
2
Noop the <p> element from i=0 to i=1.
Then the function applies the sequence of operations to the DOM. Figure 9.9 shows the result of applying the first operation to the DOM. Before you look at the figure, can you guess what the result will be? Is it what you expected? Is it correct?
1. Move the <span> element to
.
i=0
The element at index 0 wasn’t
part of the component!
<div>
<div>
<p>A</p>
<span>C</span>
!
<p>B</p>
The element at index 0
<p>A</p>
<span>C</span>
<p>B</p>
</div>
The span to move
</div>
Figure 9.9
Move the <span> element from i=1 to i=0.
That’s wrong! The problem is that the arraysDiffSequence() calculates the indices of the operations relative to the lists of nodes it receives as arguments, which are the nodes inside the component’s fragment. This list of nodes doesn’t include all the elements below the parent <div> element; it’s missing the first <p> element that’s outside the component’s view. This situation arises from having components whose vdom is a fragment because its elements are inserted into a node that’s outside the component—a host element that might contain other elements external to the component. When the component’s view has a single root element, this problem doesn’t occur (why this is I’ll leave as an exercise for you; the answer is at the end of the chapter).
The indices of the move operations are relative to the fragment; they don’t account for the elements outside the component’s fragment. Something similar happens when a node is added in the component’s view if the component’s view is a fragment. The index where the node is to be added is relative to the fragment items, not accounting for the elements outside the fragment.
How do we go about fixing this problem? It’s time to introduce the concept of a component’s offset.
DEFINITION
The offset of a component is the number of elements that precede the component’s first element in the parent element when the former’s view top node is a fragment. In other words, it’s the index of the component’s first element in the parent element.
If you can compute the offset of a component, you can correct the indices of the move and add operations returned by arraysDiffSequence(). The offset for the example component is 1 because the first element of the component is the second element in the parent element (figure 9.10).
228
CHAPTER 9
Stateful components
The component’s host element
<div>
<p>A</p>
<p>B</p>
Offset = 1
<span>C</span>
</div>
Figure 9.10
The offset of the
The component’s HTML
component is 1.
If we correct the index of the operations by adding the offset, the operations will be relative to the parent element, not to the fragment. Figure 9.11 shows the correct application of the move operation.
1. Move the <span> element to i=0+offset.
1
<div>
<div>
<p>A</p>
<p>A</p>
The element at index 1
<p>B</p>
<span>C</span>
<span>C</span>
<p>B</p>
</div>
The span to move
</div>
Figure 9.11
Move the <span> element from i=2 to i=1 (corrected).
Let’s implement a getter for the component’s offset. Just below the component’s constructor, write the code shown in bold in the following listing.
Listing 9.7
Getting the component’s first element offset (component.js)
import { destroyDOM } from './destroy-dom'
import { DOM_TYPES, extractChildren } from './h'
import { mountDOM } from './mount-dom'
import { patchDOM } from './patch-dom'
export function defineComponent({ render, state }) {
class Component {
#isMounted = false
#vdom = null
#hostEl = null
constructor(props = {}) {
this.props = props
this.state = state ? state(props) : {}
}
9.3
Components with state
229
get elements() {
If the vdom is
if (this.#vdom == null) {
null, returns an
If the vdom top node
return []
empty array
is a fragment, returns
}
the elements inside
the fragment
if (this.#vdom.type === DOM_TYPES.FRAGMENT) {
return extractChildren(this.#vdom).map((child) => child.el)
}
If the vdom top
return [this.#vdom.el]
node is a single node,
}
returns its element
get firstElement() {
The component’s
return this.elements[0]
first element
The component’s
}
first element offset
inside the parent
get offset() {
element
if (this.#vdom.type === DOM_TYPES.FRAGMENT) {
return Array.from(this.#hostEl.children).indexOf(this.firstElement)
}
return 0
When the component’s view
}
isn’t a fragment, the offset is 0.
updateState(state) {
this.state = { ...this.state, ...state }
this.#patch()
}
// --snip-- //
}
return Component
}
Now that you can ask a component about its offset, you can correct the indices of the operations returned by arraysDiffSequence(). In section 9.3.4, you’ll refactor the patchDOM() function to include the offset.
9.3.4
Patching the DOM using the component’s offset
To use the component’s offset in the patchDOM() function, you need to pass the component instance to the function. The following listing shows how.
Listing 9.8
Passing the component instance to the patchDOM() function (component.js) export function defineComponent({ render, state }) {
class Component {
// --snip-- //
#patch() {
if (!this.#isMounted) {
throw new Error('Component is not mounted')
}
230
CHAPTER 9
Stateful components
const vdom = this.render()
this.#vdom = patchDOM(this.#vdom, vdom, this.#hostEl, this)
}
}
Passes the
component instance to
return Component
the patchDOM() function
}
Now you want to include the host component as an argument of the patchDOM() function and pass it to the patchChildren() function. That component will have a default value of null. In the patch-dom.js file, write the code shown in bold in the following listing.
Listing 9.9
Passing a host component to the patchDOM() function (patch-dom.js) export function patchDOM(
Passes the host
oldVdom, newVdom, parentEl, hostComponent = null
component instance to
) {
the patchDOM() function
if (!areNodesEqual(oldVdom, newVdom)) {
const index = findIndexInParent(parentEl, oldVdom.el)
destroyDOM(oldVdom)
mountDOM(newVdom, parentEl, index)
return newVdom
}
newVdom.el = oldVdom.el
switch (newVdom.type) {
case DOM_TYPES.TEXT: {
patchText(oldVdom, newVdom)
return newVdom
}
case DOM_TYPES.ELEMENT: {
patchElement(oldVdom, newVdom)
break
}
Passes the
}
component instance
to the patchChildren()
function
patchChildren(oldVdom, newVdom, hostComponent)
return newVdom
}
Now comes the important part: you need to use the component’s offset to correct the indices of the operations returned by arraysDiffSequence(), but only if a host component is passed. Otherwise, you can assume that the component’s offset is 0, which means that you’re dealing with a root component—one that doesn’t have a parent component.
Thus, the component can’t have an offset. Only the operations that reference elements in the DOM by their index need to be corrected. If you recall, only the move and add
9.3
Components with state
231
operations refer to DOM nodes by their index. Thus, neither the remove nor the noop operation needs to be corrected, but you still have to modify both operations to pass the hostComponent argument back to the patchDOM() function.
You saw a graphical example of the move operation in figure 9.8. Figure 9.12 shows a graphical example of the add operation. As you can see, the index of the add operation is relative to the fragment, not to the parent element, so you need to correct it by adding the component’s offset. Include the code shown in bold in listing 9.10.
<div>
The component’s host element is
Add inside div at index 2 + offset.
the parent of the moved children.
<p>
Component
<div>
Offset = 1

