

FROM
SCRATCH
BUILD A
Ángel Sola Orbaiceta
M A N N I N G
Start
Old node
New node
No
Yes
Equal?
Te t
x
El ment
e
Fr gment
a
no e?
d
destroyDOM()
no e?
d
no e?
d
mountDOM()
patchText()
patchAttrs()
patchClasses()
End
End
patchStyles()
patchEvents()
End
No
Has
Yes
children?
Add?
mountDOM()
Remove?
destroyDOM()
For
End
patchChildren()
each
Move?
move node
Noop?
This figure presents a flow diagram of the reconciliation algorithm used by the frontend framework you’ll build in the book, detailing the process for identifying the minimal set of DOM modifications required to synchronize the HTML document with changes in the application’s state.
Build a Frontend
Web Framework
(From Scratch)
ÁNGEL SOLA ORBAICETA
M A N N I N G
SHELTER ISLAND
For online information and ordering of this and other Manning books, please visit
ublisher offers discounts on this book when ordered in quantity.
For more information, please contact
Special Sales Department
Manning Publications Co.
20 Baldwin Road
PO Box 761
Shelter Island, NY 11964
Email: [email protected]
©2024 by Manning Publications Co. All rights reserved.
No part of this publication may be reproduced, stored in a retrieval system, or transmitted, in any form or by means electronic, mechanical, photocopying, or otherwise, without prior written permission of the publisher.
Many of the designations used by manufacturers and sellers to distinguish their products are claimed as trademarks. Where those designations appear in the book, and Manning Publications was aware of a trademark claim, the designations have been printed in initial caps or all caps.
Recognizing the importance of preserving what has been written, it is Manning’s policy to have the books we publish printed on acid-free paper, and we exert our best efforts to that end.
Recognizing also our responsibility to conserve the resources of our planet, Manning books are printed on paper that is at least 15 percent recycled and processed without the use of elemental chlorine.
The authors and publisher have made every effort to ensure that the information in this book was correct at press time. The authors and publisher do not assume and hereby disclaim any liability to any party for any loss, damage, or disruption caused by errors or omissions, whether such errors or omissions result from negligence, accident, or any other cause, or from any usage of the information herein.
Manning Publications Co.
Development editors: Toni Arritola and Ian Hough
20 Baldwin Road
Technical editor: Arpit Sharma
PO Box 761
Review editor: Dunja NikitovicŚhelter Island, NY 11964
Production editor: Kathy Rossland
Copy editor: Keir Simpson
Proofreader: Mike Beady
Typesetter: Dennis Dalinnik
Cover designer: Marija Tudor
ISBN: 9781633438064
Printed in the United States of America
To my wife, Jen, for her unwavering love and support, and to my parents, who instilled in me the importance of hard work and dedication.
I also dedicate this book to the special family members and
friends who support my technical writing, even when it’s a world apart from their understanding.
contents
■
■
■
■
v
vi
CONTENTS
■
■
■
■
■
■
■
■
■
■
■
■
■
■
■
■
■
CONTENTS
vii
■
■
■
■
■
■
■
■
■
■
■
■
■
viii
CONTENTS
■
■
■
■
■
■
■
■
■
■
■
CONTENTS
ix
■
■
■
■
■
■
■
preface
In 2007, when I began programming web applications, popular frameworks such as Vue, React, Svelte, and Angular didn’t exist, and Node JS was a few years from its debut.
To make a web application interactive back then, you had to attach event listeners to HTML elements manually and update the Document Object Model (DOM) through code. This approach often felt repetitive and cumbersome. Fortunately, innovators, including Miško Hevery at Google, recognized the need for a more efficient solution and introduced AngularJS, a groundbreaking framework designed to liberate developers from direct DOM manipulation. Around the same time, frameworks such as Backbone.js and Knockout emerged. In the years that followed, we witnessed the rise of Ember, Elm, and React, marking the beginning of a flourishing era in the world of web development frameworks.
It’s 2023 at the time of this writing, and we still see new and innovative frameworks being released. Such is the example of Qwik, also made possible by Miško Hevery.
(What a legend!)
My first encounter with Angular left me utterly astounded. I marveled at how, when the data within a component changed, the framework effortlessly updated the corresponding HTML. The speed at which this process occurred was nothing short of magical. It wasn’t until I delved into Vue a few years later, however, that I felt burning curiosity to comprehend the mechanics behind this sorcery.
This experience occurred during my tenure as a frontend engineer at my current company. I decided to invest my learning time in dissecting Vue’s source code and unraveling its inner workings. I embarked on this journey by cloning Vue’s repository xi
xii
PREFACE
and meticulously traversing each commit, one step at a time. My objective was to comprehend how every subtle modification in the codebase contributed to the framework’s functionality. I was captivated by the elegantly written source code, which remains easy to follow even today. My admiration for Evan You, a true frontend hero, grew with each insight I gained. Acquiring profound understanding of Vue’s underlying mechanics proved to be invaluable for troubleshooting complex issues and making informed architectural decisions when crafting applications.
I repeated the same exercise with Svelte and Mithril, and I learned a lot from it.
Svelte was particularly interesting, as its approach is quite different. That framework is a compiler that transforms your code into JavaScript components that update the DOM
directly; no virtual DOM is involved. Rich Harris, the creator of Svelte, is a genius.
At one point, I posed a question to myself: Could I create a basic framework from scratch, not for the purpose of competing with industry giants or producing a production-ready solution, but solely for the sake of learning? Intrigued by the idea, I scoured the internet for resources, stumbling upon articles that discussed aspects such as the virtual DOM and rendering, but I found no comprehensive guide that would allow someone to build a framework entirely from the ground up. The thought struck me: “This would make an excellent book!” I would unquestionably purchase a book like that. So why not take on the challenge and write it myself?
Thus, I embarked on the journey of creating a simple framework—one that mirrors the tools you’re accustomed to using in your daily work. I aimed to strike a bal-ance between simplicity and real-world functionality. Although it may not have many advanced features or performance optimizations, this framework is a comprehensive one, offering insight into the core mechanics of frameworks. To ensure clarity, I dedicated myself to breaking intricate concepts into bite-size, understandable segments, supplementing the content with diagrams and detailed explanations when necessary, recognizing the intricate nature of frontend frameworks. Yet, as I delved deeper, I underestimated the enormity of the task, resulting in a book that is far more extensive than I initially envisioned. To keep it accessible, I pruned it down. After all, who wants to navigate an unwieldy 800-page tome? But I didn’t want to deprive you of valuable insights into the advanced topics I had to omit, such as routing and creating a template loader plugin for Vite. Therefore, I decided to include these supplementary chapters in the wiki section of the book’s GitHub repository, which you can find at
I hope that you embark on this journey with me and enjoy the ride at least as much as I enjoyed writing the book. Learning how something works under the hood by doing it yourself, from scratch, is one of the most rewarding experiences you can have as a developer.
acknowledgments
Writing a book is a very time-consuming task, and it’s rarely the effort of a single person.
Despite being the author of this book, I’m not the only one who contributed to it. Other great professionals helped me along the way, and they deserve to be mentioned here.
I’m very grateful to Manning’s team of extraordinary professionals who have helped me in the process of writing this book. First, I’m thankful to Eric Pillar and Brian Sawyer for getting in touch with me and giving me the opportunity to write this book. They liked the idea from the beginning and decided to give it a go. Brian was especially helpful in the early stages of giving shape to the idea, turning what could have been an arid technical book into one that’s more approachable and fun to read.
If it weren’t for him, this book would be more of a technical dissertation on the inner workings of frontend frameworks and less of a practical guide to building one.
I want to thank Toni Arritola, my development editor, for her patience and support. If this book does a good job of teaching you the concepts efficiently, it’s all thanks to her. I learned a lot from her experience in teaching effectively, something for which I’m very grateful. Thanks for showing me your tricks, Toni! I also want to thank Ian Hough, who was the development editor in the last stages of the book, for the fantastic job he did.
I want to thank Arpit Sharma, my technical reviewer, for his invaluable feedback.
Arpit is an engineer at OLX Group Berlin who has worked extensively on JavaScript and its related frameworks for the past 10 years in multiple organizations. He has a keen eye for JavaScript internals and web performance. Working with Arpit has been a pleasure.
xiii
xiv
ACKNOWLEDGMENTS
I want to thank Ivan Martinovic´ for his help with the technical aspects of the book.
Thanks, Ivan, for helping me with finding the proper formatting for the code snippets. Without your expertise in AsciiDoc, the listings in this book wouldn’t look as good as they do.
Thank you to all the reviewers: Andres Sacco, Andrew Judd, Chris Shin, David Cabrero, Fatih Ozer, Fernando Bernardino, Francisco Rivas, Frans Oilinki, Giampiero Granatella, Gregorio Piccoli, Ian De La Cruz, Jaume López, Javid Asgarov, Jeremy Chen, Jon Humphrey, Jonathan Reeves, Justin Kahn, Kamwa Fosso Arcel Raulain, Ken W. Alger, Lin Zhang, Luke Kupka, Manoj Kumar M. Reddy, Matteo Battista, Mladen Ðuric´, Muhammad Yousuf Tafhim, Nader Bahrami, Patrice Maldague, Petru Bocsanean, Prashant Sharma, Raul Ciotescu, Riccardo Marotti, Richard Meinsen, Rodney Weis, Rooparam Choudhary, and Stephan Max. Your suggestions helped make this book better.
Many other incredible professionals at Manning helped me in the process of writing this book. I want to thank them all for their support and encouragement.
Special thanks to my brother, Pablo (whose artistic name is Paul Alone), for his music, which has been the soundtrack of this book. I’ve listened to his songs on repeat for hours while writing. They helped me focus, and I found inspiration in them when I needed it most. (His song “Quería” is playing right now.)
Finally, I thank all my colleagues at Glovo, who were very supportive while I was writing this book. Thanks to all of you who bought the MEAP and gave me feedback about it. I appreciate it.
about this book
Build a Frontend Web Framework (From Scratch) is a hands-on guide designed to lead you through the creation of your own frontend framework, closely mirroring the tools you routinely use in your professional life. My primary goal is to unveil the inner workings of frameworks, enabling you to harness their power more effectively. But the book isn’t just about education; it’s also about reveling in the journey!
Frontend frameworks are intricate pieces of software, and this book was crafted with your learning in mind. Each concept is methodically deconstructed into easily digestible segments, supplemented by diagrams and comprehensive explanations. I aim to equip you with everything you need to construct your own framework.
Who should read this book
You may be a frontend developer (at any level of seniority) who’s curious enough to want to understand how the tool they use every day works under the hood. Or you may be a coding enthusiast who wants to spend a few weekends using JavaScript to code a frontend framework for the fun of it—and for the learning experience, of course.
The book assumes that you have a basic understanding of JavaScript and HTML, as well as some experience with frontend frameworks. For the topics that are a bit more advanced, I’ve included links to external resources where you can learn more about them, as well as more detailed explanations. The book is written so that developers at all levels of experience should be able to follow along.
xv
xvi
ABOUT THIS BOOK
How this book is organized: A road map
This book is divided into three parts. Part 1 introduces frontend frameworks and shows you how to code a simple application by using vanilla JavaScript.
Chapter 1 covers how frontend frameworks work from 30,000 feet.
Chapter 2 introduces the application you’ll rewrite throughout the book. In this chapter, you start by coding the application with vanilla JavaScript.
Part 2 teaches you how to create the simplest possible frontend framework that renders components and handles the state of the application.
Chapter 3 covers what the virtual DOM is and how it works. In this chapter, you implement the h() function to create virtual DOM nodes.
Chapter 4 covers how to render the virtual DOM to the real DOM, creating the HTML elements and appending them to the browser’s document. You implement the mountDOM() function for this task, and you use destroyDOM() to remove the elements from the DOM when the component is unmounted.
Chapter 5 shows you how to implement a simple state management system that updates the DOM when the state of the application changes.
Chapter 6 explains how to package and publish your framework’s first version to NPM.
Chapter 7 covers the first part of the reconciliation algorithm, comparing two virtual DOM trees to find out what changes need to be made in the real DOM
to make it match the virtual DOM.
Chapter 8 covers the second part of the reconciliation algorithm, updating the real DOM to make it match the virtual DOM. In this chapter, you implement the updateDOM() function to apply the changes to the real DOM.
In part 3, you make components manage their own state, communicate with other components, and run code as part of their lifecycle (when they’re mounted and unmounted from the DOM).
Chapter 9 explains how to define components that manage their own state and render themselves to the DOM. You implement the defineComponent() function to create component prototypes.
Chapter 10 covers how components can implement functionality inside their prototype’s methods.
Chapter 11 covers how components can include other components inside their view and how they communicate with one another.
Chapter 12 shows why it’s so important to use a unique identifier when rendering lists of components and how to tweak your reconciliation algorithm to use hints that improve performance.
Chapter 13 analyzes how asynchronous code executes in the browser and uses that knowledge to create a scheduler that executes the component’s lifecycle methods (also known as hooks).
ABOUT THIS BOOK
xvii
Chapter 14 shows how to test components written with your framework, especially the ones that use asynchronous code.
Appendix A covers configuring the NPM project where you’ll be writing the code for your framework. I show you how to set it up yourself, but you can use a command-line-interface tool I created to scaffold the project.
Some extra chapters didn’t fit into the book. You’ll find this extra material in the wiki section of the book’s GitHub repository: . The topics in that section are advanced ones that you may want to explore to continue improving your framework. The extra chapters cover topics such as creating slots to insert external content into components, creating a single-page application router, and writing a template compiler to transform HTML templates into render functions for your components. When you finish the chapters in this book, know that more content is waiting for you to help you continue learning.
About the code
This book contains many examples of source code, both in numbered listings and inline with normal text. In both cases, source code is formatted in a fixed-width font like this to separate it from ordinary text. Sometimes, code is also in bold to highlight code that you need to add in an existing code fragment. Code that’s struck through like this is code that you need to remove from an existing code fragment.
In this book, you’ll create your framework’s code incrementally. You’ll modify the code you wrote in previous chapters, removing some parts and adding new ones. This is why using bold and strikethrough is so important: that formatting helps you identify what code you need to add and what code you need to remove. Suppose that you’ve written the following code for a function called createTextNode(): function createTextNode(vdom, parentEl) {
const textNode = document.createTextNode(vdom.value)
vdom.el = textNode
parentEl.append(textNode)
}
If I want you to modify that code so that the function accepts a third parameter called index and to modify the function’s last line to call an insert() function instead of using the append() method of the parentEl element, this is how I’ll format the code: function createTextNode(vdom, parentEl, index) {
const textNode = document.createTextNode(vdom.value)
vdom.el = textNode
parentEl.append(textNode)
insert(textNode, parentEl, index)
}
xviii
ABOUT THIS BOOK
As you can see, the first line includes the new index parameter in bold, meaning that you need to add it to the function’s signature in your existing code. The previous last line is struckthrough, meaning that you need to remove it from your existing code and instead write the new line in bold.
Source code for the examples in this book is available for download from the publisher’s website at
You can also find it on the book’s GitHub repository at
. You can get executable snippets of code from the liveBook (online) version of this book at
liveBook discussion forum
Purchase of Build a Frontend Web Framework (From Scratch) includes free access to liveBook, Manning’s online reading platform. Using liveBook’s exclusive discussion features, you can attach comments to the book globally or to specific sections or paragraphs. It’s a snap to make notes for yourself, ask and answer technical questions, and receive help from the author and other users. To access the forum, go to
You can also learn more about Manning’s forums and the rules of conduct at
Manning’s commitment to our readers is to provide a venue where meaningful dialogue between individual readers and between readers and the author can take place. It isn’t a commitment to any specific amount of participation on the part of the author, whose contribution to the forum remains voluntary (and unpaid). We suggest that you try asking the author some challenging questions lest their interest stray! The forum and the archives of previous discussions will be accessible on the publisher’s website as long as the book is in print.
Other online resources
Coding a frontend web framework from scratch is as complex as it is fun. Covering all the details in a single book of a reasonable size isn’t an easy task, so I had to leave out some advanced topics. You’ll find this extra material on the wiki space of the book’s GitHub repository at .
The book contains exercises to test your knowledge and help you practice what you’ve learned. The answers to those exercises are also available in the wiki section of the book’s GitHub repository at
I suggest that as you read the book, you have the Mozilla Developer Network (MDN) documentation open in your browser. You’ll need to refresh your knowledge of the Document API, and you’ll probably need to look up some of the methods you’ll be using to manipulate the DOM. You can find the documentation at.
Sometimes, you might want to dive deeper into a topic that I cover briefly in the book. When I want to learn how something related to HTML works or how JavaScript
ABOUT THIS BOOK
xix
executes in the browser, my ultimate source is the HTML specification, which you can find at To learn specifics about the JavaScript language, I recommend the ECMAScript specification, which you can find at
. As a frontend developer, you should always have these references at hand.

about the author
ÁNGEL SOLA ORBAICETA is a senior software engineer with more than 10 years of experience building all kinds of software, from
native desktop applications to backend services and frontend web applications. Mechanical engineer by training but software
engineer by passion, Ángel is a curious person who loves to learn how things work from first principles and to share his knowledge with others. In his spare time, you’ll likely find him
hanging out with friends, cooking food from all over the world,
or reading a book—most likely a popular science book or a dys-
topian novel.
xx
about the cover illustration
The figure on the cover of Build a Frontend Web Framework (From Scratch) is “Insulaire Nord Est de l’Asie” or “Islander North East Asia,” taken from a collection by Jacques Grasset de Saint-Sauveur, published in 1788. Each illustration is finely drawn and colored by hand.
In those days, it was easy to identify where people lived and what their trade or sta-tion in life was just by their dress. Manning celebrates the inventiveness and initiative of the computer business with book covers based on the rich diversity of regional cul-ture centuries ago, brought back to life by pictures from collections such as this one.
xxi
Part 1
No framework
This first part comprises two introductory chapters. The first chapter offers a high-level overview of frontend frameworks, providing a foundational understanding without delving into specifics.
In the second chapter, you’ll embark on a hands-on journey to create a TODO application using vanilla JavaScript with no framework assistance. If you’ve never built an interactive frontend application without a framework, this exercise will provide insight into the intricacies of connecting the Document Object Model (DOM) and JavaScript code manually. You’ll also appreciate the challenge of modifying the DOM programmatically whenever the application’s state changes.
The essence of a framework lies in automating these tasks, which allows you to concentrate on your application’s logic. By mastering the manual process, you’ll gain a deeper appreciation of the indispensable role that a framework plays in your development workflow.
Are frontend frameworks
magic to you?
This chapter covers
Why you should build your own frontend
framework
The features of the framework we’ll build together
How frontend frameworks work
Have you ever wondered how the frontend frameworks you use work internally?
Are you curious about how they decide when to re-render a component and why they update only the parts of the Document Object Model (DOM) that change?
Isn’t it interesting that a single HTML page can change its content without reloading and that the URL in the browser’s address bar changes without requesting the new page from a server? The inner workings of frontend frameworks are fascinating, and there’s no better way to learn about them than to build one from scratch.
But why would you want to learn how frontend frameworks work? Isn’t it enough just to know how to use them?
Good cooks know their tools; they can use knives skillfully. Great chefs go beyond that skill, however: they know the different types of knives, when to use each type, and how to keep the blades sharp. Carpenters know how to use a saw to cut wood, but great carpenters also understand how a saw works and can fix it if it 3
4
CHAPTER 1
Are frontend frameworks magic to you?
breaks. Electrical engineers not only understand that electricity is the flow of electrons through a conductor, but also deeply understand the instruments that they use to mea-sure and manipulate it. They could build a multimeter, for example, and if their multimeter broke, they could disassemble it, figure out what went wrong, and repair it.
As a developer, you have a frontend framework in your toolbox. Do you know how it works, or is it magic to you? If the framework broke—say, you found a bug—would you be able to find its source and fix it? When a single-page application (SPA) changes the route in the browser’s URL bar and renders a new page without requesting it from the server, do you understand how that happens?
1.1
Why build your own frontend framework?
The use of frontend frameworks is on the rise; it’s uncommon to write pure-vanilla JavaScript applications nowadays, and rightly so. Modern frontend frameworks boost productivity and make building complex interactive applications a breeze. Frontend frameworks have become so popular that there are jokes about the unwieldy number of them at our disposal. (In the time it took you to read this paragraph so far, a new frontend framework was created.) Some of the most popular frontend frameworks even have their own fan groups, with people arguing about why theirs is the best. Let’s not forget that frontend frameworks are tools—means to an end—and that the end is to build applications that solve real problems.
Framework vs. library
Frameworks and libraries are different. When you use a library, you import its code and call its functions. When you use a framework, you write code that the framework executes. The framework is in charge of running the application, and it executes your code when an appropriate trigger happens. Conversely, you call the library’s functions when you need them.
Angular is an example of a frontend framework, whereas React claims to be a library that you can use to build user interfaces (UIs). For convenience, I’ll refer to both frameworks and libraries as frameworks in this book.
All of the most popular frameworks currently available—such as Vue, Svelte, Angular, and React—are exceptional. Why should you create your own frontend framework when so many great options are already available? Well, aside from the satisfaction and enjoyment of building a complex software piece from scratch, you have a few practical reasons to consider. Let me tell you a little story about a personal experience to illustrate this fact.
When I was little, I went to a cousin’s house to hang out. He was a few years older than me, and he was a handyman, with cabinets full of cables, screwdrivers, and other tools. I’d spend hours observing how he fixed all kinds of appliances. Once, I brought a remote-control car along so we could play with it. He stared at it for some time and
1.2
The framework we’ll build
5
then asked a question that took me by surprise: “Do you understand how this thing works?” I didn’t; I was just a kid with zero electronics knowledge. Then he said, “I like to know how the stuff I use works. So what do you say we take it apart and see what’s inside?” I still think about that experience sometimes.
Now let me ask you a question similar to the one that my cousin asked me. You use frontend frameworks every day, but do you understand how they work? You write the code for your components and then hand it over to the framework, which does its magic. When you load the application into the browser, it works. It renders the views and handles user interactions, always keeping the page updated (in sync with the application’s state). For most frontend developers—including me years ago—how this magic happens is a mystery. Is the frontend framework that you use a mystery to you?
Sure, most of us have heard about that thing called the “virtual DOM.” We’ve heard about a “reconciliation algorithm” that selects the smallest set of changes required to update the browser’s DOM. We also know that SPAs modify the URL in the browser’s address bar without reloading the page, and if you’re the curious kind of developer, you may have read about how the browser’s history API achieves this task. But do you understand how all these things work together? Have you disassembled and debugged the code of the framework you use? Don’t feel bad if you haven’t. Most developers haven’t, including some very experienced ones. This reverse-engineering process isn’t easy; it requires lots of effort (and motivation).
In this book, you and I—together as a team—will build a frontend framework from scratch. This framework will be simple but complete enough to demonstrate how frontend frameworks work. From then on, what the framework does will no longer be a mystery to you. This project will be lots of fun as well.
1.2
The framework we’ll build
I like to set expectations early, so here goes: we won’t build the next Vue or React in this book. After you finish the book, you may be able to do that yourself by filling in the missing details and optimizing a couple of things here and there. The framework we’ll build can’t compete with the mainstream frameworks, but that’s not the objective anyway. The objective of this book is to teach you how these frameworks work in general so that what they do isn’t magic to you anymore. You don’t need to build the most advanced framework in the world to achieve this goal. You’d need a book four times as thick as this one, and writing that kind of framework wouldn’t be as much fun. (Did I mention that writing your own framework is fun?)
The framework we’ll build borrows ideas from a few existing frameworks, most notably Vue (), Mithril (), Svelte (
React ( Angular (
and Hyperapp (). Our goal is to build a framework that’s simple but includes the typical features of a frontend framework. I also want it to represent some of the relevant concepts behind the source code of the most popular frameworks.
6
CHAPTER 1
Are frontend frameworks magic to you?
Not all frameworks use the virtual DOM abstraction, but a big portion of them do.
(Svelte in particular considers it to be pure overhead, and the reasons are simply brilliant; I recommend that you read their blog post at I chose our framework to implement a virtual DOM that’s representative of the framework you’re likely using today. In essence, I chose the approach that I thought would result in the greatest learning for you. I’ll cover the virtual DOM in detail in chapter 3, but in a nutshell, it’s a lightweight representation of the DOM that’s used to calculate the smallest set of changes required to update the browser’s DOM. The HTML markup
<div class="name">
<label for="name-input">Name</label>
<input type="text" id="name-input" />
<button>Save</button>
</div>
would have a virtual DOM representation like figure 1.1, for example. (Note that the saveName() event handler in the figure doesn’t appear in the HTML markup. Event handlers typically aren’t shown in the HTML markup; they’re added programmatically.) I’ll be using figures a lot throughout the book to illustrate how the virtual DOM
and the reconciliation algorithm work. The reconciliation algorithm is the process that decides what changes need to be made to the browser’s DOM to reflect the changes in the virtual DOM, which is the topic of chapters 7 and 8.
<div>
class: "name"
<label>
<input>
<button>
for: "name-input"
type: "text"
click: saveName
id: "name-input"
Text
Text
"Name"
"Save"
Figure 1.1
A virtual DOM representation of HTML markup
Your framework will have some shortcomings that make it a less-than-ideal choice for complex production applications, but it will still be a good fit for your latest side project. The framework will support only the standard HTML namespace (
which means that Scalable Vector Graphics (SVG) won’t be supported. Most of the popular frameworks support this namespace, but we’ll leave it out for simplicity.
1.2
The framework we’ll build
7
1.2.1
Features
The framework you’ll have by the time you finish the book will have the following features, which you’ll build from scratch:
A virtual DOM abstraction
A reconciliation algorithm that updates the browser’s DOM
A component-based architecture in which each component does the following:
– Holds its own state
– Manages its own lifecycle
– Re-renders itself and its children when their states change
If you decide that you want to continue learning, you can find extra chapters in the book’s GitHub repository (appendix A). These chapters cover the following advanced features:
An SPA router that updates the URL in the browser’s address bar without reloading the page
Slots for rendering content inside a component
HTML templates that are compiled into JavaScript render functions
Server-side rendering
A browser extension that debugs the framework
As you can see, the framework will be a fairly complete framework—not a full-blown framework like Vue or React, but enough to demonstrate how those frameworks function. The neat thing is that you’ll build the framework line by line, so you’ll understand how everything fits together. I’ll use lots of figures to help you understand concepts that may be hard to grasp. I recommend that you write the source code yourself as you read the book. Try to understand it line by line, take your time, debug it, and make sure that you understand the decisions and trade-offs that we’ll make along the way.
Figure 1.2 shows the architecture of the framework we’ll build. It depicts all the parts of the framework and shows how they interact.
I’ll revisit this figure throughout the book, making sure to highlight each part of the framework as we build it. You don’t need to understand all the details of the architecture right now, but it’s good to have a high-level understanding. By the end of the book, this figure will make a lot of sense to you: you’ll recognize every part because you’ll have built each one yourself.
8
CHAPTER 1
Are frontend frameworks magic to you?
Browser
Render
Updates
cycle
Parent element
Application
Component
Private
Private
isMounted
component
vdom
parentEl
hostEl
parentComponent
riggers
Starts
Public
dispatcher
T
subscriptions
mount(parentEl)
unmount()
patch()
Public
props
state
Dispatcher
get elements
get firstElement
subscribe(name, handler)
get offset
afterEveryCommand(handler)
dispatch(name, payload)
updateProps(props)
updateState(state)
async onMounted()
async onUnmounted()
emit(eventName, payload)
render()
mount(hostEl, index)
unmount()
<<custom methods>>
Figure 1.2
Architecture of the framework we’ll build
1.2.2
Implementation plan
As you can imagine, you can’t build everything in a single chapter. You want to break it down into smaller pieces so that you can focus on one thing at a time. Figure 1.3
shows the implementation plan for the framework; it resembles a kanban board, with each sticky note representing the work of one or more chapters. You’ll pick up a sticky note in each chapter.
You’ll start by implementing a simple example application using vanilla JavaScript, which will help you understand how frameworks can simplify the code of a frontend


1.2
The framework we’ll build
9
Chapter 2
“Suffer the pain"
No framework
Vanilla JavaScript
to-do application
Chapters 3 & 4
Chapter 5
Chapters 7 & 8
Virtual DOM
The state
Virtual DOM
Basic
management
reconciliation
framework
Mounting and
system
algorithm
unmounting
Chapters 9 & 10
Chapters 11 & 12
Stateful
Subcomponents
components
(props and events)
and keyed lists
No more pure
functions
A better
framework
Chapter 13
Chapter 14
Component
Testing async
lifecycle hooks
components
and the
scheduler
Figure 1.3
Implementation plan for the framework we’ll build
app. (After you’ve suffered the “pain,” you’ll be in a better position to appreciate the benefits of a framework.)
STATELESS COMPONENTS AND GLOBAL APPLICATION STATE
When you have a better understanding of the benefits of frameworks, you’ll extract parts of the application’s view to stateless components modeled by pure functions that return the virtual DOM representation of their view. The application will hold the entire state of the application and pass it to the components, which allows you to focus on the DOM reconciliation algorithm—likely the most complex part of the framework.
STATEFUL COMPONENTS
Next, you’ll allow components to have their own state, which makes state management much simpler. The application will no longer need to hold the entire state; state will be split among components instead. Pure functions will turn into classes that implement a render() method, and each component will be its own little application with its own lifecycle.
10
CHAPTER 1
Are frontend frameworks magic to you?
SUBCOMPONENTS
You’ll add support for subcomponents, which allow you to split the application into smaller pieces. A component can pass information to its children via props, which are similar to the arguments of a function. Components can also communicate with their parents via events to which the parent can subscribe.
LIFECYCLE HOOKS
You’ll add lifecycle hooks to the components. These hooks make it possible to execute code at certain moments, such as when the component is mounted into the DOM. An example lifecycle hook might fetch data from a remote server when the component is mounted.
TESTING
Every application must be tested, so how do you write unit tests for an application using our framework? You’ll learn how to test the application’s components and how to handle asynchronous events or lifecycle hooks.
1.3
Overview of how a frontend framework works
Now that you know what you’ll build and have a plan, let’s take a quick look at how frontend frameworks work. This section reviews how a frontend framework works when observed from the outside. (You’ll learn about the internals throughout the rest of the book.) We’ll start from the viewpoint of the developer—someone who’s using the framework to build an application. Then we’ll take the browser’s perspective.
1.3.1
The developer’s side
A developer starts creating a project by using the framework’s command-line interface (CLI) tool or by installing the dependencies and configuring the project manually.
Reading the framework’s documentation is important, as every framework works differently.
In a web application, developers create components that define part of the application’s view and how the user interacts with it. Components are written in HTML, CSS, and JavaScript code. Most frameworks use single-file components (SFCs), in which all the component’s code (HTML, CSS, and JavaScript) lives in a single file. A nota-ble exception is Angular, which uses three files for each component: one for the HTML, one for the TypeScript code, and one for the CSS. This arrangement allows the developer to keep the languages separate and potentially get better syntax support from their IDE, but it may be inconvenient to jump between files to see the entire component.
React and Preact use JSX—an extension of JavaScript—instead of writing HTML
directly. Other frameworks (including Vue, Svelte, and Angular) use HTML templates with directives to add or modify the behavior of DOM elements, such as iterating over and displaying an array of items or showing specific elements conditionally. The following code snippet shows how you’d show a paragraph conditionally in Vue:
1.3
Overview of how a frontend framework works
11
<p v-if="hasDiscount">
You get a discount!
</p>
The v-if directive is a custom directive that Vue provides to show an element conditionally. Other frameworks use slightly different syntaxes, but all of them give the developer a way to show or hide elements based on the application’s state. For the sake of comparison, here’s how you’d do the same thing in Svelte
{#if hasDiscount}
<p>
You get a discount!
</p>
{/if}
and in React
{hasDiscount && <p>You get a discount!</p>}
When the developer is satisfied with the application, they need to bundle the code into fewer files than originally written so that the browser can load the application by making fewer requests to the server. The files can also be minified—made smaller by removing whitespace and comments and by giving variables shorter names. The process of turning the application’s source code into the files that are shipped to the users is called building.
Before we can deploy a frontend application to production, we need to build it.
Most of the work of building an application with a specific framework is done by the framework itself. The framework typically provides a CLI tool that we can use to build the application by running a simple NPM script such as npm run build.
NOTE
An application can be built in many ways, resulting in a wide variety of bundle formats. Here, I’ll explain a build process that encapsulates some of the most common practices.
Building the application involves a few steps:
1
The template compiler transforms the template for each component into JavaScript code. This code, executed in the browser, creates the component’s view.
2
The components’ code, split into multiple files, is transformed and bundled into a single JavaScript file, app.bundle.js. (For larger applications, it’s common to have more than one bundle and to lazy-load them—that is, load them only when they’ll become visible to the user.)
3
The third-party code used by the application is bundled into a single JavaScript file, vendors.bundle.js. This file includes the code for the framework itself, along with other third-party libraries.
4
The CSS code in the components is extracted and bundled into a single CSS file: bundle.css. (As before, larger applications may have more than one CSS bundle.)
12
CHAPTER 1
Are frontend frameworks magic to you?
5
The HTML file that will be served to the user (index.html) is generated or copied from the static-assets directory.
6
The static assets (such as images, fonts, and audio clips) are copied to the output directory. Optionally, they can be preprocessed to optimize images or convert audio files to a different format.
A typical build process results in four files (or more, in the case of larger apps):
app.bundle.js with the application’s code
vendors.bundle.js with the third-party code
bundle.css with the application’s CSS
index.html—the HTML file that will be served to the user These files are uploaded to a server, and the application is ready to be served to the user. When a user requests the website, the HTML, JS, and CSS files are statically served.
NOTE
When a file is statically served, the server doesn’t need to do anything before sending it to the user. The server simply reads the file from disk and sends it. By contrast, when the application is rendered on the server, the server generates the HTML file before sending it to the user’s browser.
Figure 1.4 shows a diagram of the build process. Note that a typical build process is more complex than the one shown in the figure, but this illustration is enough to explain the concepts. I’ve included a step that transforms the JavaScript code. This generic step applies to any transformation that needs to be made before the code is bundled, such as transpiling it by using Babel ) or TypeScript
Let’s see what happens in the browser after these files are loaded. The flow is slightly different depending on whether the application server-side rendered (SSR) or statically served as an SPA. Let’s start with the slightly simpler latter case.
1.3.2
The browser side of an SPA
In an SPA, the server responds with a mostly empty HTML file that’s used to load the application’s JavaScript and CSS files. Then the framework uses the Document API to create and update the application’s view. A router makes sure that the entire application isn’t reloaded when the user navigates to a different URL; rather, the view is updated to show the new content. The router also updates the URL in the browser’s address bar to give the user a nice experience. The following sections describe this process step by step.


1.3
Overview of how a frontend framework works
13
Source files
Third-party libraries
Static assets
Code
Markup
Styles
Code
index.html
Images, etc.
html
css
html
png
Template
compiler
JavaScript
Style
Assets
transformer
bundler
copying
JavaScript
bundler
Result
png
css
html
app.bundle.js
vendors.bundle.js
bundle.css
index.html
Other assets
Figure 1.4
A simplified diagram of a frontend application’s build process


14
CHAPTER 1
Are frontend frameworks magic to you?
STEP 1: LOADING THE HTML FILE
When the user navigates to the application by writing its URL, the browser requests the page’s HTML file (1), which is returned by the server (2), as illustrated in figure 1.5.
1. User requests page.
Loading...
2. Server responds with HTML file.
Browser storage
The HTML file references
<link rel="stylesheet" href="app.bundle.css"> the .js and .css bundles.
<script src="app.bundle.js"></script>
<script src="vendors.bundle.js"></script>
html
The HTML file is loaded into the browser.
Figure 1.5
SPA requesting the mostly empty HTML page
The browser loads the HTML file and parses it. This HTML, which is mostly empty, is used to load the JavaScript and CSS bundles declared in the <script> and <link> tags. These bundles are the application and vendor bundles we talked about in the previous section.
STEP 2: LOADING THE JAVASCRIPT AND CSS FILES
The browser loads the JavaScript and CSS files referenced in the HTML file (3) and parses the JavaScript code, as depicted in figure 1.6.
The browser is still blank at this point. It has rendered the HTML file, but this file’s
<body> element is mostly empty—except maybe for a <div id="app"> tag that some frameworks use to render the app. The view of an SPA is created dynamically by the framework’s JavaScript code.
STEP 3: CREATING THE APPLICATION’S VIEW (MOUNTING THE APP)
The framework JavaScript code (living in the vendors bundle) finds the components defined in the application’s code that need to be rendered (4) and creates the application’s view (5), as depicted in figure 1.7. This initial rendering is called mounting the application.


1.3
Overview of how a frontend framework works
15
3. Browser loads .js and .css files.
Loading...
Blank browser. Nothing has
Browser storage
been rendered yet (except
the mostly empty HTML file).
Application and vendor bundles
are loaded into the browser.
js
css
js
html
Application bundle
Vendors bundle
Figure 1.6
The browser loads the JavaScript and CSS files referenced in the HTML.
Idle server
The first render happens when
the framework mounts the app.
Browser storage
4. Framework reads the view’s components.
5. Framework creates the HTML programmatically.
js
css
js
html
Application bundle
Vendors bundle
Figure 1.7
The framework creates the application’s view using the Document API.


16
CHAPTER 1
Are frontend frameworks magic to you?
The framework uses the Document API to create the application’s HTML programmatically. The Document API allows HTML elements to be created programmatically through JavaScript. Let’s take a quick detour to see how this process works. Given an empty HTML <body> element like
<body></body>
a paragraph can be created programmatically and appended to the document like so: const paragraph = document.createElement('p')
paragraph.textContent = 'Hello, World!'
document.append(paragraph)
This process results in the following HTML:
<body>
<p>Hello, World!</p>
</body>
STEP 4: HANDLING USER INTERACTIONS
Going back to how SPAs work, what happens when the user interacts with the application? When the user interacts with the application (6), the framework handles the event and updates the view accordingly, as depicted in figure 1.8. The framework han-Idle server
Only the parts that change in the
6. User interacts with the
HTML are patched (re-rendered).
page. An event is emitted.
Browser storage
7. Framework executes the event handlers
defined in the application.
8. Framework patches the parts of the HTML
that change.
js
css
js
html
Application bundle
Vendors bundle
Figure 1.8
SPA handling user interactions
1.3
Overview of how a frontend framework works
17
dles the event from the browser by executing the event handling code defined in the application’s code (7) and then updating the view to reflect the changes in the application’s state (8).
The framework is responsible for updating only the parts of the HTML that need to be updated. This process is called patching the DOM.
DEFINITION
A single change that the framework makes in the DOM is called a
patch. The process of updating the view to reflect the changes in the application’s state is called patching the DOM.
Making changes in the document is expensive, so a well-implemented framework minimizes the number of changes to the document required to make it reflect the updates. By expensive, I mean that the browser needs to repaint and reflow the document to reflect the changes—a process that consumes resources.
TIP
To better understand why changing the DOM is expensive in terms of computation, I recommend that you read “Render-tree Construction, Layout, and Paint” at This article explains how the browser renders the document and gives you an overview of everything that happens under the hood.
How this task is achieved varies greatly across frameworks. Some frameworks use a virtual DOM (as ours will) to compare the current state of the document with the desired state and apply only the necessary changes; others take a completely different approach. To learn more about how some frameworks update the view, check the following sidebar.
How some frameworks update the view
Svelte understands the ways in which the view can be updated at compilation time, and it produces JavaScript code to update the exact parts of the view that need to be patched for each possible state change. Svelte is remarkably performant because it does the least work in the browser to update the view.
Angular runs a change detection routine, comparing the last state it used to render the view with the current state, every time it detects that the state might have changed. Changes to the state of a component typically happen when an event listener runs, when data is requested from a server via an HTTP request, or when macrotasks (such as setTimeout()) or microtasks (such as Promise.then()) are executed. Angular makes this detection possible thanks to zone.js (
), an execution context that’s aware of the asynchronous tasks running at any given time. With zone.js, Angular can detect when a macrotask or microtask is executed and run the change detection routine. The web page “Event loops: microtasks and macrotasks” is a wonderful resource for learning more about the JavaScript event loop and the difference between the micro- and macrotask queues.)


18
CHAPTER 1
Are frontend frameworks magic to you?
(continued)
Most other widely used frameworks—including Vue, React, Preact, and Inferno—use a virtual DOM representation of the view. So by comparing the last-known virtual DOM
with the virtual DOM after the state has changed, they compute the minimum changes required to update the HTML. React makes this virtual DOM comparison every time a component changes the state, using either setState() or the useState() hook’s mechanism. Vue takes a remarkably smart approach, including a reactivity layer that the developer can use to define the application’s state. These reactivity primitives wrap regular JavaScript objects (including arrays and sets) and primitives (such as strings, numbers, and booleans); they automatically detect when values change and notify the components that use those values that they need to re-render.
STEP 5: NAVIGATING AMONG ROUTES
The last step we need to cover is how the framework handles navigation among routes. When the user clicks a link (9), the framework’s router prevents the default behavior of reloading the page; instead, it renders the component that’s configured for the new route (10 and 11). The router is also in charge of changing the URL (12) to reflect the new route. Figure 1.9 illustrates this process.
/abc
12. Framework changes the URL
without reloading the page.
9. User clicks a link. A
The navigation happens without
navigation event is emitted.
requesting a new page to the server .
Browser storage
10. Framework’s router selects the
view that needs to be rendered.
11. Framework repla
h
ces t e current view
with the new one.
js
css
js
html
Application bundle
Vendors bundle
Figure 1.9
SPA navigation among routes
An SPA works with a single HTML file in which the HTML markup code is updated programmatically by the framework, so new HTML pages aren’t requested to the server
1.3
Overview of how a frontend framework works
19
when the user navigates to a different route. SPAs are called single-page applications because a single HTML file is involved. The illusion of multiple pages is created by the framework, which renders the components that are configured for each route.
THE COMPLETE FLOW OF AN SPA
Figure 1.10 depicts the complete flow of an SPA, including all the steps described earlier but showing them more schematically.
12. Framework changes the URL
without reloading the page.
1. User requests page.
/abc
2. Server responds with (mostly empty)
HTML file.
6. User interacts with the
html
page. An event is emitted.
3. Browser loads .js and .css files.
5. Framework creates the
HTML programmatically.
9. User clicks a link. A
navigation event is emitted.
js
css
Application bundle
8. Framework patches the parts
of HTML that change.
11. Framework replaces the
current view with the new one.
4. Framework reads the
view’s components.
js
Vendors bundle
7. Framework executes the event
handlers defined in the application.
10. Framework’s router selects the
view that needs to be rendered.
Figure 1.10
The complete flow of an SPA rendered in the browser
1.3.3
The browser and server sides of an SSR application
Now that you know how SPAs work, let’s compare them with SSR applications. SSRs are web applications that render the HTML markup on the server and send it to the browser. Therefore, a backend is required to handle requests and render the HTML
pages. In the browser, the frontend code is responsible for handling user interactions and updating the view to reflect the changes in the application’s state, as in an SPA.
But when the user navigates to a different route, the browser requests a new HTML
page from the server instead of updating the HTML markup programmatically. Let’s see how an SSR application works step by step.


20
CHAPTER 1
Are frontend frameworks magic to you?
STEP 1: LOADING AN HTML PAGE
When the user types the application’s URL into their browser, the browser asks the server for the HTML file (1). The server sends back a complete page that is created each time someone requests it. To create the page, the server uses the application’s router to figure out which components to show based on the requested route; then it instantiates those components (2). Next, each component loads data from other servers or databases and executes its mounting code before being rendered. Finally, the components are turned into HTML (3) and sent to the user (4). Figure 1.11 illustrates this process.
1. User requests page.
4. Server responds with the
full HTML.
html
The fully rendered
Running
HTML file
app
2. Backend instantiates the
Browser storage
components for the page.
3. Components are rendered
into an HTML string.
The HTML file references
html
the .js and .css bundles.
Figure 1.11
SSR application requesting an HTML page from the server
Even though the file looks like a static HTML file to the user, the server generates the page each time it’s requested. The HTML file served to the user displays already-rendered HTML markup, so the framework doesn’t need to use the Document API to generate it programmatically. But the HTML coming from the server lacks the event handlers defined in the application code, so the application doesn’t respond to user interactions. This situation is where the hydration process comes into play.
DEFINITION
Hydration is the process by which the framework matches HTML
elements with their corresponding virtual DOM nodes and attaches event handlers to make the HTML markup interactive in the browser. The hydration algorithm binds the browser’s HTML to each component’s virtual DOM, allowing for dynamic updates.


1.3
Overview of how a frontend framework works
21
STEP 2: HYDRATING THE HTML PAGE
The HTML document instructs the browser to load the application JavaScript files and CSS stylesheets (5)—the same as in the case of an SPA. When the JavaScript code is parsed, the framework code needs to connect the existing HTML—produced in the server—to the component’s virtual DOM, as well as attach event handlers (6). Figure 1.12 depicts the hydration process.
5. Browser loads .js and .css files.
6. Framework hydrates the components.
Running
app
Browser storage
Application and vendor bundles
are loaded into the browser.
js
css
js
html
Application bundle
Vendors bundle
Figure 1.12
The framework hydrates the HTML page.
STEP 3: HANDLING USER INTERACTIONS
After the framework’s hydration process makes the page responsive, the user can interact with it. When the user interacts with the page (7), the framework’s event handlers are triggered (8), and as in an SPA, the framework patches the parts of the HTML that need to be updated (9). All this processing happens in the browser, so the server isn’t involved, as you can see in figure 1.13.
What happens when the user navigates to a different route? The flow is a bit different from flow in the case of SPAs.
STEP 4: NAVIGATING BETWEEN ROUTES
When the user clicks a link (10), the browser changes the URL (the framework doesn’t do anything on the browser side this time), and the page is reloaded (11). A new HTML page is requested from the server (12), and the process starts again from step 1
(figure 1.14).


22
CHAPTER 1
Are frontend frameworks magic to you?
Idle server
Only the parts that change in the
7. User interacts with the
page. An event is emitted.
HTML are patched (re-rendered).
Running
app
Browser storage
8. Framework executes the event handlers
defined in the application.
9. Framework patches the parts of the HTML
that change.
js
css
js
html
Application bundle
Vendors bundle
Figure 1.13
SSR application handling user interactions
/abc
11. Browser updates the URL and
reloads the page.
12. Browser requests the new page to the server.
10. User clicks a link. A
navigation event is emitted.
Running
app
The server receives the request,
and the process starts from step 1.
Browser storage
This HTML file will be replaced by
the new one coming from the server.
js
css
js
html
Application bundle
Vendors bundle
Figure 1.14
SSR application navigating among routes

1.3
Overview of how a frontend framework works
23
As you can see, navigating among pages is quite different in an SSR application than in an SPA. In the case of SPAs, the server isn’t involved in the process. With SSRs, pages are generated in the server.
THE COMPLETE FLOW OF AN SSR APPLICATION
Figure 1.15 shows the complete flow of an SSR application, including all the steps described earlier but in a more schematic way.
1. User requests page.
/abc
1
t
1. Browser upda es the URL and
10. User clicks a link. A
reloads the page.
navigation event is emitted.
4. Server responds with the
full HTML.
7. User interacts with the
page. An event is emitted.
html
Running
app
2. Backend instantiates the
5. Browser loads .js and .css files.
components for the page.
3. Components are rendered
into an HTML string.
6. Framework hydrates the components.
js
9. Framework patches the parts of the
css
HTML that change.
Application bundle
8. Framework executes the event handlers
defined in the application.
js
Vendors bundle
Figure 1.15
The complete flow of an SSR application—rendered in the server and hydrated in the browser Now that you’ve seen how both SPAs and SSRs work, what about building a simple application yourself, without using a framework? That experience will show you what it was like to write web applications before frontend frameworks appeared.
24
CHAPTER 1
Are frontend frameworks magic to you?
Summary
Building a frontend framework from scratch is a great way to learn how frameworks operate.
Frontend frameworks bundle the application’s code into a single JavaScript file, the third-party dependencies into another file, and the CSS styles into yet another file. If the application is large, the framework might split the application’s code into multiple bundles that are loaded lazily (as needed).
The Document API allows HTML elements to be created programmatically, using JavaScript. Frontend frameworks use the Document API to create the application’s view.
SPAs consist of a single HTML file that’s loaded by the browser and updated by the framework to reflect the application’s state. When the route changes, the framework changes the view; the browser doesn’t reload the page.
The hydration process connects the existing HTML markup, rendered in the server, to the component’s state and event listeners.
Vanilla JavaScript—
like in the old days
This chapter covers
Building an application using vanilla JavaScript
and HTML
Creating DOM elements programmatically
Using the Document API to manipulate the DOM
Before you can understand the benefits of using a frontend framework, you need to understand the problems that it solves, and there’s no better way to gain this understanding than to write an application without a framework. That is, you should do the framework’s job yourself. The objective of this chapter is to make you suffer the pain of writing applications without a framework so that you can build some appreciation for the job that frameworks do for you.
In the old days (I’m not that old, but technology evolves fast), developers wrote applications using only vanilla JavaScript and HTML. JQuery was the best we had; it provided a nice API to interact with the Document Object Model (DOM), hiding the browser differences. But we still had to write code down to the level of working with the DOM, and to be fair, the work wasn’t that bad. That is, it wasn’t bad until we used our first modern frontend framework (Angular, in my case). Now there’s 25
26
CHAPTER 2
Vanilla JavaScript—like in the old days
no going back. We’ve been there. We know how much simpler it’s become to write JavaScript applications.
You’re probably accustomed to writing applications that use the power of a framework—something you should keep doing if you get paid to ship applications quickly—
so it may be hard for you to realize the problems that the framework solves. Or maybe, like me, you’re from the pre-framework era but haven’t written an application without a framework in a long time, in which case this chapter will be good for refreshing your memory. If your case is the former, I’m positive that when the framework is taken away from you, you’ll quickly realize why you used it in the first place. Suppose that you always find your working space clean and tidy, but you rarely appreciate it because you’re used to seeing it that way—until the cleaning personnel get sick and you have to clean up yourself. You suddenly realize that vacuuming every corner of the office is an arduous task and removing dust from the shelves and behind your computer—let alone cleaning the bathroom—is a pain. Only when you realize how much you value working in a clean, tidy environment do you start to truly appreciate the job that cleaning personnel do.
In this chapter, you’ll do the cleaning yourself, so to speak. You’ll build a simple application from scratch, using only vanilla JavaScript and HTML. The cleaning personnel—the existing frontend frameworks—will be on strike. Despite the simplicity of the app, you’ll notice that the code operates at a low abstraction level by manipulating the DOM directly and that it’s very imperative. You’ll need to write code explicitly to update the HTML document with every change in the application state.
It’s evident that not using a framework becomes a challenge as the complexity and size of an application increase. The purpose of this chapter, however, is for you to realize this fact on your own by experiencing the process of creating an application without framework support.
NOTE
Before you go any further, go to appendix A, and follow the instructions to set up the project for writing the code. Bear in mind that appendix A is a detour from the main topic of this chapter, but it’s necessary for setting up the project. When you finish, and without further ado, you’ll begin building the application. You can find the code you’ll be writing in the GitHub repository, inside the examples/ch02 directory,
2.1
The assignment: A TODOs app
You’re a developer in a consulting company, and your manager has assigned you a new project. A new client has an innovative idea for a new application, which they say has the potential to disrupt the market, and they want you to build it. The work might be interesting. Your manager sets up a meeting with the client to discuss the project.
In the meeting, you make sure to understand the requirements, which you summarize as follows:
Main idea: keep a list of the things I need to do (to-dos) in a day.
A to-do can be marked as done so that it’s removed from the list.
2.2
Writing the application
27
A to-do can be modified when the user makes a typo or wants to change the description.
The idea is so simple that you’re a bit wary of its being “super-mega revolutionary.”
(You wrote that phrase down; it’s what the client said.) But your job is to build the app, not to question its disruptive potential.
TODOs applications and frontend frameworks
The TODOs application is a classic in the frontend-framework world
It’s the equivalent of “Hello World” for learning a new programming language.
Framework authors like to use it as an example, both to test it and to show other developers how it’s used. I don’t want to break the tradition, so I’ll use it as well.
Vue.js implemented one of these applications, which you can find in the examples directory of the framework’s old repository at. React did as well, as early as in its initial public release (v0.3.0), which you can find in the examples directory atOne more TODO application is Mithril’s, which you can find in the examples directory of the framework’s repository at
.
Next, you talk with the design team to get the mockups for the application. The designers love the idea—although they swear that they’ve seen something similar—
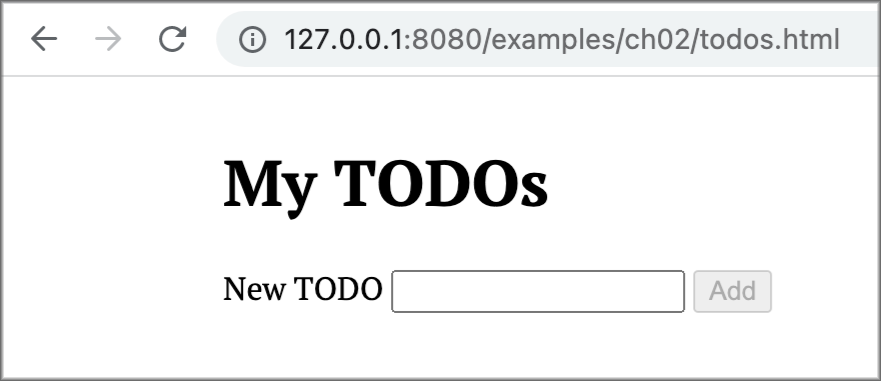
and they come up with a quick wireframe design that looks like figure 2.1. You show the design to the client, who loves it. It’s time to get down to business.
My TODOs
New TODO
Add
- Walk the dog
Done
TODO in edit mode
-
Water the plants
Save
Cancel
- Sand the chairs
Done
TODO in read mode
Figure 2.1
Wireframe design for the TODOs app
2.2
Writing the application
Now that you have the requirements and the design for the TODOs app, it’s time to start writing the code. First, though, you decide to take some time to plan how you’re going to tackle the task—as every good developer does. You realize that the application
28
CHAPTER 2
Vanilla JavaScript—like in the old days
is a simple one; it doesn’t have fancy features or complex requirements. So the first decision you make is to use plain JavaScript and HTML without any framework. You might use one later if the application grows in complexity, but for now, you want to keep things simple.
You figure out that part of the HTML markup is static—it won’t change as the user interacts with the application—and that part of it needs to be generated dynamically because it depends on the application’s current state. The list of to-dos, for example, will be generated from JavaScript programmatically because we can’t know in advance what TODOs the user will write. By contrast, the title (My TODOs), the input box where the user enters a new to-do, that box’s label, and the Add button will always be the same. Figure 2.2 shows the static and dynamic parts of the application.
My TODOs
New TODO
Static HTML
Add
- Walk the dog
Done
Code-generated HTML
-
Water the plants
Save
Cancel
- Sand the chairs
Done
Figure 2.2
Static and dynamic HTML of the TODOs app
Then you think about what makes up the application’s state. The application will look different when there are no to-dos than it does when there are to-dos, for example.
This means that the list of to-dos is part of the application’s state, so you’ll need an array of strings to keep track of the existing to-dos. The strings represent the descrip-tions of the to-dos.
DEFINITION
The state is the information the application keeps track of that makes it look and behave the way it does at a particular moment.
Last, before you start coding, you think about the application’s behavior. Based on the requirements, the design, and a short conversation you had with the user-experience specialist, you decide that the application will behave as follows:
When the user writes a new to-do and clicks Add, the to-do is added to the list of to-dos.
If the user presses the Enter key while the input field is focused, the to-do is appended to the list of to-dos as well.
2.2
Writing the application
29
The application won’t allow the user to add to-dos that are shorter than three characters.
To edit a to-do, the user has to double-click it.
If the user discards the changes by clicking the Cancel button, the to-do is restored to its previous state; the changes are lost.
When a to-do is marked as done, it’s removed from the list of to-dos.
With these conditions in mind, it’s time to start writing the code. Let’s start by setting up the project.
2.2.1
Project setup
You’ll write the vanilla JavaScript version of the TODOs application inside the examples directory in your project. (Make sure that you’ve completed the setup from appendix A.) First, create a new folder inside the examples directory for this chapter called ch02: $ cd examples
$ mkdir ch02
Then create two new files inside the ch02 directory:
todos.html, where you’ll write the HTML markup for the application
todos.js, where you’ll write the JavaScript code for the application Your examples directory should look like this:
examples/
└── ch02/
├── todos.html
└── todos.js
You want to move your terminal’s working directory back to the project’s root directory, so you can run the serve:examples script from there:
$ cd ..
$ npm run serve:examples
Your browser should open the examples directory and show the ch02 directory inside it. Click the todos.html file to open it. You should see an empty page because you haven’t written any HTML markup yet. We’ll write the static part of the HTML
markup next.
2.2.2
The HTML markup
The static part of the HTML markup is fairly simple, consisting of a title (<h1>), an input field (<input>) with its label (<label>), and a button (<button>). There should also be a list, empty to start with, where the to-dos will be rendered programmatically
30
CHAPTER 2
Vanilla JavaScript—like in the old days
(<ul>). Finally, it’s important for the HTML document to load the JavaScript file containing the application’s code: todos.js.
The first task is to load the todos.js file as an ECMAScript (ES) module inside the
<head> of the document, which you do by adding the type="module" attribute to the
<script> element. All modern browsers support ES modules, and a neat feature is that they are deferred by default (), which means that they won’t start executing the JavaScript code until the HTML document has been parsed. That’s why we can load the JavaScript file at the top of the document, the <head>, and still be sure the HTML markup will be available when the JavaScript code starts executing.
TIP
Read more about how ES modules are different from classic scripts in the browser in the V8 blog at The post is a good read that clarifies many concepts related to ES modules and their behavior in the browser; it’s written by people who work on V8 itself.
Next, you’ll add the input field, that field’s label, and the Add button inside a <div> element. Note that you need to add id attributes to the input field and the button so that you can reference them from the JavaScript code. The same goes for the <ul> element that will contain the to-dos, which is below the <div> element and is empty at first. The JavaScript code will render the to-dos programmatically as <li> elements inside the <ul> element. Open the todos.html file, and add the markup in the following listing. If you refresh the browser window now, you should see something like figure 2.3.
Listing 2.1
The static HTML markup for the TODOs app (todos.html)
<!DOCTYPE html>
<html lang="en">
<head>
<meta charset="UTF-8" />
<title>My TODOs</title>
The todos.js
file loaded as
an ES module
<script type="module" src="todos.js"></script>
</head>
<body>
<h1>My TODOs</h1>
The input field, the
field’s label, and
the Add button
<div>
<label for="todo-input">New TODO</label>
<input type="text" id="todo-input" />
<button id="add-todo-btn" disabled>Add</button>
</div>
<ul id="todos-list"></ul>
List where the
</body>
to-dos will be
</html>
rendered
2.2
Writing the application
31
Figure 2.3
The HTML markup
for the TODOs app
The JavaScript code will generate the remaining HTML markup dynamically. This part is where the fun begins.
Exercise 2.1
Add some CSS styles to the title, the input field, and the button. Following are some suggestions:
Use a nicer font than the default one. You can choose a free one from Google Fonts, such as Roboto ), and apply it to the document.
Center the application in the middle of the page horizontally.
Make the title bigger.
Place the input field’s label above the input field and make it italic.
Give the input and button some padding.
Find the solution at
2.2.3
The JavaScript code
You’ll write the JavaScript code in the todos.js file, so make sure that you have it open in your editor. First, you want to define the application’s state, which is a list of todos—an array of strings. You’ll add some to-dos already populated in the array so that when you open the page in the browser, you’ll see some to-dos already rendered.
Then you want to grab references to the DOM elements that you need to interact with, using the document.getElementById() function from the Document API. Open the todos.js file, and write the code in the following listing.
Listing 2.2
The state and HTML element references (todos.js)
// State of the app
const todos = ['Walk the dog', 'Water the plants', 'Sand the chairs']
// HTML element references
const addTodoInput = document.getElementById('todo-input')
const addTodoButton = document.getElementById('add-todo-btn')
const todosList = document.getElementById('todos-list')
32
CHAPTER 2
Vanilla JavaScript—like in the old days
So far, your application doesn’t do anything when you type a new to-do description in the input field and click the Add button. The to-do items in the state aren’t rendered either. The reason is that you’ve neither added event listeners nor written the code that renders the to-dos.
INITIALIZING THE VIEW
You want to initialize the view of the application—that is, dynamically generate the HTML markup that depends on the application’s state—and attach event listeners to the DOM elements that need them. To initialize the view, iterate over the to-dos in the application’s state and render each one, using a function that you’ll call renderTodoInReadMode(). Then append each element to the <ul> element, using the todosList element append() method.
DEFINITION
To render means to transform some data into a visual representation—something we can see.
In this context, when we render a to-do, we’re creating the HTML elements that represent the to-do in our application. The task of rendering a to-do—a JavaScript string—
into an HTML representation is carried out by a function that you’ll call renderTodoInReadMode(). The name is important here: it says that the to-do is rendered in read mode. If you remember from your discussion with the client, the to-do can be edited, so you need to render it in edit mode as well. In short, a to-do can be rendered in two ways because it has two different visual representations. You’ll write a renderTodoInEditMode() function later in the chapter.
After rendering the to-dos in read mode, you need to add a few event listeners to the DOM elements. First, you add a listener to the <input> field’s input event, which is fired every time the user types something in the input field. This handler function should check whether the input field has fewer than three characters, in which case the button is kept disabled to prevent the user from adding empty (or extremely short) to-do items. The button is enabled (that is, the disabled attribute is removed) when the to-do has at least three characters (figure 2.4). If you remember the HTML
markup in listing 2.1, the Add <button> element is disabled by default.
With fewer than three characters,
New TODO
the button remains disabled.
Wa
Add
New TODO
Water
Add
With three characters or more,
the button is enabled.
Figure 2.4
The field is disabled when the input field has fewer than three characters.
2.2
Writing the application
33
Next, you’ll add a listener to the <input> field’s keydown event, which fires every time the user presses any key. But you’re not interested in responding to every key the user presses; only the Enter key is relevant. For this reason, you want to check whether the key pressed is Enter. If so, call a function named addTodo(), which you’ll implement in the next listing; this function will add a new to-do to the application’s state and render it in the HTML.
Finally, you need a listener for the Add <button> element’s click event. The event handler is the same as the one for the keydown event: it calls the addTodo() function, clears the input field, and disables the Add button. In the todos.js file, write the code in listing 2.3.
NOTE
A // TODO comment in the code means that you’ll implement that part of the code later in the chapter. I’ll add these comments sometimes to let you know that something is missing in the code and that you’ll get to it soon.
Listing 2.3
The initialization of the application (todos.js)
// Initialize the view
To-dos rendered as <li>
for (const todo of todos) {
items inside <ul>
todosList.append(renderTodoInReadMode(todo))
}
addTodoInput.addEventListener('input', () => {
<button>
addTodoButton.disabled = addTodoInput.value.length < 3
disabled until
})
<input> has
at least three
addTodoInput.addEventListener('keydown', ({ key }) => {
characters
if (key === 'Enter' && addTodoInput.value.length >= 3) {
addTodo()
}
Pressing Enter
})
adds the to-do
written in the
addTodoButton.addEventListener('click', () => {
<input>.
addTodo()
})
When <button> is
// Functions
clicked, the to-do in the
function renderTodoInReadMode(todo) {
<input> is added.
// TODO: implement me!
}
function addTodo() {
// TODO: implement me!
}
Figure 2.5 shows a visual representation of the events you’ve added to the static part of the HTML markup.
Now we’re getting to the meat of the application: rendering to-dos. This task is one that a framework would do for you, but you’re going to do it yourself in this chapter.
34
CHAPTER 2
Vanilla JavaScript—like in the old days
My TODOs
New TODO
Add
'input' : () => {}
'click' : addTodo()
'keydown' : addTodo()
Listens to the button being
clicked to add a new to-do
Listens to the changes in the field’s
value to enable/disable the button
Figure 2.5
The event
and to the Enter key being pressed
listeners added to the
to add a new to-do
HTML elements
Exercise 2.2
Add a CSS transition to the color property of the button when it’s enabled or disabled. This transition will make the button’s color change smoothly when it’s enabled or disabled. Following are some tips in case you get stuck:
You can use the transition CSS property. Read about it in the MDN documentation ) if you need a refresher.
You can use the :disabled pseudoclass to style the button when it’s disabled.
You can use the :enabled pseudoclass to style the button when it’s enabled.
Find the solution
RENDERING TO-DOS IN READ MODE
To render a to-do in read mode, you need to use the document.createElement() method of the Document API to create some HTML elements:
The to-do items are inside an unordered list element (<ul>), so each to-do should go inside a list item element (<li>).
The to-do itself is simple text that you can render inside a <span> element.
The user should be able to mark a to-do as done, so you need to provide a button for that purpose.
Figure 2.6 depicts the HTML markup for a to-do in read mode.
The to-do description can be added as the textContent property of the <span> element. We could have created a text node and appended it to the <span> element—
using span.append(todo), for example—but setting the textContent is a bit more concise.
The <span> element needs to have a listener attached to its dblclick event that will replace the to-do in read mode with the edit-mode version. To accomplish this
2.2
Writing the application
35
- Walk the dog
Done
<li>
<span>Walk the dog</span>
<span>
<button>
<button>Done</button>
</li>
<li>
Figure 2.6
A TODO in read mode is rendered as a <li> element containing a
<span> element with the to-do text and a button to mark it as done.
task, you’ll call the replaceChild() method on the <li> DOM node. This method removes the entire <li> element and its children from the list of to-dos and renders the edit-mode version of the to-do in its place. To do the rendering, call the renderTodoInEditMode() function, which you’ll implement in the next section.
The replaceChild() method
The replaceChild() method from the DOM API replaces a child node of a DOM node (the one on which the method is called) with another node. It accepts two arguments:
newNode—The node that replaces the old node
oldNode—The node to be replaced
Last, you attach an event listener to the <button> element’s click event that will remove the to-do from the list of to-dos. For that purpose, you’ll write a removeTodo() function, which you’ll also need to fill in later. Now that you know what the plan is, fill in the renderTodoInReadMode() function as shown in the following listing.
Listing 2.4
Rendering the to-dos in read mode (todos.js)
function renderTodoInReadMode(todo) {
A <li> element that
const li = document.createElement('li')
contains the to-do
A <span> with the
const span = document.createElement('span')
to-do description
span.textContent = todo
span.addEventListener('dblclick', () => {
A dblclick event toggles
const idx = todos.indexOf(todo)
the to-do to edit mode.
todosList.replaceChild(
Replaces the to-do with
renderTodoInEditMode(todo),
its edit mode version
todosList.childNodes[idx]
)
})
li.append(span)
A <button> to mark
const button = document.createElement('button')
the to-do as done
button.textContent = 'Done'
Removes the to-do
button.addEventListener('click', () => {
from the list
const idx = todos.indexOf(todo)
36
CHAPTER 2
Vanilla JavaScript—like in the old days
removeTodo(idx)
})
li.append(button)
return li
}
function removeTodo(index) {
// TODO: implement me!
}
Figure 2.7 is a visual representation of the events you’ve added to the to-dos in read mode.
Listens to the button being
clicked to remove the to-do
- Walk the dog
Done
'click' : removeTodo()
'dblclick' : renderTodoInEditMode()
Listens to the span being double-clicked
Figure 2.7
The event listeners
to toggle the to-do to its edit mode
added to the to-dos in read mode
RENDERING TO-DOS IN EDIT MODE
Now let’s implement the renderInEditMode() function. The to-do in edit mode is also part of the unordered list of to-dos, so it should also appear inside a <li> element. But this time, the <li> element should contain an <input> element instead of a
<span> element so that the user can modify the to-do description. Also, instead of having one button, we need two: one to save the changes and another to cancel them.
Figure 2.8 shows the HTML markup for a to-do in edit mode.
<li>
-
Water the plants
Save
Cancel
<input type="text" />
<button>Save</button>
<input>
<button> <button>
<button>Cancel</button>
</li>
<li>
Figure 2.8
A TODO in edit mode is rendered as a <li> element containing an <input> element with the to-do text and two buttons to save or cancel the changes.
When the user clicks the Save button, a function that you’ll write later, updateTodo(), will modify the to-do description in the state and replace the to-do in edit mode with
2.2
Writing the application
37
the read-mode version. (When the user is done editing the to-do, we want them to see the updated version in read mode.) When the user clicks the Cancel button instead, you need to call the renderTodoInReadMode() function. Write the code for the renderTodoInEditMode() function as shown in the following listing.
Listing 2.5
Rendering the to-dos in edit mode (todos.js)
function renderTodoInEditMode(todo) {
<li> element that
const li = document.createElement('li')
contains the to-do
An <input> with the
const input = document.createElement('input')
editable to-do description
input.type = 'text'
input.value = todo
li.append(input)
A <button> to
const saveBtn = document.createElement('button')
save the changes
saveBtn.textContent = 'Save'
saveBtn.addEventListener('click', () => {
Updates the to-do
const idx = todos.indexOf(todo)
description
updateTodo(idx, input.value)
})
li.append(saveBtn)
A <button> to
const cancelBtn = document.createElement('button')
cancel the changes
cancelBtn.textContent = 'Cancel'
A click event cancels
cancelBtn.addEventListener('click', () => {
the changes.
const idx = todos.indexOf(todo)
todosList.replaceChild(
Replaces the to-do with
renderTodoInReadMode(todo),
its read-mode version
todosList.childNodes[idx]
)
})
li.append(cancelBtn)
return li
}
function updateTodo(index, description) {
// TODO: implement me!
}
The code is similar to the one for the read-mode version of the to-do. Figure 2.9 shows the events you’ve added to the to-dos in edit mode.
-
Water the plants
Save
Cancel
'click' : renderTodoInReadMode()
'click' : updateTodo()
Figure 2.9
The events added to the to-dos in edit mode
38
CHAPTER 2
Vanilla JavaScript—like in the old days
The only things left to implement are the addTodo(), removeTodo(), and updateTodo() functions. Let’s do that work now.
ADDING, REMOVING, AND UPDATING TO-DOS
The functions to add, remove, and update to-dos are defined in our todos.js file, but they’re not implemented yet. We left TODO comments (oh, the irony!) in the code to remind us of that fact. The implementation of these functions is straightforward, so let’s see what each of them does.
The addTodo() function reads the description of the new to-do from the <input> element’s value property, and pushes it into the array of to-dos. Then it calls the renderTodoInReadMode() function to render the HTML for the new to-do and appends it to the todosList element. Last, it clears the <input> element’s value property so that the user can enter a new to-do description; then it disables the Add button.
The removeTodo() function removes the to-do from the array of to-dos and the
<li> element from the document. To remove the <li> element from its parent <ul>, it calls the remove() method on the target node, which you can locate by index inside the childNodes array of the <ul> element.
The updateTodo() function needs to have two parameters passed to it: the index of the to-do to update and the new description of the to-do. The passed description overwrites whatever is in the array of to-dos at the given index. Then, using the renderTodoInReadMode() function, you can render the HTML for the updated to-do.
Finally, you can replace the to-do at the given index inside the todosList element’s childNodes array with the new HTML. The following listing shows the code for the addTodo(), removeTodo(), and updateTodo() functions.
Listing 2.6
Functions to add, remove, and edit to-dos (todos.js)
function addTodo() {
Adds a new to-do
const description = addTodoInput.value
todos.push(description)
const todo = renderTodoInReadMode(description)
todosList.append(todo)
addTodoInput.value = ''
addTodoButton.disabled = true
}
Removes a to-do
at a given index
function removeTodo(index) {
todos.splice(index, 1)
todosList.childNodes[index].remove()
}
Updates a to-do
at a given index
function updateTodo(index, description) {
todos[index] = description
const todo = renderTodoInReadMode(description)
todosList.replaceChild(todo, todosList.childNodes[index])
}

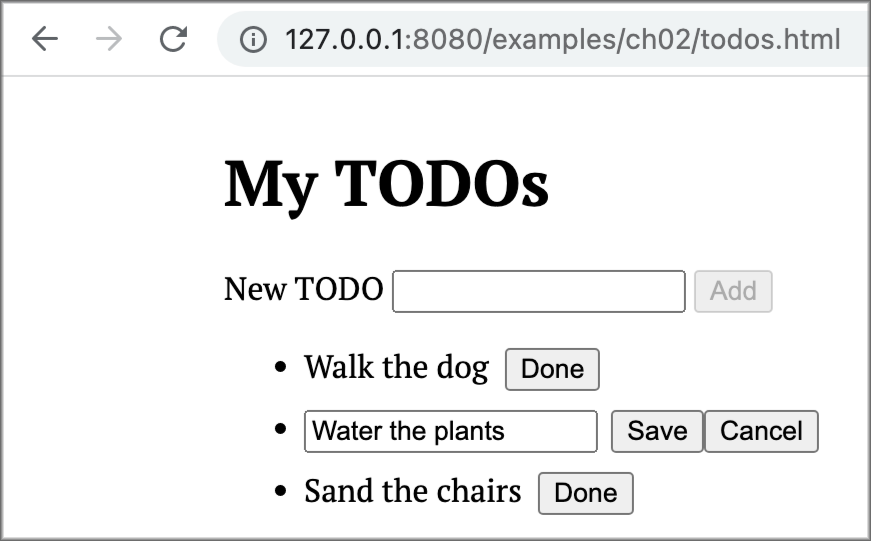
2.2
Writing the application
39
If you refresh the page now, you should be able to add, remove, and update to-dos.
Your application should look similar to figure 2.10. You’ve written a web application without a framework. The experience wasn’t too painful, was it?
Figure 2.10
The finished TODOs app
Try to add a new to-do by typing something like Sing a song in the input field and clicking the Add button. Then click the Done button to remove the to-do from the list.
Try clicking one of the to-dos to see how it’s replaced by its edit-mode version, as in figure 2.11.
Figure 2.11
The TODOs app
in edit mode
I hope you’re excited about what you’ve built: an interactive web application made without a framework! But I also hope that you’ve realized how inefficient it would be to write a large application this way, which is why using a framework is a great idea.
Operating at such a low level to generate the HTML markup for the DOM programmatically is tedious and error-prone.
40
CHAPTER 2
Vanilla JavaScript—like in the old days
Exercise 2.3
Suppose the customer says that they don’t want done to-dos to be removed from the list; instead, they want those items to be crossed out. Can you implement this feature for them?
Find the solution
Exercise 2.4
The customer tried the application and loved it. But then they realized they could add the same to-do multiple times, which is unacceptable. Can you fix this bug so that if the user tries to add an existing to-do, the application doesn’t add it and warns the user?
Find the solution .
Exercise 2.5
The customer has a challenging request for you. To aid users with a hearing impair-ment, the customer wants the application to read each to-do aloud when it’s added to the list. Can you implement this feature?
(Psst! Here’s a little tip from a senior developer at your company: you may want to read about the Web Speech API at .) Find the solution
The first thing we want our framework to take care of is the use of the Document API to create and manipulate the DOM—the part that’s most burdensome to write. If we can abstract away the manipulation of the DOM, we can focus on the application logic, which makes our applications useful. Think about it: the time we spend working on manipulating the DOM doesn’t add value for the user. We need to do this work to make the application interactive, but it’s not what the user cares about. A good framework should allow us to forget about dealing with the DOM and focus on the application logic. That’s exactly what we’ll do in chapter 3.
Summary
Nothing prevents us from writing complete frontend applications without a framework, but doing so can easily result in code that’s a mix of application logic and DOM manipulation, using the Document API to modify the browser’s document.
When we use vanilla JavaScript to write a fronted application, every event that changes the state of the application forces us to write the code that updates the DOM to reflect the new state. This code tends to be imperative and verbose.
Part 2
A basic framework
Get ready, because the real excitement begins now! You’ve already dab-bled in the creation of a TODO application, using nothing but HTML and vanilla JavaScript. Part 1 gave you a glimpse of the challenges involved in developing large, complex web applications that require manual Document Object Model (DOM) manipulation and real-time synchronization between the view and the model as users interact with the app.
But don’t worry; frontend frameworks were designed to make your life easier!

