Power BI is self-service business intelligence. It provides highly interactive visualizations, where a user can create reports and dashboards by themselves. It has an interface that is very much similar to Microsoft Excel but is more powerful in terms of reporting and dashboards.
It provides a cloud-based Services –known as Power Bi Services, along with Power BI Desktop interface. The Initial version was unveiled in September 2014.
Power BI service provides fast and easy access to data, supporting inputs from most of the data sources, and the data can be visualized and analyzed by anyone.
Here we will discuss points to publish a Power BI report to Power Bi online dashboard with Row-level security and how to embed this report to the SharePoint site. This is an open-source Power BI Desktop and Power BI Service online to allow to build simple to complex report to monitor the health of the system. You can provide different facilities for the end-users to visualize the data.
- Fast Deployment, secure, and can be integrated with any existing systems.
- Pre Build Dashboard templates.
- Supports both live connections, on-premise, and cloud.
Power BI automatically updates the data in real-time and providing options to refresh the data by schedule refresh promptly and which will depend on data sources that you are binding to the Power BI report. Real-time data options will be available through Azure Stream Analytics, integration, and the REST API for Power BI. With both mentioned ways, the data can be moved into Power BI directly.
Power BI Desktop
Power BI desktop is a visual data exploration and reporting too. Using this reporting tool, users can connect diffident data sources and can generate reports and dashboards as a single location. Power BI desktop tool can connect a variety of data sources like Excel, SQL, OData feed, etc. There are already many supporting formats like charts, table which can help the user in analyzing the data.
Power BI desktop can connect different data sources like with file (Excel and CSV), Azure (Azure Services), Databases (SQL, and Oracle Server DB), and also Facebook and Google analytics.
To restrict data at report or dataset level, Row Level Security (RLS) is used.
To implement dynamic RLS in Power BI, you need to follow the below steps.
- Create a role and maintain security logic (using DAX Expression) in the Power BI Desktop tool.
- Create a workspace & members to it for whom RLS has to be enabled (Optional)
- Upload the report to Power BI services and assign users under the security tab of the dataset.
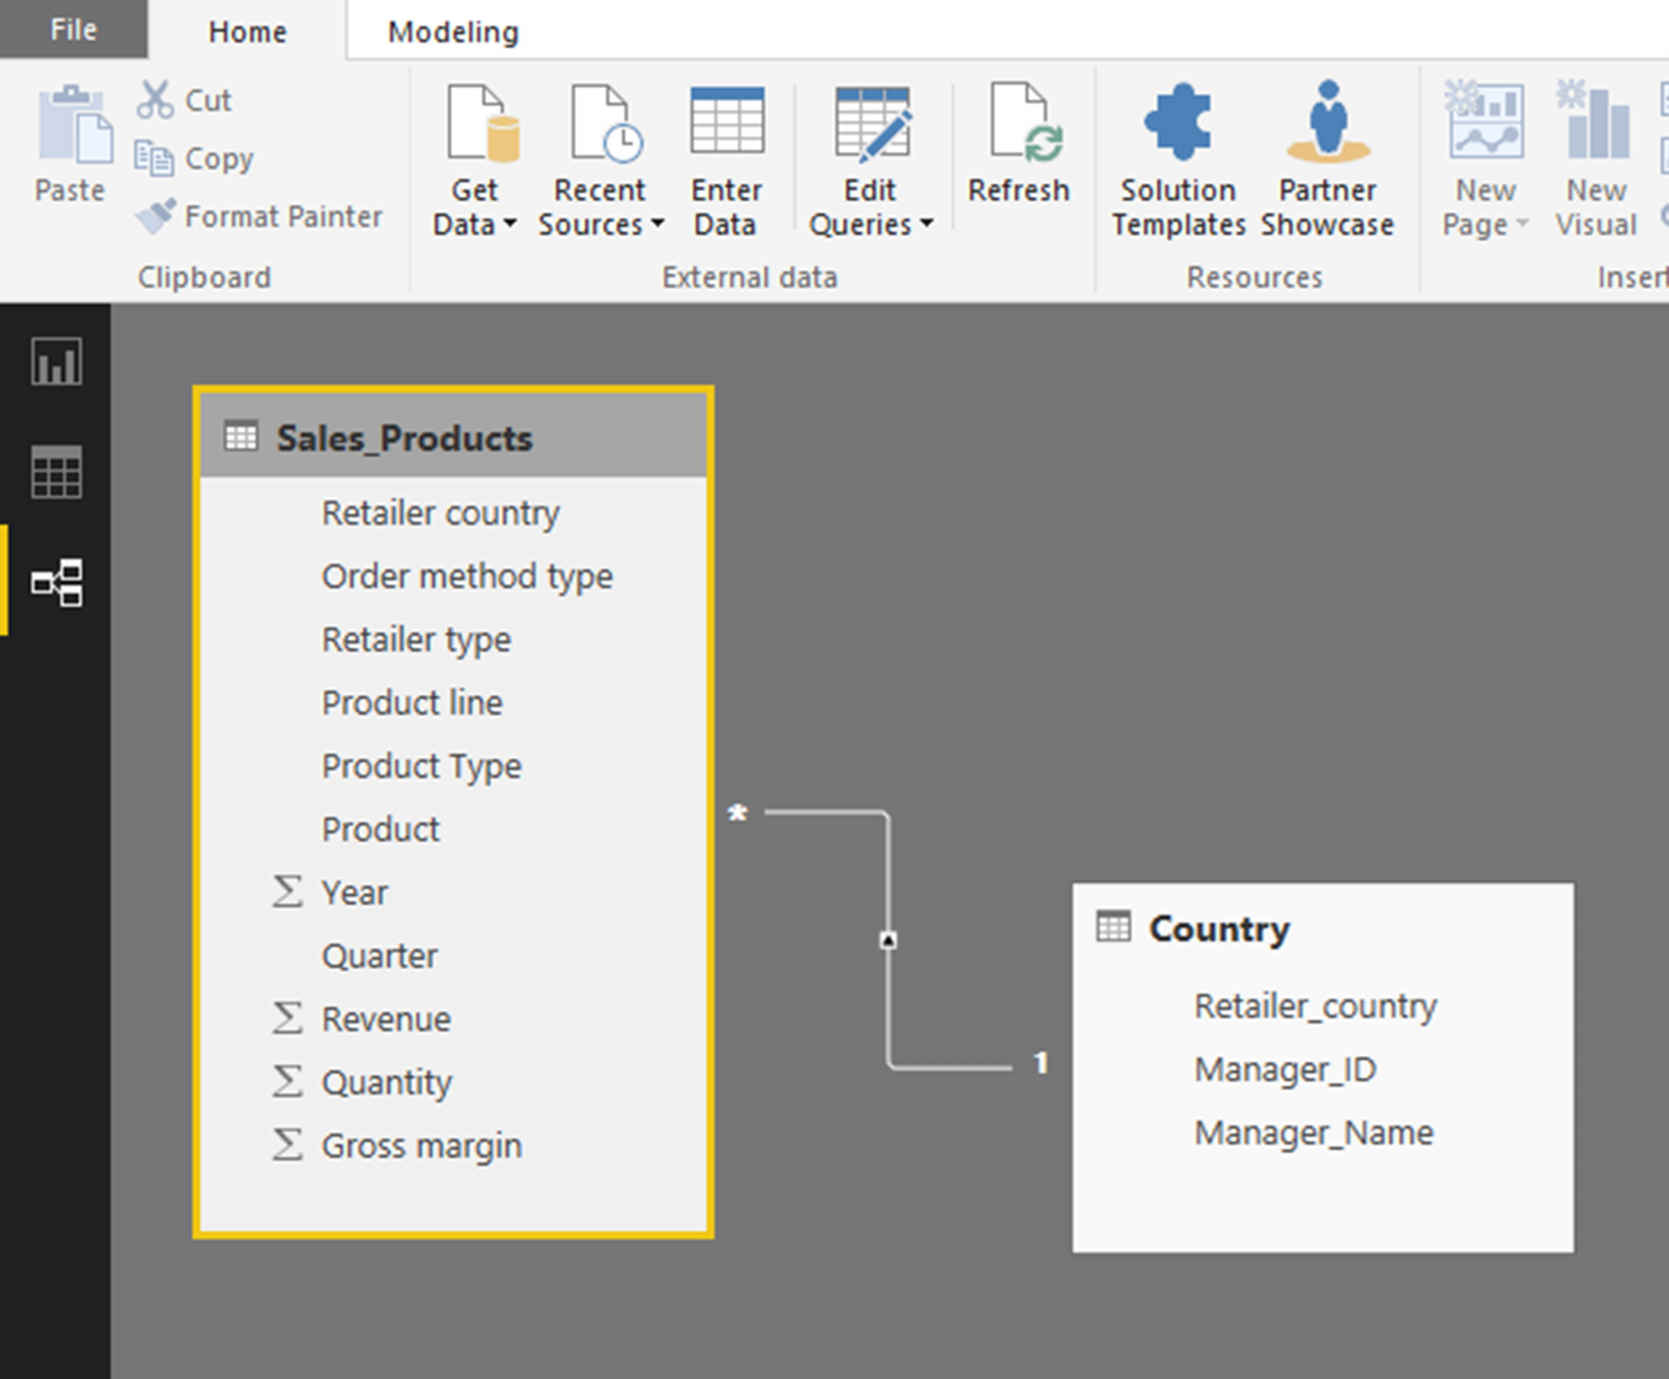
Here you will use the data from an Excel source, which has two tables, Sales_Products, and Country.
Sales_Product Table
Country Table
In this example, you have three users Mary (Manager of US & Canada), Dan (Manager of UK) and John (Admin User)
You will create a report and apply dynamic security. The Manager will be seeing only those countries which belong to him (or) her.
Steps to Implement Dynamic RLS
Import tables in Power BI and create the relationship by joining the “Retailer_country” column from the country table with the “Retailer country” column in Sales_Products.
This relationship is associated with the Manager Id.

Create the report as per requirement:
In example. You have created three slicers (Product Line, Retail Country & manager) and one detailed report (table view).
Once the report is created and then you will implement security.
Step 1
Create a role and add filter condition.
To do this, go to the modeling tab. Then create a role(Manager) and add filter condition on the respective table. In the example you have added “Manager_ID = Username()” condition on country table.
Username() is the DAX function, which will return the username of the person who is logged in.
By using this filter, the user who has logged in will only be able to see their own records present in the complete dataset. Here in the example, the Manager_Id field in Country table defined exactly like the Power BI usernames. Sales_Products table is the replica of Retailer_Country, therefore changing any of the tables will also reflect in the other table automatically.
Step 2 :
Create an app workspace in Power BI service as Implement_RLS_Group and add the members into it.
Log into Power BI services (using admin login), click on “Create app workspace” under workspaces.
Then provide Name, Privacy settings, and members mentioned as below example.
Example:
Name: Implement_RLS_Group
Members:
[email protected]– Admin (The person who creates the app workspace)
[email protected] – Member (Manager for the UK)
[email protected] – Member (Manager for US & Canada)
Step 3:
Assign users to Power BI Security.
First, save, and then publish the report under “Implement_RLS_Group” in Power BI. Then, navigate to the “Security” tab of the dataset, which has been published just now (In your case, the name of the dataset is Store_RLS).
Click on the “security tab,” you will see the role you created in power BI Desktop. Add the user under that role for whom RLS should be implemented.
The users added on this page will see only those records, i.e., which are associated with their own username. Whereas for the user who publishes (admin), the report can see whole revenue details since he/she is the admin.
Step 4 :
Test the RLS by logging into BI services using Mary or John login.
You should only see those records that belong to them.
This is how Dynamic RLS is implemented in Power BI.
Power BI Row-level security can be used to limit the report access for specified users. Also, you have Power BI filters to restrict data at the row-level; the filters within the roles can be defined.
The security roles can be defined by following these steps:
1. Open the Power BI report and select the Modeling tab.
2. Then choose Manage Roles option from the Modeling tab.
3. Select Create .
4. You should name the role after clicking on the create button as above.
5. Choose the table in which you are going to restrict and choose a DAX rule to apply.
6. Enter a DAX expressions - this will return true/false. E.g.: [Entity ID] = “Value”.
7. You can select the checkmark after applying the DAX formula to validate above the expression content box to the expression as below.
8. Choose Save .
Users can only be assigned roles through the Power BI service, not through the Power BI desktop. However, the Desktop can be used for creating the role.
9. After creating a role, the results of that role can be validated in Power BI Desktop. For this, you should choose View As Roles option from the Modeling tab as below shown below.
10. You can see and change the view roles using View as Roles dialog as below.
11. After that, you can select the checkbox for the respective role you have created and click on OK to apply modifications. The reports will pull the data appropriate for that selected role only. You can select other given user checkbox also.
You can bring the data from the below datasets to Power BI.
- SaaS Data Sources (Software as Service): GitHub, Microsoft Dynamics CRM, SendGrid
- Azure Resident Systems: Azure SQL/DW
- On-Premise systems: SQL, Tabular, Excel, PBI Desktop
Row-Level Security in Power BI
You have to create roles within the Power BI Desktop. You cannot create the roles in the Power BI service.
When you publish this to Power BI Service, the role definition will also be published. You can add the users in the Roles created at Power BI Service.
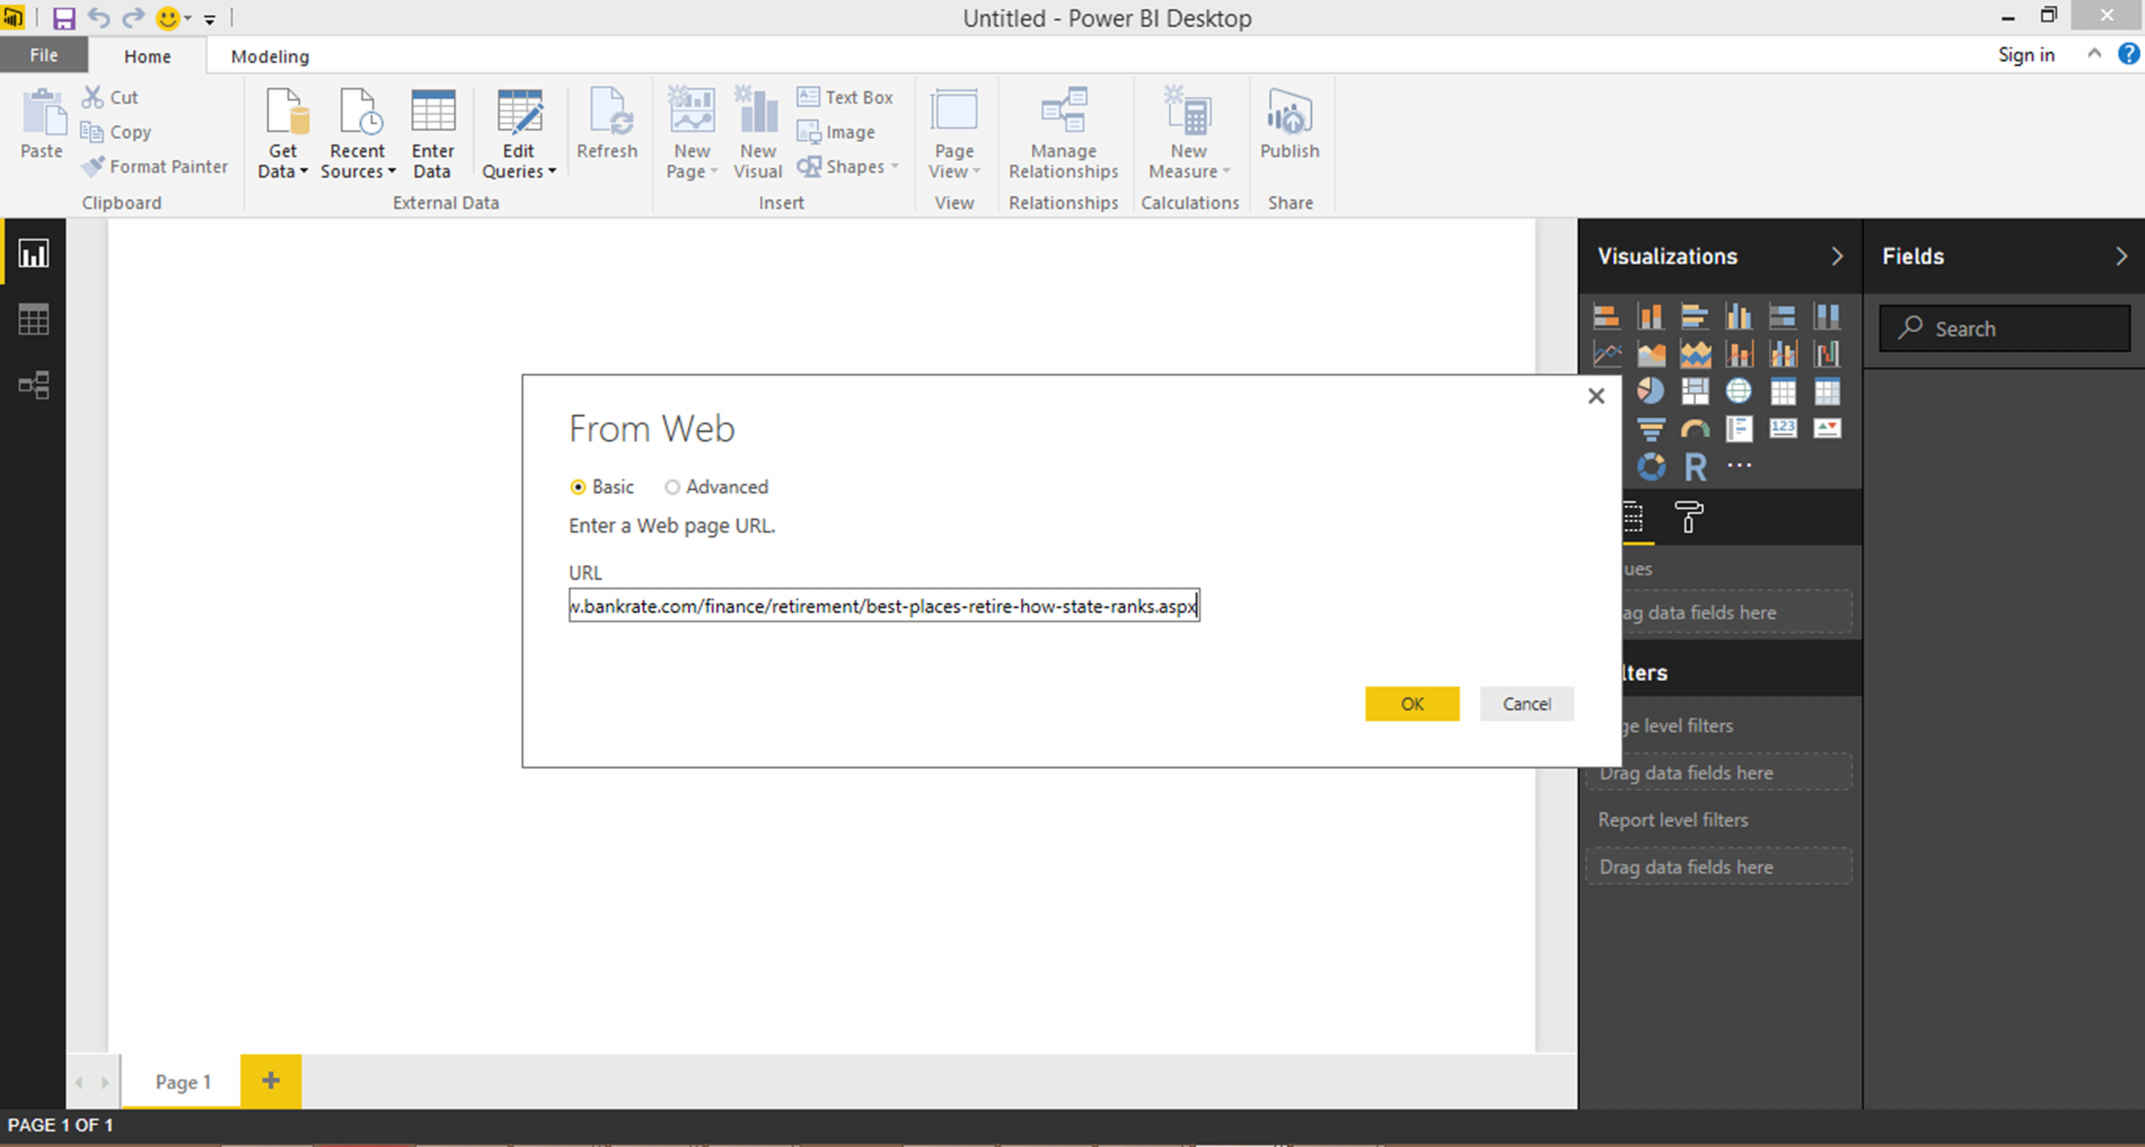
Step 1: Import Data to Power BI Desktop

From the above web source, I have selected the data from Table(0).
Step 2:
Now select the Modeling tab and click on the Manage Roles.
I’m creating a Role Texas to enable the user to view data only in that State.
You have to create the DAX expression for the same and can validate by clicking on the tick mark to avoid further errors.
As mentioned above, you cannot assign users within Power BI Desktop; this can be done only at Power BI Service.
Instead, you can have dynamic security in Power BI Desktop using the username() and lookup function as in Tabular Cube.
Step 3:
Publish this report and log onto the Power BI Service. Under the datasets, click(…) on the Model that you have created.
Now you can add the User ID under the members of the Roles created. You can also test the Role by clicking on Test as Role. (Now you will be able to see the data only for Texas).
Publishing the Report
- Select the Publish button.
- Once Publish has done, it will show below popup for success confirmation.
- By using the Link in the above popup, you can open Power BI online service.
Manage Security on Model
To manage security on your data model, you should do the following steps:
1. Select the security under the dataset .
2. You can add a member to the role by giving an email address or name of the user. This member should exist within your organization. You cannot add Groups created within the Power BI desktop.
3. You can remove members also by clicking on X next to their names.
Embed in SharePoint Online
- Go to My Workspace-> Report-> File -> “ Embed in SharePoint Online ”.
- You will get a URL. Now you should log-in to the SharePoint site and create a new page.
- After that, you can see a PLUS button as below to add/embed the Power BI report to SharePoint.
- You should place the URL (Which you copied from Power BI online My Workspace-> Report-> File -> “ Embed in SharePoint Online ”) in the below box to embed.
- Once you are done with the above steps, you can see the Power BI report in SharePoint online.
Power BI Mobile Development Steps
- The Power BI mobile applications are where you can view Power BI content only, but you cannot create it.
- Power BI Mobile development will be done in Power BI desktop; then, it will have converted into a Mobile view.
- Once you are done with required functionalities in Power BI desktop.
- Then you can change the view into the phone view by selecting the option “Phone Layout” from the VIEW tab.
- Then it will open the visual and Mobile view. You need to arrange the visuals as you wanted in the Power BI Mobile screen by drag and drop the visuals into the Mobile view.
- Then publish the above changes into power BI service as below. From there, you can access the Power BI service and Power BI Mobile app as well.
- Select the Publish button.
- Once Publish has done, it will show below popup for success confirmation.
- You should install the Power BI Mobile app from the App Store to access the same.
Cons in Power BI Row Level Security
- Only Direct Query connections are supported. This doesn’t support live the connections to Analysis Services. You have to have them on the on-Premise Model itself.
- You have to recreate the roles in Power BI Desktop if you have them in Power BI services.
- Cortana is not supported.
- The roles can only be defined in Power BI Desktop.
Therefore, Row-Level Security is just a way to restrict the access of the user. This can be achieved by applying filters at the row level.

