Chapter 20
Deploying XAML Applications via the Window 8 Windows Store
What's in this chapter?
A new deployment option for Windows 8 apps
Getting an account at the Windows Store
Requirements for apps in the Windows Store
Working with the Windows Store in Visual Studio
Packaging an app and deploying it to the store
Side-loading LOB apps in an organization
The deployment mechanism for Windows 8 apps is a radical departure from previous platforms. In this chapter, you will see why these radical changes were made, and get an introduction to the main deployment option in Windows 8, which is the Windows Store.
. If you are not logged in to a Microsoft account, the first step will be to do so.
As mentioned earlier, make sure you log in with the email address you want to be associated with the app store account. If you log in with one email address and then later enter a different email address in the screen in Step 3, you'll just have to start over.
Microsoft has made some recent changes in the switch from the Windows Live ID system, and you may be requested to provide additional validation of your Microsoft account via a number that is emailed to you. This is a one-time process; if you've already done it, you will not need to do it again.
Step 2 — Configure Account Type
The first screen in the process of registering an account looks like .
Choosing the account type to set up a Windows Store account
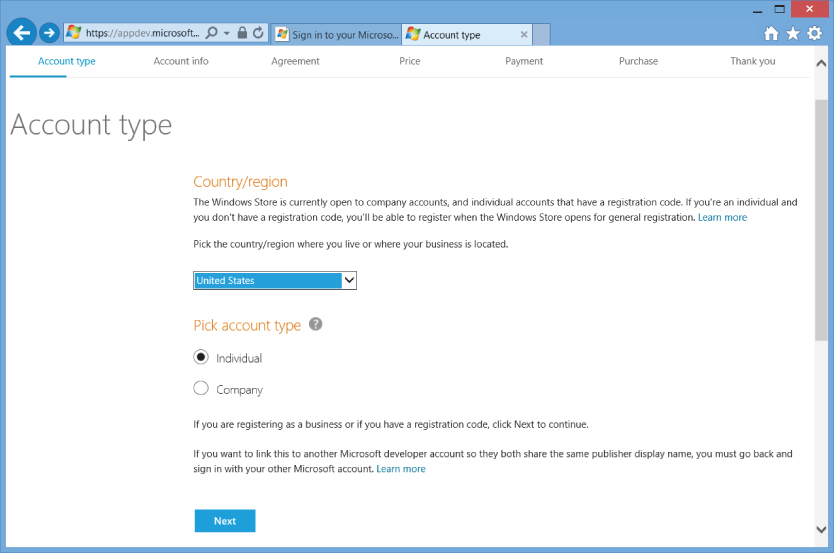
The only choices you make at this point are the country or region in which your business is located, and the type of account you want. Company accounts require some extra information, so the account type is needed before the next steps.
As discussed previously, when you are first starting out and just learning how the app store works, you might want an Individual account. It's somewhat simpler to acquire. However, when you get ready to actually sell apps or distribute apps for a company, you'll probably want a Company account. That requires additional verification and has an associated account for the money that comes in for the app.
Step 3 — Enter Demographic Information and Publisher Name
In this step, you'll put in your demographic information—name, address, etc. The email address you use in this step should be the same email with which you logged into your Microsoft account.
You also need to supply a “Publisher display name” as the last item on the page. This area of the screen is shown in . Naturally, this is the name the Windows Store will display as the publisher of the app.
Specifying the Publisher display name for a Windows Store account
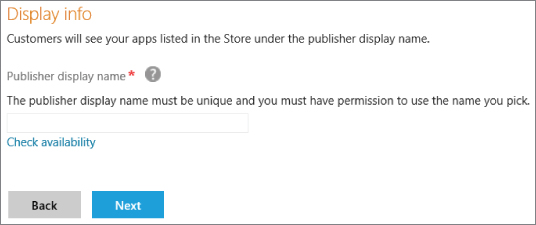
The Publisher display name must be unique. If you are getting a Company account for your organization, and you know this will be the main account to deploy your organization's apps, you should use your organization's name. If you work for a large organization, you may want to check with any appropriate parties before using the name.
If you are creating an Individual account, or a Company account for yourself or some small entity, choose a name you have control over and which you don't need any special permission to use. If you have a personal corporation, such as an LLC, that name would be a good choice. The screen will let you check the availability of your chosen name, and you must enter a unique name before you proceed.
Step 4 — Accept Application Developer Agreement
Given the complexity of what happens in the Windows Store, including transfer of money, it's no surprise that a detailed agreement is required to get a Windows Store account. In this step, you will indicate that you have read and accept the agreement.
Read it first—don't just treat it as just another EULA. It's a binding legal agreement that designates the terms of selling and supporting your application, and such aspects as what to do if someone else is infringing on your app. There are a number of constraints in it to be aware of, particularly the Certification Requirements, which can be seen at . The section below on “Checking to See if an App Meets Requirements” discusses some of the more important aspects of certification for Windows 8.
Step 5 — Supply a Registration Code and/or Pay a Registration Fee
The next step is where you commit to getting the account and, if necessary, paying a fee for it. As of the time this is written, Individual accounts have a list price of $49US, and Company accounts have a list price of $99US. However, the page also allows you to enter a registration code, which may reduce or eliminate the fee.
For developers acquiring an Individual account, Microsoft has various mechanisms for distributing registration codes. These will likely vary over time, so this chapter will not detail the precise mechanisms in place at the moment.
Step 6 — Confirm Identity
The procedure for confirming identity varies depending on the type of account. Company accounts require more confirmation. You will need to carry out the instructions on the registration screens for your particular case. Once this step is done, you should have an active account at the app store.
, should guide you to the most current version of the requirements.
However, this chapter summarizes some of the most important requirements you will need to know as you begin development of Windows 8 style apps. It's very important that you know and understand these requirements. When you place an app in the store, it is subject to being tested by human testers who will verify whether or not your app meets the requirements. If it doesn't, it won't be made available in the store.
In the section on “Checking to See if an App Meets Requirements,” you will look at the process you use for checking to see if you app meets the requirements. Some requirements are rather specific, and it's easy to see if you meet them. These can be validated before you attempt to place your app in the store. Other requirements are more general, and whether you meet them is open to interpretation once your apps have been placed in the store. However, you would be wise to understand those requirements and attempt to meet them before placing your app in the store.
Specific Requirements
Here are some of the specific requirements for an app to be certified for the Windows Store. This list isn't intended to be comprehensive; it simply highlights some of the requirements you will want to know about right away. You should still look at the entire set of requirements at to become acquainted with the entire list.
Restricted APIs
Apps in the store can access only a restricted set of APIs. The certification requirements have the details, but you are basically restricted to a set of namespaces in the Windows 8 runtime libraries, a set of namespaces in the .NET libraries for Windows 8 style apps, and the Live Connect API for authentication.
This obviously means you can't use any version of the general .NET Framework libraries. Those libraries are intended for applications that run in the desktop mode.
Support for Windows 8 Interaction
Your app must support touch input to be certified, but this is usually handled by the controls you use to build the interface. More importantly, your application must not violate conventions for visual elements, including the bottom app bar and top navigation panel. Your app isn't required to use these elements, but if it does, it must use them correctly. For example, the app bar has to appear with a bottom swipe.
These requirements are easy to meet. One that's a bit harder is that your app must support a snapped view. This usually means special design for the view that is shown in the snapped view. Chapter 13 covered an example.
Performance Criteria
As you might expect, your app can't lock up. But it also can't run too slowly. The current certification criteria, for example, specify that the app has to start up in five seconds or less, and suspend in two seconds or less, even on a low-powered computer.
General Requirements
Some requirements are open to interpretation by the testers at the Windows Store. However, for the typical business application, it's unlikely an application would fail certification for such requirements.
Provide Customer Value
There are several listed requirements about providing value to the customer. Those requirements mean your app has to actually do something worthwhile, which means you probably won't be able to deploy a “Hello, World” app to the store. Also, if your app has a trial version, it has to look and act a lot like the full version.
There are a number of requirements that apply to any advertising you place in your apps. There are certain parts of Windows 8, such as the app bar, where you are not allowed to place ads. And of course, there are content policies prohibiting inappropriate ads.
Privacy and Consent
A number of requirements detail what you must do if you collect personal information. Certain privacy guidelines must be observed by your application.
Windows Store Apps also have some restrictions on the content they can access and display. As you might expect, there are restrictions on adult content, and on content that is discriminatory. Given the proclivities of some developers, it's worthwhile to mention that excessive or gratuitous profanity is not allowed. The Windows Store includes an age rating system, and your app is required to have an age rating that accurately matches your app.
. The Visual Studio 2012 menu for working with the Windows Store
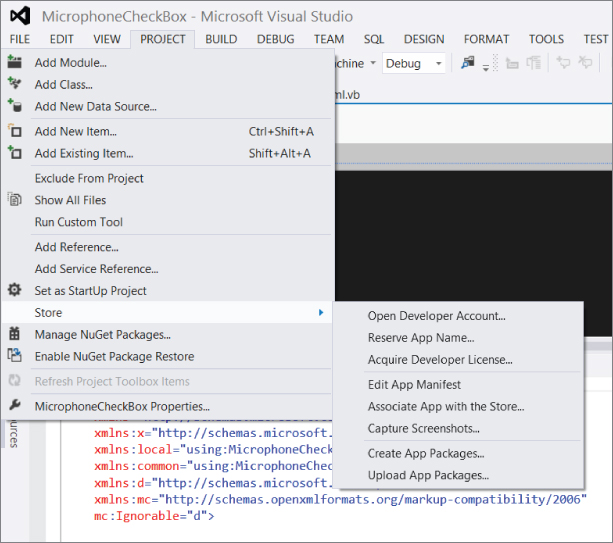
Options on the Store Menu
The Visual Studio 2012 menu for working with the Windows Store

You saw earlier in the chapter the first option on the Store menu, which is used to get a Windows Store account using “Open Developer Account…” Other options cover additional steps in the process of testing and deploying the app. Some of these options link to the Window Store Dev Center, which includes options for configuring your apps in the Windows Store.
For example, one of the earliest options you'll want to use if you intend to sell an app is “Reserve App Name…” That will open a browser window with the title “Submit an app” and several options associated with submission. The top option is “App name.” The window is shown in .
Options associated with submitting an app to the Windows Store
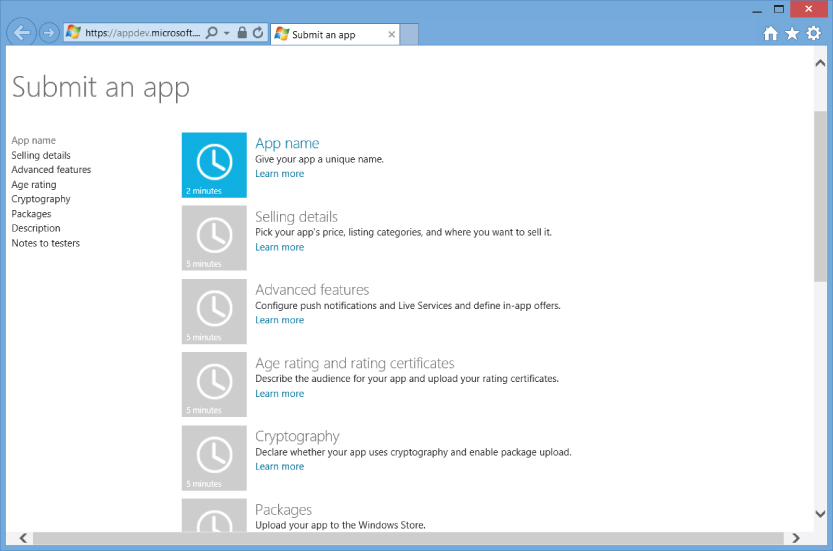
Most of the options on this screen are easy to figure out. For example, the App name option simply requires you to enter a name you intend to use, which should be a unique name for your app. The reservation on the name is good for up to one year. Therefore, if you have a clever name you intend to use and can't develop the app right away, you should go ahead and reserve your name. You can also reserve a name at the point that you create an app package.
Since most of the options are straightforward, the details will not be discussed here. You will see the last option, Packages, discussed later. It is used to upload your app the Windows Store.
The “Capture Screenshots…” is the recommended way to capture screenshots used in the Windows Store. At least one screenshot is required for an uploaded app.
The last two options on the menu are both quite important. They allow you to create an app package for testing or to upload to the store, and to upload the app package to the store.
Creating an App Package
After you have finished much or all of the functionality of your app, you will want to test it to see if it meets Windows Store requirements. This requires that a package be created for the app using the Create App Packages menu option.
The first step is to reserve a name for the app, unless you have done that previously. The dialog will show you the names you have reserved and allow you to choose one. The dialog is shown in .
Choosing an app for which to generate a package
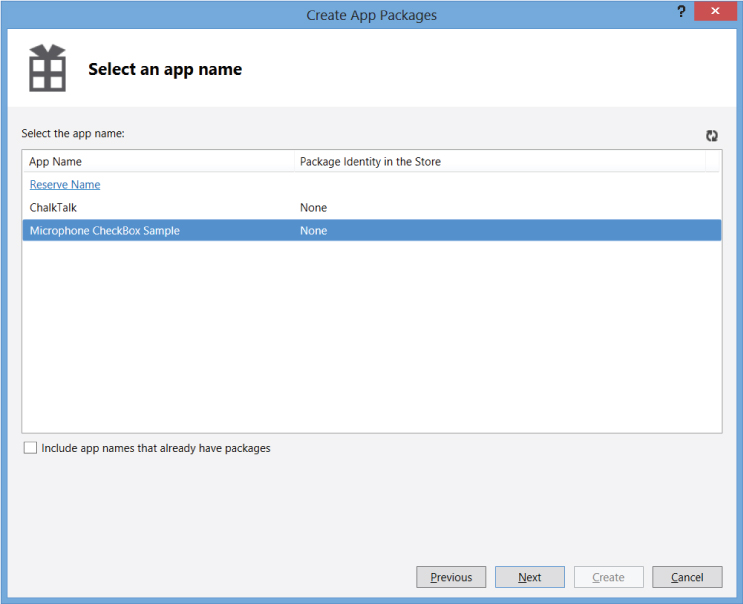
In the next step, you'll supply a version number and specify the architectures you want to support. That's usually Neutral, unless your app has special needs or features that tie it to a particular platform. After supplying that information, press the Create button, and your package will be created. The resulting screen will look much like .
The dialog that displays once an app has been packaged
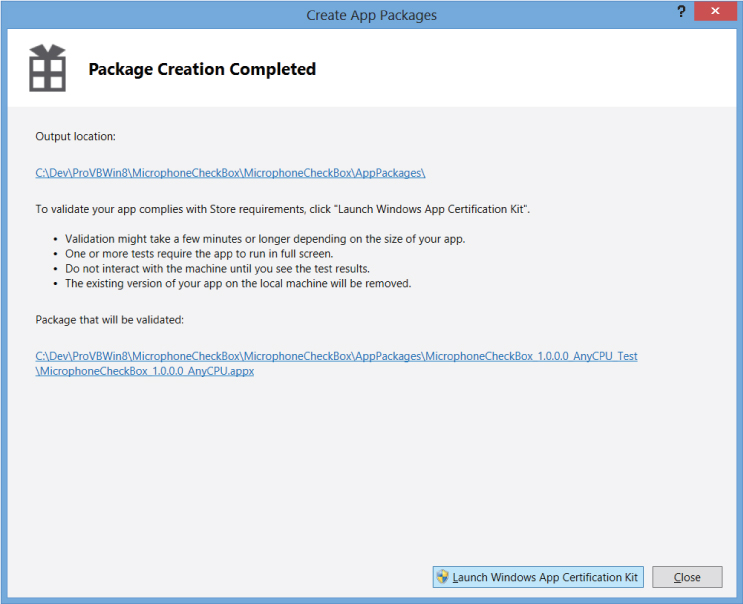
In addition to a Close button, the dialog also contains a button that says “Launch Windows App Certification Kit.” This is one way to launch the app that checks to see if your app meets Windows Store requirements.
Checking to See if an App Meets Requirements
The software used to check your app to see if it meets requirements for the Windows Store is the Windows App Certification Kit. It is part of the SDK for Windows 8, and is installed automatically as a part of a Visual Studio 2012 install.
Before an app can be tested, it must be packaged and deployed on the local machine, as just shown. As mentioned in chapter 13, the app must be based on an appropriate template so that it contains the items needed to be packaged, particularly the application manifest.
If you wish, you can start the Windows App Certification Kit as soon as your app is packaged, as shown in above. The app that was just packaged will automatically become the app to be validated.
You can also start the kit by accessing it directly from Windows Explorer or the command line. The default directory that contains the kit is one of the following directories, depending on whether you have a 32-bit version of Windows 8 or a 64-bit version:
C:\Program Files\Windows Kits\8.0\App Certification Kit C:\Program Files (x86)\Windows Kits\8.0\App Certification Kit
The executable is appcertui.exe. If you navigate to the above directory and run that executable, you will get a screen asking you what kind of app you want to validate. In this case, you're only concerned with Windows Store Apps, which is the first option.
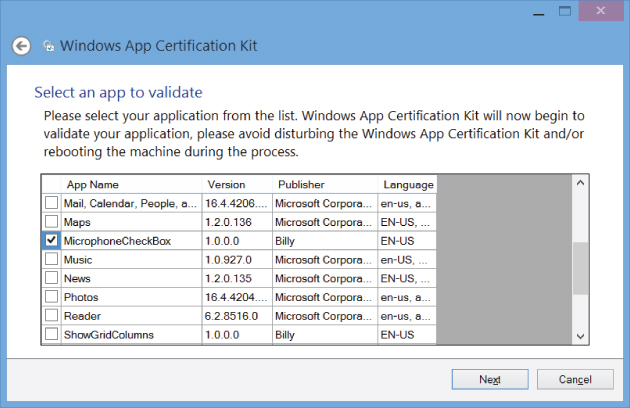
The program then scans the system to find all the Windows 8 style apps. It presents a list and allows you to choose the app you want to check. That list looks like .
Choosing the app to be validated by the Windows App Certification Kit
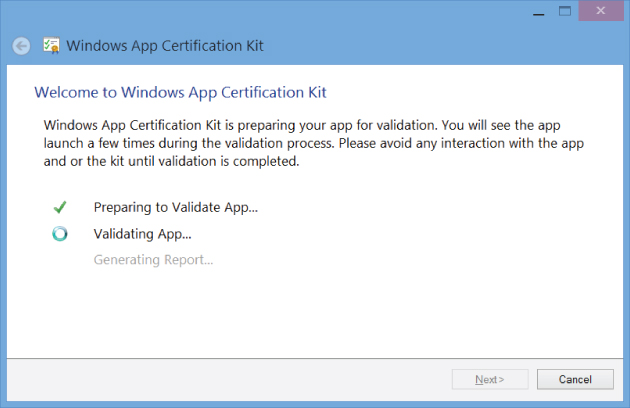
Once you start the validation process, it's best to leave your machine alone while it's going on. You'll see a progress screen that looks like , but it will be replaced from time to time with the app being checked, and you're not supposed to interact with the app during the validation process.
When the validation process is finished, you'll see a screen indicating whether the app has passed, and a link to a detailed report. Remember, the validation process doesn't check everything the Windows Store requires. A “Hello World” application will pass the Windows App Certification Kit tests, but it doesn't deliver any value, so the human testers at the Windows Store will likely turn it down.
Deploying the App to the Windows Store
Once you have an app that has passed the Windows App Certification Kit tests, you are almost ready to upload the app to the Windows Store. However, you need to carry out several preliminary steps to configure the app in the store, and then do the actual upload step.
If you select the Project ⇒ Store ⇒ Upload App Packages option, you'll get the same screen you saw in . You'll need to step through the unfinished options there, probably starting with “Selling details.” As mentioned earlier, these steps are straightforward, and this chapter won't cover the details.
The progress screen shown during app validation
By the way, it isn't necessary to complete all these steps at once. You can do each step at a different time if need be.
Once you have completed the steps shown on the submission screen for your app, your app will be vetted by the Windows Store, and you'll be notified when it is in the store and ready for other people to get it.
Your main interaction with your app in the app store from this point is using the Dashboard. It contains the apps you have placed in the store, and those in the process of being put in the store. shows the Dashboard.
The Dashboard for a Windows Store account
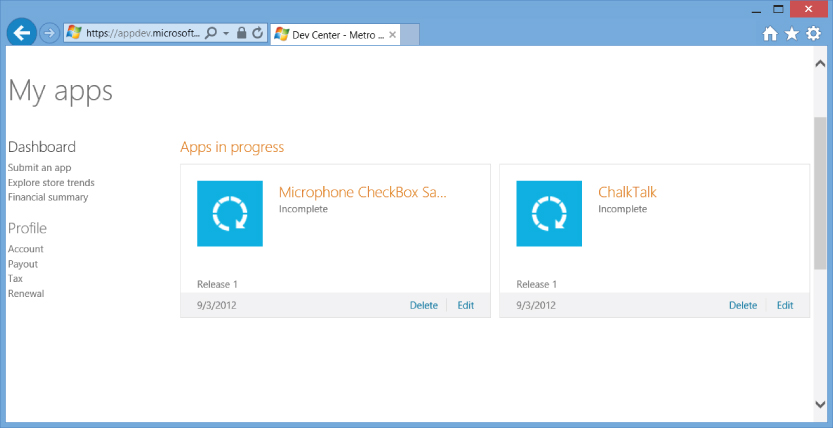
The Dashboard helps you see metrics for how your app is doing, including a financial summary. It also lets you delete or edit an app.
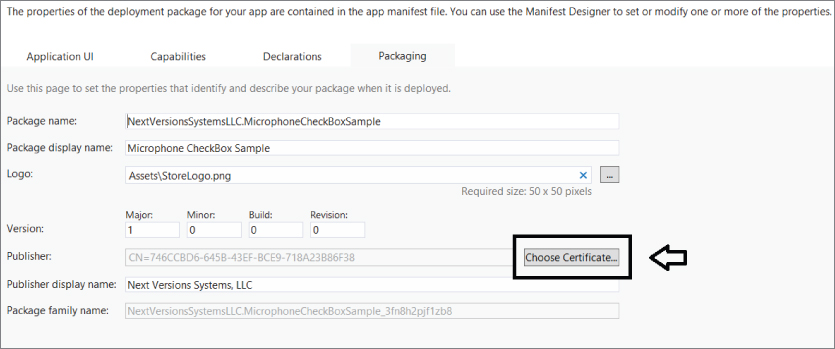
. The dialog contains a button with “Choose Certificate…,” which is highlighted in . Preparing Client Machines for Side-loading
Once your app is signed and you have located the packages for any dependencies of your app, the next step is to prepare the Windows 8 client machines that will receive the side-loaded app. There are two requirements for client machines that need to receive side-loaded apps:
HKEY_LOCAL_MACHINE\Software\Policies\Microsoft\Windows\Appx\AllowAllTrustedApps = 1
Selecting a different certificate for signing the app
There is one last requirement, but it varies based on which version of Windows 8 is in use on the client machine and whether the client machine is on a domain. For Windows 8 Enterprise Edition and Windows 8 ARM Edition, if the machine is on a domain, the client machine is ready for side-loading. For other editions, or for client machines not on a domain, a script must be run on the client machine. At the time this is being written, the script and the process for running it is not yet available.
The Side-loading Operation
Once the prerequisites for the client machine are accomplished, the actual side-loading operation is simple. From a PowerShell command prompt that is started with “Run as Administrator,” just use a command similar to this:
add-appxpackage C:\MyDeploymentDir\MyAppName.appx
The .appx package is the one that was generated during the earlier packaging operation. The same command is also used to deploy updates.
Summary
The Windows Store represents a huge shift in application deployment. The process is far more complex and restrictive than older deployment options. You must follow carefully prescribed guidelines for your application to be considered valid for placement in the Windows Store.
However, the benefits are major. The Windows Store provides the infrastructure to locate, deploy, and update an app once you have placed your app in the store. That reduces your responsibilities, and gives you a lot of instrumentation that you likely did not have with earlier options.
And, of course, the threat of malware is significantly reduced. Even for applications that do not go through the Windows Store, the process requires a level of trust via certificates that will be hard for malware to routinely overcome.
This chapter has told you the basics, but given that the Windows Store is rather new, you can expect evolution and refinement of the process in short order. Once you understand the concepts, you'll want to invest some time in online resources to be aware of changes over time.

