Книга: Linux Command Line: An Admin Beginners Guide
Назад: The Command Line - More Advanced Commands
Дальше: Important System Management Commands
Searching
Wildcards
In Linux, "wildcards" are symbols that can substitute for other information when performing a search. Three wildcard symbols are used quite frequently in Linux, each with their own unique functions: the star wildcard * or asterisk symbol; the question mark wildcard or ?; and the square bracket wildcard or [ ].
| * | Match one or more preceding terms |
| . | Match one instance of any character except newline |
| ? | Match zero or one of the preceding character |
| [ ] | Match a character in the set |
The Star Wildcard -> *
The star wildcard, or asterisk symbol, is used to match one or more instances of any character when searching for information. For example, if you type ‘find . -name "my_test*"’ in the terminal and press Enter , your search results will list all files that start with my_test in the directory in which you are currently working.
The Question Mark Wildcard -> ?
The question mark wildcard, or ? Is used to match one character in the search. For example, if you wanted to search for every instance of a file that was only five characters long, you would type, find . -name "?????" and press Enter . Note the difference between ? and * - the * matches 1 or more characters while the ? only matches 1 character.
The Square Brackets Wildcard -> [ ]
You can use the square brackets wildcard, or [ ], to search for specific information contained in filenames or directories. For instance, if you wanted to find every file in a specific directory that started with the letter "a," "b," or "c" in lowercase, you could enter, ‘find . -name "[a,b,c]*"’ into the command prompt. The brackets match a, b or c while the * covers any other characters in the name. If you only wanted the file named a, b, or c, you would use ‘find . -name "[a,b,c]"’ and only those characters would be matched.
Many other things can also be done with the square brackets wildcard command, such as finding files within a certain range, or even sets of ranges. For instance, if you wanted to search for every file that began with a letter, you could type, ‘find . -name "[a-z]*"’ and press Enter . The search results should yield a list of every file that has a name that starts with a lowercase letter.
Exercise:
Use the star wildcard * to find every instance of a file containing a certain word in your Desktop folder.
Try using the question mark wildcard ? to find every instance of a file with a certain number of letters.
Use the square brackets wildcard [ ] to find every instance of a file that starts with the letter "a."
Pair these three wildcards with three commands you learned in this chapter. Record your findings in your notebook.
#
locate
To use the locate command to find a file, type locate and the name of the file you want to find; then, press Enter . The search results should list the directory and path in which the file is found.
Example:
Let's pretend you are searching for a file that you named "codewords2019.txt", but you can't find all of them. Using the locate command should find that file for you while also giving you their directory path, so you can access and modify it without looking through a bunch of unrelated files.
Explanation:
The locate command helps you find instances of a file name and may be useful if you have multiple files of the same name and do not know how to access them. Using it will result in a list of files that contain your keywords and the paths associated with the listed files.
Exercise:
Create a file or search for one already created using the locate command. Record your findings in your notebook.
Regular Expressions:
If you need to narrow down your search, you may be able to do so by using regular expressions such as grep. We will be covering these wildcards later in this chapter.
#
find
The find command can be used like the ls command to search for all files in the current working directory. Just type find and no other arguments. You can also type in the direct path if you want to have it list other files in another directory.
It can also be used for other things, such as what the next few sections will cover.
Searching for Files
Usage: find <path to start searching from> -name <name to search for>
You can search for files with a specific name as follows:
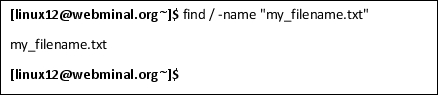
Will find all the files named "my_filename.txt" in the root directory. This command becomes very powerful when paired with wildcards.
This command can also be used to search for files of a specific type. Type find -name "*.[the type of file you want to be found]".
For example, if you want to see all of the ".jpg" files in the current directory and subdirectories, you would type, find . -name "*.jpg" and Enter

You can also use this command when searching for files that are not of a certain type. For example, if you entered find . -not -name "*.jpg", you would get a list of all files that are not .jpg files.
Exercise:
Use the find command to locate a list of files of a specific type. Write down the file you want to use in the next part of this exercise, then copy the absolute path of the file in case you need to enter it.
Next, search for that specific file. Was Linux able to find it? Record your findings in your notebook.
#
grep
The grep command is the global regular expression parser and it looks for a pattern in a file. To use it, type grep followed by the command or string you want to find, as well as the location you want it to search for the command or string.
For instance, if you wanted to find all files in a particular directory starting with a specific word or letter, you could use the grep command by typing “grep [name of the file you want to find] [name of the directory where you want to find it]”.
If you wanted to find user information for a user named James, you could type something like the following and get the resulting print out.

Explanation:
grep stands for "global regular expression parser," and the name comes from when software was simple and one of its main concerns was saving space.
Exercise:
Use grep to search for a word. In this scenario, we will be searching for every file with the word "photos." Type grep -w "photos" file, then search for a file you have that starts with a certain word using the "grep " command. If you don't have a file, either rename an existing file or create one with the touch command.
Next, search for one of the users on your computer or network; if you are using a virtual machine, that might be only you. In that case, search for your username. Record your findings in your notebook.
Archive And Compression
tar
In Linux, tar stands for "tape archive." You can use this command to create archive files and compress and store data, so it takes up less space on your drive. Just type tar , choose the option you want to use, name the file, and decide where you want to store it.
In this example, let's say you wanted to create a tar file named "abc" and from the directory called "docs." To do this, you would type something like tar abc.tar usr/home/docs. If you did it correctly, you would have a .tar file called "abc.tar" that includes the contents of the docs directory in the current directory.
Explanation:
The tar command helps you save space, which can come in handy if you have a computer or network with limited storage space due to usage as a server or multi-user machine or network.
Exercise:
Create a new file using the touch command, then change it into a .tar file.
#
gzip
The gzip command zips a file, and you can use the gzip command in a similar way to the tar command. Like tar, it is used to compress or expand files. To use this feature, type gzip and the filename into the terminal, then press Enter .
By default, the gzip command deletes the original file once it creates the zipped version. You can prevent this, however, by typing -k before the filename. For example, if you did not want Linux to delete the original file, you could type “gzip -k filename”.
Exercise:
Create a zipped text file using gzip.
#
zcat
If you want to read files that were gzipped without unzipping them and potentially wasting time and space in the process, you can use the zcat command. This command will allow you to read gzipped files from the terminal. To use it, type zcat and the name of the gzipped file you want to have a look at. Then, press Enter .
If you've done this correctly, you should be able to view the contents of the file from the terminal without having to uncompress the file.
Exercise:
Read a zipped text file without unzipping it first using the zcat command.
Useful Commands
wc
The wc , or "word count," command counts the number of words, letters, and lines of the information it is told to count. To use it, you would type wc and the name of the file or directory in which you want the word count performed.
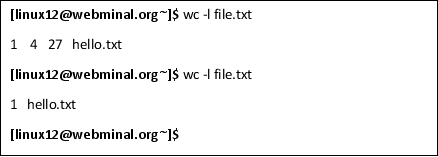
For example, let's say we wanted to get the word count of file1.txt. We could type “wc file1.txt”. The results should give us three numbers--the first is the number of lines, the second is the number of words, and the third is the number of bytes. If you only wanted to know one of these things, you could use other options.
We can also get the number of lines by typing “wc -l file.1.txt”.
Replacing the -l in the previous example with a -w will give you just the word count.
Replacing the -w with -c would give us the number of bytes.
You can also use the --help command for a list of even more options.
Exercise:
Find the word count, number of lines, and number of bytes of a file of your choice. Try to use a different file than the ones you've used for previous exercises.
Compare the word count of two different files, then write your findings in your notebook.
#
history
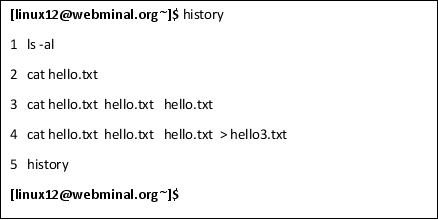
Linux allows you to view the commands that have been typed in the terminal previously. Type history and press Enter to see the command history . By default, Linux will list the last 500 commands you typed into the terminal. You can even combine this command with other commands, such as the tail command, to make it more useful.
Sometimes you may need a reminder of how exactly to write a command. Instead of looking them up all the time or memorizing them, you can use Linux's built-in features to make that process much easier. Some commands, such as the help command, the man command, and the history command, all fall into this category.
Entering the history command allows you to view the past 500 commands you entered into the terminal, which will come in handy if you don't remember exactly what you typed and don't want to or can't afford to waste time looking it up on the Internet.
You can also find recent commands by pressing the Up arrow key .
Exercise:
Use the history command to display your last 500 commands.
Next, jump to the Magic of Piping section and the use piping with another command you learned earlier in this chapter to make the history command display only the last 25 commands you used. Write down which commands you entered in the Linux terminal to make it work.
#
tree
Do you remember using the tree command earlier in this book? You can use the tree command if you want to know what subdirectories and files are contained in the folder in which you are working. Type tree into the command line, then press Enter .
This may remind you of the ls command, but it is much more detailed, as it shows not only each folder a directory contains but also each program file contained inside those folders as well.
Exercise:
Use the tree command to generate a detailed list of files and folders in your current working directory. Then, do the same thing using the ls command. Write how they are different in your notebook. What might you use the ls command for that you would not use the tree command for? What might you use the tree command for that you couldn't use the list command for?
#
alias
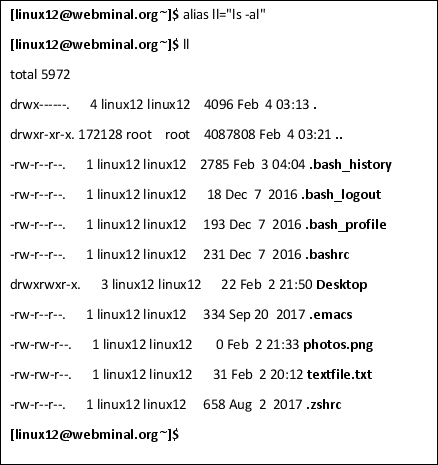
This is a shortcut for commands that you use frequently. Some people use an alias to change the default behavior of a command. For example, we could assign an alias to the remove rm command so that it asks us to confirm the deletion of a file (the rm -l where that is a lowercase L not a #1). To use the alias command, just type the new command you created.
Example:
A common alias is ll which will call the ls -al to show all files in long-form.
Don't worry about messing anything up; your custom commands will not be available in your next session unless you edit your shell configuration profile.
You can look up how to edit your shell configuration profile, but make sure you are well versed in Linux programming and commands before you do that, as it is not a task that is recommended for beginners.
It is possible to mess a few things up when creating custom commands, so be careful and don't opt to make them permanent until you have tested it and know it works.
Exercise:
Create three custom commands and then run them. Record your findings in your notebook. What were your commands, and what did they help you do? What potential uses do you see for setting aliases in the future?
#
curl
The curl command can be used to download files from the internet using the terminal in the absence of a GUI. To use this command, type curl, the option that you want the machine to perform, and the URL of the information you want to retrieve. You can also use the curl command to upload files to the Internet.
Example:
If you wanted to download a picture of the Biggest Ball of Twine using the curl command, you would enter

Doing so would download a file of the same name as the file you typed in.
If you want to use curl to view the content of a website, type curl [site whose file content you want to view]. The result should be the HTTP source code.
To upload a file, you can type "curl [file] [upload address]." For example, if I wanted to upload a file called "photos" to a local server called "server," I might type,

Exercise:
Download a file and save it on your desktop using the curl command.
View the contents of a website of your choice using the curl command.
Write your findings in your notebook.
#
diff
The diff command compares two similar files and prints out the parts that are different, making changing the files to where they are identical much easier. This command is easy to use -- just open your Linux terminal and type diff, then the name of the two files you want to be compared, separated by a space. For example, you can type diff file1 file2
#
cmp
If you want to compare two files byte by byte, you can use the cmp command. Unlike the diff command, this command will print out which bytes and line numbers are different in the files being compared.
Exercise:
Practice using the diff and cmp commands.
For the diff exercise:
Open a word processing program on the GUI and make a short list of items. Then, save it as a .txt file and copy the list. Paste it in another document on the word processing program and change one word. Name these files something recognizable, and then go back to the terminal.
Example:
| Document 1 | Document 2 |
|
|
|
|
Type diff into the terminal and enter the names of the two files you created. The results should print to the screen at the terminal. Record your findings in your notebook.
For the cmp exercise:
Open another word processing document on the GUI and make two documents, each with a shortlist of the same items. This time, don't change any of the text in one of the documents except for one number on the list. You should have two nearly identical documents, except one with a different number on the list.
Example:
| Document 1 | Document 2 |
|
|
|
|
Run the cmp command and record your findings.
#
which
The Linux which command can aid you in locating where your important programs are installed by providing the absolute path of the file. To use this command, type which , followed by the name of the program you want to find. For example, if you are looking for the path and directory where the executable file for the internet browser "Firefox" is stored, you would type “which firefox” and press the Enter key in the terminal.

The directory and its path should print to the screen, which should look something like /usr/bin/firefox. We can also use this to find multiple files by typing which followed by the name of each file you want to locate, separated by a space. For example, entering which firefox gimp would give you the paths and directories of both the Firefox internet browser and the Gimp photo editing program.
Exercise:
Use the which command to locate a file you created in a previous exercise, then write down the results in your notebook.
#
ping
The ping command lets you check whether or not a remote host is responding. Just type in ping , followed by the URL of the website you are trying to reach. For example, if you wanted to ping Google, you would type, ping www.google.com.
Exercises:
ping a website of your choice. Use the Ctrl+c keyboard shortcut to escape the loop, then record your findings.
Help Commands
man
If you type in man in the terminal followed by the command you want to be described, you'll get a list of uses for the command. For example, if you typed man touch, you would get a list of uses for the touch command. This comes in handy if you need to know what a command is in a pinch and don't have time to look it up.
Typing man for the manual page command will give you a lot more information about the command you may want to use, including syntax for executing successful versions of the command you want to use. You will also get information on what the command does.
Exercise:
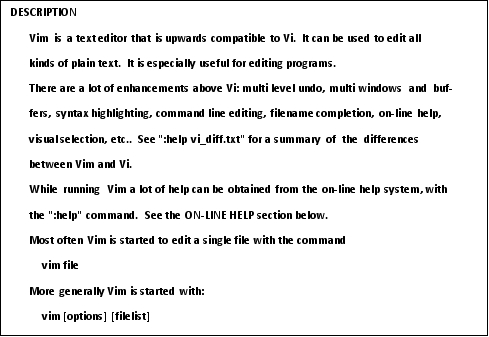
Look up the man vim command by typing “man vim” at a command prompt. You should get something like below:
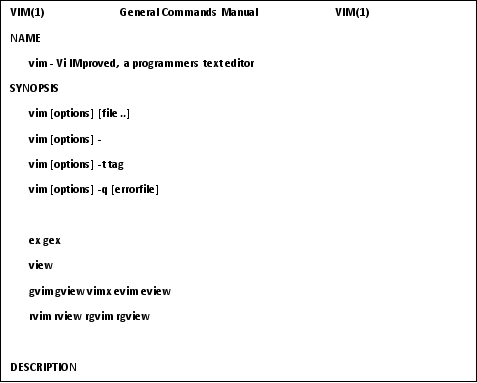
And the Description follows the above:
Further Explanation:
man pages = manual pages
Back when programming was just beginning, remembering a certain command syntax wasn't as easy as hopping on the Internet and looking it up. Linux was created from Unix and computers were around before the Internet was widely available. It made more sense to build a list of command explanations into the system itself.
Since this system was invented before internet access and reliable search engines were available, the man command provided the user with a convenient way to look up information about different commands.
Today, man pages are still useful, especially if you are working in a terminal that has no GUI and is not connected to the internet. No matter where you are, you can still get help finding the proper commands and what they do.
If you are unsure of how to use a certain command, type man, then the command that you are having trouble with a space in the middle. An explanation of the command and how it is to be used will show up on the screen.
Type clear if you want the terminal to stop displaying the man page text.
#
help
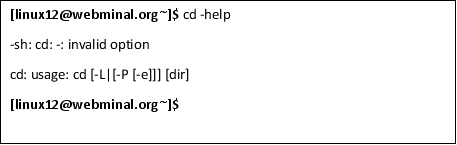
The help command functions like the man command and it can sometimes be used to find options to use with commands. The help command can also remind you how a command is supposed to be used. To use it, type the command and then -help. For instance to see the help for cd, type cd -help
The Magic of Piping
Let's talk a little bit about piping, revisit grep, and go over the various options that can be used with this helpful command.
If you've ever browsed a Linux help forum, you might have come across people talking about "piping" certain programs. It's not a complicated process that only computer programmers can master; in fact, piping isn't much more complicated than any other Linux command.
One important aspect of Linux command lines is the ability to "pipe" commands. I personally consider this Linux's greatest strength.
The Unix philosophy is to have each program do one thing well. Piping creates a small chain of commands. The output from one command is used as input for the next . For example, if you searched for all of the .doc files in a certain directory, then directed Linux to grep those files to find the desired string, that would be an example of piping.
Piping can be described as the process of redirecting standard output to another command, program, or process to be worked on further. Let's say you want documents sorted, but you only want to sort the ones that have "cheese" in the title. You may consider using a pipe command to help you give those instructions to the terminal.
Let's make a simple piping command.
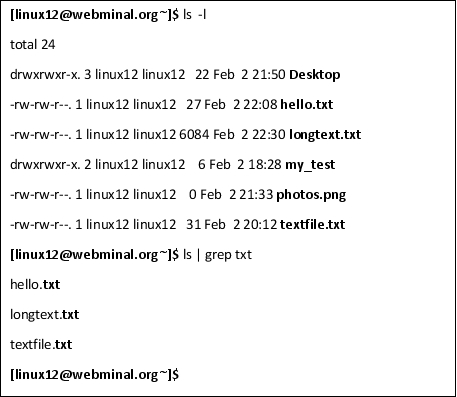
Find the "| " key on your keyboard--it is usually Shift+\ . This is the symbol you will use to create a piping command. Open up your terminal and type the following: ls | grep txt. Write your findings in your notebook.
Exercise:
Create your own pipe and enter the command in the terminal. Write down your findings in your notebook.
Chapter Summary
- In this chapter, we covered more advanced Linux commands, including searching using the locate, which, and find commands. We also learned about the grep command; how to find the word count, line count, number of bytes; and how to use wildcards.
- We also covered other useful commands, such as zipping files, history, tree, alias, curl, diff, cmp, and pinging.
- We also covered some helpful commands, including man and the help commands.

