Книга: Linux Command Line: An Admin Beginners Guide
Назад: What is the Linux Filesystem?
Дальше: Chapter Summary
CHAPTER FIVE: The Linux Command Line - The Basics
Everything in Linux, from your root filesystem to your programs, is stored as a file or directory. In fact, even a directory is a file. To gain full access to the files in Linux, you may need to learn how to use the command line. The command line is a more powerful way to access files than the GUI and often gives the user more options than using a GUI interface.
To review, a GUI (Graphical User Interface) is the screen that is displayed that contains clickable icons to access the programming files you need. Most everyday functions can be carried out using the GUI in most versions of Linux. However, to become a Linux power-user, you must learn to use the command line for more flexibility and control over the filesystem and programs. The command line is sometimes called the line user interface , or LUI . It is most commonly referred to as the command line interface or CLI . In this chapter, we will be covering some basic commands to help you get more comfortable with using the CLI.
There are multiple ways to do these exercises on a computer. You can run a complete Ubuntu installation in VirtualBox as covered in Appendix A. Ubuntu can also be run from a bootable Live USB image but you won't be able to jump back and forth between Ubuntu and Windows/Mac like you can with the VirtualBox installation.
Another option is opening up a virtual terminal emulator in a browser. To find terminal emulators, try searching for "virtual Linux terminal online". I actually like using webinal.org because the terminal starts at a user-mode prompt (~) instead of a root user mode prompt (# - explained in more detail below).
One good resource with a list of virtual Linux terminals was https://itsfoss.com/online-linux-terminals/
Before we begin, this would be a good time to grab a pencil and a small notebook to take notes. You are more likely to learn by actually doing the exercises and taking careful notes. Some of the commands listed can seem somewhat similar if you are just starting out. Recognize that memorizing all of these commands can take time, so slow down and work smart. Take notes to prevent yourself from feeling overwhelmed, as the human mind can only absorb a little bit of information at a time. To successfully learn something, you should break the information up into small chunks and not try to cram it in all at once.
Alright, with our pencil and notepad ready and the computer on, let's get started.
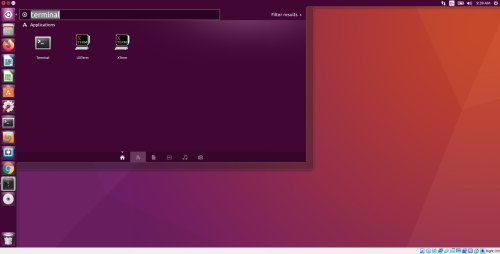
We will be using Ubuntu in our examples. To get started, open up a terminal. As shown below, you will search for Terminal and then click on it.
The Terminal application should look like this:
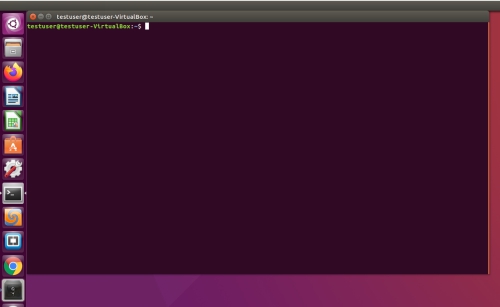
Open up a terminal - you should see something like username@machinename~$.
The dollar sign, $, is used to denote user mode. It differs from the pound sign or hashtag #, which is used to denote root user mode. Remember that you do not get access to the root user directly in Ubuntu; you have to type in sudo, which is the command to access the root directory, and then your command. We'll talk about how to do that in another chapter. For now, let's focus on some basic commands.
The Command Line - Basic Commands
| Command | Description |
| pwd | Print Working Directory |
| cd | Change Directory |
| clear | Clear the terminal |
| ls | List Directory |
| file | File characteristics |
| mv | Move a file or directory |
| cp | Copy a file |
| mkdir | Make Directory |
| rm | Remove a file |
| rmdir | Remove an empty directory |
| touch | Create an empty file |
| cat | Concatenate a file (dump contents of result) |
| echo | Echo the contents to the terminal |
| less | Display the contents of a file |
| head | Display the first 20 lines of a file |
| tail | Display the last 20 lines of a file |
Command Options:
Sometimes you can add options to commands to make them do different things. For example, you could add -b to your file command to display a brief version. This may come in handy if all you want to know is the file type in brief mode.
When combining this command with options, use the syntax: file [option] [filename]. For a complete list of options, see the man command, or manual pages by typing man after the command (ie file man) into the terminal. You may also be able to use the --help option such as ls --help
#
Basic Navigation
The following commands are used to move around in the filesystem.
#
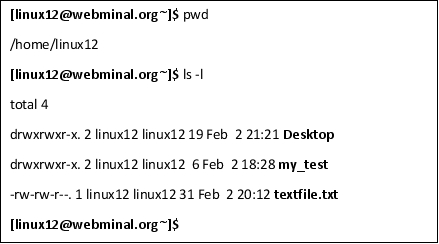
pwd
pwd stands for "print working directory," and when this command is used, it will print the full path of your present working directory on the screen. To use this, just type pwd and press Enter . You should get something like, /users/files/namedfolder.
Example:
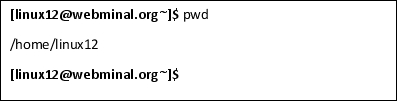
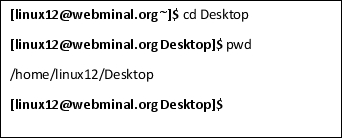
In the example above, the present working directory is /home/linux12 because we're logged in as the user linux12. We could have guessed this from the ~ in the bracket path. We can also see that we're in user mode because of the $ at the prompt.
Explanation:
Linux systems may require you to enter very specific commands to receive the results you want. The folder you are working in matters when determining whether or not these commands are successful. A program isn't going to assume you have access to anything other than your current folder. But sometimes you may not be sure where you are and the pwd command lets you know where you are. In this case, we're in one of the bedrooms of the Linux house.
#
cd
This command stands for "change directory." To change to a lower level directory than the one you're already working in, type cd, press the Spacebar and then type the name of the directory to move to. Let's say we're trying to access a folder called "my_test" in the current directory. We would type cd my_test, and then we would press Enter .
Doing so is a request to find "my_test" in the current folder. Those not familiar with navigating files and folders in Linux may think that relative commands do not work and the only reliable way to access files and folders is by typing in the absolute path, such as cd misc/var/web. While Linux does recognize relative commands, there is a slightly different syntax.
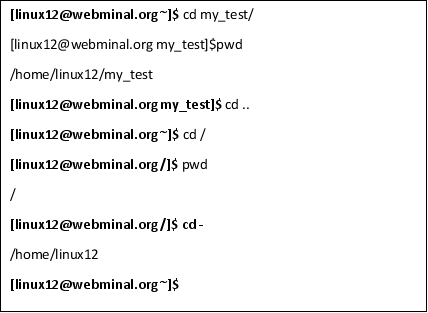
Example
Explanation:
A lot is going on in the example above. We move into the my_test directory and print the working directory to make sure we are where we think we are. The ".." means the parent directory so the "cd .." takes us back to the home directory where we came from. We then change into the root directory and confirm our location. The - is used to take us back to the last directory we were in so the "cd -" takes us back to the home directory.
A lot of tutorials on the internet about using the Linux command line may make the process appear more complicated than it really is. A person new to using the command line and unfamiliar with using relative commands may make the mistake of typing out the full path every time he or she tries to execute a command. You don't have to do this.
Remember that Linux uses a different kind of syntax than Windows. For example, typing / before the folder name is like asking it to find a folder in root. If the folder is not in root, you may receive an error message. Likewise, if you try to find a folder in ~, or home, and the folder is not in that directory, you may also receive an error message.
Use the pwd and the cd commands to move around and understand the filesystem structure.
Example:
Let's go from your home, or ~, folder to your Desktop folder on the command line. Just type cd Desktop into the command line and press Enter . You should now see something like this:
To go back, type cd $HOME, or cd ~ ($HOME and ~ represent the same home directory in this context). Both of these will take you back to your home folder. You should now see something like below:
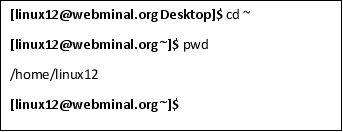
Do you notice how the directory is different from when you were in your Desktop folder?
Exercise:
Open the command line on your Linux device or virtual machine and type, ls. This should bring up a list of files and folders on your device. Next, use the "change directory" command. Type, cd, press the Spacebar , then type and the name of a folder you would like access to. For this exercise, let's use, etc. To ensure you've gone to the correct directory, use the pwd command, which will be explained below.
#
Files Types & Organization
When using the command line, you may want to check the specifics of a file. Is it a file or a directory? Is it a text file or an executable?
#
clear
When you are typing commands into the terminal, it can often become quite cluttered, especially if you've recently downloaded new software using the command line. When the screen gets cluttered, it can make it harder to focus on your next command. The cluttered commands can also get in the way of commands you want to implement later. Although using Escape , Delete , and Backspace will not work to remove your old commands, you don't necessarily have to close the terminal and open a new one if all you want is to clear the screen.
Just type, clear into the terminal after the $. The screen should clear itself, and you should be able to resume typing commands onto the screen.
#
ls
You can use the ls, or "list" command, to display files in the current working directory. Remember that the current working directory is the directory on your current command line that you are working with. As you move into a new directory, that becomes your current working directory.
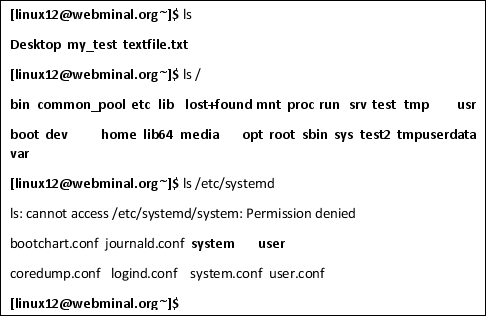
Type ls to have a list of files generated. The ls by itself command lists all the files in the current directory. However, if you put a path after the ls, you can list the files in any directory.
Type ls / to see the files in the root directory or ls /etc/systemd to see the files in the /etc/systemd directory
Example:
Helpful Options
The output of the ls command isn't very helpful. 3 values are printed out on the same line. There are 2 of these values in bold (Desktop and my_test) to signify a directory. Many options can be used to tailor the ls command to your needs. We will only cover a few of the most used options but you can see the entire list by typing ls --help (there are a lot of options so I won't capture them here).
-l : long listing format (this is a lower-case l and not a #1)
-a : list all the files including hidden files (preceded with a .)
-s : Sort by size
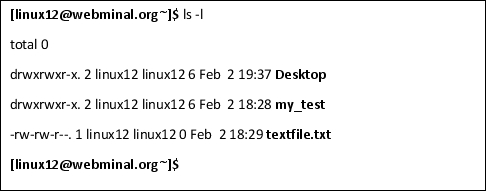
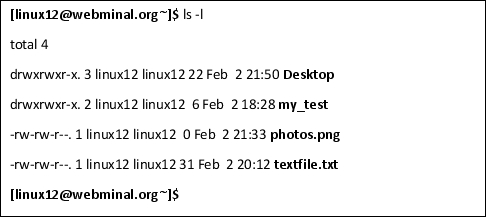
A better way to display the current directory is with ls -l because it gives much more useful information.
Example:
Explanation
See how this is much easier to read with each file on a different line? Notice the "d" in the left-hand column of Desktop and my_test is used to indicate a directory. Also note the modification timestamp of the file - which was February 2 at around 6pm.
We will discuss the rwx fields at a later time.
To see the hidden files in a directory, type ls -al to show everything in the directory in long format.
Example:
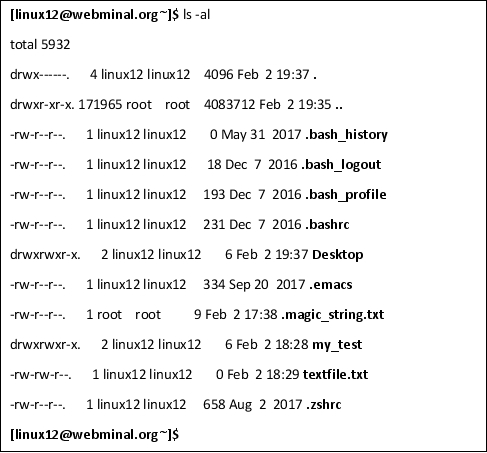
Explanation
Notice the files with the “.” preceding the name. This indicates a hidden file. At the end of the Linux Basic File Directory chapter, we discussed the . which indicates the current directory and the .. which indicates the parent directory and are shown at the top of the dump. They both have a d indicating they are directories.
#
file
Use this command to have your computer tell you a file's type. All you have to do is enter the file followed by the name of the file of which you want to know the type. The file command can be helpful when you aren't sure how to handle a specific file. Let's say you've saved several different kinds of files under the same name (my_name.png, my_name.txt, and my_name.pdf), or you need to help rewrite a specific file on the system, but you aren't sure what kind of file it is. You can use the file command to help you figure that out.
For example, if I wanted to know what type of file "file textfile.txt" was or even what the cd command was, I would need to type the following into the terminal.
Example:
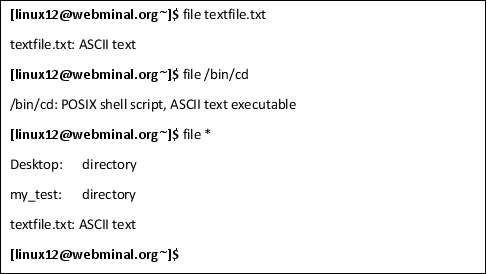
Explanation:
The file command tells us the textfile.txt file has ASCII text which is just text like you are reading. However, the cd command used to change directories is a shell script made from ASCII text which is executable. As discussed in the Linux Basic File Directory chapter, the /bin directory is the kitchen and holds the common Linux command line programs we'll be running.
You can also use this command to find all of the files in your current working directory by typing file *. The asterisk, *, signals to the machine that you want it to show you the file characteristics of everything that Linux considers a file in the current directory.
#
Manipulating Files in Linux
These commands are used to manipulate files including create a directory, move, copy, and delete.
#
mv
If you type mv into the terminal, you are telling Linux to move a file. To use this command, type, mv and the name of the file you want to move, then type the name of the location where you want to move that file. Once you've done all that, hit Enter . The mv command is also used to rename a file - think of this as moving the file to a new name.
Example:
Let's say you want to move a file called "photos.png" to my home Desktop directory. All you would need to do is type the following into the terminal:
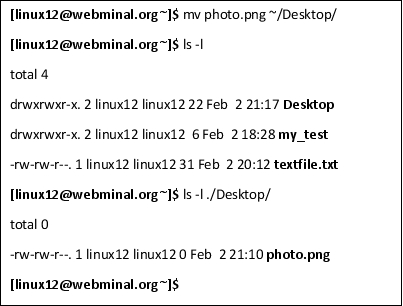
If you do everything correctly, the file "photos.png" would appear in my Desktop directory. The Desktop directory is under the home directory /home/<username> because ~ refers to the home directory.
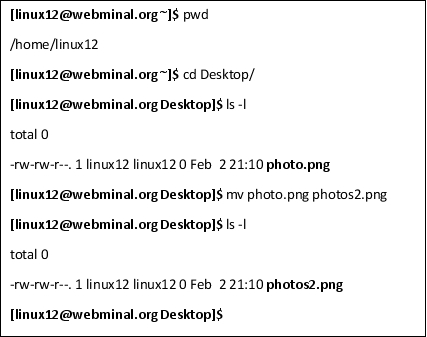
To rename the file, you can go to the "Desktop" directory and type in the new filename, mv photos.png photos. It should now appear in your Desktop folder as a photos file. Notice that it doesn't have the png at the end so we would need to use the file photos to figure out that it was a .png file.
#
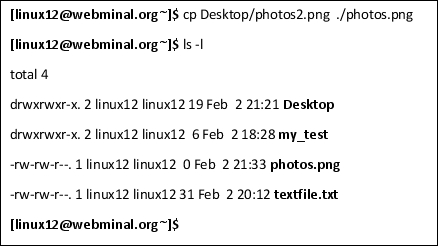
cp
When you type cp into the terminal, it stands for "copy file." In a sense, this command is used similarly to the mv command. To make a copy of a file with a new filename in the same directory, you would simply need to type cp and the name of the current file, then the name of the new file you want to copy to.
When copying directories, you may receive a message saying you need to put an -r after cp to copy the files or directories. The -r is for recursive and indicates you want to copy the directory and all the contents inside the directory.
Example:
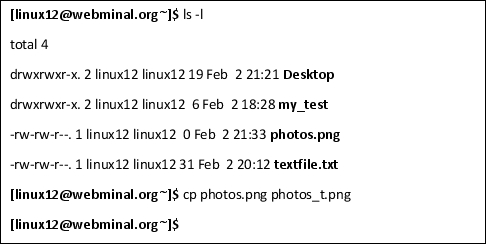
First, we’ll figure out where we are. Use the pwd to find out where we are.
This shows the current directory.
Now, let’s copy the photos2.png file from Desktop/photos to the current directory and rename it photos.png.
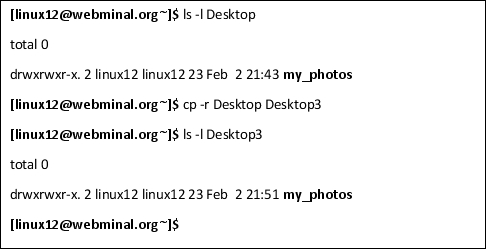
But what about copying a complete directory? Can we just copy a directory the same way?
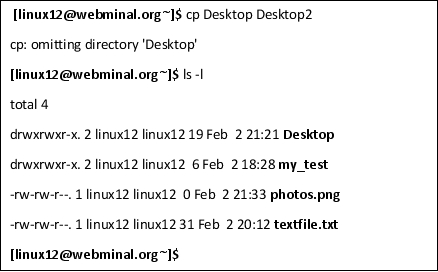
Nope. That failed because the directory has files in it. If the directory were empty, the copy would succeed.
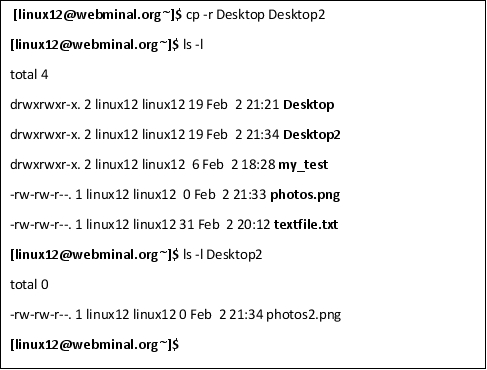
To copy the directory and all the files inside it, we need to use the -r option which does a recursive copy.
#
mkdir
The abbreviation mkdir stands for "make directory." Think of it kind of like the "create new folder" option in Windows. Entering this command in Linux will make a new directory where you specify. For example, if you type mkdir apples on the command line, it will create a new directory labeled "apples" in the directory where you are working.
You can also create a new directory and put it in a specific directory by specifying a path. For example, let's say you want to create a new folder called "photos" on your Desktop. At the command line, you would type mkdir ~/Desktop/photos, and a folder called "photos" would appear on your desktop.
Example:
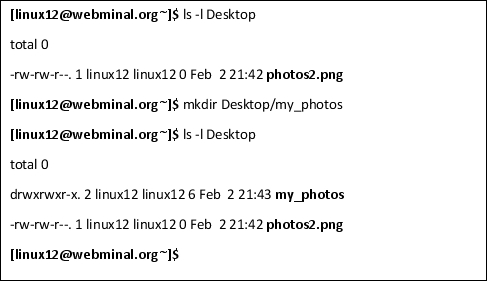
We look at the Desktop directory and then we created a new directory in the Desktop directory. We confirmed the new directory with the ls command.
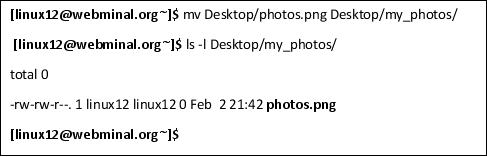
Now let’s try moving a file into the new directory
#
rm
If you want to remove a file, type rm and the name of the file you want to remove. Make sure the file you want to remove is in the directory you are currently working in, or it may return an error.
We’ve now made a copy of a file that we can now delete.

Removing a Full Directory
If you want to delete a directory that has items in it, you may have to add an -r after the rm command to indicate the remove is recursive. When you do this, it will look something like rm -r dir1 instead of just rm dir1.
We created a new directory named Desktop3. Why? So that we can delete it, of course.

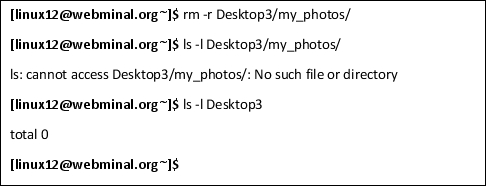
But this acts the same as the copy command. The directory can’t be deleted if it still has files in it. Remember how we copied the entire directory and files last time?
Yes, we need to use the -r command to recursively delete the files inside the directory as well as the my_photos directory.
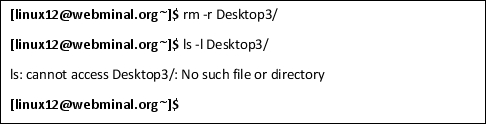
Now let’s confirm the Desktop3 directory isn’t there anymore.
The removal appears complete.
#
rmdir
This stands for "remove directory," and it looks like, rmdir on the command line. When you type rmdir and the name of the directory you want to remove, the directory should disappear. The directory has to be empty, however. This will not work on a directory that already has something in it.
Removing a Full Directory
If you want to delete a directory that has items in it, you may have to add an -r after the rm command to indicate the remove is recursive. When you do this, it will look something like rm -r dir1 instead of just rm dir1.

We created a new directory named Desktop3. Why? So that we can delete it, of course.

 But this acts the same as the rm command. The directory can’t be deleted if it still has files in it. Remember how we deleted the entire directory and files last time? Yes, we need to use the -r command to recursively delete the files inside the directory as well as the my_photos directory.
Now that the directory is empty, we can use the rmdir command.
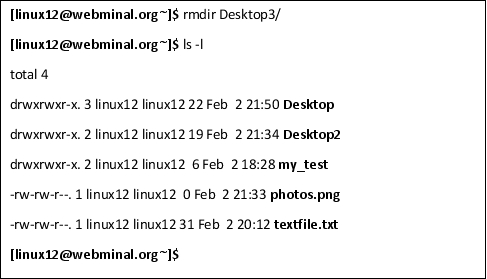
Sure enough, the Desktop3 directory is now gone after running the rmdir command.
The rmdir command may come in handy if you create a file in a directory that you no longer need and it's inconvenient or not possible to remove the file using the desktop. As mentioned earlier, not all Linux systems have desktop environments installed, so you may find yourself using this command frequently if you work somewhere where you need to create files and then delete them.
Be careful with the rm or rmdir commands because using them carelessly can damage your system and you could end up with missing files. To prevent costly errors, make sure to back up your data before removing files or directories at the command line.
#
Creating and Viewing Files
Being able to manipulate files may be a step in the right direction, but how do you create and view files?
touch
The touch command creates a blank file. Just type touch and the name of the file you would like created.
Example:
First, let’s get a feel for what the directory looks like.

We know what the current directory looks like. How can we create a new empty file?
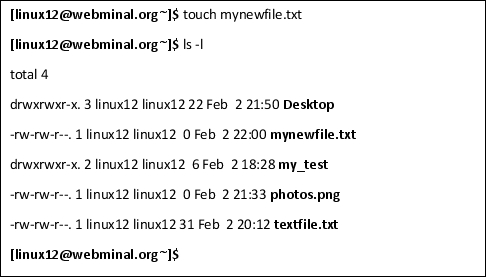
As you can see, the touch command created a new file with a size of 0 (see the 0 right before the Feb 2?)
Notice that the total didn’t change (still 4) because total gives the number of blocks used. Since the file is 0 in size, nothing needs to change.
Exercise:
Create two empty text files using the touch command. Place them on your Desktop.
#
echo
Use the echo command when you want to echo a string of text. Just type echo and write the message you want to say in quotation marks. For example, echo, "hello world" would print out "hello world" to the screen on the terminal. This may come in handy if you are programming and want to leave personalized instructions to whoever uses the terminal next.
Other Uses for echo
You can also use echo like the list command. To do so, you would type "echo" and an asterisk. It should give you a list of all of the files and directories in your current working directory.
To put a string in a file, you can use the Linux redirect command which is the > symbol. The redirect symbol redirects the output into a file so you won't see it on the screen. Let's give it a try:
Example:
Let’s try using the echo command.
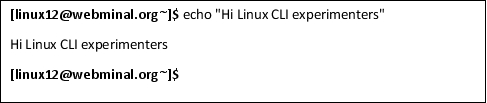
Well, that doesn’t do much, does it? It just printed out a string – just like if we’d typed it.
Can we do something useful with it? How about creating a file with a greeting inside?
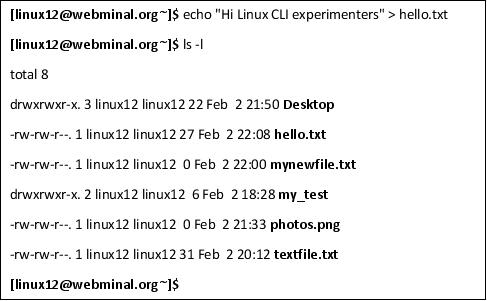
The hello.txt file has “Hi Linux CLI experimenter” in it – just as if you’d typed it into Notepad or a text editor.
Exercise:
Use the echo command to print "hello world" to the screen.
Pair the echo command with the * command and print a list of your current files and directories in your home folder. Record your findings in your notebook.
Using the options you know of now, create a new command using the echo [options] [strings] syntax and enter it into your terminal and describe what it does. If it doesn't do anything, write that down, too. Experiment with adding two or three different commands and record your findings.
#
cat
To concatenate means to link multiple things together. You can combine multiple files by entering the cat command. A nice side-effect of the cat command is that it prints out the results of the concatenation operation on the screen. Just type, cat and the name of the file to view the contents of the file in the terminal.
You can do quite a bit with this command, including creating new files, viewing the contents of multiple files, displaying the output of a file, copying the contents of one file to another file, and appending the contents of one file to another.
Creating an Empty File
You can also use this command to create new empty files by typing, cat > file1 . Doing so will create a file called "file1."
View the Contents of Files
For example, typing cat file1 and then pressing Enter would allow you to see the contents of file1. To view more than one file with the cat command, just enter the command cat and the names of the files you want to be displayed with spaces in between their names.
For example, cat file9 file10 would display the contents of file9 and file10 to the terminal emulator screen.
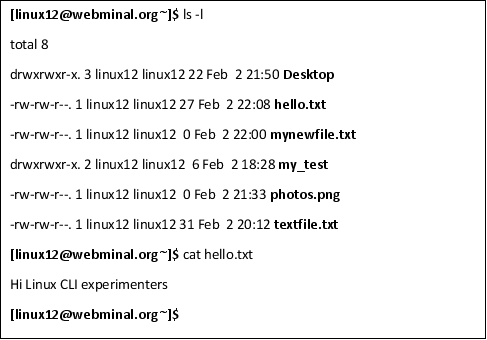
So we use the cat command to see the contents of the hello.txt file.
To concatenate means to link multiple things together. Think of cat as a command that you use to merge files together.
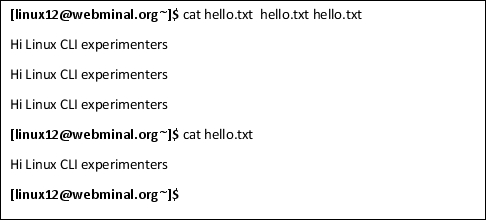
We sent the contents of the hello.txt file to the output display 3 times. Just to verify that hello.txt didn’t change, we cat it by itself again.
But if we send the resulting output to a file, cat is an even more useful command. To do this, we use the > symbol along with the name of the file. The > filename means send the output into a file instead of displaying it on the screen.
Let’s give it a try. We use the same command as above but this time, the output will be re-directed into a file.
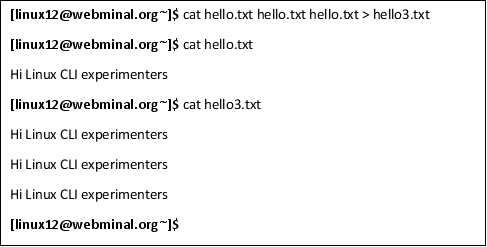
Notice that there is no output on the screen when it is redirected to the file. I cat the original file - it is the same and then I cat hello3.txt and see the 3 copies of the string.
Exercise:
With this exercise, we will practice using the cat command to create new files at the command line, read those files, and merge them into one new document.
To complete this exercise, you may need a Linux operating system with a desktop environment installed.
Change directories to your desktop environment and use the echo and cat commands to create a new file. Create another new file with the cat command. Write whatever you want in this file as well.
Now cat both files so you can see their contents on the terminal. Once you've done that, use the cat command again to create a new file by merging the contents of the old files and redirecting the output to the new file.
Record your findings in your notebook after you complete the exercise. Use the rm command to get rid of the files you created if you have no other use for them.
#
less
The less command allows you to view the content of the files displayed on the screen in small chunks rather than as a giant wall of text that you may have trouble reading.
The less command stops at each page and you can use the up/down arrows and the page up and page down buttons to get to the end. This command helps you quickly scan files for important information while avoiding wasting time wading through the information that you don't need.
You can also type a search term after “/” and have every occurrence of the term you are searching for highlighted, making it much easier to find the specific information you're looking for. It is similar to the Ctrl+f keyboard shortcut Windows, Chrome OS, and Mac.
To exit less, type the letter "q" (which means quit).
Exercise:
Go online and copy some Lorem Ipsum text or write a long document. View its contents using the cat command and notice how it scrolls past very fast. Then try using less to view it.
Also, try adding a / and using the search option. Record your findings in your notebook.
#
head
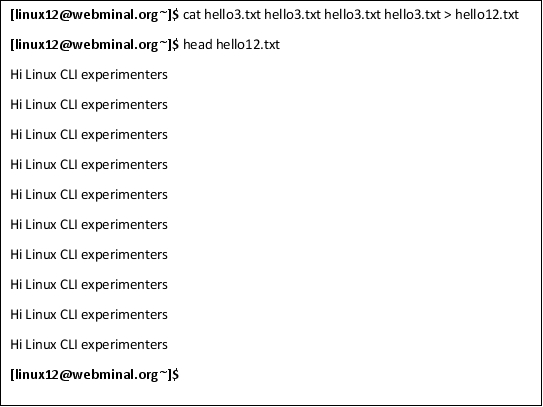
If you want to see the beginning of a specific file, the head command is what you're looking for. Typing in head and the name of the file that you want to be read will result in the first ten lines of the file's content being printed out onto the screen of the terminal.
The head command shows the first ten lines of the contents of a specific file by default, and you can adjust it using the -n option and specifying a number. For example, let's pretend that you have a text file with over 700,000 lines of code, but you only need the first 17 lines. You can use the head command with -n 17 and the filename to retrieve that information without having to open the entire file with all 700,000 lines of code.
The head command helps reduce clutter if you decide to read a large file and you already know that the information you need is at the beginning of the file. For instance, the title of a document is probably one of the first lines in the file along with the date. If you only need that information, the head command is faster and cleaner than using the less command.
It also might help the terminal use less memory printing and processing text while saving you time when looking through large files.
Example:
By default, the head command will display the first 10 lines of the file so we’ll create a file with 12 lines.
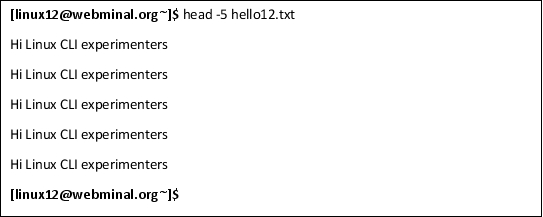
And if we want to only see 5 lines, we can use the -5 option.
Many times, we want to see a smaller number of lines and we can use the -n option along with the head command where n is the number of lines to show. Let’s try displaying on the first 5 lines.
Exercise:
Create a text document using either the touch or cat command. You can go to your desktop environment and edit it by hand if you don't want to try doing it in the terminal. Then, create a document with 25 lines. You don't have to write anything on the lines if you don't want to; just make sure that you number them 1-25.
Use the head command to view the first ten lines of your document in the terminal.
Next, add an option, such as -n, and the number of lines you want to view. For instance, try using -18 to view the first 18 lines of the document in the terminal.
Experiment with options you've learned so far in this book and see if any of them work with the head command. If so, what are they and what do they do? Write your findings in your notebook.
#
tail
Like the head command, the tail command displays a certain number of lines from a file as standard output but is the opposite of the head command. The tail command returns the last ten lines of a document or other file by default. Its usage is similar to the head command and you can use the -n option.
To use this command, type tail and the name or the file or directory that you want it to read and display.
For example, imagine that you only need the code in the last five lines of a long and complicated file. Type tail and the name of the file. Like the head command, you can also alter the number of lines it prints out using the -n option.
You can also use the -c option to limit the number of bytes, as opposed to lines. For example, if you only wanted it to display 12 bytes of information, you might type -c 12.
Explanation:
Like the head command, the tail command has a range of uses, though it mostly serves as a means of helping you quickly find important information. It can become tedious to print a long file to the terminal and scan through it manually for things like coding errors, update problems, or other inconsistencies.
Many times, the error in a log file will be at the end so the tail command is perfect for seeing what caused an error.
Exercise:
Go back to the document you created in the previous exercise and use the tail command and the -n option to print out only the last five lines of your document.
Experiment with the -c option. Type -c and a number and see what happens. Record your findings in your notebook.
Назад: What is the Linux Filesystem?
Дальше: Chapter Summary

