Chapter 10. Game Programming: Coding for Fun
In , we combined animation and user interaction to make a fun app. In this chapter, we’ll build on those concepts and add elements of game design to create a game from the ground up. We’ll combine our ability to draw animations on the screen with our ability to handle user interaction, like mouse movement, to create a classic Pong-type game we’ll call Smiley Pong.
Games that we enjoy playing have certain elements of game design. Here is a breakdown of our Smiley Pong design:
- A playing field or game board. A black screen represents half a Ping-Pong board.
- Goals and achievements. The player tries to score points and avoid losing lives.
- Playing pieces (game characters and objects). The player has a ball and a paddle.
- Rules. The player scores a point if the ball hits the paddle, but the player loses a life if the ball hits the bottom of the screen.
- Mechanics. We’ll make the paddle move left and right with the mouse, defending the bottom of the screen; the ball may move faster as the game progresses.
- Resources. The player will have five lives or turns to score as many points as they can.
Games use these elements to engage players. An effective game has a mix of these elements, making the game easy to play but challenging to win.
Building a Game Skeleton: Smiley Pong, Version 1.0
Pong, shown in , was one of the earliest arcade video games, dating back to the 1960s and ’70s. More than 40 years later, it’s still fun to play.
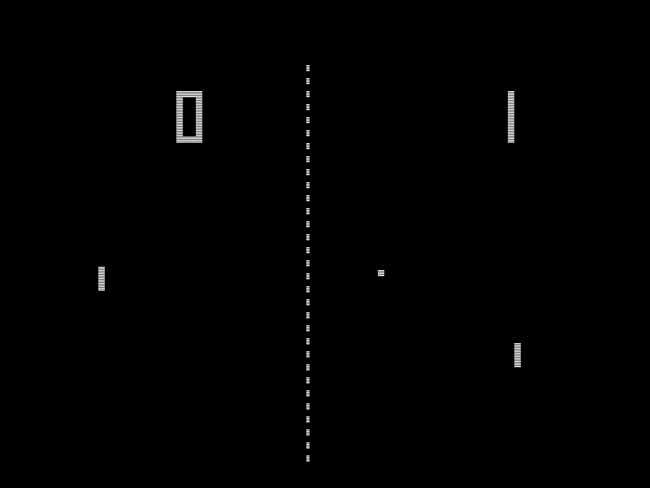
Wikimedia Commons
The gameplay for a single-player version of Pong is simple. A paddle moves along one edge of the screen (we’ll place our paddle at the bottom) and rebounds a ball, in our case a smiley face. Players gain a point each time they hit the ball, and they lose a point (or a life) every time they miss.
We’ll use our bouncing smiley face program from as the foundation for the game. Using SmileyBounce2.py () as our base, we already have a smoothly animated smiley ball bouncing off the sides of the window, and we’ve already taken care of the while loop that keeps the animation going until the user quits. To make Smiley Pong, we’ll add a paddle that follows the mouse along the bottom of the screen, and we’ll add more collision detection to see when the smiley ball hits the paddle. The final touch will be to start with zero points and five lives, give the player a point when they hit the ball, and take away a life when the ball bounces off the bottom of the screen. shows what we’re working toward. When we’re finished, our final program will look like the one in .
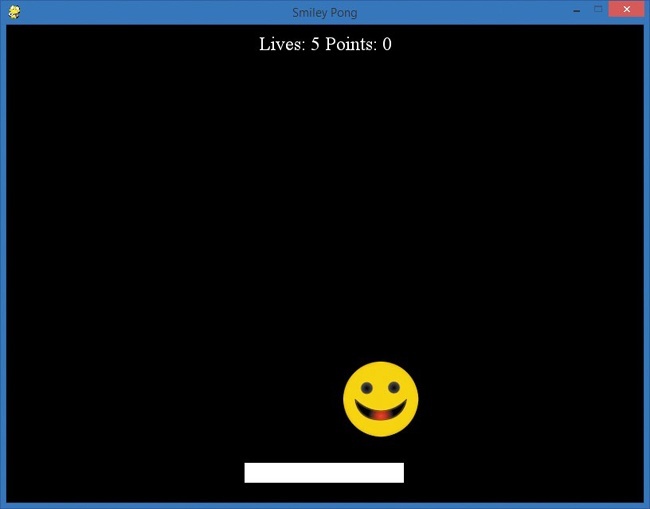
The first feature we’ll add to the former SmileyBounce2.py app is the paddle.
Drawing a Board and Game Pieces
In our finished game, the paddle will move along the bottom of the screen, following the mouse’s movement as the user tries to keep the ball from hitting the bottom edge.
To get the paddle started, we’ll add this information to the setup section of our app:
WHITE = (255,255,255) paddlew = 200 paddleh = 25 paddlex = 300 paddley = 550
These variables will help us create a paddle that is simply a white rectangle of width 200 and height 25. We’ll want the coordinates of its top-left corner to start at (300, 550) so that the paddle starts off slightly above the bottom edge and centered horizontally on the 800 × 600 screen.
But we’re not going to draw this rectangle yet. Those variables would be enough to draw a rectangle on the screen the first time, but our paddle needs to follow the user’s mouse movements. We want to draw the paddle on the screen centered around where the user moves the mouse in the x direction (side to side), while keeping the y-coordinate fixed near the bottom of the screen. To do this, we need the x-coordinates of the mouse’s position. We can get the position of the mouse by using pygame.mouse.get_pos(). In this case, since we care only about the x-coordinate of get_pos(), and since x comes first in our mouse position, we can get the x-coordinate of the mouse with this:
paddlex = pygame.mouse.get_pos()[0]
But remember that Pygame starts drawing a rectangle at the (x, y) position we provide, and it draws the rest of the rectangle to the right of and below that location. To center the paddle where the mouse is positioned, we need to subtract half the paddle’s width from the mouse’s x-position, putting the mouse halfway through the paddle:
paddlex -= paddlew/2
Now that we know the center of the paddle will always be where the mouse is, all we need to do in our game loop is to draw the paddle rectangle on the screen:
pygame.draw.rect(screen, WHITE, (paddlex, paddley, paddlew, paddleh))
If you add those three lines before the pygame.display.update() in the while loop in SmileyBounce2.py and add the paddle color, paddlew, paddleh, paddlex, and paddley to the setup section, you’ll see the paddle follow your mouse. But the ball won’t bounce off the paddle yet because we haven’t added the logic to test whether the ball has collided with it. That’s our next step.
Keeping Score
Keeping score is part of what makes a game fun. Points, lives, stars — whatever you use to keep score, there’s a sense of achievement that comes from seeing your score increase. In our Smiley Pong game, we want the user to gain a point every time the ball hits the paddle and lose a life when they miss the ball and it hits the bottom of the screen. Our next task is to add logic to make the ball bounce off the paddle and gain points, as well as to subtract a life when the ball hits the bottom of the screen. shows what your game might look like after a player gains some points. Notice how the point display has been updated to 8.
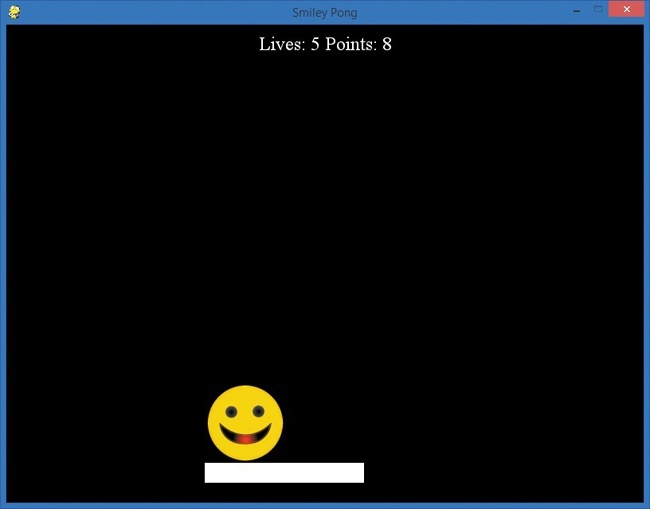
As mentioned earlier, we’ll start our game with zero points and five lives in the setup portion of our code:
points = 0 lives = 5
Next we have to figure out when to add to points and when to take away from lives.
Subtracting a Life
Let’s start with subtracting a life. We know that if the ball hits the bottom edge of the screen, the player has missed it with the paddle, so they should lose a life.
To add the logic for subtracting a life when the ball hits the bottom of the screen, we have to break our if statement for hitting the top or bottom of the screen (if picy <= 0 or picy >= 500) into two parts, top and bottom separately. If the ball hits the top of the screen (picy <= 0), we just want it to bounce back, so we’ll change the direction of the ball’s speed in the y direction with -speedy:
if picy <= 0: speedy = -speedyIf the ball bounces off the bottom (picy >= 500), we want to deduct a life from lives and then have the ball bounce back:
if picy >= 500: lives -= 1 speedy = -speedySubtracting a life is done, so now we need to add points. In , we saw that Pygame contains functions that make it easier to check for collisions. But since we’re building this Smiley Pong game from scratch, let’s see how we can write our own code to check for collisions. The code might come in handy in a future app, and writing it is a valuable problem-solving exercise.
Hitting the Ball with the Paddle
To check for the ball bouncing off the paddle, we need to look at how the ball might come into contact with the paddle. It could hit the top-left corner of the paddle, it could hit the top-right corner of the paddle, or it could bounce directly off the top of the paddle.
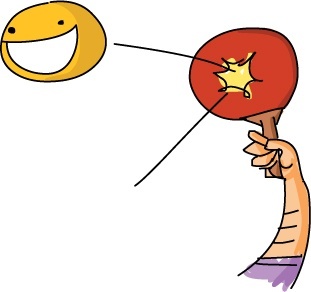
When you’re figuring out the logic for detecting collisions, it helps to draw it out on paper and label the corners and edges where you need to check for a possible collision. shows a sketch of the paddle and the two corner collision cases with the ball.

Because we want the ball to bounce realistically off the paddle, we want to check for the cases where the bottom center of the ball just touches the corners of the paddle at the left and right extremes. We want to make sure the player scores a point not only when the ball bounces directly off the top of the paddle but also whenever it bounces off the paddle’s corners. To do this, we’ll see if the ball’s vertical location is near the bottom of the screen where the paddle is, and if so, we’ll check whether the ball’s horizontal location would allow it to hit the paddle.
First, let’s figure out what range of x-coordinate values would allow the ball to hit the paddle. Since the middle of the ball would be half the width of the ball across from its (picx, picy) top-left corner, we’ll add the width of the ball as a variable in the setup section of our app:
picw = 100
As shown in , the ball could hit the top-left corner of the paddle when picx plus half the width of the picture (picw/2) touches paddlex, the x-coordinate of the left corner of the paddle. In code, we could test this condition as part of an if statement: picx + picw/2 >= paddlex.
We use the greater than or equal to condition because the ball can be farther right (greater than paddlex in the x direction) and still hit the paddle; the corner case is just the first pixel for which the player gets a point for hitting the paddle. All the x-coordinate values between the left corner and the right corner of the paddle are valid hits, so they should award the user a point and bounce the ball back.
To find that top-right corner case, we can see from the figure that we’re requiring the middle of the ball, whose x-coordinate is picx + picw/2, to be less than or equal to the top-right corner of the paddle, whose x-coordinate is paddlex + paddlew (or the starting x-coordinate of the paddle plus the paddle’s width). In code, this would be picx + picw/2 <= paddlex + paddlew.
We can put these two together into a single if statement, but that’s not quite enough. Those x-coordinates cover the whole screen from the left corner of the paddle to the right corner, from the top of the screen to the bottom. With just the x-coordinates determined, our ball could be anywhere in the y direction, so we need to narrow that down. It’s not enough to know that our ball is within the horizontal limits of the paddle; we also have to know that our ball is within the vertical range of y-coordinate values that could allow it to collide with the paddle.
We know that the top of our paddle is located at 550 pixels in the y direction, near the bottom of the screen, because our setup includes the line paddley = 550 and the rectangle begins at that y-coordinate and continues down for 25 pixels, our paddle’s height stored in paddleh. We know our picture is 100 pixels tall, so let’s store that as a variable, pich (for picture height), that we can add to our setup section: pich = 100.
For our ball’s y-coordinate to hit the paddle, the picy location plus the picture’s height, pich, needs to be at least paddley or greater for the bottom of the picture (picy + pich) to touch the top of the paddle (paddley). Part of our if statement for the ball hitting the paddle in the y direction would be if picy + pich >= paddley. But this condition alone would allow the ball to be anywhere greater than paddley, even at the bottom edge of the screen. We don’t want the user to be able to get points for moving the paddle into the ball after the ball has hit the bottom edge, so we need another if condition that sets the maximum y-coordinate value we’ll give points for.

A natural choice for the maximum y-coordinate value for earning a point might be the bottom of the paddle, or paddley + paddleh (the paddle’s y-coordinate, plus its height). But if the bottom of our ball is past the bottom of the paddle, the player shouldn’t get a point for hitting the ball, so we want picy + pich (the bottom of the ball) to be less than or equal to paddley + paddleh — in other words, picy + pich <= paddley + paddleh.
There’s just one more condition to check. Remember that the ball and paddle are virtual; that is, they don’t exist in the real world, don’t have actual edges, and don’t interact like real game pieces do. We could move our paddle through the ball even when it’s bouncing back up from the bottom edge. We don’t want to award points when the player has clearly missed the ball, so before awarding a point, let’s check to make sure the ball is headed down, in addition to being within the vertical and horizontal range of the paddle. We can tell the ball is headed down the screen if the ball’s speed in the y direction (speedy) is greater than zero. When speedy > 0, the ball is moving down the screen in the positive y direction.
We now have the conditions we need to create the two if statements that will check whether the ball hit the paddle:
if picy + pich >= paddley and picy + pich <= paddley + paddleh \ and speedy > 0: if picx + picw/2 >= paddlex and picx + picw/2 <= paddlex + \ paddlew:
First, we check whether the ball is within the vertical range to be able to touch the paddle and whether it’s heading downward instead of upward. Then, we check whether the ball is within the horizontal range to be able to touch the paddle.
In both of these if statements, the compound conditions made the statement too long to fit on our screen. The backslash character, \, allows us to continue a long line of code by wrapping around to the next line. You can choose to type a long line of code all on a single line, or you can wrap the code to fit the screen by ending the first line with a backslash \, pressing ENTER, and continuing the code on the next line. We have some long lines of logic in the games in this chapter, so you’ll see the backslash in several of the code listings. Just remember that Python will read any lines separated by a backslash as a single line of code.
Adding a Point
Let’s build the logic to bounce the ball and award a point. To complete our paddle logic, we add two more lines right after the two if statements:
if picy + pich >= paddley and picy + pich <= paddley + paddleh \ and speedy > 0: if picx + picw/2 >= paddlex and picx + picw/2 <= paddlex + \ paddlew: points += 1 speedy = -speedy
Adding a point is easy: points += 1. Changing the direction of the ball so it looks like it bounced off the paddle is easy too; we just reverse our speed in the y direction to make it go back up the screen: speedy = -speedy.
You can run the program with those changes and see the ball bounce off the paddle. Each time the paddle hits the ball, you’re earning a point, and whenever the ball misses the paddle, you’re losing a life, but we’re not showing those on the screen yet. Let’s do that next.
Showing the Score
We have the logic we need to add points and subtract lives, but we don’t see the points on the screen as we play. In this section, we’ll draw text to the screen to give the user feedback while they’re playing, as shown in .
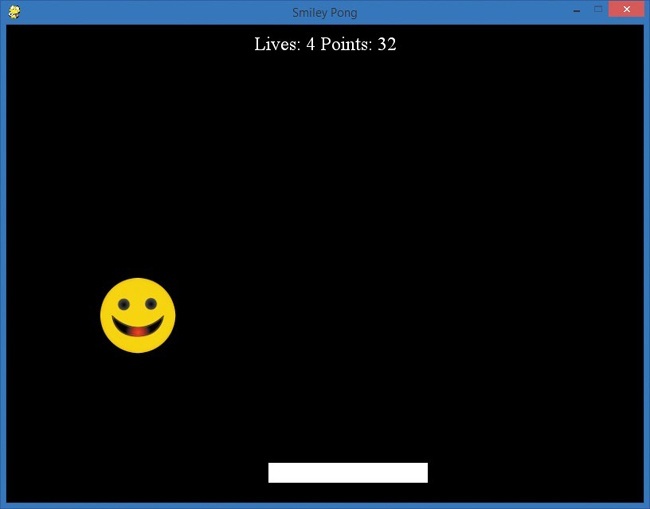
The first step is putting together the string of text that we want to display. In a typical video game, we’d see our points and how many lives or turns we have left — for example, Lives: 4, Points: 32. We already have variables with the number of lives (lives) and total points (points). All we have to do is use the str() function to turn those numbers into their text equivalent (5 becomes "5") and add text to indicate what the numbers mean in each pass through our game loop:
draw_string = "Lives: " + str(lives) + " Points: " + str(points)
Our string variable will be called draw_string, and it contains the text we’d like to draw on the screen to display to users as they play. To draw that text on the screen, we need to have an object or variable that is connected to the text-drawing module pygame.font. A font is another name for a typeface, or the style characters are drawn in, like Arial or Times New Roman. In the setup section of your app, add the following line:
font = pygame.font.SysFont("Times", 24)This creates a variable we’ll call font that will allow us to draw on the Pygame display in 24-point Times. You can make your text larger or smaller, but for now, 24 points will work. Next we’ll draw the text; that should be added into the game loop, right after our draw_string declaration. To draw the text on the window, we first draw the string on a surface of its own with the render() command on the font object we created:
text = font.render(draw_string, True, WHITE)This creates a variable called text to store a surface that contains the white pixels that make up all the letters, numbers, and symbols of our string. The next step will get the dimensions (width and height) of that surface. Longer strings will render or draw wider, while shorter strings will take fewer pixels to draw. The same goes for larger fonts versus smaller fonts. The text string will be rendered on a rectangular surface, so we’ll call our variable text_rect for the rectangle that holds our drawn string:
text_rect = text.get_rect()
The get_rect() command on our text surface will return the dimensions of the drawn string. Next we’ll center the text rectangle text_rect horizontally on the screen, using the .centerx attribute, and position the text rectangle 10 pixels down from the top of the screen so it’s easy to see. Here are the two commands to set the position:
text_rect.centerx = screen.get_rect().centerx text_rect.y = 10
It’s time to draw the text_rect image to the screen. We’ll do this using the blit() function like we did for our picture pic:
screen.blit(text, text_rect)
With those changes, our Smiley Pong game has become like the classic version of the game, but with our smiley face as the ball. Run the app, and you’ll see something like . We’re on our way to an arcade-quality game!
Putting It All Together
We’ve used many coding skills to make this game. Variables, loops, conditions, math, graphics, event handling — almost our full toolkit. Games are an adventure for both the coder and the player. Producing a game is challenging and rewarding; we get to build the gameplay we want, then share it with others. My sons loved version 1.0 of the Smiley Pong game, and they gave me great ideas for extending it to version 2.0.
Here’s the full version 1.0, SmileyPong1.py:
SmileyPong1.py
import pygame # Setup pygame.init() screen = pygame.display.set_mode([800,600]) pygame.display.set_caption("Smiley Pong") keepGoing = True pic = pygame.image.load("CrazySmile.bmp") colorkey = pic.get_at((0,0)) pic.set_colorkey(colorkey) picx = 0 picy = 0 BLACK = (0,0,0) WHITE = (255,255,255) timer = pygame.time.Clock() speedx = 5 speedy = 5 paddlew = 200 paddleh = 25 paddlex = 300 paddley = 550 picw = 100 pich = 100 points = 0 lives = 5 font = pygame.font.SysFont("Times", 24) while keepGoing: # Game loop for event in pygame.event.get(): if event.type == pygame.QUIT: keepGoing = False picx += speedx picy += speedy if picx <= 0 or picx + pic.get_width() >= 800: speedx = -speedx if picy <= 0: speedy = -speedy if picy >= 500: lives -= 1 speedy = -speedy screen.fill(BLACK) screen.blit(pic, (picx, picy)) # Draw paddle paddlex = pygame.mouse.get_pos()[0] paddlex -= paddlew/2 pygame.draw.rect(screen, WHITE, (paddlex, paddley, paddlew, paddleh)) # Check for paddle bounce if picy + pich >= paddley and picy + pich <= paddley + paddleh \ and speedy > 0: if picx + picw / 2 >= paddlex and picx + picw / 2 <= paddlex + \ paddlew: points += 1 speedy = -speedy # Draw text on screen draw_string = "Lives: " + str(lives) + " Points: " + str(points) text = font.render(draw_string, True, WHITE) text_rect = text.get_rect() text_rect.centerx = screen.get_rect().centerx text_rect.y = 10 screen.blit(text, text_rect) pygame.display.update() timer.tick(60) pygame.quit() # Exit
Our gameplay is nearly complete: the ball bounces off the paddle, points are awarded, and players lose a life if they miss the ball and it hits the bottom edge of the screen. All the basic components are there to make this an arcade-style game. Now think about what improvements you would like to see, work out the logic, and try adding code to version 1.0 to make your game even more fun. In the next section, we’ll add three more features to create a fully interactive, video game–like experience that we can share with others.
Adding Difficulty and Ending the Game: Smiley Pong, Version 2.0
Version 1.0 of our Smiley Pong game is playable. Players can score points, lose lives, and see their progress on the screen. One thing we don’t have yet is an end to the game. Another is the sense of greater challenge as the game progresses. We’ll add the following features to Smiley Pong, version 1.0, to create a more complete game in version 2.0: a way to show that the game is over when the last life is lost, a way to play again or start a new game without closing the program, and a way to increase the difficulty as the game goes on. We’ll add these three features one at a time, winding up with a fun, challenging, arcade-style game! The final version is shown in .
Game Over
Version 1.0 never stopped playing because we didn’t add logic to handle the game being over. We know the condition to test for: the game is over when the player has no lives left. Now we need to figure out what to do when the player loses their last life.
The first thing we want to do is stop the game. We don’t want to close the program, but we do want to stop the ball. The second thing we want to do is change the text on the screen to tell the player that the game is over and give them their score. We can accomplish both tasks with an if statement right after the draw_string declaration for lives and points.
if lives < 1: speedx = speedy = 0 draw_string = "Game Over. Your score was: " + str(points) draw_string += ". Press F1 to play again. "
By changing speedx and speedy (the horizontal and vertical speed of the ball, respectively) to zero, we’ve stopped the ball from moving. The user can still move the paddle on the screen, but we’ve ended the gameplay visually to let the user know the game is over. The text makes this even clearer, plus it tells the user how well they did this round.
Right now, we’re telling the user to press F1 to play again, but pressing the key doesn’t do anything yet. We need logic to handle the keypress event and start the game over.
Play Again
We want to let the user play a new game when they’ve run out of lives. We’ve added text to the screen to tell the user to press the F1 key to play again, so let’s add code to detect that keypress and start the game over. First, we’ll check if a key was pressed and if that key was F1:
if event.type == pygame.KEYDOWN: if event.key == pygame.K_F1: # F1 = New Game
In the event handler for loop inside our game loop, we add an if statement to check if there was a KEYDOWN event. If so, we check the key pressed in that event (event.key) to see if it’s equal to the F1 key (pygame.K_F1). The code that follows this second if statement will be our play again or new game code.
Note
You can get a full list of the Pygame keycodes, such as K_F1, at .
“Play again” means that we want to start over from the beginning. For Smiley Pong, we started with 0 points, 5 lives, and the ball coming at us at 5 pixels per frame from the top-left corner of the screen, (0, 0). If we reset these variables, we should get the new game effect:
points = 0 lives = 5 picx = 0 picy = 0 speedx = 5 speedy = 5
Add these lines to the if statement for the F1 key KEYDOWN event, and you’ll be able to restart the game anytime. If you’d like to allow restarting only when the game is already over, you can include an additional condition that lives == 0, but we’ll leave the if statements as they currently are in our version 2.0 so that the user can restart anytime.
Faster and Faster
Our game lacks one final element of game design: it doesn’t get more challenging the longer it’s played, so someone could play almost forever, paying less and less attention. Let’s add difficulty as the game progresses to engage the player and make the game more arcade-like.
We want to increase the speed of the ball slightly as the game advances, but not too much, or the player might get frustrated. We want to make the game just a bit faster after each bounce. The natural place to do this is within the code that checks for bounces. Increasing the speed means making speedx and speedy greater so that the ball moves farther in each direction each frame. Try changing our if statements for collision detection (where we make the ball bounce back from each edge of the screen) to the following:
if picx <= 0 or picx >= 700: speedx = -speedx * 1.1 if picy <= 0: speedy = -speedy + 1
In the first case, when the ball is bouncing off the left and right sides of the screen in the horizontal direction, we increase the horizontal speed, speedx, by multiplying it by 1.1 (and we still change the direction with our minus sign). This is a 10 percent increase in speed after each left and right bounce.
When the ball bounces off the top of the screen (if picy <= 0), we know that the speed will become positive as it rebounds off the top and heads back down the screen in the positive y direction, so we can add 1 to speedy after we change the direction with the minus sign. If the ball came toward the top at 5 pixels per frame in speedy, it will leave at 6 pixels per frame, then 7, and so on.
If you make those changes, you’ll see the ball get faster and faster. But once the ball starts going faster, it never slows back down. Soon the ball would be traveling so quickly that the player could lose all five lives in just a second.
We’ll make our game more playable (and fair) by resetting the speed every time the player loses a life. If the speed gets so high that the user can’t hit the ball with the paddle, it’s probably a good time to reset the speed to a slower value so the player can catch up.
Our code for bouncing off the bottom of the screen is where we take away one of the player’s lives, so let’s change the speed after we’ve subtracted a life:
if picy >= 500: lives -= 1 speedy = -5 speedx = 5This makes the game more reasonable, as the ball no longer gets out of control and stays that way; after the player loses a life, the ball slows down enough that the player can hit it a few more times before it speeds back up.
One problem, though, is that the ball could be traveling so fast that it could “get stuck” off the bottom edge of the screen; after playing a few games, the player will run into a case in which they lose all of their remaining lives on a single bounce off the bottom edge. This is because the ball could move way below the bottom edge of the screen if it’s traveling really quickly, and when we reset the speed, we might not get the ball completely back on the screen by the next frame.
To solve this, let’s add one line to the end of that if statement:
picy = 499
We move the ball back onto the screen completely after a lost life by setting the picy to a value, like 499, that places the ball completely above the bottom boundary of the screen. This will help our ball move safely back onto the screen no matter how fast it was traveling when it hit the bottom edge.
After these changes, version 2.0 looks like .
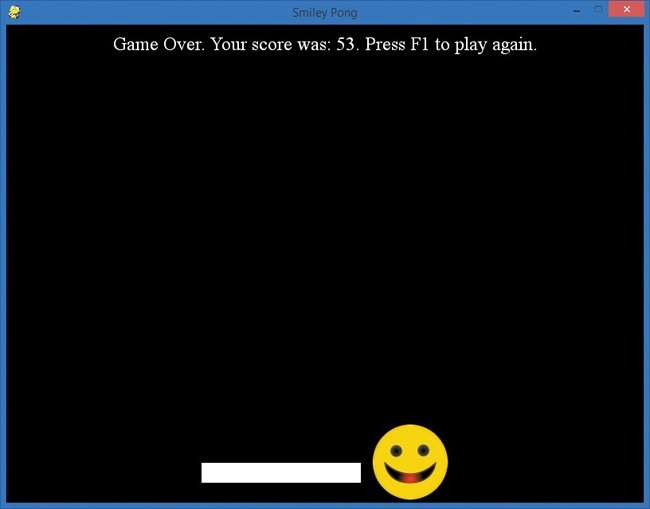
Version 2.0 is like a real arcade game, complete with the game over/play again screen.
Putting It All Together
Here’s our finished version 2.0, SmileyPong2.py. At just under 80 lines of code, it’s a full arcade-style game that you can show off to friends and family. You can also build on it further to develop your coding skill.
SmileyPong2.py
import pygame # Setup pygame.init() screen = pygame.display.set_mode([800,600]) pygame.display.set_caption("Smiley Pong") keepGoing = True pic = pygame.image.load("CrazySmile.bmp") colorkey = pic.get_at((0,0)) pic.set_colorkey(colorkey) picx = 0 picy = 0 BLACK = (0,0,0) WHITE = (255,255,255) timer = pygame.time.Clock() speedx = 5 speedy = 5 paddlew = 200 paddleh = 25 paddlex = 300 paddley = 550 picw = 100 pich = 100 points = 0 lives = 5 font = pygame.font.SysFont("Times", 24) while keepGoing: # Game loop for event in pygame.event.get(): if event.type == pygame.QUIT: keepGoing = False if event.type == pygame.KEYDOWN: if event.key == pygame.K_F1: # F1 = New Game points = 0 lives = 5 picx = 0 picy = 0 speedx = 5 speedy = 5 picx += speedx picy += speedy if picx <= 0 or picx >= 700: speedx = -speedx * 1.1 if picy <= 0: speedy = -speedy + 1 if picy >= 500: lives -= 1 speedy = -5 speedx = 5 picy = 499 screen.fill(BLACK) screen.blit(pic, (picx, picy)) # Draw paddle paddlex = pygame.mouse.get_pos()[0] paddlex -= paddlew/2 pygame.draw.rect(screen, WHITE, (paddlex, paddley, paddlew, paddleh)) # Check for paddle bounce if picy + pich >= paddley and picy + pich <= paddley + paddleh \ and speedy > 0: if picx + picw/2 >= paddlex and picx + picw/2 <= paddlex + \ paddlew: speedy = -speedy points += 1 # Draw text on screen draw_string = "Lives: " + str(lives) + " Points: " + str(points) # Check whether the game is over if lives < 1: speedx = speedy = 0 draw_string = "Game Over. Your score was: " + str(points) draw_string += ". Press F1 to play again. " text = font.render(draw_string, True, WHITE) text_rect = text.get_rect() text_rect.centerx = screen.get_rect().centerx text_rect.y = 10 screen.blit(text, text_rect) pygame.display.update() timer.tick(60) pygame.quit() # Exit
You can continue to build on the game elements in this example (see ), or you can use these building blocks to develop something new. Most games, and even other apps, have features like the ones you added in this chapter, and we usually follow a process similar to the one we used to build Smiley Pong. First, map out the skeleton of the game, and then build a working prototype, or a version 1.0. Once that’s working, add features until you get the final version you want. You’ll find — adding features one at a time to create new versions — useful as you build more complex apps.
Adding More Features: SmileyPop V2.0
We’ll follow our iterative versioning process one more time by adding features that my son Max and I wanted to see in the SmileyPop app in . First, he wanted a sound effect whenever a smiley face bubble (or balloon) was popped by a mouse click. Second, we both wanted some kind of feedback and display (maybe how many bubbles had been created and how many had been popped), and I wanted some sign of progress, like the percentage of bubbles we’d popped. The SmileyPop app was already fun, but these elements could make it even better.
Look back at ; we’ll start with this version of the app, and we’ll build our second version (v2.0, short for version 2.0) by adding code. The final version, SmileyPop2.py, is shown in .
We’ll begin by adding Max’s request: the popping sound.
Adding Sound with Pygame
At , you’ll find modules, classes, and functions that can make your games more fun to play and easier to program. The module we need for sound effects is pygame.mixer. To use this mixer module to add sound to your game, you first need a sound file to use. For our popping sound effect, download the pop.wav file from under the source code and files for .
We’ll add these two lines to the setup section of SmileyPop.py, right below sprite_list = pygame.sprite.Group():
pygame.mixer.init() # Add sounds pop = pygame.mixer.Sound("pop.wav")
We begin by initializing the mixer (just like we initialize Pygame with pygame.init()). Then we load our pop.wav sound effect into a Sound object so we can play it in our program.
The second line loads pop.wav as a pygame.mixer.Sound object and stores it in the variable pop, which we’ll use later when we want to hear a popping sound. As with image files, you’ll need pop.wav saved in the same directory or folder as your SmileyPop.py program for the code to be able to find the file and use it.
Next we’ll add logic to check whether a smiley was clicked and play our pop sound if a smiley was popped. We’ll do this in the event handler section of our game loop, in the same elif statement that processes right-mouse-button events (elif pygame.mouse.get_pressed()[2]). After the sprite_list.remove(clicked_smileys) that removes clicked smileys from the sprite_list, we could check to see if there were actually any smiley collisions, then play a sound.
The user could right-click the mouse in an area of the screen with no smiley faces to pop, or they might miss a smiley when trying to click. We’ll check whether any smileys were actually clicked by seeing if len(clicked_smileys) > 0. The len() function tells us the length of a list or collection, and if the length is greater than zero, there were clicked smileys. Remember, clicked_smileys was a list of the smiley sprites that collided with or were drawn overlapping the point where the user clicked.
If the clicked_smileys list has smiley sprites in it, then the user correctly right-clicked at least one smiley, so we play the popping sound:
if len(clicked_smileys) > 0: pop.play()
Notice that both lines are indented to align correctly with the other code in our elif statement for handling right-clicks.
These four lines of added code are all it takes to play the popping sound when a user successfully right-clicks a smiley. To make these changes and hear the result, make sure you’ve downloaded the pop.wav sound file into the same folder as your revised SmileyPop.py, turn your speakers to a reasonable volume, and pop away!
Tracking and Displaying Player Progress
The next feature we want to add is some way to help the user feel like they’re making progress. The sound effects added one fun kind of feedback (the user hears a popping sound only if they actually clicked a smiley sprite), but let’s also track how many bubbles the user has created and popped and what percentage of the smileys they’ve popped.
To build the logic for keeping track of the number of smileys the user has created and the number they’ve popped, we’ll begin by adding a font variable and two counter variables, count_smileys and count_popped, to the setup section of our app:
font = pygame.font.SysFont("Arial", 24) WHITE = (255,255,255) count_smileys = 0 count_popped = 0We set our font variable to the Arial font face, at a size of 24 points. We want to draw text on the screen in white letters, so we add a color variable WHITE and set it to the RGB triplet for white, (255,255,255). Our count_smileys and count_popped variables will store the number of created and popped smileys, which both start at zero when the app first loads.
Smileys Created and Popped
First, let’s count smileys as they’re added to the sprite_list. To do that, we go almost to the bottom of our SmileyPop.py code, where the if mousedown statement checks whether the mouse is being dragged with the mouse button pressed and adds smileys to our sprite_list. Add just the last line to that if statement:
if mousedown: speedx = random.randint(-5, 5) speedy = random.randint(-5, 5) newSmiley = Smiley(pygame.mouse.get_pos(), speedx, speedy) sprite_list.add(newSmiley) count_smileys += 1Adding 1 to count_smileys every time a new smiley is added to the sprite_list will help us keep track of the total number of smileys drawn.
We’ll add similar logic to the if statement that plays our popping sound whenever one or more smileys have been clicked, but we won’t just add 1 to count_popped — we’ll add the real number of smileys that were clicked. Remember that our user could have clicked the screen over two or more smiley sprites that are overlapping the same point. In our event handler for the right-click event, we gathered all these colliding smileys as the list clicked_smileys. To find out how many points to add to count_popped, we just use the len() function again to get the correct number of smileys the user popped with this right-click. Add this line to the if statement you wrote for the popping sound:
if len(clicked_smileys) > 0: pop.play() count_popped += len(clicked_smileys)
By adding len(clicked_smileys) to count_popped, we’ll always have the correct number of popped smileys at any point in time. Now, we just have to add the code to our game loop that will display the number of smileys created, the number popped, and the percentage popped to measure the user’s progress.
Just like in our Smiley Pong display, we’ll create a string of text to draw on the screen, and we’ll show the numbers as strings with the str() function. Add these lines to your game loop right before pygame.display.update():
draw_string = "Bubbles created: " + str(count_smileys) draw_string += " - Bubbles popped: " + str(count_popped)
These lines will create our draw_string and show both the number of smiley bubbles created and the number popped.
Percentage of Smileys Popped
Add these three lines, right after the two draw_string statements:
if (count_smileys > 0): draw_string += " - Percent: " draw_string += str(round(count_popped/count_smileys*100, 1)) draw_string += "%"
To get the percentage of smileys popped out of all the smileys that have been created, we divide count_popped by count_smileys (count_popped/count_smileys), then multiply by 100 to get the percent value (count_popped/count_smileys*100). But we’ll have two problems if we try to show this number. First, when the program starts and both values are zero, our percentage calculation will produce a “division by zero” error. To fix this, we’ll show the percentage popped only if count_smileys is greater than zero.
Second, if the user has created three smileys and popped one of them — a ratio of one out of three, or 1/3 — the percentage will be 33.33333333. . . . We don’t want the display to get really long every time there’s a repeating decimal in the percentage calculation, so let’s use the round() function to round the percentage to one decimal place.
The last step is to draw the string in white pixels, center those pixels on the screen near the top, and call screen.blit() to copy those pixels to the game window’s drawing screen:
text = font.render(draw_string, True, WHITE) text_rect = text.get_rect() text_rect.centerx = screen.get_rect().centerx text_rect.y = 10 screen.blit (text, text_rect)You can see the effect of these changes in .
The smaller smileys are more difficult to catch and pop, especially when they’re moving fast, so it’s hard to pop more than 90 percent. That’s exactly what we want. We’ve used this feedback and challenge/achievement component to make the app feel more like a game we might play.
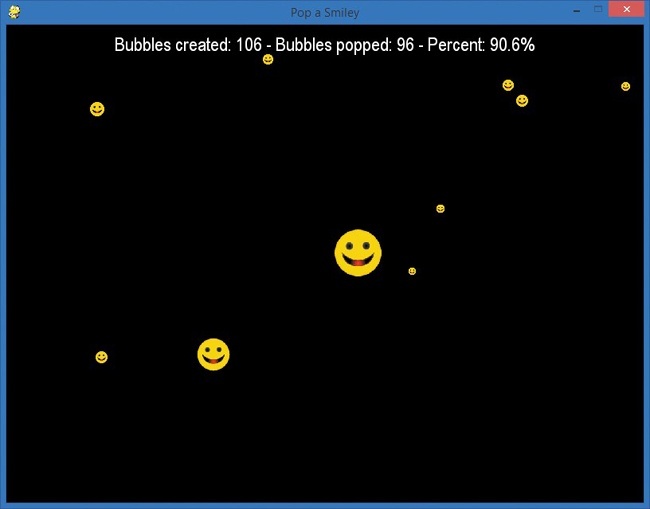
The popping sound and progress display feedback have made SmileyPop feel like a mobile app. As you’re popping smiley faces by right-clicking, you can probably imagine tapping the smileys with your finger to pop them on a mobile device. (To learn how to build mobile apps, check out MIT’s App Inventor at .)
Putting It All Together
Here’s the complete code for SmileyPop, version 2.0. Remember to keep the .py source code file, the CrazySmile.bmp image file, and the pop.wav sound file all in the same folder.
At almost 90 lines, this app might be a bit too long to type by hand. Go to to download the code, along with the sound and picture files.
SmileyPop2.py
import pygame import random BLACK = (0,0,0) WHITE = (255,255,255) pygame.init() screen = pygame.display.set_mode([800,600]) pygame.display.set_caption("Pop a Smiley") mousedown = False keep_going = True clock = pygame.time.Clock() pic = pygame.image.load("CrazySmile.bmp") colorkey = pic.get_at((0,0)) pic.set_colorkey(colorkey) sprite_list = pygame.sprite.Group() pygame.mixer.init() # Add sounds pop = pygame.mixer.Sound("pop.wav") font = pygame.font.SysFont("Arial", 24) count_smileys = 0 count_popped = 0 class Smiley(pygame.sprite.Sprite): pos = (0,0) xvel = 1 yvel = 1 scale = 100 def __init__(self, pos, xvel, yvel): pygame.sprite.Sprite.__init__(self) self.image = pic self.scale = random.randrange(10,100) self.image = pygame.transform.scale(self.image, (self.scale,self.scale)) self.rect = self.image.get_rect() self.pos = pos self.rect.x = pos[0] - self.scale/2 self.rect.y = pos[1] - self.scale/2 self.xvel = xvel self.yvel = yvel def update(self): self.rect.x += self.xvel self.rect.y += self.yvel if self.rect.x <= 0 or self.rect.x > screen.get_width() - self.scale: self.xvel = -self.xvel if self.rect.y <= 0 or self.rect.y > screen.get_height() - self.scale: self.yvel = -self.yvel while keep_going: for event in pygame.event.get(): if event.type == pygame.QUIT: keep_going = False if event.type == pygame.MOUSEBUTTONDOWN: if pygame.mouse.get_pressed()[0]: # Left mouse button, draw mousedown = True elif pygame.mouse.get_pressed()[2]: # Right mouse button, pop pos = pygame.mouse.get_pos() clicked_smileys = [s for s in sprite_list if s.rect.collidepoint(pos)] sprite_list.remove(clicked_smileys) if len(clicked_smileys) > 0: pop.play() count_popped += len(clicked_smileys) if event.type == pygame.MOUSEBUTTONUP: mousedown = False screen.fill(BLACK) sprite_list.update() sprite_list.draw(screen) clock.tick(60) draw_string = "Bubbles created: " + str(count_smileys) draw_string += " - Bubbles popped: " + str(count_popped) if (count_smileys > 0): draw_string += " - Percent: " draw_string += str(round(count_popped/count_smileys*100, 1)) draw_string += "%" text = font.render(draw_string, True, WHITE) text_rect = text.get_rect() text_rect.centerx = screen.get_rect().centerx text_rect.y = 10 screen.blit (text, text_rect) pygame.display.update() if mousedown: speedx = random.randint(-5, 5) speedy = random.randint(-5, 5) newSmiley = Smiley(pygame.mouse.get_pos(), speedx, speedy) sprite_list.add(newSmiley) count_smileys += 1 pygame.quit()
The more programs you write, the better you’ll get at coding. You may start by coding games that you find interesting, writing an app that solves a problem you care about, or developing apps for other people. Keep coding, solve more problems, and get better and better at programming, and you’ll soon be able to help create products that benefit users around the world.
Whether you’re coding mobile games and apps; writing programs that control automobiles, robots, or drones; or building the next social media web application, coding is a skill that can change your life.
You have the skills. You have the ability. Keep practicing, keep coding, and go out there and make a difference — in your own life, in the lives of the people you care about, and in the world.
What You Learned
In this chapter, you learned about elements of game design, from goals and achievements to rules and mechanics. We built a single-player Smiley Pong game from scratch and turned our SmileyPop app into a game we could picture playing on a smartphone or tablet. We combined animation, user interaction, and game design to build two versions of the Smiley Pong game and a second version of SmileyPop, adding more features as we went.
In Smiley Pong, we drew our board and game pieces, added user interaction to move the paddle, and added collision detection and scoring. We displayed text on the screen to give the user information about their achievements and the state of the game. You learned how to detect keypress events in Pygame, added “game over” and “play again” logic, and finished version 2.0 by making the ball speed up as the game progressed. You now have the framework and parts to build more complex games.
In SmileyPop, we started with an app that was already fun to play with, added user feedback in the form of a popping sound using the pygame.mixer module, and then added logic and a display to keep track of the user’s progress as more bubbles are created and popped.
The apps you’ll create with your programming skills will also start with a simple version, a proof of concept, that you can run and use as a foundation for new versions. You can begin with any program and add features one at a time, saving each new version along the way — a process called iterative versioning. This process helps you debug each new feature until it works correctly, and it helps you keep the last good version of a file even when the new code breaks.
Sometimes a new feature will be a good fit, and you’ll keep it as the foundation of the next version. Sometimes your new code won’t work, or the feature won’t be as cool as you expected. Either way, you build your programming skills by trying new things and solving new problems.
Happy coding!
After mastering the concepts in this chapter, you should be able to do the following:
- Recognize common game design elements in games and apps that you use.
- Incorporate game design elements into apps that you code.
- Build a skeleton of a game by drawing the board and playing pieces and adding user interaction.
- Program collision detection between game pieces and keep score in an app or game.
- Display text information on the screen using the
pygame.fontmodule. - Write game logic to determine when a game is over.
- Detect and handle keypress events in Pygame.
- Develop the code to start a new game or play again after a game ends.
- Use math and logic to make games progressively more difficult
- Add sounds to your apps with the
pygame.mixermodule. - Display percentages and rounded numbers to keep users informed of their progress in a game.
- Understand the process of iterative versioning: adding features to an app one at a time and saving it as a new version (1.0, 2.0, and so on).

