Review and Preview
In the first class, we spent all of our time just preparing our computer for creating and running Java programs. In this second class, we will look further into some of the tasks we have done.
 We will learn the basic structure of a Java program by reexamining the Welcome Project from Class 1. We will learn some of the basic rules for writing Java programs. We will create and save a project using NetBeans, our development environment. And, we will learn just what goes on when you compile and run a Java program. This will give us the skills needed to create our first Java program in Class 3.
Structure of a Java Program
Java, like any language (computer or spoken), has a terminology all its own. Let’s look at the structure of a Java program and learn some of this new terminology. A Java program (or project) is made up of a number of files. These files are called classes. Each of these files has Java code that performs some specific task(s). Each class file is saved with the file extension .java. The filename used to save a class must match the class name. One class in each project will contain something called the main method. Whenever you run a Java program, your computer will search for the main method to get things started. Hence, to run a program, you refer directly to the class containing this main method.
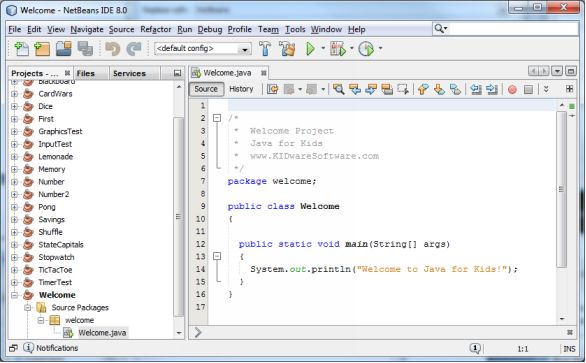
Let’s see how this relates to Welcome project we saw in Class 1. Start NetBeans. The JK Code folder should still be the Project Group (if not, make it your project group). The Welcome project should still be the main project. If it isn’t, right-click the Welcome project folder in the file view and choose Set as Main Project. NetBeans has a special folder for all classes in a project. They are stored in a folder named Source Packages/package name (in this case package name is welcome). The package name is created when you create a project (we will learn how to do this).
You should see:

This particular project has a single file named Welcome.java. Notice, as required, the name Welcome matches the class name seen in the code (public class Welcome). If no code is seen, simply double-click on the filename Welcome.java. If the project had other classes, they would be listed under the Source Packages/welcome folder. Notice too in the code area the word main. This is the main method we need in one of the project’s classes.

That’s really all we need to know about the structure of a Java program. Just remember a program (or project, we’ll use both terms) is made up of files called classes that contain actual Java code. One class is the main class where everything starts. And, one more thing to remember is that projects are grouped in project groups. With this knowledge, we can dissect the Welcome program line by line to start understanding what Java programming is all about.
The Welcome Project (Revisited)
You should still have NetBeans running with the Welcome program displayed. If not, start NetBeans, make Welcome your main project (right-click the project name and select Set as Main Project) and double-click the Welcome.java file. Here’s the code you will see:
/*
* Welcome Project
* Java for Kids
* www.KIDwareSoftware.com
*/
package welcome;
public class Welcome
{
public static void main(String[] args)
{
System.out.println("Welcome to Java for Kids!");
}
}
Let’s go through this code line by line to explain its structure.

The first several lines of the program are:
/*
* Welcome Project
* Java for Kids
* www.KIDwareSoftware.com
*/
These lines are a comment. They simply provide some information about what the program is and provides some contact information. The comment begins with the symbol /* and ends with symbol */. These lines are also known as a program header. It’s a good idea to always put a header on your Java programs to give someone an idea of what your program does and who wrote it. The Java compiler ignores any comments – their only use is provide explanation.
The first non-comment line is:
package welcome;
This is the package name assigned by NetBeans to the folder holding the class files. It is typical to use all lower case letters for a package name.
The next line is:
public class Welcome
{
This line is the definition of our class named Welcome. The keyword public determines if other parts of the program can access this class. Keywords are part of every programming language – these are reserved words and cannot be used in any regular Java expression. The left curly brace ({) is used to start the definition of the class. You will see lots of curly braces are used in Java!
The next line is:
public static void main(String[] args)
{
This line creates the main method discussed earlier. Don’t worry what all the words mean right now. Just notice that this begins the main method where we write the Java code we want to execute once the program starts. For most of this course, we will put all of our code in the main method. Notice another left curly brace is used to start defining the method.
The single Java statement in the main method is:
System.out.println("Welcome to Java for Kids!");
Remember when you ran the Welcome project back in Class 1? When you ran it, you saw a message that said Welcome to Java for Kids! in the output window. The above line of code printed that message. In this line, System is a class built into Java, out is the object of the class (referring to the output window). The word println (pronounced print line) displays a single text line. The text to be displayed is in double-quotes. Notice the statement ends with a semicolon (;) – there are lots of semicolons in Java too! In this simple example, the main method only has a single statement. Of course, later examples will have many more statements. Methods are where Java programs perform tasks. In addition to writing our own methods, you can use any of the many methods built into the Java language. You will learn about such methods as you progress through this course.
Following this line of code are two more lines, each with a right curly brace (}). The first brace ends the main method, the second ends the class definition. You will always need to make sure that every time you use a left curly brace in a Java program, that there is a matching right curly brace.
Though this is a very short, very simple program, it illustrates the major components in a Java program. You need a program header, a class definition and a main method. And, you need to remember to save the class file with the same name as used in the class definition. That file will have a .java extension.


